1
Majesti Appliances
WHERE
Model
SERVICE
MATTERS
iViJ 9200W
Separate/Stacking
Washer
OwneFs
Revision Date 1 !/t103
WARNING- To reduce the risk of fire, electric shocks, or injury to
persons when using your appliance, follow the basic precautions,
including the following:
1. Read all instructions before using the appliance..
2. Do not wash articles that have been previously cleaned in,
washed in, or spotted with gasoline, dry-cleaning solvents, or'
other flammable and explosive substances such as solvents°
3. Do not add gasoline, dry-cleaning solvents or other flammable
or explosive substances to the wash water._ These substances
give off vapors that could ignite or explode.
4. Under certain conditlons, hydrogen gas may be produced
in a hot water system that has not been used for 2 weeks or
more. If this is the case, before using your washing machine,
turn on all hot water faucets and let the water flow from each
faucet for several minutes. This will release any accumulated
hydrogen gas. Do not smoke or use an open flame during this time°
5, Do not allow children to play on or' in the appliance, Close supervision of children is
necessary when the appliance is in use.
6. Before the appliance is removed from service or discarded, remove the door,
7. Do not reach into the appliance if the tub or agitator is moving°
8, Do not install or store this appliance where it will be exposed to the weather,
9. Do not tamper with controls.
10oDo not repair or replace any part of the appliance or attempt any servicing unless
specifically recommended in the user-maintenance
instructions or in published userrepair manual, Also make sure that you understand the instructions completely and
have the skills to carry them out.
11,.Do not use fabric softener's or products to eliminate static unless recommended
by
the manufacturer' of the fabric softener or product.
12.Do not place items exposed to cooling oils in your dryer, Items contaminated with
cooking oils may contribute to a chemical reaction that could cause a load to catch
fire.
13,This appliance must be grounded. Refer to the INSTALLATION
for grounding details.
SAVE THESE INSTRUCTIONS
Pa
e
@2003 Manufacturers
S_uupply,
INSTRUCTIONS
[]
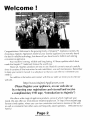
Congratulations. Welcome to the growing family of Majestic TMAppliance owners° By
choosing a Majestic Appliances model as your laundry appliance you not only found
the best in reliable technology, but above all you have founct a faithful and untiring
convenience appIiance_
Your machine is strong, reliable and long lasting All those qualities which have
made the Majestic TMtrademark famous the wor]d over°
Above all, Majestic products are easy to use. Read this owner's manual carefully
since it contains all the instruction for safe installation, use and maintenance. Remember
to keep your owner's manual in a safe place so that you can refer to it whenever you
need to.
For addition information and contact with the our staff, we invite you to visit our
web site.
http://www.MajesticAppliances.corn
(Please Register your app[iance, on our web site or
by returning
your registration
a cornplimentary
card via mail and receive
VI4S tape, "introdudion
to Majestic")
We offer a wicle range of app[iance products, some of which might suit your
needs. We also offer our revolutionary MajesticAppliances.TV
(http:/!www_majesticapp
liances.tv)web option, where you can view orientation and service movies on the web
as well as comments from other users and frequently askecl questions.
Welcome to our
Family!
Page
@2(')03 Manufacturers
:2
Supp;yr
Ta
Page
of Contents
5
Getting things
,
your a
ready
to
m
Unpacking,
inspecting,
Electricity,
Closets/Alcoves,
Fiurnbing,
Venting
Page 8
Page
11
Page
13
For best
Trou
eshooting
Washing,
dry time,
Page
! 4
Drying, Vibration,
wrinkles,
draining
aintenance
Optimizing
tips
Water, exterior,
interior, winterizing,
detergent,
pump, technica_
specifica=
tions,
Obtaining
Service
Page
16
rranty
|nformatJon
Registering
your appmiance
via the
ternet,
Extended
Warranty
options,
ordering
maintenance
manuals
in=
nsta|
ng/Removin
Getti
l
1
Unpacking,
ing,
inspecting,
Electricity,
C osets/Alcoves,
Plumb=
Venting
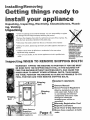
Unpacking
" Check the packing box for external damage tt is your responsibility to register
any damage with the freight company delivering the product
° Remove the strapping, then slide the cardboard surround off the machine Remove the foam protecting material and the plastic bag
° Write down the serial number from the box or the back of the machine
° Destroy the carton, plastic bags and foam parts after appliance has been unpacked
° Children should never be left alone or unattended in the area where
appliances being unpacked..
" If you have any doubts, do not use the appliance and call a qualified technician
WARNING
:
OWNER RESPONSIBLE
FOR DAMAGE RESULTING FROM TIPPING
MACHINE
AFTER
REMOVING
SHIPPING BOLTS. AVOID
TIPPING
MACHINE
FORWARD AFTER
SHIPPING
BOLTS ARE
REMOVED.
WARHRHG!!!
TIPPBHG THE MACHRHE
TO POSITION
nT FOR USE
BE DOHE WITH THE SHiPPiNG
BOLTS STILL IH THE MACHINE!
MUST
TiP-
PiNG THE MACHIHE
WITHOUT
SHgPPIHG
BOLTS, CAN CAUSE THE
iNNER
DRUM TO iMPACT
OTHER
iNTERNAL
PARTS, THUS DAMAGING THEM= POSiTiON
THE MACHINE
AS CLOSE AS POSSIBLE
TO IT'S
FINAL
POSiTiON
AND THEN REMOVE
SHiPPiNG
BOLTS.
r_]INSPECT
[]
Owners
[]
Brass
CONTENTS
Manual
Pressure
Regulators
(Must be installed
on hot and
cold water inlet, Failure to do
Shipping
so can damage the internal
components
and cause water
damage for which the
installer/owner
will be responsible!)
[]
[]
[]
[]
Brass Pressure
Regulators
installed on back
of appliance.
Page
@2003 Manufacturers
4
Supply.
Warranty
Registration
Card
iVlajestic
Literature
Drain Hose U-Clip
(Optional)
Hoses have washers
in both
ends=
in
g/Kemovmn
#_
"n
m
ings
appiJaflce
to insta||
ready
y@ur
{continued)
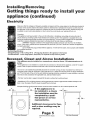
Electricity
Make sure that the vottage and frequency available correspond with the values stated on the data place located at
the back of the machine and that the e[ectdc system is dimensioned to withstand the maximum current shown on
the data plate If the socket the machine is connected to does not correspond with the plug, replace the plug with
a suitable one and avoid using adapters or shunts since they could cause over heating and burn out.
Grounding
This appliance must be grounded In the event of malfunction or breakdown, grounding will reduce the risk of
electric shock by providing a path of least resistance for eiectric current, This appliance is equipped with a cord
having an equipment-grounding
conductor and a grounding plug The plug must be ptugged into an appropriate
outlet that is propedy installed and grounded in accordance with at local codes and ordinances
WARNING- Improper connection of the equipment-grounding conductor can result in a risk of electric
shock Check with a qualified service representative or personnel if you are in doubt as to whether the appliance
is properly grounded
Do not modify the plug provided with the appliance: if it will net fit the outlet, have a proper outlet installed
by a qualified electrician
Electrical Specifications:
VoltagelAmperage - 115V, 12 Amp, 60 Hz 3 Prong plug attached to the appliance in the factory
Circuit/Protection.
3 wires single phase, 120V, 60 Hz0AC separate 15 amp circuit or greater,
Recessed,
Closet
This appliance
inches.
and Alcove
may be installed
in a recessed
instal|aliens
area, closet
or alcove.
All measurements
are in
• If the appliance is to be installed in a closet with zero clearance on the side of the appliance, a total of 12 square
inches of free air space movement to the back of the unit must be allowed into the closet
• tf a door is to be installed that potentially encloses the unit while running, the door must allow for a minimum of
20 square inches of free air movement "There must also be a 1" space from the front of the unit to the closed door
and 1" from the back of the unit to the wall Additional spacing should be considered for easy installation, servicing,
removal and and compliance with applicable local, state and federal codes
•The floor must be able to support at least 280 Ibs and a surface that is solid and 1eve!
• installations in RV's or Marine pleasure craft suggest that the machine might best be installed midships in the
boat, or over the axles of the RV where movement is at a minimum
Adequate blocking should prevent extreme movement when installed in an RV or Marine pleasure craft,
if the appliance
is to
be instaBed
in a closet,
the installation
must be
compaeted
by a qualified person or service
representative.
r_
o
03
o
c
Additiena!
cUearances
waft or door moldings
required,
N
for floor,
may be
u_
83
Page 5
Front View (Recessed)
@2003Manufacturers SuppIy,
lnc
Side View (Recessed)
:a|
rig/Removing
Gettin
appliance
Plumbing
install
in s ready
(continued)
= Water,
your
Drains
WATER CONNECTION
! This appIiance can be used with either hot/cold or coldlcold connections
2 The hoses supplied have one straight end and one elbow end
The elbow end is meant to connect to the washer Be sure to connect the hot hose to the hot side of the appliance
itself, the cold side to the cold connection (See picture)
3
4
5
6
The straight end to the 3/4" BSP standard hose bib thread
Brass pressure reducers and
MAKE SURE WASHERS ARE INSTALLED IN EACH END OF THE SUPPLY HOSES. elbow ends of supply hoses
An optional "F"connector is available where cold only is desired.
Ensure that water connections are free from debris or sediment
BRASS PRESSURE REDUCERS MUST BE INSTALLED TO PROTECT
COMPONENTS INSIDE THE APPLIANCE.
IMPORTANT ! CHECK THREADS ON THE MACHINE, THE BRASS PRESSURE
REDUCERS AND THE SUPPLY HOSES TO ENSURE THEY ARE CLEAN° DO NOT
USE EXCESSIVE FORCES. TIGHTEN BY HAND DO NOT USE POWER TOOLS.
Connection
of the drain hose
to standpipe
• Outlet end of drain hose (See figure 2) must be at least 20" above bottom of washer An air break must be provided at the standpipe
to avoid siphoning,
• Connect the drain hose to a standpipe (with internat diameter of at least 3 2cm or 1 1t4" min. diameter) with a minimum carry a v_ay
votume of 7 gallons. The top of the standpipe must be 20" minimum from the bottom of the appliance, Place drainhose for drainage
into a sink tub or standpipe, ensuring that there are not kinks or bends The free end must be at a height of 80cm from the floor, the
hose much be fixed in the appropriate hook on the upper part of the back panel (fig 4)
DO NOT INSERT THE END OF THE DRAIN HOSE MORE THAN 6" INTO
THE STANDPIPE.
INSERTING
MORE MAY CAUSE THE APPLIANCE
TO
HAVE INSUFFICIENT
DRAINAGE.
CORRECT
LEVELING
OF UNIT IS ESSENTIAL
It is important for the machine to be perfectly level The
angle of inclination on the work surface must not be
more than 2 degrees
For this reason the machine is
fitted with adjustable feet used for leveling the machine
before use, In the case of carpeted flooring, remember
to check that the ventilation in the support area is not
plugged
Page 6
©2003 Manufacturers Supply. Inc
TM
Washing
For best
ts
[]
Preparation,
sorting,
inspecting,
pre=wash treatments,
helpfu! laundry
hints, simple controls,
detergent
dispensers
Preparation
Before you begin washing, taking a few simple steps will help you have a
better washing experience and save wear and tear on your clothing as well.
1) Read factory labels for washing instructions
2) Pre-treating heavily soiled areas will also improve washing results°
3) Obtain and use Majestic TM Low Suds Laundry Soap or any other commercial brand that keeps over sudsing in check_
4) Your Majestic TM has over 14 different wash cycles that can last as long
a 90 minutes or as short as 35. Select the one that is right for' the load.
Sorting
Separate laundry according to fabric type, color and how dirty things
are. Also consider separating clothing that generate lint from clothes that
do not typically generate much linL Cottons, synthetics, and woolen fabrics for starters. Color fast products vs. those that might bleed and fade
on to other clothing
What size load? A good rule of thumb is that
clothes should be visible in the window of the machine from 1/2 to
2t3's full.
|.specting
This goes without saying, but check pockets for loose change, and other hidden impediments.
Fas_
tening all zippers, hooks, and buttons will prevent damage to garments and to the machine. Turning
knit garments inside out will also protect the garmenL Using a mesh laundry pouch for delicate items
such as tights and stockings, bras, shoulder pads and underwear can prevent tangling Also, if a garrnent is torn or damaged, washing and drying will only make it worse. Take a minute and do a bit of
mending. It will enhance fabric care in the long run°
Pre=Wash
treatments
Your laundry appliance has a built in assistant to take care of your pre-wash feature Besides individually treating garments as need arises, also consider using a longer wash cycle if necessary including
the use of the pre-wash section of the detergent drawer. Often childrens play clothes and men's work
clothes take a beating and can use some extra cycles to come clean
Helpful
laundry
hints
Detergent - Because this is a front loading machine, your' Majestic TM requires less of almost everything, from laundry detergent to fabric softener to bleach. LOW SUDS detergents are even more
convenient in a front loader, because of the efficiency of clothes on clothes agitation. FABRIC SOFTENER can actually improve dry times, but NEVER USE SOFTENER SHEETS OR OVERUSE SOFTENER. It could cause damage to your machine. And using bleach can whiten clothes when nothing
else will. Use the proper dilution of bleach for your needs. Too much bleach can damage fabrics_
Page 7
@2003 Manufacturers
Supply, Inc
resu
(continued)
wa_
Preparation,
sorting,
inspecting,
pre-wash
treatments,
helpful laundry
hints, simple controls,
detergent
dispensers
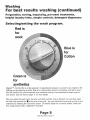
Selecting/setting
the
wash
program,
Red is
for
wool
Blue is
for
Cotton
Green is
for
synthetics
Majestic TM controls offer a simple approach to selecting the program you want to use, based on the
clothing you are planning to wash Blue is for cotton loads, Green for synthetics, and red for wool.
With the machine off, turn the selector knob clockwise until you have selected the wash cycle of
your choice.. Use the chart on page t 1 for more details.
After you select the wash cycle, the timer will rotate until the cycle is finished. You are done when
the timer has reached the _' at the end of the cycle. You can reduce the rinse cycle on any of your
selections by selecting the "Economic" button On smaller loads the "economic button" saves you
from using excess water, a Majestic TM exclusive
Page
,@2003 Manufacturers
8
Supply. Inc
results
wash n
(ce.tinued)
Preparation,
sorting,
inspecting,
pre=wash treatments,
helpful laundry
hints, simple controls,
detergent
dispenser
Controls
detergent
dispenser
Washer Timer
This control turns clockwise and
:
Economic
allows you to select any of 14
wash cycles for' any load It is
best to adjust this with the power
off Blue is for Cotton, Green for
synthetics and red for wool
Button
is a very useful button that wi]_save you a
il°t of money tt reduces
; water consumption
when rinsing if you
have a
small load, use this button and reduce
water usage
>..--_:_/_-¢_;::':
:: _' ;' : ;:': Vari-Spin Control
.;
No Spin Button
This bu[ton allows you
the option of excluding
the spin phase of the
wash cycle when washing delicate fabrics
performance drying, set the
spin speed to 1000+ The blue
spin
speeds.
If you
want high
numbers
relate
to speeds
wheo
_,'_-:_"
_.:_,:,_.;_.
ON/OFF Button
This button supplies electrical power to the appliance
Detergent
This control permits the
selection of your own desired
Drawer
The detergent dispenser is divided into 4
compartments marked I, 2, A and C
t Pro-wash detergent
2 Wash detergent
A Softeners, conditioners and
perfumes
C Bleach
Page
@2003 Manufacturers
9
Supply, [nc
in a cottons cycle and the green
numbers relates to spin speeds
when in a synthetics cycle
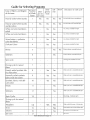
Guide for Selecting
Pm
rams
-
Type of Fabric
of dirtiness
and degree
Position
of Wash
Timer
Deter-
Detergent for
Softener
Description
of wash cycle
Bieach
[
gent for
3re-wash
Wash
soiled white laundry
Yes
Yes
Yes
Yes
Prewash,wash,rinses, extended spin
Heavily soiled white laundry
and fast colors
Yes
Yes
Yes
Yes
Prewash,wash,rinses extended spin
Yes
Yes
was, rinses, extended final spin
3
Yes
Yes
was, rinses, extended final spin
3
Yes
Yes
was, rinses, extended final spin
Yes
Yes
was, rinses, extended final spin
Heavily
White and color fast fabrics
soiled
White
and color fast fabrics
Mixed cotton + synthetics
color fast fabrics
Delicate
Colors
Rinses
5
Yes
Softeners
6
Yes
Yes
Rinses, softener, extended final spin
Rinses, softener, extended final spin
Draining and extended final rinse
Spin cycle
Drying cycle for natural
fibers
Heavily soiled synthetic fabrics/fast colors
8
Yes
Yes
Wash cycle anti - creaseidelecate spin
Normally soiled synthetic
fabrics with fast colors
9
Yes
Yes
Wash cycle anti - crease/delecate spin
Synthetic fabrics with delicate colors
10
Yes
Yes
Was!_ cycle anti - creasddelecate
Rinses
1!
Yes
Wash cycle anti - crease!de[ecate spin
Softeners
t2
Yes
Wash cycle anti _ creaseidelecate
t3
Draining,
spin
spin
delicate spin
Drying cycle for natural
fibers
Woolens
14
-
Yes
Yes
Wash cycle!Anti-crease
Rinses
15
-
-
Yes
Rinse,softene r,anti-crease,delicate
Softeners
16
-
-
Yes
Rhtse
Spin Cycle
]7
-
-
.,
@2003 Manufacturers
Supply, [nc
_41[ll_tllf
DelIC_IO
S[_I1
anI_.clua_e.dc4ica_e
delicate spin
sl_ff_
spin
Stains
To
Sta °
BALLPOINT INK
Hold stain against towel, spray closely from behind with aerosol hair spray. Ink should transfer to towel
BEVERAGES
Soak in cool water. Re-wash with stain remover: Launder using chlorine bleach (if safe for fabric) or
oxygen bleach..
BLOOD
Immediately rinse with cool water.. For dried stains, soak in warm water with a product containing enzymes°
Launder..
CANDLE WAX
Scrape off as much as possible with dull side of knife, then iron between absorbent paper, changing paper
until wax is absorbed.
CHOCOLATE
Pre-wash with product containing enzymes in warm water or treat with pre-wash stain removerv Launder.
COLLAR, CUFF SOIL
Pre-wash with stain remover, liquid laundry detergent or paste of granular detergent and water. Launder..
COSMETICS
Pre-wash with stain remover, liquid laundry detergent or' paste of granular detergent and water or rub with
bar of soap. Launder_
DAIRY PRODUCTS
Soak in a product containing enzymes for at least 30 minutes (hours for aged stains). Launder_
DEODORANTS
& ANTt-PERSPIRANTS
Pre-treat with liquid laundry detergent, Launder° For heavy stains pre-treat with pre-wash stain remover..
Allow to stand 5 to 10 minutes. Launder using an oxygen bleach_
EGG
Soak in product containing enzymes. Launder.
FRUIT JUICE
Rinse with cool water.
GRASS
Soak in product containing enzymes.. If stains persist, launder using a chlorine bleach (if safe for fabric) or
oxygen bleach.
GREASE SPOTS, OIL
Pre-treat with pre-wash stain remover or liquid laundry detergent.. For heavy stains, place stain face down
on clean paper towels. Apply cleaning agent to back of stain° Replace paper towels under stain frequently.
Let dry, rinse and launder using hottest water safe for fabric°
INK
Use ink eradicator on undyed, untreated linen..
LEMON, LIME JUICE, VINEGAR
Rinse immediately
with cool water..
LIPSTICK
On pure linen, rub with a little salad oil to dissolve lipstick, then launder' to remove oil.
MEAT JUICE
Rinse with cool, never hot, water_
MILDEW
Badly mildewed fabrics may be beyond repair. Launder stained item using chlorine bleach, (if safe
for' fabric). Or soak in oxygen bleach and hot water. Then launder.
PERSPIRATION
Use pre-wash stain remover or rub with bar of soap. If color of fabric has changed, apply ammonia to fresh
stains, white vinegar to old stains and rinse° Launder using hottest water safe for fabric°
RED WINE
Cover with salt if stain is fresh, then rinse with cool water.. If stain has dried, try club soda.
SCORCH
Treat same as for mildew (listed above).
TAR
Scrape residue from fabric. Place stain face down on paper towels. Sponge with cleaning fluid.. Replace
towels frequently. Launder in hottest water safe for fabric..
TOr_tATO
Rinse with cool water_
WHITE WINE
Use club soda.
Page
t
©2003 rvlanufactu_ers
Supply.
lnc
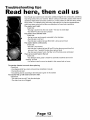
Troubleshooting
Read
tips
here,
then
call
us
Even though your washer dryer has been carefully designed and constructed, something
may still go amiss with your machine= Before rushing to technician, please check that the
operations listed below have been carried out In many cases you will save time, money
and a bother Our statistics show that many calls made to our service representatives
could have been sofved with a little more attentions to these basic operations,
The washer won't start
Check that:
• the plug is pushed into the main outlet • the door is closed tight
. the ON/OFF button has been pressed
The washer won't fill with water
Check that:
• the tap is open and properly connected to the inlet pipe
• the inlet pipe is not bent
• the inlet pipe is placed at least 80cmt32in, above ground level
The washer drains continuously
Check that:
• the inlet is not blocked
• the inlet pipe is placed at least 80 cm/32 inches above ground level but
not more than I metre/40 inches above ground level,
• the drain pump doesn't work, the fifter net of the drain pump is blocked
There is too much foam in the tub
Check that:
• the detergent being used is meant for automatic machines and not for
washing by hand
. the amount used is correct as stated in this manual and not more
The washer vibrates too much when spinning
Check that:
• the shipping bolts have been removed (see installation manual)
• the machine is level
. the washing load is according to the instructions given in this booklet
The washer fills up with water and won't drain.
Check that:
• The drain hose is only 6" into the stand pipe
• The drain hose is not clogged
Page
©2003 Manufacturers
12
Supply, lnc
Water
Hoses
Periodically check both ends of the water supply hoses to ensure that the washers have no cracks or deterioration and
that the hoses themselves have no kinks, bulges or worn spots Replacing inlet hoses from time to time can prevent
hose failure and water damage
Exterior
Keeping the exterior of the unit clean will preserve the value of you[ investment
clean and maintain the exterior
Use a soft cloth and liquid cleanser to
laterier
Do not use solvents to clean the machine or to do the wash,
Clean the detergent dispenser ever so often. This is very simple and should be done with water.
Detergent dispenser' - Your machine has an extractable dispenser to make it even easier. From time to time, using
water and a damp clothes remove excess detergent, softener and any build up of bleach that may have accumulated in
the detergent drawer,
Winterizing
To winterize your appliance, follow these steps:
1) Turn the power off
2) Put 1t2 quart of R V-type potable antifreeze in the machine and close the door
3) Turn the program selector knob to Spin. Turn the power on and let the appliance spin for 1-2 minutes
4) Turn the power off and unplug the washer
5) Shut off water at both faucets and disconnect water inlet hoses from faucets and drain. DONE!
To put the appliance back into service
1) Make sure the RV Water supply is clear of antifreeze.
2) Hook up the power and water as before
3) Run the water through the delicate cycle with 2t3 tablespoon of detergent to clean out appliance
If you are putting antifreeze in the water lines of an RV or Boat, run the machine until you see pink water introduced into
the drum. Then turn the power off and advance the timer to spin. Turn the power back on and spin for 30 seconds to get
antifreeze into the entire system Now turn the power off and continue steps 4 and 5 above
PLump
Self Cleaning Pump - Your"washer' dryer is equipped with a self-cleaning pump It is therefore
not necessary to carry out cleaning and maintenance operations, Some objects such as
buttons, coins, etc, may sometimes drop into the pump and must be removed= These items
become trapped in a special "anti-chamber" which can be reached through the front part of the
pump Open the cover of the filter, loosen the knob in counter-clockwise rotation, then take out
the filter and clean it with water (See fig 10) Carefully reassemble the filter after cleaning to
ensure that is it tight and no water can enter the filter
Page
@2003 Manufacturers
t 3
Supply, tnc
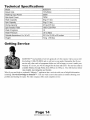
Technical
Specifications
Model
MJ9200W
Rated Volts
110V/60Hz
Washing
330W
Input Power
Spin input Power
700W
Wash Capacity
5 kg (11 Ibs)
i Spin Capacity
5 kg (I1 Ibs)
Drying capacity
Spin Rotation
2.5 kg (5.5 Ibs)
Rate
1000-1200
RPM
Wash Programs
16
Water Pressure
Outside dimensions
.05-a (Mpa)
33 1/4 x 23 3/8 x 22 inches
Hx W x D
Weight
Getting
72 kg (159 Ibs)
Service
MAJESTIC TM has hundreds of service agents all over the country Call us on our toll
free hotline (!-800-678-8002)
and we will serve your needs. Remember that if your
service call is the result of component failure we will be happy to covet it under' your
warranty. If it is not, you will be charged for the time and trave!. Our service center is
available Monday through Friday from 8:00 am to 5:00 p.m.. You will find our technicians helpful, knowledgeable and friendly.
What if you need help on weekends? Majestic TM appliances has a web site with tons of helpful information,
including "Service knowledge on demand :rM'. You can watch a movie that assists in trouble shooting your'
problem mid making the repair. No other company offers such complete service.
Page
@2003 Manufacturers
14
Supply, lnc
Warranty
Your Majestic TM Appliance is warranty for I full year from the original purchase on the mechanical
parts only when installed in accordance with the instructions in the manual_ It is the option of the factory to replace or repair any part which become defective in workmanship
or material under normal
personal, family or' household use..
During this one year, Majestic TM Appliance will provide all labor and parts necessary to repair any
defect as long as the appliance has been installed and operated in according with the instructions
provided. In the case of a tight installation, including RV's or Marine pleasure craft, providing ready
access to the appliance is the responsibility of the owner'
In no event, shall Majestic TM Appliances or its parent company, be liable for incidental or consequential damages or for damages resulting from external causes such as abuse, misuse, incorrect voltage
or acts of God. This warranty does not cover service calls which do not involve defective workmanship, incorrect installation procedures or materials not provided by Majestic TM appliances.. Therefore,
service calls, diagnosis, and repair costs for a service call which does not involve defective workmanship or materials will be the responsibility of the consumer/owner
This might include but is not
restricted to, improper hookup or leveling, cleaning or air andlor water filters, replacing broken door
handles, or excessive movement caused by travel or recreation or installation
Being fair, most work is covered. If the machine has malfunctioned
Majestic TM covers it or if the
installer/consumer
has omitted or done sornet_hing to cause the machine to malfunction, they cover it..
You can call us toll free at t_800_678-8002,
8 am to 5 pm Pacific Time for service.
Or you can call any
time and leave a message..
Our address
is
MSltMajestic Appliances
2500 Columbia House Bivd.
Vancouver, WA 98661
Ext÷nded
Warranty
lttfcr atien
Contact us at our office for up-to-date information on extended warranty costs. You can obtain an additional warranty for 1, 3 or 5 years through our exclusive warranty agreement
To be eligible for this
warranty you must use the machine for personal use, not in a commercial application, purchase the
coverage, register the contract and received your contract number or certificate.
The unit must be
registered with our approved agency and have a contract number issued within the first year of ownership, to the original owner, or this offer is void..
Page !t 5
@2003 Manufacturers
Supply, lnc
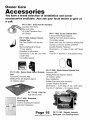
Owner
Care
Accessories
You have a broad selection
of installation
and owner
accesssories
available.
Just ask your local dealer or give us
a call.
PN 17-1051
Dryer Vent Kit includes:
Louvered Vent Hood
•,_Pipe and Collar
UL Listed Transition
(2) Clamps
"
[
}
i
Duct
PN 17-'1052
Econo Outside
Vent
J
Calcium Filled Polypropylene
Melting Point 325 degrees approxo
UV Inhibitor added
PN 17-1054
Deluxe Chrome
Outside Vent
Die Cast ZAMAK with chrome
finish
Opens with ease for maximum exhaust flow
Curved Louvers for quieter operation
Durable Weather Resistant
BIack polypropylene flange
4" hose adapter
Predrilled for #8 screws
Dimensions-5,,25" tall x 5,8" wide
Dimensions --- 6" wide x 6" tall x 5/8" flange
depth
Free Air--4" diameter = 19°5 square inches
x 2°25" deep
UV Inhibitor added
PN 17-1055
Deluxe Flush
Vent
Paintable/Chromable
ABS
Melting Point 325 degrees
UV Inhibitor added
mt Outside
PN 17-'1053
White
Paintable ABS
Deluxe
Melting Point 325 degrees
UV Inhibitor added
approx,
Outside
Vent
approx.
Easy Installation
Rubber Flap quiet when traveling
Durable Weather Resistant
Dimensions --- 5°25" wide x 6" tall x 2°25" deep
Free Air--4" diameter = 1&5 square inches
PN 17-1056
Drip Pan
High Density ABS
PN 17-1050
Stackable
Attaching
Kit
Parts for stacking the Washer
and Dryer Separates
Page
@2003 Manufacturers
16
Supply, Jnc
Majestic
P.,17-1oeo
Detergent-
Laundry
Low Sudsing Action
= Notes
-
jest ...... ......................
WHERE
SERVICE
MATTERS
©2(_03 Manufacturers Supply, ?nc
- Notes
=
Majestic Appliances
WHERE
SERVICE
@2003 Manufacturers
MATTERS
Supply, tnc
= Notes
=
@
WHERE
SERVICE
@2003 Manufacturers
MATTERS
Supply, lnc