1
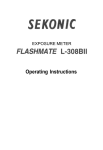
SEKONIC
DIGI MASTER L-718
Operating Instructions
Contents
Parts Designations .......................................... 2
Liquid Crystal Display ..................................... 4
Mode Selection and Operation
Reference Table ............................................. 6
Accessories
1. Lumisphare ................................................... 8
2. Lumidisc ........................................................ 8
3. Reflected-light filter ........................................ 9
4. Viewfinder 5° (sold separately) ...................... 9
5. Synchro cord (sold separately) ...................... 9
Preparing the Meter
for Operation
1. Insert the batteries ....................................... 10
2. Checking the batteries ................................. 10
3. Selecting measuring mode .......................... 11
4. Setting ISO sensitivity ................................. 13
5. Setting shutter speed .................................. 13
6. Display lighting ............................................ 14
7. Running-lock for continuous
reading ....................................................... 14
Wireless (cordless) Measurement
using Electronic Flash Unit .......................... 15
Wired Measurement using Flash
Unit with Synchro Cord ................................ 16
Cumulative Measurement using
Electronic Flash Unit ..................................... 17
Ambient Light Measurement ........................ 18
Memory Display Function ............................. 20
Post-Measurement Calculation .................... 22
Contrast Metering for Lighting
Balance .......................................................... 24
Illuminance (Lux) Measurement ................... 25
Adjusting the Balance of the Meter .............. 26
Care of the Meter ........................................... 27
Specifications ................................................ 28
1
Parts Designations
Lumisphare (interchangeable with
Lumidisc and Reflected Light Filter)
Swivel head
Tripod thread
Holder for swivel head
Setting mark for Lumisphare
Battery chamber
Measuring switch
Power switch
Liquid crystal display
Carrying strap eyelet
UP/DOWN key
Mode selection key
ISO key
Memory-off key
Memory key
F/T selection key
F/EV selection key
Multi-measurement key
Display-light key
22
Lumidisc
23
Reflected-Light Filter
Slide cover
Synchro terminal
24
Synchro cord, 5m length
(sold separately)
2
3
Liquid Crystal Display
(1) b.c. mark (battery check) is
displayed when the meter is
switched on.
(2) Digital value of the measured
F-stop or EV is shown (f/1~
f/90 or EV(- 1) ~ EV25), when
the meter is used in T-priority
mode.
(3) F-stop value is set in F-priority
mode for ambient light
measurement.
(4) E.u. (underexposure) or E.o.
(overexposure) mark is
displayed when the measuring
range is exceeded.
Any of the following symbols is
displayed depending on the mode
selection.
for wireless (cordless)
measurement for flash light
for wired measurement for
flash light
for cine mode
In case of ambient light
measurement (excepting cine
mode), no symbol mark is
indicated.
This display comes into operation
when the multi-measurement key is
pressed in both modes of wireless
and wired measurement for flash
light. The number of cumulative
flashes is limited up to 9. If it
exceeds 9, the E mark (error) is
indicated.
Display for film speed moves
through a range of ISO 3 ~ ISO
8000 by pressing either UP or
DOWN key while holding the ISO
key depressed.
By pressing F/EV key, the indicated
symbol is converted from F to EV,
and vice versa. When the meter is
used in the flash mode, only F mark
is displayed.
When the meter is used in T-priority
mode,
(1) F-stop number is also displayed
in bar-dot symbols at 1/2 F-stop
increments.
(2) The measured F-stop values
are indicated in bar dot symbol
by pressing the memory key
after each measurement. The
number of memorized values is
limited up to 2.
(1) Battery capacity is shown when
the meter is switched on.
(2) Bar symbols indicate the
fractions of F-stop or EV value.
4
(1) Digital value of the measured
shutter speed is shown in this
display (30min. ~ 1/8000sec.),
when the meter is used in
F-priority mode.
(2) Shutter speed is set in T-priority
mode;
for flash light:
1sec. ~ 1/500sec.
for ambient light:
30min. ~ 1/8000sec.
for cine scale:
6fps. ~ 128fps.
5
Mode Selection and Operation Reference Table
6
7
Accessories
1. Lumisphare
3. Reflected-light filter
Use Lumisphare when you wish to
measure incident light for portraits and
three-dimensional subjects.
Use Reflected-light filter when you wish
to measure the reflected light
(brightness) of subject. Use it to
calculate the relative brightness ratio
(illumination contrast of subject) for
adjusting lighting balance, or when it is
difficult to take incident light
measurement.
< Mounting >
Match the red dot on the Lumisphare
frame to the setting mark on the swivel
head. Gently rotate the sphare
clockwise until it clicks securely into
place. To remove, rotate the sphare
counter-clockwise.
<Taking measurements>
Point the Lumisphare accurately toward
the camera from the subject position.
Swivel head is rotatable 270°
horizontally and 90° upward.
<Taking measurements>
Point the reflected-light filter accurately
toward the subject. When you wish to
measure some part of the subject, do
so as close to the subject as possible.
2. Lumidisc
4. Viewfinder 5°
Use Lumidisc when you wish to
measure lighting contrast and lux as
well as the exposure of singledimensional subjects.
(sold separately)
Use Viewfinder in the same way as the
reflected-light filter to measure reflected
light. With a light acceptance angle of 5°
you can make a spot measurement of
distant subjects.
< Mounting >
Same as for the Lumisphare.
<Taking measurements>
Hold the meter at the subject position and
point the Lumidisc accurately toward the
light source. When measuring the
exposure of two-dimensional subjects,
point the Lumidisc toward the camera
from the subject position.
8
< Mounting >
Same as for the Lumisphare.
5. Synchro cord
(sold separately)
Synchro cord connects the meter to the
flash unit for measuring flash light in
wired measurement mode. Synchro cord,
5 meters length, has 3 plugs so that it
can simultaneously synchronize the
meter with the flash unit and the camera.
The terminal on the meter has a locking
mechanism to ensure a secure
connection. To disconnect the cord,
simply pull the ring attachment toward
you to release the locking mechanism.
9
Preparing the Meter for Operation
1. Insert the batteries
DIGI MASTER requires 2 pcs of AA
size pen-light battery (1.5V x 2).
(1) Open the battery chamber cover by
sliding it in the direction of arrow.
(2) Insert the batteries carefully aligning
(+) and (-) polarities as indicated
inside the chamber.
(3) Replace the cover by sliding it and
inserting its notch into the slot of the
meter.
(3) DIGI MASTER is equipped with auto
shut-off function. If you leave the
meter inactive for about 5 minutes,
the power is automatically switched
off. If you wish to use the meter
again, slide the power switch back to
OFF position once and then switch
the meter on again.
3. Selecting measuring mode
< NOTE >
• After changing the batteries, please
switch the meter ON once, and then
OFF. It prevents the unexpected
battery consumption that may occur
depending on the status of electric
circuit of the meter.
• When not using the meter for a week
or more, remove the batteries from
the meter. It prevents any internal
damage arising from battery leakage.
2. Checking the batteries
Check the battery capacity before using
the meter. A weak battery does not
assure the correct light readings.
(1) Slide the power switch to ON
position. Then b.c. and dot symbol
marks are displayed for about
0.5sec. to indicate the battery level
(Fig. 1). If the battery is too weak to
give a correct light reading, the b.c.
mark flashes.
(2) After checking (for about 0.5sec.),
the display is automatically
changed to the measuring mode
(Fig. 2). If you wish to keep the b.c.
and dot marks indicating, switch
the meter ON while depressing ISO
key. The marks keep indicating
until you stop depressing the ISO
key
10
11
(3) In the ambient light mode,
(a) T-priority measurement or
F-priority measurement can
be selected by pressing the
F/T selection key (Fig. 7).
4. Setting ISO sensitivity
Press either side of UP/DOWN key while
depressing ISO key. Film speed (ISO
sensitivity) can be set within the range of
ISO 3 ~ ISO 8000 (Fig. 9).
The set value of ISO sensitivity is
memorized even if the meter is switched
off or the measuring mode is changed.
5. Setting shutter speed
(b) EV measurement can be
selected by pressing the F/EV
selection key in the F-priority
mode (Fig. 8).
Press either side of UP/DOWN key. The
display of shutter speed can be changed
within the range of 30min. ~ 1/8000sec.
for ambient light measurement, and
1sec. ~ 1/500sec. for flash light
measurement (Fig. 10).
After the display of 1/8000sec. the cine
scale is indicated (8, 16, 24, 32, 64 and
128fps.). In this case the symbol C is
displayed (Fig. 11).
The set value of shutter speed (including
dine scale) is memorized even if the
meter is switched off.
12
13
Wireless (cordless) Measurement using
Electronic Flash Unit
6. Display lighting
DIGI MASTER is equipped with a background illumination for LCD. Electro
luminescence ''ECLAT" illuminates the
LCD while the display-light key (D.L.) is
depressed (Fig. 12).
In case the photographing subject is too far to use synchro cord, or in case
the synchro cord disturbs photographing, flash light can be measured
without connecting the cord.
(2) Set the film speed (ISO) and
shutter speed (T) as shown in the
paragraphs for “Preparing the
Meter for Operation”.
7. Running-lock for continuous
reading
The measuring switch can be locked for
continuous reading for ambient light.
(1) Switch the meter ON.
(2) Rotate the switch knob clockwise
until the slit on the knob matches to
the white dot while depressing the
knob.
(3) Release the locking function after the
reading is over. While the measuring
switch is locked, auto shut-off
function does not work.
(4) While the symbol is flashing (for
about 90sec.), fire the flash unit
by pressing its test button.
(5) The appropriate F-stop value is
displayed on the meter. The
measured value is indicated in dual
display by F-stop number with bar
symbols and bar-dot symbol marks
(Fig. 15).
<NOTE>
• Running-lock is only usable for
ambient light measurement, not for
flash light.
•
14
The display continues to indicate the
measured value for about 5 minutes
after measurement unless the
following measurement is made.
After this period of time the auto
shut-off circuit operates and turns
the display off.
15
Wired Measurement using Flash Unit
with Synchro Cord
Cumulative Measurement using
Electronic Flash Unit
Wired measurement is recommendable when you measure the flash light
from the subject position, or when the meter fails to register flash light in
wireless (cordless) measurement; for example, close to a fluorescent lamp,
or in high ambient condition, and so forth.
When you are unable to obtain sufficient illumination with a single flash or
you try for special effects using a multiple exposure technique, there may be
cases that you wish to use your flash repeatedly. In such cases, you should
set the meter to the cumulative measurement mode. Cumulative
measurement is usable for both wireless (cordless) and wired
measurements for flash light.
(2) Set the film speed (ISO) and shutter
speed (T) as shown in the
paragraphs for “Preparing the Meter
for Operation”.
(3) Connect the synchro cord to the
synchro terminal of meter and the
flash unit.
(4) Point the Lumisphare accurately
toward the camera from the subject
position, and press the measuring
switch to fire the flash.
(5) The appropriate F-stop value is
displayed on the meter (Fig. 18).
For repeat measurement, press
the measuring switch again.
< NOTE >
• The notes for wireless measurement
are also applicable to wired
measurement.
16
(1) Before pressing the measuring
switch, set the cumulative
measurement mode by pressing the
multi-measurement key. The symbol
of MO is indicated on the display
(Fig. 19).
(2) Measure the flash light as shown in
the paragraphs for “Wireless
(cordless) Measurement using
Electronic Flash Unit” or “Wired
Measurement using Flash Unit with
Synchro Cord”.
(3) The reading and the number of
cumulative frequency are displayed
automatically each time the flash is
fired (Fig. 20). The maximum
possible cumulative flashes is 9. If
the flash is fired 10 or more times,
the number of cumulative flashes is
replaced by E mark (Error) and no
further reading is possible (Fig. 21).
(4) To repeat the cumulative
measurement, press the multi
measurement key once to release
the current reading. And press the
multi key again to prepare the fresh
reading.
In case of wireless (cordless)
measurement, pressing the
measuring switch can also release
the current reading.
<NOTE>
• Memory display function (refer to
page 20) is not usable if the meter is
used in the cumulative
measurement mode.
17
Ambient Light Measurement
Measuring ambient light, whether it is daylight or standard electric light, is a
fairly simple matter using either incident or reflected light method.
<NOTE>
•
F-priority and T-priority can be
converted by pressing F/T
selection key (Fig. 25)
(2) Set the film speed (ISO) and shutter
speed (in T-Priority mode) as shown
in the paragraphs for “Preparing the
Meter for Operation”.
When you use the meter in F-priority
mode, set the film speed (ISO) and
F-stop value.
(3) Press the measuring switch. The
appropriate F-stop value (or shutter
speed) is displayed on the meter
(Fig. 23).
(4) If the measuring switch is kept
depressed, the display gives a
continuous reading of the changes
in brightness.
•
F and EV measurement can also be
converted by pressing F/EV selection
key (Fig. 26)
(5) When the measuring range is
exceeded, E.u. (underexposure) or
E.o. (overexposure) mark is
displayed (Fig. 24).
18
19
Memory Display Function
DIGI MASTER is equipped with a memory function for measured 2 F-stop
values. This function is usable for both wireless (cordless) and wired
measurements for a single flash light as well as ambient light measurement
in T-priority mode, but not for cumulative flash measurement.
(4) Memory mode is released by
pressing the memory-off key
(Fig. 30).
(1) After measurement, press the
memory key. The measured F-stop
value is memorized and displayed in
bar dot symbol (Fig. 27).
(2) The number of measurement to
be memorized is limited up to 2
(Fig. 28).
(3) If you press the memory key after 2
dots have been displayed, the third
dot starts flashing (Fig. 29). After 2
or 3 sec., flashing stops and the
third dot is also remaining on the
display. This third dot is not a
display of memorized value, and will
be replaced by the following
measurement.
20
21
Post-Measurement Calculation
(1) Post-measurement calculation by
changing ISO sensitivity
By changing ISO sensitivity the
measured F-stop value is
automatically changed to the
appropriate one corresponding to
the changed ISO value (Fig. 31).
This calculation is applicable to all
measuring modes, both flash and
ambient light measurement.
(3) Post-measurement calculation by
changing F-stop value :
By changing the set F-stop value
the measured shutter speed is
automatically changed to the
appropriate one corresponding to
the changed F-stop value (Fig. 33).
This calculation is applicable only
for ambient light measurement in
F-priority mode.
(2) Post-measurement calculation by
changing T value :
By changing the set shutter
speed (T) the measured F-stop
value is automatically changed to
the appropriate one corresponding
to the changed T value (Fig. 32).
This calculation is applicable only
for ambient light measurement in
T-priority mode.
22
23
Contrast Metering for Lighting Balance
Illuminance (Lux) Measurement
When calculating a desired lighting balance, DIGI MASTER can be used
to measure the brightness of main and fill-in lightings from the subject
position.
DIGI MASTER can be used as an expendient Lux meter when used with
the Lumidisc in ambient light measurement mode.
(1) Mount the Lumidisc instead of
Lumisphare for usual incident light
measurement.
(2) Select the measuring mode, and set
the ISO sensitivity and shutter speed
(T) as shown in the paragraphs for
“Preparing the Meter for Operation”.
(3) Point the center of Lumidisc
accurately toward the center of axis
of the main lighting source from the
subject, and measure the light
according to the measuring method
for the respective mode.
(4) Using the same procedure, measure
the fill-in light(s). In this case, be sure
that the meter is held so that it is not
influenced by the main lighting
source.
(5) The F-stop difference between the
main and fill-in lighting sources is
lighting contrast ratio (Table 1).
< NOTE >
• In case of the measurement for Fstop value, memory display
function (refer to page 20) is useful
for this metering.
24
(2) Set the ISO sensitivity to ISO 100.
(3) Press the F/EV selection key
and select EV mode.
(4) Hold the meter so that the Lumidisc
is parallel to the plane to be
measured, and press the
measuring switch.
(5) The measured EV value can be
converted to the corresponding Lux
value using the (Table 2).
Difference in
exposure reading
1
1 1/2
2
3
4
5
Contrast ratio
2:1
3:1
4:1
8:1
16 : 1
32 : 1
(Table 1)
25
Adjusting the Balance of Meter
Care of the Meter
While every effort has been made to ensure the most accurate standard
calibrations as applied by SEKONIC for your DIGI MASTER, provision has
been made for an adjustment of approximately ± 1EV by correcting the
setting of the dial on the underside of the swivel head. It is recommended
that you test the meter fully in actual photographic conditions before
adjusting it to suit your preference.
DIGI MASTER is a high-precision instrument containing delicate electronic parts
and components, and you are recommended to handle the meter with due care.
(1) Carefully apply a screwdriver to the
slot in the dial on the underside of
the swivel head and turn it gently.
(2) If you turn the dial clockwise, you
can increase the index which
reduces exposure when
photographing.
(3) If you turn the dial counter-clokwise,
you can reduce the index which
increases exposure when
photographing.
• Keep Lumisphare and Lumidisc clean and free from scratches.
< NOTE>
• Do not touch this dial unless you
make an adjustment.
26
• Avoid dropping or shocking the meter.
• Don't store the meter in high temperature or high humidity locations.
• To avoid unnecessary battery drain, keep the meter switched off unless actually in
use. When not using the meter for a week or more, remove the batteries from the
meter in order to prevent any internal damage arising from battery leakage.
However note that the memory settings are tossed when the battery is removed.
• Operating temperature : 0°C ~ (+)40°C
• Storage temperature : (-)20°C ~ (+)60°C
In the event that servicing is required, contact your nearest service agency. When you
send the meter to service agency by ordinary mail, it should be carefully packed in a
carton box using some shock-absorbing material at least 3cm in thickness.
27
Specifications
Measuring system :
Measuring range :
Repeat metering
accuracy
Calibration constants :
Light receiving part
Sensor:
Swivel head :
Attachments :
Display
Measuring mode :
Incident and reflected light type for both flash and ambient
light
f/1.4 ~ f/90+0.9AV / ISO 100 (for flash light)
EV(-)1 ~ EV19.9 / ISO 100 (for ambient light
measurement)
± 0.1 EV
C=340 K=12.5 (for Lumidisc : C=250)
Silicon Photodiode
270° horizontally and 90° upward rotatable
Lumisphare and Lumidisc for incident light, Reflected-light
filter (acceptance angle 54°) and Viewfinder 5° (sold
separately)
Wired and wireless measurements for flash light, wired and
wireless cumulative flash measurements, ambient light
measurement, cine scale and EV measurement
Film speed :
ISO 3 ~ 8000 at 1/3 SV unit
Shutter speed :
1sec. ~ 1/500sec. for flash light
30min. ~ 1/8000sec. for ambient light
cine scale : 8, 16, 18, 24, 32, 64 and 128fps.
f/stop :
1.4 ~ 90+0.9AV for flash light
1.0 ~ 90+0.9AV for ambient light
EV scale :
(-)6 ~ 25.9
Other display :
E.u. (underexposure), E.o. (overexposure) and battery
check
Display illumination : Electro Luminescence (“ECLAT” manufactured by Elix Co.,
Ltd., subsidiary of Sekonic)
Power Bourse :
2 x AA pen light battery (1.5V x 2)
Standard accessories : Lumisphare, Lumidisc, Reflected-light filter, neck strap,
2 batteries and case
Dimensions and
weight :
157 x 68 x 28mm
about 190 grams (excl. batteries)
28