1
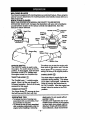
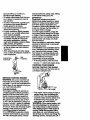
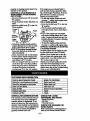
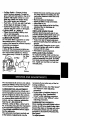
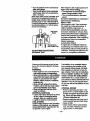
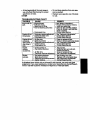
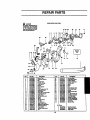
Operator's Manual
CRRFTSMRN
1.4 cu. in./24cc 2-Cycle
205 MPH/410 CFM
GASOLINE POWERED
BLOWERNAC
Model No.
358.797290
Read and follow all Safety Rules and Operating
WARNING:
Instructions before first use of this product.
For
to your
questions
thispm,
product:
Call answers
7 am-7 pm,
Mon.---Sat.,
or about
10 am-7
Sun.
•
1-800-235-5878
Sears J_oebuck
530-087632
07/10/98
(.o==_._=._..=,_m)
and Co., Hoffman Estates, IL 60179 USA
I
Warranty Statement
Safety Rules
Assembly
Operation
Maintenance
Service & Adj_,stments -
2
2
4
6
8
9
Storage
TroubleshootingChart
Pads Ust
Spanish
Parts and Ordering
10
11
13
16
Back
FULL TWO YEAR WARRANTY ON CRAFTSMAN ® GAS BLOWER
Fo_o
(2) years from date of purchasa, when this Gas Blower is maintained,
lubncatad, and tuned up accordingto the instructionsin the operator's manual,
Sears will repair, free of charge, any defects in material or workmanship.
Thb warran_j excludes blower tubes, spark plug, and air cleaner, which are expe_dabl9 parts and become worn dudng normal use.
IftM_-:bl0wer__
forcommemial purposes,this warranty appliesfor 90 days from
the date.of pumhase. If this Bloweris usedfor rentalpurposes,this warranty applies
for 30 days from the date of pumhase. This warranty applies only whilethis product
is in use in the United States.
WARRANTY SERVICE IS AVAJ_LE BY RETURNING THE BLOWER TO THE NF.JkREST
SEJ_RSSERVICE CENTFR IN THE UNITED STATES,
This warrdnty gives you specificlegal rights, and you may also have other rights
which vary from state to state.
Sears, Roebuck and Co. D/S17WA Hoffman Estates, IL 60179
Failure to follow all Safety Rules and Pre-
cautionscan result in serious injury.
KNOW YOUR UNIT
• Read your Operator's Manual carefully untilyou completely understand
and can follow all warnings and
safety rules before operating the unit.
• Restrict unitto users who understand
and will follow all warnings and safety
rules in this manual.
PLAN AHEAD
• Always wear eye pmteclionwhen op-era_ng, servicing,or performingmaintenance on unit.Woaringeye protection v_llhelp to praOentrocksor debris
from'being blown or ricochetingInto
eyes and face which can resultin
blindnessand/or seriousinjury.
• Always wear respirator or face mask
iwhen working with unit in dusty environments.
• Secure hair above shoulder length.
Secure or remove jewelry, loose
clothing, or Clothing_th loosely
hanging straps, ties, tassels, etc.
They can be caught in moving pads.
-2-
• Do not operate unitwhen you are tired,
ili,upset,or if you are underthe influence of alcohol,drugs,or medication.
• Keep children, bystanders, and animals away from work area a minimum of 50 feet (15 m) when starting
or operating unit.
• Inspectarea beforestarlingunit.Remove all debrisand hard objectssuch
as rocks,glass,wire, etc. thst can ricochet, he thrown, or otherwisecause
injuryor damage duringoperal_n,
HANDLE FUEL WITH CAUTION
• Eliminate all sources of sparks or
flame (includingsmoking, open
flames, or work that can cause
sparks) in the areas where fuel is
mixed, poured, or stored.
• Mix and pourfuel in an outdoorarea;
store fuel in a cool, dry,well ventilated
place;use an approvecl,marked contaber for all fuel purposes.
• Do not smoke while handlingfuel or
while operating the unit.
• Do not fillfuel tank while engine is
running.
• Wipe up fuel spills before starting engine.
• Move at'least 10 feet (3 meters)
away from fuel and fueling site before
starting engine.
OPERATE YOUR UNIT SAFELY
• Stop the engine before Opening the
vacuum inlet door.The engine must
be stopped and the impeller blades
no longer turning to avoid sedous injury from the rotatingblades.
• Inspect unit bafom each use for
worn, loose, missing,, or damaged
parts. Do not use until unit is in
proper working order.
• Keep outside surfaces free from oil
and fuel.
• Never start or run engine inside a
dosed room or building. Breathing
exhaust fumes can Idll.
• To avoid static electricity shock, do
not wear rubber gloves or any other
insulated gloves while operating unit.
• Do not set unit on any surface except
a clean, hard area while engine is
running. Debds such as gravel, sand,
dust, grass, etc. could be picked up
by the air intake and thrown out
through discharge opening, damaging unit,property, or causing serious
injuryto bystanders or operator.
• Avoid dangerous environments. Do
not use in unventilated areas or
where explosive vapors or carbon
monoxide build up could be prssenL
• Do not overreach or use from unstable surfaces such as ladders, trees,
steep slopes, rooftops, etc. Keep firm
footing and balance at all times.
• Never place objects inside the blower
tubes; always direct the blowing debds away from people, animals,
glass__d solid objectssuch as
trees, automobiles, walls_etc. The
force of air can cause rocks, dirt, or
sticksto be thrown or to dcochet
which can hurt people or animals,
break glass, or cause other damage.
• Never run unit without the proper
equipment attached. When using
your unit as a blower, always install
blowertubes. When using the optional vacuum kit, always install vacuum
tubes and vacuum bag assembly.
Make sure vacuum bag assembly is
coml_lately zipped.
• Check air intake opening, blower
tubes, and vacuum tubas frequently,
always with engine stopped and
spark plug disconnected. Keep vents
and discharge tubes free of debris
which can accumulate and restrict
proper air flow.
• Never place any object in air intake
opening as this could restrict proper air
flow and cause damage to the unit.
• Never use for spreading chemicals
fertilizers, or other substanceswhich
may contain toxic materials.
• To avoid spreading fire, do not use
near leaf or brush fires, fireplaces,
barbecue pits, ashtrays, etc.
• Use only for jobe explained in this
manual.
MAINTAIN YOUR UNIT PROPERLY
• Have all maintenance other than the
recommended procedures described
in the Operator's Manual performed
by Sears Service.
• Disconnect spark plug before performing maintenance except for carburetor adjustments.
• Use only recommended CRAFTSMAN• replacement parts; use of any
other parts may void your warranty
and cause damage to your unit.
• Empty fuel tank before storing the unit.
Use up fuel left in carburetorby starting
engine and letiJngit mn untilit stops.
• Do not use any accessoryor attachment otherthanthose recommended
by manufacturerfor use with your unit.
• Do not store the unit or fuel in a
closed area where fuel vapors can
reach sparks or an open flame from
hot water heaters, electdc motors or
switches,fomaces, etc.
• Store in a dry area out of reach of
children.
SPECIAL NOTICE: For users on U.S.
Forest Land and in some states, including California(Public Resources
Codes 4442 and 4443), Idaho, Maine,
Minnesota, New Jersey, Oregon, and
Washington: Certain internal combustion engines operated on forest, brush,
and/or grass covered land in the above
areas are requiredto be equipped with
a spark arrestor, maintained in effective
worldng order, or the engine must be
constmoted, equipped, and maintained
for the preventionof fire. Check with
your state or local authoritiesfor regulations pertaining to these requirement_ Failure to follow these requirements is a violationof the law. This unit
is not factory equipped with a spark arrestor;, however, a spark arrestor is
available as an optional pad. If a spark
arrestor is required in your area, contact Sears Service for the correct kit.
Prclongeduse in cold we_
has been
linkedto bloodvessel damage in otherwise healthypeopla.If _
occur
such as n4mbnees,pa_, lossof
strength,change in skincolor or texture,
or lossof feelingin the fingers,hands, or
joints,discontinuethe use of this tool
and seek medicalattention.An
antivibrstionsystemdoes not 9uarantse
the avoidanceof these problems.Users
who operate powertooison a continual
and rsgular basis must monitor clssely
their ph_'w,al conditionand the condition
ofthistool.
The spark arrestor, blower tubes, and
nozzles must be assembled to unit to
be in full compliance with regulations.
SPECIAL NOTICE: Exposure to w'oratJons through p_longed useof gasoline
powered hand tools could cause blood
vessel or nerve damage in the fingers,
hands, and joints of people prone to circulation disorders or abnormal swelling.
CARTON CONTENTS
Check carton contents against the followinglist.
Model 358.797290
• Blower
• Blower tube
• Vacuum bag
• Upper vacuum tube
• Lower vacuum tube
• 2-Cycle Engine Oil
NOTE: It is normal for the fuel filter to
rattle in the empty fuel tank.
VACUUM BAG ASSEMBLY
If you have already assembled your
unit for use as a blower, remove the
blower tube.
• Place the small end of vacuum bag
overthe blower outletand clamp knob.
Blower
Velcro Strap
ASSEMBLY
WARNING: If received assembled,
repeat all steps to ensure your unit is
properlyassembled and all fasteners
are secure.
• No tools are required for assembly,
BLOWER TUBE ASSEMBLY
If you have already assembled your
unit for use as a vacuum, remove the
vacuum tubes and collection bag.
• Align the rib on the blower tube with
the groove in the blower outlet; slide
the tube into place.
BIt_w_r:
• "lighten the Velcrc strap securely.
• Make sure the zipper on the bag is
closed completely.
• Secure the ends of the shoulder
strap by routingthe strap through the
buckle as shown.
Blower
• Tighten the tube clamp by tuming the
knob clockwise.
• To remove the tube, turn the knob
counterclockwise to loosen clamp;
remove tube.
-4-
VACUUM TUBE ASSEMBLY
WARNING Stop engine and be sure
the impeller blades have stopped turning before opening the vacuum inlet
door or attemptingto insert or remove
the vacuum tubes. The rotatingblades
can cause serious injury.
• Remove blower tube from engine.
• Align the lower vacuum tube as
shown. Push lower vacuum tube into
upper vacuum tube.
Upper
Lower
Vacuum Tube
• Insert a screwdriver intothe latch
area on the vacuum inlet cover.
.,p_.. Blower
Outlet
Latch Area
Vacuum
Inlet Cover
• Gently tilt the handle of the screwdriver toward the back of the unit while
pulling up on the vacuum inlet cover
with your other hand.
• Hold the vacuum inlet cover open until upper vacuum tube is installed.
Vacuum Inlet
Retaining Post
Vacuum
Inlet
Cover ....._q
• Place the hooks on the vacuum tube
on the retaining posts; pivot tube into
position. Secure vacuum tube by
tuming the knob clockwise until tight.
Hooks
• When conva_ng back to the blower
feature, make sure latch on the vacuum inlet cover is securely fastened.
SHOULDER STRAP ADJUSTMENT
(for vacuum use only)
• Hold the unitas shown.
• Pass the shoulder strap over your
head and onto your left shoulder.
• Snap the hook onto the retainer on
the top handle.
• Extend you right arm toward the rear
of the vacuum bag.
• Adjust shoulder strap until the vacuum bag/shoulder strap seam lies between your thumb and index finger.
• Make sure air flows freely from the
elbow tube into bag. If bag is kinked,
the unit will not operatar properly.
MULCHING BLADES
t
Your blower is equipped with mulching blades as a standard feature. When using the
optionalvacuum attachment, the mulching blades automatically reduce debris at a
ratio of up to 16:1.
KNOW YOUR BLOWER
READ THIS OPERATOR'S MANUAL AND SAFETY RULES BEFORE
OPERATING Y4DURUNIT. Compare the illustrationswith your unit to familiarize
yourself with the locationof the vadous controlsand adjustments. Save this
manual for future reference.
ON/STOP SWITCH
The ON/STOP switch is used to stop
the engine. The switch stays in the ON
position. To stop engine, push and hold
the switch in the STOP position until
the engine comes to a complete stop.
This allows you to start the engine with
fewer pulls on the starter rolbe. Activate
Pdmer Button _) by pressing it and allowing it to return to its original position,
C.OKEU W ®
RoTrLELEVER
(9
The choke helps to supply fuel to the
carburetordudng starting. This allows
:The Throttle Lever 1 controls engine
you to start a cold engine. Activate the
speed. Move it all the way forward for
full speed operation. Move it all the way choke by moving the choke lever to
the FULL position. After the engine has
_reerward for idle speed.
started, move the choke to the RUN
PRIMER BUTTON ._)
postition.
The Primer Button(_) removes air from
the fuel fines and fillsthem with fuel.
i
OPERATING TIPS
• To reduce the risk of headng loss
associated with sound level(s), hearingprotection is required.
• To rsduca the dskof bjury assodsted
wi_ contaoting rota_ngparts,stopthe
engine before installingor removing
-6-
attachment_ Do not operatewithout
gt_(s) in place.
• Operate power equipmentonly at reasonablehours-cot early in the moming
or late at nightwhen people mightbe
disturbed.Complywith times Estedin
localord'mnces. Usual recommenda-
tionsare _.00 a.m. to 5:00 p.m.,
Monday
though
Saturday.
• To reduce noise levels, limit the number of pieces of equipment used at
any one time.
• To reduce noise levels, operate power blowers at the lowest _esib|e
"throttle speed to do the job.
• "Use rakes and brooms to loosen
debrisbefore blowing.
• In dusty conditions,slightlydampen
surfaces or use a mister attachment
when water is available.
• Conservewaterby usingpowerblowersinsteadofhosesfor manylawn
and garden applications,including
areas such as gutters,screens, pe_los,
gdlls,porches, and gardens.
• Use the full blower nozzle extension
so the air stream can work close to
the ground.
• After using blowers and other equip
ment, CLEANUP! Dispose of debris in
trash receptacles.
OPERATING
POSITION
read and follow the safety rules relating
to fuel before fueling your unit.
IMPORTANT
Expedence indicatesthat alcohol
blended fuels (called gasohol or using
ethanol or methanol) can attract moisture whichleads to separation and
formation of acids duringstorage. Acidic gas can damage the fuel system of
an engine while in storage.
To avoid engine problems, empty the
fuel system before storage for 30 days
or longer. Drain the gas tank, start the
engine and let it run untilthe fuel lines
and carburetorare empty.Use fresh
fuel next season.
Never use engine or carburetorcleaner
products in the fuel tank or permanent
damage may occur.
Fuel stabilizer is an acceptable alternative in minimizing the formationof fuel
gum deposits duringstorage. Craftsman brand oil is already blended with
fuel stabilizer.See the STORAGEsection for additionalinformation.
STOPPING YOUR ENGINE
• To stop the engine, press and hold
the stop (:_ switchuntileng,ne stops.
STARTING YOUR ENGINE
BEFORE STARTING THE ENGINE
You MUSTmake sure the tubes are secure before using the unit.
BEFORE STARTING ENGINE
WARNING: Be sure to read the fuel
informationin the safety rules before
you begin. If you do not understand the
safety rules, do not attempt to fuel your
unit. Call f_800-235-5878.
FUELING ENGINE
This engine is certified to operate on
unleaded gasoline. Before operation,
gasoline must be mixed with a good
quality2-cycle air-oooled engine oil.
We recommend Craftsman brand oil.
Mix gasoline and oil at a ratio of 40:1
(A 40:1 ratio is obtained by mixing 3.2
ounces of oil with1 gallon of unleaded
gasoline). DONOT USE automotive oil
or boat oil. These oils will cause engine
damage. When mixing fuel, follow
inetru.qtlo_n_
sgdnted on container.
Once oIT_;dded to gasoline, shake
container momentarily to assure that
the fuel is thoroughly mixed. Always
• Fuel engine. Move at least 10 feet (3
meters) away from the fueling site.
• Hold the unit in the starting position
as shown. Make sure the blower end
is directed away from people, animals, glass, and solid objects.
WARNING: When startingengine,hold
the unites illostmted.Do not set uniton
anysurface
es_pt a dem, hardarea
whenstarUng
eegineorwhilsanginels
running.Debrissuchas gravel,sand,
dust,gnus,etc_
couldbepid<ed
upby
theairintakeandthrown
outthrough
the
discharge
openir_,,
dsmeflir_thetxCto,
property,or causingsedous Injuryto bystandersor the operator.
STARTING A COLD ENGINE OR A
WARM ENGINE AFTER RUNNING
OUT OF FUEL
• Move the throttle lever (_ to the fast
,r_ position.
• Press the primer button (_) slowly 12
times.
-_
.....
..
• Move the choke lever (_ tothe Pull
Choke position.
Throttle
Lever
_
Switch
If the engine has not startsd after 5
pulls (at Half Choke), repeat the Starting a Cold Engine Procedure. If the engine stilldoes not =dart, proceed to
Starting a Rooded Engine.
• To stop the englne, press and hold
the stop (_ switch untilengine stops.
FOR A WARM ENGINE
•• Move the throttle lever (_) to the fast
_IP position.
• Pull the starter handle sharply until
the engine starts, but no more than 5
pulls.
NOTE: If the engine has not started,
pull starter handle sharply for 5 more
pulls. If engine still does not run, it is
probably flooded. Proceed to Starting
a Flooded Engine.
• To stopthe engine, press and hold
the stop O switch untilengine stops.
DIFFICULT STARTING OR STARTING
A FLOODED ENGINE
Rooded engines can be startedby placing the choke lever in the Off Choke
position.Move throttle lever to fast _ ;
then, pull rope untilengine starts.After
engine starts,movethe throttle lever to
to allow engineto Idle.
Startingcould requirepuffingthe starter
rope manytimes depencfing on how
badlythe unit is flooded.If the unit_II
doesn'tstart,referto the Troubleshooting
Chart or call 1-800-235-5878.
®
Choke
Lever_
• Pull starter handle sharply untilthe
engine attempts to run, but no more
that 5 pulls (below 30°F, 8 pulls).
NOTE: If the engine attempts to start
before the 5th pull, go to the next
step Immediately.
• Move choke lever (_) to Half Choke.
• Pull the starter handle sharply until
the engine runs, but no more than 5
pulls (below 30°F, 10 pulls).
• After a 5 second warm-up, move the
choke lever (_) to the Run position.
• Allow the unit to run for 30 more seconds at Run before moving the
throttle lever (_) to the _
position.
CUSTOMER RESPONSIBILITIES
.- ;
CARE & MAINTENANCE TASK
Check for Loose fasteners and parts
Check for damaged or wom parts
Clean unit and labels
WHEN TO PERFORM
Before each use
Before each use
After each use
Clean air filter
Replace spark-plug
Every 5 hours of operation
Yasdy
Yearly
Replace fuel filter
GENERALRECOMMENDATIONS
The warranty on this unit does not cover items that have been sub|acted to
operator abuse or negligence. To receive full value from the warranty, the
operator must maintain unit as Instructed in this manual. Various adjustments
will need to be made periodically to
_p_r.opedy
malntaln your uniL
-8-
CHECK FOR LOOSE
FASTENERS AND PARTS
• Spark Plug Boot
• Air Rlter
• HousingScrews
CHECK FOR DAMAGED OR
WORN PARTS
Refer replacement of damaged/worn
parts to your Sears Service Center.
• On/Stsp
Switch-Ensure
On/Stsp
switch
prope,ly.
Tostopen-
gice, push and holdswitchin the STOP
posen
toacom-
pleta stop. Make sure engine stops;
then restartengineand continus.
• • Fusl Tank- Do not ueeualt iffueltank
showssignsofdemageorleaks.
° Optional Vacuum Bag - Do not use
vacuum bag if it is tom or damaged.
CLEAN UNIT & LABELS
• Clean the uKItusing a damp cloth
with a mild detergent.
• Wipe off unit with a clean dry cloth.
CLEAN AIR FILTER
Do not clean filter in gasoline or other
flammable solvent. Doing so can
create a fire hazard or produce harmful
evaporative emissions.
Cleaning the air filter:
A dirty air filter decreases engine performance and increases fuel consumption and harmful emissions. Always
clean after every 5 hours of operation.
/_
Alr Rlter
,_veFir Iter
We recommend all service and adjustments not listed in this manual be performed b -v,:yourSears Service Center.
CARBURETOR
ADJUS3"MENT
Carburetor adjustment is critical and if
done improperly can permanently damage the engine as well as the carburetor. If you require further assistance or
are unsure about performing this procedure, call our customer assistance
help line at 1-800-235-5878.
Old fuel, a dirty air filter, a dirty fuel filter, or flooding may give the impression
of an improperly adjusted carburetor.
Check these conditions before adjustingthe e,ai_ouretor.
The carburetor has been carefully set
at the factory.Adjustments may be
• Clean the cover and the area around
it to keep debrisfrom failing into the
carburetor chamber when the cover
is removed.
Remove parts as illustrated.
Wash the filter in soap and water.
• Allow filterto dry.
• Apply a few drops of oUto the flfter;
squeeze filter to distribute oil..
• Repleceparts.
REPLACE SPARK PLUG
Replace spark plugeach year to ensure the engine starts easier and runs
better. Set spark plug gap at .025in.
Ignitiontiming is f_ed,nonadjustable.
• Twist, then pull off spark plug boot.
• Remove spark plugfrom cylinder and
discard.
• Replace with Champion CJ-SYspark
plug and tighten with a 3/4 in. socket
wrench (10-12 ft.-Ibs).
• Reinstall the spark plugboot.
REPLACE FUEL RLTER
To replace fuel filter, drain unit by runningit dry of fuel, then remove fuel cap/
retainer assembly from tank. Pull filter
from tank and remove it from the fuel
line• Install new fuel filter on fuel line;
reinstall pads.
necessary if you notice any of the followingconditions:
• Engine will not idle. See "Idle Speed"
and "Mixture"under adjusting
procedure.
• Engine dies or hesitates instead of
accelerating. See "Accaiemtion
Check" under adjus6ng procedure.
• Loss of power. See "Mixture" under
adjusting procedure.
CARBURETOR
PRESETS
When making carburetorpreset adjustments, de notforce plastic limitercaps
beyond the stops or damage will occur,
If carburetorpresets are not needed,
proceed to *ADJUSTINGPROCEDURE,
Idle Speed."
To adjust presets:
•Tum the mixture screw counterclockwise until it stops.
•Tum the idle speed screw clockwise
until it stops. Now turn counterclockwise 4-1/2 turns.
Start motor, let it run for 3 minutes, and
proceed to the adjustment section. If
engine does not start, refer to troubleshooting chart or call 1-800-235-5878.
If engine performance is acceptabte at
the preset positions, no further adjustments are necessary.
Idle Speed
Screw
Mixture.Screw
(with Umltsr Cap)
ADJUSTING PROCEDURE
Idle Speed "IDLE"
Allow engine to idle. Adjustspeed until
engine runs without stalling.
• Turn clockwiseto incma_e_ngi_e
speed if engine stalls or dies.
• Turn counterclockwiseto decrease
speed.
No furtheradjustments are necessary if
performance is satisfactory.
MIxture "MIX"
Allow engine to idle. Then accelerate
the engine and note portormance. If
engine hesitates, bogs down, or
smokes during acceleration, turn mixtun) screw clockwise in 1/16-turnincrements untilperformance is satisfactory.
Repeat this procedure as necessary
for proper adjustment. After completing
adjustments, check for acceleration.
Reset if necessary.
Acceleration Check
If engine dies or hesitates insteadof
accelerating,turn mixture screw countemlockwise untilyou have smooth acceleration. Recheck and adjust as necessary for acceptable performance.
Prepare unit for storage at end of season or if it will not be used for 30 days
or more.
WARNING:
• Allow engine to cool, and secure the
unitbefore stodng ortransporting.
• Store unit and fuel In a well ventilated
area where fuel vapors cannot reach
sparks or open flames from water
heaters, electric motors or switches,
furnaces, etc.
• Store unit with all guards in place.
Position unit so that any sharp object
cannot accidentallycause injury.
• Store unit and fuel well out of the
reach of children.
EXTERNAL SURFACES
• I! your unit isto be stored for a period
of time, dean it thoroughly .before
storage. Store in a clean dry area.
• Ughtly oil external metal surfaces.
FUEL SYSTEM
Under Fueling Engine in the Operating
Section of this manual, see message
labeled IMPORTANT regarding the use
of gasohol in your engine.
-10-
Fuel stabilizeris an acceptable_ernerive in minim_'Jng
the _
of fuel
gum delx_'_ during storage.Add _oi,zer to gasolinein fuel tank or fuelstorage container.Followthe mixinstructions
found on stabiker ccnta_r. Run engine
at least5 minutes after addng stabTBer.
CRAFTSMAN40:1, 2-cycle engine oil
(air cooled) is already blendedwith fuel
stabilizer. If you do not use this Sears
oil, you can add a fuel stab=Tizerto your
fuel tank.
INTERNAL ENGINE
• Remove spark plug and pour I teaspoon of 40:1, 2-cycle engine oil (air
cooled) through the spark plug opening. Slowly pull the starter rope 8 to
10 times to_listributs oil.
• Replace spark plug with new one of
recommended type and heat range.
• Clean air filter.
• Check entire unit for loose screws,
nuts, and bolts. Replace any damaged, broken, or wom parts.
WARRANTY
COMMENCEMENT
DATE:
The warranty period begins on the date the
lawn and ;iardan equipment engine Is PUrchased. LENGTH OF COVERAGE: This
warmntyehailbe forapadod oftwoyears from
the Inl_ai date of purchase. WHAT IS COVERED, REPAIR OR REPLACEMENT OF
YOUR WARRANTY RIGHTS AND OBLIGATIONS: The U. S. Environmental Protection
PARTS. Repair or replacam.antof a.ny warAgencylCailfomta Air Resources Board and
rented part Willbe penormeo at no charge to
SEARS, ROEBUCKANDCO.,aroploasedto
the owner at an approved S EARB Service
e:_plainthe emlsslons controlsystem warrenCenter. If you have any.questrons..m..garamg
tyonyourJawnand gardenequipment engine,
your warranty dghts and responslD,lUeS,you
AI nowuti ]tyandlawnano garaon equipment
should contact y.ournearest authodze¢_-N.rengines muSt be designed, built, and
vice center or call SEARS, ROEBUCK AND
equipped to meet the Stringent anfi....--sm_og CO. at 1-000-235-5878 WARRANTY PEstandams. SEARS, ROEBUCK AND _;0.
RIOD: Anywarrantad part whlchls notachedmust warrant the emission control system on
uled for replacement as requlre.d maintayour lawn and garden equlpment engine for
nonce, or which is scheduled onlyTorregular
the pedods of time listedbelowproviDeDmere
Inspect|onto the effect of "repairer raplaca as
has been no ai_Jse, neglect, or Improper
necessary" shall be warranted for _ y.aare.
maintananca of your lawn and gar.danequipAny warranted part which IsscneouJeOfor rementengme.'_our emlssioncontrolsystemin"
placement as required maintenance shall be
dudes parts such as the carburetor and the
warranted for the period of time up to the first
ignitione_tem. Where a warrantable condl
scheduled re.p.lacemantpoint for that part.
lion exits SEARS, ROEBUCK AND CO. will
DIAGNOSlS.Theownarshailnotbecharged
repair your lawn and garden equipment anfor d agnostic labor whlchleess to the deterg|no at no coSt to you._xpens..os covered unruination that a warrantee part is detec_ve if
oar warranty include diagnosis, parts and lathe diagnostic work Is. performed at an ap_
bet,
MANUFACTURER'S
WARRANTY
proved SEARS Serwce.uentar. CONSE
GUENTIAL DAMAGES. SEARS, ROECOVERAGE: If any omissionsrelated part on
BUCK AND CO. may be liablefor damages to
your engine (as listed under Emissions uonother engine components causeS by the failtrol Warranty Pa_s List) Is Defect.re or a daure of a warrentodpart aitil under warranty.
fectln the mstedaJsor wo_mansnlp orme enWHAT IS NOT COVERED: All failures
gine causes the f!,Uure of such _ emission
caused by abuse, neglect, or improper mainrelated part, the part Will De repeureoor retenance are not covered. ADD_ON OR MOplaced b_, SEARS, ROEBUCK AND CO.
DIRED PARTS:The useo| sdd-Gnor mocked
OWNER S WARRANTY RESPONSIBILITIES: As the lawn and garden equipment eni_ts canbe rounds
ford
a
gineownerryou are responsibletoune penorable to cover failures of warranted parts
rnance of the required maintenance listed in
causes by the use of esd-on or modified
your Owner's Manual. SEARS, ROEBUCK
AND CO. recommends that yoU retain all reparts. HOW TO FILE A CLAIM: If you .have
any questions regardingyour warranty rights
ceipta covering maintenance on your lawn
and responsibilities,you enould contact you_
and garden equipment engine, but SEARS,
nearest authorized service center or ca,
ROEBUCK AND CO. cannot deny warranty
solaiyforthetackofreceiptsorforyourla_lure
SEARS,
ROEBUCK
AND
CO.
at
tO ensure the performance of all scheduled
1-800-235-5878. WHERE TO GET WAR.
maintenance. AsthelawrlandgardanequipRANTY SERVICE: Warrenty services or .re
mentenglne owner, you shouldbe aware that
pairs shall be provided at all SEARS S ervl_
SEARS, ROEBUCKAND CO. maydenyyou
Centers. Call: 1.800-235-5878 MNNTE
warranty cover.age If your lawn and garden
NANCE, REPLACEMENT AND REPAIR OP
equlpmantenglneorapartoflt hasfailoddue
EMISSION RELATED PARTS: Any SEARS,
toabuse,neg|ect,|mproper matntenanca,unROEBUCK AND CO. approved replacement
appmveam6d ficat ons,ortheuse ofparts not
part used In the perle.rpanca of ar!.ywarran_
mess or approves bytheodglnaiequipment
maintenance or repair on emission relamo
m_ufacturer. You are responsible for presparts will be provided without charge to th_
enung your lawn aria galen equipment anowner if the part Is under warranty. EMIS.
gins to a SEARS Service uentaras eden as a
SION CONTROLWARRANTY PARTS US1!
problem existS. Warranty repairs should be
Carburetor, lgnltlonSystem:SparkPlug(cov
completedinareasonab|eamountoft]me,not
area up to maintanen ce___,__h__du_l_e)±.lgr_nltlor
to exceed 30 days. if you have anyquastlons
Module. MAINTENANCEsTATEME_NI: ln*
regarding your warranty rightsand responslownerls responsibleforthe performanceofal
b_litles,you should contaCt your nearest aurequired maintenance as defined in the own
thonzeO servlca center or call SEARS, ROEer'S manual.
BUCK AND CO. at 1-800-235-5878.
• At the beginnin_ of the next season,
use only.fresh f0el having the proper
gasoline to oil ratio.
OTHER
TROUBLESHOOTING
• Do not store gasoline from one season to another.
• Replace your gasoline can if it starts
to rust.
CHART
TROUBLE
CAUSE
Engine will noLt• Engine flooded.
start.
,,
• Fuel tank empty.
Spark plug notft tng.
Fuel not reachin ] carburetor,
• Compression low.
REMEDY
I " See =StartingInstructions."
• Fill tank with correct fuel mixture.
Install new Sl:ark plug.
Check for did / fuel filter;,replace.
Check for kin :ed or splitfuel line;
repair or replace.
• Contact Sears Service.
Engine will not
idle properly.
_ Carburetorrequiresadjustment. • See"CarburetorAdjustmants."
Crankshaft seals worn,
• Contact Sears Service.
• Compression low.
• Contact Sears Service.
Engine will not
accelerate,
: Air filter dirty.
Spark plug fouled,
_ Clean or replace air filter. .
Clean or replace el:=rk plug, r_ap,
dies under
a or i Carbon
build up.
Sears Sen ice.
lacks
power,
CarburetorrequlrssadJustmanL
•• Contact
See =CarburetorA¢iustments."
load.
Compression low,
• Contact Sears Service.
Engine
smokes
excessively.,
• Choke partially on.
• Fuel mixture incorrect.
Adjust choke.
: Empty fuel tank and refill with
correct fuel mixture.
• Air filterdirty.
Clean or replace air filter.
• Carburetor requires adlustmant : _ See'Carburetor Adjustments."
runs hoL
Engine
Spark plug incorrect.
Replace with correct sped( plug.
i Carburetor
Fuel mixture
Incorrect.
i See "CafouretorAdjustments,
"Fueling Your UnlL"
requiresadjustmanL
'_
• Carbon build up.
Contact Sears Service.
if situations occur which are not covered in this manual, use care and good
judgement. If you need asslstanca contact your Sears Service Center/Department or call the Customer Assistance Help ne at 1-800-235-5878.
'
REPAIR PARTS
SEARS MODELIS8.797290
AUNqxdn__l_n_nW
and
malm_mancenot de_rlbed
• In the O_rlltm_ Manual
mustbe perforatedbyqu4dlfled se_lce personnel.
242526
24
36
5
48
I
21 78910
20
18
I
17
35
9 15
31
78 18
23
11
37
4145
4039
14
12
47
27
28
16
29
32
U
1_46
Re.
Pat No.
0w..puon
Pot.
PanNO.
2.
3,
4.
5.
6.
7.
8.
g.
10.
11.
12.
13.
14.
,_.
53004,g_2
530016209
530049526
530049324
530049834
530016254
530015&S2
530015775
_
S300494_S
530Q49494
5300W_4
530048496
5aoo_ea)3
Car_reto_"Adaptor
BOI_
_
Plate
Thto_tleLinkage
Choke Lever
Wu_er
Choke Spacer
Screw
Knob Replacement Kit
Ludw_e-Swla:_
Wire Clamp
Garb/_y.
Kit0NA.-229)
I.._KJw_-Grol_d
c;_:ke Pl_
29.
30.
31.
32,
33.
34.
35.
3_.
37.
38.
34).
40.
41.
42.
530049617
53004_23
5300367g2
530049311
530015886
530015880
,53C015_0
530095,_le
530049885
530095469
5,._0049879
r_OIF.WSO
r_06_47
s3oo14a_a
Gu
Iso_to_,.kmdb
Isolakx-Cranb:_um
Hous_-IJtft
Sinew
Sinew
Boll
Claml>EkMw Tube
I(rK:b--TubeCilrap
Handle
Muff_r CO_w A_
Screw
Une Iot-Cad_qge
17.
18.
19.
20.
21.
22.
Screw
Screw
Air F_r Cover
Nt Rter
Th_tlJe Lever
Se_-Cho._e Plate
Rotain_-PurQ_ B_flon
SwitchMozn_ary
44.
45.
46.
47,
48.
530049527
S,._06_1 e
G,._0,t4kl_
530_9813
530049316
Guket-F_d Tank
Line IOI.-T_
Fue_Cap w/Retaln_GI4_tt Kit
Box-_ Rlter
24,
530015;157
S3001S849
5300_4_15
_
53004_25
530019246
530016211
S300_114
2G.
._4,g_7
Purge
8utSon
,_0_76_
Ot_nmxManual
2_,
•
530016212
530016207
Spr_g--Pur_ Button
Nut
G,.,_084.4_
_
Engine_
Right Decal
Not Shown
1R
I/
REPAIR PARTS
34
3536
_37
31
36 33
47
"
36
17
36
2930
44
4
i
40
19 24
25
10
/-,
45
49
26
27
18
5
16
,J
_.
_N_
1.
2.
3.
4.
5.
_I0015880
53006_32
E
53OO49488
N
9.
10.
11.
12.
13.
14.
15.
10,
17.
_18,
19.
20.
21.
22.
23.
24,
530O15810
530015815
530019240
530029182
5300_17
530095461
,S,_0015828
53062_
_._004_13
S304_2043
S3004,_9"/
530019181
530049429
S300_12S
6300_124
530019179
530015945
5300_618
25. S3003S20S
26.
27.
5300_3817
530016180
_|cdptlon
Ref.
Parl NO.
28.
29.
530049713
530016203
So'ew
Rope K_
Starter PulleyKit
StarterHandle
StarterSprl_
Fan Hous_'_ wtoeadng
Screw
530049454
530O15941
5_069813
Impeller ASS"/.
Mulch B;ade/k_'y.
W_t
Nut
Inlet
SlXlng-.RetumCover
Cmnkcl*e Cover
GUI_¢
_.
_._19247
40.
41,
42.
43.
530016080
530049903
53001516_
5,_00_9945
44.
530069812
4_
47,
48,
49.
50.
530O16226
_
&._0191_
530015149
530092322
Sea_-F_n
HS;...F_..
Muffk."Bolt
MufflerCover Plate
Muf_ K_
Retab_" RIng--C"ch_lt
MufflerSltleld
Serew
Si_uk Plug (CJ-eY)
Gasket Kit
Air Dam
/_itlo_ Module
Crank¢_ A.'y.
Inner Beerin0
Outer seerfng
Crankcase Seal
Retaining Ring
Crankcase ,A_'y.
(b_ 20-23)
R_er
P_
(Ir_ 4_& 421
Retainer Cam
Seadng
romme_n.
Wa:¢_r
Loc_her
Module
NotShown
DeCal
Flywheel S_er
530O644O4
14
W=mlng
REPAIR PARTS
Carburetor
Aamm_blv Part Number
K_
P_
1
2
3
$300_1403
t_069011
530069944.
No.
No.
g30069924
- _NA229_
Descd_ion
l.lmiter C_p
taro. Repair Kit
Gasket/okk Kit
2
Va_urrl
"rum Aml'v.
Gutter
5
Att_hrMnt
Kit IIg_-.TQ6812
/-3
4
3
3
-_
KEY
NO.
+PAR'[
NO.
DESCRIPTION
I
2
3
4
S
6
_
5300_470
_._095589
5,_049686
530049485
830095468
Va¢ Bag w/Strap
Elbow-Vat Tube
LowerTube
CI_p-Va¢Tube
Knob-Vat Tube
Upper Tube
Kl_lr I
_o.i
15
mg
/-s
nn
PART
.o.
OF_C_h_rlo N
1
2
3
4
53(_N426
530402918
530094425
530004424
Nozzle
Elbow&_OI...._Ring
ExtlmldonTIJ_
PivotTube
6
5
A
530094850
9,52701645
530402930
_Ad_e_r
WambtgDecal
_
A_
For the repair or replacement parts you need
delivered 'directly to your home
Call 7 am - 7 pm, 7 days a week
1-800-366-PART
(1-800-366-7278)
I
Para ordenar p|ezas con entrega a
domi¢ilio - 1-800-659-7084
t
For in-home major brand repair service
Call 24 hours a day, 7 days a week
1-800-4-REPAIR
(1-800-473-7247)
Para pedir servicio de reparaci6n a
domicilio - 1-800-676-5811
For the location of a Sears Parts and
Repair Center in your area
Call 24 hours a day, 7 days a week
1-800-488-1222
nmmmmm
muummm
For information on purchasing a Sears
Maintenance Agreement or to inquire
about an existing Agreement
Call 9 am 5 pro, Monday Saturday
1-800-827-6655
When requesting service or ordering
parts, always provide the following
information:
• Product Type
• Model Number
•
•
Part Number
Part Description
SEAR8
America's Repair Specialists