1
BOSCH
Use & Care Manua_
__Qui_nce
/
Model WFK 2401
Tumble Action
Clothes Washer
m
•
" ° *
'
IMPORTANT SAFETY INSTRUCTIONS
GROUNDING INSTRUCTIONS
2-3
2
ABOUT YOUR WASHER
GETTING TO KNOW YOUR WASHER
BEFORE USING THE FIRST TIME
USING THE FIRST TIME
4
4
4
5
CONTROL PANEL
GEl-rING STARTED
5
5
CYCLE SELECTION CHART, TABLE 1
6
BEFORE WASHING
\
/
Index
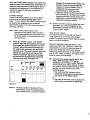
USING THE DISPENSER DRAWER
DETERGENT USE
DISPENSER DRAWER
C)
OPERATION
IMMEDIATE START
DELAYED START
TO INTERRUPT, END OR
CHANGE CYCLE
CYCLE SELECTION
SPIN SPEED SELECTION
ADDITIONAL FUNCTIONS
SPECIAL CYCLES
)!
1
CARE and CLEANING
SERVICE
KEEP
15
10-13
11-12
12
15-16
2O
SELF-HELP, TABLE 4
FACULT CODES, TABLE 5
u
10-14
14-15
17-19
and REPAIR
WARRANTY
8
8
8-9
21-22
22
24
m
THESE
(In case of change
INSTRUCTIONS
FOR FUTURE
of ownership,
should be conveyed
manual
REFERENCE.
with the washer.)
i,,,,, ,
IMPORTANT SAFETY INSTRUCTIONS
WARNING:
To reduce the risk of fire, electric shock, serious injury or death to persons
when using your washer, follow basic precautions, including the following.
1. Bosch washers are provided with two manuals; one Installation Instruction manual
and one Use and Care manual. Read all instructionsbefore using the washer.
2. Do not wash articles that have been previously cleaned in, washed in, soaked in, or
spotted with gasoline, dry cleaning solvents, other flammable, or explosive substances
as they give off vapors that could ignite or explode.
3. Do not add gasoline, dry cleaning solvents, or other flammable, or explosive
substances to the wash water. These substances give off vapors that could ignite or
explode.
4. Under cedain conditions, hydrogen gas may be produced in a hot water system that
has not been used for 2 weeks or more. HYDROGEN GAS I$ EXPLOSIVE. If the hot
water system has not been used for such a pedod, before using a washing machine,
turn on all hot water faucets and let the water flow from each for several minutes. This
•_ will release any accumulated hydrogen gas. As the gas is flammable, do not smoke or
use an open flame during this time.
5. Do not allow children to play on or in the appliance. Close supervision of children is
necessary when the appliance Is used near children.
6. Before the appliance is removed from service or discarded, remove the door and the
power cord/plug.
7. Do not reach into the appliance if the wash drum is moving.
8. Do not install or store this appliance where it will be exposed to the weather.
9. Do not tamper with.the controls.
10. Do not repair or replace any pad of the appliance or attempt any service unless
specifically recommended in the user-maintenance instructions or in published user
repair instructions that you understand and have the skills to carry out.
11. Always be sure to unplug the washer from the electrical supply before attempting any
service. Disconnect the power cord by grasping the plug, not the cord.
12. To reduce the risk of firo, clothes, cleaning rags, mop heads and the like which have
traces of any flammable substance, such as vegetable oil, cooking oil, petroleum
based oils or distillates, waxes, fats, etc., must not be placed in the washer. These
13.
14.
15.
16.
items may contain some flammable substance(s) after laundering, which may smoke
or catch fire by itself.
Do not use chlodne bleach with ammonia or acidic solutions (such as vinegar or rust
removers) in the Same wash load. Hazardous fumes can form.
Do not machine wash fiberglass materials (many curtains and window covedng use
fiberglass materials). Small padicles can remain in the washing machine and stick to
fabrics in subsequent wash loads causing skin irritation.
Do not sit on top of the washer.
To reduce the risk of fire or electrical shock, DO NOT use an extension cord or an
adapter to connect the washer to the electrical power supply.
GROUNDING
INSTRUCTIONS
This appliance must be grounded, in the event of malfunction or breakdown, grounding will
reduce the risk of electric shock by providing a path of least resistance for the electdc
current. This appliance is equipped with a cord having an equipment-grounding conductor
and a grounding plug. The plug must be plugged into an appropriate outlet that is properly
installed and grounded in accordance with all local codes and ordinances.
WARNING Improper connection of the equipment-grounding conductor can result in a dsk
of electdc shock. Check with a qualified electrician or serviceman if you are in doubt as to
whether the washer is propedy grounded.
Do not modify the plug provided with the appliance - if it will not fit in the outlet, have a
proper outlet installed by a qualified electrician.
IMPORTANT SAFETY INSTRUCTIONS (continued)
17.
18.
19.
20.
21.
22.
23.
24.
The washer must only be used for its intended purpose.
Always follow the fabric care instructions recommended by the clothing manufacturer.
Replace worn power cords end/or loose plugs.
Make sure that all water connections to the washer have shut-off valve(s) and that
they are readily accessible. Close the washer water shut-off valve(s) at the end of
each wash day.
Check the fill hose connections on a regular basis to assure that they are tight and not
leaking.
Always read and follow the instructionsof the manufacturer of the detergent(s),
cleaning aid(s), fabdc softener(s) and static eliminator(s), which you are using. Heed
all warnings and precautions.
Store all laundry chemicals and aids in a cool dry place according to the
manufacturer's instructions.
To reduce the risk of poisoning or chemical bums, keep all cleaning products out of
the i'each of children.
25._.D0 not operate the washer with any guards and/or panels removed.
26: -Do not operate the washer with missing or broken parts.
27. Do not bypass any safety devices.
28. Do not operate this washer until you are sure:
a. the washer has been installed according to the INSTALLATION INSTRUCTIONS.
b. all connections for water, drain, electrical power and grounding are in compliance
with all local codes and/or other applicable codes and requirements.
29. Failure to install, maintain and/or operate the washer according to the manufacturer's
instructions may result in conditions which can lead to bodily injury and/or property
damage.
Notes: A. The IMPORTANT SAFEGUARDS and WARNINGS presented in this manual do
not cover all possible conditions that may occur. Common sense, caution and
care must be exercised when installing, maintaining or operating the washer.
B. Always contact your dealer, distributor, service agent or the manufacturer about
any problems or conditions that you do not understand.
SAVE THESE INSTRUCTIONS
ABOUT YOUR WASHER
Congratulations on having selected a Bosch high
efficiency clothes washer, the choice of those that
demand exceptional cleaning performance from their
washer. The Bosch washer offers the following
standard features:
•
Horizontal-Axis, Tumble Action Wash System,
without agitator
•
Stainless Steel Inner and Outer Wash Drums
•
Exceptionally Low Energy and Water
Consumption
Sensotronic Plus -monitors and optimizes the
wash process at every stage.
Internal Heating Element, forTemperature
Boosting, up to 161 "F (71"C)
High Spin Speeds, up to 1,200 rpm, remove
more water from fabrics to reduce drying time
and energy.
4 Fabric and 5 Temperature Settings.
•
•
•
•
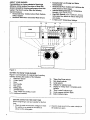
20
19
|
\
17
16
Lr_,-
BOSCH
\_,.
18
tl
ill liR
\
J
J
f
f
f
\
\
\--..
\\
\
\
\
7
8 9 10111213'
14 / j
//
\
15
J
/
/
f
/
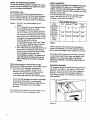
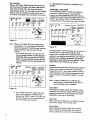
Figure 1.
GETTING TO KNOW YOUR WASHER
Figure 1 is an illustration of a typical Bosch washing
machine showing the location of the following:
1,
Dispenser drawer
2.
Control panel
3.
Door
4.
Door handle
5.
Kick panel
6.
Rating plate
7.
"On/Off" Button
8.
"Start" Button for starting a cycle
9~12. Additional functions
13.
14.
15.
16.
17.
"Delay Start" time selector
Spin speed selector
Cycle selector
Indicator for selected cycle
Display for "Delay Start" / remaining cycle
duration
18.
19.
20.
"Door Locked" indicator light
Cycle progress indicator lights
Button indicator lights
BEFORE USING FOR THE FIRST TIME
Before beginning to use your washer for the first
time:
1. Check to make sure that the voltage on which
the washer is to operate is the same as
shown on the rating plate.
2. Check to make sure that the water valve(s) to
the washer are open.
#'_4
It is recommended that the first wash be run without
laundry, to remove any water left from the factory
tests. To perform this first wash the following steps
should be followed:
1. Check that the shipping bolts have been
removed. Check that water hoses are connected.
Check that drain hose is connected to drain
receptacle. Refer to installation instructions.
2. Open the water valve(s) to the washer.
3. Pull the dispenser drawer out.
4. Pour half a measuring cup of detergent into
compartment II (on the left-hand side). Do not
use a special detergent for delicates or woolens,
as these will create too much foam.
5.
6.
7.
8.
Press the ON/OFF button. The indicator light will
become illuminated and the indicator above the
=Start" button will begin to flash.
Set cycle selector to REGULAR/COTTON (5)
(Power Temp.Boost).
Press the "START" button.
The letters "CL" will be displayed in the
alphanumeric display when cycle ends, press the
"ON/OFF" button to turn machine off.
_,J t*_ i L_
i |_
|
Note: Do Not use liquid chlorine bleach in this
washer.
Turn On the Washer
Press the "ON/OFF" button. The indicator light
will become illuminated and the indicator above
the "START" button will begin to flash.
Select Cycle
Set the cycle selector knob (item 15, figure 1) to
the cycle desired.
Note:
The "Door Locked" indicator light, see Figure 1, item
18, will become illuminated, whenever the door is
locked. The doo_locks automatically when water
enters the machihe and remains securely locked
during running of cycle. Locking of the door Is a
safety feature. Do not attempt to bypass this or any
other safety feature.
_,_ f=,¢_ LI_ I 1,4 _ i i_
Pull the dispenser drawer, see F'_jure 1, out as
far as it wilt go and add detergent and softener as
required. See following section titled USING THE
DISPENSER DRAWER.
Please refer to the CYCLE SELECTION CHART,
Table 1, for description/explanation of the wash
cycles (fabric type/wash temperature combinations)
as well as an explanation of the special cycles. You
will also find, directly to the left of the Cycle Selector
window, see Figure 1, a table giving a short
descdption of the wash temperatures and SPECIAL
CYCLES available.
Select Spin Speed
The spin speed selector (item 14, figure 1) may
be left in the =normal" position, which is straight
up. The washer will then spin at the highest
speed allowed for the cycle selected. See
following section titled SPIN SPEED SELECTION
for detailed explanation of selection possibilities.
GETTING STARTED
Below, in order to get started, you will find a summary
of how to operate the washing machine. Also refer to
the CYCLE SELECTION CHART, Table 1, for tabular
summary, with some typical cycles and steps used in
running the washer. For detailed instructions on
sorting, pre-treating stains see the following section
titled BEFORE WASHING. For detailed instructions
on controls setting see the following section titled
OPERATION.
•
Open Water valve(s)
Check water valve(s) and make sure they are
open.
•
Load
Load the items into the washer.
•
Select Additional Functions (if desired)
See following section titled ADDITIONAL
FUNCTIONS.
Press the "START" Button
The "START" indicator light will become
illuminated and the washer will start. The
alphanumeric display will show the minutes
remaining in the cycle. When the cycle is
complete the letters =CL" appear in the display
and there will be an "END OF CYCLE" signal.
See following section titled ADDITIONAL
FUNCTIONS on information on how to set or turn
off the "END OF CYCLE" signal.
•
Turn Off Washer
Depress the "ON/OFF" button.
•
Close the Water Valve(s)
It is recommended, after completing washing for
the day, that the water valve(s) be closed.
Close Door
Check the door seating area to make sure there
is nothing that will be caught between the door
aod the rubber seal when closing the door. Close
the door by pushing it shut firmly until it snaps
into place with an audible click.
5
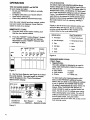
CYCLE SELECTION
type
CHART
Reoom_ndedmax.
load
Wash Cycles
(fabdc type/washtemperature
combinations)
Colorfastand white
cottonand linen
normally lo lightly
_oiled
(e.g.towels,sheets)
soiled
fu11
load
soiled
Non-colorfast
cottonandlinen
3olorfastpermanent
press(e.g. dress
shids/pants,
poly/
cottonblend)
86
9b
additionalrinse
75
normallyto lightly
52
soiled
38
1/2 load
74
Non-colodast
82
permanentpress
rinse
Oeticatesand
knittedfabrics
60
normallytolightly
42
soiled
(eg. silk, curtaias)
1/2 load
Warm
(95=F135_)
soiled
30
61
Cold (Be'F/is=c)
74
48
Rand washables
andwoolens
normallyto lightly
42
5oiled
soiled
_7
3O
52
1/3 load
addilionalrinse
49
withoat! with
IntervalSpin
Special Cyctes
Cotton/Linen
PermanentPress/
Oelicates/Woolens
11 I Rinse/Spin
selectspin
9 I Spin
10 I SoftRinse/Spin
speed or
B ISoftSpin
" 'Soak
19/25
13/19
16/23
nterva Spn
6 I Drain
I
To interrupt,end,or change
1)= Detergent dosing: 1 part for prewash,
2) = The indicated times relate to average
'Additional Functions' or if water inlet
3) = With 'Power Temp 8,ooet' temperature
Table t.
6
X I Reset
3 parts for main wash
load and can be shorter or longer in certain cases (e.g. in combination with other
temperature is below normal). Cycles with Interval Spin take 5-8 minutes longer.
setting.
616
120
2
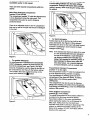
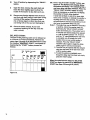
_,ycle|noicator Llgnts
The "Wash" and "Rinse/Spin" lights, referred to as the
Cycle Indicator lights, seP,'e to indicate the part of the
cycle in which, the washer is operating. Refer to
Figure 1 and Figure 2.
Wash
Rinse/Spin DoorLocked
"
"
Machine Wash, Cottons
Machine Wash, Permanent Press
Machine Wash. Delicates
cycleCou_own
I
1
_7
Hand Wash
TEMPERATURES
Start
]Pre-washQUisC_ !un: e iDe'ayStartl
P0wer ,I Hours
Wash
Figure 2.
BEFORE
WASHING
E_7
Cold
'_
Warm
'_
Hot
PREPARE CLOTHES FOR WASHING
•
•
•
•
Check poql_ts and cuffs. Make sure all pockets
are empty. It is also recommend that all pockets
be turned inside out, Also, make sure that nothing
has been caught in the cuffs. A bobby pin, nail or
sharp object in a wash load can cause tears. A
crayon or tube of lipstick in a wash load can
cause stains.
Mend holes and tears Small holes and tears
can become enlarged dudng a wash cycle. Mend
holes and tears before washing.
Zip up zippers and secure all hooks Zippers
and hooks can catch on clothing in a wash load
and tear them.
Check for color fastness Check care label or
immerse a section of the garment in warm or hot
soapy water and then wdng out the water. If the
color bleeds (runs), wash the garment separately
in cold water,
SORT WASH LOAD
The laundry load should be sorted by color, fabric
type, care label and amount of soil. Do not wash
clothes in.washing machine if the care label says "Do
Not Wash or the DO NOT WASH symbol, _t on
the care label. Always follow the care symbols. Some
typical care symbols and their meanings are listed
below:
Refer to the CYCLE SELECTION CHART, Table I,
for more information.
Wash new colored items separately or with similarly
colored items. Always wash flourescent, or bright
colors serarately
LOAD THE WASHER
Mix large and small items in a load to get the best
results. Load the items loosely into the wash drum.
The bulk of the clothes, rather than the weight of the
load will determine the load size. Load sizes will vary.
Small and large items should be washed together to
create a balanced load. Do not hesitate to fill the
entire wash drum of the washer. It is recommended,
for best results, that the drum be loaded, by fabric
type, as follows:
Full Load- Cotton and Linens
Load - Permanent Press, Synthetic Blends and
Poly Knits.
Load - Woolens, Delicates, Silk
The term full load, above, means packing the drum
until it is filled with dry, unfolded clothes, without
packing it tightly. If necessary, use the SOAK cycle,
(7), for heavily soiled items.
USING THE DISPENSER DRAWER
For the best washing result it is important to use the
correct amount of detergent and additives as called
for by the clothing manufacturer,
DETERGENT USE
It is recommended that low sudsing powdered or
liquid detergents be used that have been developed
for use with high efficiency, front-loading washers.
Powdered bleach can also be used in the dispenser.
WATER HARDNESS
Water hardness information will normally be provided
in grains (grains/U.S. gallon) or in PPM (parts per
million), Your local water department or utility or State
Extension Service should be able to advise you of the
hardness of your water.
It is recommended, for reference, that the indicator
arrow in the dispenser be set to show the water
hardness in your area. Sea Table 2.
Table of Water Hardness
Notes: 1. DO NOT use chlodne bleach in this
washer.
2. If it is necessary to use a detergent made
for top loading washers, to avoid
oversudsing, it is recommended that only
1/4 to 1/2 of the amount recommended by
the detergent manufacturer for top loading
washers be used. Using this lesser amount
may e-_ect the cleaning performance. The
first time, start with 114 of the
recommended amount. Then, only if there
is a low level of sudsing and your clothes
are not getting clean, try a little more.
3. One of the features of Sensotronic Plus is
suds sensing. If excessive suds develop
dudng the wash cycle, this will be sensed
and an additional rinse cycle will
automatically be added. This added rinse
cycle will extend the total cycle time and
will be reflected in the Cycle Countdown
display.
When using detergent recommended for high
efficiency, frent-leading washers, use only the amount
recommended by the detergent manufacturer:
•
Use of too much detergent, as with use of
detergent developed for top loading washers,
could result in an oversudsing condition.
Oversudsing will result in a poor-washing result.
Water
Hardness
Soft
Medium
Hard
Very
Hard
Dispenser
Setting
1
2
3
4
Grains per
US Gallon
0-3.5
3.6-7.0
7.1-10.5
10.6+
Parts Per
Million
0-60
61-120
121-180
180+
(PPM)
table 2,
Water should be soft enough to allow detergent to
remove soil effectively. You will find that the clothes
will be whiter and brighter when washed in soft water.
Hard water will not remove soil as well as soft water.
To get clothes clean in hard water use slightly more
detergent. If you have hard water it can also be
softened by installing a mechanical water softener in
your home.
DISPENSER DRAWER
The dispenser drawer is located at the top left front of
the washer, see Figure I and Figure 3. Pull out the
dispenser as far as it will go. Also, upon loading the
dispenser it should be closed carefully (slowly) to
avoid mixing together of the detergent, softener or
other additives.
Use of too little detergent will become noticeable
by a graying of the wash or a not propedy
cleaned appearance; grey/brown stains form on
the wash; scale builds up on the heating
elements.
For smaller loads or less than normal soiling or soft
water reduce the amount of detergent used.
Figure 3.
8
CLEANING section in this manual.
There are three separate compartments within the
drawer:.
to avoid spilling detergent into the fabdc softener
compartment. Detergent wiU thicken fabric softener,
making it gummy, which could clog the tubing within
the washer.
Main Wash Detergent Compartment
(marked "ll"on the left)
The compartment marked "11"holds the detergent that
is to be dispensed dudng the main wash. This
compartment may also be used to dispense
powdered bleach.
There is an adjustable insert in the "I1"compartment
that may be set for the type and amount of detergent
to be used.
Figure 6.
•
For liquid detergents
Pug the insert as far to the front as it will go and
press downwards, See Figure 6. When pressed
downwards the arrow on the insert will angle forward
so that it is positioned to point towards the liquid
detergent symbol L._.
Note:
t
Figure 4.
•
For powder detergents
For small amounts of powdered and concentrated
("ultra') detergents, position the insert towards the
front of the compartment, see Figure 4; for large
amounts of detergent, push the insert to the back of
the compartment, see Figure 5 (the factory setting).
Then position the insert so that the arrow on the
insert points towards the
symbol.
I
Figure 5.
If the delayed start feature is going to be used
it is not recommended that liquid detergents
be used in the dispenser. Liquid detergents
can thicken overtime and eventually clog
tubing if left standing for extended periods, if
liquid detergent is desired when using the
time delay feetum, use a special dispenser,
for liquid detergents, such as a plastic ball.
PrewashlSoak Detergent Compartment
(marked "r' on the right)
The compartment marked "1"holds the detergent that
is to be dispensed during prewash or soaking.
Pour the detergent or soaking agent into the "I"
compartment of the dispenser drawer. If soaking
please refer to the following section titled
OPERATION.
This compartment may also be used to dispense
starch to the washing, see secUon Extra Rinse/Extra
Soft Rinsing (and Starching), under the OPERATION
section of this manual.
Fabric Softener Compartment
(marked _, in the middle)
The middle compartment is where fabric softener to
be added {n the final rinse should be placed.
Place fabdc softener in the center compartment,
before starting the washer. Do not fill beyond the
MAX mark. Adding more than the MAX revel
indicated could result in premature dispensing of the
softener or additive and possible staining of the
fabrics in the washer. DO NOT pour fabric softener
directly on the wash load.
OPERATION
TIPS ON SAVING ENERGY and WATER
To save energy and water.
•
Do not use PREWASH for lightly to normally
soiled items.
•
For tightly soiled items use "QUICK WASH".
•
Soak heavily soiled items.
•
Wash using maximum recommended loads.
Once the water valve(s) have been opened, washer
has been loaded and dispenser drawer filled the
washer is ready to be started.
IMMEDIATE
L
START:
Close the door of the washer making
that the door latches closed.
II.
sure
Press the "ONIOFF" button (Figure 7, below1.
The "ON/Q .FF" indicator light will become
illuminated and the "START" Indicator light
will begin to flash.
CYCLE SELECTION
It is easy to make cycle selections with the Bosch
washer. Simply turn the cycle selector knob to one of
the selections listed on the dial. The washer offers 12
standard wash cycles, combinations of 4 fabric types
and 5 wash temperature settings as well as 6 Special
Cycles. The selections are descriptive of the type of
wash that is to be cleaned or provide special control
features to allow manual operation of the washer in
the modes desired; such as, spinning, soaking or
draining.
Directly to the left of the Cycle Selector window you
will find a table, see Figure 9, that as a reminder,
provides a brief description of the meaning of the
numbers listed on the cycle selector knob:
Special Cycles
Wash Temperatures
11 RinseiSpir_
5 Power Temp Boost
10 Soft Rinse/Spin
4 Temperature Boost
9 Spin
3
Hot
8 Soft Spin
2 Warm
7 Soak
1 Cold
6 Drain
l°:
Figure 9,
STANDARD wAsH CYCLES
L--.
Figure 7.
IlL Use the Cycle Selector, see Figure 8, to select
the cycle desired. The cycle length, In minutes,
will be displayed in the "Cycle Countdown"
alphanumeric display.
.,. _., .= w,= k
I. Io I° Io Io
t
'='
I
I
Additional
Spin Speed
Functions
Selector
Figure 8.
10
_,"
I°_
Cycle
Selector
Knob
4 Fabric Types:
t. RegutadCotton
The cotton settings are intended to be used for
sturdy, hard weadng items made from cotton or
[{nen, such as:
Play clothes
_ Towels
Work clothes
_ Jeans
Sheets
0 T-shirts, etc.
For best results when cleaning heavily soiled
items use the PREWASH additional function.
Refer to the care label on the clothing for settings
to use. th general, the POWER TEMP BOOST
(5) setting is recommended for sturdy whites and
diapers. While TEMPERATURE BOOST (4)
would normally be used for colorfast cotton and
linens. The (3), (21 and (1) settings save energy
when cleaning lightly soiled cotton. The cold (1)
setting is recommended for very bright celoreds
that are lightJysoiled. Using the hottest
temperature safe for the fabric will usually provide
best cleaning results.
A.,
i
t,_e616_,MiJ_is**
i
iw,,A,,_
The Permanent Press settings are intended to be
used with permanent press items and items
made from cotton, synthetic or blended fabdcs
and outer garments, such as:
<) Dress shirts
€ Dress pants
€ Poly/cotton blend clothing
Clothes requiring a special tumble sequence
and spin speed to minimize wrinkling.
,
4,
Delicates
The Delicates settings are intended for use with
delicate easy care items made from cotton,
synthetic or blended fabdcs and curtains. During
these cycles, no spinning takes place between
the rinsing cycles.
Hand Washables
The Hand W_shables settings are intended for
very delicate "easy care items that usually require
hand washing. These cycles have been
specifically designed to provide extremely gentle
treatment of fabrics. All woolens or other, items
marked with the "Hand Wash_symbol, _, on the
care label can be safely washed in this cycle.
5 Wash Temperature Settings
The numbers 5-thru-1 associated with the
STANDARD WASH CYCLES provide a reference to
the wash temperatures available:
Power Terop Boost (5) - 161"F (71"C)
This is the highest temperature setting. The water
temperature is raised to approximately 161"F (71"C).
Temperature Boost (4) - 140"F (6O'C|
Hot (3) - 122"F (50"C)
I
•
I
i
---
_
mlN_|
HOU_
=t,m t#=
°
i
!
i
i
!
tie FI_=
Ltw_am h==l
zwae=
1200
Figure 10.
NORMAL (straight up) Position
The NORMAL position is the straight up position.
When set at the NORMAL position the maximum spin
speed wilt not exceed the values shown in table 3. tt
is possible to set the spin speed to a lower level than
shown in table 3 to limit the speed; for example, in
cases where very delicate items are being washed.
Maximum Spin Speed
Cycle
Normal
1200
INTERVAL SPIN
800
800
800
Oelicates
600
600
Spin & Rinse/Spin
Soft Rinse &
Soft Rinse/Spin
1200
800
800
800
Regular/Cottons
Permanent Press &
Hand Washables
Table 3.
Note:
One of the features of Sensotronlc Plus is
the sensing of unbalanced loads. If
Sensotronic Plus detects an unbalanced load
it will automatically interrupt the spin cycle to
redistribute the clothes. If the load cannot be
distributed evenly, the maximum spin speed
will automatically be reduced.
Warm (2) - 95"F (35"C).
Cold (1) - 60"F (15"C).
Numbers 6-thru-11
The numbers 6-thru-11 are explained below in the
section titled SPECIAL CYCLES.
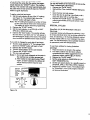
IV. Use the Spin Speed Selector,
to set the speed desired.
L.____
1Nuh
see Figure 10,
Interval Spin
When set for INTERVAL SPIN the wash is spun more
gently and loosened in several stages. In INTERVAL
SPIN cycle, time will be extended for up to 10
minutes. Maximum spin speeds of cycles when spin
is set for INTERVAL SPIN are also shown in Table 3,
above.
SPIN SPEED SELECTION
The spin speed selector knob provides an easy
method of selecting the drum spin speeds, Interval
Spin or No Finat Spin.
11
No Final Spin
When in NO FINAL SPIN the water will not be spun
out at the end of the cycle. The wash is left with the
water from the final dnse. The drum will spin the
wash between dnses, Use this setting to avoid setting
wdnkles, when the clothing cannot be taken out of
the washer immediately upon completion of the cycle.
I_
DoorLod_d
€_bc=_wcv,_
S_=_O/dK
w_ror_wza_,6
4 T*mMri_ _
'Pre-
Q:k:k
i
iRinse
t
P:r
i
JOet,lySt,trt gs_
'= _
i
1200
[
i
No
Inle,'yal
i
_
_
t
z
'
i
i
_
!
E
I
i
i
i
V. Set Additional Functions/see
desired.
Figure 13, If
ADDITIONAL FUNCTIONS
The STANDARD WASH CYCLES are suitable for
most wash conditions that one may encounter,
however, for those special situations there are four
"ADDITIONAL FUNCTION" keys located between the
"START" and "DELAY START HOURS" buttons on
the control panel of the washer, see Figure 13 below.
1000
6OO
Figure 11.
SpinStk_l rpm
"'-
Note: When in NO FINAL SPIN, the washer stops
and displays "CL" in the display, but the door
cannot be opened. To finish the wash load and
enable opening of the door there are two
choices:
1. If you desire the wash to be spun dry: set
the spin speed indicator to speed desired or
INTERVAL SPIN and depress the "START"
button. The wash will then be spun dry and
upon completion the door will be able to be
opened.
*
,--
:ash
i
i
li
,P_u,
!.
i
•
Wash I.
iHours
it
?_zk
11 CaCd
,s=x,_
.o,.
'zw_
I
NoRr,al
1200
l_pkt
11_0
I
i
,
'i
I
The ADDITIONAL FUNCTION keys can be chosen to
be used with the cycle selected with the cycle
selector knob and also can be combined with one
another for use with the selected cycle. The indicator
light above the additional function key will become
illuminated to show that it has been selected. These
ADDITIONAL FUNCTIONS are as follows:
Prewaeh
Recommended for garments that are heavily soiled or
stained, work clothes, overalls, etc. The Prewash
temperature is 30"C. When using Prewash, place ¼
of the detergent in the Prewash compartment of the
dispenser drawer (compartment marked "1", on the
right).
L....
i
*
Figure 13.
400""..___/"_00
m
Note: In order to protect the very delicate and
woolen fibers, Prewash will not function if a
Hand Washable cycle is selected.
SpinSp_drpm
Figure 12.
2. If you desire to have the wash remain wet:
set the cycle selector to DRAIN (6) and
depress the "START" button, The water will
then be pumped from the washer and the
door will be able to be opened.
Quick Wash
If the degree of soiling is light, this function may be
selected to save time and energy. With this function
selected the cycle time for DEUCATES and HAND
WASHABLES will only be 30 minutes.
Rinse Plus
When this button is depressed, an additional rinsing
cycle will
be added to the selected cycle.
Power Wash
Recommended for heavily soiled and or stained
items. Particulady recommended when trying to
remove protein stains. Wash time is extended by
12
drum with POWEER WASH selected. The washer then
displayed in the alphanumeric-disPlay may
therefore change to accommodate the
change in a sensed condition; such as
unbalanced load, excessive suds,
extremely large or small loads, etc.
2. The Bosch washer will often start and stop
white operating as it changes drum rotation
direction and makes various checks and
adjustments to accommodate the load. This
stopping and starting is normal.
heats the water to the selected wash temperature. By
raising the temperature from cold through to the set
temperature all components of the detergent are
activated in stages for best stain removal and
cleaning results.
TYPICAL CYCLES
If there is still some question as to how the Bosch
washer is set for vadous washing duties refer to
Table 1, CYCLE SELECTION CHART and go through
the step by step suggestions and re-read the
OPERATION section. This will usually clear-up any
remaining questions.
Note:
VI.
Water Level: Another aspect of the
Sensotronic Plus system is the load sensor
that will automatically adjust the water level in
the Bosch washer to accommodate the type
and sizd'Of load.
Press the "START"
selected cycle. The cycle indicator lights will
display the cycle that is running and the
"Cycle Countdown" alphanumeric display
will indicate the estimated time remaining
until the cycle ends. See Figure 14.
o
Start
At the end of the cycle the washer will stop,
the letters "CL" will be displayed in the
alphanumedc display and there will be an
"End of Cycle" signal.
"End of Cycle" Signal
The washer leaves the facto_ with the =End Of
Cycle" signal turned on and set to the loudest
position. To reset the "End of Cycle" signal to a lower
level, or turn it off completely:
button. The "START"
indicator light will stop flashing and become
illuminated, the washer will start the "Door
Locked" light will become illuminated and
the washer will continue to the end of the
°:,
VII.
jPr_
1Quick iRi_e
•
IP0wer IDe_Start
i_us WaSh_.o_
_::::_::_::::_:_ _:_:::::_::. i_,_:_::_:_:_
i ,:_::_:_:
• i ."_:_::,
i
Before the beginning or after the end of a cycle
depress and hold in the "PREWASH" button. After
approximately 3 seconds the signal will begin to
sound. The volume level of the sound may be
changed by holding the button in until desired volume
level or "OFF" setting is reached. The setting will be
stored for future use until altered.
VIII. If you have the speed selector set to "NO
FINAL SPIN" the letters "CU' will be
displayed, but the "Door Locked" light will
be on and the door will be locked. To bring
the cycle to the point where the door can be
opened you must perform one of the
following steps:
1. The wash must first be spun out, by
setting the speed selector to the desired
spin speed or "INTERVAL SPIN",
or,
iiiii!i_iiiilii
n
, i
2. The water in the wash must be drained by
setting the cycle selector to DRAIN (6).
Figure 14.
Notes: 1. The Bosch washer's Sensotronic Plus, a
sophisticated sensor technology package,
will constantly monitor, control and optimize
13
IX.
Turn off washer by depressing the "ON/OFF"
button.
X
Open the door, remove the wash load and
leave the door slightly open to allow the
inside of the washer to dry after each use.
XI.
Remove any foreign objects from the drum
seal that may have come to rest there during
running of the washer. Otherwise there is
risk of sharp object or other item that may
rust being left on the seal and damaging it.
Xll.
Close the water valve(s). If you have
completed washing for the day close the
water valve(s)
DELAYED START:
The start of the washing cycle can be delayed up
to 19 hours, in b-hour increments. Perform the
same steps I through V as described above under
the heading "IMMEDIATE START", but instead of
depressing the "START" button proceed as
follows:
On/Off
e
XIII. Press "DELAY START HOURS" button, see
figure 15. The alphanumeric display above
the button will display "lh" indicating that a
one hour delay has been selected. Press the
"DELAY START HOURS" button as many
times as necessary, or hold it in, to display
the number of hours delay desired,
A small dot will flash on and off, in lower dght
hand comer of display, to indicate the washer is
counting down from the set time. The washer
will count down in one-hour increments and will
start once the indicated delay has past.
Notes: 1. The delay time may be altered or cancelled
at anytime, before the washer starts, by
depressing the "DELAY START HOURS"
button and holding it in. Then either hold it
in until the new desired delay time appears
or, until the display passes "19". If held in
past the "19" being displayed the start time
is cancelled and will display the cycle
duration time as soon as the button is
released. Press the "DELAY START
HOURS" button again to begin the delay
setting again in one hour increments.
2. The door may be opened after the delayed
start time has been set to add more wash
until the washer starts.
3. To start the washer immediately even
though the delay start has been set simply
press the =Start" button.
When the cycle ends the steps for DELAYED
START are again the same as for IMMEDIATE
START. See steps VII through Xll, above.
!
Figure 15.
14
simply depress the "ON/OFF" button. The machine
will stop. The machine will restart approximately from
the point where it was tumed off when the "ON/OFF"
button is again depressed.
To end a cycle that has begun:
Set the cycle selector to any of the "X" settings,
see Figure 16. The indicator light above the
"START" button will begin to flash.
Note: The "X" setting that appears a number of times
on the cycle selector knob is the reset position.
This setting is used to reset the programming.
_, Depress the =START" button.
Set the cycle selector to a SPIN (8) or SOFT
SPIN (9) or DRAIN (6) cycle.
_. Depress the "Start" button. The washer will spin
dry and drain or just drain and "CL" will appear in
the alphanumeric display when done. The washer
door can theh be opened and the wash removed.
If you wish to change the cycle after it has begun:
_, Turn the cycle selector to "X" The indicator light
above the "START" button will begin to flash.
Depress the "START" button.
_. Turn the Cycle selector to the cycle desired.
Depress the "START" button.
_. The new cycle will begin.
Notes: 1. Do not add more detergent as the water in
the machine has not been pumped ouL
2. If the washer is interrupted during "Wash',
"Spin', or Drain" selection the clothes will
not be rinsed and there may be soap
residue.
Mte_d
[
You can add clothes to the wash load as long as the
"Wash" indicator light is illuminated.
•
Depress the "On/Off" button.
•
Wait until the "Door Locked" indicator light goes
off.
•
Open the door and add clothes.
•
Close the door by pushing it shut firmly until it
snaps into place with an audible click.
• Depress the "On/Off" button. The machine wig
restart approximately at the point where it was
turned off.
SPECIAL
CYCLES
Rinse/Spin (11) & Soft Rinse/Spin (10) (and
Starching)
A separate rinsing cycle followed by spinning. Used
for rinsing individual items that have been washed by
hand, for starching, or for flushing detergent residue
from the washer after too much detergent has been
used. The Soft Rinse/Spin (10) is specially designed
for permanent press and delicate items.
To use these settings for rinsing (includes
spinning):
1. Place the wash to be rinsed in the washer.
2. Pour fabric softener into the fabric softener
compartment (the middle compartment in the
dispenser drawer, marked _),
if desired.
3. Depress the "On/Off" button.
4. Set the cycle selector to RINSE/SPIN (11) or
SOFT RINSE/SPIN (10).
5. Set the spin speed selector to a specific speed, or
INTERVAL SPIN, or NO FINAL SPIN, if desired.
6. Depress the "START" button. The indicator light
for "Rinse/Spin', in the cycle progress indicator
will become illuminated.
lOOQ
Figure 16.
15
The cycle will end automatically after the spin cycle,
unless NO FINAL SPIN has been selected. If NO
FINAL SPIN was selected, refer to page 12 for
information on how to end the cycle and enable
opening of the door.
To use these settings for starching:
1. Place the washing to be starched into the
washer. The washing should not have been
treated with fabric softener.
2, Dissolve sufficient starch for 4 gallons (15 litres)
of water (being sure to observe the starch
manufacturer's instructions) in a quart (1 litre) of
water.
3.
4.
Depress the "ON/OFF" button.
Set the cycle selector to RINSE/SPIN (11) or
SOFT RINSE/SPIN (10).
5. Set the spin speed selector to a specific speed,
or INTERVAL SPIN, or NO FINAL SPIN.
6. Depress the,."START" button. The indicator light
for "Rinse/Slain", in the cycle progress indicator
will become illuminated and the time of the cycle
will appear in the "Cycle Countdown"
alphanumeric display.
7. When the water begins to flow into the washer,
pull out the dispenser drawer slightly and pour
the starch solution into the prewash compartment
(compartment marked "1", on the right).
8. Close the dispenser drawer.The cycle will end
automatically after the spin cycle, unless NO
FINAL SPIN has been selected, If NO FINAL
SPIN was selected, refer to page 12 for
information on how to end the cycle and enable
opening of the door.
Soft Spin (8) & Spin (9)
These setting selections are used to spin individual
items of laundry. The SOFT SPIN (8) is performed at
a lower speed for permanent press and delicate
items. Maximum spin speeds of different cycles and
for INTERVAL SPIN setting are shown in Table 3,
page 11.
16
7 Soak
The Soak setting is used to pre-treat heavily stained
items:
1. Only items of the same color should be soaked in
a single load.
2. Pour the soaking agent into Prewash
compartment (compartment "1", on the right).
3. Depress the "ON/OFF" button.
4. Set the cycle selector to 7 SOAK.
5. Depress the "START" button. The indicator light
for Washing in the cycle progress indicator will
become illuminated.
The Soak cycle lasts 2 hours. All the water is pumped
out, without a spin. The clothes remain wet. A rinse
cycle can be selected to remove the soak water from
the wash. You may, as well, without soaked clothes
being rinsed first, select desired wash cycle.
6 Drain
The DRAZN setting is used to pump water out of the
washer, without spinning, for example after the NO
FINAL SPIN selection has ended the cycle.
£*e_.,aJ
G_
jWa._Tomp,_'zuaN
__ _l_w_ml
0 S,ae
Rk,
ou_
SIZuww
1"zn_
P.ooa
_,07o,'a_b_ BN_
o_s_,
j2wn
)qoRnal
s_n
_2_
_=n,_ _
i i
n_Q
i t0ee
Sen SF4ed rpm
Figure 17.