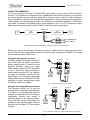
1
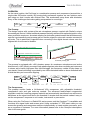
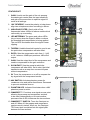
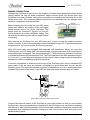
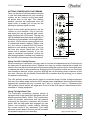
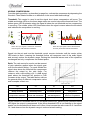
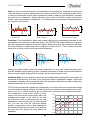
www.radialeng.com
True to the Music
®
PreComp
™
500 Series Preamp and Compressor
User Guide
®
True to the Music
www.radialeng.com
Radial Engineering Ltd.
1588 Kebet Way, Port Coquitlam
British Columbia, Canada, V3C 5M5
tel: 604-942-1001 • fax: 604-942-1010
email: [email protected]
WARNING NOTICE TO USER!
Although preventative safety measures have been designed into Radial 500 series
products we strictly advise against hot-swapping modules or plugging and
unplugging them when the Workhorse or other 500 series racks are powered on.
Hot swapping can cause connection sparks at the card-edge connector that could
send damaging transients to other equipment. This also reduces the life span of the
contacts. Damage due to hot swapping is not covered under warranty. There are no
user serviceable parts inside.
®
True to the Music
Radial PreComp
®
™
500 Series Preamp and
VCA Compressor Channel Strip
Table of Contents
Page
Overview.......................................................................................................................1
Features .......................................................................................................................2
Making Connections .....................................................................................................3
Getting Started .............................................................................................................4
Using the preamp functions ..........................................................................................4
Using the compressor functions ...................................................................................5
Ominiport ......................................................................................................................7
Specifications ...............................................................................................................8
Block Diagram ..............................................................................................................8
Radial Limited Warranty ................................................................................Back Cover
INTRODUCTION
Thank you for purchasing the Radial PreComp, a combination microphone preamp and
compressor designed to fit the more advanced Radial 500 series power racks and earlier
designs made by others. We invested a ton of effort during the development stage to make
the PreComp quick to set up and easy to use so that you can enjoy superb results each and
every time you put it to work. Plug in your favorite microphone, set the Accustate gain control
for maximum signal-to-noise and then engage the compressor for the most effective dynamic
control you have ever encountered!
There are lots of little extras that are built into these fabulous devices. This is where reading
the manual is essential. Please take a few minutes to read through so that you can take full
advantage of the feature set and maximize the performance.
If afterwards you have a question that is not covered herein, please take a minute to consult the
PreComp’s FAQ section on the Radial website. This is where we post questions and answers
from users along with updates. If you still have a question, feel free to send us an email at
[email protected] and we will do our best to answer in short order.
Now get ready to start working faster and smarter than ever before.
Radial Engineering Ltd.
PreComp™ Preamp and VCA Compressor
®
True to the Music
OVERVIEW
As the name implies, the PreComp is a combination preamp and compressor jammed into a
single wide 500 series module. By housing both processors together we can optimize each
gain stage so that it works with minimal fuss. This accelerates setup times and eliminates
many of the challenges that make getting compression to sound right.
MIC
INPUT
MIC
PREAMP
PRE OUT
LINE
OUTPUT
VCA
COMPRESSOR
OMNIPORT
I/O
COMP IN
The Preamp
The design begins with a state-of-the-art microphone preamp coupled with Radial’s unique
Accustate gain control. Unlike traditional preamps that only achieve their optimal signal-to-noise
when pushed to maximum, Accustate employs a dual wafer potentiometer that simultaneously
sets the input sensitivity and preamp gain so that the signal-to-noise ratio remains constant at
all levels. This is particularly important when recording in the digital domain where even the
slightest bit of noise can be audible.
MAXIMUM GAIN - WIDE SIGNAL-TO-NOISE RATIO
MINIMUM GAIN - NARROW SIGNAL-TO-NOISE RATIO
NOISE FLOOR
Traditional preamp gain
Accustate preamp gain
The preamp is equipped with +48V phantom power for condenser microphones and active
direct boxes, a 180° polarity reverse to help phase align two mics when recording an instrument
in stereo and a handy high-pass filter that eliminates low frequency rumble to help clean up
your tracks. Visual monitoring is provided by two LEDs that show below or above threshold and
a third that lets you know when clipping.
MIC
INPUT
+48
VOLTS
PREAMP
180°
REV
MIC
PREAMP
HI-PASS
FILTER
ACCUSTATE
GAIN
VCA
COMPRESSOR
OUTPUT
GAIN
LINE
OUTPUT
COMPRESSOR
The Compressor
The preamp section feeds a full-featured VCA compressor with adjustable threshold,
compression ratio and gain make-up controls. The advanced feed-forward compression
algorithm reads the incoming program material and automatically transitions from soft-knee to
hard-knee as the signal rises above the threshold. A simple slow-fast switch makes it easy to
set the compressor’s response to suit vocals, instruments or percussion.
When using the PreComp in a Radial 500 series power rack the Omniport™ is available and
functions as a signal insert and access point. Using a standard ¼” TRS insert cable you can
access the preamp and compressor sections independently or insert another processor, such
as an equalizer in between. For more information please refer to the Omniport descriptions
later in this user guide.
Radial Engineering Ltd.
1
PreComp™ Preamp and VCA Compressor
®
True to the Music
FEATURE SET
1. GAIN: Used to set the gain of the mic preamp.
Accustate gain control sets the input sensitivity
and gain at the same time to optimize signal to
noise at all settings.
1
2. 180° REVERSE: Inverts the polarity to help phase
align two microphones when recording in stereo.
2
3. HIGH-PASS FILTER: Gently rolls-off low
frequencies below 100Hz to reduce rumble which
can muddy up a recording.
4
3
4. LED METERING: The green and yellow LEDs
let you know when the signal is below or above
the threshold and compression is being applied.
The red LED illuminates when the signal is near
clipping.
5
6
5. THRESH: Variable threshold control is used to set
the point when compression will take effect.
7
6. RATIO: Sets the compression ratio from 1:1 (off)
to 10:1 where a 10dB input produces 1dB at the
output.
8
9
7. GAIN: Sets the output level of the compressor and
used to compensate for the gain reduction.
11
8. SLOW-FAST: Sets the speed at which the
compressor will take effect. Set to slow, the initial
transient such as a snap from a snare will pass
without compression.
12
9. IN: Turns the compressor on or off to compare the
dry signal with the compressed results.
10
13
10. 48V SWITCH: Activates phantom power for
condenser mics and active direct boxes. Recessed
to prevent accidental turn-on.
11. PHANTOM LED: Indicator illuminates when +48V
phantom power is active
12. OMNIPORT™: Functions as a signal access point
allowing the preamp and compressor sections
to be used independently or to insert another
processor like an EQ in between the two sections.
13. OMNIPORT™ SWITCH: Turns the Omniport on
and off. When off, the preamp and compressor
sections work in series. When on, the Omniport
TRS insert jack is switched into the signal path
between the two sections.
Radial Engineering Ltd.
2
PreComp™ Preamp and VCA Compressor
®
True to the Music
MAKING CONNECTIONS
Although the PreComp is easy to use, we suggest you follow these simple instructions before
getting started. As with all audio equipment, always ensure levels are turned down and
equipment is turned off before making any connections or inserting the PreComp into a 500
series power rack. This common practice ensures turn-on transients will not damage more
sensitive components such as tweeters.
Before inserting the PreComp into your 500 series
power rack observe the setting of the mini-toggle
switch located next to the 15-pin card-edge. This
switch turns the Omniport™ function on and off.
During initial set up use the ‘NORMAL’ setting. This
will turn the Omniport function off and simplify setup
and testing.
INSERT
OMNIPORT ON
NORMAL
OMNIPORT OFF
After inserting the PreComp into your 500 series rack, secure it using the supplied machine
screws to ensure it does not accidentally become dislodged during use. To prevent damage to
the power rack, do not over-tighten the mounting screws.
Most 500 series racks are equipped with balanced XLR connectors. When you insert the
PreComp into your 500 series rack it will automatically route the rear panel XLR connections to
the module’s input and output. This is augmented with ¼” TRS connectors if using the PreComp
in a Radial Workhorse 500 series power rack. The PreComp follows the AES standard with pin2 (+) hot, pin-3 (-) cold. Most devices are wired this way but older vintage equipment should be
checked to confirm compatibility with AES standards.
Connect a microphone or direct box to the input of the PreComp input using a standard XLR
patch cable. If you are using a condenser microphone or active direct box, turn on the 48V
phantom power. The switch is recessed to prevent accidental turn on. Use a small screw driver
or paper clip to push in the switch. A red LED will illuminate when phantom power is active.
CARD SLOT 1
INPUT
FEED
OFF
OUTPUT
LINK
OFF
OMNIPORT
1
OUTPUT
INPUT
REAR PANEL MIC INPUT AND LINE OUTPUT
Connect the line-level output of the PreComp to your audio system so that you can audition
the PreComp. We recommend that you first listen to the PreComp on its own before combining
with effects or other signal processors until you have had a chance to familiarize yourself with
the preamp and compressor functions. Using your own voice to test is best as it gives you a
familiar starting place.
Radial Engineering Ltd.
3
PreComp™ Preamp and VCA Compressor
®
True to the Music
GAIN
GETTING STARTED WITH THE PREAMP
Once you have the PreComp safely mounted
in your rack and patched into your recording
system, set the controls on the front panel
as shown here on the right. This ‘starting
position’ removes the compressor from the
signal chain to enable you to first set the
preamp to optimize signal-to-noise.
Minimum
MAX
ABOVE
MIN
BELOW
Off (out)
100Hz
RATIO
THRSH
Power on the audio system and turn up the
volume on your monitors. Plug in your mic
and slowly turn up the preamp gain control
while observing the LED meter. The top red
LED illuminates when the signal is clipping. If
it flashes on signal peaks, turn the gain down
by about 10% to ensure a strong signal level
is maintained without clipping. Always test
at a low volume to ensure the PreComp is
patched in and working correctly. If you do
not hear any sound, check that your 500
series rack is patched correctly. If you are
using a condenser microphone, ensure the
48V phantom power is turned on by checking
the red LED at the bottom of the front panel.
Off (out)
180º
-10
0dB
-20
+10
2:1
5:1
0dB
1:1
1:1
10:1
GAIN
0
0dB
-20
+20
SLOW
Slow (out)
FAST
Bypass (out)
IN
STARTING POSITION
Using The 180° Polarity Reverse
When recording an instrument, you may want to use two microphones and two PreComps at
the same time to capture the sound. Together, the mics can create a timbre that a single mic
cannot. One may be positioned near the instrument while the second may be set further away
to capture the room’s natural ambiance. Engaging the 180º polarity reverse on one PreComp
can sometimes achieve a fuller sound by aligning the low frequency phase response of the
two mics. (Devices like the Radial Phazer take this to another level by allowing you to adjust
the phase incrementally.)
The 180º polarity reverse can also be used to correct the phase of older vintage equipment
that may have been made before the AES standard was established. Most equipment today
employs the standard with pin-1 ground, pin-2 hot (+), and pin-3 cold (-). Depressing the
180º polarity reverse switch will toggle pins 2 and 3 at the XLR input to compensate for nonstandard or vintage equipment.
Using The High-Pass Filter
The PreComp’s microphone preamp section is
equipped with a high-pass filter that gently rolls off
bass frequencies below 100Hz. This is particularly
useful for acoustic instruments that can produce
excessive low frequency resonance like acoustic
guitar. With the high-pass filter engaged you can
reduce low frequency rumble without affecting
the overall sound of the instrument. This helps
eliminate excess bass in the mix and will increase
the dynamic range of your recording.
Radial Engineering Ltd.
4
+10
+5
+0
-5
-10
-15
-20
20
50
100
200
500
1k
2k
5k
10k
20k
Hz
High-pass filter response
PreComp™ Preamp and VCA Compressor
®
True to the Music
ADDING COMPRESSION
From the starting position, as described on page four, activate the compressor by depressing the
IN switch. There should be little or no difference in the sound with these settings.
BELOW
ABOVE
+10dB -
+10dB -
THRESHOLD LEVEL
0dB -
BELOW
ABOVE
Threshold: This control is used to set the signal level where compression will occur. The
middle and bottom LEDs on the three stage meter are used to help set the threshold level. The
bottom green LED illuminates when the signal is below the set threshold and no compression
is occurring. The middle yellow LED illuminates when the signal crosses above the threshold
and indicates the compressor is working.
0dB -
-10dB 0dB
-20
+10
THRSH
THRSH
-10dB -10
When the input signal is below the threshold
level the green LED indicator illuminates.
-10
0dB
-20
+10
THRESHOLD LEVEL
When the input signal is above the threshold
level the yellow LED indicator illuminates.
Speak into the mic and turn the threshold control counter clockwise until the center yellow
LED starts to flash. Lowering the threshold further will compress most of the audio signal
and severely reduce the dynamic range. Raising the threshold leaves most of the dynamics
unchanged and only compresses the loudest peaks.
Ratio: The ratio control is used to set the amount
of gain reduction applied when the signal goes
over the threshold setting. For each decibel the
signal rises above the threshold the compressor
reduces the output by the ratio factor. For
instance, with a ratio setting of 4:1 a 4dB signal
peak above the threshold will produce a 1dB
increase at the output. The table below outlines
the general effect of different compression ratios
and examples of their use.
1.2:1
2:1
5:1
10:1
Slight
Moderate
Significant
Heavy
Mostly unnoticed
Smooth dynamics
Controlled dynamics
No dynamics
Used for master bus
compression and music
Used to smooth out
vocals and instruments
Used for instruments
with wide dynamics
Highly compressed with
narrow or no dynamics
Music program playback
Ballad vocals & strings
Slap bass & percussion
Sound effects, Announce
Set the control to a moderate ratio of 2:1 and speak into the mic. Each time the yellow threshold
LED lights the output is compressed. If the yellow threshold LED is not flashing on the signal
peaks, turn the threshold level down until it does. Now increase the ratio control to 5:1 and then
10:1 and observe how the dynamic range is reduced at each setting.
Radial Engineering Ltd.
5
PreComp™ Preamp and VCA Compressor
®
True to the Music
Gain: As you increase the amount of compression by lowering the threshold or raising the
ratio, the dynamic range is reduced and less output is produced. The compressor gain control
is used to compensate for this and is sometimes called a ‘make-up’ gain because it replaces
the gain lost in compression. Simply adjust the gain control to bring the output level back to
where it was before adding compression. Try comparing the pre and post compressed effect
by using the in/out switch.
+10dB -
+10dB -
0dB -
0dB -
0dB -
-10dB -
-10dB -
-10dB -
Before compression: signal is
over threshold.
+10dB -
After compression: dynamic
range is reduced.
Output gain compensates for
reduced dynamic range.
Fast/Slow: The compressor’s attack and release settings are automatically adjusted in real
time based on the dynamics of the input signal. The FAST/SLOW switch allows you to choose
how the compressor responds to the input signal. When set to slow, the compressor will allow
the initial transient to pass before the compression effect kicks in. This is often used with
singers for a natural vocal sound with smooth dynamics.
SLOW ATTACK
FAST ATTACK
RESULT
Setting the speed control to fast will cause compression to occur the instant the signal goes
over the threshold. A fast setting is often used with percussion to make sure the initial transient
does not cause digital clipping at the recorder. Set the speed control to suit.
Soft/Hard-Knee: For the most part, there are two fundamental compression curves known as
hard-knee and soft-knee. The knee is the pivot point where compression begins. Hard-knee
compression abruptly affects transients above the threshold while soft-knee sets in before the
threshold and does so in a smoother fashion.
The PreComp dynamically adjusts the compression curve from soft-knee to hard-knee based
on the incoming program material. At lower levels the compressor automatically uses a softknee curve for a natural rendering but as peaks are encountered and dynamics increase,
the compression curve pivots toward a hard+10dB
knee curve ensuring the output stays within the
SOFT
0dB
predetermined range. In the chart to the right
the soft-knee curve is represented by the long
THRESHOLD
-10dB
dashed line, the hard-knee by the short dashed
-20dB
line. You can see how the soft-knee applies
gradual compression as the signal approaches
-30dB
the threshold while the hard-knee curve reduces
HARD
-40dB
the gain once the signal has gone above the
threshold.
-50dB
Radial Engineering Ltd.
6
PreComp™ Preamp and VCA Compressor
®
True to the Music
USING THE OMNIPORT™
If you are using the PreComp in a Radial 500 series power rack you can use the Omniport
function. The Omniport is configured as an unbalanced insert point that gives you access to
the signal between the preamp and compressor. It allows you to insert an audio processor,
like an equalizer, in between the preamp and compressor or use the preamp and compressor
independently, as if two separate modules. The Omniport is used with a standard ¼” TRS insert
type cable to connect the preamp output and compressor input. The TIP carries the output
signal from the preamp section and the RING is the input to the compressor.
OMNIPORT I/O
XLR
IN
MIC
PREAMP
VCA
COMPRESSOR
XLR
OUT
¼” TRS
¼” TS
TIP: PREAMP OUT
RING: COMP IN
Standard unbalanced studio INSERT cable used with PreComp Omniport.
Before you can use the Omniport it must be turned on. Power down the rack and remove the
module. Set the mini-toggle switch located next to the 15-pin card-edge to ‘INSERT’. Re-install
the module and power up the rack.
Using the Omniport as an insert
Inserting another 500 series module is
quick and easy as Radial Workhorse
power racks provide ¼” jacks for cross
patching modules. Using your insert
cable, simply connect the TIP and RING
to the ¼” input and output provided on
each module card slot I/O. It is common
to insert an equalizer module like the
Radial Q4 but you can also insert guitar
effect pedals using the Radial EXTC 500
modules or even a spring reverb using
the Radial TankDriver module.
PRECOMP
EQ
CARD SLOT 1
CARD SLOT 1
INPUT
INPUT
FEED
FEED
OFF
OFF
OUTPUT
OUTPUT
LINK
LINK
OFF
OFF
OMNIPORT
OMNIPORT
1
1
INPUT
NPU
OUTPUT
INPUT
TIP
RING
OUTPUT
Fig-a: Using the Omniport as an insert
Using as two independent processors
The Omniport allows you to use the
preamp and compressor independently.
For instance, you can patch the output of
another mic preamp into the PreComp’s
compressor section and output a
balanced signal to the recorder (fig-b).
You could also use the PreComp’s mic
preamp to start another signal chain by
patching the Omniport TIP into another
module.
MIC-PRE #2
PRECOMP
CARD SLOT 1
CARD SLOT 1
INPUT
INPUT
FEED
FEED
OFF
OFF
OUTPUT
OUTPUT
LINK
LINK
OFF
OFF
OMNIPORT
OMNIPORT
1
1
INPUT
NPU
INPUT
RING
OUTPUT
TIP
OUTPUT
Fig-b: Using the compressor section with another mic preamp.
Radial Engineering Ltd.
7
PreComp™ Preamp and VCA Compressor
®
True to the Music
RADIAL PRECOMP 500 SPECIFICATIONS*
Preamp circuit type: .....................................Accustate input with variable gain front end.
Compressor circuit type: ..............................Feed forward VCA compressor with true RMS sidechain.
Frequency response: ...................................20Hz ~ 20kHz (-1.5dB @ 20Hz)
Total harmonic distortion:.............................<0.003%
Dynamic range: ...........................................112dB
Input impedance: .........................................3.3kOhms
Maximum input: ...........................................+24dBu
Maximum gain: ............................................55dB
Make up gain: ..............................................Up to +25dB
Output impedance: ......................................300 Ohms
Equivalent input noise: ................................-120dBu
Noise floor: ..................................................-85dB @ +40dB of gain
Intermodulation distortion: ...........................0.03%
LED Meter: ..................................................Below threshold (green), above threshold (amber), over load (red)
Omniport Function: ......................................Insert point - Tip: Preamp output / Ring: Compressor input
Power requirement: .....................................56mA
XLR Configuration: ......................................Follows AES spec: pin-1 ground, pin-2 (+), pin-3 (-)
Size:.............................................................5.25” x 1.5” x 6.6” (13.34 x 3.81 x 16.75cm)
Standard 500 series rack format
Weight: ........................................................1.5lbs (0.7Kg)
Warranty: .....................................................3 Years, transferable
BLOCK DIAGRAM
OMNI RING (RECEIVE)
ACCUSTATE
GAIN
REAR
PANEL
INPUT
PHANTOM
POWER
PHASE
REVERSE
MIC
PREAMP
OMNI TIP (SEND)
OMNIPORT
UNBALANCED
INSERT
HIGH
PASS
FILTER
REAR MINI-TOGGLE
OUT+
IN/BYPASS
RMS
DETECT
/THRSH
SIDE CHAIN
Radial Engineering Ltd.
RATIO
CONTROL
MAKEUP
GAIN
BELOW
ABOVE
LED METER
PHASE
INVERTER
BUSS
OUTPUT
O/D
LED
8
OUTREAR PANEL OUTPUT
SPEED
FAST/
SLOW
VOLTAGE
CONTROLLED
AMPLIFER
PreComp™ Preamp and VCA Compressor
THREE YEAR TRANSFERABLE LIMITED WARRANTY
RADIAL ENGINEERING LTD. (“Radial”) warrants this product to be free
from defects in material and workmanship and will remedy any such defects free of charge according to the terms of this warranty. Radial will
repair or replace (at its option) any defective component(s) of this product
(excluding finish and wear and tear on components under normal use) for
a period of three (3) years from the original date of purchase. In the event
that a particular product is no longer available, Radial reserves the right
to replace the product with a similar product of equal or greater value. In
the unlikely event that a defect is uncovered, please call 604-942-1001
or email [email protected] to obtain an RA number (Return Authorization number) before the 3 year warranty period expires. The product
must be returned prepaid in the original shipping container (or equivalent)
to Radial or to an authorized Radial repair center and you must assume
the risk of loss or damage. A copy of the original invoice showing date of
purchase and the dealer name must accompany any request for work to
be performed under this limited and transferable warranty. This warranty
shall not apply if the product has been damaged due to abuse, misuse,
misapplication, accident or as a result of service or modification by any
other than an authorized Radial repair center.
THERE ARE NO EXPRESSED WARRANTIES OTHER THAN THOSE
ON THE FACE HEREOF AND DESCRIBED ABOVE. NO WARRANTIES
WHETHER EXPRESSED OR IMPLIED, INCLUDING BUT NOT LIMITED TO, ANY IMPLIED WARRANTIES OF MERCHANTABILITY OR FITNESS FOR A PARTICULAR PURPOSE SHALL EXTEND BEYOND THE
RESPECTIVE WARRANTY PERIOD DESCRIBED ABOVE OF THREE
YEARS. RADIAL SHALL NOT BE RESPONSIBLE OR LIABLE FOR ANY
SPECIAL, INCIDENTAL OR CONSEQUENTIAL DAMAGES OR LOSS
ARISING FROM THE USE OF THIS PRODUCT. THIS WARRANTY
GIVES YOU SPECIFIC LEGAL RIGHTS, AND YOU MAY ALSO HAVE
OTHER RIGHTS, WHICH MAY VARY DEPENDING ON WHERE YOU
LIVE AND WHERE THE PRODUCT WAS PURCHASED.
!
This product is intended for professional use only.
The user should be familiar and experienced with
the 500 series rack and module format.
www.radialeng.com
Radial Engineering Ltd.
1588 Kebet Way, Port Coquitlam BC V3C 5M5
tel: 604-942-1001 • fax: 604-942-1010
[email protected] • www.radialeng.com
Radial® PreComp™ User Guide - Part# R870 1253 00 • rev.1
Specifications and appearance are subject to change without notice.