1
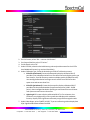
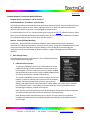
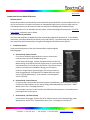
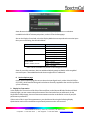
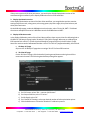
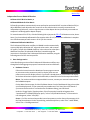
EIZO Monitor CalMAN Setup Guide CalMAN Display Calibration Software can automatically create optimized calibration 1D or 3D LUTs for EIZO monitors equipped with a self-calibration sensor. CalMAN controls the EIZO monitor’s internal calibration sensor and test patterns to create a custom LUT file, optimized to calibrate the EIZO monitor to the selected performance standard. CalMAN then automatically loads the custom LUT file into the EIZO monitor in one of the monitors’ Cal1, Cal2, or Cal3 Display Mode selections. 3D LUT or 1D LUT & Color Matrix CG222W, CG223W, CG232W, CG242W, CG243W, CG245W, CG246, CG275W, CG276, CS230*, CX240*, CX247*, CX270*, CX277* *3D or 1D LUT available only with Eizo ColorNavigator license For the EIZO ColorEdge monitors above, CalMAN can load a 3D cube LUT file into the monitor to calibrate the monitor’s luminance and color throughout its entire 3D color space. Or, CalMAN can load a 1D RGB LUT file into the monitor and adjust its color matrix to calibrate the monitor’s gamma and grayscale plus its color gamut. Note: The above monitors can be calibrated with either a 3D LUT or a 1D LUT, but not both. 1D LUT & Color Matrix CG210, CE210W, CG211, CG220, CG221, CE240W, CG241W, CG301W, CG303W CS230*, CX240*, CX241*, CX270*, CX271* *1D LUT available only with Eizo ColorNavigator license For the EIZO ColorEdge monitors above, CalMAN can load a 1D RGB LUT file into the monitor and adjust its color matrix to calibrate the monitor’s gamma and grayscale plus its color gamut. RGB Gains & Color Matrix CS230*, CX240*, CX270* *without Eizo ColorNavigator license For the EIZO ColorEdge monitors above, CalMAN can adjust the monitor’s RGB Gains and its color matrix to calibrate the monitor’s grayscale and color gamut. Required CalMAN Software Version: Version 5.4.0 or newer Version 5.4.1 or newer for CG247, CG277, CX241, CX271 Required CalMAN Workflow: 3D LUT: Color Cube (3D LUT) 1D LUT & Color Matrix: Monitor - Direct (EIZO/HP) 1D LUT & Color Matrix (standalone mode): Si Advanced Calibration 17544 Midvale Avenue N., Suite 100, Shoreline, WA 98133 USA C orporate: +1 206 420 7514 | Tech Support: +1 206 457 8949 | www.spectracal.com EIZO Monitor Control Connection: USB Connect your EIZO monitor to the CalMAN computer with a USB cable. No USB driver required EIZO Monitor Connection Modes An Eizo monitor may normally be connected to its signal source in one of two basic modes. The monitor’s normal connection mode determines the optimum calibration method to use in the following sections. The two connection modes are: Graphics Adapter Connection Mode - Connected to a computer’s standard graphics adapter output. Independent Source Mode - Connected to another signal source (e.g. signal router, video adapter device, etc.). Calibration Procedure Selection Click on one of the links below to jump to the desired calibration procedure for an Eizo monitor that is connected either to a computer’s standard graphics adapter output or to an independent signal source. Graphics Adapter Connection Mode Calibration Calibrate 3D LUT - Color Cube (3D LUT) workflow Calibrate 1D LUT & Color Matrix - Monitor - Direct (EIZO/HP) workflow Calibrate RGB Gains & Color Matrix - Monitor - Direct (EIZO/HP) workflow Independent Source Mode Calibration Calibrate 3D LUT - Color Cube (3D LUT) workflow Calibrate 1D LUT & Color Matrix - SI Advanced Calibration workflow Calibrate RGB Gains & Color Matrix - SI Advanced Calibration workflow 17544 Midvale Avenue N., Suite 100, Shoreline, WA 98133 USA C orporate: +1 206 420 7514 | Tech Support: +1 206 457 8949 | www.spectracal.com Back to Top Graphics Adapter Connection Mode Calibration Calibrate 3D LUT Follow this procedure to automatically create and load an optimized 3D LUT monitor calibration file into an EIZO monitor that is normally connected to a computer’s standard graphics adapter output. To instead create a 1D LUT and ICC Profile, click the following link to jump to the 1D LUT & Color Matrix calibration section, below. Color Cube (3D LUT) Workflow The Color Cube workflow in CalMAN is used to create display calibration 3D cube LUTs. In the CalMAN main menu, select Open Workflow Template / Color Cube (3D LUT). Proceed through the instructions in each step of the Color Cube workflow, using the following notes for EIZO monitor specifics. 1. Initial Setup section In the Initial Setup section of the Color Cube workflow, step through the following pages: a. Session Setup - Meter Connect For monitors without a supported built-in meter, connect your external color meter to the CalMAN computer. On the Session Setup page, click the Find Meter button. On the Find Meters dialog, select either your Eizo display meter, or your externally connected meter if it is listed, then click Search. If your external color meter is not listed on the Find Meters dialog, just click Search. Under the Target Display Type drop down, if the Eizo monitor has wide color gamut that “reproduces 97% of Adobe RGB color space,” select “LCD (LED Wide Gamut).” If the monitor is not wide gamut, select “LCD (LED).” b. Session Setup - Source Connect For Eizo monitors that provide internal test patterns (listed above), on the Session Setup page, click the Find Source button. On the Source dialog, under Manufacturer, select “Eizo.” Under Model, select “Eizo – ColorEdge monitors.” Note: The internal test patterns cannot be used on an Eizo monitor that is being used a workstation’s primary display. For cases where you can’t or don’t wish to use EIZO internal test patterns, use CalMAN Client 3 or a hardware test pattern generator as the source. c. Session Setup - LUT Device Setup On the Session Setup page, click the Find 3D LUT Device button. On the Display dialog, under Manufacturer, select “Eizo.” Under Model, select “Eizo – ColorEdge monitors 3D LUT.” 17544 Midvale Avenue N., Suite 100, Shoreline, WA 98133 USA C orporate: +1 206 420 7514 | Tech Support: +1 206 457 8949 | www.spectracal.com Note: Because the Eizo monitors have only one 3D LUT per input, there are no selections available in the 3D LUT Memory drop down, on the LUT Device Setup page. Also on the Display Control tab, select the Display Mode that corresponds to the monitor input that you are calibrating. See the table below: Eizo Monitor CG222W, CG232W, CG242W CG223W, CG243W, CG245W CG275W CG246, CG276 CS230*, CX240*, CX270* Display Mode Cal – for all inputs CAL1 – for DVI-1 CAL2 – for DVI-2 CAL3 – for DisplayPort CAL1 – for DVI CAL2 – for DisplayPort-1 CAL3 – for DisplayPort-2 CAL1 – for DVI CAL2 – for DisplayPort CAL3 – for HDMI *3D or 1D LUT available only with Eizo ColorNavigator license Note: On some Eizo monitors, there are additional display modes available, which are global across all inputs. These additional modes do not support 3D LUT calibration. d. Session Options page On the Session Options page, be sure to select the Input Signal Levels, either Video (16-235) or PC (0-255), which matches the signal levels that are normally supplied to the monitor input that you are calibrating. 2. Display Pre-Test section In the Display Pre-Test section of the Color Cube workflow, you can measure the performance of a display before you calibrate it, on the Gamma & ColorChecker page and on the Advanced Linearity page. On the Performance Analysis page, these monitor measurements are then evaluated in a series of pass/fail performance parameters. If the monitor fails in any of these parameters, you should consider using the following Display Optimization section of the workflow to optimize adjustments on the monitor itself. 17544 Midvale Avenue N., Suite 100, Shoreline, WA 98133 USA C orporate: +1 206 420 7514 | Tech Support: +1 206 457 8949 | www.spectracal.com If the monitor passes all of these parameters, you can skip the Display Optimization section of the workflow and go immediately to the Display Calibration section of the workflow. 3. Display Optimization section In the Display Optimization section of the Color Cube workflow, you are guided to optimize monitor settings for picture mode, color gamut, color temp, gamma, dynamic range, white point balance, and white point luminance. On the RGB Adjust page, under the RGB Adjust Levels selection, select “2 Point 30, 100%.” Click Read Continuous and adjust the monitor’s RGB Gain controls for RGB balance at 100%. 4. Display Calibration section In the Display Calibration section of the Color Cube workflow, there are provisions for calibrating both a 1D RGB LUT (1D Ramp LUT page) and a 3D cube LUT (3D Cube LUT page). When we are calibrating an EIZO monitor with a 3D LUT, we will skip the 1D Ramp LUT page (1D RGB LUT) and use only the 3D Cube LUT page. Note: Eizo monitors can be calibrated with either a 1D LUT or a 3D LUT (supported models), but not both. a. 1D Ramp LUT page Skip over the 1D Ramp LUT page when creating a 3D LUT file for an EIZO monitor. b. 3D Cube LUT page 1. On the 3D Cube LUT page, click the AutoCal (rotating arrows) button at the right end of the meter action buttons. The AutoCal Setup dialog then appears (see below). 17544 Midvale Avenue N., Suite 100, Shoreline, WA 98133 USA C orporate: +1 206 420 7514 | Tech Support: +1 206 457 8949 | www.spectracal.com 2. 3. 4. 5. For File Format, select “3DL – common .3dl formats.” For Output Cube Size, select “17 Points.” For Bit Depth, select “16.” Under File Path, select the desired directory path and provide a name for the LUT file that CalMAN will create (e.g. monitor ID and date). 6. Under Calibration Type, select the desired type of 3D LUT calibration process. IR Profile (time based): Creates the best quality display calibration 3D LUT possible in the selected period of time. You select how much display quality you have time for, from 30 minutes to maximum display quality (6,000 points max). Uses Intelligent Resolution Profiling to search out the most nonlinear color space areas and correct those first. IR Profile (point based): Creates the best quality display calibration 3D LUT possible with the selected number of measurement points (1,000 - 10,000 points). Uses Intelligent Resolution Profiling to search out the most nonlinear color space areas and correct those first. Lightning LUT: Creates a display calibration 3D LUT in five minutes or less. Produces a very high quality result on professional displays with moderate linearity. Displays with significant nonlinearity may produce marginal results. 7. Under Video Range, select “SMPTE (16-235)” if you are calibrating a video display that clips signal values above reference white. 17544 Midvale Avenue N., Suite 100, Shoreline, WA 98133 USA C orporate: +1 206 420 7514 | Tech Support: +1 206 457 8949 | www.spectracal.com 8. Click OK. Upon completion of the AutoCal 3D hardware LUT calibration process, CalMAN automatically loads the optimized 17x17x17 LUT calibration data into the EIZO monitor. Note: Once an optimized 3D LUT has been loaded into an Eizo monitor, there is no need for, or advantage to, creating an ICC profile for the monitor. 5. Display Validation section When the cube calibration completes, CalMAN automatically loads the optimized 17x17x17 LUT calibration data into the EIZO monitor. You can test the performance of the monitor, in the Display Validation section of the Color Cube workflow, to verify the accuracy of the monitor when using the 3D calibration LUT. You can switch back to the Gamma & ColorChecker Pre-Test page to compare to the pre-calibration performance. DONE – You are done with the 3D LUT monitor calibration for an EIZO monitor that is normally connected to a computer’s standard graphics adapter output. 17544 Midvale Avenue N., Suite 100, Shoreline, WA 98133 USA C orporate: +1 206 420 7514 | Tech Support: +1 206 457 8949 | www.spectracal.com Back to Top Graphics Adapter Connection Mode Calibration Calibrate 1D LUT, Color Matrix, and ICC Profile, or Calibrate RGB Gains, Color Matrix, and ICC Profile Follow this procedure to automatically create and load an optimized 1D LUT monitor calibration file (or adjust RGB Gains), adjust the color matrix, and then create an ICC profile for an Eizo monitor that is normally connected to a computer’s standard graphics adapter output. To instead create a 3D LUT file, click the following link to jump to the 3D LUT calibration section, above. Note: If you have already calibrated the Eizo monitor with a 3D LUT, the monitor calibration is complete. You should not attempt to also create a 1D LUT for the monitor. Monitor - Direct (EIZO/HP) Workflow The Monitor - Direct (EIZO/HP) workflow in CalMAN is used to automatically create a 1D display calibration LUT, adjust the color matrix, and create an ICC profile. To open this CalMAN workflow, in the main menu select Open Workflow Template / Monitor - Direct (EIZO/HP). Proceed through the instructions in each step of the Monitor Direct workflow, using the following notes for EIZO monitor specifics. 1. Base Settings section In the Base Settings section of the Monitor - Direct (EIZO/HP) workflow, step through the following pages: a. Calibration Client Connect To connect to CalMAN Client 3 on the local computer on which CalMAN is running, in order to calibrate an Eizo monitor on the local computer, click the “Local Client Connect” button. CalMAN will automatically connect to the locally installed CalMAN Client 3 as a Source device and as a Display Control device. To connect to CalMAN Client 3 on another computer on the local network, in order to calibrate an Eizo monitor on that computer, click the “Networked Client Connect” button. On the Source dialog, under Manufacturer, select “SpectraCal.” Under Model, select “SpectraCal – CalMAN Client 3 Pattern Source.” In the Socket Connection search box, select the IP address for the desired target computer, and then click Connect. Note: The Eizo internal test patterns are not an advantage in this situation, and cannot be used on an Eizo monitor that is being used as a workstation’s primary display. Note: Because the Eizo monitors have only one 1D LUT per input, there are no selections available in the Select Monitor and Calibration Memory drop down on this Calibration Client Connect page. 17544 Midvale Avenue N., Suite 100, Shoreline, WA 98133 USA C orporate: +1 206 420 7514 | Tech Support: +1 206 457 8949 | www.spectracal.com b. Display Connect On the Display Connect page, follow the instructions to make a USB connection from the CalMAN computer to the Eizo monitor that is to be calibrated. Click the “Eizo Connect” button. This USB connection will be used to load calibration data into the target monitor. Note: If more than one Eizo monitor is connected to the computer, disconnect all the Eizo monitors except for the one that you are currently calibrating. c. Meter Setup For monitors without a supported built-in meter, connect your external color meter to the CalMAN computer. On the Meter Connect page, click the Find Meter button. On the Find Meters dialog, select either your Eizo display meter, or your externally connected meter if it is listed, then click Search. If your external color meter is not listed on the Find Meters dialog, just click Search. Under the Target Display Type drop down, if the Eizo monitor has wide color gamut that “reproduces 97% of Adobe RGB color space,” select “LCD (LED Wide Gamut).” If the monitor is not wide gamut, select “LCD (LED).” d. Session Options On the Session Options page, confirm that the listed monitor and display mode are correct. If not, step back to the Select Monitor and Calibration Memory drop down, on the Calibration Client Connect page, to make the desired selection. Make any desired changes to the default White Point and Gamma targets. Note: This workflow defaults to PC (0-255) for Input Signal Levels. This is required to support 1D LUT calibration. 2. Metered Calibration section In the Metered Calibration section of the Monitor - Direct (EIZO/HP) workflow, step through the following pages: a. Pre-Calibration Capture On the Pre-Calibration Capture page, you can measure the monitor’s performance before you calibrate it. When you click the Read Series button, CalMAN measures the monitor’s grayscale balance, the luminance at reference white, and the ColorChecker error across the monitor’s color gamut. b. Adjust Brightness On the Adjust Brightness page, you can change the monitor’s luminance output by adjusting its Brightness control. Click the CalMAN AutoCal button and input your desired White Level Target to automatically adjust the Brightness control. Or, click the Read Continuous button and adjust the software Brightness control in CalMAN to change the white level luminance. 17544 Midvale Avenue N., Suite 100, Shoreline, WA 98133 USA C orporate: +1 206 420 7514 | Tech Support: +1 206 457 8949 | www.spectracal.com c. Monitor Optimization Perform this RGB Gains calibration step only if the Eizo monitor does not have a full 1D LUT available. An available 1D LUT will be calibrated on the following CalMAN page. On the Monitor Optimization page, you can optimize the Eizo monitor’s RGB Gain and RGB Black Level controls. There is no need to set the Eizo Color Temperature control, as it is automatically set to User when the RGB controls are adjusted. Click the CalMAN AutoCal button and select “2 Point 30, 100%” to automatically adjust these grayscale controls. d. Internal Monitor Calibration On the Monitor Optimization page, CalMAN automatically adjusts the Eizo monitor’s output 1D LUT to calibrate gamma and adjusts its color matrix to calibrate CMS. Click the CalMAN AutoCal button to start the automatic calibration process. Note: If the Eizo monitor does not have an internal 1D LUT, use the previous CalMAN page to calibrate the monitor’s RGB Gain controls. e. ICC Profile On the ICC Profile page, CalMAN automatically measures the Eizo monitor’s color primaries and its grayscale levels. It then creates an ICC profile that it writes to the computer that is driving the Eizo monitor. Click the CalMAN AutoCal button to start the automatic ICC profile process. f. Calibration Results On the Calibration Results page, CalMAN displays the monitor measurement data from the previous Pre-Calibration Capture page. It also automatically measures the monitor’s postcalibration performance and displays the results for comparison. Click the CalMAN Read Series button to start the post-calibration measurement. g. Visual Verification On the Visual Verification page, CalMAN displays comparison chip charts for the monitor’s pre calibration and post-calibration grayscale performance and ColorChecker performance. It also displays a variety of photo images on the calibrated display, with the option to disable the ICC Profile for comparison. DONE – You are done with the 1D LUT/CMS/ICC monitor calibration for an EIZO monitor that i s normally connected to a computer’s standard graphics adapter output. 17544 Midvale Avenue N., Suite 100, Shoreline, WA 98133 USA C orporate: +1 206 420 7514 | Tech Support: +1 206 457 8949 | www.spectracal.com Back to Top Independent Source Mode Calibration Calibrate 3D LUT Follow this procedure to automatically create and load an optimized 3D LUT monitor calibration file into an Eizo monitor that is normally connected to an independent signal source, such as a signal router or video adapter device (not directly connected to a computer’s standard graphics adapter output). To instead create a 1D LUT and adjust the color matrix, click the following link to jump to the 1D LUT & Color Matrix calibration section, below. Color Cube (3D LUT) Workflow The Color Cube workflow in CalMAN is used to create display calibration 3D cube LUTs. In the CalMAN main menu, select Open Workflow Template / Color Cube (3D LUT). Proceed through the instructions in each step of the Color Cube workflow, using the following notes for EIZO monitor specifics. 1. Initial Setup section In the Initial Setup section of the Color Cube workflow, step through the following pages: a. Session Setup - Meter Connect For monitors without a supported built-in meter, connect your external color meter to the CalMAN computer. On the Session Setup page, click the Find Meter button. On the Find Meters dialog, select either your Eizo display meter, or your externally connected meter if it is listed, then click Search. If your external color meter is not listed on the Find Meters dialog, just click Search. Under the Target Display Type drop down, if the Eizo monitor has wide color gamut that “reproduces 97% of Adobe RGB color space,” select “LCD (LED Wide Gamut).” If the monitor is not wide gamut, select “LCD (LED).” b. Session Setup - Source Connect For Eizo monitors that provide internal test patterns (listed above), on the Session Setup page, click the Find Source button. On the Source dialog, under Manufacturer, select “Eizo.” Under Model, select “Eizo – ColorEdge monitors.” For cases where you can’t or don’t wish to use EIZO internal test patterns, use a hardware test pattern generator as the source. c. Session Setup - LUT Device Setup On the Session Setup page, click the Find 3D LUT Device button. On the Display dialog, under Manufacturer, select “Eizo.” Under Model, select “Eizo – ColorEdge monitors 3D LUT.” 17544 Midvale Avenue N., Suite 100, Shoreline, WA 98133 USA C orporate: +1 206 420 7514 | Tech Support: +1 206 457 8949 | www.spectracal.com Note: Because the Eizo monitors have only one 3D LUT per input, there are no selections available in the 3D LUT Memory drop down, on the LUT Device Setup page. Also on the Display Control tab, select the Display Mode that corresponds to the monitor input that you are calibrating. See the table below: Eizo Monitor CG222W, CG232W, CG242W CG223W, CG243W, CG245W CG275W CG246, CG276 CS230*, CX240*, CX270* Display Mode Cal – for all inputs CAL1 – for DVI-1 CAL2 – for DVI-2 CAL3 – for DisplayPort CAL1 – for DVI CAL2 – for DisplayPort-1 CAL3 – for DisplayPort-2 CAL1 – for DVI CAL2 – for DisplayPort CAL3 – for HDMI *3D or 1D LUT available only with Eizo ColorNavigator license Note: On some Eizo monitors, there are additional display modes available, which are global across all inputs. These additional modes do not support 3D LUT calibration. d. Session Options page On the Session Options page, be sure to select the Input Signal Levels, either Video (16-235) or PC (0-255), which matches the signal levels that are normally supplied to the monitor input that you are calibrating. 2. Display Pre-Test section In the Display Pre-Test section of the Color Cube workflow, on the Gamma & ColorChecker and Check Linearity pages, you can measure the performance of the monitor before you calibrate it. On the Performance Analysis page, these monitor measurements are then evaluated in a series of pass/fail performance parameters. If the monitor fails in any of these parameters, you should consider using the following Display Optimization section of the workflow to optimize adjustments on the monitor itself. 17544 Midvale Avenue N., Suite 100, Shoreline, WA 98133 USA C orporate: +1 206 420 7514 | Tech Support: +1 206 457 8949 | www.spectracal.com If the monitor passes all of these parameters, you can skip the Display Optimization section of the workflow and go immediately to the Display Calibration section of the workflow. 3. Display Optimization section In the Display Optimization section of the Color Cube workflow, you are guided to optimize monitor settings for picture mode, color gamut, color temp, gamma, dynamic range, white point balance, and white point luminance. On the RGB Adjust page, under the RGB Adjust Levels selection, select “2 Point 30, 100%.” Click Read Continuous and adjust the monitor’s RGB Gain controls for RGB balance at 100%. 4. Display Calibration section In the Display Calibration section of the Color Cube workflow, there are provisions for calibrating both a 1D RGB LUT (1D Ramp LUT page) and a 3D cube LUT (3D Cube LUT page). When we are calibrating an EIZO monitor with a 3D LUT, we will skip the 1D Ramp LUT page and use only the 3D Cube LUT page. Note: Eizo monitors can be calibrated with either a 1D LUT or a 3D LUT (supported models), but not bo th. c. 1D Ramp LUT page Skip over the 1D Ramp LUT page when creating a 3D LUT file for an EIZO monitor. d. 3D Cube LUT page On the 3D Cube LUT page, click the AutoCal (rotating arrows) button at the right end of the meter action buttons. The following AutoCal Setup dialog then appears: a) b) c) d) e) For File Format, select “3DL – common .3dl formats.” For Output Cube Size, select “17 Points.” For Bit Depth, select “16.” For Cube 3D LUT Settings, select your desired number of cube optimization points. Click the OK button to initiate the 3D cube LUT calibration process. 17544 Midvale Avenue N., Suite 100, Shoreline, WA 98133 USA C orporate: +1 206 420 7514 | Tech Support: +1 206 457 8949 | www.spectracal.com Upon completion of the AutoCal 3D hardware LUT calibration process, CalMAN automatically loads the optimized 17x17x17 LUT calibration data into the EIZO monitor. Note: Once an optimized 3D LUT has been loaded into an Eizo monitor, there is no need for or advantage to creating an ICC profile for the monitor. 5. Display Validation section When the cube calibration completes, CalMAN automatically loads the optimized 17x17x17 LUT calibration data into the EIZO monitor. You can test the performance of the monitor, in the Display Validation section of the Color Cube workflow, to verify the accuracy of the monitor when using the 3D calibration LUT. You can switch back to the Gamma & ColorChecker page to compare to the precalibration performance. DONE – You are done with the 3D LUT monitor calibration for an EIZO monitor that is not normally connected to a computer’s standard graphics adapter output. 17544 Midvale Avenue N., Suite 100, Shoreline, WA 98133 USA C orporate: +1 206 420 7514 | Tech Support: +1 206 457 8949 | www.spectracal.com Back to Top Independent Source Mode Calibration Calibrate 1D LUT & Color Matrix, or Calibrate RGB Gains & Color Matrix Follow this procedure to automatically create and load an optimized 1D LUT monitor calibration file (or adjust RGB Gains) and adjust the color matrix for an Eizo monitor that is normally connected to an independent signal source, such as a signal router or video adapter device (not directly connected to a computer’s standard graphics adapter output). To instead create a 3D LUT file, click the following link to jump to the 3D LUT Calibration section, above. Note: If you have already calibrated the Eizo monitor with a 3D LUT, the monitor calibration is complete. You should not attempt to also create a 1D LUT for the monitor. SI Advanced Calibration Workflow The SI Advanced Calibration workflow in CalMAN is used to automatically create a 1D display calibration LUT, adjust the color matrix, and create an ICC profile. To open this CalMAN workflow, in the main menu select Open Workflow Template / SI Advanced Calibration. Proceed through the instruction in each step of the SI Advanced Calibration workflow, using the following notes for Eizo monitor specifics. 1. Base Settings section In the Base Settings section of the SI Advanced Calibration workflow, step through the following pages to prepare for automatic monitor calibration: a. Hardware Connect Follow the instructions on the Hardware Connect page to connect to your meter and to connect to your Eizo display, both as a test pattern source and for display control. If you haven’t already done so, connect the Eizo display to the host calibration computer with a USB cable, as detailed in the initial setup section above. Meter - For monitors without a supported built-in meter, connect your external color meter to the CalMAN computer. On the Meter Connect page, click the Find Meter button. On the Find Meters dialog, select either your Eizo display meter, or your externally connected meter if it is listed, then click Search. If your external color meter is not listed on the Find Meters dialog, just click Search. Under the Target Display Type drop down, if the Eizo monitor has wide color gamut that “reproduces 97% of Adobe RGB color space,” select “LCD (LED Wide Gamut).” If the monitor is not wide gamut, select “LCD (LED).” Source – For Eizo monitors that provide internal test patterns, on the Source Connect page, click the Find Source button. On the Source dialog, under Manufacturer, select “Eizo.” Under Model, select “Eizo – ColorEdge monitors.” 17544 Midvale Avenue N., Suite 100, Shoreline, WA 98133 USA C orporate: +1 206 420 7514 | Tech Support: +1 206 457 8949 | www.spectracal.com For cases where you can’t or don’t wish to use EIZO internal test patterns, use a hardware test pattern generator as the source. Display Control – On the Display Connect page, click the Find Processor/Display button. On the Display dialog, under Manufacturer, select “Eizo.” Under Model, select “Eizo – ColorEdge monitors 3D LUT.” On the Display Control tab, select the Display Mode that corresponds to the monitor input that you are calibrating. See the table below: Eizo Monitor Display Mode CG222W, CG232W, CG242W CG223W, CG243W, CG245W Cal – for all inputs CAL1 – for DVI-1 CAL2 – for DVI-2 CAL3 – for DisplayPort CAL1 – for DVI CAL2 – for DisplayPort-1 CAL3 – for DisplayPort-2 CAL1 – for DVI CAL2 – for DisplayPort CAL3 – for HDMI CG275W CG246, CG276 CS230*, CX240*, CX270* *3D or 1D LUT available only with Eizo ColorNavigator license b. Meter Positioning Position your color meter at the center of the EIZO screen, touching the screen. c. Options I. On the Session Options page, make any desired changes to the default Color Space, White Point, and Gamma targets. II. On the Settings tab (gear wheel), select either “Video (16-235)” or “PC (0-255)” for Luminance Levels, to match your normal signal content. Note: Although these selections are labeled in 8-bit levels, the output bit depth is determined by the signal output device. d. Pre Calibration Settings If you wish to document the monitor’s control settings prior to calibration, you can record that information on this page. This information will then be available on a calibration report. e. Pre Calibration View If you wish to document the monitor’s performance prior to calibration, you can do that on this page. This information will then be available on a calibration report. f. Mode Settings On the Mode Settings page, you can make monitor measurements to help decide which modes in which to operate the monitor for calibration. 17544 Midvale Avenue N., Suite 100, Shoreline, WA 98133 USA C orporate: +1 206 420 7514 | Tech Support: +1 206 457 8949 | www.spectracal.com g. Disable Auto Features Skip this page. The Eizo monitor has no automatic features that require disabling. h. Dynamic Range Follow the instructions on the Dynamic Range page to adjust the monitor’s Contrast control as high as possible without causing one of the red, green, or blue lines to become nonlinear. Do not be concerned that the RGB lines are separated from each other at this point in the calibration process. Adjust the monitor’s Brightness control to produce the desired maximum luminance level. i. Color Decoder Skip this page. The Eizo monitor has no color decoder with its associated color and tint controls. j. Resolution Skip this page. The Eizo monitor has no controls that can degrade resolution. 2. Metered Calibration Section In the Metered Calibration section of the SI Advanced Calibration workflow, step through the following pages to calibrate the Eizo monitor’s 1D LUT (or RGB Gains) and color matrix: a. Grayscale – 2pt Perform this Grayscale – 2pt calibration step only if the Eizo monitor does not have a full 1D LUT available. An available 1D LUT will be calibrated on the following CalMAN page. On the Grayscale – 2pt page, you can optimize the Eizo monitor’s RGB Gain and RGB Black Level controls. There is no need to set the Eizo Color Temperature control, as it is automatically set to User when the RGB controls are adjusted. Click the CalMAN AutoCal button and select “2 Point 30, 100%” to automatically adjust these grayscale controls. b. Grayscale/Gamma On the Grayscale/Gamma page, CalMAN automatically adjusts the Eizo monitor’s output 1D LUT to calibrate gamma and grayscale tracking. Click the CalMAN AutoCal button to start the automatic calibration process. Note: If the Eizo monitor does not have an internal 1D LUT, use the previous Grayscale – 2pt page to calibrate the monitor’s RGB Gain controls. c. CMS Calibration On the CMS Color Gamut page, CalMAN automatically adjusts the Eizo monitor’s color matrix to calibrate CMS. Click the CalMAN AutoCal button to start the automatic calibration process. Note: When calibrating the Eizo monitor’s 1D LUT, a better final result is obtained by first calibrating CMS, then Grayscale/Gamma, then repeating the CMS calibration. 3. Post Calibration Section 17544 Midvale Avenue N., Suite 100, Shoreline, WA 98133 USA C orporate: +1 206 420 7514 | Tech Support: +1 206 457 8949 | www.spectracal.com In the Post Calibration section of the SI Advanced Calibration workflow, step through the following pages to check and document the Eizo monitor calibration: a. Post Calibration Settings If you wish to document the monitor’s control settings after calibration, you can record that information on this page. This information will then be available on a calibration report. b. Post Calibration View If you wish to document the monitor’s performance prior to calibration, you can do that on this page. This information will then be available on a calibration report. DONE – You are done with the 1D LUT/CMS/ICC monitor calibration for an EIZO monitor that is not normally connected to a computer’s standard graphics adapter output. 17544 Midvale Avenue N., Suite 100, Shoreline, WA 98133 USA C orporate: +1 206 420 7514 | Tech Support: +1 206 457 8949 | www.spectracal.com