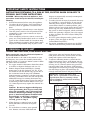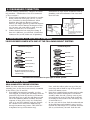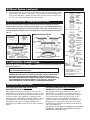
1
EZ Mount System (continued)
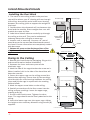
H.
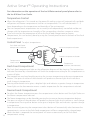
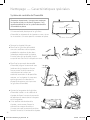
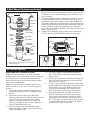
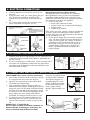
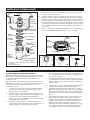
Place mount ring over sink flange and hold in place while installing cushion
mount (large side down) so the groove on the inside of cushion mount fits
over lip on sink flange, similar to putting the lid on a plastic container (see
3G, 3H & 3J). Please read important notice below.
STOPPER*
REMOVABLE
SPLASH
GUARD**
SINK
FLANGE
IMPORTANT NOTICE: CUSHION MOUNT DETAIL
RUBBER SINK
FLANGE GASKET
When the cushion mount is installed correctly, the lip of the sink flange fits into the
groove on the inside of the cushion mount and mount ring can be pulled downward over
cushion mount and will be free to rotate. The bottom bead of the cushion mount acts as
a gasket between the bottom of the sink flange and the top of the disposer. See illustration 3J.
3F
3G
SINK
3J
CUSHION MOUNT DETAIL
FIBER
GASKET
SINK
SUPPORT RING
NOTE: ARROWS
INDICATING UP
SUPPORT
RING
TOP OF SINK FLANGE
SINK
FIBER
GASKET
BOTTOM
BEAD OF
CUSHION
MOUNT
OPEN AREA, NO
OBSTRUCTION
RUBBER
GASKET
MOUNT
RING
3H
TIGHTENING
EARS‡
SUPPORT
RING
SINK
FLANGE
MOUNT RING SHOULD BE
FREE TO MOVE UP & DOWN
MOUNT RING‡
GROOVE
BOTTOM
BEAD
BOTTOM “LIP”
OF SINK
FLANGE
CUSHION
MOUNT
GROOVE
HOPPER
DISHWASHER
DISCHARGE
INLET
ELBOW GASKET
CUSHION MOUNT
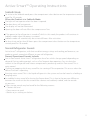
4. ELECTRICAL CONNECTIONS
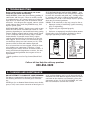
Now is the time to record the SERIAL NUMBER (located on the bottom of the disposer)
onto the warranty card.
IF YOU ARE NOT FAMILIAR WITH ELECTRICAL POWER AND PROCEDURES,
CALL A QUALIFIED ELECTRICIAN
DANGER: IMPROPER CONNECTION OF THE EQUIPMENT-GROUNDING
CONDUCTOR CAN RESULT IN A RISK OF ELECTRIC SHOCK. CHECK WITH A
QUALIFIED ELECTRICIAN OR SERVICEMAN IF YOU ARE IN DOUBT AS TO
WHETHER THE APPLIANCE IS PROPERLY GROUNDED. DO NOT MODIFY THE
PLUG PROVIDED WITH THE APPLIANCE IF IT WILL NOT FIT THE OUTLET,
HAVE A PROPER OUTLET INSTALLED BY A QUALIFIED ELECTRICIAN.
ENDBELL
(ELECTRICAL
CONNECTIONS
SCREWS
ELBOW
FLANGE
DISCHARGE
ELBOW
SERIAL # – RECORD
ON WARRANTY CARD
*Batch Feed Stopper looks different than
the stopper illustrated.
**NOT used with Batch Feed units.
‡Your mount ring may look different and
not have tightening ears.
GROUNDING INSTRUCTIONS
FOR WASTE DISPOSERS EQUIPPED WITH A
GROUNDED PLUG-IN POWER CORD.
This appliance must be grounded. In the event of a
malfunction or breakdown, grounding provides a path
of least resistance for electric current to reduce the risk
of electric shock. This appliance is equipped with a
cord having an equipment-grounding conductor and a
grounding plug. The plug must be plugged into an
appropriate outlet that is properly installed and
grounded in accordance with all local codes and ordinances.
FOR WASTE DISPOSERS NOT EQUIPPED WITH A
GROUNDED PLUG-IN POWER CORD.
This appliance must be grounded. In the event of
malfunction or breakdown, grounding provides a
path of least resistance for electric current to reduce
the risk of electric shock. The power cord (to be
installed) must have an equipment-grounding
conductor and a grounding plug. The plug must be
plugged into an appropriate outlet that is properly
installed and grounded in accordance with all local
codes and ordinances.
Disconnect electric power to disposer circuit before
installation. Turn the circuit breaker to the OFF
position or remove the fuse.