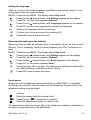
1
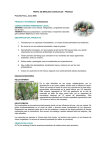
Milano 40 USER MANUAL and Safety Precautions Corded Telephone with Caller ID 11/05hj V3 TABLE OF CONTENTS Description of the Appliance .........................................................4 Menu structure .............................................................................................4 Appliance overview ......................................................................................5 Backside view of the base............................................................................6 Display and symbols ....................................................................................6 Contents of the packing................................................................................7 Specific features...........................................................................................7 Default settings (set in the factory)...............................................................7 Installation of the appliance ..........................................................8 Emergency call with locked keypad .............................................................8 Safety precautions........................................................................................9 Configuration ................................................................................10 Choice of the ringer melody .......................................................................10 Setting the ringer volume ...........................................................................10 Switching key tones ON and OFF ..............................................................10 Activating or deactivating the keypad lock .................................................11 Changing the PIN .......................................................................................11 Inputting the network provider's pre-selection number (Call by call) ..........11 Activating the prefix number.......................................................................12 Saving the access code for external calls ..................................................12 Setting the Flash time.................................................................................13 Setting the dialing mode.............................................................................13 Setting the date and the time .....................................................................14 Setting the contrast of the display ..............................................................14 Setting the language ..................................................................................15 Returning the settings to the defaults.........................................................15 Insert pause................................................................................................15 USING THE TELEPHONE ....................................................16 Answering an incoming call........................................................................16 Making a hands-free call ............................................................................16 Setting the volume for speaker phone calling ............................................16 Calling Outside ...........................................................................................17 Dialing preparation .....................................................................................17 Redial (simple) ...........................................................................................17 Redialing the last five numbers called........................................................17 Dialing a number from the phonebook .......................................................18 Dialing a number from the CID list .............................................................18 Dialing a number from the shortcut dialing keys ........................................18 2 AEG Milano 40 V.2_en External comfort functions.......................................................... 19 Waiting call and toggling............................................................................ 19 Consultation and toggling .......................................................................... 19 Conference call with three people ............................................................. 19 Turning off the microphone (Mute) ............................................................ 20 Saving numbers in the shortcut memories ................................................ 20 Reading the call duration ........................................................................... 20 PHONEBOOK ...................................................................... 21 Generalities................................................................................................ 21 Table of characters (Standard) .................................................................. 21 Add a new phonebook entry ...................................................................... 22 Searching in the phonebook ...................................................................... 22 Editing phonebook records ........................................................................ 23 Deleting a phonebook entry....................................................................... 23 Deleting all phonebook entries .................................................................. 23 CID LIST (caller list - CLIP)................................................. 24 Generalities................................................................................................ 24 Opening the CID list................................................................................... 24 Dialing from the CID-list............................................................................. 25 Copying a number from the CID list to the phonebook .............................. 25 Copying a number from the CID list to the shortcut memories .................. 25 Deleting numbers from the CID list individually ......................................... 26 Deleting all telephone numbers from the CID list ...................................... 26 APPENDICES....................................................................... 27 Technical data ........................................................................................... 27 Troubleshooting ......................................................................................... 28 Maintenance .............................................................................................. 28 Recycling ................................................................................................... 28 INDEX .......................................................................................... 29 CE declaration of conformity...................................................................... 32 Environmental Protection........................................................................... 32 AEG Milano 40 V.2_en 3 Description of the Appliance Menu structure MENU Key Lock Key PIN-_ Key Lock-Off/On Audio Ring Tone Ring Tone-1-5 Ring Loudness Loudness-1-4/Off Key Tone Key Tone-Off/On Key PIN Key PIN-_ New PIN-_ Prefix Number Key PIN-_ Prefix_ Prefix Prefix-On/Off Dial Pref* Key PIN-_ Flash Time Flash-80 / 100 / 270 ms Dialing mode Dialing Tone/Pulse Contrast Contrast 1-5 Language Deutsch / English / Français / Italiano / Nederlands / Portugues / Turkce / Magyar / Ukrainia / Bulgaria / Czech / Polski / Romania / Greek Date / Time 01 / 01 - 0000:00 Reset Sure? PABX Setting Setting 4 Dial Pref._ AEG Milano 40 V.2_en Appliance overview B A 20 9 10 11 12 13 14 1 21 2 3 4 5 6 D 7 C 1. 2. 3. 4. 5. 6. 7. 8. 9. 10. 11. 12. 13. 14. 15. 16. 17. 18. 19. 20. 21. 17 16 15 18 19 8 LED indicating communication. Shortcut dialing memories M1 – M3. "R" - key. "Mute" – key (microphone off). Repeat key / Pause. Volume ringer / handset / hands-free +. Volume ringer / handset / hands-free –. Hands-free key. Scroll down key – back in the menu. Phonebook. MENU - key / "OK" key. Scroll up key – forward in the menu. Dialing key (dials the displayed phone number). ESC – key to quit the menus. Menu - key. Delete key. Open caller log (CID list). Alphanumeric keypad. LED indicating hands-free. Hook. Loudspeaker. AEG Milano 40 V.2_en 5 A. B. C. D. E. F. Basic appliance Handset Handset cable inlet at the handset Handset cable inlet at the base Inlet for the telephone cord Power supply inlet Backside view of the base F E Display and symbols 1 x M v i ) B REPT CLIP ' 1 2 3 6 2 3 ring tone is switched off mute (microphone switched off) hands-free on handset is picked up, the telephone line is engaged no function phonebook open repeat = several calls from same number came in caller list open no function counter for caller list and phonebook time display in hours : minutes date display in day / month AEG Milano 40 V.2_en Contents of the packing • 1 base • 1 handset • 1 cable for the handset • 1 telephone line cord • 1 power supply adapter • 1 manual Specific features • Display with 1 Alphanumeric DOT-matrix-line for the name and two lines with 7-segment display for number and symbols • Hands-free • Caller ID (CLIP) with a maximum of 30 telephone numbers in the log • Phonebook with a maximum of 50 different telephone numbers • Re-dialing the last 5 numbers dialed • Display of the call duration • Volume of the ringer selectable in 5 levels or switched off • Table appliance • Can be used in connection with a switchboard • Tone or pulse dialing – Flash-time adjustable • LED for optical call indication • Keypad locking • Volume of the earpiece adjustable • Mute (microphone switched off) • 3 memories for shortcut dialing M1-M3 • 14 menu languages Default settings (set in the factory) Contrast Menu language Date / hour Dialing mode Flash – time Pause Caller list and phonebook Shortcut memories and repeat list Keypad lock Volume of the earpiece Volume of the hands-free loudspeaker PIN - code Ringer melody Ringer volume AEG Milano 40 V.2_en 3 German (or your country’s language) 01/01/05 12:00 tone dialing 300 or 100 ms (depending on your country’s version) 3 seconds empty empty off level 2 level 4 0000 type 1 level 4 7 Installation of the appliance 1. Plug in the small connector of the power supply (coming from the adapter) at the backside of the base in power inlet (F). Plug in the adapter in the wall outlet (230V~). 2. Use the telephone line cord to realize the connection between the telephone inlet and the connection (E) at the back of the base. 3. Connect the handset cable to the inlet (D) of the base (A) and with plug (C) to the handset (B). This manual is meant for your information. Its contents are no part of the contract. All values quoted are standard values. The described equipment and the options can be different, depending on the requirements of your country. We reserve our right to technical modifications. Emergency call with locked keypad When the keypad is locked, it is not possible to make calls without prior disabling the keypad locking. Making an emergency call (110 or 112), on the other hand, is an exception to this rule. Emergency numbers with 4 figures at the most will still be accessible. When you programmed a zone prefix number of 3 digits and / or an operator prefix number of maximum 6 digits, these numerals are put in front of the telephone number for emergencies and dialed before the telephone number. Attention: If you use more than 4 digits, when dialing an emergency telephone number, the announcement "Key Lock-On" appears on the display, and after the fifth digit, further input will be ignored. 8 AEG Milano 40 V.2_en Congratulations Thanks for purchasing this telephone! In order to be able using your phone in full comfort, we advise to read this manual completely, so you will be familiar with its possibilities. Safety precautions Do not place the set in the proximity of heat sources and don't expose is to direct sunrays, dust or vibrations. Do not place the base station in a moist room, such as bathroom or shower. The ideal temperature range is between +5° and +35° C and the humidity between 25 % and 85 %. Do not use the phone in environment subject to explosion hazard e.g. auto paint booths. Read these instructions carefully, and make sure that they accompany the appliance, when you give it to others to use. Dispose of the battery and phone in accordance with environmental regulations! Modern furniture generally has a surface finish with synthetic materials or paintwork of different types. They need to be maintained with specific products of different make. These products can affect the feet of your telephone! Avoid scratches on your furniture by placing the appliance on an antiskid mat. We will not accept any reliability for this kind of damage! AEG Milano 40 V.2_en 9 Configuration For changing the settings, you open the menu by pressing the "MENU" - key. One can navigate inside the menus with the scrolling keys d and c. Confirming and saving a choice is done by pressing the "OK" - key. Leaving menus or submenus is done with the "ESC" -key (14). Choice of the ringer melody MENU Press the key MENU. The display shows Key Lock. d Press the key d, on the screen appears Audio. OK Press OK, on the screen appears Ring Tone. OK Press OK, on the screen appears Ring Tone-1 and you hear the corresponding melody. cd Select the desired melody (1-5) with the scroll keys. OK Confirm your choice with OK. You hear a confirmation tone and your setting is saved. @ Press ESC twice to leave the menu. Setting the ringer volume MENU Press the key MENU. The display shows Key Lock. d Press the key d, on the screen appears Audio. OK Press OK, on the screen appears Ring Tone. d Press the key d, on the screen appears Ring Loudness. OK Press OK, on the screen appears Ring Loudness-4 and you hear the chosen melody with the volume set as explained above. cd Select the wanted volume (1-4) with the scroll keys, or choose OFF (silence – no ring tone). OK Confirm your choice with OK. You hear a confirmation tone and your setting is saved. @ Press ESC twice to leave the menu. Switching key tones ON and OFF Each time you press a key, you hear a beep. If you want to, you can turn these beeps off and back on again. The default setting is ON. MENU Press the key MENU. The display shows Key Lock. d Press the key d, on the screen appears Audio. OK Press OK, on the screen appears Ring Tone. d Press the key d several times, until Key Tone appears on the display. OK Press OK, on the screen appears Key Tone AAN. cd Select ON or OFF with the scroll keys. 10 AEG Milano 40 V.2_en OK @ Confirm your choice with OK. You hear a confirmation tone and your setting is saved. Press ESC twice to leave the menu. Activating or deactivating the keypad lock MENU Press the key MENU. The display shows Key Lock. OK Press OK, on the screen appears Key PIN-****. n Input the PIN code on the keypad (default 0000, set at the factory). OK Confirm your choice with OK, on the screen appears Key Lock-Off. cd Select ON or OFF with the scroll keys. OK Confirm your choice with OK. You hear a confirmation tone and your setting is saved. @ Press ESC twice to leave the menu. Attention: Please also read the remark on page 10 concerning emergency calls! Changing the PIN MENU Press the key MENU. The display shows Key Lock. d Press the key d several times, until PABX Setting appears. OK Press OK, on the screen appears Key PIN. OK Press OK, on the screen appears Key PIN-****. n Input the PIN code on the keypad (default 0000, set at the factory). On the screen appears New PIN-0000. n Input the new PIN code on the keypad, e.g. 1234. OK Confirm your choice with OK. You hear a confirmation tone and your setting is saved. @ Press ESC twice to leave the menu. Setting network provider's pre-selection number (Call by call) In this menu point, you have the possibility to input the pre-selection number of a network provider, which allows cheaper calls or to input a prefix number that you use frequently. MENU Press the key MENU. The display shows Key Lock. d Press the key d several times, until PABX Setting appears. OK Press OK, on the screen appears Key PIN. d Press the key d several times, until Prefix number appears. OK Press OK, on the screen appears Prefix-. AEG Milano 40 V.2_en 11 n OK @ Use the keypad to input the prefix number. Confirm your choice with OK. You hear a confirmation tone and your setting is saved. Press ESC twice to leave the menu. The length of the prefix number is limited to 6 digits! Activating the prefix number Only if you activate the prefix number (described above), this number will be dialed before every telephone number you call. MENU Press the key MENU. The display shows Key Lock. d Press the key d several times, until PABX Setting appears. OK Press OK, on the screen appears Key PIN. d Press the key d several times, until Prefix number appears. OK Press OK, on the screen appears Prefix-Off. cd Select ON or OFF with the scroll keys. When you select ON, the prefix number will always be dialed. Selecting OFF disables the dialing of the prefix number. OK Confirm your choice and save it by pressing OK. @ Press ESC twice to leave the menu. Saving the access code for external calls When used with a PABX, it is sometimes required that an access code for external calls is entered (mostly 0 or 9), sometimes followed by a pause. When it is activated, this access code will be dialed automatically by your telephone, each time you make an external call from the caller list. The length of this access code is limited to 3 digits. MENU d OK d OK n OK @ 12 Press the key MENU. The display shows Key Lock. Press the key d several times, until PABX Setting appears. Press OK, on the screen appears Key PIN. Press the key d several times, until Dial pref appears on the display. Press OK, on the screen appears Dial pref.-. Use the keypad for entering the access code for external calls. You can find this access code in the documentation of your PABX. Confirm your choice and save it by pressing OK. Press ESC twice to leave the menu. AEG Milano 40 V.2_en Setting the Flash time The flash key "R" can be set with three different flash-times (80 / 100 / 270 ms). The flash-time to be used depends on the installation, on which your unit is connected • connected to the public telephone network with comfort functions; • connected to a PABX with similar functions. The comfort functions: waiting call toggling consultation second call conference call with three must be ordered and paid for with your local telephone network operator. Your provider will also be able to tell you, which flash-time has to be used on his installation (the flash-time to be set is usually 270 ms). When the appliance is connected to a personal PABX, its supplier or the delivered manual can inform you about the flash-time to be set (the flash-time to be set is usually 100 or 80 ms). The following description does not necessarily correspond to the description in the manual of your PABX. MENU Press the key MENU. The display shows Key Lock. d Press the key d several times, until PABX Setting appears. OK Press OK, on the screen appears Key PIN. d Press the key d several times, until Flash Time appears on the display. OK Press OK, on the screen appears Flash-270ms. cd Select the wanted flash-time with the scroll keys. OK Confirm your choice and save it by pressing OK. @ Press ESC twice to leave the menu. Setting the dialing mode Two dialing modes are available: • MFV (tone): the actual standard (DTMF mode) • IWV (pulses): only necessary for older installations Proceed as follows for setting the correct dialing mode: MENU Press the key MENU. The display shows Key Lock. AEG Milano 40 V.2_en 13 d Press the key d several times, until PABX Setting appears. OK Press OK, on the screen appears Key PIN. d Press the key d several times, until Dialing mode appears. OK Press OK, on the screen appears Dialing-Tone. cd Select your dialing mode between Dialing-Tone and Dialing-Pulse. OK Confirm your choice and save it by pressing OK. @ Press ESC twice to leave the menu. Setting the date and the time MENU Press the key MENU. The display shows Key Lock. d Press the key d several times, until Setting appears on the display. OK Press OK, on the screen appears Contrast. d Press the key d several times, until Date/Time appears on the display. OK Press OK, on the screen appears 01 / 01-00 12:00. n Use the keypad to enter the actual date, e.g. for August 8th 2005: 080805. Then, you enter the correct time, e.g. for 15:37h: 1537. OK Confirm your choice and save it by pressing OK. @ Press ESC twice to leave the menu. Setting the contrast of the display You can set the contrast of the display at 5 different levels, in order to adjust it to the ambient light. Proceed as follows: MENU Press the key MENU. The display shows Key Lock. d Press the key d several times, until Setting appears on the display. OK Press OK, on the screen appears Contrast. OK Press OK, on the screen appears Contrast-3. cd Select the wanted level with the scroll keys. OK Confirm your choice and save it by pressing OK. @ Press ESC twice to leave the menu. 14 AEG Milano 40 V.2_en Setting the language There is a choice of fourteen languages available for the screen menus. To set a language please proceed as follows: MENU Press the key MENU. The display shows Key Lock. d Press the key d several times, until Setting appears on the display. OK Press OK, on the screen appears Contrast. d Press the key d several times, until Language appears on the display. OK Press OK, on the screen appears the actually set language. cd Select your language with the scroll keys. OK Confirm your choice and save it by pressing OK. @ Press ESC twice to leave the menu. Returning the settings to the defaults When you make a reset, all settings return to the default values, as they were at delivery. This is necessary, when you have forgotten your PIN. Proceed as follows: MENU Press the key MENU. The display shows Key Lock. d Press the key d several times, until Setting appears on the display. OK Press OK, on the screen appears Contrast. d Press the key d several times, until Reset appears on the display. OK Press OK, on the screen appears Sure?. OK You must press OK to confirm. The telephone's settings are returned to the default settings, originally set at the factory. @ Press ESC twice to leave the menu. Insert pause When you use the telephone connected behind an older PABX, it is possible that the access code for external calls must be followed by a pause, before the telephone number may be dialed. n Unhook. Enter the access code for external calls. /P Press the key /P, the pause is inserted. n Enter the telephone number you wish to call. This pause takes the place of one digit in the telephone number for repeating, in the shortcut memories and in the phonebook. AEG Milano 40 V.2_en 15 USING THE TELEPHONE Be aware that, in the case of a power failure or in case of a defect of the telephone's power supply, the basic functions (making and receiving calls) remain intact. Answering an incoming call A ring tone and the LED (1), flickering in the same rhythm as the ring tone signal the incoming calls. The screen displays the number of the caller (when the network provider delivers it) and the name of the caller (when the delivered number is stored in the phonebook). Pick up the handset for answering the call, or press the hands-free key v (8). The symbol of the picked-up handset "i" appears on the screen, and about 8 seconds later, the duration of the call is displayed. When in hands-free mode, the loudspeaker symbol v appears on the display. To end the conversation, you hang up or press the hands-free key again. The total duration of the call remains visible for about 5 seconds. Making a hands-free call This function allows you to have a telephone conversation without having to hold the handset. You can use this function to make the connection, but also activate it during the call. 1. Press the key v to switch on the hands-free function. 2. Press the key v to switch off the hands-free function. 3. To end the conversation, you simply hang up. The volume of the loudspeaker in hands-free mode corresponds with the volume of the ear piece. Setting the volume for speaker phone calling 1. Press the key v for a call in hands-free mode. 2. Press one of the keys v + or v -, you hear the actual volume and on the screen appears Speaker-5. 3. Press one of the keys v + of v -, to select the desired volume in the range from 1 to 5. The chosen level is stored in memory 16 AEG Milano 40 V.2_en Calling Outside External calls are calls to the public telephone network. 1. Pick up the handset or press the hands-free key. You hear the dialing tone. 2. Input the desired number on the keypad (18). 3. The input number appears on the display and is dialed automatically. 4. To end the conversation, you hang up or press the hands-free key again. Dialing preparation 1. This stands for inputting the desired telephone number in standby, before picking up the handset. When you input a wrong digit, you can correct it with the scroll, delete and number keys. 2. The input number appears on the display. Press the talk key i (13) or pick up the handset, the number is dialed automatically. 3. To end the conversation, you hang up or press the hands-free key again. Redial (simple) To redial the very last number called, just press the redial key (5). 1. Press the redial key (5), the last number called (of maximum 32 digits) appears on the display. 2. Press the talk key i (13) or pick up the handset, the displayed telephone number is dialed automatically. 3. To end the conversation, you hang up or press the hands-free key again. Redialing the last five numbers called The redial key (5) also allows you to redial one of the last five telephone numbers called. 1. Press the redial key several times (5), with each activating of the redial key, the previous number called appears on the display. 2. Press the talk key i (13) or pick up the handset. 3. The displayed telephone number is dialed automatically. 4. To end the conversation, you hang up or press the hands-free key again. AEG Milano 40 V.2_en 17 Dialing a number from the phonebook Also read the chapter "PHONEBOOK". 1. Press the key phonebook B. . 2. On the screen appears Review, press OK. The first number (in alphabetical order) of the phonebook appears on the display. 3. 4. 5. 6. Press the scroll keys cd to scroll through the phonebook. You can also input the first letter of the name you are looking for; the list will then start from the first name with this initial letter. When you have found the wanted telephone number, you press the talk key i (13) or pick up the handset, the displayed telephone number is dialed automatically. When your appliance is connected behind a PABX, that does not open the outside line automatically, the number in the phonebook must be preceded by the access code for outside lines and, if necessary, a pause. Just hang up to end the conversation. Dialing a number from the CID list Also read the chapter "CID list". 1. Press the key CID list y (17). 2. The first number in the CID list appears on the display, with number, name (if saved in the phonebook), time and date of the call. 3. Press the scroll keys cd to scroll through the list for searching the wanted telephone number. 4. When you have found the wanted telephone number, you press the talk key i (13) or pick up the handset. 5. The displayed telephone number is dialed automatically. 6. Just hang up to end the conversation. Dialing a number from the shortcut dialing keys 1. Press the key M1, M2 or M3. 2. The number and the name appear on the display. 3. Press the talk key i (13) or pick up the handset, the displayed telephone number is dialed automatically. 4. When your appliance is connected behind a PABX, that does not open the outside line automatically, the number in the shortcut memory must be preceded by the access code for outside lines and, if necessary, a pause. 5. Just hang up to end the conversation. 18 AEG Milano 40 V.2_en External comfort functions The comfort functions: waiting call, toggling, consultation, second call, conference call with three must be ordered and paid for with your local telephone network provider. Your provider will also be able to tell you which flash-time has to be used on his installation (please also read the chapter on "Flash time" (page 13). When the unit is connected to a personal branch exchange (PBX), its supplier, or the delivered instruction manual will be able to inform you. Waiting call and toggling You have the necessary subscription at your telephone network provider. While you are having a telephone conversation, you hear a tone, i.e. a signal that indicates that another user "knocks" (signal second call). Use the R - key to put the actual conversation on hold. You hear the extra dialing tone. By pressing "2" you can answer the second call. When you want to return to the first conversation partner, you press the R - key again and dial "2" again. You are now connected to the first conversation partner, and the second caller is put on hold. This action (called toggling) can be repeated as often as you wish, until one of the parties hangs up. Consultation and toggling With the function consultation / toggling, you can talk in turns to two different callers, without one hearing what you discuss with the other. You can accept an incoming call or call another participant yourself. This function also creates the base for a conference call with three people. You are calling with somebody and wish to retrieve information with another participant (internal or external). To achieve this, you press the "R" - key to park the first communication. You hear the extra dialing tone. Dial the number of the other participant and have your conversation. When you press the "R" - key again, you can park the second communication. Press "2", and you return to the first conversation partner. Now you can toggle between both conversation partners. When you wish to end your call after the consultation, use the R - key and press "1". The connection with the second conversation partner is broken. Conference call with three people This function allows you to talk with two conversation partners simultaneously; each of the three parties is participating simultaneously, and hears both other participants all the time. The connection between the three partners is built up as described above, in the chapter consultation and toggling. AEG Milano 40 V.2_en 19 When you want to set up a conference call, press the "R" – key again. The active conversation is parked and you hear an extra dialing tone. Now press "3". The conference with 3 people is now activated. When one of the conversation partners hangs up, the communication with the other partner can continue. When you hang up yourself, the conference call is ended. Turning off the microphone (Mute) The microphone can be turned off temporarily. This allows you to talk to people in your direct environment, without the telephone conversation partner overhearing it. 1. You are making a call. 2. Press the "Mute" key M (4) to turn off the microphone, it is inactivated and the symbol M appears on the display. 3. Now, you can talk to the people around you. Your conversation partner at the other side of the line can't hear what is said. 4. To continue the call, Press the "Mute" key M (4) again, to switch on the microphone. You can continue your conversation. Saving numbers in the shortcut memories Three telephone numbers with the corresponding name can be saved in the shortcut memories. Proceed as follows: 1. Press the key M1, M2 of M3. On the screen appears New. 2. Press the key OK. 3. Enter the number that you want to save. When your appliance is connected behind a PABX, that does not open the outside line automatically, the number in the shortcut memory must be preceded by the access code for outside lines and, if necessary, a pause. 4. Press OK again. 5. Enter the name, corresponding to the number entered. 6. Press OK again, on the screen appears Saved and a confirmation signal sounds. Reading the call duration About 8 seconds after you have pressed the hands-free key or picked up the handset, the duration in minutes and seconds 00:00 appears on the display; e.g.: 01:20 = 1min, 20 sec. At the end of the conversation, this duration remains on the screen during approximately 5 seconds. 20 AEG Milano 40 V.2_en PHONEBOOK Generalities Your set allows you to store 50 telephone numbers in a phonebook. Each entry can consist of 24 digits for the telephone number and 16 letters for the name. These records are sorted alphabetically. You can scroll through the phonebook entries, add new ones and edit or delete existing ones. For certain functions, alphanumeric input is necessary. In that case, the keypad automatically switches to alphanumeric mode. By pressing several times on the suitable key, all letters, numbers and special signs are possible. When the next sign must be input with the same key as the previous, wait until the cursor has moved to the next position before pressing the key again. Example: PRIVAT: 1xkey 7 - pause - 3xkey 7 - pause - 3xkey 4 - 3xkey 8 - 1xkey 2 1xkey 8. The input letters are all lower case. Changing to upper case is possible by pressing *. From this moment on, all input is in upper case. Return to lower case, by pressing the asterisk * again. Table of characters (Standard) 0-9,*,# numeric keys for inputting the digits of the number * toggling between upper and lower case # à á â Ç 0 + & @ 0 / % * # $ £ ¥ § ¿¡ 1 „Space“ - ? 2 (upper case) A B C 2 Æ Å à á â Ç 3 (upper case) D E F 3 è É ê ë 4 (upper case) G H I 4 ì í î ï 5 (upper case) J K L 5 € 6 (upper case) M N O 6 ñ ö ò ó ô 7 (upper case) P Q R S 7 ß 8 (upper case) T U V 8 ù ú û Ü 9 (upper case) W X Y Z 9 2 (lower case) a b c 2 ä æ å à á â ç 3 (lower case) d e f 3 è é ê ë 4 (lower case) g h i 4 ì í ï AEG Milano 40 V.2_en ! 1 , . : ; „ ‘ ( ) = - /_ „ 21 5 (lower case) j k l 5 € 6 (lower case) m n o 6 ñ ö ò ó ô 7 (lower case) q q r s 7 ß 8 (lower case) t u v 8 ù ú û ü 9 (lower case) w x y z 9 Add a new phonebook entry Save all telephone numbers with the zero and the zone prefix, in order to have the name appearing on the screen when a call from that number comes in, and to have this name also stored in the CID list. 1. Press the key phonebook B. 2. Press the key d, New appears. 3. Press the key OK, a blinking cursor appears on the screen _. 4. Us e the keypad n to enter the telephone number. 5. Press the key OK and, with the keypad n, enter the corresponding name. 6. Press the key OK, on the screen appears Saved and again New. You can continue keying in the next telephone number and name or leave the phonebook with the ESC - key. (10). On the screen appears Review. Attention! When your appliance is connected behind a PABX, that does not open the outside line automatically, the number must be preceded by the access code for outside lines and, if necessary, a pause. Example (access code = 0): 0 – pause – prefix – telephone number Searching in the phonebook 1. Press the key phonebook B. 2. Press OK. The first number (in alphabetical order) of the phonebook appears on the display. 3. Press the scroll keys cd to scroll through the phonebook (10). On the screen appears Review. or 1. Press the key phonebook B. 2. Press the key OK. The first number (in alphabetical order) of the phonebook appears on the display. 3. One can also input the first letter of the name you are looking for on the keypad n; the list will then start from the first name with this initial letter. 4. Press the scroll keys cd to scroll through the phonebook, starting from the found record. 22 (10). On the screen appears Review. AEG Milano 40 V.2_en Editing phonebook records 1. Press the key phonebook B. 2. Press the key OK. The first number (in alphabetical order) of the phonebook appears on the display. 3. Press the key OK, the first digit of the telephone number starts blinking. Use the scroll keys, c resp. d to move the cursor to the right resp. to the left. 4. The blinking sign can be overwritten by a new input or deleted with the X key. When you're finished inputting the change, press OK. 5. The first digit of the name starts blinking. Proceed with the name as described above for the number. Press OK, when the wanted changes are made. On the screen appears Saved. Exit the phonebook by pressing the ESC - key. (10). On the screen appears Review. Deleting a phonebook entry (individually) 1. Press the key phonebook B. 2. Press the key OK. The first number (in alphabetical order) of the phonebook appears on the display. 3. Find the record, you want to delete by pressing the scroll keys cd. 4. Press the key X, a request for confirmation is displayed: Sure?. 5. Confirm with the OK - key. 6. A confirmation signal sounds and the record is deleted. This procedure needs to be repeated for each telephone number you want to delete. (10). On the screen appears Review. Deleting all phonebook entries 1. Press the key phonebook B. 2. Press the key OK. The first number (in alphabetical order) of the phonebook appears on the display. 3. Press the scroll-up key d several times, until you find the menu point Delete ALL. 4. Press the key OK, a request for confirmation is displayed: Sure?. 5. Confirm by pressing the OK - key. A confirmation signal sounds and all the records in the phonebook are deleted. AEG Milano 40 V.2_en (10). On the screen appears Review. 23 CID LIST (caller list - CLIP) Generalities Your set shows the number of the incoming call, as well as the day and the hour of the call, if the telephone network provider has activated this feature and if the caller did not hide his number (with the CLIR – function). The CLIP – function also offers the following possibilities: • Identifying the caller before accepting a call; • Registering the last 30 calls with the number of the caller in the CID list • Consulting the CID list, finding the last calls entered with the date and time of the call and the telephone number of the caller; • Seeing the name of the caller, if the number is saved in the phonebook; • Scrolling through the CID list; • Dialing a number from the CID list; • Saving a number from the CID list to the phonebook. When the network operator also sends the date and time, the internal clock of your set will be adjusted automatically when the first call enters. Many operators, however, only send the number. In order to have a correct registration of the date and time that a call entered, you will have to adjust the clock as described. When your appliance is connected behind a PABX, that does not open the outside line automatically, the number in memory must be preceded by the access code for outside lines and, if necessary, a pause. For more information please check with your network operator. Always add the prefix to the telephone number you save in the phonebook, in order to see their name when they call you. Opening the CID list 1. Press the key CID list y (17). The first number in the CID list appears on the display, with number, name (if saved in the phonebook), time and date of the call. 2. Use the scroll keys cd to run through the list. The telephone number stays on display until 5 seconds after the last ring tone, then the set returns to stand-by. During a conversation, there is no room for displaying the telephone number. When the CID – list is full, the oldest call is erased. 24 AEG Milano 40 V.2_en Dialing from the CID-list 1. Press the key CID list y (17). 2. The first number in the CID list appears on the display, with number, name (if saved in the phonebook), time and date of the call. 3. Press the scroll keys cd to scroll through the list for searching the wanted telephone number. 4. When you have found the wanted telephone number, you press the talk key i (13) or pick up the handset. 5. The displayed telephone number is dialed automatically. 6. Just hang up to end the conversation. Copying a number from the CID list to the phonebook 1. Press the key CID list y (17). 2. The first number in the CID list appears on the display, with number, name (if saved in the phonebook), time and date of the call. 3. Press the scroll keys cd to scroll through the list for searching the wanted telephone number. 4. Press OK, on the screen appears Store to Book. 5. Press OK, the first digit starts blinking. If you want to edit the number, you can do so as described in chapter "Editing phonebook records". If you do not want to edit the number, press OK. 6. Then, a blinking cursor appears for entering the name. Use the keypad as described higher to enter the name. 7. Press OK when you are happy with the modifications made. On the screen appears Saved. Copying a number from the CID list to the shortcut memories 1. Press the key CID list y (17). 2. The first number in the CID list appears on the display, with number, name (if saved in the phonebook), time and date of the call. 3. Press the scroll keys cd to scroll through the list for searching the wanted telephone number. 4. Press OK, on the screen appears Store to Book. 5. Press on d, on the screen appears Store to M1 or Replace No?, when M1 was already used previously. The scroll key d allows you to choose also M2 or M3. AEG Milano 40 V.2_en 25 6. When you have made your choice, then press OK. 7. The first digit starts blinking. If you want to edit the number, you can do so as described in chapter "Editing phonebook records". If you do not want to edit the number, press OK 8. Then, a blinking cursor appears for entering the name. Use the keypad as described higher to enter the name. 9. Press OK when you are happy with the modifications made. On the screen appears Saved. Deleting numbers from the CID list individually 1. Press the key CID list y (17). 2. The first number in the CID list appears on the display, with number, name (if saved in the phonebook), time and date of the call. 3. Press the scroll keys cd to scroll through the list for searching the wanted telephone number. 4. Press the key X, a request for confirmation is displayed: Sure?. 5. Confirm with the OK – key if you are sure. A confirmation signal sounds and the record is deleted. On the screen appears the next record. Deleting all telephone numbers from the CID list 1. Press the key CID list y (17). 2. The first number in the CID list appears on the display, with number, name (if saved in the phonebook), time and date of the call. 3. Press the key X and hold it until Delete ALL appears on display. Press OK, a request for confirmation is displayed: Sure?. 4. Press OK to delete the whole CID list. A confirmation signal sounds and two dotted lines appear on the screen. All records in the CID list are deleted. 26 AEG Milano 40 V.2_en APPENDICES Technical data System analog, corded telephone Power supply power adapter 230VAC / 50Hz / 35mA; exit voltage 6V DC / 300mA / 1,8 VA Memory Flash memory Room temperature +5° C à + 35° C; Relative air humidity 25% à 85% Temperature during storage -10° C à + 50° C Dialing system tone or pulse Function flash-key flash-time 80, 100, 270ms Dimensions: 195 x 195 x 70 mm Cable lengths: power supply cable: telephone line cord: Weight approx. 3,0 m approx. 3,0 m ca. 540 grams We reserve our right to technical modifications! AEG Milano 40 V.2_en 27 Troubleshooting No dialing tone • Check if the telephone line cord is well connected to the base and to the wall outlet. • Use only the delivered cable. • Adjust the volume of the handset to a higher level. Dialing a number impossible • Check if the dialing mode set, corresponds with the dialing mode of the telephone network. Set the correct mode. • The dialed telephone number is blocked. • The keypad is locked. • You have forgotten your PIN. • Reset the settings of the handset back to the defaults. No display • Check if the power supply cord is well connected to the base and to the wall outlet. Maintenance Clean the base station and the handset with a moist cloth or with an antistatic cloth. Never use dry cloth! There is a danger of static charge! Recycling When your telephone is taken out of service, dispose of it in an environmentally friendly way! 28 AEG Milano 40 V.2_en INDEX A K Audio · 10 Key PIN · 11; 12; 13; 14 Key Tone · 10 keypad · 5; 8; 11; 12; 14; 17; 21; 22; 25; 26; 28 B beep · 10 L C CID list · 5; 18; 22; 24; 25; 26 conference call · 13; 19; 20 consultation · 13; 19 Contrast · 7; 14; 15 Language · 15 lower case · 21; 22 M mute · 6 D date · 6; 14; 18; 24; 25; 26; 31 Date/Time · 14 default · 10; 11; 15 Delete ALL · 23; 26 Dialing-Pulse · 14 Dialing-Tone · 14 E external · 12; 15; 19 F flash · 13; 19; 27 Flash Time · 13 N New · 11; 20; 22 P PABX · 11; 12; 13; 14; 15; 18; 20; 22; 24 PABX Setting · 11; 12; 13; 14 pause · 12; 15; 18; 20; 21; 22; 24 Pause · 5; 7 phonebook · 6; 7; 15; 16; 18; 21; 22; 23; 24; 25; 26 PIN · 7; 11; 15; 28 Prefix · 11; 12 Prefix-Off · 12 H hands-free · 5; 6; 7; 16; 17; 20 AEG Milano 40 V.2_en 29 T R redial · 17 Replace No? · 25 Reset · 15; 28 Review · 18; 22; 23 Ring Loudness · 10 Ring Tone · 10 technical data · 27 time · 6; 7; 10; 12; 13; 14; 18; 19; 24; 25; 26; 27 toggling · 13; 19; 21 U upper case · 21 S Saved · 20; 22; 23; 25; 26 setting · 10; 11; 12; 13 Setting · 10; 13; 14; 15; 16 shortcut · 7; 15; 18; 20; 25 Speaker-5 · 16 Store to Book · 25 Store to M1 · 25 Sure? · 15; 23; 26 30 V volume · 7; 10; 16; 28 W Waiting · 19 AEG Milano 40 V.2_en Warranty Please check with your local dealer to know what kind of warranty this appliance carries, according to your country's laws and to the local practice. The warranty period starts from the first acquisition of the appliance. In order to prove the date of purchase, we advise you to keep the purchase receipt. A repair to an appliance that has been sent back, which is not accompanied by the purchase receipt, will always be charged. This will also be the case for badly packed appliances. During the warranty period, all deficiencies, caused by material or production flaws, will be executed free of charge. The manufacturer reserves his right to repair or replace, at his own discretion. The length of the warranty period will never be prolonged by possible reparation or in case of replacement. The original warranty period continues and takes a definitive end at the normal date, depending on the purchase date and the original length of the warranty period. The manufacturer can never be held responsible for any damage or costs, incidental, caused or indirectly brought about by a defect. From warranty are also excluded the damages caused by abnormal use, wear, interventions by third parties or violence. The spare parts, subject to wear (batteries, rechargeable batteries, packing etc.) are excluded from the warranty, as well as the possible deficiencies that only slightly influence the meant use and the possibilities of the appliance. During the warranty period you should bring your defective appliance back to the sales point where you bought it, which will make sure that it is repaired or replaced as soon as possible. It goes without saying that your sales point will always be at you disposal, even after the warranty period. For every repair that is not covered by the guarantee, the sales point will first make a proposition. AEG Milano 40 V.2_en 31 CE declaration of conformity Your set is adapted to be used in the country where you bought is. It has homologation for connection to the public telephone network, only for using it in private homes and shops. It can be connected to a normal outlet and be used by anyone. Each other use will be considered as inappropriate and not conform to the prescriptions. Any alteration or modification, not described in this manual, are not allowed. Hereby we, ITM Technology AG, state that this appliance corresponds with the prescriptions and directives applicable, and with all the other arrests connected to the directive EC 1999/5/EG. The original statement of conformity can be read on the Internet, on the site: www.aeg-itm.de 0 Environmental Protection Discarded electric appliances are recyclable and should not be discarded in the domestic waste! Please actively support us in conserving resources and protecting the environment by returning this appliance to the collection centers (if available).