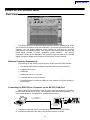
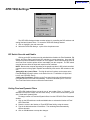
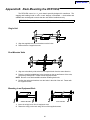
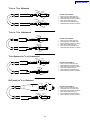
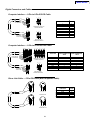
1
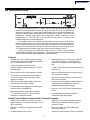
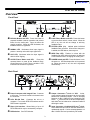
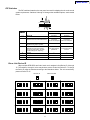
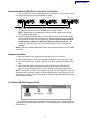
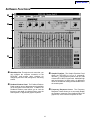
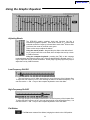
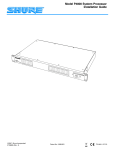
Main Menu
Shure Brothers Incorporated
222 Hartrey Avenue
Evanston IL 60202-3696 U.S.A.
Model DFR11EQ User Guide
ÁÁ ÁÁ
Á Á
ÁÁ
ÁÁ
Á
ÁÁ ÁÁ ÁÁ
ÁÁ
Á
DFR11EQ
Digital Feedback Reducer and Graphic Equalizer
With Software Interface for Windows *
1996, Shure Brothers Inc.
27A8523 (PJ)
Printed in U.S.A.
Main Menu
TABLE OF CONTENTS
INTRODUCTION . . . . . . . . . . . . . . . . . . . . . . . . . . . . . . . . . . . . . . . . . . . . . . . . . . . . . . . . . . . . . . . . . . . . . . . . . . . . . . . . . 2
Features . . . . . . . . . . . . . . . . . . . . . . . . . . . . . . . . . . . . . . . . . . . . . . . . . . . . . . . . . . . . . . . . . . . . . . . . . . . . . . . . . . . . 2
Added Features When Interfaced with a Personal Computer . . . . . . . . . . . . . . . . . . . . . . . . . . . . . . . . . . . . . . . 2
THE DFR11EQ . . . . . . . . . . . . . . . . . . . . . . . . . . . . . . . . . . . . . . . . . . . . . . . . . . . . . . . . . . . . . . . . . . . . . . . . . . . . . . . . . . . 3
Overview . . . . . . . . . . . . . . . . . . . . . . . . . . . . . . . . . . . . . . . . . . . . . . . . . . . . . . . . . . . . . . . . . . . . . . . . . . . . . . . . . . . . 3
DFR11EQ Theory . . . . . . . . . . . . . . . . . . . . . . . . . . . . . . . . . . . . . . . . . . . . . . . . . . . . . . . . . . . . . . . . . . . . . . . . . . . . 5
Setup for Feedback Control . . . . . . . . . . . . . . . . . . . . . . . . . . . . . . . . . . . . . . . . . . . . . . . . . . . . . . . . . . . . . . . . . . . . 7
Connecting the DFR11EQ in a Sound System . . . . . . . . . . . . . . . . . . . . . . . . . . . . . . . . . . . . . . . . . . . . . . . . . . . . 8
COMPUTER INTERFACE . . . . . . . . . . . . . . . . . . . . . . . . . . . . . . . . . . . . . . . . . . . . . . . . . . . . . . . . . . . . . . . . . . . . . . . . 10
Overview . . . . . . . . . . . . . . . . . . . . . . . . . . . . . . . . . . . . . . . . . . . . . . . . . . . . . . . . . . . . . . . . . . . . . . . . . . . . . . . . . . . 10
Software Functions . . . . . . . . . . . . . . . . . . . . . . . . . . . . . . . . . . . . . . . . . . . . . . . . . . . . . . . . . . . . . . . . . . . . . . . . . . 12
Using the Feedback Reducer Panel . . . . . . . . . . . . . . . . . . . . . . . . . . . . . . . . . . . . . . . . . . . . . . . . . . . . . . . . . . . . 13
Using the Graphic Equalizer . . . . . . . . . . . . . . . . . . . . . . . . . . . . . . . . . . . . . . . . . . . . . . . . . . . . . . . . . . . . . . . . . . 14
Viewing Response Curves . . . . . . . . . . . . . . . . . . . . . . . . . . . . . . . . . . . . . . . . . . . . . . . . . . . . . . . . . . . . . . . . . . . . 15
Exiting the DFR11EQ Application . . . . . . . . . . . . . . . . . . . . . . . . . . . . . . . . . . . . . . . . . . . . . . . . . . . . . . . . . . . . . . 15
Accessing Connected DFR11EQs . . . . . . . . . . . . . . . . . . . . . . . . . . . . . . . . . . . . . . . . . . . . . . . . . . . . . . . . . . . . . 16
DFR11EQ Settings . . . . . . . . . . . . . . . . . . . . . . . . . . . . . . . . . . . . . . . . . . . . . . . . . . . . . . . . . . . . . . . . . . . . . . . . . . 17
Scenes . . . . . . . . . . . . . . . . . . . . . . . . . . . . . . . . . . . . . . . . . . . . . . . . . . . . . . . . . . . . . . . . . . . . . . . . . . . . . . . . . . . . . 18
APPENDICES . . . . . . . . . . . . . . . . . . . . . . . . . . . . . . . . . . . . . . . . . . . . . . . . . . . . . . . . . . . . . . . . . . . . . . . . . . . . . . . . . . 19
Appendix A. Specifications . . . . . . . . . . . . . . . . . . . . . . . . . . . . . . . . . . . . . . . . . . . . . . . . . . . . . . . . . . . . . . . . . . . . 19
Appendix B. Rack Mounting the DFR11EQ . . . . . . . . . . . . . . . . . . . . . . . . . . . . . . . . . . . . . . . . . . . . . . . . . . . . . 20
Appendix C. Connectors and Cables . . . . . . . . . . . . . . . . . . . . . . . . . . . . . . . . . . . . . . . . . . . . . . . . . . . . . . . . . . . 21
Appendix D. Warranty . . . . . . . . . . . . . . . . . . . . . . . . . . . . . . . . . . . . . . . . . . . . . . . . . . . . . . . . . . . . . . . . . . . . . . . . 25
*Trademark Notifications
Shure is a registered trademark of Shure Brothers, Inc. Windows is a registered
trademark of Microsoft Corporation. Crystal is a trademark of Crystal Semiconductor
Corporation. Motorola is a registered trademark of Motorola, Inc. IBM is a registered
trademark of the IBM Corporation.
1
Main Menu
INTRODUCTION
The Shure Model DFR11EQ is a single channel signal processor that combines a
feedback reducer and graphic equalizer in a single, half-rack enclosure. The DFR11EQ is
designed to be placed in a sound reinforcement signal path to automatically detect and
control acoustical feedback and equalize overall sound system response. The DFR11EQ is
designed for installed sound reinforcement applications: theater, conference rooms,
meeting halls, etc. The DFR11EQ is also an effective setup tool for controlling major
feedback modes in live music applications.
The feedback reducer of the DFR11EQ automatically inserts narrow notch filters at
detected feedback frequencies. These notch filters stop a sound system from feeding back,
but are narrow enough so their effect on audio quality is minimized. The feedback detection
algorithm constantly searches for feedback, with or without the presence of program audio.
The feedback reducer functions on its own or under external computer control.
The graphic equalizer of the DFR11EQ is made up of thirty 1/3-octave, constant Q filters
and adjustable high pass and low pass filters. The graphic equalizer can be accessed via
computer control with the supplied Windows* interface software.
Features
Adaptive Notch Filter algorithm (patent pending)
which automatically detects feedback and deploys
up to 10 narrow band notch filters.
Crystal* 20-bit A/D and D/A converters
(Analog-to-Digital, Digital-to-Analog) for 104 dB
dynamic range.
Independently driven, cross-coupled, balanced
1/ -in. and XLR outputs. Can be used with
4
balanced or unbalanced inputs, without signal
loss.
+4 dBu/–10 dBV DIP-switch-selectable input and
output levels.
48 kHz sampling rate for flat response to 20 kHz.
1/
2
Motorola* DSP56009 processor engine with full
24-bit internal processing.
RS-232 interface for external computer control
and firmware updates.
Internal linear power supply switchable between
120 and 240 Vac eliminates the need for a
cumbersome external power supply.
rack space chassis allows rack mounting of
one or two units in a single rack space with no
sagging or bending.
Shure Link Interface allows multiple units to be
programmed with a single computer.
No internal batteries. Settings and DSP program
stored in internal EEPROM chip.
Electronically balanced input with combination
1/ -in. and XLR connector. Can be used with
4
balanced or unbalanced outputs.
Meets UL, CSA, VDE, and CE requirements for
safety.
Solid state bypass eliminates unreliable
mechanical relays and switches.
Added Features When Interfaced with a Personal Computer
Tamper-proof, constant-Q, 30-band, 1/3 -octave
graphic equalizer. Can boost up to 6 dB or cut 12
dB for each band.
Response Curve Viewing. Displays frequency
response of the feedback reducer, graphic
equalizer, or both.
Adjustable 12 dB/octave high pass and low pass
filtering.
Numerical display of active feedback filter
frequency and depth.
Front/back panel lockout control.
Storage of multiple scenes to floppy or hard disk.
2
Main Menu
THE DFR11EQ
Overview
Front Panel
BYPASS Button and LED. Press this button to
suspend feedback reducer operation and remove
filters from the audio path. Does not affect the
graphic equalizer. When the LED illuminates, the
feedback reducer is bypassed.
SIGNAL LED. Illuminates when input signal is
present. Intensity varies with input signal level.
CLIP LED. Illuminates when the input signal is
within 6 dB of clipping.
CLEAR Filters Button and LED.
Press this
recessed button to reset all the feedback filters.
Clears filters even if Lock Filters is enabled. LED
illuminates as the button is pressed.
Back Panel
LOCK Filters Button and LED. Press this button
to lock the filters at their current values. When the
LED is on, the unit will not change or add any
feedback filters.
FILTERS LEDs (10). Indicate when individual
feedback filters are active. When a filter changes or
is added, the LED flashes, then stays on.
NEW Filter LED. Flashes in unison with the
feedback filter LEDs when the detector is deploying
a new feedback filter or changing an existing one.
POWER Switch and LED. Press this button to turn
the power on. LED illuminates when unit is powered
on. When the power is off, the unit is bypassed
automatically.
ÑÑÑÑ
ÑÑ
Ñ ÑÑ
Ñ
Ñ
Ñ
Ñ
Ñ
ÑÑ
ÑÑ
ÑÑ ÑÑ
ÑÑ
ÑÑ
ÑÑÑÑÑ ÑÑ
Power Connector with Integral Fuse. Connects
to AC power. The fuse is located in the drawer below
the connector.
9-Pin RS-232 Port. Connects the unit to a
computer. For use with DFR11EQ software and for
DSP firmware upgrades.
Shure Link Interface. Allows linking of up to 16
DFR11EQs which may be accessed by computer.
DIP Switches. See DIP Switches.
3
Output Connector—1/4-Inch & XLR. Active,
cross-coupled, balanced outputs can be used with
balanced or unbalanced inputs. Can be switched
between +4 dBu/–10 dBV line-level operation by DIP
switch. 1/4-Inch and XLR are driven independently
and either can be balanced or unbalanced without
affecting the other.
Input Connector—Combined XLR and 1/4-Inch.
Active balanced input can be used with balanced or
unbalanced outputs. Can be switched between +4
dBu/–10 dBV line-level operation by DIP switch.
Main Menu
DIP Switches
The DIP switches located on the rear panel are used for adapting the unit to the sound
system requirements. Switches 5 through 10 change other available options, see the table
below.
DIP
SWITCH
FUNCTION
1–4
POSITION
UP
DOWN
see below
see below
High Q
1/10-octave
narrows as it deepens
Low Q
1/10-octave
widens as it deepens
EQ On
EQ Off
Unlock
Front panel buttons
operational
Lock
Front panel buttons
inactive
Device ID
5
Filter Bandwidth Select
Determines the Q of the feedback filter.
6
Graphic Equalizer Defeat
Bypasses the graphic equalizer.
7
Front Panel Lockout
Disables the front panel controls,
except the power switch. Protects
current settings from tampering.
8
unused
—
—
9
Output Level
+4 dBu
–10 dBV
10
Input Level
+4 dBu
–10 dBV
Shure Link Device ID
When multiple DFR11EQ’s are linked, each one is assigned a Link Device ID, 0 through
15. DIP switches 1 through 4 on the rear panel are used to set the Link Device ID. To change
the Device ID, align the switches according to the illustrations below. The unit comes factory
preset to Device ID 15.
DEVICE ID 0
1
2
3
4
DEVICE ID 4
1
2
3
2
3
4
2
3
DEVICE ID 1
DEVICE ID 2
1
2
3
4
1
1
2
3
4
1
2
3
4
1
1
2
3
3
4
2
3
4
1
2
3
4
1
4
2
3
2
3
4
1
2
3
4
DEVICE ID 11
4
DEVICE ID 14
4
1
DEVICE ID 7
DEVICE ID 10
DEVICE ID 13
4
2
DEVICE ID 3
DEVICE ID 6
DEVICE ID 9
DEVICE ID 12
1
SWITCH DOWN
DEVICE ID 5
DEVICE ID 8
1
SWITCH UP
1
2
3
4
DEVICE ID 15
4
1
2
3
4
Main Menu
DFR11EQ Theory
Feedback and DFR11EQ Operation
When acoustical feedback occurs in a sound system, it is because the gain of the system
is too high. Since no sound system (microphones, loudspeakers, room acoustics, etc.) has
an absolutely flat frequency response, feedback will occur at specific frequencies before
others; these are the frequencies with the most gain. If the gain at only these specific
frequencies is lowered, then the system can operate with more overall gain before it feeds
back, without a perceptible difference in tonal quality. This is the operating principle of the
DFR11EQ.
At the heart of the DFR11EQ is a very powerful algorithm that can accurately and quickly
discriminate between feedback and non-feedback sounds (speech and music). When this
algorithm detects feedback, it smoothly inserts a –3 dB, 1/10-octave notch filter into the audio
path to reduce the gain at the frequency which is feeding back. If the feedback does not stop,
the filter depth is increased in 3 dB increments (up to –18 dB) until the feedback stops.
After the DFR11EQ stops the feedback at one frequency, the sound system may start
feeding back at another frequency. In this case, the DFR11EQ inserts another notch filter
into the audio path at the new frequency. The DFR11EQ can insert a total of 10 notch filters to
reduce feedback.
DFR11EQ Limitations
The DFR11EQ (or any other notch filter system) cannot entirely eliminate feedback in a
sound system, it can only help to reduce it. In a typical system, a point of diminishing returns
is reached after 4 to 8 notch filters are set. This is because generally there are only a few
dominant frequency response peaks above the response of the entire system (see diagram
below). The DFR11EQ works very well controlling these peaks. The user can expect a 6 to 9
dB improvement of gain-before-feedback in a typical system. However, if the system has too
much overall gain, then all of the frequencies have too much gain; instead of trying to notch
out all of the frequencies, better results will be obtained by lowering the gain of the system. If
the system still has insufficient gain, then other changes must be made to the sound system
such as different microphone or loudspeaker placement. There are several excellent
publications which delve deeper into the issue of feedback and sound systems, including:
Acoustic Feedback – How to Avoid It, Vivian Capel, Bernard Babani Publishing, ISBN
0–85934–255–7; Sound Reinforcement Handbook, Gary Davis and Ralph Jones, Hal
Leonard Publishing, ISBN 0–88188–900–8; Sound System Engineering, Don and Carolyn
Davis, Howard W. Sams and Co., ISBN 0–672–21857–7; “Understanding Sound System
Design”, Rick Frank, Shure Brothers, # AL1174; “Basic Handbook of Feedback Reduction”,
Matt Anderson and Jon Tatooles, Shure Brothers, # AL 1280.
100
95
90
85
80
75
70
65
60
100
200
500
1000
2000
FREQUENCY (Hz)
5
5000
10000
20000
Main Menu
Fixed and Dynamic Notch Filters
The DFR11EQ can control the notch filters as either dynamic or fixed. The DFR11EQ’s
10 notch filters are factory preset as 5 fixed and 5 dynamic filters. There is no difference
between dynamic and fixed filters until all 10 filters have been set. After all 10 notch filters are
set and a new feedback frequency is detected, the DFR11EQ will remove the oldest set
dynamic filter and re-deploy it at the new feedback frequency. The fixed filters remain
unchanged. However, if feedback occurs at the same frequency as an existing dynamic or
fixed filter, the existing filter will deepen. The number of fixed versus dynamic filters can be
adjusted via the DFR11EQ’s Windows interface.
An example of a system that would benefit from more fixed filters and less dynamic filters
is one that has fixed microphone and loudspeaker locations. In this type of system, the most
dominant frequencies of feedback are defined by the room dimensions and the microphone
and loudspeaker placement, and will not change appreciably. However, feedback can still
occur, for instance, when someone’s hand or head approaches a microphone. A good
setting for this type of system would be 7 fixed filters for the non-changing feedback
frequencies, and 3 dynamic filters to catch the feedback frequencies caused by the talker.
On the other hand, more dynamic than fixed filters would be appropriate in a system that
has several non-stationary wireless microphones. Eight or even all 10 filters could be set to
dynamic in this type of system to obtain maximum feedback protection. As every application
is different, some experimentation is recommended to get the best results from a given
sound system.
High Q vs. Low Q Filters
The DFR11EQ offers two selections for the shape of the 1/10-octave notch filters. The
first, High Q, is the default setting. A High Q filter’s width stays very narrow as the filter depth
is increased. This attenuates the minimum amount of signal possible to ensure system
stability, while maintaining excellent sound quality. This setting is appropriate for most
applications.
The Low Q setting maintains the filter’s shape as it is deepened, so the width of the filter
effectively widens as the depth increases. Using this setting attenuates the signal more,
producing a greater system stability than the High Q setting, but with slightly diminished
sound quality. This setting is appropriate for systems such as a speech-only PA where
stability is an absolute must, but the sound quality can be compromised a bit.
Filter Locking
The feedback filters can be locked from the front panel of the unit or from the computer
interface. When locked, new filters will not be deployed and existing filters will not be
deepened, even if feedback is detected. The DFR11EQ’s algorithm is designed to
accurately differentiate feedback from non-feedback sounds such as speech. However,
certain sounds such as electric guitar feedback or test tones, which sound like feedback,
may cause the algorithm to deploy an unwanted filter.
For most applications, locking the feedback filters is unnecessary. As a rule of thumb, if
the application will contain material which sounds similar to acoustic feedback, then it is
prudent to lock the filters after ringing out the sound system.
6
Main Menu
Setup for Feedback Control
The DFR11EQ will operate stand-alone as a feedback reducer. However, when
connected to a personal computer running the supplied DFR11EQ software, additional
options are available. See Computer Interface for details.
There are two basic ways in which to set-up the DFR11EQ: The “Ring Out” method and
the “Insurance Policy” method. Both are valid for different situations. The “Ring Out” method
is a preemptive measure in which the system gain is raised beyond the normal setting to
deliberately make the system feed back. The DFR11EQ will then set its filters, and the
system gain is then reduced slightly, and the system is stable and useable. This set-up
method is primarily used for systems which are operated near the feedback point and need
an extra margin of stability.
For the “Insurance Policy” method, the DFR11EQ is simply installed in the sound
system, but filters are not set prior to use. The DFR11EQ adds extra insurance against
feedback: the system is not expected to feed back, but if it does, the DFR11EQ is there to
catch it. This set-up method is used for systems which already have sufficient
gain-before-feedback, but need protection from the occasional stray feedback which can
occur due to non-stationary microphones or user-adjustable gain controls.
Setup
1. Connect the DFR11EQ in the desired signal path location. See Connecting the Unit
In a Sound System.
2. Set the input and output level DIP switches to the appropriate settings for the
sensitivities of the connected equipment.
WARNING: Other equipment may potentially be damaged after DFR11EQ power
off if the DFR11EQ input is set to +4 and the output is set to –10. If the DFR11EQ
input is set to +4 and the output is set to –10, then the DFR11EQ is acting as an
attenuator, lowering the signal to the proper level for the power amplifier. If the
DFR11EQ is turned off, this attenuation is bypassed and the power amplifier will
receive too strong a signal. It is recommended that you avoid using this setting.
3. Set the system gain to minimum, and power up all of the equipment.
4. Slowly raise the gain of the system, and set the gain of each microphone to achieve
the desired level.
5. The red CLIP LED should illuminate only on the highest signal peaks. If it illuminates
more frequently, check to see that the input level switch is set properly. If it is, lower
the level of the signal coming into the DFR11EQ.
6. At this point it is highly recommended to equalize the sound system with the
DFR11EQ’s built–in graphic equalizer (see Computer Interface) or an external
equalizer. The DFR11EQ’s feedback reducer is more effective on a well–equalized
sound system.
Ringing Out the System (“Ring Out” method only)
1. If necessary, clear any notch filters in the DFR11EQ by pressing the CLEAR button.
Turn off the BYPASS and LOCK LEDs if they are not already off.
2. Slowly raise the gain of the signal going through the DFR11EQ. When feedback
occurs, the DFR11EQ will insert a filter deep enough to stop the system from feeding
back.
3. Repeat step 2 until all fixed filters are set. (There are 5 fixed filters, unless changed
by the user via the computer interface.)
4. Lower the gain by 3 to 6 dB to stabilize the sound system.
Power Down
When power is removed from the DFR11EQ, all settings (graphic equalizer, feedback
filters, button states) are automatically saved to the DFR11EQ’s internal non-volatile
memory. On power up, all settings are recalled automatically.
7
Main Menu
Connecting the DFR11EQ in a Sound System
The DFR11EQ should be placed where an equalizer would be in a signal path — it should
be the final piece of equipment a sound signal passes through before going to a power
amplifier. Other signal processors (for example, delay or reverb effects devices) should be
placed before the DFR11EQ along the signal path.
The following four diagrams show typical connections. Because of its utility and
flexibility, the DFR11EQ can be connected in a large variety of different setups to benefit a
sound system.
NOTE: See Appendix C. for descriptions of all cable and connection wiring.
Between the Mixer Main Output and the Power Amplifier
The DFR11EQ is most commonly placed between the main output of a mixer and the
input of a power amplifier, after any dynamics control processors. At the main output, the unit
will affect all input channels. This setup is ideal for using the DFR11EQ as a feedback
reducer and as a graphic equalizer.
LINE IN
ÑÑÑ
ÑÑ
DFR11EQ
LINE IN
ÑÑ
ÑÑÑ
ÑÑÑ
ÑÑ
POWER AMPLIFIER
LINE OUT
ÑÑÑÑÑÑÑÑÑÑÑÑÑÑ
ÑÑ
Ñ
ÑÑ
ÑÑÑ
ÑÑÑÑÑÑÑÑÑÑÑÑ
Ñ
Ñ
Ñ
ÑÑ
ÑÑ
Ñ
ÑÑ
Ñ
ÑÑ
ÑÑÑÑ
ÑÑ
Ñ
ÑÑ
Ñ
ÑÑ
Ñ
Ñ
Ñ
Ñ
ÑÑ
ÑÑ
Ñ
Ñ
ÑÑÑÑÑÑÑÑÑÑÑ
ÑÑÑÑÑÑÑÑÑÑÑÑÑÑ
Ñ
ÑÑ
ÑÑÑÑÑÑÑÑÑÑÑÑ
Ñ
ÑÑ
ÑÑ
Ñ
ÑÑ
Ñ
ÑÑÑÑÑÑÑ
ÑÑ
Ñ
Ñ
ÑÑ
Ñ
ÑÑÑ
Ñ
Ñ
Ñ
Ñ
Ñ
ÑÑ
ÑÑ
Ñ
Ñ
ÑÑ
ÑÑÑÑÑÑÑÑÑÑÑÑÑÑ
Ñ
ÑÑÑÑ
ÑÑ
ÑÑÑÑ
ÑÑÑÑÑÑÑ
ÑÑÑ
ÑÑÑ
ÑÑÑÑ
LINE OUT
LOUDSPEAKER
MIXER
At a Subgroup Insert
When using a multiple bus mixer, the DFR11EQ can be connected to a single subgroup
insert. The unit will affect only the channels associated with that subgroup: the other
channels will remain unaffected.
ÑÑÑ
Ñ
Ñ
ÑÑ
Ñ
ÑÑ
ÑÑ
LINE IN
SUB SEND
LINE
OUT
MAIN
SUB RETURN
ÑÑ
Ñ
ÑÑÑ
DFR11EQ
LINE IN
ÑÑÑÑ
ÑÑ
ÑÑ
POWER AMPLIFIER
LINE OUT
LOUDSPEAKER
MIXER
8
Main Menu
Inserted in an Input Channel
If only a single microphone is creating feedback problems, the DFR11EQ can be inserted
on that channel alone. This is especially useful for wireless microphones, because the
constant movement of a performer may bring the microphone too close to the sound
reinforcement loudspeakers.
CHANNEL 1 IN
CHANNEL 1
INSERT
ÑÑ ÑÑ
ÑÑ
ÑÑÑ
Ñ
ÑÑÑ
Ñ
LINE IN
LINE
OUT
MAIN
ÑÑÑ
ÑÑ
LINE IN
LINE OUT
POWER AMPLIFIER
DFR11EQ
LOUDSPEAKER
MIXER
LINE OUT
WIRELESS RECEIVER
Inserted Between Mixer and Monitor
Since monitor loudspeakers and microphones are usually in close proximity, the
DFR11EQ can be connected to stabilize a monitor system. Place a DFR11EQ on the aux
output which goes to the monitor loudspeaker. For multiple monitor mixes, a DFR11EQ
should be placed at the output of each monitor send.
LINE IN
ÑÑÑ
ÑÑ
ÑÑÑ
AUX 1 AUX 2
OUT
OUT
LINE IN
ÑÑÑ
Ñ
Ñ
ÑÑÑ
ÑÑ
DFR11EQ
LINE IN
LINE OUT
MIXER
9
ÑÑÑÑ
DFR11EQ
LINE OUT
LINE IN
ÑÑÑÑ
ÑÑ
ÑÑ
MONITOR
POWER AMPLIFIER
MONITOR
LOUDSPEAKERS
Main Menu
COMPUTER INTERFACE
Overview
This section describes the Windows based computer interface software which allows
you to utilize the full features of the Shure DFR11EQ. By connecting the DFR11EQ to your
computer, you can access additional control features to customize the operating
characteristics of the feedback filters. The computer interface also allows access to the
built-in digital, 30-band, 1/3-octave, constant-Q, graphic equalizer.
The resulting
equalization curves can be displayed in the frequency response graph for an accurate
display of either the feedback filter response, EQ response, or both combined.
Minimum Computer Requirements
The following are the minimum requirements to run the Shure DFR11EQ software.
One 486DX 33MHz IBM*-compatible computer (math coprocessor required)
2 MB hard drive space
4 MB RAM
Windows version 3.1x, or greater
1 available RS-232 serial (COM) port
One RS-232 cable to connect the COM port of the computer to the DB-9 connector of
the DFR11EQ
Connecting the DFR11EQ to a Computer via the RS-232 (COM) Port
Before connecting the DFR11EQ to the computer, determine whether the computer’s
RS-232 (COM) port is 9-pin or 25-pin. Use the proper cable (purchased separately). For
RS-232 cable diagrams, see Appendix C. Cables and Connectors.
TO COMPUTER
RS-232 CONNECTOR
TO DFR11EQ
RS-232 CONNECTOR
(9-PIN MALE)
1. Connect the 9-pin plug (male) of the cable to the RS-232 port of the DFR11EQ.
2. Connect the other end of the cable to the RS-232 port of the computer.
10
ÑÑ
ÑÑÑÑ
ÑÑÑÑ
ÑÑ
ÑÑ
Ñ
Main Menu
Networking Multiple DFR11EQs via the Shure Link Interface
Up to 16 DFR11EQ’s can be linked together and controlled from a single computer. Each
unit comes supplied with one 5-pin DIN cable for linking.
Ñ
Ñ
ÑÑÑÑ
ÑÑ
DFR11EQ #1
LINK IN
TO
COMPUTER
ÑÑÑ
Ñ
ÑÑ
Ñ
ÑÑÑ
DFR11EQ #2
LINK OUT
LINK OUT
LINK IN
ÑÑÑ
Ñ
Ñ
ÑÑÑ
ÑÑ
DFR11EQ #3
LINK OUT
LINK IN
1. Assign each unit a Device ID (0 through 15) via the DIP switches on the rear panel
(see Shure Link Device ID, in the Hardware section of this manual).
NOTE: Multiple units can be assigned the same Device ID, enabling those units to
be controlled simultaneously.
2. Using the supplied 5-pin DIN cable, connect the Shure Link OUT of the first unit (the
one connected directly to the computer) to the Shure Link IN of the next unit. Repeat
this connection for each unit to be networked. The last unit in the chain should be
connected from its Shure Link OUT to the Shure Link IN of the first unit. This
creates the loop necessary for all of the networked units to communicate with the
computer.
NOTE: Although a standard MIDI cable can be used to link units, Shure Link is not MIDI
compatible.
Software Installation
1. Insert the supplied 3.5-in floppy disk into the disk drive of your computer.
2. With Windows active, click on the File heading of the main menu, then click on Run...
3. In the Run window, type “a:\setup”, where “a” is the drive containing the Shure Setup
disk.
4. Shure Setup will suggest a destination on your hard disk for the DFR11EQ files.
Shure Setup will check the computer hardware to ensure that a coprocessor is
present. Setup will also prompt you for your name and organizational information.
NOTE: Remember to register your software by filling out and mailing the enclosed
registration card, or online via the Shure World Wide Web site (“http://www.shure.com”).
This will ensure that you receive information about software updates with additional features
as they become available.
The Shure DFR11EQ Program Group
The DFR11EQ program group contains the main application icon, a Windows Help file,
and a Readme file with up-to-date information. To launch the application, double-click on the
DFR11EQ icon.
11
Main Menu
Software Functions
Main Menu Bar. Through the main menu bar, you
can configure the computer connection to the
DFR11EQ, and access other windows for
configuring the DFR11EQ, setting filters, and saving
scenes.
Feedback Reducer Panel. The Feedback Reducer
Panel contains many of the same controls available
on the front panel of the DFR11EQ. In addition, the
Feedback Reducer panel allows you to view the
frequency and depth of individual filters, mute the
sound system, or bypass the graphic equalizer.
12
Graphic Equalizer. The Graphic Equalizer Panel
allows the DFR11EQ to act as a constant-Q,
30-band, 1/3-octave graphic equalizer with up to 6 dB
of boost and 12 dB of cut per band. Additional high
and low frequency cut filters with a 12 dB/octave
rolloff are included for setting the bandwidth limit of
the sound system.
Frequency Response Curves. The Frequency
Response Viewer allows you to accurately display
the frequency response of the feedback filters, the
graphic EQ, or the combined response of both.
Main Menu
Using the Feedback Reducer Panel
Feedback Reducer (DFR) Bypass Button and LED
Pressing the DFR bypass button suspends the feedback reducer operation and
removes its filters from the audio path. It does not affect the graphic equalizer. When the
LED illuminates, the feedback reducer is bypassed. This is identical to the front panel
BYPASS button and LED.
EQ Bypass Button and LED
Pressing the EQ bypass button removes the graphic equalizer filters from the
audio path. This button does not affect feedback reducer operation. When the LED
illuminates, the graphic equalizer is bypassed. This is identical to the rear panel EQ Bypass
DIP switch.
Mute Button and LED
To mute the audio signal of the DFR11EQ, click on the MUTE button. The LED
will illuminate and no sound will pass through.
Clear Filters Button and LED
Click on the CLEAR button to clear all feedback filters. The Clear function is
active even if LOCK filters is active. The LED illuminates as the DFR clears the
filters. This is identical to the CLEAR button and LED on the front panel of the
DFR11EQ.
Lock Filters Button and LED
Click on the LOCK button to lock the filters at their current values. The LED
illuminates when the lock is active. The DFR11EQ will not set any new filters or
change the depth of any existing feedback filters. This is identical to the LOCK
button and LED on the front panel of the DFR11EQ.
Feedback Filters Button and LED
As on the front panel of the unit, there are 10
LEDs representing each of the 10 feedback
filters. The LEDs illuminate from left to right, with
the LEDs on the left representing the fixed filters.
In order to view the settings of a specific filter,
click on the right and left arrows to either side of the filter LEDs. This will move the red
arrows above and below the selected filter LED. When a filter is selected, the current
frequency and depth of that filter will appear in the FREQ. and DEPTH fields. The number
displayed in the FREQ. field is the exact frequency which has been feeding back. The
DEPTH field shows the feedback filter depth required to reduce the feedback at that
frequency.
Connect Button and LED
Clicking the CONNECT button brings the DFR11EQ plugged in to the
computer online, along with any other DFR11EQs netwoked via Shure Link.
CONNECT automatically selects the unit connected to the computer. When the
green LED illuminates, the connected units are online. When the LED is off, the
units are operating without the computer interface and the software is running offline.
13
Main Menu
Using the Graphic Equalizer
Adjusting Bands
The DFR11EQ graphic equalizer looks and functions just like a
conventional graphic equalizer. Each slider controls a 1/3-octave band
centered around the frequency indicated above each slider. When a slider
is selected, the center of the slider turns green.
There are two ways to adjust the sliders:
Using the mouse pointer... drag and drop the slider to the desired level.
Or you can point and click on the band, which will adjust the level up or down
in 3 dB increments.
Using the computer keyboard... pressing the [Tab] on the computer
keyboard selects the sliders from left to right. When the desired slider is selected, use the ↑ ↓
keys to adjust the level by 0.5 dB increments. Us the [Page Up] and [Page Down] keys to
adjust the level by 3 dB increments.
Low-Frequency Roll-Off
The Low frequency roll-off slider determines the corner frequency of the highpass filter.
To adjust the Low frequency roll-off, click and drag the slider to the desired frequency. You
can also use the ← and → keys on the computer keyboard to move this slider.
High-Frequency Roll-Off
The High frequency roll-off slider determines the corner frequency of the lowpass filter.
To adjust the High frequency roll-off, click and drag the slider to the desired frequency. You
can also use the ← and → keys on the computer keyboard to move this slider.
Flat Button
The Flat button resets all the sliders, bringing them back to the 0 dB position.
14
Main Menu
Viewing Response Curves
DFR Response Curves
Clicking on the DFR button displays the feedback filter frequency response
curve on the graph. This curve shows the response of all deployed feedback
filters. Here you can check the frequency and depth of each filter.
EQ Response Curves
Clicking on the EQ button displays the graphic equalizer frequency
response curve on the graph. Use this curve as an aid in setting up the graphic
equalizer.
Both
Clicking on the BOTH button displays the composite response of the
graphic equalizer and the deployed feedback filters. Here you can see how the
equalized sound is affected by the feedback filters.
Exiting the DFR11EQ Application
To Exit
1. Click on File in the main menu bar.
2. Select the Exit option of the drop-down menu.
15
Main Menu
Accessing Connected DFR11EQs
Configuring the Computer Serial Port
1. Launch the DFR11EQ software.
2. Click on Setup in the main menu bar.
3. Click on the COM port option of the drop-down menu.
4. In the DFR11EQ Serial Port window, select an available COM port on the computer.
5. Click on the OK button.
NOTE: The COM port selection is saved in the DFR11EQ file, and will not need to be
selected again unless you need to change the hardware configuration.
Accessing the Connected DFR11EQs
To bring the networked DFR11EQ’s online, click on the CONNECT button of the DFR
panel. Or, select the Connect option of the Setup drop-down menu of the main menu bar.
The program searches for each unit connected in the network, reading the Shure Link Device
ID of each.
Shure Link Device ID Selection
DFR11EQ’s are addressed by their Shure Link Device ID. For instructions in assigning
Shure Link Device IDs, see Shure Link Device ID. Units with the same Device ID will receive
the same settings from the computer. To access Units with different Device ID’s, you will
need to select the Device ID from the main menu.
To select a Device ID:
1. Click on Device ID in the main menu bar. A drop-down menu will appear showing
the Device IDs of all the connected DFR11EQs.
2. Click on the desired Device.
The Device ID will appear beside the DFR11EQ heading at the top of the main window,
indicating that all the units with that Device ID will receive computer commands.
16
Main Menu
DFR11EQ Settings
The DFR11EQ Settings window contains options for controlling the DIP switches and
setting fixed and dynamic filters. To access the DFR11EQ Settings window:
1. Click on Options in the main menu bar.
2. Select the DFR11EQ Settings... option of the drop-down menu.
DIP Switch Override and Disable
Clicking on the DIP switches override and disable box disables the Filter Bandwidth, EQ
Defeat, and Front Panel Lock/Unlock DIP switches to prevent tampering. Once the DIP
switches override and disable is activated, an X will appear in the box and the High Q/Low Q
and Front Panel Lockout options will be controllable from the computer. The DIP switch
override does not affect the input and output level DIP switches.
NOTE: Because the computer bypassing of the graphic equalizer is DIP switch controlled,
computer control of the graphic equalizer automatically locks out the DIP switches on the
unit.
Setting High Q or Low Q Filters... The High Q and Low Q options are the same as the
Filter Bandwidth DIP switch options on the back of the unit. For definitions of High Q and
Low Q, see DFR11EQ Theory.
Locking the Front Panel... Clicking on the Front panel lockout box will deactivate the
front panel buttons of the DFR11EQ hardware. Lockout is indicated by an X in the box.
The Front Panel lockout does not affect the Power button.
Setting Fixed and Dynamic Filters
DFR11EQ feedback filters are set in one of two modes: Fixed or Dynamic. For
definitions of these two modes, see DFR11EQ Theory. The DFR11EQ comes factory preset
with 5 fixed and 5 dynamic filters.
To change number of Fixed and Dynamic filters from the DFR11EQ Filter Parameters
window:
1. Click on the DIP switches override and disable box to activate the Number of Fixed
DFR Filters field.
2. Place the cursor in the Number of Fixed DFR Filters field by using the mouse.
3. Type in the desired number of fixed filters. The remaining filters automatically
become dynamic.
4. Click on the OK button to accept the changes.
17
Main Menu
Scenes
Once a DFR11EQ has been set up with a desired combination of settings, they can be
stored on disk as a Scene. Although the DFR11EQ automatically saves the current scene in
internal memory, other scenes can be saved to disk. Scenes are useful for reducing setup
time when multiple units require similar settings. Scenes are also useful for multi-purpose
sound system, or events which require changing settings “on the fly”. Up to 16 events may be
stored on the computer for later recall.
To Store a Scene in the DFR11EQ
The DFR11EQ stores one scene in its internal non-volatile memory. This scene is
automatically saved in the DFR11EQ upon power down. After any adjustments are made to
any settings, the computer can simply be disconnected from the DFR11EQ, and the
DFR11EQ will retain the settings.
To Save a Scene to Disk
Scenes are saved to the DFR11EQ.INI file located in the Windows system directory. To
save a scene:
1. Click on File in the main menu bar.
2. Select the Scenes... option of the drop-down menu.
3. On the Scene Dialog window type a name (8 characters maximum) in the Scene
Name field.
4. Click on the Save Scene button.
To Recall a Scene from Disk
Once a scene has been saved, the Windows software can be used to reload that scene
from disk and recall it to a DFR11EQ. To recall a scene:
1. Click on File in the main menu bar.
2. Select the Scenes... option of the drop-down menu.
3. On the Scene Dialog window, click on the arrow key beside the Scene Name field
for a drop-down list of available scene names.
4. Select the desired scene name.
5. Click on the Recall Scene button.
To Delete a Scene from Disk
1. Click on File in the main menu bar.
2. Select the Scenes... option of the drop-down menu.
3. On the Scene Dialog window, click on the arrow key beside the Scene Name field
for a drop-down list of available scene names.
4. Select the desired scene name.
5. On the Scene Dialog window, click on the Delete Scene button.
18
Main Menu
APPENDICES
Appendix A. Specifications
Weight
930 g (2.5 lbs)
Frequency Response
20 to 20k Hz ± 1.0 dB re 1 kHz
Dynamic Range
104 dB minimum, A-weighted, 20 Hz to 20 kHz
Sampling Rate
48 kHz
Digital-to-Analog, Analog-to-Digital Conversion
20 bit resolution
Voltage Gain
–1 dB ± 1dB (power off)
0 dB ± 2 dB (equal input and output sensitivities)
12 dB ± 2 dB (input –10 dBV, output +4 dBu)
–12 dB ± 2 dB (input +4 dBu, output –10 dBv)
Impedance
Input: 47 kΩ ± 20% actual
Output: 120 Ω ± 20% actual
Input Clipping Level
+18 dBu minimum (at +4 dBu setting)
+6 dBu minimum (at –10 dBV setting)
Output Clipping Level
+18 dBu minimum (at +4 dBu setting)
+6 dBu minimum (at –10 dBV setting)
Total Harmonic Distortion
< 0.05% at 1 kHz, +4 dBu, 20 to 20 kHz
LED Signal Indicators
Clip: 6 dB down from input clipping
Delay from Input to Ouput
< 1.0 ms, all filters set to Flat
Polarity
Input to output: non-inverting
XLR: pin 2 positive with respect to pin 3
1/ -in. TRS: tip positive with respect to ring
4
Operating Voltage
DFR11EQ: 108 to 132 Vac, 50/60 Hz
DFR11EQE: 216 to 264 Vac, 50/60 Hz
NOTE: This product is not disconnected from the mains
power supply when the POWER switch is in the Off
position.
Temperature Range
Operating: 0_ to 60_ C (32_ to 140_ F)
Storage: –30_ to 70_ C (–22_ to 158_ F)
Fuse
DFR11EQ:120 VAC. Fuse: 100 mA, 250V time delay.
DFR11EQE: 250 VAC. Fuse: 50 mA, 250V time delay
In order to change a blown fuse, remove the power cord
and pry open the drawer with a flathead screwdriver.
FEEDBACK FILTERS
Ten (10) 1/10-octave adaptive notch filters from 60 Hz
to 20 kHz
Deployed to 1 Hz resolution of feedback frequency
Deployed in depths of 3 dB, 6 dB, 9 dB, 12 dB, and 18
dB attenuation
Filter shape variable between HI Q and LOW Q (see
High Q vs. Low Q Filters.
GRAPHIC EQUALIZER
Frequency Bands
30 bands on ISO, 1/3-octave centers
Filter Type
1/ -octave, constant-Q
3
Maximum Boost
6 dB per band
Maximum Cut
12 dB per band, highpass and lowpass filters
CERTIFICATIONS
DFR11EQ: UL Listed and cUL Listed to UL 813 and CSA
C22.2 No. 1. Authorized under Verification provision of
FCC Part 15 as a Class B Digital Device.
DFR11EQE: Conforms to European Union Directives,
eligible to bear CE marking. Meets European Union Low
Voltage Requirements: VDE GS-Certified to EN 60 950.
Meets European Union EMC Emissions Requirements:
EN 50 081-1 (1992) [EN 55022]. Meets European
Union EMC Immunity Requirements EN 50 082–1
(1992): [RF radiated (IEC 801–3) meets Criterion A;
ESD meets Criterion B; EFT (IEC 801–4) meets
Criterion B].
This symbol indicates that dangerous voltage
constituting a risk of electric shock is present
within this unit.
This symbol indicates that there are important
operating and maintenance instructions in the
literature accompanying this unit.
FURNISHED ACCESSORIES
Power Cable (DFR11EQ) . . . . . . . . . . . . . . . . . . . 95A8389
Power Cable (DFR11EQE) . . . . . . . . . . . . . . . . . 95A8247
5-pin DIN Shure Link Cable . . . . . . . . . . . . . . . . . 95A8676
Single Mount Rack Bracket . . . . . . . . . . . . . . . . . 53A8450
Dual Mount Rack Bracket . . . . . . . . . . . . . . . . . . 53B8442
Straddle Bars . . . . . . . . . . . . . . . . . . . . . . . . . . . . . 53B8443
3.5” Floppy disk . . . . . . . . . . . . . . . . . . . . . . . . . . . . 84A003
FUSE
Dimensions
219 mm x 137 mm x 40 mm
8 5/8 in x 5 3/8 in x 1 3/4 in
19
Main Menu
Appendix B. Rack Mounting the DFR11EQ
The DFR11EQ comes in a 1/2-rack chassis specially designed for sturdiness. The
sagging and bending found in most 1/2-rack designs is eliminated — the brackets and
straddle bars are designed to ensure that the units will be installed securely.
WARNING: Do not torque the screws too tightly, or the chassis may be damaged.
Single Unit
ÑÑ
ÑÑ
ÑÑ
ÑÑÑÑÑ
Ñ
ÑÑ
ÑÑ
ÑÑ
ÑÑÑÑÑ
Ñ
ÑÑÑ
Ñ
ÑÑ
ÑÑÑÑ
Ñ
Ñ
Ñ
ÑÑÑ
ÑÑ
ÑÑ
Ñ
ÑÑ
ÑÑ
Ñ
ÑÑÑÑÑÑÑ
ÑÑÑÑÑÑ
ÑÑÑÑÑ
ÑÑÑ
1. Align the supplied rack-mount brackets over the holes.
2. Fasten with the 8 supplied screws.
Dual-Mounted Units
ÑÑÑ
ÑÑ
ÑÑÑ
ÑÑ
ÑÑÑÑ
ÑÑ
ÑÑÑÑÑ
ÑÑÑ
Ñ
ÑÑ
ÑÑ
ÑÑÑÑÑÑÑ
ÑÑÑÑ
ÑÑÑÑÑ
ÑÑÑÑ
Ñ
Ñ
ÑÑ
Ñ
Ñ
ÑÑÑ
ÑÑ
ÑÑÑ
Ñ
ÑÑ
ÑÑ
ÑÑÑÑ
ÑÑÑ
ÑÑ ÑÑÑÑ
ÑÑÑÑÑÑ
Ñ
1. Align two units side by side so that the front panels both face the same direction.
2. Place the supplied straddle bars in the recesses on the top and bottom of the units,
so that they overlap both. Fasten with the supplied screws.
NOTE: Be sure to use both straddle bars when installing dual units.
3. Position the rackmount brackets over the holes in the side of the unit. Fasten with
the supplied screws.
Mounting in an Equipment Rack
ÑÑÑ
ÑÑ
ÑÑÑÑÑ
Ñ
ÑÑÑ
Ñ
Ñ
ÑÑÑÑÑ
Ñ
Ñ
ÑÑÑÑÑ
ÑÑÑ
ÑÑ
ÑÑÑ
ÑÑÑÑ
Ñ
Ñ
ÑÑÑÑÑ
ÑÑÑÑÑ
ÑÑ
ÑÑÑÑÑ
Ñ
ÑÑ
ÑÑÑÑ
ÑÑ
ÑÑÑ
ÑÑ
ÑÑÑÑÑÑ
Ñ
ÑÑÑÑ
ÑÑÑÑÑ
ÑÑ
Ñ
ÑÑ
ÑÑ
ÑÑ
ÑÑÑÑÑ
ÑÑÑÑ
ÑÑÑ
Ñ
SINGLE MOUNT
DUAL MOUNT
1. Insert the unit(s) into a 19-inch equipment rack.
2. Fasten the unit(s) to the rack using all four of the supplied screws.
20
Main Menu
Appendix C. Connectors and Cables
NOTE: Except for the Shure Link cable, none of the cables shown come supplied with the
DFR11EQ.
Audio Connectors
DFR11EQ Audio Output
DFR11EQ Audio Input
Connector:
(XLR and
1/4-inch
separate)
XLR (male)
1/4-inch
phone plug
(female)
Configuration:
active balanced
cross coupled
active balanced
cross coupled
47 kΩ
Actual
Impedance:
120 Ω
120 Ω
+4 dBu
(+4 input level)
+4 dBu
(+4 input level)
Nominal
Output Level:
+4 dBu
(+4 output level)
+4 dBu
(+4 output level)
–10 dBV
(–10 input level)
–10 dBV
(–10 input level)
–10 dBV
(–10 output level)
–10 dBV
(–10 output level)
+18 dBu
(+4 input level)
+18 dBu
(+4 input level)
+18 dBu
(+4 output level)
+18 dBu
(+4 output level)
+6 dBu
(–10 input level)
+6 dBu
(–10 input level)
+6 dBu
(–10 output level)
+6 dBu
(–10 output level)
Pin
Assignments:
Pin 1 = ground
Pin 2 = hot
Pin 3 = cold
Tip = hot
ring = cold
sleeve = ground
Pin
Assignments:
Pin 1 = ground
Pin 2 = hot
Pin 3 = cold
Tip = hot
ring = cold
sleeve = ground
Voltage /
Current/
Phantom Power
Protection?
yes
yes
Voltage /
Current/
Phantom Power
Protection?
yes
yes
Connector:
(XLR and
1/4-inch
combined)
XLR (female)
1/4-inch
phone plug
(female)
Configuration:
active balanced
active balanced
Actual
Impedance:
47 kΩ
Nominal
Input Level:
Maximum
Input Level:
Maximum
Output Level:
Audio Cables
The variety of connectors on audio equipment sometimes leads to confusion in cabling.
The diagrams below provide cabling recommendations for most common cabling situations.
The following is not a complete list, only a sample of some of the more commonly used cables
and applications. Some of the equipment in a given sound system may have different
pinouts than the given examples. Consult the documentation for that equipment.
XLR (male) to XLR (female)
PIN 2
PIN 1
+
PIN 3
–
PIN 2
PIN 1
PIN 3
–
21
+
TYPICAL APPLICATIONS
Mixer Line Out to DFR11EQ Input
DFR11EQ Output to Amplifier Input
DFR11EQ Output to Mixer Sub Return
Mixer Send to DFR11EQ Input
Mixer Sub Send to DFR11EQ Input
DFR11EQ Output to Mixer Sub Return
Main Menu
1/ -in.
4
to 1/4 -in. Balanced
SLEEVE
RING
–
+
–
TIP
SLEEVE
RING
TYPICAL APPLICATIONS
Mixer Line Out to DFR11EQ Input
DFR11EQ Output to Amplifier Input
DFR11EQ Output to Mixer Sub Return
Mixer Send to DFR11EQ Input
Mixer Sub Send to DFR11EQ Input
DFR11EQ Output to Mixer Sub Return
TYPICAL APPLICATIONS
Mixer Line Out to DFR11EQ Input
DFR11EQ Output to Amplifier Input
DFR11EQ Output to Mixer Sub Return
Mixer Send to DFR11EQ Input
Mixer Sub Send to DFR11EQ Input
DFR11EQ Output to Mixer Sub Return
TYPICAL APPLICATIONS
Mixer Line Out to DFR11EQ Input
DFR11EQ Output to Amplifier Input
DFR11EQ Output to Mixer Sub Return
Mixer Send to DFR11EQ Input
Mixer Sub Send to DFR11EQ Input
DFR11EQ Output to Mixer Sub Return
TYPICAL APPLICATIONS
Mixer Line Out to DFR11EQ Input
DFR11EQ Output to Amplifier Input
DFR11EQ Output to Mixer Sub Return
Mixer Send to DFR11EQ Input
Mixer Sub Send to DFR11EQ Input
DFR11EQ Output to Mixer Sub Return
+
TIP
1/ -in.
4
to 1/4 -in. Unbalanced
SLEEVE
TIP +
SLEEVE
TIP +
1/ -in.
4
Balanced to 1/4 -in. Unbalanced
SLEEVE
RING
–
TIP
+
SLEEVE
TIP +
XLR (male) to 1/4 -in. Balanced
PIN 2
PIN 3
SLEEVE
PIN 1
+
–
RING
–
TIP
+
22
Main Menu
XLR (female) to 1/4 -in. Balanced
PIN 2
PIN 1
PIN 3
+
–
SLEEVE
RING
–
TIP
TYPICAL APPLICATIONS
Mixer Line Out to DFR11EQ Input
DFR11EQ Output to Amplifier Input
DFR11EQ Output to Mixer Sub Return
Mixer Send to DFR11EQ Input
Mixer Sub Send to DFR11EQ Input
DFR11EQ Output to Mixer Sub Return
TYPICAL APPLICATIONS
Mixer Line Out to DFR11EQ Input
DFR11EQ Output to Amplifier Input
DFR11EQ Output to Mixer Sub Return
Mixer Send to DFR11EQ Input
Mixer Sub Send to DFR11EQ Input
DFR11EQ Output to Mixer Sub Return
+
XLR (female) to 1/4 -in. Unbalanced
PIN 2
PIN 1
PIN 3
+
–
SLEEVE
TIP +
Y-adapter cable, 1/4 -in. Balanced to 1/4 -in. Unbalanced
RING
–
SLEEVE
TIP
+
TYPICAL APPLICATIONS
Mixer Send/Return (Insert) to DFR11EQ
Input and Output
RCA to 1/4 -in. Unbalanced
SLEEVE
TIP +
SLEEVE
TIP +
23
TYPICAL APPLICATIONS
DFR11EQ Output to Amplifier Input
Main Menu
Digital Connectors and Cables
Computer Interface — 9-Pin to 9-Pin RS-232 Cable
5 3 1
4 2
1
3
2
5
4
9-PIN FEMALE
TO COMPUTER
6
7
8
9
COMPUTER 9-PIN RS-232
CONNECTOR MALE
8 6
9 7
1 3 5
2 4
5
3
4
1
2
9-PIN MALE
TO DFR11EQ
FUNCTION
PIN #
—
RX
TX
DTR
GND
DSR
RTS
CTS
—
1
2
3
4
5
6
7
8
9
9 7
8 6
DFR11EQ RS-232
CONNECTOR FEMALE
7 9
6 8
Computer Interface — 9-Pin to 25-Pin RS-232 Cable
13 11 9 7 5 3 1
12 10 8 6 4 2
1
3
2
5
4
9
7
6
8
11 13
10 12
FUNCTION
25-PIN FEMALE
TO COMPUTER
14 16 18 20 22 24
15 17 19 21 23 25
COMPUTER 25-PIN RS-232
CONNECTOR (MALE)
24 22 20 18 16 14
25 23 21 19 17 15
5
1 3 5
2 4
3
4
9-PIN MALE
TO DFR11EQ
1
2
9 7
8 6
DFR11EQ RS-232
CONNECTOR FEMALE
7 9
6 8
9-PIN CONNECTOR 25-PIN CONNECTOR
PIN #
PIN #
—
RX
TX
DTR
GND
DSR
RTS
CTS
—
1
2
3
4
5
6
7
8
9
8
3
2
20
7
6
4
5
22
Shure Link Cable — 5-Pin DIN Cable (MIDI-compatible cable)
1
3
2
5
4
4
5
2
3
1
SHURE LINK IN
1
3
2
5
4
4
5
2
3
1
SHURE LINK OUT
24
FUNCTION
PIN #
—
DATA
SHIELD
DATA
—
1
2
3
4
5
Main Menu
Appendix D. Warranty
Warranty
Shure Brothers Inc. (“Shure”) hereby warrants that these products will be free from
defects in material and workmanship for a period of one year from the date of purchase. At its
option, Shure will repair or replace the defective product and promptly return it to you, or
refund the purchase price. Retain proof of purchase to validate the purchase date and return
it with any warranty claim. If you believe this product is defective within the warranty period,
carefully repack the unit, insure it, and return it postpaid to:
Shure Brothers Inc.
Attention: Service Department
222 Hartrey Avenue
Evanston, IL 60202-3696 U.S.A.
For service outside the United States, return the product to your authorized Shure
Distribution Center.
All claims of defects or shortage should be directed to the above address. Please furnish
model number, date, place and proof of purchase (such as a copy of your sales receipt) to
establish warranty. Your letter should include all pertinent details including applicable model
or part numbers and a brief description of the problem. Do not mail any units or parts to Shure
unless requested to do so by Shure’s Service Department. Any returned items must have
prior authorization. Unauthorized returns are delayed in handling; these delays can be
avoided by contacting Shure in advance and furnishing the necessary information.
Shure reserves the right to make design changes and product improvements on any
previously manufactured products. Shure also reserves the right to ship new and/or
improved products which are similar to the form, fit and function of the originally ordered
products.
25
Main Menu
Notes
26
Main Menu
The Sound of Professionals...Worldwide
Shure Brothers Incorporated
222 Hartrey Avenue
Evanston, IL 60202–3696 U.S.A.