1
Owner's Manual
IERRFTSMRN'I
10 in. Stationary
TABLE SAW
Model No.
315.228410
)
Save this manual
for
future reference.
• Safety
• Features
CAUTION:
Read and follow all
Safety Rules and Operating
Instructions before first use of
this product.
Customer
Help Line: 1-800-932-3188
Sears, Roebuck
and Co., Hoffman
Estates, IL 60179
Visit the Craftsman web page: www.sears.com/craftsman
972000-525
11a-98
•
•
•
•
Assembly
Operation
Maintenance
Parts List
USA
NRTL/C
FULL ONE YEAR WARRANTY
ON CRAFTSMAN
TABLE SAW
If this rRRFT$14RN Table Saw fails due to a defect in material or workmanship within one year from the date of
purchase, Sears will repair it, free of charge.
Contact a Sears Service Center for repair.
If this product is used for commercial or rental purposes, this warranty applies only for 90 days from the date of
purchase.
This warranty gives you specific legal rights, and you may also have other rights which vary from state to state.
Sears, Roebuck and Co., Dept. 817WA, Hoffman Estates, IL 60179
Your saw has many features for making cutting operations more pleasant and enjoyable. Safety, performance
and dependability have been given top pdodty in the design of this saw making it easy to maintain and operate.
_k
CAUTION:
Carefully read through this entire owner's manual before using your new saw. Pay close
attention to the Rules For Safe Operation, and all Safety Alert Symbols, including Danger, Warning and
Caution. If you use your saw properly and only for what it is intended, you will enjoy years of safe, reliable
service.
_,
Look for this symbol to point out important safety precautions. It means attention!!! Your safety is involved.
_1= WARNING:
The operation of any power tool can result in foreign objects being thrown into your eyes,
which can result in severe eye damage. Before beginning power tool operation, always
wear safety goggles or safety glasses with side shields and a full face shield when needed.
We recommend a Wide Vision Safety Mask for use over eyeglasses or standard safety
glasses with side shields, available at Sears Retail Stores.
•
Warranty and Introduction ..............................................................................................................................
•
Table Of Contents .......................................................................................................................................
2-3
•
Rules For Safe Operation ...........................................................................................................................
4-6
•
Electrical .........................................................................................................................................................
7
•
Glossary and Product Specifications
8
•
Unpacking and Accessories ...........................................................................................................................
•
Loose Parts List ............................................................................................................................................
•
Small Parts List .......................................................................................................................................
•
Tools Needed ...............................................................................................................................................
•
Labels ......................................................................................................................................................
14-15
•
Features ..................................................................................................................................................
16-17
•
Assembly .................................................................................................................................................
18-28
.............................................................................................................
Installing Handwheels on Table Saw Base ..................................................................................................
[RRFTSMRN" TABLE SAW315.228410
2
2
9
10
11-12
13
18
Assembling Leg Stand ............................................................................................................................
18-19
Mounting the Lag Stand on the Table Saw Base ........................................................................................
19
Assembling Table Extensions ......................................................................................................................
20
Aligning Table Extensions ............................................................................................................................
20
Installing the Rear Rail .................................................................................................................................
21
Installing the Front Rail ................................................................................................................................
22
Aligning Rip Fence and Front Rail ..........................................................................................................
22-23
Mounting the Motor and Switch ...............................................................................................................
23-24
Installing the Belt and Belt Guard ................................................................................................................
24
Installing the Blade Guard ............................................................................................................................
25
Checking the Throat Plata ............................................................................................................................
26
Aligning the Riving Knife with the Blade ......................................................................................................
26
Checking Rip Fence and Blade Alignment ..................................................................................................
27
Changing the Motor Voltage ........................................................................................................................
28
Adjustments .............................................................................................................................................
Replacing the Blade ..............................................................................
29-32
; ......................................................
29
Heeling (Paralleling) the Sawblada to Miter Gage Groove ..........................................................................
30
Setting the Bevel Stops and Indicator ..........................................................................................................
31
Adjusting theMlt6r Gage ..............................................................................................................................
32
Removing / Replacing the Throat Plate .......................................................................................................
32
Basic Operation of the Table Saw ..........................................................................................................
Causes of Kickback ......................................................................................................................................
33-42
33
Avoiding Kickback ........................................................................................................................................
33
Cutting Aids ..................................................................................................................................................
33
Resetting Thermal Ovedoad Protector ........................................................................................................
Causes of Overload ......................................................................................................................................
34
34
Types of Cuts ...............................................................................................................................................
35
Making a Cross Cut .................................................................................................................................
36-37
Making a Rip Cut ..........................................................................................................................................
37
Making a Miter Cut .......................................................................................................................................
38
Making a Bevel Cross Cut .......................................................................................................................
38-39
Making a Bevel Rip Cut ................................................................................................................................
Making a Compound (Bevel) Miter Cut ........................................................................................................
39
40
Making a Large Panel Cut ............................................................................................................................
41
Making a Dado Cut .......................................................................................................................................
42
Making a Non-Through Cut ..........................................................................................................................
42
Maintenance .................................................................................................................................................
43
Lubdcation ....................................................................................................................................................
43
Troubleshooting .......................................................................................................................................
44-46
Exploded View and Repair Parts List ......................................................................................................
48-65
Parts Ordering / Service ...................................................................................................................
3
back page
[RRFTSMRW TABLESAW315.228410
The purpose of safety symbols is to attract your attention to possible dangers. The safety symbols, and the
explanations with them, deserve your careful attention and understanding. The safety warnings do not by
themselves eliminate any danger. The instructions or warnings they give are not substitutes for proper accident
prevention measures.
SYMBOL
MEANING
A
SAFETY ALERT SYMBOL
A
DANGER: Failure to obey a safety waming will result in serious injury to yourself or to others.
Always follow the safety precautions to reduce the dsk of fire, electric shock and personal injury.
A
WARNING:
Failure to obey a safety warning can result in serious injury to yourself or to others.
Always follow the safety precautions to reduce the risk of fire, electric shock and personal injury.
A
CAUTION: Failure to obey a safety warning may result in property damage or personal injury to
yourself or to others. Always follow the safety precautions to reduce the risk of fire, electdc shock
and personal injury.
Note:
Advises you of information or instructions vital to the operation or maintenance of the equipment.
Indicates danger, warning, or caution. May be used in conjunction with other symbols or
pictographs.
IMPORTANT
Servicing requires extreme care and knowledge of the
system and should be performed only by a qualified
service technician. For service we suggest you return
the tool to your nearest Sears store or repair center.
Always use original factory replacement parts when
servicing,
_,
WARNING:
Do not attempt to operate this tool
until you have read thoroughly and understand
completely all instructions, safety rules, etc.
contained in this manual. Failure to comply can
result in accidents involving fire, electrical shock,
or serious personal injury. Save the owner's
manual and review frequently for continuing safe
operation, and instructing others who may use
this tool.
READ ALLINSTRUCTIONS
•
KNOW YOUR POWER TOOL. Read the owner's
manual carefully. Learn the saw's applications and
limitations as well as the specific potential hazards
related to this tool.
i
MAINTAIN TOOLS WITH CARE. Keep tools sharp
and clean for better and safer performance. Follow
instructionsfor lubricating and changing accessories.
•
DO NOT USE IN DANGEROUS ENVIRONMENT.
Do not use power tools near gasoline or other
flammable liquids, in damp or wet locations, or
expose them to rain. Keep the work area well lit.
•
USE THE RIGHT TOOL FOR THE JOB. Do not
•
•
force the tool or attachment to do a job it was not
designed for, Use it only the way it was intended.
B DRESS PROPERLY. Do not wear loose clothing,
gloves, neckties, rings, bracelets, or other jewelry.
They can get caught and draw you into moving
pads. Rubber gloves and nonslip footwear are
recommended. Also wear protective hair covering
to contain long hair.
MAKE WORKSHOP CHILD-PROOF with padlocks
and master switches or by removing starter keys.
KEEP CHILDREN AND VISITORS AWAY. All
visitors should wear safety glasses and be kept a
safe distance from work area. Do not let visitors
contact tool or extension cord while operating.
i
KEEP THE WORK AREA CLEAN. Cluttered work
areas and work benches invite accidents. DO NOT
leave tools or pieces of wood on the saw while it is
in operation.
rlIRFTSMRN" TABLE SAW 315.228410
4
•
ALWAYS WEAR SAFETY GLASSES WITH SIDE
SHIELDS. Everyday eyeglasses have only impactresistant lenses; they are NOT safety glasses.
•
NEVER STAND ON TOOL. Serious injury could
occur if the tool is tipped or if the blade is unintentionally contacted.
RULES FOR SAFE OPERATION
(Continued)
•
DO NOT OVERREACH.
balance at all times.
•
SECURE WORK. Use clamps or a vise to hold
work when practical. It's safer than using your
hand and frees both hands to operate tool.
•
Keep proper footing and
n DO NOT FORCE THE TOOL. It will do the job
better and more safely at the rate for which it was
designed.
•
USE THE PROPER EXTENSION CORD. Make
B BEFORE MOUNTING, DISCONNECTING OR
REMOUNTING THE MOTOR; unplug the saw and
remove the switch key.
sure your extension cord is in good condition. Use
-only a cord heavy enough to carry the current your
product will draw. An undersized cord will cause a
drop in line voltage resulting in loss of power and
overheating. A wire gage size (A.W.G.) of at least
14 is recommended for an extension cord 25 feet
_k
or less in length. If in doubt, use the next heavier
gage. The smaller the gage number, the heavier
the cord.
•
AVOID ACCIDENTAL
•
STARTING. Be sure switch
is off when plugging in.
•
REMOVE WRENCHES
AND ADJUSTING
KEYS.
•
•
•
CHECK DAMAGED PARTS. Before using the tool
again, check any damaged parts, including guards,
for proper operation and performance. Check
alignment of moving pads, binding of moving parts,
breakage of parts, saw stability, mounting and any
other conditions that may affect its operation. A
damaged part must be properly repaired or replaced by a qualified service technician at a Sears
store or repair center to avoid risk of personal
injury.
USE ONLY SEARS REPLACEMENT
replaced by a qualified service technician at a
Sears store or repair center.
•
GUARD AGAINST ELECTRICAL SHOCK by
preventing body contact with grounded surfaces
such as pipes, radiators, ranges, refrigerator
enclosures.
•
GROUND ALL TOOLS. See Electrical page.
n WEAR A DUST MASK to keep from inhaling fine
particles.
•
PROTECT YOUR HEARING. Wear hearing
protection during extended periods of operation.
•
DO NOT OPERATE THIS TOOL WHILE UNDER
THE INFLUENCE OF DRUGS, ALCOHOL, OR
ANY MEDICATION.
Using
PARTS. All
repairs, whether electrical or mechanical, should
be made by a qualified service technician at a
Sears store or repair center.
•
•
STAY ALERT AND EXERCISE CONTROL.
•
AVOID AWKWARD OPERATIONS AND HAND
POSITIONS where a sudden slip could cause your
hand to move into the blade. ALWAYS make sure
OF FEED. Feed work into a
blade or cutter against the direction of rotation of
the blade or cutter only.
•
Watch
what you are doing and usa common sense. Do
not operate tool when you are tired. Do not
rush.
KEEP GUARDS IN PLACE and in good working
order. This includes the blade guard, riving knife,
and anti-kickback pawls.
CHECK DIRECTION
NEVER USE THIS TOOL IN AN EXPLOSIVE
ATMOSPHERE.
Normal sparking of the motor
could ignite fumes.
DO NOT USE TOOL IF SWITCH DOES NOT
TURN IT ON AND OFF. Have defective switches
USE ONLY CORRECT BLADES. Use the right
blade size, style and cutting speed for the material
and the type of cut. Blade teeth should point down
toward the front of the table.
USE RECOMMENDED ACCESSORIES.
improper accessories may risk injury.
WARNING:
When servicing, use only identical
Craftsman replacement pads. Use of any other
parts may create a hazard or cause product
damage.
MAKE SURE THE WORK AREA HAS AMPLE
LIGHTING to see the work and that no obstructions will interfere with safe operation BEFORE
performing any work using this tool.
Get in the habit of checking - before turning on tool
- that hex keys and adjusting wrenches are removed from tool.
•
NEVER LEAVE TOOL RUNNING UNAI-FENDED.
TURN THE POWER OFF. Do not leave tool until it
comes to a complete stop.
you have good balance.
•
DISCONNECT ALL TOOLS. When not in use,
before servicing, or when changing attachments,
blades, bits, cutters, etc., all tools should be
disconnected from power supply.
5
ALWAYS SUPPORT LARGE WORK PIECES
while cutting to minimize risk of blade pinching and
kickback. Saw may slip, walk or slide while cutting
large or heavy boards.
I:RRFTSMRN" TABLESAW315.228410
RULES FOR SAFE OPERATION
•
•
•
•
i
iContinued)
•
ALWAYS PUSH THE WORKPIECE;
toward the saw.
never pull it
•
DO NOT FEED THE MATERIAL TOO QUICKLY.
Do not force the workpiece against the blade.
ALWAYS TURN OFF SAW before disconnecting
it, to avoid accidental starting when reconnecting to
power supply. NEVER leave the table saw unattended while connected to a power source.
CUT ONLY WOOD, PLASTIC OR WOOD-LIKE
MATERIALS. Do not cut metal.
•
NEVER cut more than one piece at a time. DO
NOT STACK more than one workpiece on the saw
table at a time.
BEFORE CHANGING THE SETUP, REMOVING
COVERS, GUARDS, OR BLADE; unplug the saw
and remove the switch key.
•
KEEP TOOL DRY, CLEAN, AND FREE FROM
OIL AND GREASE. Always use a clean cloth
when cleaning. Never use brake fluids, gasoline,
petroleum-based products, or any solvents to clean
tool.
•
KEEP BLADES CLEAN, SHARP AND WITH
SUFFICIENT SET. Sharp blades minimize stalling
and kickback.
DO NOT REMOVE THE SAW'S BLADE
GUARDS. Never operate the saw with any guard
or cover removed. Make sure all guards are
operating properly before each use.
•
NEVER PERFORM ANY OPERATION FREEHAND. Always place the workpiece to be cut on
the saw table and position it firmly against the
fence as a backstop.
•
USE THE RIP FENCE. Always use a fence or
straight edge guide when ripping.
•
BEFORE MAKING A CUT, be sure all adjustments
are secure.
•
BE SURE THE BLADE PATH IS FREE OF
NAILS. Inspect for and remove all nails from
lumber before cutting.
•
BE SURE THE BLADE CLEARS THE
WORKPIECE. Never start the saw with the blade
touching the workpiece.
•
KEEP HANDS AWAY FROM CUTTING AREA.
Do not reach underneath work or in blade cutting
path with your hands and fingers for any reason.
Always turn the power off.
_i,
ALLOW THE MOTOR TO COME UP TO FULL
SPEED before starting a cut to avoid blade binding or stalling.
USE A SUPPORT FOR THE SIDES AND BACK
OF THE SAW TABLE when sawing wide or long
workpieces. Use a sturdy "outrigger"support if a
table extension is more than 24 inches long and is
attached to the saw, to prevent tipping.
•
•
•
GUARD AGAINST KICKBACK. Kickback can
occur when the blade stalls, driving the work piece
back toward the operator. It can pull your hand into
the blade, resulting in serious personal injury. Stay
out of the blade path and turn switch off immediately if blade binds or stalls.
USE ONLY OUTDOOR EXTENSION CORDS.
Use only extension cords with the marking =Acceptable for use with outdoor appliances; store
cords indoors while not in use." Use extension
cords with an electrical rating not less than the
saw's rating. Always disconnect the extension cord
from the outlet before disconnecting the product
from the extension cord.
INSPECT TOOL CORDS AND EXTENSION
CORDS PERIODICALLY and, if damaged, have
repaired by a qualified service technician at a
Sears store or repair center. Stay constantly aware
of cord location and keep it well away from the
moving blade.
USE A PUSHBLOCK OR PUSH STICK for
workpieces so small that your fingers go under the
blade guard. NEVER TOUCH BLADE or other
moving parts during use, for any reason.
WARNING:
•
DO NOT ABUSE CORD. Never yank cord to
disconnect it from receptacle. Keep cord from
heat, oil, and sharp edges,
•
SAVE THESE INSTRUCTIONS. Refer to them
frequently and use to instruct other users. If you
loan someone this tool, loan them these instructions also.
Blade coasts after being turned off.
SAVE THESE INSTRUCTIONS
[RIIFIFSMRN" TABLESAW 315,228410
6
EXTENSION
CORDS
GROUNDING
Use only 3-wire extension cords that have 3-prong
grounding plugs and 3-pole receptacles that accept
the tool's plug. When using a power tool at a considerable distance from the power source, use an
extension cord. heavy enough to carry the current that
the tool will drew. An undersized extension cord will
cause a drop in line voltage, resulting in a loss of
power and causing the motor to overheat. Use the
chart provided below to determine the minimum wire
size required in an extension cord. Only round jacketed cords listed by Underwriter's Laboratories (UL)
should be used.
Length of Extension Cord
In the event of a malfunction or breakdown, grounding
provides a path of least resistance for electric current
to reduce the risk of electric shock. This tool is
equipped with an electric cord having an equipmentgrounding conductor and a grounding plug. The plug
must be plugged into a matching outlet that is prepedy
installed and grounded in accordance with all local
codes and ordinances.
Do not modify the plug provided. If it will not fit the
outlet, have the proper outlet installed by a qualified
electrician. Improper connection of the equipmentgrounding conductor can result in a risk of electric
shock. The conductor with insulation having an outer
surface that is green with or without yellow stripes is
:the equipment-grounding conductor. If repair or
replacement of the electric cord or plug is necessary,
do not connect the equipment-grounding conductor to
a live terminal.
Wire Size (A.W,G.)
Up to 25 feet
14
26-100 feet
12
INSTRUCTIONS
When working with the tool outdoors, use an extension cord that is designed for outside use. This is
indicated by the letters WA on the cord's jacket.
Before using an extension cord, inspect it for loose or
exposed wires and cut or worn insulation.
Check with a qualified electrician or service personnel
if the grounding instructions are not completely
understood, or if in doubt as to whether the tool is
properly grounded.
_1= CAUTION: Keep the cord away from the cutting
area and position the cord so that it will not be
caught on lumber, tools, or other objects during
cutting operations.
Repair or replace a damaged or worn cord immediately.
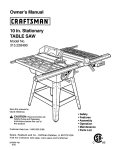
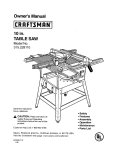
This tool is intended for use on a circuit that has an
ELECTRICAL
outlet like the one shown in Figure 1. It also has a
grounding pin like the one shown.
CONNECTION
Your Sears Craftsman Table Saw is powered by a
precision built electric motor. It should be connected
to a power supply that is 120 volts, 60 Hz, AC only
(normal household current). It should be connected
to a 240 volt power supply only if it has been reset
according to the instructions in this manual. The
motor has been set at the factory for 120 volts; if it is
reconnected to operate at 240 volts, all attachment
plugs and any receptacles must be replaced with
devices rated for 240 volts. Do not operate this tool on
direct current (DC). A substantial voltage drop will
cause a loss of power and the motor will overheat. If
the saw does not operate when plugged into an
outlet, double check the power supply.
SPEED
_i,
WARNING:
Instructions are given in the
Assembly section for changing the motor voltage
to 240 volts. Follow them carefully .. Electrical
shock can kill.
AND WIRING
The no-loed speed of your table saw is approximately
3,600 rpm. This speed is not constant and decreases
under a load or with lower voltage. For voltage, the
wiring in a shop is as important as the motor's horsepower rating. A line intended only for lights cannot
properly carry a power tool motor. Wire that is heavy
enough for a short distance will be too light for a
greater distance. A line that can support one power
tool may not be able to support two or three tools.
o.o:.:,.o \
COVEROF GROUNDED
OUTLET60X
Fig. 1
7
rRIIFT];MIIH" TABLESAW 315.228410
Anti-Kickback Pawls
Toothed safety devices behind the blade designed to
stop a workpiece from being kicked back at the
operator during a ripping operation.
Molding
A non-through cut that gives a varied shape to the
workpiece and requires a special blade.
Bevel Cut
Push Stick
A device used to feed the workpiece through the saw
blade during narrow cutting operations. It helps keep
the operator's hands well away from the blade.
A cutting operation made with the blade at any angle
other than 90" to the saw table.
Rabbet
A notch in the edge of a workpiece.
Arbor
The shaft on which a blade or cutting tool is mounted.
Resaw
Compound Cut
A cut with both a miter angle and a bevel angle.
A cutting operation to reduce the thickness of the
workpiece in order to make thinner pieces.
Crosscut
A cutting operation made across the grain or the width
of the workpiece.
Resin
A sticky, sap-based substance.
Dsdo
:
A non-through cut that gives a square notch or trough;
requires a special blade.
Rip Cut
A cut made with the the grain of the workpiece.
Sawblade Path
The area directly in line with the blade -- over, under,
behind, or in front of it. Also, the workpiece area
which will be or has been cut by the blade.
Feetherboard
A device to help guide workpieces during rip cuts.
Freehand (for table saw)
Dangerous practice of making a cut without using rip
or miter fences. See Safety Rules.
Set
The distance that the tip of the saw blade tooth is bent
(or set) outward from the face of the blade.
Gum
Throw-Back
Saw throwing back a workpiece; similar to kickback.
A sticky, sap-based residue from wood products.
Heel
Through Sawing
Any cutting operation where the blade extends
completely through the workpiece.
Alignment of the blade.
Kerr
The material removed by the blade in a through cut or
the slot produced by the blade in a non-through cut.
Trailing End
The workpiece end last cut by the blade in a rip cut.
Kickback
A hazard that can occur when blade binds or stalls,
throwing workpiece back toward operator.
Workplece
The item on which the cutting operation is being done.
The surfaces of a workpiece are commonly referred to
as faces, ends, and edges.
Leading End
The end of the workpiece pushed into the cutting tool
first.
Worktable
The surface on which the workpiece rests while
performing a cutting operation.
Miter Cut
A cutting operation made with the miter gage using
any angle other than O"on the miter gage.
Blade Arbor
Blade Diameter
Blade Tilt
518 in.
Rating
10 in.
Input
0 ° - 45"
120 / 240 V, 60 Hz - AC only
13/6.5 Amperes
No Load Speed
3,600 RPM
Table Size without table extensions
20 in. x 27 in.
Cutting Capacity with Miter at O'/Bevel 0":
3-3/8 in.
Table Size with table extensions
44 in. x 27 in.
Cutting Capacity with Miter at 0"/Bevel 45":
2-1/4 in.
CRAFTSMAN"TABLE SAW315.228410
8
•
Your new table saw has been designed to give you
many years of high quality performance. To insure
this goal, proper care and treatment is important.
Careful treatment begins with removing all parts from
the carton and checking them against the list of loose
parts. The long box contains the re,s. The large box
holds all other pads, which are detailed in the Loose
Pads List.
•
Remove the wax paper covering on the table. Use
any ordinary household type grease and spot
remover. Immediately apply a coat of automotive
type paste wax to the table and table exensions.
WARNING: To prevent accidental starting that
could cause possible serious personal injury,
assemble all parts to your saw before connecting
it to power supply. Saw should never be
connected to power supply when you are
assembling parts, making adjustments, installing
or removing blades, or when not in use.
Separate the saw and all parts from the packing
matedals and check each against the packing list,
especially the small parts that can be hidden in the
packing material.
Note: Do not discard the packing materials until you
have carefully inspected the saw, identified all
parts, and satisfactorily operated your new saw.
_1= WARNING:
If any parts are missing, do not
operate this tool until the missing parts are
replaced. Failure to do so could result in possible
serious personal injury.
WARNING:
Never use gasoline, naptha, or
other highly volatile solvents. Do not ever let
brake fluids, gasoline, petroleum-based
products, or penetrating oils contact plastic parts.
Such chemicals can weaken or destroy plastic.
The following recommended accessories are currently available at Sears Retail Stores.
•
Fence Guide System
•
7 in. Stack Steel Dado
•
Guide Master
•
7 in. x 9/16 in. Stack Dado
•
Box Joint & Miter Guide
•
7 in. Molding Head Set
•
Universal Jig
•
2 Bit Molding Head Set
•
Taper Jig
•
Saw Baskets
•
10 in. Sanding Disc
•
Jointer Clamps
•
8 in. Sanding Disc
•
Specialty Throat Plate
•
Elite Dado
•
Miter Gage Hold Down Clamp
•
Excalibur Dado
•
Align-A-Rip XRC Rip Fence
•
7 in. Adj. Dado 36 tip
•
Dust Collection System
•
7 in. Adj. Dado 24 tip
_k
WARNING:
The use of attachments or accessories not listed might be hazardous.
9
rRAFTSMAN" TABLESAW315,228410
The following items are included with your Table Saw.
L
L°
I
G
D
H
J
O
K
S
T
A. Table Saw Base ....................................................
B, Belt .......................................................................
C. Belt Guard (2 Piece) .............................................
D. Blade Guard Assembly
(Hardware Shown Separately) .............................
E. Wrench .................................................................
F. Handwheel
(Hardware Shown Separately) .............................
G. Leg Brace, lower (short) .......................................
H. Leg Brace, lower (long) ........................................
I. Leg Brace, upper (short) .......................................
J. Leg Brace, upper (long) ........................................
K. Leg ........................................................................
L. Miter Gage ............................................................
M. Motor and Switch ..................................................
N. Switch Key ............................................................
rBRFTSMBN" TABLE SAW315.228410
1
1
1
O.
P.
Q.
R.
1
1
S.
"I".
V.
2
2
2
2
2
4
t
1
1
W.
X.
Y.
Z.
10
Figure 2 a
Rip Fence .............................................................
1
Rail, Front (Hardware Shown Separately) ............ 1
Rail, Rear (Hardware Shown Separately) ............ 1
Motor Mounting Plate
(Hardware Shown Separately) ............................. 1
Blade Guard Bracket ............................................ 1
Table Extension ....................................................
2
Hardware for Mounting Motor, Motor Mounting
Plate, and Belt Guard (Shown Separately) ........... 1
Hardware for Table Extensions
(Shown Separately) ..............................................
1
Hardware for Leg Stand, Leveling Feet, and
Mounting Saw Base (Shown Separately) ............. 1
Hardware for Blade Guard Bracket and
Blade Guard Assembly (Shown Separately) ........ 1
Owner's Manual (not shown) ................................ 1
Check all loose parts from the box with the list on the previous page, the figures below and on the following
page. Small items such as fasteners and end caps are shown in figures 2 b and 2 c. Follow the instructions in
the Assembly section to assemble your new saw.
F.
Hardware for Handwheel ...................................
2
screw (3/16-24 x 1/2 in.) .....................................
2
Hardware for Leg Stand, Leveling Feet, and
Mounting Saw Base
fiat washer (3/16 in.) _..........................................
2
Hardware for Leg Stand .....................................
Xg
1
carriage bolt (5/16-18 x 3/4 in.) ........................ 24
V.
flat washer (5/16 in.) .........................................
24
hex nut (5/16-18) ..............................................
24
Hardware for Mounting Motor, Motor Mounting
Plate and Belt Guard
Hardware for Mounting Motor .................... :....... 1
hex bolt (5/16-18 x 1 in.) ............................ _....... 4
8
Hardware for Leveling Feet ................................
1
lock washer (5/16 in.) .........................................
4
leveling foot ........................................................
4
hex nut (5/16-18) ................................................
4
flat washer (5/16 in.) ...........................................
8
hex nut (5/16-18) ................................................
8
flat washer (5/16 in.) ...........................................
I
Hardware for Motor Mounting Plate ................... 1
hex bolt (5/16-18 x 5/8 in.) .................................
2
I
|
.=i,===..,,_
Hardware for Mounting Saw Base ..................... 1
Hardware for Belt Guard ....................................
1
hex bolt (5/16-18 x 1/2 in.) .................................
4
hex nut (3/16-24) ................................................
4
flat washer (5/16 in.) ...........................................
8
flat washer (3/16 in) ............................................
4
hex nut (5/16-18) ................................................
4
Fig. 2 b
W. Hardware for Table Extensions .......................... 1
hex bolt (5/16-18 x 1-1/4 in.) ..............................
8
flat washer (5/16 in.) .........................................
16
hex nut (5/16-18) ..............................................
,. 8
11
CRRFTSMRN" TABLESAW315.228410
Check all loose parts from the box with the list and figures below and on the previous pages. Small items such
as fasteners and end caps are shown in figure 2 c. Follow the instructions in the Assembly section to assemble
your new saw.
P.
Hardware for Rail, Front .....................................
Y.
1
square head bolt (5/16-18 x 1 in..) ..................... 6
Hardware for Blade Guard Bracket and Blade
Guard Assembly
flat washer (5/16 in.) ...........................................
6
Blade Guard Bracket ..........................................
1
hex nut (5/16-18) ................................................
6
hex cap screw (5116-18 x 1/2 in.) ....................... 2
end cap for front rail ...........................................
2
lock washer (5/16 in.) .........................................
2
screw (5/32-32 x 1/2 in.) .....................................
2
Blade Guard Assembly .......................................
1
socket head cap screw (1/4-20 x 3/8 in.) ........... 3
flat washer (114 in.) ....... ].....................................
M.
Q. Hardware For Rail, Rear ....................................
1
square head bolt (5116-18 x 1 in.) ...................... 6
flat washer (5/16 in.) ...........................................
6
hex nut (5/16-18) ................................................
6
end cap for rear rail ............................................
2
screw (5/32-32 x 1/2 in.) .....................................
2
3
Hardware for Mounting Switch Assembly
square head nut (1/4-20) ....................................
2
screw (1/4-20 x 3/8) ............................................
2
Fig. 2 c
©
[RRFTSMRN" TABLE SAW315.228410
12
The following tools are needed for assembly and alignment. Note: The five hex keys listed below have been
provided with your saw. The remaining tools are typical shop tools and are not included with your saw.
SMALL/ MEDIUM
PHILLIPSSCREWDRIVER
NUTDRIVER
8 mm,10 ram,and 12 mm
HEXKEYS(PROVIDED)
and 6 mm
COMBINATIONSQUARE
HAMMER
45° TRIANGLE
WRENCHES:8 mm,10 mm,and 12 mm
ADJUSTABLEWRENCH
FRAMINGSQUARE
13
CRAFTSMAN"TABLESAW315.228410
B
F
C
D
G
E
A
H
0
B
_WARNIN{]
, RaisedGuard
CanDropon
Spinning
Bladeand
Break.
•To ReduceThe
Riskof Injury,
GuardMustBe
In Place
DuringUsa.
• Alignand
TigMen
RivingKnife
Fasteners
BeforeUse.
A
10 inch Table Saw
3,600RPM
120/240V01.1S
S0_ ACONLY
13AIB,SA
WARNING: WHEN SERVIClNGjUSE ONLYIDENTICAL
CRAFTSMAN
REPLACEMENT
PARTS.
MODEL 315.228410
SER.NO.
M_DE INROEBUCK
T/dWAN
SEARS,
I
AND CO.
(_i
]
_A_O_.
_aOL
Customer Help Line 1-800-932-3188
,
Fig. 4 a
ERAFTSMAH" TABLESAW 315.228410
14
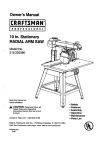
When Mounting an Auxiliary Fence Face, Poahlon Mounting
Hardware Beyond Arrow at Right and Left as Indicated.
WARNING
Keep Fasteners Away From Blade.
C.
I
E
D
A WA--RNING
Debris on rail can misalign
I or
Do Extension
Not Li.ft Saw
Tables.
With Rails
the rip fence. Workpiece
could bind or suddenly
kick back. You could be
hit or cut. Clean debris
off fence rail before
)ositioning fence.
A WARNING
G
• Attach Blade Guard
Assembly
Operating
Before
this Saw
H
Turn Clockwise to
Increase Blade
Angle.
_f'l °°
A WARNING
Turn Clockwise to Raise
Blade.
Turn Counterclockwise to
Lower Blade.
• For your safety, read owners manual before
operating sew.
• Wear eye protection,
• Keep blade guard down and in place for through
cuts.
• Keep hands out of path of saw blade.
• Do net perform any oparatlon freehand.
• Knew how to reduce the risk of klokback.
See Instructions for dpplng.
• Never reach around or ever sew b_ade.
15
• When dppln9, use push stick when fence Is set
2 Inches er less from blade.
• When dpplng, use push block and auxllary lance
when fence Is set between 1/2 and 2 Inches from
blade. Do not make rip cuts narrower then 1/2 Inch.
• Turn off tool and walt for saw blade to stop before
moving workplece or changing settings.
• Dlseonnact the sew from the power source before
changing blade or servicing.
• Do not expose to rain or use |n damp places.
Fig. 4 b
CRAFTSMAN"
TABLESAW315.228410
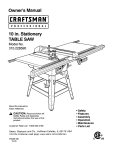
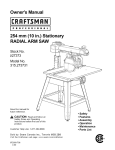
KNOW YOUR TABLE
SAW
ANTI-KICKBACKPAWLS
BLADE
REARRAIL
RIVINGKNIFE
OR SPREADER
RiPFENCE
ALIGN-A-CUT
INSERT
TABLE
EXTENSION
MITER
GAGEGROOVE
SCALE
TABLE
EXTENSION
:RONT
RAIL
MRER
GAGE
SWITCH
WITH KEY
RNE
ADJUSTMENT
KNOB
BEVEL
HANDWHEEL
SCALE
RIP FENCE
HANDLE
HANDWHEEL
LEGSTAND
BELTCOVER
o
LEVEUNGFOOT
o
BEVEL
LOCKHANDLE
MOTOR
Fig. 5
the basic cuts: cross cuts, miter cuts, bevel cuts, and
OVERVIEW
compound cuts.
The upper portion of the blade projects up through the
table, surrounded by an insert called the throat plate.
The height of the blade is set with a handwheel and
locked with a handle, both on the front of the cabinet.
To accommodate wide panels, the tabletop has
extensions on each side. Detailed instructions are
For cuts with the blade straight up and cutting across
the grain (cross cuts or miter cuts), use the miter gage
to set the angle and push the wood into the blade. To
cut with the blade straight up, along the grain of the
wood (rip cuts), use the rip fence to guide the wood.
Push smaller pieces with a pushblock or pushstick.
provided in the Operation section of this manual for
CRRFTSMRN"
TABLESAW315.228410
16
To tilt the
blade for a bevel cut, use the bevel
handwheel on the side of the cabinet. A bevel scale
on the front of the cabinet shows the blade angle.
Inside the cabinet, adjustable positive stops control
the degree of tilt.
require special attachments, which have detailed
instructions to reduce risk of injury and ensure the
best performance from your new saw.
Before attempting to use your saw, familiarize yourself
with all operating features and safety requirements of
your Sears Craftsman table saw. The saw's features
are described below.
Use the miter gage with a bevel cross cut (compound
ct_t) and the dp fence with a bevel rip cut. Other cuts
ALIGN-A-CUT INSERT - A plastic insert on which
marks may be made to indicate the location of the
sawcut on the workpiece.
ANTI-KICKBACK PAWLS - Kickback is a hazard in
MITER GAGE GROOVES - The miter gage rides in
these grooves on either side of the blade.
MITER GAGE KNOB - Located on the miter gage,
this knob locks in the cutting angle after selection.
which the workpiece is thrown back toward the
operator. The toothed pawls are designed to snag the
workpiece to prevent or reduce injury should kickback
occur.
MOTOR (13/6.5 AMP) - The powerful induction motor
is 3HP, with capacitor start and V-belt drive, and is
housed in a sturdy steel base.
OVERLOAD PROTECTOR - This device switches off
the saw it overheats. See the Operation section.
BEVEL HANDWHEEL - This handwheel, on the right
side of the cabinet, tilts the blade for a bevel cut.
RAILS - Front and rear rails provide support for large
workpieces and the rip fence.
BEVEL SCALE - The easy-to-road scale on the front
of the workstand shows the exact blade angle.
RIP FENCE - A sturdy metal fence guides the
workpiece and is secured with the rip fence handle.
Grooves run along the top and sides of the rip fence
for use with optional clamps and accessories.
BLADE -This saw is provided with a Craftsman 24
tooth, 10 in. carbide tipped blade. The blade is
adjusted with bevel and height handwheels on the
cabinet. Bevel angles are locked with a handle below
the front rail.
RIP FENCE FINE ADJUSTMENT KNOB - The knob
on the front of the rip fence makes fine adjustments to
the desired measurement for precise cutting. Push in
the knob and turn to position fence.
WARNING:
Be sure to use only blades rated for
at least 5,000 rpm and recommended for use on
this saw. Check with your nearest Sears retail
store.
RIP FENCE HANDLE - The handle on the front of the
rip fence releases the rip fence or locks it in place.
BLADE GUARD - Always keep the guard down over
the blade for through-sawing cuts.
RIVING KNIFE OR SPREADER - Located directly
behind the blade, it keeps cut edges from binding and
supports the blade guard.
BEVEL LOCK HANDLE - This handle, placed just
under the worktable surface on the front of the cabi-
SCALE - Found on the front rail, the easy-to-read
scale provides precise measurements in rip cuts.
net, locks the angle setting of the blade. Be sure the
handle is hanging straight down before tilting the
blade. If it is not straight down, it may jam and bend
the locking bolt.
SWITCH WITH KEY - Your table saw has an easy
access power switch located below the front rail. The
yellow switch key must be removed from the hardware bag and inserted into the switch before saw can
be operated. To lock the switch in the OFF position,
remove the switch key from the switch. Place the key
in a location that is inaccessible to children and others
not qualified to use the tool.
DUAL VOLTAGE - Your table saw can be set up to
operate at 120 voltage or at 240. Use extreme caution
when changing the voltage.
HEIGHT HANDWHEEL - Use this handwheel to lower
and raise the blade for adjustments or replacement. It
is located on the front of the cabinet.
TABLE EXTENSIONS - Removable cast iron extensions, 12 in. by 27 in., support larger workpieces.
MITER GAGE - This gage aligns the wood for a
crosscut. The easy-to-read indicator shows the exact
angle for a miter cut, with positive stops at 90" and
45".
17
CRAFTSMAN" TABLESAW315.228410
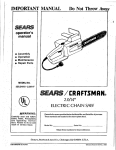
Assembly is best done in the area where the saw will be used. When you remove the table saw base, loose
parts, and hardware from the packing materials, check all items with the loose parts list and drawing. If you are
unsure about the description of any part, refer to the drawing. If any parts are missing, delay assembling until
you have obtained the missing part(s).
INSTALLING
HANDWHEELS
ON SAW BASE
Note: If you mount the saw base on a bench instead
of the legs, go to the Assembling Table Extensions procedure. The bench surface must have
an opening for sawdust to fall through, as large
as the opening in the bottom of the saw base, A
height of 36 in. from the top of the saw table to
the floor is recommended.
See Figure 6.
•
Each handwheel bag contains a metal handwheel,
a screw (3/16-24 x 112 in.), and a fiat washer
(3/16 in.).
•
Align the handwheels to the shaft ends that extend
from the front and right side of the table sawbase.
Match the flat spots on the shaft and inside the
handwheel. Insert a screw and a fiat washer in the
handwheel center and tighten with a 4 mm hex key.
ASSEMBLING
STEEL
LEG STAND
See Figures 7 and 8.
•
BEVEL
HANDWHEEL
Take the following hardware from the leg stand
hardware bag:
24 carriage bolts (5/16-18 x 3/4 in.)
4 leveling feet
32 flat washers (5/16 in.)
32 hex nuts (5/16-18)
Note: Remaining hardware from this bag is used for
mounting leg stand on the table saw base.
TABLE
BASE
HANDWHEEL
SCREW
SHAFTEND
•
Take 4 legs and 8 braces from loose parts.
•
Place a short upper brace inside two of the legs,
with the legs wide end up. (Upper braces have two
large holes in each end.) Make sure the two posts
on the leg align with the small holes on the brace,
WASHER
WASHER
Fig. 6
UPPERBRACE
HEXNUT
CARRIAGE
BOLT
LOWERBRACE
WASHER
LEVELINGFOOT
Fig. 7
[IIRFTSHRI_TABLESAW315.228410
18
•
Align the two large holes on the brace and the
legs. Insert the carriage bolts. Add fiat washers
and hex nuts and hand tighten. Repeat for the
other short upper brace. These are the front and
back sets.
•
For the side sets, install a long upper brace on two
legs. Add hardware and finger tighten. Repeat for
the other long upper brace.
•
Usa the same steps to install the lower braces.
Tighten all hex nuts with a 12 mm wrench.
•
Place a hex nut and fiat washer on each leveling
foot. Install the leveling feet from the bottom of
each leg with the bolts pointing up. Cap with the
remaining fiat washers and hex nuts but do not
tighten.
•
_,
Move the leg set to desired location. Adjust the
leveling feet with a 12 mm wrench, then tighten the
top hex nut.
WARNING:
Do not lift the saw without help.
The saw base weighs approximately 95 Ibs. Hold
it close to your body. Keep your knees bent and
lift with your legs, not your back. Ignoring these
precautions can result in back injury.
•
Place the leg stand on the table saw base. Align
the holes in the table with the holes in the end
braces. Make sure the Craftsman label faces the
front of the saw which has the height handwheel.
•
Place a flat washer on a bolt and insert through
hole. Add a fiat washer and a hex nut. Hand
tighten.
•
Repeat for three remaining holes. Tighten all
hardware with a 12 mm wrench. You may find it
helpful to use one wrench to hold the head of the
bolt and one to tighten the hex nut. Leave the saw
upside down to add the extensions.
LEG
STAND
BRACE
RAT WASHER
HEXBOLT
SAWBASE
LOWERBRACE
LEGSTANDASSEMBLED
Fig. 8
MOUNTING
THE LEG STAND
ON THE TABLE
SAW BASE
See Figure 9.
•
Take the following from e small hardware bag:
4 hex bolts (5/16-18 x 1/2 in.)
4 hex nuts (5/16-18)
8 flat washers (5/16 in.)
Note: This hardware was in the bag with hardware for
assembling the leg stand and leveling feet.
•
Place the saw table upside down on a smooth
surface, such as cardboard, on the floor.
Fig. 9
19
[HFtSNAN'TABLE SAW315,228410
ASSEMBLINGTABLE EXTENSIONS
_k
See Figure 10.
• Locate the table extensions and the small hardware bag with the following:
8 hex bolts (5/16-18 x 1-1/4 in.)
8 hex nuts (5/16-18)
16 fiat washers (5/16 in.)
A
•
ALIGNING
TABLE
EXTENSIONS
See Figure 11.
WARNING:
The table extensions not only
provide a better cut on the workpiece but help
protect you. Serious injury can result from
workpiece binding or kickback due to twisted
rails or a misaligned rip fence.
A good alignment allows the roils to slide on easily.
• Stand at the front of the saw and line up the front
edges of the table and extensions.
With the saw upside down. align the extensions
with the table with the bevel edges in front. Put a
flat washer on each bolt. Attach the extensions to
the table by inserting the bolts from the direction of
the table.
•
Slip the remaining flat washers and hex nuts on the
bolts, Lightly tighten them with a 12 mm wrench.
•
Get help to stand the saw assembly upright using
the center saw table. Do not grasp the saw by the
extensions.
TABLE
EXTENSION
WARNING:
The extensions are very heavy. Do
not lift the saw table without help. Keep your
knees bent and lift with your legs, not your back.
Ignoring these precautions can result in back
injury.
•
To align extensions without damaging the table
saw, put a block of wood at the front of the table
where the extension meets the table, and tap the
block with a hammer. Check and repeat until the
front edges are even.
•
Lift each extension slightly until it is higher than the
table (if necessary, place a block of wood below
and tap upward). Center the block over the edges
and tap it. Recheck the front alignment. If it is even,
tighten the screws with a 12 mm wrench.
BLOCKOF WOOD
SAWTABLE
EXTENSION
SAW
VIEWED FROM SIDE
\
TABLEEXTENSIONEDGE
FORWARD
SAW TABLEEDGE
_m
TAP
HERE
VIEWED FROM FRONT
HEX
NUT
TAP HERE
m
SAWTABLE EDGE
HEXBOLT
FLATWASHER
"_
TABLEEXTENSION
Fig. 10
Fig. 11
[IIRFTSNItN' TABLE SAW 315.228410
20
•
At the back of the table, put the square head bolts
in the holes in the edge of the table and extensions
so bolt heads extend outward 1/2 in.
•
Under the table, loosely attach the flat washers
and hex nuts onto bolts. Slide the slot on the rear
rail over the bolts. Adjust each bolt to fit the rail
closely to the table.
From the carton, remove the rear rail and the
following hardware:
•
Position rail so that the right hand edge extends 21/2 inches beyond the table extensions.
6 square head bolts (5/16-18 x 1 in.)
6 hex nuts (5/16-18)
6 flat washers (5/16 in.)
Right and left end caps for rear rail
2 screws (5/32-32 x 1/2 in,) for end caps
•
Push the rail against table and tighten each hex
nut with a 12 mm wrench. If the rail does not slide
easily over the bolts, re-align the table extensions.
•
Put the end caps on the rail ends. Insert the
screws and tighten with a phillips screwdriver.
INSTALLING
THE REAR
RAIL
See Figures 12, 13, and 14.
,_
•
WARNING:
Front and rear rails must be
carefully aligned to reduce the risk of kickback,
which can cause serious injury.
Note: Remaining hardware from this hardware bag is
used for installing the front rail and end caps.
SLOT FORBOLT
TABLEEXTENSION
REARRAIL
SQUAREHEADBOLT
HEXNUT
SQUAREHEADBOLT
FLATWASHER
Fig. 13
2-1/2 In.
ENDCAP
REARRAILINSTALLED
Fig. 14
Fig. 12
21
rRRFTSNI_N"
TABLESAW315.228410
INSTALLING
THE FRONT
RAIL SLOT
RAIL
HEXNUT
See Figures 15, 16, and 17.
•
Locate the front rail, the switch assembly, and the
following hardware:
6 square head bolts (5/16-18 x I in.)
6 fiat washers (5/16 in.)
6 hex nuts (5/16-18)
Right and left end caps for front rail
2 screws (5/32-32 x 1/2 in.) for end caps
•
Set aside the end caps and two screws until the rip
fence and front rail have been aligned and the
switch has been installed.
•
Insert the six square head bolts into table and
extensions, so the bolt heads extend out 1/2 in.
•
Loosely attach a flat washer and a hex nut to each
bolt. See Figure 15.
•
The back of the rail has two slots. See Figure 16.
Slide the upper slot over the bolts. (Bottom slot is
for switch.)
•
Align the rail left to right - Match the 7-1/8 in. mark
on the right scale to the right edge of the saw base
(main table). See Figure 17.
•
Snug the rail against table. Finger-tighten each nut
on the table and extensions.
SLOT
FRONTRAIL
Fig.-16
TABLETOP VIEWEDFROMABOVE
S"" TA"'E
,,w=.
SCALE
_'I [I, i, _i,
TABLE
.ALE
I l.
I EXTFNS'OH
I/
I, It P;',t,I, i, _,t ,I, I1 P_,t,I ,i ,'_I ,l, i,l_i,
\
\
FRONTRAIL
I, i
7-1/8in.MARKRIGHTSCALE
FRONTRAIL
Fig. 17
ALIGNING
THE RIP FENCE
AND FRONT
RAIL
See Figures 18, 19, and 20.
HANDWHEEL
The rip fence scale indicator is installed on the right
side of the rip fence but can be removed and reinstalled on the left side if needed. If a cutting operation
requires placing the rip fence on the left side of the
blade, and you find relocating the indicator necessary,
simply unscrew and re-attach it.
BOLT
HEXNUT
FLAT WASHER
Fig. 15
[illlr_NRIr TABLESAW315,228410
22
•
Hook the back of the rip fence over the rear rail.
Lower the front of the rip fence into the groove on
the front rail. See Figure 18.
•
Slide the rip fence back and forth, it should move
freely with about 1/16 in. clearance between the rip
fence and table surface. If it doesn't, loosen the
nuts holding the front rail and adjust the rail up or
down. See Figure 19.
•
Remove the rip fence and repeat on the other side
of the blade. When the fence rides smoothly,
tighten all rail hex nuts with a 12 rnm wrench.
RIPFENCE
HOOK
OVER
REAR
RAILHERE
MOUNTING
THE MOTOR
AND SWITCH
See Figures 21 and22.
•
Locate the motor and switch assembly, the motor
mounting plate and the following hardware:
4 hsx bolts (5/16-18 x I in.)
8 fiat washers (5/16 in.)
4 lock washers (5/16 in.)
4 hex nuts (5/16-18)
2 hex bolts (5/16-18 x 5/8 in.)
Yellow switch key
RAIL
Note: Remaining hardware from this bag is used for
installing the belt guard.
Fig. 18
TO INSTALL
INDICATOR
ON LEFT
SIDE
•
Release the bevel lock handle (front of the cabinet)
and turn the bevel handwheel (dght side of the
cabinet) until the blade is fully vertical Rstighten
the bevel lock handle.
•
Align the holes in the motor mounting plate and the
motor bracket so the top edges are even. Place a
fiat washer on the four 1 in. bolts and insert them
into the holes.
•
Install a flat washer, a lock washer, and a hex nut
on each bolt. Hand tighten only. This is the motor
support assembly.
Center the motor side to side on the motor mount-
•
ing plate. Tighten the nuts with a 12 mm wrench.
•
Insert the two rods on the motor support assembly
into holes in the cradle. Push the motor in as far as
it will go. Thread the two hex bolts into the cradle
to clamp down on the rods. Do not securely
tighten bolts yet.
RIP FENCE
HEXBOLTS
FRONTRAIL
MOTORSUPPORT
A,_EMBLYROD
MOTOR
MOUNTING
PLATE
RiP FENCEHANDLE
Fig. 19
FLATWASHER
WASHER
ENDCAP
1 In. HEXBOLTS
MOTOR
MOTOR
Fig. 21
Fig. 20
23
I:RRFTSNRN"
TABLESAW315.228410
•
Locate the switch assembly, two screws (1/4-20 x
318 in.) and two square nuts (1/4-20).Insert the
screws from the rear of the switch plate and add
the square nuts on the front.
•
Holding the switch to the front, insert and slide the
two square nuts into the lower slot of the front rail.
U
WARNING:
Place the switch out of the immediate work area to avoid accidentally turning it off
during operation.
•
Slide the switch assembly to a convenient position,
leaving ample clearance for the handwheel.
Tighten securely with a screwdriver.
•
Install the yellow switch key on the switch. See
Figure 51.
•
Attach the rail end caps and screws with a phillips
screw driver. See Figure 20.
#
'_ TABLE
•
Pull the motor out until the belt is taut. Securely
tighten the hex bolts above the rods with a 12 mm
wrench.
•
Put your hand around the belt halfway between the
two pulleys and squeeze the belt until both sides of
the belt touch. The motor should move freely as
you squeeze the belt. If it does not, loosen the
clamp screws and readjust the belt tension.
•
Lower the blade by turning the height handwheel.
Lift the motor forward and remove the belt.
•
Open the hinged belt guard and place it over the
motor screws on the motor pulley. Secure with flat
washers and hex nuts. Tighten the hex nuts with a
10 mm wrench.
•
Replace the belt and snap the guard closed.
•
Check clearances by indexing the blade. Release
the bevel lock handle on the front of the cabinet
and turn the bevel handwheel on the right side of
cabinet to 45" and back. Use the height handwheet
to fully lower and raise the blade.
EXTENSION
SAW
HEX
SWITCHSCREW
SW_CH
MOTOR
SUPPORT"
ASSEMBLY
MOTOR
BELT
MOTOR
PULLEY
SWITCHKEY
Fig. 22
INSTALLING
MOTORSCREW
Fig. 23
THE BELT AND BELT GUARD
See Figures 23 and 24.
•
Locate the belt, belt guard, 4 flat washers (3/16 in.)
and 4 small hex nuts (3/16-24).
•
Lower the blade by turning the height handwheel
on the front of cabinet.
•
Slip the belt on the saw pulley inside the saw
cabinet. Lift the motor forward and place the belt on
the motor pulley.
•
Check that the belt is straight and both pulleys are
aligned with each other, If not, adjust the motor on
the motor support assembly. Refer to Mounting the
Motor.
•
BELTGUARD
,WASHER
HEX NUT
Raise the saw blade all the way up.
Fig. 24
[RRFTSMRIr TABLE SAW315.228410
24
INSTALLING
THE BLADE
GUARD
SOCKETHEADCAPSCREWS(3)
BLADEGUARD
See Figures 25, 26, and 27.
FLATWASHER
\
WARNING:
If the blade is not fully lowered, tum
the height handwheel on the front of the cabinet
to lower the blade to prevent the risk of injury.
•
Locate the blade guard, the blade guard bracket,
and the following hardware:
2
2
3
3
hex bolts (5/16-18 x 1/2 in.)
lock washers (5/16 in.)
socket head screws (1/4-20 x 3/8 in.)
fiat washers (1/4 in.)
BLADE
BRACKET
•
Align the lower end of the blade guard bracket and
the threaded holes of the cradle and insert the two
hex bolts and lock washers. Securely tighten with a
12 mm wrench. See Figure 25.
•
Remove the throat plate. See Removing/Replacing the Throat Plate in the Adjustments section.
•
Put the blade guard assembly in place on the
tabletop, aligning the screwholes in the riving knife
to the holes in the blade guard bracket. Align the
hole in the front of the riving knife base with screw
hole in the saw table. See Figure 26.
Fig. 26
Note: The screw hole is located under the slot in back
of the throat plate.
•
Insert two socket head screws and two flat washere in the two holes at the back of the riving knife
base. Securely tighten with a 5 mm hex key.
•
Insert the third socket head screw and a flat
washer into the screw hole in the saw table under
the throat plate. Securely tighten with a 5 mm hex
key. See Figure 27.
•
Replace the throat plate.
CRADLE •
BLADE
BRACKET
BLADEGUARD
SOCKETHEAD
CAP SCREW_I_
HEX
FLATWASHER%_p
ANTI-KICKBACK
PAWLS
KNIFE
Fig. 25
Fig. 27
25
[lltll'r|MllR" TABLESAW315.228410
CHECKING THE THROAT PLATE
See Figure 28.
_k
•
BLADEGUARD
CAUTION: The throat plate must be even with the
table surface. Ifit istoo high ortoo low,the workplace
can catch on uneven edges and cause kickback.
Make sure the throat plate is flush with the table top.
To change the height ofthe throat plate, loosen the fiat
head screw that secures the throat plate and adjust
the four setscrews on the throat plate with a 2 mm hex
key. Do not allow the throat plate to bow up above the
table surface.
SETSCREWS(4)
2 mm
"V" _.oou,..
THROATPLATE
_k
FLAT
Fig. 30
WARNING:
It is important to install and adjust
the riving knife correctly. Poor alignment could
cause kickback and throw the workpisce at the
operator.
The riving knife must be aligned with and centered
over the blade.
BEVEL
HANDWHEEL
HEIGHT
HANDWHEEL
Fig. 28
AUGNING
RIVING
Raise the blade and the blade guard.
•
Place a framing square or straightedge beside the
blade on the left. See Figure 29.
•
Loosen front screw on riving knife with a 5 mm hex
key. See Figure 30.
KNIFE WITH THE BLADE
_k
See Figures 29, 30, and 31.
_k
•
WARNING:
Make sure the switch is off, the
switch key is removed, and the caw is
unplugged. Failure to do so could result in
accidental starting, causing carious injury.
"__
RIVINGKNIFE
WARNING:
Do not loosen the screws holding
the riving knife to the blade guard bracket.
Unsecured pawls or riving knife could cause
personal injury while you are adjusting the riving
knife.
•
Center riving knife over the blade. See Figure 31.
•
Securely tighten screw with a 5 mm hex key.
RIVINGKNIFE
FRAMINGSQUARE
)
VIEWED FROM TOP OF SAW
WITH RIVING KNIFE SHOWN
CENTERED OVER BLADE
FRAMINGSQUARE
Fig. 29
(III|t3NIIII'TABLIE SAW316,228410
26
_
BLADE
CHECKINGRIPFENCEAND
BLADEALIGNMENT
MITERGAGEGROOVE
FRAMING
SQUARE
See Figures 32, 33, and 34.
The rip fence is self-aligning but should be checked
before first use.
,_
WARNING:
Failure to align the rip fence to the
blade can cause jams and kickback, resulting in
serious personal injury.
•
Slide the rip fence to the miter gage groove, which
is parallel to blade. Do not lock the rip fence.
•
Place a framing square against the blade, with the
long end under the rip fence at the front. See
Figure 32. Note the distance.
•
Move the square to the back and m_asura the
length from the other end of the fence. See Figure
33.
•
If the distances are different, loosen the four
screws around the rip fence handle with a 6 mm
hex key. Altamata the order (remove the screw
opposite, not next to the first one). See Figure 34.
•
Hold the fence handle against the front rail and
align the rip fence with the blade.
•
Retightan the screws in alternating order and
check the alignment.
•
Repeat until the rip fence is aligned.
ADJUSTMENTSCREWS
33
RIP FENCE
ADJUSTMENT
SCREWS(4)
MITERGAGEGROOVE
BLADE
RIPFENCE
RIP FENCE
HANDLE
RNE ADJUSTMENTKNOB
Fig. 34
Note: To insure proper serf alignment when positioning rip fence, push sides of scale indicator
housing against front rail before locking rip
fence handle.
•
Attach the fine adjustment knob bracket to the
bottom of the rip fence head using the two screws
provided. The bracket will attach on either side of
the rip fence handle.
•
Push in on the knob and turn to move rip fence to
desired location.
MITERGAGE
GROOVE
Fig. 32
27
(lUlFI"SNIIN'TABLESAW315.228410
CHANGING
THE MOTOR
GREENGROUNDING
WIRE
VOLTAGE
See Figures 35 and 36.
_h,
BLACKLEAD
BROWNLEAD
WARNING:
If you are unfamiliar with the basic
fundamentals of electricity do not attempt this
procedure. Use a qualified electrician to change
the voltage of the saw to avoid electric shock or
possibly a fire.
Your saw is set at the factory for 120V usage See
Figure 35. Use extreme caution in changing to 240V,
as with any electdcal procedure. Check the receptacle.
It must be a 220-240V, 15 amp, 3-blade unit -- connected to a 240V AC power supply -- through a 240V
branch circuit -- with at least a 15 amp capacity -oand
protected by a 15 amp time-delay fuse or circuit
breaker. All attachment plugs and any receptacles
designed for 120 volt usage must be replaced with
devices rated for 240 volts.
CONNECTOR
BOXCOVER
120 VOLTWIRING
2
_,
•
WARNING:
Never connect the plug to the
power source outlet until all assembly steps are
completed. Unplug the saw before changing any
connections.
Open the motor connector box cover on the end of
the motor with a phillips screwddver. Remove the
brown motor lead from terminal #2 and attach it to
the #3 terminal.
Fig. 35
GREENGROUNDING
WIRE
Note: The brown lead is not needed in 240V usage.
•
Remove the yellow motor lead from terminal #1 and
attach it to terminal #2.
•
Cut off the 120V power cord plug and replace it
with a three-blade 240V, 15 amp U.L. listed plug.
•
Connect the power cord white and black leads to
the =hot" plug blade terminals.
•
Connect the power cord green grounding wire to
the plug ground prong terminal.
•
Close the motor connector box. Be careful to place
the power cord in the strain relief groove. Tighten
the box cover screws.
•
Plug the saw into the appropriate 220-240V,
15 amp, 3-blade receptacle.
•
Make sure the receptacle is connected to a 240V
AC power supply through a 240V branch circuit
having at least a 15 amp capacity and protected by
a time delay fuse or circuit breaker of the correct
size.
BROWNLEAD
BLACKLEAD
CONNECTOR
240 VOLTWIRING
3
2
Fig. 36
CIIRFTSMRWTABLE SAW315.228410
28
To avoid unnecessary setups and adjustments, a good practice is to check your setups carefully with a framing
square and make practice cuts in scrap wood before making finish cuts in good workpieces. Do not start any
adjustments until you have checked with a square and made test cuts to be sure adjustments are needed.
REPLACING
THE BLADE
See Figures 37, 38, and 39.
BLADEGUARD ._
|
THROATPLATE
,_
•
•
WARNING:
Make sure the switch is off, the
switch key is removed, and your saw is
unplugged. Failure to do socould result in serious
personal injury.
•
To replace the blade with an accessory blade,
follow the instructions provided with accessory.
•
,_,
BLADEAT HIGHEST
PosmoN
Raise the blade to its highest position:by turning
the height handwheel clockwise. Angle the blade
straight up by loosening the bevel lock handle and
turning the bevel handwheel. Wedge a piece of
scrap wood against the front of the blade. See
Figure 37.
Loosen the blade nut with the blade wrench
provided with your saw. Remove the blade nut and
blade washer. Carefully remove the scrap wood
and blade.
I/I /
REMOVED____,._
Raise the blade guard and remove the throat plate.
To remove, loosen the screw at the front with a
phillips screwdriver and lift the front end. Pull it out
toward the front end.
•
/_ /
//-_/_)
//
_@_///
SCRA,
WOO
/
5
NEW BLADE,TEETH
Fig. 37
BLADEWASHER,
DOMESIDE OUT
DOWNAT FRONT /_'_"
To install a standard blade, place the new blade on
the arbor shaft, with teeth pointing down toward the
front of the saw. See Figure 38. Wedge a piece of
scrap wood at the back of the blade. See Figure
39.
BLADENUT
BLADE
ARBOR
0
CAUTION: The teeth must point down toward
the front of the saw to work properly. Otherwise,
damage to the blade, saw, or workpiece can
occur.
•
Place blade washer and blade nut over blade arbor.
Be sure dome side of blade washer faces out from
blade and that all items are snug against the arbor
housing. Tighten securely.
•
Remove wood and rotate blade by hand to make
sure it turns freely.
•
Lower blade and slip the throat plate into the
opening and push it toward the back of the saw to
engage the spdng clip. Securely tighten the screw.
If the throat plate is not flush with the table, adjust
the setscrews with a 2 mm hex key. Do not allow
the throat plate to bow up above the table surface.
Fig. 38
SCRAPWOOD
TO TIGHTEN
BLADENUT
Fig. 39
29
rRRFTSMRN'TABLE
SAW315.228410
HEELING (PARALLELING)
THE SAWBLADE
TO THE MITER GAGE GROOVE
MARKEDTOOTH
AT BACK
FRAMINGSQUARE
See Figures 40, 41, and42.
until you have checked with a square and made
test cuts to be sure adjustments are necessary.
Once the screws are loosened, these Items must
be reset.
WARNING: Make sure the switch is off, switch
DO NOT
anyand
screws
forunplugged.
this adjustment
key Ioosan
is removed
saw is
Failure to
do so could result in accidental starting causing
sadous personal injury.
_k
•
•
•
!_
Fig. 41
WARNING: The sawblade must parallel the
miter gage groove so the wood does not bind,
resulting in kickback. You could be hit or cut.
Lift the blade guard. Raise the blade all the way by
turning the height handwheel.
Mark beside one of the sawblade teeth at the front
of the blade. Place a framing square beside the
blade on the mark. Be sure the framing square is
between the teeth and fiat against the blade.
Measure the distance to the dght gage groove.
Turn the sawblade so the marked tooth is at the
back.
•
Remove the throat plate by loosening the front
screw with a phillips screwdriver. Lift the throat
plate and pull it out by the front end.
•
Lower the blade completely with the height
handwheel. You can then access the table brackets through the throat plate opening.
•
From the back, loosen the three screws holding the
rear table bracket with a 12 mm wrench.
•
If the blade was too far from the miter gage groove,
move the bracket toward the miter gage groove.
Tap with a wood block and hammer.
•
Move the square to the rear and again measure
the distance to the right miter gage groove. If the
distances are the same, the blade and the miter
gage groove are parallel.
•
If the blade was too close to the miter gage groove,
back the bracket away with a block of wood and
hammer.
•
Tighten the screws, raise the blade and recheck.
•
If the distances measured are different, adjust the
table brackets underneath the saw.
•
Repeat until blade is parallel to miter gage groove.
•
If blade is not parallel, adjust front table bracket.
Tilt blade to 45" with bevel lock handle and bevel
handwheel.
•
From the back of the saw, loosen bolts holding
front table bracket, as well as rear table bracket.
•
Reposition the blade to 90" with the bevel handwheel and bevel lock handle.
•
Lower blade and move the brackets as needed.
Retightan all bracket screws.
•
Raise blade and recheck. Repeat until blade is
parallel to the miter gage groove.
•
Place threat plate in opening and push it toward
the rear of saw base to engage the spring clip.
,_,
WARNING: When reaching under the saw table,
wear gloves or first remove blade. Accidental
contact with the blade that could cause a cut
resulting in serious personal injury.
BLADEGUARDIS NOTSHOWNFOR CLARITY
FRAMINGSQUARE
MARKEDTOOTH
MITERGAGEGROOVE
Note: The keyslot in throat plate will drop over front
screw.
©
•
Fig. 40
[llllUrr,_M
RIrTABLESAW315.228410
30
Tighten the screw. Do not allow the throat plate to
bow up above the table surface.
SAW
TABLE
VIEWED
FROM
BELOW
•
REAR
TABLE
BRACKET
REAR
BRACKET
SCREW
If scale indicator does not point to O', loosen scale
indicator screw with a screwdriver. Adjust scale
indicator within slot and retighten screw.
•
If blade angle is wrong, adjust the 90" stop screw
(left of the blade, looking from the front). See
Figure 44. Start by turning the 90" stop screw three
or four times with a 4 mm hex key,
•
Turn bevel handwheel clockwise once, then back
counterclockwise to square blade with table.
REAR
BRACKET
SCREW
•
Tighten the 90" stop screw and recheck that the
blade is square in a 90" position. If not, repeat.
When blade is square, check scale indicator. If it is
not at zero, reset scale indicator as before.
FRONTTABLE
BRACKET
•
Check the 45" setting. Tilt the blade with the bevel
handwheel as far as it will go to the left. Place
square against the blade (be sure the square is not
against one of the saw teeth). If the blade is not at
45", unscrew the 45" stop screw (right of blade),
turn handwheel until blade is correct, and tighten
the screw. Recheck and repeat if necessary.
•
Check that the scale indicator is at 45".
FRONTTABLE BRACKET
Fig. 42
SETTING THE BEVEL STOPS AND INDICATOR
See Figures43 and 44.
• If not, loosen scale indicator with a screwddver,
adjust it within the slot, and retighten the screw.
_1= WARNING:
Make sure the switch is off,the
switch key is removed, and your saw is
unplugged. Failure to do so could result in
sedous personal injury.
90"STOPSCREW
Bevel scale should show O"when the blade is set at
90" and 45" when blade is at a 45" tilt.
•
Raise blade all the way up by turning height
handwheeL Lift blade guard.
•
Loosen bevel lock handle and turn the bevel
45"STOP
handwheel clockwise to tilt the blade. See Figure
43. Reverse it and tum handwheel counterclockwise until it stops.
•
Check blade angle with a combination square.
Don't let the square touch a blade tooth. Blade
should be at 90" and scale indicator at 0".
HEIGHT
HANDWHEEL
Note: The scale indicator is the plastic plate on the
scale at the front of the cabinet.
BEVEL
HANDWHEEL
Fig. 44
BEVELLOCK
HANDLE
(NOTSHOWN)
HEIGHT
HANDWHEEL
SCALE
INDICATOR
Fig. 43
31
CRRFTSMaM'TABLESAW315.228410
ADJUSTING
THE MITER
See Figure 45.
MITER GAGEKNOB
GAGE
MITERGAGEROD
You can set the miter gage at 0" and plus or minus
45" with the miter gage stop pin and adjustable stop
screws.
Note: The miter gage provides close accuracy in
angled cuts. For very close tolerances, test
cuts are recommended.
•
•
MITERGAGEBASE
Loosen knob and pull out on stop pin to rotate
miter gage base past stop screws.
45"STOPSCREW
Loosen the lock nut of the 0 ° stop screw at the stop
pin with an 8 mm wrench.
•
Place a 90" square against the miter gage rod and
the miter gage base.
I
If the rod is not square, loosen the knob, adjust the
rod, and tighten the knob.
•
Adjust the 0 ° stop screw until it rests against the
stop pin.
•
Adjust the plus and minus 45" stop screws using a
45" triangle and the steps above.
0"STOPSCREW
STOPPIN
LOCKNUT
Fig. 45
THROATPLATE
KEYSLOT
/
/
/
REMOVING / REPLACING THE THROAT PLATE
See Figure 46.
,_
SPRINGCLIP
TABLETOP
WARNING:
Make sure the switch is off, the
switch key is removed, and the plug is out of the
outlet. Failure to do so could result in accidental
starting, resulting in serious personal injury.
•
To remove the throat plate, first loosen the screw
holding the throat plate with a phillips screwdriver
and lift the front end. Pull throat plate out toward
the front of the saw.
•
To re-install the throat plate, place in the opening.
Push throat plate toward the rear of saw base to
engage the spring clip.
Note: The keyslot in the throat plata will drop over the
screw.
•
Check that the throat plate is even with the table
top. If not, adjust the four comer setscrews with a 2
mm hex key. See the procedure in Assembly
section.
•
Securely tighten throat plate screw. Do not let the
throat plate to bow up above the table surface.
[ItRFTSNRN'TABLE
SAW315.228410
Fig. 46
32
BASIC
OPERATION
OF THE TABLE
SAW
A table saw can be used for straight-line cutting
operations such as cross cutting, ripping, mitering,
beveling, compound cutting, and resawing. It can
make dado or molding cuts with optional accessories.
The three-prong plug must be plugged into a matching outlet that is properly installed and grounded
according to all local codes and ordinances. Improper
connection of the equipment can result in electric
shock. Check with an electrician or service personnel
if you are unsure about proper grounding. Do not
modify the plug; if it will not fit the outlet, have the
correct outlet installed by a qualified electrician. Refer
to the Electrical page of this manual.
•
To avoid pinching the blade, support the work
properly before beginning a cut.
•
When making a cut, use steady, even pressure.
Never force cuts.
•
Do not cut wet or warped lumber.
•
Always hold your workpiece firmly with both hands
or with pushsticks. Keep your body in a balanced
position to be ready to resist kickback should it
occur. Never stand directly in line with the blade.
•
Use the right type of blade for the cut being made.
CUTTING
See Figure 47.
Pushsticks are devices used for safely pushing a
workpiece through the blade instead of using your
hands. They can be made in various sizes and
shapes from scrap wood to use in a specific project.
The stick must be narrower than workplace, with a 90"
notch in one end and shaping for a grip on other end.
Note: This table saw is designed to cut wood and
wood composition products only.
CAUSES OF KICKBACK
Kickback can occur when the blade stalls or binds,
kicking the workpiece back toward you with great
force and speed. If your hands are near the sawblade,
they may be jerked loose from the workpiece and may
contact the blade. Obviously, kickback can cause
serious injury, and it is well worth using precautions to
avoid the risks.
A pushblock has a handle fastened by recessed
screws from the underside. Use it on non-threugh
cuts.
_i,
Kickback can be caused by any action that pinches
the blade in the wood, such as the following:
•
Making a cut with incorrect blade depth
•
Sawing into knots or nails in the workpiece
•
Twisting the wood while making a cut
•
Failing to support work
•
Forcing a cut
•
Cutting warped or wet lumber
•
Using the wrong blade for the type of cut
•
Not following correct operating procedures
•
Misusing the saw
•
Failing to use the anti-kickback pawls
•
Cutting with a dull, gummed-up, or improperly set
blade
Always use the correct blade depth setting. The top
of the blade teeth should clear the workpiece by
118 in. to 1/4 in.
•
Inspect the work for knots or nails before beginning
a cut. Knock out any loose knots with a hammer.
Never saw into a loose knot or nail.
•
Always use the rip fence when rip cutting and the
miter gage when cross cutting. This helps prevent
twisting the wood in the cut.
•
Always use clean, sharp, and properly-set blades.
Never make cuts with dull blades.
CAUTION: Be sure the screw is recessed to
avoid damaging the saw or workpiece.
PUSHS_CKS
PUSHBLOCKS
AVOIDING KICKBACK
•
AIDS
Fig. 47
A featherboard is a device used to help control the
workplace by guiding it securely against the table or
fence. Featherboards are especially useful when
ripping small workpieces and for completing nonthrough cuts.The end is angled, with a number of
short kerfs to give a friction hold on the workpiece.
Lock it in place on the table with a C-clamp. Test that
it could resist kickback.
_k
33
WARNING:
Place the featherboard against the
uncut portion of the workpiece, to avoid
kickback that could cause serious personal
injury.
(RRFT,tNRN"
TABLESAW315.228410
RESETrlNG
THE THERMAL
PROTECTOR
CAUSES
OVERLOAD
OF OVERLOAD
Overload and overheating result from a number of
sources. Always check the connections, the load and
the supply circuit if motor performance is not satisfactory. Check wire sizes and length in the chart below.
Refer to the Electrical page and check your work area
for problem conditions such as the following:
See Figure 48.
Your table saw is equipped with an overloed protector
to shut off the saw when a power circuit limit is
reached and the motor temperature begins to rise.
Otherwise, overheating can occur and cause poor
performance, machine damage or fire. Be prepared to
deal with overload should it occur, first in the immediate situation and then in locating the cause.
•
Loose or incorrect connections (see Connecting
the Motor and Changing the Motor Voltage in the
Assembly section)
If the motor overheats, the ovefloed protector shuts
down the power. Use the steps listed below to restart.
•
Wrong type of plug (use only 3-prong grounding
type) or receptacle (matching receptacle for 3prong plug)
•
•
Reduced input voltage (too small a wire or too
many items on the circuit)
•
Extension cord is too long or wrong type (use only
outdoor extension cords sized by the chad.)
•
Using a dull blade or forcing a cutting operation.
Turn the switch off to eliminate any possibility of
the blade restarting when the motor has cooled.
Remove any objects, including the workplece, from
contact with the blade to prevent binding when you
do rested operation.
u
WARNING:
If the overload protector shuts off,
immediately tum the saw switch off and remove
anything contacting the blade to prevent the risk
of injury. When the motor cools off, it could
unexpectedly restart the blade, throwing an
object or cutting your hand if you are touching
the blade.
•
Allow time for the motor to cool. You may have to
let the motor cool for as long as it had run before
the protector shut it down.
•
While the motor is cooling, refer to the section
below to try to determine the reason for ovedoed.
Correct the problem before resuming operation.
Press hard on the red button on the end of the
•
_,
WARNING:
Use the correct cord and plug to
prevent overload and motor burnout.
motor (opposite end from the pulley). If the motor
has cooled enough, you will hear a click. If you do
not hear a click, let the motor cool longer.
•
When you hear the click, the motor has been reset
and you can continue your project.
EXTENSION CORD
LENGTH
AWG WIRE SIZE FOR
110-12OV
220-240V
MOTORRESETBuTrON
0-25 ft
14
18
26-50 ft.
12
18
€IIIFI_HIII[ TABLE SAW 315.228410
Fig. 48
Note: This motor should be blown out or vacuumed
frequently to prevent saw dust buildup which
could interfere with motor cooling.
34
TYPES
OF CUTS
See Figure 49.
There are six basic cuts: 1) the cross cut, 2) the rip
cut, 3) the miter cut, 4) the bevel cross cut, 5) the
bevel rip cut, and 6) the compound (bevel) miter cut.
All other cuts are combinations of these basic operations. Operating procedures for making each kind of
cut are given later in this section.
CROSSCUT
Q
_1= WARNING: Always make sure the blade guard
and anti-kickback pawls are in place and working
properly when making these cuts to avoid
possible injury.
RIP CUT
Q
Cross cuts are straight 90" cuts made across the grain
of the workpiece. The wood is fed into the cut at a 90"
angle to the blade, and the blade is vertical.
MITERCUT
Rip cuts are made with the grain of the wood. To
avoid kickback while making a rip cut, make sure one
side of the wood rides firmly against the rip fence.
®
The rip fence features a micro-adjust knob, which
allows for precise adjustments of the rip fence and
fine tolerances in the woodwork.
Miter cuts are made with the wood at any angle to the
blade other than 90 °. The blade is vertical. Miter cuts
tend to "creep" away from the miter fence during
cutting. This can be controlled by holding the
workpiece securely against the miter fence.
_.
BEVELRIP CUT
WARNING: Always use a push stick with small
pteces of wood, and also to finish the cut when
ripping a long narrow piece of wood, to prevent
your hands from getting close to the blade.
®
COMPOUND(BEVEL)MITERCUT
Bevel cuts are made with an angled blade. Bevel
cross cuts are across the wood grain, and bevel rip
cuts are with the grain. The rip fence must always be
on the right side of the blade for bevel rip cuts.
Fig. 49
Compound (or bevel) miter cuts are made with an
angled blade on wood that is angled to the blade. Be
thoroughly familiar with making straight cross cuts, rip
cuts, bevel cuts, and miter cuts before trying a compound miter cut.
,_
WARNING: All blades and cutting accessories
must be rated for at least 5,000 rpm to prevent
possible injury.
35
rRRFTSMRIr TABLESAW 315.228410
MAKING
A CROSS
CUT
See Figures 50, 51, 52, and 53.
_i_
WARNING: Make sure the blade guard is lowered
over the blade and is working properly to prevent
possible injury.
It is recommended that you make test cuts on scrap
wood. Stand at the front of the saw and push the
wood with the miter gage.
•
Set blade to the right depth for workpiece by
tuming height handwheel.
•
Set the miter gage to 0 °. See Figure 50. Make sure
miter gage knob is securely tightened.
•
:
Place a support the same height as top of saw
table behind the saw for cut work.
•
The miter gage may be used in either of the two
grooves in the table. When using left groove, hold
workpiece firmly against the miter gage base with
your left hand and grip the knob with your right
hand. When using right groove, hold workpiece
firmly against the miter gage base with your right
hand and grip the knob with your left hand. See
Figure 50.
INSERTSWITCHKEY
Fig. 51
I
Fig. 52
Fig. 53
__CROSS CUT
WHENMITERGAGEIS ON
LEFTSIDE OF BLADE
PLACERIGHTHANDON
MITERGAGEKNOBHERE
PLACELEFTHAND ON
WORKPIECEANDMITER
GAGEHERE
Fig. 50
CRRFTSMRN"
TABLE SAW315.228410
36
•
Check that the wood is not touching the blade.
Insert switch key and lift switch to ON position. See
Figures 51 and 52.
l
Let blade obtain full speed before feeding
workpiece into the blade with the miter gage.
_k
WARNING:
Make sure the blade guard is
lowered over the blade and is working properly to
prevent possible injury.
•
Remove miter gage and attach dp fence over rails.
I
Hold work firmly against miter gage and push miter
gage to feed work into the blade.
•
Place a support the same height as top of saw
table behind the saw for cut work.
•
When work is completed, press switch off and
remove switch key. See Figure 53.
•
Position rip fence the correct distance from blade
for cut.
•
For small pieces of wood, use a pushstick to move
wood into and past blade.
•
Make sure wood is not touching blade. Insert
switch key and lift switch to ON position. Let blade
obtain full speed before feeding workpiece into the
blade.
•
When work is completed, press switch off and
remove switch key.
MAKING
A RIP CUT
See Figure 54.
Making a test cut on scrap wood is highly recommended. From the front of the saw, position the wood
against the dp fence and push it to the blade with a
pushstick. Be sure the end of the wood is square.
WARNING:
NEVER stand directly in the line of
cut. Stand to the side to reduce risk of injury.
_1= WARNING:
NEVER push a small piece of wood
into the blade with your hand.
RIP CUT
SCALE
BLADE,
RIP FENCE
Fig. 54
37
rRRFTSMRN"TABLESAW315.228410
MAKING
A MITER
CUT
•
Hold work firmly against the miter gage and push to
feed work into the blade.
•
When work is completed, press switch off and
remove switch key.
See Figure 55.
_,
WARNING:
Make sure the blade guard is
lowered over the blade and is working properly to
prevent possible injury.
MAKING
,_k
The miter gage may be used in either of the grooves.
When using the left groove, hold the workpiece firmly
against the miter gage base with your left hand and
grip the miter gage knob with your right hand. When
using the right groove, hold the work piece with your
right hand and the miter gage knob with your left
hand.
Check that the blade is at the correct height for the
workpiece. To change the blade height, turn the
height handwheel.
•
If blade is not at 90" to the table, loosen bevel lock
handle and turn bevel handwheel. Reset bevel lock
handle.
Place a support the same height as top of saw
table behind the saw for cut work.
•
Make sure wood is not touching the blade
before turning on the saw. Insert switch key and lift
switch to ON position. Let the blade obtain full
speed before moving the miter gage to feed the
workpiece into the blade.
WARNING: Make sure the blade guard is
lowered and is working properly to prevent
possible injury.
Make a test cut on scrap wood. From the front of the
saw, push the wood to the blade with the miter gage.
When using the miter gage in the left groove, hold the
workpiece firmly against the miter gage base with
your left hand and grip the miter gage knob with your
dght hand. When using the right groove, hold the work
piece with your right hand.
BEVELCROSSCUT
• To set the wood angle, loosen miter gage knob, set
the angle with the indicator on the miter gage, then
retighten miter gage knob,
•
CUT
See Figure 56.
Make a test cut on scrap wood. From the front of the
saw, push the wood to the blade with the miter gage.
•
A BEVEL CROSS
BLADE
MITERGAGE
STRAIGHT
MITERCUT
BLADE
_
-----'_,_
MITERGAGE
ANGLED
BEVELLOCK
HANDLE
(NOTSHOWN)
HANDWHEEL
HEIGHT
HANDWHEEL
Fig. 55
[RI_FT_MAN"TABLE SAW315.228410
38
Fig. 56
•
Raise rip fence handle and remove rip fence.
•
Set blade angle by loosening bevel lock handle
and turning bevel handwheel until scale on the
cabinet front reads zero. Retighten bevel lock
handle.
•
Set miter gage to 0" if needed. Loosen miter gage
knob and use indicator on the miter gage. Re-
•
Set blade angle by loosening blade lock handle
and turning bevel handwheeL Retighten blade lock
handle.
tighten miter gage knob.
•
Place a support the same height as top of saw
table behind the saw for cut work.
•
Make sure wood is clear of blade before turning on
saw. Insert switch key and lift switch to ON position. Let blade obtain full speed before feeding
wood into blade with miter gage.
•
Hold the work firmly against the miter gage and
push the miter gage to feed the work into the blade.
•
When work is completed, press the switch off and
remove the key.
_i,
VIEWEDFROMTHE FRONT,BELOWTHE SAWTABLE
i
HEIGHT
HANDWHEEL
WARNING:
When making a bevel rip cut, the
rip fence must be on the right side of the blade.
Otherwise the fence could trap the workpiece,
possibly causing kickback and resulting in injury.
•
Attach rip fence on the right side of the blade at
correct distance from blade for cut. Use fine adjustment knob on front rail.
•
Place a support the same height as the top of saw
table behind the saw for the cut work.
A
m
WARNING: NEVER stand directly in the line of
cut. Stand to the side to reduce the risk of injury
should kickback occur.
•
Make sure wood is clear of the blade before turning
on saw. Insert switch key and lift switch to ON
position. Let blade obtain full speed before feeding
workpiece into the blade.
BEVELLOCK
HANDLE
_L WARNING:
NEVER push a small piece of wood
into the blade with your hand. Use a pushstick as
the end of the workpiece nears the blade to
avoid serious personal injury.
•
When work is completed, press switch off and
remove switch key.
Fig. 57
BEVELRiPCUT
MAKING
A BEVEL
RIP CUT
See Figures 57 and 58.
BLADEANGLED__Ip
Try this cut on a piece of scrap wood before cutting
your workpiece. Use a pushstick to move small pieces
of wood into and past the blade.
N
FENCEON
RIGHTOF BLADE
WARNING:
Make sure the blade guard is
lowered and is working properly to prevent
possible injury.
FINEADJUSTMENT
KNOB
Fig. 58
39
CRRFTSMRN" TABLE SAW 315.228410
CUT
•
Practice on scrap wood. From the front of the saw,
push the wood to the blade with the miter gage. Do
not use the rip fence.
Set blade angle and height by loosening the bevel
lock handle and tuming the height and bevel
handwheels. Retighten bevel lock handle.
•
Set wood angle by loosening miter gage knob and
setting it to desired angle.
•
Retighten miter gage knob.
•
Place a support the same height as top of saw
table behind the saw for cut work.
•
Make sure wood is not touching the blade.
•
Insert switch key and lift switch to ON position. Let
blade obtain full speed.
•
Hold workflrmly against miter gage with both
hands and push miter gage to feed work into blade.
•
When work is completed, press switch off and
remove switch key.
MAKING
A COMPOUND
(BEVEL)
MITER
See Figure 59.
_k
_k
WARNING: Make sure the blade guard is
lowered over the blade and is working properly to
prevent possible injury.
WARNING:
When the blade is angled to the
left, the miter gage must be on the right side of
the blade. Otherwise the gage could trap the
workpiece, possibly causing kickback and
resulting in injury.
COMPOUND(BEVEL)MITERCUT
PLACERIGHTHANDON
WVORKPIECE
AND MITER
GAGEHERE
WHENMITERGAGEIS ON
RIGHTSIDE OF BLADEPLACE
LEFTHAND ONMITERGAGE
KNOBHERE
Fig. 59
r'RAFTtMI_N'TABLESAW 315.228410
40
MAKING
A LARGE
PANEL
•
CUT
See Figure 60.
Make sure the saw is propedy secured to a work
surface to avoid tipping from the weight of a large
panel.
_,
•
WARNING:
Make sure the blade guard is
lowered over the blade and is working properly to
prevent possible injury.
Place a support the same height as top of saw
table behind the saw for cut work. Add supports to
the sides as needed.
Depending on the shape of panel, use rip fence or
miter gage. If panel is too large to use either rip
fence or miter gage, it is too large for this saw.
WARNING: Never make freehand cuts (cuts
without the miter gage or rip fence), which can
result in serious injury,
•
Make sure wood does not touch blade before you
turn on saw. Let blade obtain full speed before
feeding wood into blade.
•
When work is completed, press switch off and
remove switch key.
LARGEPANELCUT
RIP FENCE
=EVELHANDWHEEL
SUPPORTS
HEIGHTHANDWHEEL
Fig. 60
41
[RRFTSNRH"
TABLESAW315.228410
MAKING
A NON-THROUGH
CUT
MAKING
A DADO CUT
See Figure 61.
See Figure 62.
This is the only type of cut made without the blade
guard.
An optional dado throat plate is required for this
procedure. See the Accessories section of this
manual and check with your nearest Sears Retail
Store. All blades and dado sets must be rated at least
5,000 RPM.
_,
WARNING:
Unplug saw while removing or
replacing the blade guard to prevent accidental
starting and injury.
_k
WARNING:
Never put your hands within 3 in. of
the blade when it is on or you could be seriously
hurt.
_k
WARNING:
Unplug saw before working around
the blade. Accidental starting could cause
serious injury.
•
Take out throat plate by removing the screw.
•
Lift the blade guard out of the way.
•
•
Adjust blade angle and height by releasing bevel
lock handle and turning height and bevel
handwheels. Reset bevel lock handle.
Remove riving knife and blade guard assembly.
Remove the blade.
•
Mount dado blade according to instructions provided with it.
•
Test blade nut and blade washer tightness.
•
Install optional dado throat plate.
•
Plug in saw and follow dado instructions. Always
use pushsticks with dado cuts.
•
Make sure wood does not touch the blade before
•
•
_k
Remove riving knife and guard assembly as
shown. Take out throat plate by removing the
screw with a phillips screwdriver. Be sure to
reinstall throat plate before moving to the next
step.
Place a support the same height as top of saw
table behind the saw for cut work. Add supports to
the sides as needed.
you tum on saw. Let blade obtain full speed before
feeding wood into the blade.
WARNING:
Always use pushsticks or
pushblocks when making non-through cuts to
avoid the risk of serious injury. Never feed wood
with your hands.
•
Make sure wood is not touching blade. Insert
switch key and lift switch to ON position. Let the
blade obtain full speed before feeding workpiece
into blade.
•
When the work is completed, reinstall the riving
knife and the blade guard. Press the switch off and
remove the key.
•
When work is completed, press switch off and
remove switch key.
•
Unplug saw and reverse first five steps.
DADOCUT
NON-THROUGHCUT
BLADEGUA_
REMOVED
PUSHSTICK
Fig. 62
Fig. 61
(;ItRFTSMIIN"
TABLE SAW 315.228410
42
GENERAL
MAINTENANCE
MOTOR
•
_k,
WARNING:
When servicing, use only identical
Craftsman replacement parts. Use of any other
part may create a hazard or cause product
damage.
Remove sawdust from the rails, top surface, and
inside of saw frequently.
•
Clean plastic parts with a soft damp cloth. Do not
use any strong solvents.
Frequently vacuum or blow out any sawdust from
the motor.
WARNING:
If the power cord is worn, cut, or
damaged in any way, have it replaced immediately by a qualified service technician at a Sears
store or repair center. Failure to do so could
result in serious personal injury.
WARNING:
To prevent accidental starting that
could cause possible serious personal injury,
turn off the saw, remove the switch key, and
unplug the saw before working on the table saw.
•
/ ELECTRICAL
WARNING: To avoid fire or electrocution,
reassemble electric parts with only identical
Craftsman replacement parts. Reassemble
exactly as originally assembled.
WARNING:
Do not at any time let brake fluids,
gasoline, petroleum-based products, penetrating
oils, etc. contact plastic parts. They contain
chemicals that can damage, weaken or destroy
plastic.
•
Periodically clean the table, roils, and rip fence with
gum and pitch remover. Do not allow pitch to
accumulate on the sew.
•
Apply a thin coat of paste wax to the table top so
the wood slides easily while cutting.
•
Regularly check all nuts, bolts, screws, and belts
for tightness and condition. Make sure the throat
plate is in good condition.
\
This saw has been lubdcated at the factory prior to
shipment. After extended use, you should inspect,
clean, and lubricate the areas shown in the drawing.
Clean before lubricating with a solvent recommended
for gum and pitch removal. Lubricate with SAE no. 20
or no. 30 engine oil.
See Figure 63.
•
Table brackets. (a)
•
Bevel handwheel rod threads and knuckle. (b)
•
Height handwheel threads and trunnion. (c)
AI
;
/
B
43
i
_C
7.
FRONTOF SAW
Fig. 63
CRAFTSMAN"
TABLESAW315.228410
i
PROBLEM
CAUSE
SOLUTION
Saw does not start.
1, Motor cord or wall cord is not
plugged in.
1. Plug in motor cord or wall cord,
2, Circuit fuse is blown,
2. Replace circuit fuse.
3. Circuit breaker is tripped.
3. Reset circuit breaker.
4. Cord or switch is damaged.
4. Have the cord or switch replaced at your nearest Sears
Service Center.
1. Motor needs attention.
1. Have the motor checked at
Saw is noisy when running,
your nearest Sears Service
Center.
Motor is slow or weak.
1, Voltage from source is low.
.
Windings are burned out or
open.
3, Have the switch replaced,
4. Circuit is overloaded with
4. Do not use other appliances or
motors on the same circuit
when using the saw.
,
Motor stalls, blows fuses, or trips
circuit breakers.
CRnFTSMRN"TABLESAW315.228410
2. Have the motor checked at
your nearest Sears Service
Center.
3. Start switch is defective.
appliances, lights, Or other
motors.
Motor overheats.
1, Request a voltage check from
the power company.
May be wired for 240 volts
instead of 120 volts.
,
Check wiring of the saw with
info and diagrams in Changing,
the Motor Voltage in the
Assembly section.
1. Motor is overloaded.
1. Request a voltage check from
the power company,
2. Dull blade.
2. Replace the blade.
3. Sawdust inside saw is blocking
air flow.
3, Clean out the saw base.
1. Starter switch is defective.
1. Have the switch replaced.
2, Voltage from source is low,
2. Request a voltage check from
the power company.
3. Dull blade.
3. Replace the blade.
4. Fuses or circuit breakers are
wrong size or defective.
4. Replace fuses or circuit
breakers.
5. Feeding workpiece too rapidly.
5. Feed workplece into blade
slower.
44
OBLEM
Fuses orcircuitbreakers open
frequently.
CAUSE
SOLUTION
1. Motor is overloaded.
1. Feed work more slowly.
2. Fuses or circuit breakers are
2. Replace fuses or circuit breakers.
wrong size or defective.
3. Dull blade.
3. Replace the blade.
4. Start switch is defective.
4. Have the switch replaced.
1. Blade is warped.
1. Replace the blade.
2. Beltisdamaged.
2. Replace the belt.
3. Saw fsnot mounted securely.
3. Tighten all hardware.
4. Work surface is uneven.
4. Reposition on a flat surface. Adjust the leveling feet on legs.
1. Switch contacts are bumed out.
1. Have the switch replaced and request a voltage check from the
power company,
2. Capacitor is defective
2. Have the capacitor replaced.
3. Connections are loose or damaged,
3. Have the wiring checked and repaired.
Handwheels are hard to turn.
1. Sawdust has collected on the
mechanism inside saw.
1. Clean and lubricate the mechanism.
Blade does not lower when turning
height handwheel,
1, Blade lock handle is not fully
released,
1. Fully release
handle.
Saw vibrates excessively.
Start switch does not operate.
the blade
i
Mitergagedoesnotmovesmoothly.
1. Miter gage assembly is dirty or
sticky,
lock
I
1. Releasethemitergageknoband
wax the miter gage base and
sides.
i
Cut binds,bumsorstallsmotorwhen
ripping.
Saw blade does not cut true at 90" or
45" positions.
1. Blade or teeth are dull.
1. Sharpen or replace the blade.
2. Blade is heeling.
2. See Heeling the Sawblade in the
Adjustments section.
3. Board is warped.
3. Replace the board.
4. Ripfencedoesnotparallelblade.
4. See Aligning the Rip Fence in the
Assembly section.
1. Indicatorsare not properlyad-
1. See Setting the Bevel Stops and
Indicator in the Adjustments section.
justed.
2. Positive stops inside base are
not accurate.
i
45
2. See Setting the Bevel Stops and
Indicator in the Adjustments section,
CRRFTSMRN"
TABLESAW315.228410
PROBLEM
CAUSE
SOLUTION
Rip fence does not move smoothly.
1. Rip fence is not mounted correctly.
1. Remove and reposition the rip
fence, See Aligning Rip Fence
and Front Rail in the Assembly
section.
2. Rails are dirty or sticky.
2. Clean and wax the rails.
1. Rip fence is misaligned.
1. See the AssemblysecUon for
Checking Rip Fence and Blade
Alignment and Aligning Rip
Fence and Front Rail
procedures.
Wood edges away from rip fence
when ripping.
CRRFTSMaN" TABLE SAW31S.228410
46
47
CRRFT$141tN"
TABLE
SAW
315.228410
CRAFTSMAN
I
TABLE SAW - MODEL
NO. 315.228410
I
The model number will be found on a plate attached to the cabinet. Always mention the model
number in all correspondence regarding your TABLE SAW or when ordering repair parts.
m4
12
11
I0
8
9
FIGURE
A
CRAFTSMAN" TABLE SAW315.228410
48
|
J
CRAFTSMAN
I
TABLE SAW - MODEL
NO. 315.228410
The model number will be found on a plate attached to the cabinet. Always mention the model
number in all correspondence regarding your TABLE SAW or when ordering repair pads.
PARTS LIST FOR FIGURE A
KEY
NO.
PART
NUMBER
DESCRIPTION
1
977481-001
End Cap .........................................................................................
1
2
979974-001
Miter Gage Knob (Includes Key No. 1) .........................................
1
3
** STD551031
4
979982-001
5
**STD511003
QUAN.
* Washer (5/16 in.) ...........................................................................
1
Miter Gage .....................................................................................
1
* Screw (3/16-24 x 3/8 in.) ...............................................................
3
6
979978-001
Miter Scale Indicator ......................................................................
1
7
979979-001
Miter Gage Block ...........................................................................
1
8
97998_001
Stop Pin .........................................................................................
1
9
979984-001
Shoulder Screw .............................................................................
1
10
979981-001
Miter Gage Rod .............................................................................
1
11
**STD510807
* Screw (#8-32 x 518 in.) ..................................................................
3
12
**STD541008
* Hex Nut (#8-32) .............................................................................
3
Standard Hardware Item -- May Be Purchased Locally
Available From Div. 98 -- Source 980.00
49
!
|
I
CRAFTSMAN
TABLE
SAW-
MODEL
NO. 315.228410
I Them_de_numberwi__bef_un__nap_ateattachedt_thecabinet.A_waysmenti_nthem_de_numberina__c_rresp_ndenceregardingy_urTABLE
}SAWor when ordering repair parts.
nl
,-t.
ol
o
2
2
1
FIGUREB
10
CRAFTSMAN TABLE SAW- MODEL NO. 315.228410
I
SAWmodel
or when
ordedng
repair
parts.
J The
number
will be
found
on a plate attached to the cabinet. Always mention the model number in all correspondence regarding your TABLE
PARTS LIST FOR FIGURE B
KEY
NO.
=.
PART
NUMBER
DESCRIPTION
1
979999-001
Leveling Foot .....................................................................................................................................................
4
2
STD541031
* Hex Nut (5/16-18) ...........................................................................................................................................
36
3
STD551031
* Washer (5/16 in.) .............................................................................................................................................
40
4
979995-001
Leg ....................................................................................................................................................................
4
5
979994-001
6
979993-001
End Brace .........................................................................................................................................................
2
7
979997-001
Side Brace .........................................................................................................................................................
2
8
979888-001
* Bolt (5/16-18 x 1/2 in. Hex Hal.) ........................................................................................................................
4
9'
979996-001
Short Leg Brace ................................................................................................................................................
2
10
979998-001
Long Leg Brace .................................................................................................................................................
2
11
980315-001
Logo Plate .........................................................................................................................................................
1
* Cardage Bolt (5/16-18 x 3/4 in.) ..........................................................................
i|
q
W
*
**
O
Standard Hardware Item -- May Be Purchased Locally
Available From Div. 98 -- Source 980.00
QUAN.
- ...........................................
24
J
|
i
CRAFTSMAN
TABLE
SAW - MODEL
NO. 315.228410
or when
ordering
repair
parts.
I SAW
The model
number
will be
found
on a plate attached to the cabinet. Always mention the model number in all correspondence regarding your TABLE
m
4
i
/.÷"
1
_,jJ
35
33
8.,,
I0
31.
30.
13
14
15
28
17
2_
21
25
FIGUREC
I
24' _
23
20
_
18
I
CRAFTSMAN
TABLE SAW - MODEL NO. 315.228410
l
or when
ordedng
repair
parts.
I SAW
The model
number
will be
found
on a plate attached to the cabinet. Always mention the model number in all correspondence regarding your TABLE
I
I
PARTS LIST FOR FIGURE C
KEY
NO.
Ol
=i
-I
),
PART
NUMBER
DESCRIPTION
1
979973-001
Fence End Cap ....................................
2
979945-001
3
** STD541425
4
QUAN.
KEY
NO.
PART
NUMBER
DESCRIPTION
Roll Pin (8 x 40 mm) .............................
1
18
979966-001
*
Screw (5/32-32 x 1/2 in.) ...................... 4
19
979967-001
*
Lock Nut (1/4-20) .................................
1
20
980953-001
Fence Adjustment Knob ........................ 1
979970-001
Lock Plate ............................................
1
21
980952-001
Spring ....................................................
1
5
979969-001
Lock Spring ..........................................
1
22
980951-001
Bushing .................................................
1
6
979968-001
Fence Lock Rod ...................................
1
23
** STD512505
7
979972-001
Rear Fence Slide .................................
1
24
980949-001
Fence Adjusting Bracket ....................... 1
8
** STD551008
Washer (5/32 in.) .................................
1
25
980948-001
Push Nut ...............................................
1
9
979961-001
Scale Indicator .....................................
1
26
980947-001
Rubber Bumper .....................................
1
10
979962-001
Fence Plate ..........................................
1
27
980946-001
Washer (3/16 in.) ..................................
1
11
979963-001
1
28
980945-001
Screw (3/16-24 x 112 in.) ....................... 1
12
979881-001
Screw (5/16-18 x 1/2 in. Socket Hd.) ... 4
29
980966-001
Rear Glide .............................................
13
979964-001
Fence Handle Bracket .........................
1
30
980598-001
14
980964-001
Cam Sleeve .........................................
1
31
980965-001
Front Glide ............................................
15
980595-001
Pin ........................................................
1
32
979960-001
Scale Indicator Housing ........................ 1
16
980596-001
Retaining Ring .....................................
2
33
979959-001
Rip Fence ..............................................
1
17
979965-001
Rip Fence Handle ................................
1
34
980322-001
Warning Label .......................................
1
35
980318-001
Fence Label ..........................................
1
Rip Fence Cover ..................................
*
r-
rn
(n
*
*
*
=
ol
io
QD
O
QUAN.
_t
Standard Hardware Item -- May Be Purchased Locally
Available From Div. 98 -- Source 980.00
.
2
Screw (114-20 x 3/4 in. Socket Hd.) ...... 4
Screw (114-20 x 1/2 in.) ......................... 2
2
Screw (5/32-32 x 3/8 in.) ....................... 4
2
CRAFTSMAN
i
i
|
TABLE
SAW-
MODEL NO. 315.228410
!
SAW
or when
ordering
repair
parts,
The model
number
will be
found
on a plate attached to the cabinet. Always mention the model number in all correspondence regarding your TABLE
i
i
i
0
9
3
2_
FIGURED
7
11
l
|
CRAFTSMAN
TABLE SAW - MODEL NO. 315.228410
I
or when
ordering
repair
parts.
I SAW
The model
number
will be
found
on a plate attached to the cabinet. Always mention the model number in all correspondence regarding your TABLE
PARTS LIST FOR FIGURE D
KEY
NO.
ol
Ol
m
o
PART
NUMBER
DESCRIPTION
1
979935-001
Push Nut ...........................................................................................................................................................
4
2
979940-001
Anti-Kickback Pawl ...........................................................................................................................................
2
3
979944-001
Spacer ...............................................................................................................................................................
2
4
*" STD551025
* Washer (1/4 in.) .................................................................................................................................................
3
5
979942-001
* Bolt (1/4-20 x 3/8 in. Socket Head) ...................................................................................................................
3
6
979941-001
Riving Knife .......................................................................................................................................................
1
7
979937-001
Blade Guard Bracket .........................................................................................................................................
1
8
979939-001
Spring ................................................................................................................................................................
1
9
979938-001
Pin .....................................................................................................................................................................
1
10
979934-001
Blade Guard ......................................................................................................................................................
1
11
979936-001
Pin .....................................................................................................................................................................
1
12
980955-001
Roll Pin ..............................................................................................................................................................
1
13
980400-001
Waming Label ...................................................................................................................................................
1
14
980324-001
Blade Guard Label ............................................................................................................................................
1
QUAN.
I
|
CRAFTSMAN
TABLE SAW-
MODEL
NO. 315.228410
The model number will be found on a plate attached to the cabinet. Always mention the model number in all correspondence regarding your TABLE
SAW or when ordering repair pads.
i
O1
11
9
FIGUREE
i
I
CRAFTSMAN
TABLE SAW - MODEL NO. 315.228410
i
or when
ordedng
repair
pads.
I SAW
The model
number
will be
found
on a plate attached to the cabinet. Always mention the model number in all correspondence regarding your TABLE
PARTS LIST FOR FIGURE E
KEY
NO.
PART
NUMBER
1
979945-001
* Screw (5/32-32 x 1/2 in.) ....................................................................................................................................
3
2
** STD512503
* Screw (1/4-20 x 3/8 in.) ......................................................................................................................................
2
3
980652-001
Switch Plate .......................................................................................................................................................
1
4
980594-001
5
979986-001
Strain Relief ........................................................................................................................................................
2
6
979991-001
Power Cord (Power Source) ..............................................................................................................................
1
7
976863-001
Switch Key .........................................................................................................................................................
1
8
980001-001
Switch (Includes Key #7) ...................................................................................................................................
1
9
979987-001
Switch Housing ..................................................................................................................................................
1
10
*" STD511003
* Screw (#10-24 x 5/16 in.) ...................................................................................................................................
2
11
979990-001
* Star Washer (#10) ..............................................................................................................................................
2
12
980321-001
On/Off Label .......................................................................................................................................................
1
DESCRIPTION
* Square Nut (1/4-20) ...........................................................................................................................................
QUANo
2
ol
m
_=
a!
P_
*
**
Standard Hardware Item -- May Be Purchased Locally
Available From Div. 98-- Source 980.00
!
I
CRAFTSMAN
TABLE SAW - MODEL
NO. 315.228410
i
|
or when
ordering
repair
parts.
J SAW
The model
number
will be
found
on a plate attached to the cabinet. Always mention the model number in all correspondence regarding your TABLE
=l
I
|
4
ol
Go
RGURE F
I
CRAFTSMAN
TABLE SAW - MODEL NO. 315.228410
or when
ordering
repair
parts.
I SAW
The model
number
will be
found
on a plate attached to the cabinet. Always mention the model number in all correspondence regarding your TABLE
PARTS LIST FOR FIGURE F
KEY
NO.
O1
_O
PART
NUMBER
DESCRIPTION
1
979933-001
Outer Belt Guard ...............................................................................................................................................
1
2
** STD541010
* Hex Nut (#10) ....................................................................................................................................................
4
3
** STD551010
* Flat Washer (#10) .............................................................................................................................................
4
4
979932-001
Inner Belt Guard ................................................................................................................................................
1
5
979900-001
Pulley ................................................................................................................................................................
1
6
** STD502502
* Setscrew (1/4-20 x 114 in.) ................................................................................................................................
2
7
980962-001
Motor .................................................................................................................................................................
1
8
980960-001
Power Cord (Motor) ..........................................................................................................................................
1
i
m
m
GO
o
*
**
Standard Hardware Item -- May Be Purchased Locally
Available From Div. 98 -- Source 980,00
QUAN.
]
i
CRAFTSMAN
TABLE SAW - MODEL NO. 315.228410
1
SAWmodel
or when
ordering
repair
parts.
The
number
will be
found
on a plate attached to the cabinet. Always mention the model number in all correspondence regarding your TABLE
ill
4_
o_
O
FIGUREG
I
|
CRAFTSMAN
TABLE SAW - MODEL NO. 315.228410
I
SAW
or when
ordering
repair
pads.
The model
number
will be
found
on a plate attached to the cabinet. Always mention the model number in all correspondence
J|
regarding your TABLE
PARTS LIST FOR FIGURE G
KEY
NO.
PART
NUMBER
DESCRIPTION
1
979992-001
Base ...................................................................................................................................................................
1
2
** STD523105
* Bolt (5/16-18 x 1/2 in. Hex Hd.) .........................................................................................................................
3
3
980588-001
* Star Washer (5/16 in.) ........................................................................................................................................
3
4
977227-001
Handwheel Assembly (Includes Key Nos. 5, 6, and 7) ......................................................................................
2
5
977229-001
Handle ................................................................................................................................................................
2
6
977491-001
Screw (MS x 1.25 in.) .........................................................................................................................................
2
7
977481-001
End Cap .............................................................................................................................................................
2
8
980602-001
* Screw (3/16-24 x 1/2 in.) ....................................................................................................................................
2
9
** STD551010
* Washer (#10) .....................................................................................................................................................
2
10
980320-001
Bevel Scale Label ..............................................................................................................................................
1
11
980326-001
Data Plate ..........................................................................................................................................................
1
Ill
¢zl
**
o
Standard Hardware Item -- May Be Purchased Locally
Available From Div. 98 -- Source 980.00
QUAN.
CRAFTSMAN
TABLE SAW - MODEL
NO. 315.228410
!
SAWmodel
or when
ordering
repair
parts.
The
number
will be
found
on a plate attached to the cabinet. Always mention the model number in all correspondence regarding your TABLE
rn
,=
O3
tO
12
"_11
FIGUREH
9
JI
CRAFTSMAN TABLE SAW - MODEL NO. 315.228410
|
SAWmodel
or when
ordering
repair
parts.
The
number
will be
found
on a plate attached to the cabinet. Always mention the model number in all correspondence regarding your TABLE
PARTS LIST FOR FIGURE H
KEY
NO.
PART
NUMBER
1
979945-001
* Screw (5/32-32 x 1/2 in.) ...................................................................................................................................
4
2
979946-001
End Cap (Left Rear) ..........................................................................................................................................
1
3
980954-001
Rear Rail ...........................................................................................................................................................
1
4
979948-001
End Cap (Right Rear) .......................................................................................................................................
1
5
980957-001
Extension Table .................................................................................................................................................
2
6
979957-001
Scale .................................................................................................................................................................
1
7
979952-001
Front Rail (Includes Key No. 6) .........................................................................................................................
1
8
979951-001
End Cap (Right Front) .......................................................................................................................................
1
9
979949-001
End Cap (Left Front) .........................................................................................................................................
1
10
979879-001
Bolt (5/16-18 x 1 in. Square Hd,) ....................................................................................................................
12
11
** STD523112
* Bolt (5/16-18 x 1-1/4 in. Hex Hd.) .....................................................................................................................
8
12
** STD551131
* Washer (5/16 in.) .............................................................................................................................................
28
13
** STD541031
* Hex Nut (5116-18) ...........................................................................................................................................
20
14
979873-001
* Setscrew (3/16-24 x 3/16 in.) ............................................................................................................................
4
15
979871-001
Throat Plate .......................................................................................................................................................
1
16
979872-001
* Screw (3/16-24 x 3/4 in.) ...................................................................................................................................
1
17
980956-001
Saw Table ..........................................................................................................................................................
1
--I
18
979874-001
r-
19
979875-001
Align-A-Cut Insert ..............................................................................................................................................
1
20
980323-001
Label .................................................................................................................................................................
1
O3
Z
s
=.
:=.
co
I"11
¢/J
31,
(Jr
io
4a,
DESCRIPTION
* Setscrew (5/16-1.8 x 518 in.) .............................................................
*
**
QUAN.
:...:,...:...... .................................................
Standard Hardware Item -- May Be Purchased Locally
Available From Div. 98 -- Source 980.00
2
J
|
CRAFTSMAN
TABLE SAW - MODEL
NO. 315.228410
or when
ordering
repair
parts.
I SAW
The model
number
will be
found
on a plate attached to the cabinet. Always mention the model number in all correspondence regarding your TABLE
J
I
4
5
51
1
6
7
14
15
16
52
o)
4_
47
44
47_
42.
43
22
40
42
39
38
37
36
10
35
34
FIGUREI
€
CRAFTSMAN
TABLE SAW - MODEL
NO. 315.228410
I
SAW
or when
ordering
repair
parts.
The model
number
will be
found
on a plate attached to the cabinet. Always mention the model number in all correspondence
regarding your TABLE
!
I
PARTS LIST FOR FIGURE I
KEY
NO.
O1
i
o_
rm
=E
PART
NUMBER
1
** STD551131
2
3
4
5
6
7
8
9
10
11
** STD523105
979880-001
979883-001
979884-001
979885-001
979886-001
980888-001
979879-001
979896-001
979895-001
12
13
14
979894-001
979893-001
***
15
16
17
18
19
20
21
22
23
24
25
26
27
979891-001
979890-001
979889-001
979906-001
979907-001
979912-001
979910-001
979917-001
979915-001
979905-001
979904-001
979885-001
** STD511003
DESCRIPTION
QUAN.
* Lock Washer (5116 in.) ............................ 6
* Bolt (5/16-18 x 1/2 in, Hex Hd.) .............. 2
Riving Knife/Blade Guard Bracket ..........
* Bolt (1/4-20) ............................................
Spring ......................................................
Washer ....................................................
Table Bracket ..........................................
Star Washer ............................................
1
1
1
1
2
6
* Bolt (5/16-18 x 1 in. Hex Hal.) ................ 10
Retaining Ring .........................................
Ball Bearing (6202Z) ...............................
2
2
Key ..........................................................
Arbor Shaft ..............................................
1
1
10 in. Blade (Item No. 928673) .............. 1
Outer Blade Washer ................................ 1
Blade Nut .................................................
1
Blade Wrench ..........................................
Shaft ........................................................
Bevel Lock Handle ..................................
1
1
1
* Washer (5/32 in.) ..................................... 5
* Screw (5/32-32 x 3/8 in.) ......................... 5
Threaded Rod ......................................... 1
Bracket ....................................................
1
Spring ......................................................
Retaining Ring .........................................
Washer ....................................................
1
1
1
KEY
NO.
PART
NUMBER
28
29
30
31
32
33
34
35
36
980946-001
979908-001
979911-001
979914-001
980589-001
979924-001
979923-001
979922-001
979897-001
37
38
39
40
41
42
43
44
45
46
47
48
49
50
51
52
979898-001
979902-001
979903-001
979901-001
979900-001
STD502502
980593-001
STD523106
979925-001
979926-001
979904-001
979927-001
979928-001
979929-001
STD541031
STD551031
972000-525
**
**
**
**
DESCRIPTION
* Washer (#10) ..........................................
Bracket ....................................................
Bevel Scale indicator ..............................
Knuckle ...................................................
2
1
1
1
Retaining Ring ........................................
Height Adjustment Rod ...........................
Washer ...................................................
Washer ...................................................
1
1
2
1
Cradle (Trunnion) ...................................
Arbor Housing .........................................
Washer ...................................................
1
1
1
Retaining Ring ........................................
V-Belt (17-420) .......................................
Pulley ......................................................
* Setscrew (1/4-20 x 114 in.) .....................
1
1
1
4
Retaining Ring ........................................
* Bolt (5/16-18 x 518 in. Hex Hd.) ..............
Motor Support Base ................................
Spring .....................................................
1
2
1
1
Retaining Ring ........................................
Pivot Shaft ..............................................
Screw ......................................................
2
1
1
Motor Mounting Plate ............................. 1
* Hex Nut (5/16-18) ................................... 4
* Washer (5/16 in.) .................................... 8
Owner's Manual
* Screw (3/16-24 x 3/8 in.) _........................ 2
(31
k_
€>
QUAN.
* Standard Hardware Item -- May Be Purchased Locally
** Available From Div. 98 -- Source 980.00
*** Complete Assortment Available At Your Nearest Sears Retail Store
For in-home major brand repair service:
Call 24 hours a day, 7 days a week
1-800-4-MY-HOME s" (1-800-469-4663)
Para pedir servicio de reparacibn a domicilio - 1-800-676-5811
In Canada for all your service and parts needs call - 1-800-665-4455
Au Canada pour tout le service ou les pi_ces
For the repair or replacement parts you need:
Call 6 am - 11 pm CST, 7 days a week
PartsDirects.
1-800-366-PART (1-800-366-7278)
Para ordenar piezas con entrega a domicilio
- 1-800-659-7084
For the location of a Sears Parts and Repair Center in your area:
Call 24 hours a day, 7 days a week
1-800-488-1222
For information on purchasing a Sears Maintenance Agreement
or to inquire about an existing Agreement:
Call 9 am - 5 pm, Monday - Saturday
1-800-827-6655
The Service Side of Sears