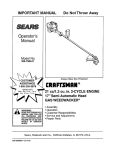
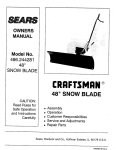
1
IMPORTANT MANUAL
Do Not Throw Awa,_
SEARS
operator's
manual
J
•
•
•
•
Assembly
Operation
Maintenance
Repair Part s
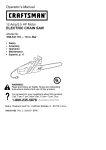
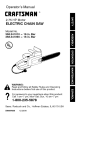
MODEL NO.
358.34110 - 2.0/14"
-S ,RS
/ I:RRFTSMRN
2.0/14" "
ELECTRIC CHAIN SAW
_01LWARNING:
Recordin the spaceprovidedbelowthe Model No.and Serial No.0fyoursaw.
These numbers are located on the name plate decal.
read and follow
Safety Rules, Precautions
and Operating
Instruclions. Failure to do so can
result ih serious injury.
Model No.
Serial No.
Retain these numbers for future reference.
Sears,
•
i
s30-o67576.a-p0pn.q
.
Roebuck
••
' "
and
Co., Chicago,
. •
IlL 60684
•
U.S.A.
•
©Sears, Roebuck and Co., 1989
J
=
I
_._
l
FULL 1 YEAR WARRANTY
ON ELECTRIC
CHAIN
SAW
: F_r _r_eyear _bm date _f pumha_se_
_ears wi_ repair defe.cts|_ mateda__ w_rkmans_ip in this E_ctri_ C hain _aw at n_ charge_
This warranty exbludes bar & chain, which are expendable parts and becomewem during normal use,
__
___
If this Electric Chain Saw is used for commercial or rental purpose, this warranty applies for only 30 days from date of purchase.
WARRANTY 8 ERVICE IS AVAILABLEBY RETU RNING THE CHAIN SAWTO THE N EARESTSEARS SERVICE CENTER/DEPARTM ENT
IN THE UNITED STATES.
This warranty gives you specific legal rigMs, and you may also have other rightswhich vary fromstate to state.
Sears, Roebuck and Co., Sears Tower,Dept. D731C R_W,Chicago, IL60684
-_
TABLE OF CONTENTS
S-pecifications ................................
SPECIAL SAFJSTYSECTION ......................
Know Your Chain Saw ............................
preparing Y0u_Saw For Use .......
_.... _.........
A, Getting Ready ..............................
B. Power Source and E_tensien Cord ..............
C. Attaching the Bar and Chain ...................
D. Chain Tension ..............................
E, Bar and Chain Oil ...................................
Using Your Saw .........
•......................
A, Control Devices-•.. ........
•..........
: .....
13.Pre-Operation Checks,, _,,. : ................
C, Starting and Stopping the Saw ................
Types of Cutting ..............................
A, BasicCutting Technique .....................
I
'L 7'
:2
B, Tree Felling Techniques ......................
3
C. Bucking ..................................
6
D. Debranching and Pruning .....................
".......
:7 Maintenance ...... •...................
7
A. Cleaning the Saw ..........................
7
B. Guide Bar and Chain ........................
8
C, Sprocket/Gear Assembly .....................
9
D. Storage ..................................
9
E, Maintenance Acces-sor_es....................
10
F. Trouble Shooting Chart•. : .....................
10 Repalr Parts List.. : ...........................
10 Quick Reference Page... .......................
10
11
11
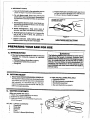
•SPECIFICATIONS
MODEL
. , 358.34110(2.0/14 #)
110-120 Volts AC
50-60 Hz
POWERSUPPLY
RATED CURRENT
10.5 Amps
MAXIMUM MOTOR OUTPUT
.
SPROCI(ET/bRIVE
,
2.0Horsepower
Gear Drive "
.
,
• •
CHAINm Oregon®
,,
....
,_r8Pitch, LOW]_ofile
Non-Chrome Cutters
Replscement Stock No• 71-3f_17
GUIDE BAR -- Lo Kick°
14_ NorvArmored Tip Nose
Rep acement Stock No• 71-36365
OILER
Manu_
CHAIN SHARPENING
Manual
Handle _Oiler
_"
Act uator/Filler CaP
Lockout Button
Adjusting Screw
OII Level
Reduced--K_k
Golds Bar
.Low-Kickback
Powe_r Cord
Indicator
. Spikes
Chain
Motor Housing
!j
0
,"
11
13
14
.-15
15
15
17
18
18
19
.2 0.
23
.
i.
SAFETY
SECTION
L
KICKBACK,.
"
REDUCE
THE GHANCE
OF KICKBACK
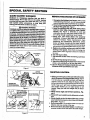
1. Recognize that kickback can happen. With a basic
understandingof kickback, you can reduce the ele.
ment of surprise which contributes to accidents.
2. Never let the moving chain contact any object at
the tip of th e guide bar. Figure 1.
• 3. Keep the working area free from Obstructions
such as otherlrees,_brenches,
rocks, fences,
stumps, etc. Figure 2. Eliminate or avoid any
obstructionthat your saw chain could hit while you
are cutting through a particular log or branch.
4. Keep your saw chain sharp and properly
tensioned. A loose or dull chain can increase the
chance of kickback. 'Follow manufacturer's chain
sharpening and maintenance instructions. Check
tension at_tegolar intervals with the motor stopped,
neverwiththe motorrunning.Makesurethatbar clamp
nulsaresecurelytightened aftertensioning the chain,
5_ Begin and continue cutting only with the chain
moving at full speed. If the chain is moving at a
slower speed, there is greater chanc e for kickback
_k KICKBACK WARNING
Klokb_.k can Qccur when the moving chain contacts
an obj_"t atthe upperportion of the tip of the guidebar
or when the wood closes in and pinches the saw chain
in the cut. Contact at the upper portion of the tip of the
gutde bar can cause the chainto dig intothe object and
stop the chain for an instant. The result is a lightning
fast, reverse reaction which kicks the guide bar upand
back toward the operator. If the saw chain is pinched
"along lhe top of the guide bar,. the guide,bar can be
drivenrapidly back towardthe operator. Either of these
reactionscan cause loss of saw cont,_ wh}ch can
result in serious injury.
tO
KtCKBACK
,r
AGAINST
Kickback is a dangerous reaction that can lead t0
serious injury. Do not rely only on the safety devices
provided withyoursaw. As a chain saw user, you must
take special safety precautions to help keep your
cutting Jobs free from accident or injury.
_"
Hill
GUARD
........
i'
OCCU
SPECIAL
,,,,,,,,,,,,,,,,,,,
6. Cut one log at a time.
7. Use extreme caution when reentering a previous
cut.
8. Do not attempt plunge or bore cuts.
9. Watchforshiftinglogsorotherforcesthatcould
close a cut and pinch or fall intothe chain.
,10, Use the Reduced.Kic.kback Guide Bar and LowKickback Chain specified fol" your saw.
PATH
Figure I
MAINTAIN
AVOID
OBSTRUCTIONS
1. Keep a good firm grip on the saw with both hands
when the motor is runniqg and don't let go, _q_ure
3. A firm grip can neutralize kickback and help you
maintain contmt of the saw.Keep the fingers of your
lefthand encirclingand yourleftthumbunderthefront
handle. Keep your right hand completelyaroundthe
rear handle Whether _ou are .right handed or fell
• har_ded.Keep your left arm straight with the elbow
locked.
2. Never reverse right and left hand positions. Figure3.
3. Stand with your weight evenly balanced on both
feet,
4. Stand slightly to the left side of the saw, to keep
ymarbody from being in a direct fine with the cutring chain. Figure 3.
5. Do not overreach. You could be drawn or thrownoff
balance and lose control of the saw.
6, Do not cut above shoulder height, it is difficult to
maintain control of the saw above shoulder heighL
• CLEAR,rrlE
WORKINGAREA
Figure 2
_
KEIEP A FIRM GRIP
V
t_
\
'_;_,#"_
WIT,SOT..A.OS
WITHLEFT
THUMB
:_NDLE
NEVER
HAND
REVERSE
POSITION
!
CORRECT
GRIP
INCORRECT
GRIP
CORRECT
CONTROL
POSITION
Figure 3
•
r
, •
SPECIAL
i
SAFETY
SECTION
J
iiii
(continued)
i
.....
; =ll,,ill
i illi
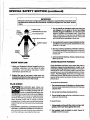
AWARNING
Because a chain saw is a high-speed wood-cutting tool, special safety precautions must
be observed to reduce the risk of accidents. Careless or improper use can cause serious
injury.
_SAFETY
"" 'FITTINGSNUG
" -| _
CLOTHING
_IAT
. .
|/HEARING'PROTECTION
)TECTION
HEAVY DUTY GLOVES
SAFETYCHAPS
li
"
3. Do not handle or operatea chain saw when you
• • are, fatigue d, ill, or upset; or if you have taken.
alcohol,drags or medication. You must be in good
physical condition and mentally alert. Chain saw
work is strenuous. If you have any condition that
might be aggravated by strenuouswork, check with
your doctor before operating a chain saw.
4, Do not attempt to use your sawdudng bad weather
conditions suchas strong wind,electricalstorms,rain,
snow,etc., or at night.
5. Plan your sawtng operations carefullyin advance.
Do not start cutting until you have a clear work area,
secure footing,and ifyou are felling trees, a planned
retreat path.
6. Avoid accidental starting. Always unplug the saw
when not in use.
• KNOW
YOUR
SAW
1. Read.youl; Operator's Manuai carefully unti!.you
completely understand and can follow all safety
instructions and operating instructions before
attempting to operate the unit.
2. Restrict the use of your saw.to adult users Who.
u_
andfolfowt,_e_fety ruhgs,
precautJor_and
operatingin'structionsfound in tl'_ manual.
AVOID
REACTIVE
FORCES
Pinch.Kickback and Pull-in occur when the chain is . -._-:
suddenly stopped by being pinched, caught, or by
contacting a foreign object in the wood. Thisresultsin
reversal of the chain force being used to cut wood and
causes the sawto move in the opposite directionofchain
rotation. Pinch-Kickback drives the saw straight back
toward the operator, pull-in pulls the saw away from the
operato_Eitherreaction canres_Jltin theI(_;srof
control and .
serious injury. "
To avoid Pinch-Kickback:
PLAN
i.
AHEAD
.Wear protective gear, Always use
steel-toedsafetyfootwearwtthnon-slip
soles; snug-fittingclothing with reinforced cutresistantinserts;heavy-duty
non-slipgloves;eye protectionsuch as non-fogging,
vented goggles or face screen; an approved safety
hard hat; and hearing protection. Secure long hair
above shoulder length with a hairnet to prevent
•: entanglement. Frequent users should have hearing
checked regularly as chain saw noise may damage
hearing,
2. Keep children, bystandem, and animals out of the
work area -- a minlmu m of 30 feet. Do notaJiowpeople or an imals tobe near the chain saw or exten sion
cord when sta_ing or operating the chain saw:
1. Be extremely aware of situations or obstructions
thatcan causemateria]to pinchthetop ofOrotherwise
stopthe chain.
2. Do not cut more than one log at a time.
3. Do not twist the saw as the bar iswithdrawnfrom an
under-cutwhen bucking.
To avoid Pull-in:
1. Always begin cutting with the chain moving at full
apeed and the law frame against the wood.
2. Use wedges made of plastic or wood, (never of
metal ) to h01dthe cut open.
ii
iiiiiiiiiiiii
SPECIAL
SAFETY
i
OPERATE
i
i
YOUR
iiiiiiii
SECTION
iiiimlpl
,,,,mlll_,lll_
12. Unplug thepoWerconnection whenthesawisnot
in Use,
•
.
GOOD
YOUR
WQRKING
ii
ii
I/I
i
(continued)
m l
ii
i
ill
ii
.........
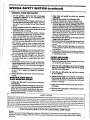
SAW SAFELY
1. DO not operate a chain saw that is damaged,
improperly adjusted, or not completely and
securely assembled.
2. Do not use the saw if the trigger switch does not
turn the unit on and off properly. Repairsto the trigger switch must be made by your Sears Service
Center.
3. Do not operate the saw from a ladder or in a tree.
4. PoslUon al! pads of your body to the left of cut
when themotor is running.
5, Cut wood only. Do notcut metaJ,plastics,masonry,
non-woodbuildingmaterials,etc, Do notuse_oursaw
topry or shove awaylimbs,rootsor otherobjects.
6. Make, sure the chain will not make contact with
any object before starting the motor, Never try to
start the saw when the guide bar.is in a cut or kerr.
7. Use extreme csution when cutting small size
brush and saplings. Slender material can catch the
saw chain and b_ whipped towardyou or pull you off
balance•
B. Be alert for springbaek when cutting a limb that is
• under tensionto avoid be ngstruckbythe limbor saw
when the tensiorl in the wood fibers is released.
9, Do not t_orcethe saw through a cut. Exert light
pressure only. Pressure on the saw at the end of a
cut could cause loss of control when the cut is
completed.
10. Avoid body contact with the chain anytime the
saw is plugged into a power source, The chain wjtl
continue to move fore shorttime after the trigger is
released.
1"L AvolddangerouSsltuations, Do notexposethesaw
to rain, or use in damp, wet, gaseous, or explosive
locations.
MAINTAIN
IHI
SAW IN
ORDER
i. Unplug the saw before servicing or changing
accessories.
2. Your ChainSaw isdoubleinsutstedtohelpprotect
aga!nst electdc shock. Have all chainsaw service
(other than the service described in the maintenance section of this man ual) performed by your
Sears Service Center,
3. Keep chain andguide bar. clean and properly _
lubricated,
."
4. Keep oiTcap, screws,and fasteners tight.
5. Keep the handles dry, clean, and free of off,
6. Stop the saw if the chain strikes a forelgn object.
Checkfor alignment, binding, breal<age, and mounting ofmovingparts and any other conditionthat may
affectthe operationofthe unit. Check guards _d .all
other padsto see if eaoh will operate properly and.
perform itsintended function. Any part-that is damaged should be properly repaired or replaced by
using the instructions in this manual or by seeing
your Sears Service Center.
7. Be certain the saw chain stops moving when the
• trigger swttch is released.
8.. Make certain that all hand tools are removed from
the saw before connecting the saw to the power
source.
9. Never modify y_ur saw in any wBy. Use onlya_achments sup'pliedor specificallyrecommended bythe
manufacturer.
•10. Alwaysreplacethe left motorhousing immediately if
thehandguard orhandte becomes dam aged,broken,
or otherwise'removed. "
CARRY AND STORE
YOUR SAW SAFELY
1. Never carry your saw while climbing. Both hands
are needed for safe climbing.
2. Carry the unit unphJgged,, by the front handle,
finger off the trigger switch, and with the guide
bar and chain to the rear.
3. Carry the saw with guide bar and chain covered
by the scabbard.
" _ .' 4. Bef0reltninsportlng in any vehicle or storing" in
any enclosure;- allow your saw to cool completely,
cover the barand chain and properly secure t-oavoid
turnover or damage.
5_ Orain Oil tank before storing your saw for 30 or
more days.
6. Store the saw unplugged in a dry place out of the
reach of children.
Exposure to vibrationsthrough prolonged useof handtoolscould cause blood vesselor nerve damage in the fingers, hands,
anti'wristsof people prone tOcircui_tiondisorders or abnormal swellings; Prolonged use in cold weather has been i_nkedto
blood vessel damage in otherwise healthy people. Ifsymptoms occur such as numbness, pain, loss of strength, change in
skin coloror texture, or tossoffee}ing inthe fingers,hands, orwrists, discontinuethe use ofthistool and seek medical attenSAFETY NOTICE
r
tion. An antiwibration system does not guaranteethe avoidance of these problems. Users who operate power toolson a con.
tinual and regular basis must monitor closelytheir physical condJtionandthe condition ofthis tool.
THIS CHAIN SAW IS FOR OCCASIONAL
• 1
USE ONLY.
Notice:
Refer to the Code of Federal Regulations, Section 19t0.266 (5); 2.5.1 ofAmerican National Standard Safety Requirei ments for Pulpwood Logging, ANSi 03.1-1978;and relevant state safety codes when using a chain SaWfor logging
purposes.
:
.
5
i
t
....................................................
.
:!-+
-+,
j,llll
-
iii
iiiII
SPECIAL
i I
i
,
I
,ll
SAFETY
-
II
SECTION
ii
i
Hill
(continued)
i iiii ii iiiii iiiiii
IIIII
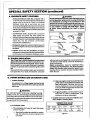
A. KICKBACK
ii
SAFETY
FEATURES
ii
I ii
• A, WARNING
DOnotoperatethe chain saw Unless tile safetydevices
or their specified replacements are propedy installed
and maintained according to the instructions in this
manual. Do not use any other guide bar and chain combination that isnot equivalent to the originalequipment
or not certified to comply with ANSI B175,1. Failure
to follow these instructions can res_ultin serious
• -_ Reduced-Kicl_back Guide Bar+ designed with a
small radiustip whichreduoesthesizeofthe kickback
danger zone on the bar tip. Figure 5. A Reduced
Kickback Guide Bar is one which has been
demonstrated to significantly reducethe numberand
.seriousness ofkickbacks whQn_sted inaccordance
with the safety requirements for electricchain saws.
• assetbyU.L i662. "
"--_
-- Low-Kickback Chain, designed with a contoured
depth gauge and .guard link which deflect the
-kickback force and a!low woodto gradually ride into
the cutte_Figure 5.Low-Kickback Saw Chain ischain
•which h_s met the .kickback performance
requirements of ANSI B175.1.
J
[
-- Handgua_; designed to reduce the chance ofyourleft
hand contactinglhe chain ifyour hand slipsoff the front
handlebar.
-- Position of front and rear handlebars, designed
with distancebetweenhandleswhich providesbetter
control, balance, and msistan_:_if kickback occurs.
t
4.;
•
B, DOUBLE
•
.
i
' ' C,. POWERSOURCE
AND
EXTENSION.
lille
ii
+
ii iiiiii
II
CORD
2.) Heavy enough to cat'rythe currentfrom the
power source to the distance at which the
saw is to be used. Otherwise, loss of power
and overheating can occur causing damage
to theunit. Refer to Figure6 for minimum wire
gauge recommendationS.
Use only._anA.C. voltage supply identical to that
.... shown o n the name plate of th e saw to power this
chain saw,
WARNING
3.) In good condition. Cbi'dinsulationmust be
intact with no cracks or deterioration. Plug
connectors must be undamaged
All electrical repairs to this saw, including housing,
switch, motor, etc., must bediagnosedand repaired by
your Sears Service Center. Failure to do so can cause
thedouble insulation construction to becomeineffeotlve and resultin sedous injury.
b. Suitable extension cords are available at your
•Sea_ Retail or Catalog Store.
MINIMUM WIRE GAUGE
RECOMMENDATIONS
2, EXTENSION CORD
a. The extension cord used to reach the power
source must be:
'_+) Specifically markL_l as suitable for outdoor
Use. The suffix,W-A, mustbe included on the
cord label.
6
I
with yoursawcan be plugged intoany conventional 120
volt electrical outlet without concern for maintaininga
'ground connection.
-Safety precautions
must be observed when
operating any electrical tool. The double insulation
system only supplies added protection against injury
resulting from a possible electrical insulation failure
within the saw.
1. POWER.SOURCE
-
I
INSULATION
Your Chain Saw is double insulated to help protect
•against electdc shock. A double insulatedtool iscon.
structedthroughout with two separate "layers" of electrical insulation or one double thickness of insulation
between the operator and the electrical system of tl_e +
tool.
Tools built with this insulation system are not intended
to be grounded. As a resutt, the extension cord used
LL
Figure 5
ii
,,,
AMP
VOLTS
10.5
120
25 FT_ 50 FT.
100 FT.
' !8
16
14
A+W.G.A.W.G.A.W.G.
Figure 6
150 FT,
12
AW.G.
3. IMPORTANT
POINTS
a. Securethetoolcordtotheextensioncordas
shownin Figure 7 tOprevent disconnection.
b. De not abuse cords. Never carry saw by the
p0wercord oryank itto disconnect:Keep toolcord
and extension cordaway from heat, oil, and sharp
edges.
g. Inspect chain sewcord before each use. Do not
use the unit with a damaged cord. Take the unit
to a Sears Service Center for repairs.
SECURE TOOL CORD TO
EXTENSION CORD,
c. Guard against electric shock, Avoid body contact with any grounded conductor,such as metal
pipes and wire fences.
d. Avoid entanglement. Kee; cords clear of
operator, saw chain, and branchesat;all times.
e. Avoid da ngereus situations. Do not expose the
saw to rain, or use in damp, wet, gaseous, or
explosive locations.
Figure 7
f. Inspect extension .cords before each use.
Replace before using the saw if damaged.
SAVE THESEINSTRUCTIONS_
ji
PREPARING
• "
....
T
11
iiii
Jill
II
" •
• '_yoursaw has been designedwith safety in mindand
includes the following features as standard
equipment:
--- Reduced-KickbackGuide Bar (Lo-Kick_)
Low-Kickback Chain (Xtra-GUARD®)
Handguard
C.
.YourOperator's Manual has been developed to help
you prepare you_saw for use and to understand its
safe operation. It is important that you read your _ .
manual completely tobecome familar with the unit
• before you begin assembly.
CARTON
i
i
I
IIHI
•
_WARNING
The foUowlng features are included on...yoursaw to
help reduce the hazard of kJckba¢k. However, such
features will not totally eliminate this dangerous reaclion. As a chain saw user, do not rely onl_ on safety
devices. You must follow all safety precautions; in_
structlons and maintenance in this manualto help
avoid kickback and othe r forces whichcan result in
serious Injury.
READY
: 1. IREAD YouR OPERATOR'SMANUALCAREFULLY.
-.
i
YOUR SAW FOR USE
A, INTRODUCTION
13. GETTING
ii
i,
:2..HAVE THE FOLLOWING AVAILABLE:
- a:PmtectiveGIoves.
".........
b. 9/16 inch wrench or'equivalent.
c. Standard Screwdriver.
d. Bar and Chain Oil (see page 9).
CONTENTS
After you unpack the carton:
1. Check the contents against the list below.
2. Examine the items for damage.
3. NotifyyourSearsstoreimmediatelyifapartismfs_i_g or damaged.
I KEY NO.
1
2
3
4
--
CARTON CONTENTS:
Powerhead
Guide Bar
Scabbard
Chain
Operator's Manual (Not Shown)
QTY.
1
1
1
1
1
,
k
......
,,,, ,, i i
ii I
ii
i
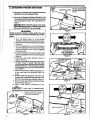
' C. ATTACHING
THE BAR AND CHAIN
GUIDE
R
I
iiii
"
MOUNTINGSTUDS
i
i,iiil,,
iiiiii
ii
i ii iii
i
i
MOUNT GUIDE BAR
ON THE MOUNTING
STUDS
• Your saw is equipped with a Reduced-Kickback
Guide Bar and a Low-Kickback Chain,
• Use orily the Reduced,Kickback Guide Bar and
Low.Kickback Chain specified for your chain saw,
when replacing these parts, See "Specifications,'
page 2.
ICAUTION: IWear protective gloves when handUng or operating your saw. The chain is sharp and
can-cut you even when it Is not moving!
,
:': -::"/
" "AWARNING
""
Avoid accidental starting. Always unplug the saw
from the power source before installing a bar and/or
c llain.
:i
Figure 9
J
•
-- -
"-
1. Turn .unit upside down on a flat surface,
Straightenoutchain, then layiton aflatsurface.
2. Remove the B_r Clamp Nuts &Bar Clamp Plate.
Figure12.
3. "PJrn,the AdjustingScrew counterc]ock_/ise to
move the Adjusting Pin almost as far as itwill go
tothe rear. Figure 8. Do not remove Adjusting
Pin from the unit.
4. placethe GuideBar on thesaw byfittingthe long
slotinthe GuideBar overthe two moun.tingstuds."
Figure 9.
5. Hold chain with cutters facing as shown in
Figures 10and 12.
6. Slide thechain between the right housing and the
sprocket. Figure 1t (inset). Place the chain
around the sprocketand fit thedrivelinks intothe
Guidp Bar grooves --first the bottom and then
the top groove, and then around the guide bar
nose. Figure 11.
7. Slide the bar forwardand fitthe adjusting pin into the round hole in the Guide Bar.Figure 12
(inset).
8. Hold the Guide Bar against the saw frame and
installthe BarClamppiate. Besurethe tab onthe
Bar Plate istowardthe rear ofthe Bar.Figure 12.
9. Secure:the Bar Clamp Platewith the Bar Clamp
Nuts:_untitfinger tightonly.
10, Follow "Chain Tension" Instructions on next
• !
!
CUTTERSMUST .
FACE IN DIRECTION
OF ROTATION
Figure 10
Figure 11
page.
If saw chain "is installed, backwards,thes_wwill vibrate excessivelyandwill not c_t.
TURN ADJUSTING
SCREW
COUNTERCLOCKWISE
Figure 8
TAB
Figure 12
t
D. CHAIN
ii
i
i
iiiii
ii
Nil
TENSION
• Chain tension isvery Important:
_A loose chain willwear the bar and itself.
-- A loose chain can jump offthe bar while you are
cutting
-- A tightchain can damage the saw and/or break.
e. The chain stretches during.use, especially when
new. Check tension:
-- each lime the saw is used
--more frequently when the chain is new
--as the chain warms up to normal operating
temperature.
ADJUSTING
SCREW
TANGS
TURN
TO TIGHTEN
&WARNING.
TENSION
.
TO LOOSEN
TENSION
, Figure 13
r_VOld accidental sta_ing. Always. unplug the _..I '
Irrom the power source before adjusting chain l
tension,
i
• It is recommended that the saw be turned upside
down for chain tensioning,
• Chain tensioning procedure:
NOTE: The bar clamp nuts must be no more than
finger tight to tension the chain correctly.
1. Hold the saw and turn the AdjustingScrew clocl<.
wise _
until the Tangs on the chain enter the
Guide Bar Groove. Figure 13 (inset).
NOTE: To tighten chain, turn the adjusting screw
clockwise ,,--._. To loosenchain, turn the adjusting
screw counterclockw_se_l[-"_. Figure13.
2. With your g_oved hand, "snap" the chain several
times by pulling down and. letting go of'the_chain:: Figure 14.This action removes some ofthe stiffness
in the chain.
3. Turn the Adjusting Screw clockwise.,,--_ until the
chain tie-straps sag 1116"below the bar railS. Figure
!4 (inset).
E. BAR AND CHAIN
TURN
ak-,,
Figure 44
4. Hold the saw and.tighten the Bar Clamp Nuts with a
9116"wrench.
5. Recheck tension.
,,,,,,
OIL
III
,,,,,,,,,,,;,
i,,,,,,,,
.........
f. I._tsaw stand unplugged for 15 minutes
•
before storing. It is'normalfora small amount
ofoil todrip off the bar and chainwhen the saw
is not in use. The excess oil should be wiped
from the saw before storing.
USING THE MANUAL OILER
Your saw is equipped with an oiler actuator/cap
whioh manually suppliesoil.tothe b_ andchain.
Fig uce"15.The oiler actuatoi'/cap must be usei_
i'egularly andoffen_enough to maintain a thin
film of oil on the barand chain while the saw is
cutting. It is recommended that the oiler
actuator/cap beoperated six(6) times aminute
and held 'for approximately three (.3)seconds
each time it is pressed.
a. Operate the oiler bypressingclownon theoiler
actuator/capwith yourright thumb. Figure 15.
b. Be sure that you continue to grip handles
firmly while usingthe oiler actuatortcap.
. • The gut_lebal' and cutting chain require continuous lubrication in order to remain in operating
•condition.
-- Lack of oil will quickly ruin the bar and chain.
Too little oil will cause overheating shown by
smoke comingfrom the chainand/ordiscoloration
of the guide bar rails.
.
.
e UseSearsBarand Chain Lubricant #'/1-36554to
ill! the oil tank. Clean SAE30W oil may alsobe
:used. Never use waste oil for this purpose.
1. IMPORTANT POINTS
a: Fill the oil tank every time you use the saw
and recheck after every 15 minutes of use.
See "Specifications"
for oil Cap location.
b. Wipe off surfaces beforefilling with oll toavoid
sawdustordebdsaccidentallyfa/lingintothetank
and causingdamage.
c. Use a funnel to fill the tank. Pour slowly to
allow air to escape, Wipe up all spills. Do not
use the saw until itis wiped clean and iscompletely dry fromspilled oil
d. Replace the otl cap securely to ensure proper operation of the oiler.
e. Checktheotllevellndicatorfrequenttydur.
ing use. Locate the indicator in the saw frame
just below and behind the front handle. Figure
15. If of! is not visible in the slot when saw is
upright on a level surface, the tank requires
filling.
,
,
Figure 15
9
J
J
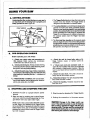
USING
YOUR SAW
ii
A.
iii
CONTROl.
iiiii
DEVICES
Understanding the control devices on your saw is
an Important part of learning how to properly and
safely operate the unit. Figure 16.
1, The Trigger Sw|tch startsor stopsttiemotoi:and is
located in the rear handle. The Trigger Switch is
designed to be used with the Lockout Button.
2. The Lockout Button isacontrol featuredesigned to
prevent the motor from being accidently started.
When the rear handle is gripped in a normal Cutting
•position;the Lockout Buttoncan be pushed.inbythe
thumb permitting the index finger to squeeze the
Trigger,It is not necessa_ rto maintain pressure on
the Lockout button once the Trigger has been
engaged.
3. The Front and Rear handles are the supportswhich
allowyoutogripthe saw inthe normal,cuttingposition.
Yourgriponthe handlesis most importantbecausepro_
pei'gripgivesyoumaximumabilitytocontrol the sawfor
safe operation.SeeFigum 3 for propergrip.
Figure t6
iiiiii
iiiiiii
ii
i
PRE-OPERATION
=
i
i
i
iiii
iiiiiiiiiiiiiiiiiiiiiiiiii
CHECKS
.
Before operating your unit always:
1..,-Check over safety rules and precautions in
this manual. Make certain you completely
understand and follow each one.
2. ,...Checkpmtectivegear. Alwaysuseeye, hearing,
and headprotectiondevic_, safe,/footwear, protective gloves, and snug fitting clothing.
3.._- Check the work area, Keep children,bystanders,
and animalsa safe distanceaway from thework area
when starting or operatingthe saw -- a minimum of
•. 30feet. "
4. ,.,Che(_l(:_weather conditions. Do not use your"
saw inbad weather,such.as strongwind, electrical
dorms, rain, snow,etc.,or at night.
ii
C.
iiiii
iii
STARTING
1. Connect
source.
I
ii
AND
STOPPING
1,1,, ,i, HJ ,u,,JJ
the saw to a proper electric power
NOTE: Push in the LockoutButtonBEFORE squeezing the Trigger.Any pressure on the Trigger before
the LockoutButton is pressedwill make the Lockout
Button hardto move. it is not necessary to continue
• pressingthe Lockout Button once the "_iggerSwitch
has been engaged.
,
.
L.
8. ,,-Check the oil tank. Tl_e tank should be filled
'- _-each time the saw is used.
9. ,..Check the handles. Handles should be dry
and free of oil.
iillillli i"
.
ii
THE SAW
2. Start the saw by pushing the Lockout Button
with your right thumb and squeezing the Trigger Switch with your right index finger.
10
5, ,.-Check the unit for loose bolts, nuts or fittings. Tighten, repair, or replace parts as
necessary.
6..p- Check tool Cord and extension cord: Inspect al! wire insulation with care. Do notoperate
with cracked Or deteriorated insulation.Take the
saw to your Sears Serv_e Center for alt electrical
repairs.
7. ,.-Check the saw chain. The chain should be
sharp and at the correct tension.
3. Stop the saw by releasing the Trigger Switch.
4. Unplug the connection to the power source,
Damage to the trigger switch can
occur If the switch is turned on and off while the
sew is cutting. Operate the trlggerwith firm and
decisive action. The saw must be running at full
speed before starting the cut and turned off only
after leevlng the material to avoid damage.
,,,,,,,,,,,
-
, ,i,
n,l,,,
:L3
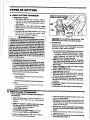
TYPES
OF CUTTING
Ill
Ilnn In
A. BASIC
iiiiiiiiiiiilllt
_
CUTTING
1111111111
/
[
I
PROCEDURE
a. Assumethe propercutUng stance described In
the section "Special Safety Section," page 3,
•"-- firm grip on front and rear handles, weight
evenly balanced on both feet;, and body
slightly to the left side of the saw.
b. Make sure the.extep_sion cord.is completly
away from the saw and your body so the cord
cannot be cut or becomewrapped around your
•feet or legs.
ocours Whenthe chain ontop ofthe bar issuddenlystopped,
,,..;
--drives thesawstraightbacktowardth#operator
-Pull-in:
occurswhen thechain onthe bottomof the bar
,,,,,,,
•
IIII I
is suddenly stopped.
--pUl/s thesaw _war_.
,
c. Press the trigger to start the chain moving
before beginning the cut.
d, Begin cutting with the saw frame and spikes
against the log. Figure 17.
e. Allow the chain to cut for you. Exert only light
downward pressure. If you force the cut, damage
to the bar, chain or motor can result.
_. Donor put pressure on the saw at the end of
the cUt to_avoidlosing control When the cut is
_omptete,
g. Release the trigger switch as soon as the Cut
Is completeo,
h. Unplug the unit after each.cutting operation.
H
,
*
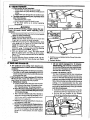
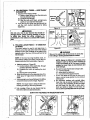
_ I_, TREE
IIIIII
IIIIII
FELLING
UI
....
I1!!!IIII ..............
_
IIII
[
1
mnnln IIIIIILLLLL±
II
I
I II
...................
TECHNIQUES
I. PLAN YOUR SAWING OPERATION CAREFULLY
IN ADVANCE
a. Clear the work ares. You need a clear area all
around the tree where you can have sectJre
footing.
i
.
Practice cutting a few small logs using the following
technique to get the "feel" Ofusing yoursaw before
you begin a major sawing operation
* Pinch-Kickback:
'
I
DOn ot stallthe chain in the cut. This
will overheat the motor and cause damage.
2, UNDERSTAND REACTIVE FORCES
• Plnch-Kicld)ack and Pull-in occur when the chain
is suddenly stopped by being pinched, caught,
- or bycontacting a foreign object in the wood. This=
results in a reversal Of the chain .forceused to cut
wood and causes the saw to move in the opposite
direction ofchain rotatiomEither reaction can result
in loss ofcontroland possiblesetfous injury,
:
.
Figure 17
'
,_ KICKBACK WARNING
Klokback can ocGur when the moving chain contacts
an object at the upper portion ofthe tip of the guide bar
orwhen the wood doses in aridpinches t heSaw chain
In the cut. Contact at the upper ponion of the tip of the
guidebar can cause the chain to dlg In_ the oh,lootand
stop the chain for an instant. The result is a lightning
fast, reverse reaction which kicks the guide bar up and
back totmrd the operator. If the saw chain is pinched
Mong the top of the guide bar, the guide bar can be
"driven re#idly back toward the operator, FJtherof these
reactions can cause loss of saw control which can
result in serious injury.
•
II
• BEGiNCUTT|NG WITH THESAW
UP AGAINST THE
TECHNIQUE
).' IMPORTANT POINTS
a. Cut wood only. Do not cut metat, plastics,
masonry,non-woodbuildingmaterials, etc.Do not
use yoursaw to pry orshoveawaylimbs, rootsor
otherobjects_
b. Stop the saw if the chain strikes a foreign
object. Inspectthe un t and repairor replaceparts
as neoessary.
.
.
c.- Keepthechsin outofdirt andsand. IEvenasmal!
amount of dirt wfl! quickly dull a chain, which
increases the possibilityof kickback.
•
lan i
b. Study the natural conditions that can cause
the tree to fall in a particular direction.
1.)The WIND directionand speed.
2._The LEAN ofthe tree.
3.)WEIGHTED wfthBRANCHES on one side.
4.)Surrounding TREES and OBSTACLES.
:c. Look for decay and rot. If the trunk is rotted, it
can snap and fall towardtheoperator.
d. Check for broken or dcad brencheswhich could
fall on you while cutting.
e. Make sure there is enough room for the tree to
fall. Maintaina distanceof21/2tree lengths fromthe
nearest person or other objects. Motor noise can
drown out warning call.
t. Remove dirt, stones, loose bark, nails, staples,
and wire from the tree where cuts are to be
made.
g. Plan to stand on the up-hill side whencutting on
a Slope. Figure 17.
h, Plan a clear retreat path to the rear and diagonal
tOthe line of fail. Figure ! 8.
_
2. FELLING SMALL TREES-LESS THAN 6"
IN DIAMETER
a_ tfyou know thedirectionoffell:
"1.) Make a single felling cut on the side away
from the directionof fall
2.) Cut a!lthe way through..
3.) Stop the saw, put it down, and get away
quickly on your planned retreat path.
b. If you are not sure which way the tree will fall,
use the notch method described for felling
large trees.
• .,AWARNING
._
_:_
.
Do not cut • tree in any manner that would endanger people, cause property damage, or strike
e utility llne. Notify the utlllty company immediately If a tree makes any contact with a utillty
llne.
:3.
DIRECTION
he.-- .......
OFFALL
.j
,
FELLING
,,,,,
Use a wedge if there is any chance that_the
tree will notfall in the desired direction.
Check the wind.
Don'tcutdownwind:
• k
"•-lit
Figure 21
Stay on the-uphill side of the. terrain to avoid, the
A WARNING
tree rolling or sliding
downhill after it is felled.
k
DON'T PUT YOURSELF
CUT
CLOSING
Fig ure 20
NOTE: The hinge helps to keep the tree from
twistingand fa!_ingin the wrong direction.
",d.
Figure 19
Figure 18
HINGE HOLDS THE TREE ON STUMP
AND CONTRO_.S THE FALL
FELLING LARGE TREES w 6" DIAMETER
OR MORE
The notch method is used to cut large trees. A
notch is cut on the Side of the free in the desired
direction of fall. After a felling cut is made on the
opposite side of the tree, the tree.will tend to fall
into the n0tch:
•"
•e. Make the notchcut. Figure 20.
• 1.)- Cut the bottom of the o.otch first,,through
!/3 ofthediameter ofthe tree.
2.) Complete 1he notch by making the slant
cut.
3.) Remove the notchof wood
b. Make the felting cuton the oppositeside 0f the
notch about 2" higher than the bottom of the
not(_h.
•
. :_.c, Leave enough ur_cuiwood belween the felling
cutand the notchtoform a hinge. Figure 21.
_.....
,
t
4m
NOTE: If the tree has large buttress roots, remove before making the notch. Cut into the buttresses vertically,then horizontally. Figure 19.
i
,oo, t
_'_/_/_
e,
g.
NOTE: Before the fellingcut is complete, ddve
wedges to open up the cut when necessary to
control the direction of fall. Use wo_ or plastic
wedges but never metal, to avoid kickbackand
chain damage. "
Be alert for signsthat the free is readyto fall:
I.) cracking sounds
2.) widening ofthe fellingcut
3.) movemenf in the upper branches.
As the tree starts to fall; stop the saw; put it
down, end get away quickly on.yourplanned
retreatpath.
"
Be extremely cautious with partially fallen
trees that may be poody supported,When a
tree doesn't fall completely_set the saw aside
and pull down the tree with a cable winch,
block and tackle or tractor. To avoidinjun],do
• notcut downa partiallyfallen treewithyoursaw,
IN THESE POSITIONS
Check the lean.
Don't cut on lean side.
Check the balance,
Don'tcutonweightedside.
"Z.
r
_
".
-
-
,,,,,,,,,,,,,,,
iii
£
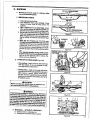
C.
iiiiii
BUCKING
i
iii
'
i
--_
•
i J
,i
1ST CUT PRESSURE
•,,i
SIDE
4---
Bucking is the term used for cutting a fallen
tree to the desired log size,
1. IMPORTANT
POINTS
2ND CUT
a. Cutonlyonelog atatime.
b• Cut shattered wood very carefully. Sharp
pieces of wood could be flung toward the
operator•
C. Use a sawhorse to cut small logs. Never
,allow an.other-personto hold the log while cutting and neverhold the logwith yourlegoHoOt.
d•- Do not cutin an area where logs, limbs and
roots are tangled such as in a blown down
area. Drag the logsintoaclear area before cutting by pulling out exposed and cleared logs
first.
e, Make the first bucking cut 1/3 of the way
through the log and finish with a 2/3 cut on the
opposite side, Figures22, 25 and26. Asthe log
is being cut, it will tend to _<md.The saw can
become pinched or hung in the log if you make
the firstcut deeper than 1/3of the diameter of the
log.
f. Give special.attentionto.logs under strain
to prevent the saw from pinching. Make'the
first cut on the pressureside to relieve the
,. stress on the log, Figure 22.
2. TYPES OF CUTTING
2ND CUT
STCUT.PRESSURESIDE
......
Figure 22 '
UNDERCUT
Figure23
USED :(Figure 23)
Overoutting - begin on the top side of the log
with the.bottom of .the saw .agafnst !he log;
exert light pressure downward.
m Undercutting - begin on the under,side of the
log with the top of the saw againstthe log;exed
light pressure upward. During undercutting,
the saw wilt tend to pushback at you, Be prepared for.this reaction and hold the saw firmly
tOmaintbir)c0ntrol,
Figure 24
1..... .w...,.o ]
Never turn the saw upside down to undercut. The
.. saw cannot be Controlled in this positio n.
_WARNING
If saw becomes pinched or hung tn a log, don't try to
force it out. You could lose control of the saw resulting
in personal Injury and/or damage to the saw. Stop the
saw and drive a wedge of plastic or wood Intothe cut until
saw Dan be removed easily. Figure 24. Restart the saw
and oarefully reenter the out, To avoid kickback and
cheth damage, do not usea metal wedge. Do not attempt
to restart your saw when it Is pinched or hung In a log.
Figure 25
1,1
.
2NO CUT
15T CUT
I'!
2NO CUT
1ST
CUT
3. BUCKING _ WITHOUT A SUPPORT
a. Overcutwith a t /3 diameter cut,
b. Rol log over and finishwith an overcut.
1ST
CUT
_L "
'"........Figure26
_:
13
4. BUCKING -- USING ANOTHER LOG AS A
SUPPORT (Figure 25):
a. In area A:
1.) Undercut 1/3 of the way throughthe fog.
2,) Finish with an overcut.
b. In area B:
1.) Overcut. 1/3 of theway throughthe log.
2.) Finishwith an undercut.
• 5. BUCKING-USING A STAND (Figure 26):
a. In area A:
•1_)Undercut t t3 ofthewaylhroughthe log.
2.) Finish with an overcut.
b. InareaB:
1 .) Overcut 1/3 ofthe way throughthe tog_
2.) Finishwith an undercut.
i
it_
•
:
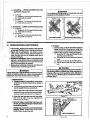
IireRANCNING
. i iiiiiiiiii
.i
i
AND PRUNING
: I
A WARNING
| Never climb into a tree to debranch or prune. Do not
J stand on ladders, platforms, a log or in any position
| which can cause you to lose control of the .saw.
1. DEBRANCHING
a; AlWa_ debranch a tree after it iScut down.
Onlythen can debranchingbe done safelyand
:_
properly.
b. Leave the larger limbs underneath the felled
treeto support thetree as you work, "
L
MAINTAIN SECURE FOOTING
USE COMMON SENSE
i= =
• Work slowly, keeping beth hands on the saw with
a firm grip. Maintain secure footing and balance.
• Watch out for springpoles. Use extreme_caution
when cutting small size limbs. Slender material .can
•..catchthe saw chain and be whippedtowardyou or
pull you offbalance.
s Be start for spdngback. Watch outfor branches that
are bent or under pressureas youare cuttingto avoid
being struck by the branch or the saw when the tension in the wood fibers is released.
e Keepa clear workarea. Frequentlyclear branches
CUtof the way to avoidtdRoingoverthem.
J
•
ii
Do not stand on the
tog being cut. Any portion can roll r
A WARNING
caustng loss of footing and control,
.....
HH I
: ;,,_,,
H ,,,,.,,,,,,,,,,,
,_;/,,,,
,_,,,,,,,,,,i,,,,,,,,:,','-"
i
-'::
7,
........
2, PRUNING
a. Limit pruning to limbs shoulder height or
below. Do not cut if branches are higher than
yourshoulder.Get a professionalto dotile job..
b. Refer to Figure 28 for pruning technique.
1.) Undercut 1/3 of the way through the limb
near the trunk of the tree.
2.) Finish with an overcut farther out from the
trunk.
3.) Keep out of the way of the falling limb.
4.) Cut the stump flushnear the trunkofthe
tree.
A, WARNING
Be alert for and guardragalnst kickback. Do not allow
the moving chain to contact any other branches or
objects at the nose of the guide bar when debranching or pruning. Allowing such contact.can result in
serious Injury.
.
=
i=
REMOVE SMALL LIMBSi
: WITH ONE
CUT
'c. Start at the base of the felled tree and work
towards the top, cutting branches and limbs.
Remove sroall limbswith one cut. Figure 27.
d. Keep the tree between you and the chain.
Cut from the side of the tree opposite the
branch you are cutting.
i
e. Remove larger, supporting branches with
the 1/3, 2/3 cuffing techniques described in
the bucking section,
L Alwa_ use an overcut tocut srnall and freely
hanging limbs, Undercutting could cause
limbs to fall and pinch the saw.
k
RRST PRUNING CUT
Fin,rA 28
/
o
....
.
ii
ii
ii
iiiiiilU
i{111
i ii i i
iiiiiiiii
MAINTENANCE
...............
i
i
. ._
l
I
III
I
I II I
A-good maintenan_ program of regular inepec.
tion and care will increase the service life and
help to maintain the safety and performance of
your saw.
-
.
WARNING
All electrical repairs to this saW, including housing,
switch, motor, etc., mustbe diagnosed and serviced
by your Sears Service Center. Failure to do so can
cause the double insulation construction to become
I
IIIml
"
•
Check the saw for loose bolts, screws, nuts, and
fittings daily when the saw is in use. Loose
fasteners can cause an unsafe condition as welt
as damage
to your saw. Tighten, repair, or
repi,_ce as necessary..
] ineffective and result in serious injury.
Inspect all wire insulation carefully beforeeach
period of use. Do not operate or try to repair the
saw if wire insulation is cracked or deteriorated. Take the unit to your Sears Service Center
for repair.
Q
::_
A,
_kWARNING
Avoid acCldental:ztarting;'Alwws unplugth_ m from
the power =oume before cleaning or performing any
mm_n_en:=nco
to the saw orwhen not in use.
"
i
ii
CLEANING
iiiiii
ii
THE
SAW
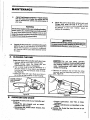
Clean and inspect the saw after each day of use.
1. Remove the bar and chain from the saw.
NOTE: A/ways clean the Guide Bar and
: Chainwhen.the chain issharpehed,
2. Use a sinai{ brush or the air discharge of a
vacuum cleaner to clean debris and sawdust
from the air inlet and exhaust slots on housing. Figure 29.
3. Wipe saw clean with rags. Make sure there is
no oi! film on.the handles or saw housing.
JCAUTION:I Do not use wafer, gasoline,
kerosene or any type of cleaning fluid to clean
the housing. Moisture can cause short circuits: Hydrocarbons will attack and deteriorate the housing.
4. Remove all sawdust and oil from the drive
sprocket and bar.mounting
pad area of the
saw. Figure 30.
Figure 29
Figure 30
,m,,,,,i
B.
GUIDE
BAR AND
i
lull
IIII
IIIIIIII
I
III
II
CHAIN
• Increase the service lite of your Guide Bar and
Chain by:.
_Using
the saw property and as recommended In this manual.
_Malntalnlng
the correct Chain Tension. See
"Chain Tension,"
--Proper
lubrication.
See"Bar
& Chain
Lubricant:'
--Regular maintenance as described in this
section,
• Remove the Guide Bar from the saw for all
maintenance.
t5
i
Always wear gloves when ha ndling the
chain. The chain is sharp enough to cut you even
though it is too dull to cut wood.
FILE HOLOER
......
,
1. CHAIN MAINTENANCE
* Sharpen the chain when:
-- Wood chips are small and powdery. Wool
chips 'made by the saw (_hainshould be
about the size of the teeth of the chain.
-- Saw has to be forced through the cut.
-- Saw cuts to one side.
.°.
_,
Figure31
a. CLEAN TREE SAP FROM THE CHAIN
BEFORE IT IS .SHARPENED:
:
1.) .Soak (:hain in a petroleum based solvent
or a detergent and water solution.
2.) Dry chain thoroughly.
3.) Immerse the clean chainin lightoil untiloil
seeps into the rivet holes.
NOTE: Do not run a chainwhich hasbeen
•cleaned without lubricating it first.
b.
CUTTER/_
UNE
•,
Figure32
CUTTERS
REMOVE
DAMAGE
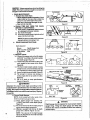
SHARPENIN G INSTRU C!"IONS •
ltents required:
Gloves
Depth Gauge Tool
5132"roundfile Screwdriver
6" file holder Vise
•:Flat file
1.) Sharpen Cutters.
a.) Support the square rod on the fife holder
(with5/32" roundfile)onthe cuttertopplate
and depth gauge. Figure 31,
b.) Hold the rite holder levelwiththe 30° guide
mark p_ra!lel to the center of the chain.
Figure 32.
.
•c.) File from inside toward outside of cutter,
str_ght across,on forward strokeonly.Use
2 or 3 strokes per cutting edge, Figure 32.
d.) Keepallcutters the same length.Figure33.
e.) File enough to remove any damage to
cutting edge (side & top plate) of cutter.
Figure'33: ,
..
i.) File 91 G chain to meet specifications.
shown in Figure 34.
IOE PLATE
Fig ure 33
Figure34
2.) Correct Depth Gauges
NOTE: Avoid contact with other parts of the
chain toprevent damage tochain•
a.) Place depth gauge tool (Catalog No.
71-36557) over each cutter depth gauge.
Figure 35.
b.) File level with the flat file if depth gauge is
higherthan the depth gauge tool.
c.) Maintain rounded front corner of depth
gauge with a fiat file, Figure 35 &36.
16
NOTE: The very top of the depth gauge
should be flat with the front half rounded :
off with a flat file.
' .....
-
Figure 35
_WARNING
Maintain the proper hook angle according to the
manufacturei_'s specification for the Chain you are
Using. Too"muchhook angle will increase the chanc e
of kickback which can result in serious injury. Figu ms
34 and 36.
TOP 16t.ATt_
HOOK
TOO MUCH
HOOK ANGLE
.025.
SQUARED
OFF
CORNER
OUNOED
ORNER
WRONG WAY
FLIGHT WAY
Figure 36
Jl_
WARNING
Depth gauge tool is required to insure proper depth
gauge filing. Filing the depth gauge too deep will
increase the chance of kickback which can result in
serious injury.
J
c, CHAIN REPLACEMENT
will damage the chain and make cuttingmore
difficult.
1) Use onlythe Low4(Jck Chainspecifled
for your sawin "Specifications,"
for
replacement chain.
2) Replace the chain when cutters or
links break.
3). See-your Seare..Service
Center to
replaceand sharpen indlviduai cutters
for matching your chain.
4) Always have a worn sprocket/gear
assembly replaced by your Sears
Service Center when installing a new
chain to avoid excessive wear to the
Chain,
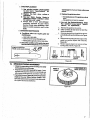
2. GUIDE BARMAINTENANCE
•
•
Repiacethe guide bar when:
the inside groove ofthe gu'_e bar railsis
•worn.
-- the guide bar is bent or cracked,
Use only the Reduced-Ktcld0ack Guide
Bar specified foryoursawin
"Specifications," for replacement,
a, Remove the guide bar to seryice,
b,. Clean oil holes at least once for each five
•hoursof operation,
c, Removesawdustfromtheguidebargroove
pedodicailywithaputtyknlleor awire, Figure
37.
d. Remove burrs by filing the sideedges ofthe
.guide bar-grooves square with a flat file.
Figure38,
e. Restore square edges io an uneven rail top
by filing w_h.a fiat file. Figure 38,
Cor)dltions which can require guide bar
rnatnter_nce:
-- saw cuts to one side
saw hasto be forced through a cut
-- inadequate Supplyofoil tobar and chain.
• Check tim condition of the guide bar each
time thechair) issharpened. Awom guidebar
REMOVE
SAWDUST
FROM GUIDE BAR GROOVE
CORRECT
GUIDE BAR
GROOVE
WORN GROOVES
FILE EDGES
SQUARE
Figure 37
T
•C.
Hill
......
i¥,,,,,
, i
i';;";";';;;
.........
sPROOKETIGEARASSEMBLY
Cl_aft lhe sprocket and surrouriding area daily "
during heavy use of the saw.
.,inspect
the sprocket regularly for wear. A worn
sprocket will cause the chain to run erraticallyand
• wilt shorten the life of the bar and chain. Figure 39.
= If sprocket Is worn (Figure 39),.have thesproel0et.
replaced by your Sears Service Center. User
. Sprocketreptacementcan causethedoubleir)sula- "
•tion SYstemto become ineffective.
WEAR IS
V4SIBLE
......................................
CHAIN WEAR ON
DRIVE SPROCKET
r
17
i
,,ll i
i
ii
D.
i
|11|ii
i|111
When your saw is to be stored for over 30 days
always:
1. Store the saw unplugged in a dry place out of the
reach of children.
2. Drain oil tank.
3. Remove, clean, and dry the bar and chain.
ii
E.'
i
iiiii
iii
I
i
STORAGE
..-4. Store the chain_!n a container filled With oil tO
prevent rust.
5. Apply a_oating of oil {o the entire surface of
the ba_ and wrap it in heavy paper, cloth, or
ptastic.
6. Wipe off the outside surfaces of the unit.
I
iiii
MAINTENANCE
AccESSORiES
iii
"11
i
.
_ "
Available through your nearest Sears Store, Catalog Sates Office ,orServlce Center, but may not befurnished
with your saw.
Key
No.
1
2
3
Catalog No.
71-36524
71-36565
71-36557
71-3617
71-36554
-,_71-36556
71-36365
Description
File (5./32"dia.)Twin pack
FileGuide
Depth Gauge Tooi
_raGUARD _ Chain "
Bar and Chain Lubricant- I qt..
Bar and Chain Lubricant- 1 gal.
Lo-Kick_ Guide Bar-t4"-(Not Shown)
•
•
"r
i
I
ii
iiiiiiiiiiiiii
i
i,,
F.
TROUBLE
SHOOTING
iiiiiiiiiiiiiii
ii
,
.
i,,,,,, ,,,11
i
iii iiiii i
CHART
Read and follow all safety Instructions in the Special Safety Section before servicing you_ saw.
TROUBLE
CAUSE
REMEDY
Oil inadequate for bar
and chain lubrication
1. Oil tank empty.
2. Oil outlet clogged.
3. Guide bar oil holeblocked.
1. Fi!loiltank.
2. ContactSears ServiceCenter.
3. Removebar and Clean.
Chaindoes not move
when trigger switch is
engaged.
1. Chain tension •too tight.
2. Guide barrails pinched.
3. _igger switchfailu re.
1. See Chain Tension.
2. Repairor replace.
3. Conlact Sears Service Center.
Chain clatters or cuts
roughly
1. Chain tension incorrect.
2. Cutters dull, improperly sl_arpo
ened; depth gauges too high.
3. Sprocket worn.
4. Chain wear due to contactwith dirt,
sand, or metalobject inwood.
5. Cutters damaged after striking
foreign material.
1. See Chain Tension.
2. See Chain Sharpening.
Chain stops" withi_ the
cut
.•
1,.Chain cutter tops ,not filed flat,
2. Guide bar burred or bent; rails
uneven,
Chain cuts at an angle
I. Cutters
damaged
on one side.
2. Chain dull on one side.
3. Guide bar bent or worn.
k
J
3. Contact Sears Service Center.
4. Resharpenor replaceChain.
5. Sharpen __!!cu_em eve._y-and
uniformly or replacechain.
See Chain Sharpening.
1. See Chain Sharpening.
2: Repair or replaceguide bar.
"1. Resharpen untilallcutters have
equal angles and lengths or
replace chain.•
2. Resha_en untilalt cuttershave
equal angles and lengths or
replace chain.
3. Replace guide bar.
19
j."
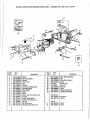
SEARS CHAIN
SAW REPAIR
PARTS LIST-
MODEL
NO. 358.34110-2.0114"
I9
15
21
18"
8
I
i
22
23
5
3
A
25
I
11
Key
NO.
"3
4
5
6
.7
8
9"
10
tl
12
13
14
15
16
17
18
Part
No.
530-015834"
630-029204
530-015832'
530-029278
580-001721
530-015842.
53O-029841
STD58203I
53O-025463
530-015495
530-015835
580-014164
530-089765
530-025873
530-025518
530-029282
530-014170
530-014169
Description
'Screw
":
Housing (_ght)
-Spacer
Gear Cover
Nut
Washer
Gear Ass'YW/Bushing
Retaining Ring
Gear Pinion
Screw
Screw
Motor Ass'), (incl. 8,9 & 10)
Cordset
Safety Lock Button
Switch-W/Safety
Lock
Oil Cap
Oil Tank Ass'),
Housing (Left) (incl. 19)
Key
No.
19
2O
21
22
23
24
25
26
27
28
A
B
Part
No.
Description
530-01583!
580-023492
580-025466
530-015514
71-3617
71-86365
530-031063
580-029285
530-052073
580-067576
Bolt-Bar Mounting
Pin"
Plate(BarAdjust.)
Screw
Chain 04")
Bar (14")
Wrench
Plate
Chain RepairKit
OperatorsManual
Not Shown
530-025644
530-061172
Scabbard
Carton
Decals
530-029308
530-029307
Decal
Decal
.
-
i
J
I
NOTES
i
1
t
!
I
21
NOTES
f
÷
r
AA
,
QUICK
REFERENCE
PAGE
Read and follow ali Safety Rules, Precautions and Operating
Failure to do so can result in serious injury,
SAFETY
RULES AND PRECAUTIONS
PREPARING
1.
2.
3.
4.
5.
YOUR SAW FORUSE
_ ......
_......................
7
Wear protective gear -- gloves;safety footwear; snug fitting clothing; and eye, hearing, and head protection.
Check for worn, loose, or damagedparts and repair or replacebefore using the saw.
Check thechainforsharpnessand tension.
Keep children, bystanders, and animals a minimum of 30 feet away from the work area.
Plan your sawingoperation carefully in advance.
........
, ,.........
_. .........
,..........
9
Fill theoil tankwithclean oil eachtime the saw isused.
Use a funnel toflit thetankand wipe up all spills.
Replacetheoilcap securely.
_perate the _ifer a_tuat_r_capsixtimes a minute and h__dd_wnf_r appr_ximate_ythree sec_nds each timethe
actuator/capispressed.
USING
1.
2.
3.
4.
5.
6.
7.
page
3
.............................................
...............................
BAR.AND CHAIN OIL ....................
1.
2.
3.
-4,
Instructions.
YOUR
SAW.
to
Connect the saw to a proper power source.
..
Make sure the ext.ension cord is completely away from the saw and cannot be cut. •
Start the saw by pushing the _ockout button and squeezing the trigger before entering the Cut.
Begin culling with the saw frame against the log.
Allow the chain to cut for you; exert only tight downward pressure.
Release the trigger switch as soon as the cut is comptet_ed.
Unplug the unit after each cutting ol_eration.
--.
MAINTENANCE
........
_.............
.....
"...........................
:. ....
. 15
1.. Take your saw to a Sears Service Center for aii electrical related' repairs.
2,
Check the guide bar for wear each time the chain is sharpened.
3.
Install a new sprooketlgear aseemblyeach time a new chain is installed,
4.
Let saw stand unplugged for t5 m!nules and wipe oil from saw and bar before storing.
5.
Store saw in a dry place out of the reach of cl_ildren.
COMMON
CHAIN SAW TERMS
Front Handle -- The support handle located at or toward the front of the chain saw.
Rear Handle -- The support handle located at or toward the rear of the saw.
3..
Trigger Swiloh-- Adevice thatwhen operated wiltcompleteor interruptan electricalpowercircuittothe motor
ofthe chain sawwhichstartsor stops the motor.
4.
Lockout Button _ Amovable stop thatpreventsthe.unintentionaloperationof thetrigge¢sw|tch untilmanuelly
actuate_d.
,
Oiler Actuator/Cap-- A systemfor oilingthe guk/ebar and sawchain.
Guide Bar -- A solid, railed structure that supports and guides the saw chain.
7. Saw Chain -- A loop of chain having cutting teeth (that cul the wood) that is driven by the.motor
and supported by the guide bar.
84
Sprocket -- The toothed part that drives the saw chain.
" 9.
Hand Guard --/The flat, shieldingsurface between the frorit handleand the nose of the guide bar,
10. Spiked Bumper(Spike) -- The pointed tooth or teeth for use when felling or bucking to pivot the
saw and maintain position while sawing.
.11.
Kickback -- The backward and/or upward motion of the guide bar occuring when the saw chain
near the nose of the top area of the guide bar contacts any object such as another log or
branch, or when the wood closes in and pinches the saw chain in the cut,
12.
Normal Cutting Position -- The position assumed in performing the bucking and felling Cuts.
13.
Felling -- The process of cutting down a tree.
14.
Notch Cu| -- A notch cut in a tree that directs the fall of the tree.
Felling Cut--The final cut in a tree felling operation made on the opposite side of the tree from
the notch _cut.
_6.
¸
Bucking -- The process of cross-cutting a felled tree or log into lengths.
17. • Plunge Cuts/Bore Cuts -- The processinvolved in cuttingwiththesaw chain at the nose (tip)ofthe guide bar,in
orderto make a hole._I_WARNING:Sears does not recommend performing plunge cuts or bore cuts due to
the dangers of kickback.
18. Adjusting pinlAdjusting Screw _ A screw and pin systemwhichmoves the guide bar forward andbackward;
Used for chain tensioning.
- ,
19. Powerhead-- The part of the sawincluding the motor, handle and handguard.
1.
2.
,
=
.
.
.
23
The Model Number an dSerial Numberwill be foundonthe motorhousingdecal
facingthe userwhen hotd|ngthesaw in thecuttingposition.Alwaysmention the
Model N umberwhen requesting service or repair parts for your Chaln Saw,
& A/RS
operator's
manual
All parts listed herein may be ordered from any Sears Service Center
and most Sears Stores.
WHEN ORDERING REPAIR PARTS ALWAYSGIVE
iNFORMATION
AS SHOWN IN THIS LIST.
THE FOLLOWING
1.
The PART NUMBER
3.
The PART DESCRIPTION
2,
The MODELNUMBER
358.34110-2.0114
_
4.
The NAME OF ITEM"
Electric Chain Saw,
If the parts you need are not stocked locally, your order will be electronically transmitted to a Sears Repair Parts Distribution Center for
expedited handling.
When you buy merchandise from
Sears you get an extra something
that nobody else can offer Sears
Service.
MODEL NO.
358,34110 - 2.0/14"
How to Order
Repair Parts
Across iown or across the country,
Sears Service follows you. providing trustworthy, competent service technicians using only Sears
specified factory parts.
"
:
,ill
,ll=
i
,_/CRRFI"$MRI_
SEARS SERVICE
IS AT YOUR SERVICE
CHAIN AND BAR
LUBRICANT
Available in Gallons (#71-36554)
and in Quarts (#71-36556) at your
nearest Sears Store, Catalog
Sales Office, or Service Center.
k
Sold
by Sears,
Roebuck
and
Co.,
Chicago,
Ill. 60684
U.S.A.