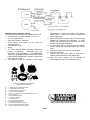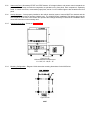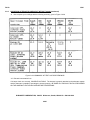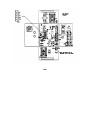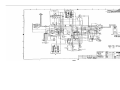
1
TM 5-4210-222-14&P-3 TECHNICAL MANUAL OPERATOR’S, ORGANIZATIONAL, DIRECT SUPPORT AND GENERAL SUPPORT MAINTENANCE MANUAL IINCLUDING REPAIR PARTS AND SPECIAL TOOLS LISTI FOR TRUCK, FIREFIGHTIN6G DRY CHEMICAL AFFF NSN 4210-00-484-5729 VOLUME III HEADOUARTERS, DEPARTMENT OF THE ARMY 14 APRIL 1986 TM 5-4210-222-14&P-3 TECHNICAL MANUAL No. 5-4210-222-14&P-3 HEADQUARTERS DEPARTMENT OF THE ARMY WASHINGTON, D.C., 14 April 1986 Operator’s, Organizational, Direct Support, and General Support Maintenance Manual (Including Repair Parts and Special Tools List) for TRUCK, FIREFIGHTING, DRY CHEMICAL AFFF NSN 4210-00-484-5729 This manual consists of 3 volumes. Each volume has its own table of contents. The index found in Volume I pertains only to Volume I. VOLUME I is the Illustrated Parts Breakdown for the entire truck. VOLUME II contains the Operation, Maintenance, and Repair Manual for: ENGINE, TRANSMISSION, CHASSIS, CAB and RELATED ITEMS VOLUME III contains the Operation, Maintenance and Repair Manual for: TWIN AGENT UNIT, INVERTER, HYDRAULIC RESCUE TOOL (Jaws of Life), POWER UNIT, RESCUE SAW 10 TON HYDRAULIC RESCUE KIT, ELECTRONIC SIREN NOTE: Throughout these manuals, information has been deleted which is not pertinent. REPORTING ERRORS AND RECOMMENDING IMPROVEMENTS You can help improve this manual. If you find any mistake or if you know of a way to improve the procedures, please let us know. Mail your letter, DA Form 2028 (Recommended Changes to Publications and Blank Forms), or DA Form 2028-2 located in the back of this manual directly to: Commander, U.S. Army Troop Support Command, ATTN: AMSTR-MCTS, 4300 Goodfellow Boulevard, St. Louis, MO 63120-1798. A reply will be furnished directly to you. REPORTING EQUIPMENT IMPROVEMENT RECOMIENDATIONS (EIR) If your fire truck needs improvement, let us know. Send us an EIR. You, the user, are the only one who can tell us what you don’t like about your equipment. Let us know why you don’t like the design. Put it on an SF 368 (Quality Deficiency Report). Mail it to us at Commander, U.S. Army Troop Support Command, ATTN: AMSTR-QX, 4300 Goodfellow Boulevard, St. Louis, MO 63120-1798. A reply will be furnished to you. OPERATION, MAINTENANCE AND REPAIR MANUAL VOLUME III TABLE OF CONTENTS SECTION PAGE ROCKWOOD INSTRUCTION AND SERVICE MANUAL TWIN AGENT 1500/250 DRY CHEMICAL/AFFF—UNIT .......................................................................... 4001 SECTION I TWIN AGENT UNIT (DRY CHEMICAL AND AFFF) ............................................................................................................................... Stand-By Mode...................................................................................................................... Operation Instructions, Hose Reel......................................................................................... Operation Instructions, Turret................................................................................................ System Purging Operation, Dry Chemical............................................................................. System Purging Operation, AFFF ......................................................................................... Bleeding Operation, Dry Chemical ........................................................................................ Bleeding Operation, AFFF..................................................................................................... Filling Instructions, Dry Chemical .......................................................................................... Filling Instructions, AFFF....................................................................................................... Parts List and Schematic....................................................................................................... 4002 4003 4005 4005 4006 4006 4008 4008 4009 4009 4010 Dry Chemical Unit.......................................................................................................... Scope..................................................................................................................... Introduction ............................................................................................................ Principle of Operation ............................................................................................ System Components.............................................................................................. Maintenance .......................................................................................................... Troubleshooting ..................................................................................................... Spare Parts ............................................................................................................ 4011 4011 4011 4011 4012 4015 4015 4016 AFFF Unit ...................................................................................................................... Scope..................................................................................................................... Introduction ............................................................................................................ Principle of Operation ........................................................................................... System Components.............................................................................................. Maintenance .......................................................................................................... Troubleshooting ..................................................................................................... Spare Parts ............................................................................................................ 4017 4017 4017 4017 4017 4020 4020 4021 SECTION II DATA SHEETS FOR COMPONENTS SUPPLIED ................................................... 1+ Inch M Series Ball Valve with Air Actuator ....................................................................... Hannay Hose Reel................................................................................................................. 4023 4023 4029 SECTION III DISCHARGE DEVICES ........................................................................................... Twin Agent Handline Index.................................................................................................... Scope............................................................................................................................. Nozzle Data ................................................................................................................... Description..................................................................................................................... Operating Instructions ................................................................................................... Maintenance ................................................................................................................. Spare Parts.................................................................................................................... 4034 4036 4037 4037 4037 4038 4038 4038 1 OPERATION, MAINTENANCE AND REPAIR MANUAL VOLUME III TABLE OF CONTENTS SECTION PAGE Remote Manual Twin Agent Turret Foam/ Dry Powder Index.......................................................................................................................... Scope ............................................................................................................................... Introduction............................................................................................................................ Figures ............................................................................................................................... Operating Instructions ........................................................................................................... Maintenance .......................................................................................................................... Spare Parts............................................................................................................................ 4043 4044 4044 4044 4045 4045 4046 DYNAMOTE "A-30" INVERTER OPERATING, INSTALLATION AND SERVICE MANUAL ........................................................................................................................... 4062 SECTION I DYNAMOTE LIMITED WARRANTY .......................................................................... 4063 SECTION II GENERAL INFORMATION ....................................................................................... Introduction and Principle of Operation ................................................................................. Specifications ........................................................................................................................ Product Configuration............................................................................................................ 4065 4065 4066 4066 SECTION III INSTALLATION INSTRUCTIONS............................................................................ Instructions ............................................................................................................................ Route Harness to Alternator .................................................................................................. Install Automatic Throttle ....................................................................................................... Attach Harness to Alternator ................................................................................................. Checkout of Harness Installation........................................................................................... Checkout Inverter Operation ................................................................................................. 4068 4068 4069 4071 4071 4074 4082 SECTION IV SERVICE AND TROUBLESHOOTING INSTRUCTIONS ........................................................................................................................... General Information............................................................................................................... Inverter Removal from Vehicle for Servicing ......................................................................... Troubleshooting Guide .......................................................................................................... Inverter Parts List .................................................................................................................. 4084 4084 4084 4085 4097 2 OPERATION, MAINTENANCE AND REPAIR MANUAL VOLUME III TABLE OF CONTENTS SECTION PAGE 4 CYCLE HURST POWER UNIT INSTRUCTION MANUAL ........................................................ Parts List ............................................................................................................................... Assembling Instructions......................................................................................................... Operating Instructions ........................................................................................................... Troubleshooting Instructions ................................................................................................. 4113 4115 4116 4120 4126 HURST JAWS OF LIFE MODEL 32b INSTRUCTION MANUAL.................................................. Parts List ............................................................................................................................... Assembling Instructions......................................................................................................... Troubleshooting Instructions ................................................................................................. Maintenance .......................................................................................................................... Operating Instructions ........................................................................................................... Cutting Instructions................................................................................................................ 4130 4132 4133 4137 4137 4139 4143 PARTNER K-1200 RESCUE SAW SERVICE MANUAL............................................................................ Safety Precautions................................................................................................................. Fitting Cutter Arm .................................................................................................................. Turning Cutter Arm ................................................................................................................ Replacing Belt........................................................................................................................ Fuel Mixture........................................................................................................................... Fuel Tank............................................................................................................................... Controls ............................................................................................................................... Starter Unit ............................................................................................................................ Air Filter ............................................................................................................................... Carburetor ............................................................................................................................. Maintenance .......................................................................................................................... Technical Data....................................................................................................................... 4148 4149 4151 4152 4153 4153 4153 4153 4154 4154 4154 4155 4156 PARTNER K-1200 RESCUE SAW OPERATOR’S MANUAL .................................................................... Table of Contents .................................................................................................................. Forward ............................................................................................................................... Parts Description ................................................................................................................... Pre-Checkout......................................................................................................................... Cutter Wheels........................................................................................................................ Diamond Blades .................................................................................................................... Carbide-Tipped Blades ......................................................................................................... Operation............................................................................................................................... Safety Regulations................................................................................................................. 4157 4158 4159 4161 4163 4166 4167 4169 4170 4176 10 TON HYDRAULIC PORTO-POWER RESCUE KIT OPERATING INSTRUCTIONS ..................................................................................................... Troubleshooting Chart Solution ............................................................................................. Troubleshooting Chart ........................................................................................................... 4178 4180 4180 3 OPERATION, MAINTENANCE AND REPAIR MANUAL VOLUME III TABLE OF CONTENTS SECTION PAGE 10 TON HYDRAULIC PORTO-POWER RESCUE KIT OPERATING INSTRUCTIONS - Continued Function ............................................................................................................................... Operating Instructions ......................................................................... .................................. Maintenance .......................................................................................................................... Inspection ............................................................................................................................. 4181 4181 4182 4182 SIGNAL MODEL PA300* ELECTRONIC SIREN INSTALLATION AND SERVICE INSTRUCTIONS ....................................................................... Section I General Description........................................................................................ Section II Specifications ................................................................................................. Section III Installation ...................................................................................................... Section IV Operation........................................................................................................ Section V Circuit Description .......................................................................................... Section VI Service and Maintenance ............................................................................... 4186 4187 4188 4189 4193 4195 4198 4 OPERATION, MAINTENANCE AND REPAIR MANUAL VOLUME III LIST OF ILLUSTRATIONS TITLE IDENTIFICATION/ ILLUSTRATION PAGE(S) 510-2120-1 4010 C-509-0663 ISO-72 6185-1 6185-1 Figure I Figure I 4023 4029 4032 4033 4039 4047 Figure 1A Figure II Figure III Figure IV 4049 4051 4054 4056 510-2120 4058 to 4061 2.0.2A 2.0.2B 2.2.5B 2.2.6A 3.3.2A and 3.3.2B 3.5.1A 4065 4065 4067 4067 4070 4071 3.5.4C ----- 4073 4091 4.3.10A 2075 2075-1 4095 4101 4102 ----- 4114 --------- 4131 4132 ROCKWOOD INSTRUCTION AND SERVICE MANUAL TWIN AGENT 1500/250 DRY CHEMICAL/ AFFF UNIT Rockwood Twin Agent RTA 1500/250 System Schematic.............................................. 1" M Series Ball Valve with Air Actuator......................................................... Hannay Hose Reel ............................................. Installation Instructions....................................... Wiring Diagram (Hose Reel) .............................. Dual Agent Handline Foam/Dry Powder............. Turret Remote Manual Twin Agent .................... Turret Remote Manual Twin Agent Assembly ........................................................... Remote Manual Turret ....................................... Shaper - AFFF.................................................... Dry Chemical Nozzle.......................................... Twin Agent 1500/250 Dual Agent System................................................................ INVERTER, DYNAMOTE A-30 Inverter Off ......................................................... Inverter On ......................................................... A30 Dimensions ................................................. Mounting Configuration ...................................... Belt Alignment .................................................... High Amperage By-Pass Installation.................. Diagram of Leece-Neville 4000AA Series Alternator................................................. SCR Checkout Procedure .................................. Diode Checkout Procedure and Readings ............................................................ A30-70D Unit Wire Diagrams ............................. A30-70D Unit Schematic .................................... HURST 4 CYCLE POWER UNIT 4 Cycle Schematic.............................................. HURST JAWS OF LIFE Rescue Tool Schematic ..................................... Accessories ........................................................ 5 OPERATION, MAINTENANCE AND REPAIR MANUAL VOLUME III LIST OF ILLUSTRATIONS TITLE IDENTIFICATION/ ILLUSTRATION PAGE(S) --------------------- 4150, 4160 4151 4152 4155 4176 Figure 1 Figure 2 Figure 3 4180 4180 4182 Figure 1-1 Figure 3-2 Figure 3-3 Figure 3-4 Figure 3-5 Figure 3-6 Figure 4-1 Figure 5-1 Figure 6-1 Figure 6-2 Figure 6-3 Figure 6-4 4187 4190 4190 4190 4192 4192 4193 4195 4199 4199 4200 4201 PARTNER K-1200 RESCUE SAW Rescue Saw Schematic ..................................... Fitting the Cutter Arm ......................................... Turning the Cutter Arm....................................... Tools .................................................................. Safety Regulations ............................................. 10 TON HYDRAULIC PORTO-POWER RESCUE KIT Spongy Effect .................................................... Ram Won’t Retract ............................................ Clamps ............................................................... SIGNAL MODEL PA300* ELECTRONIC SIREN Model PA300 Electronic Siren ........................... Rear View of PA300 ........................................... Control Cable Wiring Diagram .......................... Horn Ring Connections ..................................... Press and Hold Modification .............................. Relative PA Loudness Adjustment.. ................... Model PA300 Front View ................................... Functional Block Diagram ................................. Chassis Removed ............................................. Internal View ...................................................... Component Location Diagram............................ Schematic Diagram ........................................... 6 OPERATION, MAINTENANCE AND REPAIR MANUAL VOLUME III LIST OF TABLES TITLE IDENTIFICATION/ ILLUSTRATION PAGE(S) Table 1 4022 3.6.2A 4081 ROCKWOOD TWIN AGENT 1500/250 DRY CHEMICAL/AFFF UNIT Pressure vs Temperature Chart ......................... DYNAMOTE INVERTER Harness and Alternator ..................................... 7 ROCKWOOD TWIN AGENT 1500/250 DRY CHEMICAL/AFFF UNIT ROCKWOOD INSTRUCTIONS LOG NO. RIM 1554 KOVATCH CORPORATION 500-600 WEST CATAWISSA ST. NESQUEHONING, PA 18240 SALES ORDER C100360 MARCH, 1985 REVISED: JULY, 1985 4001 ROCKWOOD SYSTEMS CORPORATION 640 East Main Street Lancaster, Texas 75146 SECTION I TWIN AGENT UNIT 4002 OPERATIONAL PROCEDURES (SEE SCHEMATIC ON PAGE 4010 FOR ITEM NUMBERS) STAND-BY MODE: DRY CHEMICAL 1. The Dry Chemical Tank shall be full and Fill Cap securely installed. Nitrogen cylinders shall be full. 2. Turret Control Switch; OFF 3. Charging Switches; OFF 4. Nozzle Discharge Valve - 2B; CLOSED 5. Hose Reel Valve - 9B; CLOSED 6. Nitrogen By - Pass Valve - 13C; CLOSED 7. Nitrogen Bleed Valve - 13B; CLOSED 8. Master Nitrogen Valve - 12B; OPEN 9. Master Discharge Valve - 6B; CLOSED 10. M. D. V. Actuator Bleed Valve - 21B; CLOSED 11. Turret Discharge Valve - 109; CLOSED 12. Quick Opening Valves - 81A; SET AFFF FOAM SYSTEM 1. The AFFF Tank shall be full and Fill Cap securely installed. Nitrogen cylinders shall be full. 2. Turret Control Switch; OFF 3. Charging Switches; OFF 4. Nozzle Discharge Valve - 2A; CLOSED 5. Hose Reel Valve - 9A; CLOSED 6. Nitrogen By-Pass Valve - 13A; CLOSED 7. Master Nitrogen Valve - 12A; OPEN 8. Master Discharge Valve - 6A; CLOSED 9. M. D. V. Actuator Bleed Valve - 21A; CLOSED 4003 -1- Operational Procedures, Cont. (SEE SCHEMATIC ON PAGE 4010 FOR ITEM NUMBERS) 10. Drain Valve - 7B; CLOSED 11. Turret Discharge Valve - 108; CLOSED 12. Quick Opening Valves - 81A; SET 13. Temperature Relief Valve - 71; CLOSED 4004 (SEE SCHEMATIC ON PAGE 4010 FOR ITEM NUMBERS) OPERATING INSTRUCTIONS HOSE REEL The discharge of large amounts of dry chemical may create hazards to personnel such as reduced visibility and temporary breathing difficulty. 1. Activate system by placing desired agent(s) "CHARGING SWITCH" in "ON" position. (Press dashboard actuator if activating from the cab.) 2. Place desired agent(s) hose reel valve 9A/9B in "OPEN" position. 3. Unlock brake on hose reel. 4. Remove nozzle. 5. Unwind hose to desired length. 6. Place desired agent(s) nozzle discharge valve 2A/2B in "OPEN" position; operate as required. NOTE: The Dry Chemical System and AFFF Foam System-can be used simultaneously or independently. TURRET The discharge of large amounts of dry chemical may create hazards to personnel such as reduced visibility and temporary breathing difficulty. 1. Activate system by placing desired agent(s) "CHARGING SWITCH" in "ON" position. (Press dashboard actuator if activating from cab.) 2. Release turret handle locking devices 3. Select desired spray pattern. 4. Activate turret by placing selected agent switch in "ON" position. Discharge may be stopped at any time by placing switch in "OFF" position. To resume discharge, place switch in "ON" position. NOTE: The Dry Chemical System and AFFF Foam System can be used simultaneously or independently. 4005 (SEE SCHEMATIC ON PAGE 4010 FOR ITEM NUMBERS) SYSTEM PURGING OPERATION DRY CHEMICAL The discharge of large amounts of dry chemical may create hazards to personnel such as reduced visibility and temporary breathing difficulty. 1. Place "CHARGING SWITCH" in "OFF" position. 2. Shut master nitrogen valve 12B. 3. Slowly open valve 218 and vent tank pressure until relief valve 88A is reseated and valve 6B can be shut; then shut valve 21B. 4. Shut master discharge valve 6B. 5. Shut bleed valve 13B. 6. Place "CHARGING SWITCH" in "ON" position. 7. Slowly open nitrogen by-pass valve 13C. 8. Cycle nozzle discharge valve 2B. Open and close. Shut nozzle discharge valve when purging is complete. 9. Place "CHARGING SWITCH" in "OFF" position and reset the quick opening valves 81A. 10. Shut nitrogen by-pass valve 13C. 11. Open master nitrogen valve 12B. AFFF FOAM SYSTEM 1. Place "CHARGING SWITCH" in "OFF" position. 2. Shut master nitrogen valve 12A. 3. Slowly open valve 21A and vent tank pressure until relief valve 88B is reseated and valve 6A can be shut; then shut valve 21A. 4. Shut master discharge valve 6A. 5. Shut bleed valve 13A. 6. Place "CHARGING SWITCH" in "ON" position. 7. Slowly open nitrogen by-pass valve 13A. 8. Cycle nozzle discharge valve 2A. Open and close. Shut nozzle discharge valve when purging is complete. 4006 System Purglng, Cont. (SEE SCHEMATIC ON PAGE 4010 FOR ITEM NUMBERS) 9. Place "CHARGING SWITCH" in "OFF" position and re-set the Quick Opening Valves - 81A. 10. Shut Nitrogen By-Pass Valve - 13A. 11. Open Master Nitrogen Valve - 12A. -5- BLEEDING OPERATION (SEE SCHEMATIC ON PAGE 4010 FOR ITEM NUMBERS) DPY CHEMICAL 1. Place "CHARGING SWITCH" in "OFF" position. Open Valve - 81C to vent actuation line, then re-set the Quick Release Valve for Dry Chemical Nitrogen Cylinders. 2. Slowly open Valve - 21B and vent tank pressure until Relief Valve - 88A is re-seated and Valve - 6B can be shut; then shut Valve - 21B. 3. Shut Dry Chemical Master Discharge Valve - 6B. 4. Shut Nitrogen Purge Valve - 13C. 5. Open Hose Reel Auxiliary Discharge Valve - 9B. 6. Slowly open Bleed Valve - 13B. 7. Open Nozzle Discharge Valve - 2B and vent off excess nitrogen pressure. Then shut discharge valve. 8. Shut Bleed Valve - 13B. AFFF FOAM SYSTEM 1. Place "CHARGING SWITCH" in "OFF" position. Quick Release Valve for foam nitrogen cylinders. 2. Slowly open Valve - 21A and vent tank pressure until Relief Valve - 88B is re-seated and Valve - 6A can be shut; then close Valve - 21A. 3. Shut AFFF Master Discharge Valve - 6A. 4. Open Hose Reel (Auxiliary Discharge) Valve - 9A. 5. Slowly open Bleed Valve - 13A. 6. Open Nozzle Discharge Valve - 2A and vent off excess nitrogen pressure. Then shut discharge valve. 7. Shut Bleed Valve - 13A. 4008 -6- Open Valve - 81C to vent actuation line, then re-set the FILLING INSTRUCTIONS DRY CHEMICAL 1. Vent the system per enclosed "Bleeding Operation" instructions. 2. Shut master nitrogen valve 12B. 3. Slowly remove fill plug from the top of the tank. Be sure all pressure is expelled from the dry chemical tank 1B before removing plug. If pressure venting sound is audible when cap is turned, "STOP" immediately and repeat steps 1, 2, and 3. Avoid breathing dry chemical dust while filling tank. 4. Fill dry chemical tank 1B to the top with Purple-K-Powder. Do not rod or tamp dry chemical into the tank. 5. Replace fill plug on tank and tighten firmly. 6. Open master nitrogen valve 12B. 7. Check nitrogen pressure. If pressure is below 1800 psi at 70 F., replace cylinder. ° AFFF FOAM SYSTEM 1. Vent the system per enclosed "Bleeding Operation" instructions. 2. Shut master nitrogen valve 12A. 3. Slowly remove fill plug from the top of the tank. Be sure all pressure is expelled from the AFFF tank 1A before removing plug. If pressure venting sound is audible when cap is turned, "STOP" immediately and repeat steps 1, 2, and 3. 4. Fill AFFF tank 1A to the top with water and AFFF as specified on the refill table located at the rear of the skid unit. 5. Replace fill plug on tank and tighten firmly. 6. Open master nitrogen valve 12A. 7. Check nitrogen pressure. If pressure is below 1800 psi at 70 F., replace cylinder. ° 4009 DRY CHEMICAL UNIT 1.0 SCOPE This manual defines the following for Rockwood’s Self Contained Dry Chemical Unit : PAGE a) b) c) d) e) f) 2.0 Principle of operation................... System description ...................... Operating Instructions ................. Maintenance procedures ............. Trouble shooting.......................... Recommended spare parts ......... 4011 4012 4005 4015 4015 4016 INTRODUCTION 2.1 PURPOSE: Dry Chemical Fire Extinguishing Systems are used throughout the fire protection industry on class B and C fires for rapid extinguishment and knock down capabilities. Typical uses for Dry Chemical Extinguishing Systems consist of: A) B) C) D) E) F) G) Offshore platforms Tankers Bulk fuel handling terminals Heavy industrial marine, petroleum, chemical and petrochemical operations Pipe lines Crash truck and quick response vehicles Wherever fuel and chemical spills create a potential hazard. 2.2 PRINCIPLE OF OPERATION: The Dry Chemical Unit utilizes dry nitrogen in a pressurized cylinder as the propellant for the extinguishing agent and therefore requires no other power source. Nitrogen is released from the cylinder via the bottle stop or quick releasing device. The pressure is then reduced by going through a special high capacity regulator prior to entering the dry chemical tank where the dry chemical is fluidized, aggitated and pressurized. Dry chemical is then propelled through a handline or fixed discharge devices depending upon the application. Flow rates are controlled by the various types of discharge devices. 4011 3.0 SYSTEM COMPONENTS The item numbers below refer to the system schematic of Figure 510-2120-1 Page 4010 1B. A.S.M.E. DRY CHEMICAL TANK The Rockwood Dry Chemical Tank is designed, constructed and inspected in accordance with Section VIII, Rules For Construction of Pressure Vessels, Division 1 of the ASME Code. All tanks are designed for a working pressure of 250 PSI. The Dry Chemical Tank is a spherical steel tank equipped with openings for nitrogen gas input, a combination nitrogen bleed purge and safety relief, dry chemical discharge, dry chemical fill and dry chemical clean out. The Dry Chemical Tank has a four inch diameter fill opening and a threaded self venting pressure plug. The plug is designed so that there are at least four threads engaged when the plug vent is exposed. This protects the operator from injury should any residual pressure remain in the tank prior to recharging. The Tanks have a welded on external skirt support to facilitate mounting. The Dry Chemical Tank must contain a sufficient quantity of dry chemical for the required discharge time of the system, depending upon the application of the system. 2A, 2B DISCHARGE DEVICE Rockwood’s Dry Chemical Systems can be used on either portable or stationary systems with either fixed or manual discharge devices. Some examples of Rockwood’s Dry Chemical Discharge Devices consist of: Fixed nozzles, hose reels with twin agent handlines, or Dry Chemical handlines, twin agent turrets and dry chemical turrets. Any one or combination of these devices are compatable with Rockwood’s Dry Chemical System. 3B. CHECK VALVE A Check valve is installed downstream of the nitrogen regulator to prevent backflow of dry chemical from the tank to the regulator. A high back pressure could occur if a discharge outlet were shut off quickly. 4012 4B. NITROGEN REGULATOR Rockwood’s Dry Chemical System utilizes a special high flow capacity regulator to achieve the constant discharge rate required. The Regulator reduces the high nitrogen cylinder pressure to 230 psig. The Regulator incorporates a built in safety valve set to limit the secondary pressure to 400 psig. High and low pressure gage connections are also provided. 6B. MASTER DISCHARGE VALVE A Discharge Valve is located in the discharge line of the Dry Chemical Tank. This valve is normally open but shall be shut when the discharge lines are purged with nitrogen or when bleeding off the residual nitrogen pressure in the Dry Chemical Tank after full or partial discharge. It is recommended that the discharge valve be safety wired in the open position after the lines have been cleared and the unit is placed in standby condition. 10B. PRESSURE RELIEF VALVE The Pressure Relief Valve provides the tank with protection against over pressure conditions in the event of a sudden shutdown of one or more of the discharge devices or failure of the nitrogen regulator. The Relief Valve is set at 275 psi. 11C, D NITROGEN CYL INDER(S) &E The Nitrogen Cylinder(s) provide the system with the required supply of high pressure nitrogen to completely discharge all the chemical agents and clean out all lines after discharge. The cylinders contain dry nitrogen at approximately 2, 400’psig at 21.10C (700F). Bottle quantity and capacity are based upon required system duration and flow rate. Each bottle has a hand wheel operated bottle stop (or a quick release device if desired item 16B) and a safety v3lve set at approximately 3, 000 psi. 4013 12B. MASTER NITROGEN SUPPLY VALVE The Master Nitrogen Supply Valve isolates the dry chemical tank from the nitrogen supply when filling or cleaning out the tank. This valve is also closed to isolate the tank when purging the system after discharge to clean out the piping and hose lines. 13C. NITROGEN BY-PASS VALVE A By-Pass (purging) Valve is located in the lines of the nitrogen manifold system to enable the operator to by-pass the dry chemical tank with pressurized nitrogen when clearing (purging) the discharge line after use or checking the discharge lines during maintenance. 13 B BLEED VALVE A Bleed Valve is located in the lines of the nitrogen manifold system to enable the operator to depressurize the tank and facilitate purging the discharge line after use. 14B. HIGH PRESSURE GAGE A High Pressure Gage is located on the inlet side of the nitrogen regulator to indicate cylinder supply pressure. The gage has a range of 0 3000 psi. 15B. LOW PRESSURE GAGE A Low Pressure Gage is located on the outlet side of the nitrogen regulator to indicate system pressure. The gage has a range of 0 - 400 psi with normal operating pressure equal to 230 psi at 700F. 4014 4.0 MAINTENANCE A periodic check of the following should be made every thirty days. 5.0 1. Perform stand-by mode check, page 4003, to ensure valves are in proper position. 2. Check nitrogen cylinder pressure per filling instructions, steps 2 and 6, page 4009. Replace cylinder if pressure is below 1800 psi at 70° F., as read on gauge 14B (refer to table I). Nitrogen to be per FED-SPECBB-N-411, type I, Class I. 3. Ensure that discharge device works freely. Discharge device (2A, 2B, etc.) control valve should be left shut when check is complete. 4. Make certain that tank is full. 5. Check gauges for cracked or broken glass. 6. The dry chemical system is virtually maintenance free. Use touchup paint and rust preventatives as required. If the unit has been worked on, check valve position for proper ready standby configuration per stand-by mode, page 4003. TROUBLESHOOTING The information listed below provides some direction for troubleshooting difficulties that may be encountered with dry chemical systems. TROUBLE Dry Chemical System High pressure gauge shows loss of pressure Low pressure gauge reads other than 230 psi PROBABLE CAUSE REMEDY Low temperature Check high pressure gauge reading against data in table 1. Check for leaks at cylinder valve. Cylinder low/empty Replace cylinder. Defective regulator Replace regulator. Improper setting Consult factory. 4015 TROUBLE Decreased flow of dry chemical PROBABLE CAUSE REMEDY Plugged pick-up tube or packed hose resulting from incomplete clean-out Clean out line as per instruction in dry chemical system purging operations, page 4006. Defective regulator Replace regulator Discharge valves(s) partially closed Turn valve to wide open position. Master nitrogen valve partially closed Turn valve to wide open position Nitrogen by-pass (purge) valve partially open Turn valve to full closed position Nitrogen bleed valve partially open Turn valve to full closed position CAUTION: BEFORE PRESSURIZING, DEPRESSURIZING OR SERVICING DRY’CHEMICAL UNIT, READ OPERATIONS MANUAL TO ASSURE STRICT ACCORDANCE WITH INSTRUCTIONS. 6.0 SPARE PARTS The following items are the recommended list of spare parts: ITEM 1 2 3 4 5 6 7 PART NUMBER 509-0327 509-0329 509-0331 6129-2 6156-15 6156-12 110-3736-1 DESCRIPTION Repair Kit: %" M802 B.V. Repair Kit: 1" M802 B.V. Repair Kit: 1s" M802 B.V. Nitrogen Regulator High Pressure Gage Low Pressure Gage Gasket 4016 QTY 1 1 1 1 1 1 1 AFFF UNIT 1.0 SCOPE This manual defines the following for Rockwood’s Self Contained AFFF Units: PAGE a) Principle of Operation ................................ 4017 b) System Description.................................... 4017 c) Operating Instructions ............................... 4017 d) Maintenance Procedures........................... 4020 e) Trouble Shooting ....................................... 4020 f) Recommended Spare Parts ...................... 4021 2.0 INTRODUCTION 2.1 PURPOSE: AFFF Fire Extinguishing Systems are used throughout the fire protection industry on class B fires and spills. By securing the hazard with an expanded AFFF solution, the flammable vapors are suppressed, reducing the possibility of ignition. AFFF systems are designed for quick knock down of the fire, vapor suppression and blowback resistance. Typical uses for AFFF Extinguishing Systems consist of: A) B) C) D) E) F) G) Offshore platforms Tankers Bulk Fuel Handling Terminals Heavy Industrial Marine, Petroleum, Chemical and Petrochemical Operations. Pipe Lines Crash Truck and Quick Response Vehicles Wherever Fuel and Chemical Spills Create a Potential Hazard. 2.2 PRINCIPLE OF OPERATION: The AFFF Unit utilizes dry nitrogen in a pressurized’ cylinder as the propellant for the extinguishing agent and therefore requires no other power source. Nitrogen is released from the cylinder via the bottle stop or quick releasing device. The pressure is then reduced by going through a special high capacity regulator prior to entering the AFFF tank where the AFFF premix solution is pressurized. AFFF is then propelled through a handline or fixed discharge devices depending upon the application. Flow rates are controlled by the various types of discharge. 3.0 SYSTEM COMPONENTS The item numbers below refer to the system schematic of Fig. 510-2120-1 Page 4010. 1A. A.S.M.E. AFFF TANK The Rockwood AFFF Tank is designed, constructed and inspected in accordance with Section III, Rules for Construction of Pressure vessels, Division 1 of the ASME Code. All tanks are designed for a working pressure of 250 PSI. The AFFF Tank is equipped with openings for nitrogen gas input, a combination, nitrogen bleed purge and safety relief, AFFF discharge, AFFF fill and AFFF drain. 4017 The Tanks have a welded on external skirt support to facilitate mounting. The AFFF Tank must contain a sufficient quantity of Foam Solution for the required discharge time of the system. 2A, 2B etc. DISCHARGE DEVICE(S) Rockwood’s AFFF Systems can be used on either portable or stationary systems with either fixed or manual discharge devices. Some examples of Rockwood’s AFFF Discharge Devices consist of: Fixed nozzles, hose reels with twin agent handlines, or AFFF handlines, twin agent turrets and foam turrets. Any one or combination of these devices are compatable with Rockwood’s AFFF System. 3A. CHECK VALVE A Check valve is installed downstream of the nitrogen regulator to prevent backflow of AFFF solution from the tank to the regulator. A high back pressure could occur if a discharge outlet were shut off quickly. 4A. NITROGEN REGULATOR Rockwood’s AFFF System utilizes a special high flow capacity regulator to achieve the constant discharge rate required. The Regulator reduces the high nitrogen cylinder pressure to 230 psig. The Regulator incorporates a built in safety valve set to limit the secondary pressure to 400 psig. High and low pressure wage connections are also provided. 6A. MASTER DISCHARGE SALVE A Discharge Valve is located in the discharge line of the AFFF Tank. This valve is normally open but shall be shut when the discharge lines are purged with nitrogen or when bleeding off the residual nitrogen pressure in the AFFF Tank after full or partial discharge. It is recommended that the discharge valve be safety wired in the open position after the lines have been cleared and the unit is placed in standby condition. 7B. FOAM SOLUTION DRAIN VALVE The Foam Solution Drain Valve is required for maintenance of the tank. 8. FILL CUP The Fill Cup is used for gravity filling of tile foam solution AFFF Tank. 4018 9A, 9B AUXILIARY DISCIARGE VALVE(S) Auxiliary Discharge Valve(s) are provided to allow isolation of one or more systems while maintaining the remaining discharge devices in an operable condition. They can also be used to minimize nitrogen loss when purging the system after using only one discharge device. These valves are only provided if there are two or more separate discharge devices/zones. 10A. PRESSURE RELIEF VALVE The Pressure Relief Valve provides the tank with protection against over pressure conditions in the event of a sudden shutdown of one or more of the discharge devices or failure of the nitrogen regulator. The Relief Valve is set at 275 psi. 11A. NITROGEN CYLINDER(S) The Nitrogen Cylinder(s) provide the system with the required supply of high pressure nitrogen to completely discharge all the chemical agents and clean out all lines after discharge. The cylinders contain dry nitrogen at approximately 2, 400 psig at 21.1oC (700F). Bottle quantity and capacity are based upon required system duration and flow rate. Each bottle has a hand wheel operated bottle stop (or a quick release device if desired item 16A) and a safety valve set at approximately 3, 000 psi. 12A. MASTER NITROGEN SUPPLY VALVE The Master Nitrogen Supply Valve isolates the AFFF tank from the nitrogen supply when filling or draining the tank. This valve is also closed to isolate the tank when purging the system after discharge to clean out the piping and hose lines. 13A. NITROGEN BY-PASS VALVE A By-Pass (purging) valve is located in the lines of the nitrogen manifold system to enable the operator to by-pass the AFFF tank with nitrogen when clearing (purging) the discharge line after use or checking the discharge lines during maintenance. 14A. HIGH PRESSURE GAGE A High Pressure Cage is located on the inlet side of the nitrogen regulator to indicate cylinder supply pressure. The gage has a range of 0 - 3000 psi. 15A. LOW PRESSURE GAGE A Low Pressure Gage is located on the outlet side of the nitrogen regulator to indicate system pressure. The gage has a range of 0 400 psi with normal operating pressure equal to 230 psi at 700F. 4019 4.0 MAINTENANCE A periodic check of the following should be made every thirty days. 1. Perform stand-by mode check, page 4003, to ensure valves are in proper position. 2. Check nitrogen cylinder pressure per filling instructions, steps 2 and 6, page 4009. Replace cylinder if pressure is below 1800 psi at 700 F., as read on gauge 14A (refer to table I.) Nitrogen to be per FED-SPECBB-N-411, type I, Class I. 3. Ensure that discharge device works freely. Discharge device (2A, 2B, etc.) control valve should be left shut when check is complete. 4. Make certain that tank is full. 5. Check gauges for cracked or broken glass. 6. The AFFF system is virtually maintenance free. Use touch-up paint and rust preventatives as required. If the unit has been worked on, check valve position for proper ready stand-by configuration per stand-by mode, page 4003. Shut master discharge valve 6A. Remove, clean and reinstall strainer basket 5. Open 6A to place system back into normal stand-by condition. 7. 5.0 TROUBLESHOOTING The information listed below provides some direction for troubleshooting difficulties that may be encountered with self contained AFFF systems. TROUBLE AFFF System High pressure gauge shows loss of pressure Low pressure gauge reads other than 230 psi PROBABLE CAUSE REMEDY Low temperature Check high pressure gauge reading against data in table I. Check for leaks at cylinder valve. Cylinder low/empty Replace cylinder. Defective regulator Replace regulator. Improper setting Consult factory. 4020 TROUBLE PROBABLE CAUSE Decreased flow of AFFF solution. REMEDY’ Plugged or packed hose resulting from incomplete clean-out Clean out line as per instruction in dry chemical system purging operations, page 4006. Defective regulator Replace regulator Discharge valve(s) partially closed Turn valve to wide open position. Nitrogen by-pass (purge) valve partially open Turn valve to full closed position. Nitrogen bleed valve partially open. Turn valve to full closed position Fill and/or drain valve partially open Turn valve to full closed position. CAUTION: BEFORE PRESSURIZING, DEPRESSURIZING OR SERVICING AFFF UNIT, READ OPERATIONS MANUAL TO ASSURE STRICT ACCORDANCE WITH INSTRUCTIONS. 6.0 SPARE PARTS The following items are the recommended list of spare parts: ITEM 1 2 3 4 5 6 PART NUMBER 509-0327 509-0329 509-0332 6129-2 6156-15 6156-12 DESCRIPTION Repair Kit: ½" M802 B.V. Repair Kit: 1" M802 B.V. Repair Kit: 2" M802 B.V. Nitrogen Regulator High Pressure Gage Low Pressure Gage 4021 QTY 1 1 1 1 1 1 PRESSURE VS. TEMPERATURE CHART TEMPERATURE PRESSURE CORRECTIONS FOR GAGE READING °C (Base Point 220 psig at 21.1°C (70°F) °F * 43.0 (110) Subtract 221 psig from gage reading 38.0 (100) Subtract 166 psig from gage reading 32.2 ( 90) Subtract 111 psig from gage reading 26.7 ( 80) Subtract 55 psig from gage reading 21.2 ( 70) 0 15.6 ( 60) Add 56 psig to gage reading 10.0 ( 50) Add 112 psig to gage reading 4.4 ( 40) Add 168 psig to gage reading *** 1.1 ( 30) Add 224 psig to gage reading. -6.7 ( 20) Add 280 psig to gage reading -12.2 ( 10) Add 336 psig to gage reading -17.8 ( 0) Add 392 psig to gage reading -23.0 (-10) Add 448 psig to gage reading -29.0 (-20) Add 504 psig to gage reading ** NOTES: * ** *** For temperatures above 43.0°C (110F) subtract 56 psig more from gage reading for every 12.2°C (10°F) For temperatures below -29.0°C (-20°F) add 56 psig more to gage reading for every 12.2°C (100F) EXAMPLE: Pressure gage reads 1, 700 psig and outside temperature is 1.1°C (30°F). Actual nitrogen pressure is 1, 924psig, which is found by adding 224 psig to gage reading. TABLE 1. 4022 4010 SECTION II. 4023 4024 Page 4026 DELETED -1- ADJUST OPEN AND CLOSE VALVE POSITIONS (CON’T) 1. Loosen locknuts on the position adjustment screws (screws are located at the end on each cylinder or end cap. 2. To adjust for correct positioning, rotate position adjustment screws clockwise (into cylinder) for over traveling condition or counterclockwise (out of cylinder) for under traveling condition. This procedure is applicable for adjusting both open and close positions. 3. Tighten locknuts on position adjustment screws and operate unit to check corrected positions. If further corrections are needed, repeat steps 1, 2, and 3. To Manually Operate Manual operation of actuator and valve is provided in case of pressure loss or power failure. Standard wrenches fit either end of actuator output shaft or hexagon Actuator-Valve drive adapter. MAINTENANCE Clear, dry air or gas is essential for long service life and satisfactory operation. If instrument air of this quality is not available, it is recommended that an inline filter be provided to prevent foreign particles from entering the cylinders of the actuator. Under most normal circumstances the actuator does not require additional lubrication, it should be remembered that most control valves and solenoids (with the exception of positioners) perform better on lubricated air. For this reason, an airline lubricator may be installed. Care should be taken to use only lubricants compatible with the seal in the actuator and control valves. HYDRAULIC SERVICE All models of the Actuator can be furnished for using hydraulic fluid as an operating medium. When using water of other corrosive fluids as the operating medium, plating and coatings compatible with the respective operating medium, must be used. STORAGE Indoor storage, if available is recommended for all actuators. Care should be taken to plug the cylinder ports, control valves ports and the body ports. Also, actuators should not be stored in an atmosphere harmful to resilient seals. The piston(s) and other seals used in the Actuator are Buna -N material. Such synthetic materials have a shelf life of approximately 12 months at which point they go “dead”. In normal use the life of these seals is indefinite, depending upon the amount of lubrication, etc. However, if the actuator sits for extended periods of non-use, the packing will have a tendency toward going dead. In such cases, when the actuator is called on to operate, leakage by the piston(s) will be experienced. The actuator in most cases will stroke the valve but then the gas will leak from the exhause of the control valve. To prevent this from occuring we recommend that the actuator be cycled several times on at least 90 day intervals. This will keep the seals and pistion(s) “alive” and flexible. 4025 Page 4026 DELETED -2- CYLINDER DISASSEMBLY Safety First The maintenance and operation of mechanical equipment SAFETY is the basic factor which must be observed at all times. Through the use of the proper clothes, tool and methods of handling serious contents cause injury, to you or your fellow worker can be prevented. Throughout this manual are listed a number of safety precautions. Study them and follow them, also insist upon those working for you to do the same. Remember an accident is usually caused by someone’s carelessness neglect or oversight. Type AA Double Acting (Air To Air) Units: Screw Attachment Models At the base of the cylinder(s) are four (4) socket head cap screws. Alternately loosen, a little at a time, two screws across from each other. Similarly, loosen the remaining screws and remove by hand. Care should be taken when removing the last two screws as the cylinder could become free to drop or fall. CYLINDER RE-ASSEMBLY Screw Attachment Models Replace cylinder "0" ring and air passage seals (it required) and carefully slide cylinder over piston and up to body. Install the :;socket head cap screws and tighten snugly by hand. Use a wrench and alternately tighten, a little at a time, two screws across from each other Similarly, tighten the remaining screws. 4027 Page 4026 DELETED -4- ACTUATOR WEIGHTS IN POUNDS (APPROX.) pe AA PA-25 2.50 Lb. ACTUATOR FREE AIR CONSUMPTION - ONE 95° STROKE The following formula may be used to determine the free air consumption for each actuator. V D P T = = = = Free Air Consumption Per Minute (SCFM)P + 14.7 Actuator Displacement (Cubic Feet) Guage Pressure (PSIG) Actuator Operating Time (Seconds) 60 V = D x P + 14.7x 60 14.7 x T Cubic Feet = CUBIC INCHES 1728 TROUBLESHOOTING Problem: Actuator operates alone but will not operate valve. Instructions: Check actuator nameplate to insure correct model and spring rating, if so supplied, is in use. Check line pressure at actuator. Check to insure correct solenoid is being used. Check to insure that air lines are properly connected to solenoid and from solenoid to actuator. Check to insure that electric power is properly connected to solenoid. Check to see if actuator has been stored for any length of time without periodic cycling (see storage). LOCATING AND ORDERING PARTS For ease and accuracy in identifying and ordering spare or replacement parts, use parts drawings and part lists on the preceding pages. Data required from parts drawings and list are: 1. Part number 2. Name of part To obtain replacement parts submit the following information from unit nameplate: 1. Serial number 2. Model number 3. Operating pressure 4028 -5- 4029 1 of 5 Bulletin 5821A FF028 SEAL REPLACEMENT KIT For FS59000-1616-01 Swivel Joints Kit FF028 Contents Description DUST SEAL O-RING TEFLON BACKUP RING Quantity 1 1 1 Part Number 06-099-00 22550-216 FF9552-216 SERVICE INSTRUCTIONS: 1. Remove the sleeve assembly by backing off the set screw with a 1/e" hex head wrench. Then unscrew the nut completelywith a screwdriver or spanner wrench. 2. Pull out the nut and sleeve assembly. One bearing and race may remain in the housing, however, these should also be removed. If the shoulder retainer comes off of the sleeve assembly, it should be reinstalled. It must cover the shoulder since the rear of this part acts as a bearing race. 3. Remove and discard the O-ring and back-up ring from the sleeve or housing. Remove the dust seal from under the nut, clean area and replace. 4. Wipe the housing and sleeve seal area clean. Apply an assembly lubricant, such as silicone grease to these surfaces. Lubricate the O-ring and place in the housing. Place the white teflon back-up ring on the O-ring. Again, make sure the skive cut is lined up as shown. 5. If the rear bearing and race were removed from the sleeve, they must be reinstalled. The .031" thick race is placed in the housing first with the bearing on top. 6. Insert the sleeve assembly into the housing. It is not necessary to force the sleeve. Allow the nut to slowly guide the sleeve into the casing with its threading action. Occasional pressure on the sleeve should make it possible to seat the nut almost entirely by hand. 7. Snug the nut with a spanner wrench (or screwdriver). Then, loosen the nut 1/4 to 1/2 turn (maximum) to avoid overtightening. Lock the nut with the set screw. 8. Use a grease gun to grease the swivel at the lubrication fitting until grease comes out of the relief hole. Check for smooth rotation to insure proper assembly. NOTE: If, during disassembly, a problem is noted with the bearings or races such as cracks, kit number FF976 is recommended. The FF975 kit includes seals and bearings to completely refurbish the swivel assembly. Aeroqulp Corporation 1981 4030 2 of 5 IMPORTANT 1. WIRING INSTRUCTIONS FOR CIRCUIT BREAKERS USED WITH HANNAY REEL MOTORS DESCRIPTION OF CIRCUIT BREAKER The CDLM Circuit Breaker is normally used with Hannay Reels for protection of the rewind motor. This type of breaker must be manually reset by pressing firmly on the red pushbutton, if it is tripped for any reason. This insures that the problem will be corrected before the breaker is reset. 2. WIRING PROCEDURES The circuit breaker is installed into the wiring system by cutting either wire leading to the hose reel motor and connecting the two resulting ends to the two terminals of the circuit breaker. 3. MOUNTING The circuit breaker should be firmly mounted using the two mounting holes provided. The mounting position should be well removed from any abnormal sources of heat such as exhaust manifold and radiator, etc. To use the manual reset type satisfactorily a small mounting bracket, available from us as Part No. CB-1, should be used so that the reset button will be easily accessible when needed. 4. AMPERAGE RATINGS The application will determine shat amperage breaker is required. Under actual operating conditions the breaker should be of such a rating that when the hose reel motor is held in a stalled condition the breaker will open the circuit in no more than 30 seconds. To allow the circuit to remain closed for a longer period of time would begin to endanger the other components in the system. As a guideline, the following ratings would apply to motors used on Hannay Reels: Reels (except Inverted Type) with 12 volt explosion-proof rewind motor: 50 amp. Circuit breaker. CAUTION THIS CIRCUIT BREAKER IS NOT SUITABLE FOR USE WITH AC MOTORS. 3 OF 5 10M HP 7/84 4031 Form H-6913 3 of 5 INSTALLATION INSTRUCTIONS Electric Rewind Reels for 12 Volt DC Operation NOTE: FAILURE TO FOLLOW THESE INSTRUCTIONS MAY VOID THE WARRANTY. Unpacking 1. Unpack the reel and inspect for shipping damage. 2. Check wiring accessories against parts list on back of page under photo 1 or 2 depending on your model. Connecting hose 1. Do not attach hose until reel has been installed and wired. Charge hose BEFORE winding on the reel to prevent excessive pressure on the drum when the hose is charged. 2. If the reel is equipped with the flanged outlet riser remove the entire riser from hub. Be careful not to damage the gasket. Apply thread compound to all threads and bushings. Attach the hose to the outlet riser and tighten securely. Make sure the gasket is seated properly. 3. Threaded or welded outlet risers cannot be removed to attach hose. 4. Press the electric rewind operating switch or turn the hand crank to wind hose on the reel. Mounting the reel 1. Fasten reel frame securely to a level surface. 2. Turn reel discs by hand. Spool should turn freely. If it binds, just adjust self-aligning bearings. Connecting inlet 1. Threaded-type swivel joint inlets must be connected to the fluid supply by a flexible connector or the Hannay Warranty will be void. 2. Victaulic-type swivel joint inlet connections must be carefully aligned. Two victualic connections, correctly installed, will normally allow adequate flexibility for smooth rotation. 3. Install a union fitting as near as possible to the swivel joint inlet so the joint can be easily removed for servicing. 4032 4 of 5 Additional wiring materials required The following are required but not supplied with the reel. • insulated cable. minimum size No. 2 for 12 volt, • #16 Twin insulated wire. • Vapor-proof conduit. (Optional) • Circuit breaker (see sticker on reel motor for amperage rating). • Ground strap for reel. • Wiring 1. The wiring diagram shows necessary connections between components. Placement will vary depending on the installation. IT IS IMPORTANT THAT ALL GROUND CONNECTIONS ARE GOOD FOR PROPER OPERATION. Solder all connections using rosin-core solder. 2. The solenoid should be mounted in the engine 3. 4. 5. 6. 7. 8. Explosion-proof Switch and acessories supplied with EPJ 12V Reel A. B. C. D. E. F. G. H. I. J. K. L. M. N. 1 - explosion proof push button switch 1. - cast aluminum junction box 1. - terminal block for junction box 2 - 5/16” internal lockwashers 1 - 5/16” x 1” round head screw with two brass hex nuts. 1 - 1/12” pipe plug 1” to 3/4” reducing bushing 6’ - 16/2 Type SO cable 1 - solenoid control 2 - 1/2” strain relief connectors 1 - #4 terminal for 5/16” stud 2 - #8 crimp terminals for 5/16” stud 4 - #16 crimp terminals for #10-32 studs 1 - #16-14 crimp terminal for 5/16” stud 4033 compartment as close as possible to the battery and/or starter. It should be mounted vertically and securely grounded Optional vapor-proof conduit may be used for wiring betweerr the solenoid and motor/switch. A circuit breaker (not supplied) must be wired into the circuit between the solenoid and battery. A ground strap must be securely fastened between the reel frame and a grounded part of the vehicle body. Check all connections to be sure they are tight. Tape all connections. Seal the open end of the conduit, if used, with a sealing compound and wrap with plastic tape. Hose reel motor rotation can be reversed by interchanging the two motor leads at the motor. SECTION III DISCHARGE DEVICES 4034 Proven under pressure around the world R O C K W O O D S Y S T E M S C O R P O R A T I O N TWIN AGENT HANDLINE ROCKWOOD INSTRUCTION MANUAL RIM 1434 P/N 510-1678 JUNE, 1982 FIRE PROTECTION AND VALVE PRODUCT DIVISION 80 Second Street. South Portland, Maine 04106 Telephone (207) 799-3341 / TWX 710-221-1668 4035 TABLE OF CONTENTS PAGE 1.0 SCOPE ............................................................................................................................................... 4037 2.0 NOZZLE DATA................................................................................................................................... 4037 3.0 GENERAL DESCRIPTION................................................................................................................. 4037 4.0 OPERATING INSTRUCTIONS .......................................................................................................... 4038 5.0 MAINTENANCE ................................................................................................................................. 4038 6.0 SPA.RE PARTS ................................................................................................................................. 4038 FIG. 1 DUAL AGENT HANDLINE PARTS LIST 4036 RIM 1431 1.0 SCOPE This manual contains operating instructions maintenance , :procedure and parts list for the Rockwood Twin Agent Handline Nozzle. 2.0 NOZZLE DATA Hose Connections: Foam Inlet - Red swivel coupling, 1" - S NI Female National Fire hose Dry Powder Inlet - Black swivel coupling 1" - 8 Nil female National fire hose thread Liquid Discharge Rate: Dry Powder Discharge Rate: -4 DRY POWDER DISCHARGE: Discharge Pattern Data: 60 GPM @ 100 PSI Foam S-8 I ’s/Sec. @ 250 PSI 5-8 :3S/Sec. @ 100 PSI AFFF Barrel: Solid Stream - 60 feet effective range, fully dispersed stream - 15 feet wide at 26 feet range. Dry Powder Barrel: 25 to 40 feet effective range. AFFF Quality: 3.0 Expansion: 8 (Minimum) One quarter drainage time: 3 minutes (minimum), Per NFPA 412 GENERAL DESCRIPTION The nozzle consists of a dual passageway (one for foam, the other for dry powder), valve shutoffs, discharge tubes and in the foam line there is a stream forming discharge tip and deflectors. Hose connections are made to the swivel couplings at the base of the frame assembly. The discharge valves are operated by the levers in the center portion of the handline. The black handle operates the dry powder discharge and the red handle operates the foam solution. In the forward position (parallel with the discharge nozzles) the valve is closed and upright (perpendicular to the discharge nozzles) the valve is open. The foam stream deflectors are operated by the lever mounted on the foam tube. The two position deflectors are operated by placing the lever fully forward for the dispersed pattern and all the way back for straight stream. The foam passageway, operating handle and swivel coupling are color coated red. The dry powder nozzle, handle and swivel coupling are color coated black. 4037 -1- 4.0 OPERATING INSTRUCTIONS 4.1 GENERAL: WARNING The discharge of large amounts of dry chemical may create hazards to personnel such as reduced visibility and temporary breathing difficulty. The nozzle may be used right handed or left handed. It is held by placing one arm under the arm support - between the two swivel couplings and gripping the cross bar handle. The other arm is used to operate the discharge nozzles and deflectors. The nozzle is operated by selecting the desired agent and pulling on the valve handle. The dry chemical discharge valve should always be in the fully open or fully closed position. Never throttle the discharge rate with this valve. 4.2 AGENT SELECTION Foam Discharge - Red handle discharge valve. Deflectors - Open or closed by adjusting lever on foam discharge barrel. Dry Powder Discharge - Black handle discharge valve. 5.0 MAINTENANCE Inspect and manipulate all controls periodically to insure that they are in working order. Apply light silicone based oil to allow moving connections, sliding parts and friction points. There are no special tools required for maintenance or disassembly and assembly of this nozzle. 6.0 SPARE PARTS The following list of items are the recommended list of spare parts. PART NUMBER 6110-6 6118-1 6119-4 110-3702-1 10-06665 DESCRIPTION 1¼" Ball Vavle Toggle Clamp Swivel Adjustment Adapter Hose End Gasket 4038 QUANTITY 1 1 1 1 2 RIM 1434 FIGURE I. ROCKWOOD SYSTEMS CORP. 4039 Rockwood Systems Corporation 80 Second. Street South Portland, Maine 04106 RIM-1434 TITLE ITEM 1 2 3 4 5 6 7 8 9 10 11 12 13 14 15 16 17 18 19 20 21 22 23 24 25 26 27 28 29 30 DATE DUAL AGENT HANDLINE - FOAM/DRY POWDER PART NO 510-1678 QTY PART NO. 1 510-1749-1 2 6110-6 1 4803-156H 1 4426-12 1 4803-97H 1 110-0942-3 1 4803-145 1 110-3691-1 1 10-08441-2 1 510-1763-1 4 251-10003 1 6118-1 4 152-10006 4 167-12007 1 110-3704-2 2 152-08101 A/R 4259-7 1 110-3703-1 1 152-54001 1 162-040Q1 1 6119-4 1 110-3702-1 1 161-05007 2 510-1762-1 2 110-3687-1 2 284-15000 2 780-01125 2 10-06665 1 10-04421 4 254-02002 REV PREPARED BY FIG I PART NAME HANDLE 1¼" BALL VALVE 1¼" NIPPLE 1¼" x 3/4" REDUCING COUPLING 3/4" CLOSE NIPPLE DRY POWDER NOZZLE 1¼" CLOSE NIPPLE BREECH FOAM TIP SHAPER WELD ASSY MACHINE SCREW TOGGLE CLAMP CAPSCREW LOCKWASHER DEFLECTOR, ACTIVE CAPSCREW LOCKTITE ROD CAPSCREW MACHINE NUT SWIVEL, STRAIGHT ADAPTER, ADJUSTMENT HEX NUT VALVE HANDLE SWIVEL COUPLING RETAINING RING "o" RING GASKET NAMEPLATE DRIVE SCREW APPROVED BY Page 4041 DELETED PAGE 2 OF 2 4040 Proven under pressure around the world ROCKWOOD SYSTEMS CORPORATION REMOTE MANUAL TWIN AGENT TURRET FOAM/DRY POWDER PART No, 510-1679 LOG, No, RIM-1433 MAY, 1982 REVISED: AUG., 1982 FIRE PROTECTION AND VALVE PRODUCT DIVISION 80 Second Street. South Portland. Maine 04106 Telephone (207) 799-3341 / TWX 710-221-1668 Page 4041 DELETED 4042 TABLE OF CONTENTS PAGE 1.0 SCOPE .................................................................................................................................. 4044 2.0 INTRODUCTION................................................................................................................... 4044 3.0 FIGURES LIST...................................................................................................................... 4044 4.0 OPERATING INSTRUCTIONS ............................................................................................. 4045 5.0 MAINTENANCE .................................................................................................................... 4045 6.0 SPARE PARTS ..................................................................................................................... 4046 FIGURE I FIGURE II FIGURE III FIGURE IV REMOTE MANUAL TWIN AGENT TURRET ............................................ PARTS LIST .............................................................................................. REMOTE MANUAL TURRET, SUB ASSY................................................ PARTS LIST .............................................................................................. SHAPER - AFFF........................................................................................ PARTS LIST .............................................................................................. DRY CHEMICAL NOZZLE ........................................................................ PARTS LIST .............................................................................................. 4043 4047 4048 4049 4050 4054 4055 4056 4057 RIM 1433 1.0 SCOPE This manual defines the following for the Rockwood Remote Manual Twin Agent Turret P/N 510-1679. a) b) c) d) 2.0 Introduction Operating Instructions Maintenance Recommended Spare Parts INTRODUCTION Twin Agent Turrets are used throughout the fire protection industry on Class B and C fires for rapid extinguishment, knock down capabilities and securing the hazardous area. Typical uses for Twin Agent Turrets consist of: a) b) c) Municipal Airports Government - Military Installations Crash trucks and fast response vehicles The Rockwood Twin Agent Turret is a remote manual, panel mounted, foam/ dry powder turret nozzle; with 180° rotation (minimum), 80° elevation and 20° depression capabilities. Discharge ranges can be sized to meet hazard requirements with the following ranges. Foam/Water 100-400 GPM Dry Chemical 10-25 Lbs/Sec. All functions of the turret can be controlled from inside the cab including; a) Elevation c) Rotation b) Depression d) Foam/Water Pattern Rockwood's Dual Agent Turret is designed to discharge foam and dry chemical either separately or simultaneously. 3.0 FIGURES I. Remote Manual Twin Agent Turret, PN 510-1679 ...................................... Turret Top Assembly IA. Remote Manual Twin Agent Turret w/Foam Nozzle ................................... PN 510-1679-6 II Remote Manual Turret, Foam Solution Waterway ..................................... PN 10-09170-9, Turret Sub Assembly 4044 -1- PAGE 4047 4049 4051 3.0 4.0 FIGURES (Cont.) III. Shaper Assembly, PN 510-1591 ................................................................. Foam/Water Discharge Nozzle IV. Dry Chemical Nozzle, PN 510-0288............................................................ Dry Chemical Discharge Device PAGE 4054 4056 OPERATING INSTRUCTIONS After the turret has been properly mounted on the vehicle and the foam/water (2" 111/2 NPT) and dry powder (11/2" 111/2 NPT) inlets have been hooked up, tested and the handle latch (Item 50, Figure II, page 4051) has been properly aligned and mounted on the foam/water inlet, the turret may be operated as follows: Refer to Figures I, Page 4047 and II, Page 4051 Simultaneous or individual discharges may be accomplished by activating the corresponding control valve. Elevation and rotation are accomplished by raising, lowering and rotating the manual control arm (Item 44, Figure II, page 4051). The foam pattern may be varied from straight stream (push) to fully dispersed (pull) by adjusting the pattern control cable (Item 12, figure 1, page 4047). To prevent damage to the turret, it should always be locked in the travel position when it is not in use. accomplished by locking the manual control arm on to the handle latch. This is Refer to the maintenance section after discharging turret. 5.0 MAINTENANCE After each use of the turret with foam, the turret and supply lines should be thoroughly flushed with clear water to remove all foam residue. The discharge of large amounts of dry chemical may create hazards to personnel such as reduced visibility and temporary breathing difficulty. After each use of the turret with dry powder, the turret and supply lines should be thoroughly purged with gas to remove all dry powder residue. The turret is virtually maintenance free. Use touch-up paint, rust preventative and lubrication as required. 4045 RIM 1433 6.0 SPARE PARTS The following list is the suggested spare parts for P/N 510-1679; Remote Manual Twin Agent Turret. PART NUMBER DESCRIPTION 10-06917 4793-80 510-0353-4 4748-341 10-02975 780-01228 780-01326 780-01224 10-07732 780-01237 780-01234 10-07122 185-03140 10-02864-1 334-10001 780-11014 10-06051 Clamp Clamp Hose Assembly Quad. Ring Gasket "0" Ring "0" Ring "0" Ring Head Seal "0" Ring "0" Ring Wearing Ring Retaining Ring Auto Drain Valve Tube Connector U Packing Nyliner 4046 -3- QUANTITY 1 1 1 1 1 1 1 1 2 2 2 2 4 1 1 2 2 1 of 2 Figure I. 4047 Rockwood Systems Corporation 80 Second Street South Portland, Maine 04106 RIM-1433 TITLE ITEM 1 2 3 4 5 6 7 8 9 10 11 12 13 14 15 16 17 18 19 20 21 22 23 24 25 DATE REMOTE MANUAL TWIN AGENT TURRET PART NO. 510-1679 QTY PART NO. PART NAME 1 10-09170-9,-10 REMOTE MANUAL TURRET 1 510-1591 SHAPER ASSY 1 510-0288 NOZZLE DRY CHEMICAL 1 510-0353-4 HOSE ASSY, DRY POWDER 1 110-0716 SPRING BRACKET 1 110-0587 C’BALANCE SPRING 1 10-08469 ANCHOR BRACKET 2 152-04004 CAPSCREW 2 167-1200+ LOCKWASHER 1 4354-1 EYEBOLT 1 161-04012 HEX, NUT, ESNA 1 4593-3 CABLE PUSH PULL 2 510-1748-1 SHAPER SPACER ASSY 2 4793-80 CLAMP WORM DRIVE 2 10-06917 CLAMP 1 6108-17 HYDRAULIC SWIVEL 2 4816-3 FLANGE, SCREWED 2 4465-3 RING GASKET 1 4467-12 ELBOW, 90° 4 152-08030 HEX BOLT 4 161-08001 HEX NUT 1 10-08466 NAMEPLATE 4 152-05026 CAPSCREW, HEX HEAD 4 167-12010 LOCKWASHER 1 161-04005 HEX, NUT JAM REV PREPARED BY APPROVED BY 4048 PAGE 2 OF 2 FIG. 1 FIGURE 1A 1of 2 4049 Rockwood Systems Corporation 80 Second Street South Portland, Maine 04106 TITLE ITEM 1 2 3 4 5 6 7 8 9 10 11 22 23 24 25 29 32A 32B 41 42 43 44 45 46 47 48 49 50 51 DATE RIM 1433 REMOTE MANUAL TWIN AGENT TURRET PART NO. 510-1679-6 TURRET W/FOAM NOZZLE FIG. 1A QTY PART NO. PART NAME 1 l 1 1 2 2 1 1 1 4 4 1 1 1 4 1 3.33 FT. 1 1 1 1 1 510-0353-4 110-0716 110-0587 10-08469 152-04004 167-12009 4354-1 161-04012 10-08466 152-05026 167-12010 161-04013 510-0288-2 10-04421 154-02003 510-2148-1 245-10102 110-0332-8 6192-6 4593-7 4523-12 6454-1 HOSE ASSY, DRY POWDER SPRING BRACKET C’BALANCE SPRING ANCHOR BRACKET CAPSCREW VLOCKWASHER EYEBOLT HEX NUT NAMEPLATE CAPSCREW IOCKWASHER HEX NUT, JAM DRY CHEMICAL NOZZLE GENERAL NAMEPLATE SELF TAP SCREW AFFF NOZZLE PIPE CABLE BRACKET ADAPTER PUSH PULL CABLE W/VERNIER CONTROL COUPLING ADAPTER 1 2 1 510-2186-1 252-60002 10-09170-11 ACTUATOR ROD CON OR SCREW REMOIE MANUAL TURRET PREPARED BY APPROVED BY REV. 4050 PAGE 2 OF 2 FIGURE II. 1 of 2 4051 Rockwood Systems Corporation 80 Second Street South Portland, Maine 04106 RIM-1433 REMOTE MANUAL TURRET FIG. II TITLE ITEM 1 2 3 4 5 6 7 8 9 10OA 10 11 12 13 14 15 16 17A 17 18 19 20A 20 21 22 23 24 25 26 27 28 29 30 31 DATE PART NO. QTY 1 1 2 2 1 1 1 4 8 2 1 6 6 1 1 2 1 1 6 2 1 1 P 8 1. 2 2 2 2 1 2 REV. 10-09170-9 PART NO. 10-04526 PART NAME YOKE (BODY): BRONZE 10-02969 10-02580 185-39330 4748-341 10-04556 10-09106-2 11-02973 167-11013 161-10008 10-02975 165-40004 161-10009 780-01228 10-04531 10-07119 780-01326 10-04536 151-08008 161-10012 780-01224 10-04532 152-04009 167-12009 110-0129-2 10-07732 780-01237 780-01234 10-07122 10-07222 BODY RET.RING ASSY BEARING: STEEL RETAINING RING QUARD RING BASE ASSY MOUNTING PLATE SPACER COLLAR LOCKWASHER HEX NUT GASKET WASHER HEX NUT "O" RING DRIVE SHAFT BUSHING BODY BEARING "0" RING DRIVE SHAFT BEARING MACHINE SCREW HEX NUT "O" RING DRIVE SHAFT CAPSCREW LOCKWASHER HEAD HEAD SEAL "O" RING "O" RING WEARING RING BODY SHAFT 161-10012 PREPARED BY HEX NUT ESNA APPROVED BY PAGE 2 of 3 4052 Rockwood Systems Corporation 80 Second Street South Portland, Maine 04106 RIM-1433 TITLE ITEM 32 33 34 35 36 37 38 39 40 41 42 43 44 45 46 47 48 49 50 51 52 53 54 55 56 57 58 59 60 65 66 67 DATE 9/2/82 REMOTE MANUAL TURRET PART NO. 10-09170-9 QTY PART NO. 2 10-06051 2 780-11014 1 10-07776 1 10-04529 1 10-04546 4 185-03140 1 10-04544 1 10-04543 2 167-12013 2 161-08014 1 10-04545 1 10-04555-2 1 10-04542 2 10-05105 2 10-05182 1 152-05041 1 161-05005 1 10-07406 1 10-04547 1 510-0370-2 2 152-05018 2 167-12010 1 1 334-10001 1 4 A/R A/R 1 REV. A 10-04421 154-02003 4438 4474 510-1875-1 PREPARED BY FIG II PART NAME NYLINER U PACKING CLEVIS PLATE ELEV. ROD CLEVIS ELEV. ROD CLEVIS PIN RETAINING RING ELEVATION ROD ELEVATION ROD CONN. LOCKWASHER HEX NUT CONNECTOR PIN CLEVIS HANGER MANUAL HANDLE BUSHING,ELEV. LINK CLEVIS WASHER CAPSCREW HEX NUT ELEV. ROD BOOT HANDLE LATCH AUTO. DRAIN VALVE CAPSCREW LOCKWASHER PAPER TAG TUBE CONNECTOR NAMEPLATE SELF TAP SCREW DRY FILM LUBRICANT WATER REPELLANT GREASE MANUAL HANDLE ASSY APPROVED BY PAGE 3 of 3 4053 No. Fig, III RIM-1433 ENGINEERING DATA SHEET ROCKWOOD FIRE PROTECTION SYSTEMS JET - X * WaterFOG * FogFOAM * FOAM SHAPER - AFFF PART No. 510-1591 FIGURE III. DRAWN: GPL 4054 Rockwood Systems Corporation 80 Second Street South Portland, Maine 04106 RIM- 1433 TITLE ITEM 1 2 3 4 5 6 7 8 9 10 11 12 13 14 15 16 17 18 19 20 21 22 23 24 25 DATE MONITOR SHAPER ASSY - AFFF PART NO. 510-1591 QTY PART NO. PART NAME 1 510-1633-1 SHAPER SUB-ASSY - ALUMINUM 1 10-08507 DEFLECTOR ACTIVE - ALUMINUM 1 10-08508 DEFLECTOR SLAVE - ALUMINUM 4 274-10001 SPIROL PIN - ST. STEEL 1 6040-1 SPRING - ST. STEEL FIG. III 1 1 1 1 1 251-10052 161-03004 10-05836 152-04035 161-04010 MACHINE SCREW, ROUND HEAD - STEEL HEX NUT - STEEL ROD END, FEMALE CAPSCREW, HEX HEAD - STEEL HEX NUT, PALNUT - STEEL 1 110-0332-2 CABLE BRACKET - ALUMINUM 1 110-3576-2 BREECH - ALUMINUM 8 8 8 1 152-05005 165-20001 267-16008 510-1663 CAPSCREW, SOC. HEAD - STEEL WASHER, PLAIN - STEEL LOCIKWASHER - ST. STEEL DISPERSION ORIFICE 1 1 161-04005 10-07364 HEX NUT JAM - STEEL NAMEPLATE REV. PREPARED BY APPROVED BY PAGE 2 of 2 4055 No. Fig, IV RIM-1433 ENGINEERING DATA SHEET ROCKWOOD FIRE PROTECTION SYSTEMS JET - X * WaterFOG * FogFOAM * FOAM DRY CHEMICAL NOZZLE PART NO. 510-0288 FIGURE IV. 4056 Rockwood Systems Corporation 80 Second Street South Portland, Maine 04106 REPLACEMENT PARTS LIST FOR FIG. NO. IV TITLE ITEM 1 2 3 4 DATE 6/16/81 QTY 1 1 4 1 REV. PART NO. 110-0546 110-0545 151-10002 10-04790 PREPARED BY RIM- 1433 PART NAME NOZZLE BODY SHAPER NOZZLE MACHINE SCREW ¼" LG. GASKET APPROVED BY PAGE 2 of 2 4057 4058 4059 4060 4061 4062 F2265D 12/82 SECTION I. DYAMOTE LIMITED WARRANTY 1.0 LIMITED WARRANTY 1.1 DYNAMOTE CORPORATION (Manufacturer) warrants, to the original user, that each DYNAMOTE Product is free from defects in materials and factor workmanship if, and only if, the following requirements are complied with: A. The produce is installed and checked out properly, according to all guidelines, instructions, and checkout procedures set forth in the product Installation/Operation/Service Manual, and B. The installer records all checkout data required and completes, signs, and returns the warranty initiation card to the DYNAMOTE office within ten (10) days after installation. 1.2 Manufacturer’s obligation under this warranty is limited to correcting without charge any part or parts of such products which shall be returned to its factory or one of its authorized service facilities, transportation charges prepaid, within one (1) year from first installation or within eighteen (18) months from date of manufacture, whichever comes first, provided examination discloses to Manufacturer’s satisfaction that such parts ere originally defective. Correction of such defects by repair to, or supplying of replacements for defective parts, shall constitute fulfillment of all obligations to original user. 1.3 This warranty shall not apply to any of Manufacturer’s products which must be replaced because of normal wear, which have been subject to misuse, negligence, or accident, or which shall have been repaired or altered outside of Manufacturer’s factory, unless authorized by Manufacturer. 1.4 MANUFACTURER SHALL NOT BE LIABLE FOR ANY CLAIMS, LOSS, DAMAGE, OR EXPENSE WHATSOEVER RESULTING DIRECTLY OR INDIRECTLY FROM THE USE OF ITS PRODUCT OR FORM ANY OTHER CAUSE. SOME STATES DO NOT ALLOW THE EXCLUSION OR LIMITATION OF INCIDENTAL OR CONSEQUENTIAL DAMAGES, SO THESE LIMITATIONS MAY NOT APPLY TO YOU. 1.5 ANY AND ALL OTHER WARRANTIES, EXPRESS OR IMPLIED, ARISING BY LAW, COURSE OF DEALING, COURSE OF PERFORMANCE, USAGE OF TRADE OR OTHERWISE, INCLUDING BUT NOT LIMITED TO, IMPLIED WARRANTIES OF MERCHANTABILITY AND FITNESS FOR A PARTICULAR PURPOSE, ARE LIMITED IN DURATION TO A PERIOD OF ONE (1) YEAR AFTER FIRST INSTALLATION OR EIGHTEEN (18) MONTHS FROM DATE OF MANUFACTURE, WHICHEVER COMES FIRST. SOME STATES DO NOT ALLOW LIMITATIONS ON HOW LONG AN IMPLIED WARRANTY LASTS, SO THE ABOVE LIMITATIONS MAY NOT APPLY TO YOU. NO PERSON, AGENT, OR DEALER IS AUTHORIZED TO GIVE ANY WARRANTIES ON BEHALF OF MANUFACTURER OR TO ASSUME FOR MANUFACTURER ANY OTHER LIABILITY IN CONNECTION WITH ANY OF ITS PRODUCTS UNLESS MADE IN WRITING AND SIGNED BY AN OFFICER OF MANUFACTURER. SPECIAL NOTICE TO PURCHASER REGARDING WARRANTY PROCEDURE It is absolutely necessary that the requirements of Paragraph 1.1 above be complied with for warranty to be in effect. MAKE SURE THE INSTALLER HAS COMPLETED AND SIGNED YOUR PORTION OF THE WARRANTY INITIATION CARD, CERTIFYING THAT THOSE REQUIREMENTS HAVE BEEN COMPLIED WITH. If any trouble occurs with this product during installation or before the warranty has expired, follow these instruction: With model number and serial number available for reference, as well as all available installation test readings, dial the DYNAMOTE toll-free WATS line, 1-800-426-2838, and advise the receptionist that the call is regarding WARRANTY SERVICE ASSISTANCE. c Copyright 1982, -DYNAMOTE CORPORATION DYNAMOTE CORPORATION - 1200 W. Nickerson, Seattle, WA. 98119 - 206-282-1000 4063 F2100C 11/82 Sec. 2.0 SECTION II. GENERAL INFORMATION DYNAMIC INVERTERS 2.0 INTRODUCTION AND PRINCIPLE OF OPERATION: 2.0.1 Your new DYNAMOTE Series A Inverter is designed to provide 120 volt, 60 Hz AC power from the DC (rectified AC) output of a standard 12 volt electrical system (12 volt alternator in a vehicle or boat). The inverter is compact, lightweight, and operates silently. It can be placed in any convenient location in the vehicle or boat. Inverters, when installed in a 12 volt electrical system according to these instructions, can safely operate all electric tools, lights, appliances, electronic and heavy motor loads up to their rated capacity. Models are available to provide continuous 120 volt power up to 60 amps. 2.0.2 The relationship of a Dynamic Inverter to the vehicle electrical system is illustrated by the two diagram below: Figure 2.0.2A Inverter OFT Figure 2.0.2B Inverter ON (Nominal alternator output voltage, Inverter ON, Series A - 60 volts) As shown in Figure 2.0.2A, when the inverter is OFF, the alternator and battery function as in normal 12 volt operation. The only differences are 1) that Dynamote Regulator C33 controls the output of the alternator, and 2) that alternator output travels through the Dynamote harness on its way to the battery. As shown in Figure 2.0.2B, when the inverter is ON, the system operates as follows: a. b. c. All output of the alternator is switched away from the battery and into the inverter; The alternator field is regulated by Dynamote Voltage Regulator CB1 inside the inverter.(See Note 1 below.) The Dynamote regulator controls alternator output at 45 volts (A40) or 60 volts (A30/60) rather than the standard 14.2 volts; d. The high voltage output enters the inverter transformer, the inverter produces 120 volt, 60 Hz power, and at the same time charges the vehicle battery and services the vehicle DC system at 14.2 volts. (See Note 2 below.) NOTES: 1. When the inverter is energized, the Dynamic Voltage Regulator CB1 senses voltage at the secondary output of the inverter and regulates the alternator field with battery power to maintain 14.2 volts DC (rectified AC) at the BLACK wire of the inverter harness, which charges the battery. 2. The inverter transformer is wound so that at an average AC output of 120 volts, the vehicle battery is charged at 14.2 DYNAMOTE CORPORATION - 1200 W. Nickerson, Seattle, WA 98119 - 206-282-1000 4065 Sec. 2.0 2.0 INTRODUCTION AND PRINCIPLE OF OPERATION (continued) 11/82 volts DC. Both AC and DC voltages are regulated simultaneously by the Dynamote Voltage Regulator. If AC output voltage below or above 120 volts, battery charging voltage will be reduced or increased proportionately. For determining proper voltage settings after the inverter is installed, see Section 3.8, "Checkout Inverter Operation.” 2.1 SPECIFICATIONS 1. DC (rectified AC) Input: 60 volts (A30 ). 2. Input Source: 12 volt alternator. 3. Input Electrical System: From 12 volt negative ground alternator systems only. 4. Input Voltage Regulation: Solid-state voltage regulator inside inverter. 5. Output: Simultaneous output of: a. 120 volt AC ± 5%, 60 Hz ± .1 and b. 14.2 volt DC for vehicle system battery charging 6. Output Voltage Regulation: Solid-state voltage regulator inside inverter. 7. Output Frequency Regulation: Solid-state, crystal controlled oscillator inside inverter. 8. Output wave Form: Modified square x with no limitations on operation of electronic or electromechanical loads. Filters are available for wave form modification to sine wave, if required. 9. Ambient Air Requirements: Full load capability at 120°F. ambient if properly vented. Output may be derated above 120 F. 10. Cooling Air Requirements: Exhaust air must be vented away from the ambient. Intake air must be true ambient, and must be the amounts shown in Figure 2.1.1A below for each model. 11. Miscellaneous: See following page. 2.1.1 INVERTER SPECIFICATIONS Model Number A30-70B Watts, 120VAC Output 3600 Figure 2.1.1A Amps, 120VAC Output 30 Surge Cap. AC Amps 60 Max. DC Char- Dimensions ging H x W x D 70 9 ¾"x14 ¼x15" Shipping Wt. Lbs. 70. Required Intake Cooling Air, CFM 120 Inverter Specifications 2.2 PRODUCT CONFIGURATION 2.2.1 Chassis - Dynamic Inverters are housed in a durable aluminum chassis, with four shock absorbing rubber feet. Cooling air is drawn in through louvers in each side wall and exhausted out through the back panel. Tie down brackets are provided with t hardware kit; they attach to the four heavy bolts at the bottom of the front and rear panels of the chassis. 4066 2.2.2 Instrument Panel - Momentary START and STOP buttons, AC voltage indicator, and remote control receptacle are provided. Two 15 amp convenience receptacles are provided on the front panel. Each receptacle is separately fused. A control circuit fuse, commutation (input) fuses, and an "on-off" indicator light are also located on the front panel. 2.2.4 Hookup Harness - Once properly installed to the vehicle electrical system, harness MUST be checked and the results MUST be recorded on warranty initiation card. The 4-2600 Dynamic Installation Test Module plugs into the test receptacle on the front of the inverter and provides the readings necessary to checkout the installation and to record the information on the warranty card. 2.2.5 Chassis Configuration - Shown on figure 2.2.5B. Figure 2.2.5B A30 and MPA30 dimensions are: H - 9 3/4"; W - 14h; D - 15" 2.2.6 Mounting Configuration - Diagram 2.2.6A shows the mounting dimensions for the A30 Series. Figure 2.2.6A 4067 2.2.7 Miscellaneous - Installation hardware, spare fuses, warranty statement and registration card, and instruction manual accompanies each new inverter. The manual should be kept with the inverter at all times. SECTION III. INSTALLATION INSTRUCTIONS DYNAMOTE SERIES "A" DYNAMIC INVERTERS FOR INSTALLATION ON VEHICLES AND BOATS WITH 12 VOLT NEGATIVE GROUND ELECTRICAL SYSTEMS ONLY. 3.0 READ THE INSTRUCTIONS FIRST. The Dynamote Dynamic Series "A" AC Power Inverter is a precision engineered and manufactured instrument capable of providing reliable AC electric power for thousands of hours. However, in order for the inverter to perform its job reliably, it is very important that each component of the system be installed carefully, and that each step be performed correctly. Therefore, before proceeding with the installation, it is suggested that you take a few minutes to familiarize yourself with the components of the system and how they are to operate when properly installed. 3.0.1 IMPORTANT NOTE: There are seven distinct steps which must be followed in sequence to assure proper installation and operation of the entire system. These steps are summarized below, and described in detail beginning on the next page. (1) (2) (3) (4) (5) (6) (7) 3.0.2 Route harness to alternator. Install automatic throttle, if used. Attach harness to alternator. Checkout alternator connections. Checkout inverter. Wire AC output. Complete, sign, and mail warranty registration card. RECOMMENDED TOOLS AND EQUIPMENT FOR INVERTER INSTALLATION. (1) (2) (3) (4) (5) (6) (7) (8) Socket wrench set (*" or 3/8" drive) with ½", 3/8", 7/16", ½", and ¾" socket, ratchet; and 6" extension. 7" mechanic's screwdriver. ½" and 7/16" open end wrenches. V 0 M (volt-ohm-milliamp meter), #4 Fluke 8020A, Simpson 463, or equivalent; Dynamote 4-2600. Wire crimpers and lineman's pliers. Wire stripper. Electrical tape and electrical putty. Dynamote 4-2600, Installation Tester. Figure 3.0.3A on the following pate lists all the hardware items included with the various "A" Series inverters. Check and identify the various items as you unpack the shipping carton. 4068 Figure 3.0.3A HARDWARE KIT Part No. Qty. Description Included With: A30 2283-00014 1 Harness - Input - Power x 4283-00010 1 1 x 4200-06400 2 Harness - Control Field Grounding #16 White Wire (1’) Fuses, ABU 40 x x 4200-02150 3 Fuses, AGC 15 x 4282-00006 2 Holders, Spare Fuse x 3056-11451 4 Brackets, Tie Down x 4442-60920 2 Lugs, RB-257 x 4442-15200 2 Lugs, B-71 x 4442-14200 4 Lugs, B-87 x 4323-00417 1 Rubber Cap x 4722-37008 1 i-20 x 3/8" Bolt x 4520-27000 1 i-20 Kept Nut x 4722-40008 4 #14 x 1" Screws x 4442-16600 3 Lugs F-72 x 4-7211 1 Relay, High Amp. Bypass 4760-14000 5 Ty Raps Figure 3.0.3A 3.0.4 Optional x HARDWARE KIT CONTENTS Start your installation with the first step and follow each step through in sequence to successful final testing. As it is completed, check off each step in the space provided adjacent to the step number of the test/warranty registration card. DO NOT PROCEED TO ANOTHER STEP UNTIL ALL PREVIOUS STEPS HAVE BEEN SUCCESSFULLY COMPLETED. 3.2.0 ROUTE HARNESS TO ALTERNATOR BURNING OR CHAFING THROUGH HARNESS INSULATION WILL DAMAGE THE INVERTER AND THE VEHICLE ELECTRICAL SYSTEMS. YOU SHOULD BE AWARE THAT THIS IS A COMMON INSTALLATION PROBLEM. 4069 3.2.0 ROUTE HARNESS TO ALTERNATOR - Continued Route the wiring harness to the alternator, using existing holes where possible. Use tie wraps and tape liberally to secure the harness wires so they cannot come in contact with the hot engine exhaust or other heat producing components. Grommets should be used to protect the wiring harness where it comes in contact with hard or sharp edges. NOTE: Do not attach any wires to the inverter at this time. 3.3.2 The alternator must be installed correctly on the engine, according to the following general guidelines: (1) Alternator Pulley Alignment: The requirements of the alternator mechanical installation are several: (1) solid, vibration-free attachment of the mounting bracket to the engine, and of the alternator to the mounting bracket; (2) correct belt alignment; and (3) protection from road spray or marine water spray, and from engine exhaust heat. Hardened steel flat washers should be substituted for spring lock washers on bracket and alternator as mounting hardware. Flat washers tend to provide and retain greater surface tension. Correct belt alignment is essential for maximum alternator and belt service life. The center line of all pulleys related to the alternator drive must be within 1/32" of true center; See Figure 3.3.2A. Dual belts are recommended for heavy duty alternators. Best results are obtained if the belts wrap the alternator pully 1000 or more. Lesser wrap induces belt slippage, belt and alternator bearing wear; See Figure 3.3.2B. Figure 3.3.2A Figure 3.3.2B 4070 3.4.0 INSTALL AUTOMATIC THROTTLE An automatic throttle provides automatic increase in engine speed to a present RPM when the inverter is energized. It is designed for stationary use only, and should not be used while underway. IT MUST ALWAYS BE WIRED THROUGH THE NEUTRAL SAFETY SWITCH OF THE VEHICLE TRANSMISSION. If the automatic throttle is used, refer now to automatic throttle instruction manual. NOTE: Brown wire from Dynamic Inverter Harness is to be attached to black wire from Autothrottle Harness. 3.5.0 ATTACH HARNESS TO ALTERNATOR Installation of all Dynamic Inverters is exactly the same, electrically. (a) The harness for the larger capacity inverters includes three BLACK AWG #4 wires. Two of these are marked at the ends with RED and GREEN tape. If these wires are shortened, be sure to color-code the ends properly. (b) Instructions for the installation of the inverter harness begin with Section 3.5.1. 3.5.1 BASIC INSTALLATION STEPS 1. Switch battery disconnect located on console inside cab to "OFF". 2. Disconnect all wiring from the positive output (B+) terminal of the alternator. Figure 3.5.1A 4071 3.5.1 BASIC INSTALLATION STEPS - Continued 3. High Amperage Bypass Installation (a) Securely mount relay K3 as close to the alternator as is practical with large (5/16") studs down. (Mounting of this relay with the studs up or horizontal would result in improper operation of the relay.) Use the large # ¼ x3/4 self-tap screws in the hardware kit for this purpose. (b) Connect the wires removed from the alternator positive output terminal in step 2, above, along with the BLACK wire from the Dynamote harness to one of the large (5/16") studs of Relay K3. This connection provides charging current to the vehicle battery system. (c) Connect a length of #4 AWG wire from the other large (5/16") stud to the positive output terminal of the alternator. (d) Connect a #16 or #18 AWG wire from the chassis of Relay K3 to ground. (e) Connect the BROWN wire from the Dynamote harness to the small #10 stud of Relay K3. 4. Connect the RED wire from the Dynamote harness to the positive output (B+) terminal of the alternator. The ONLY other wire that can be attached to this terminal is the #4 AWG wire to the K3 Relay if that is installed. 5. Connect the GREEN wire from the Dynamote harness to the negative ground (B-) terminal of the alternator. Leave any previously attached wires connected to this ground terminal. NOTE: The B- terminal of the alternator and the negative (-) battery terminal must be securely grounded to the engine block. 6. Crimp the appropriate terminal in the hardware kit to the BLUE #16 Dynamote harness wire and attach to the Field (+) Terminal of the alternator. There should be no wire attached to the FIELD (+) terminal except the BLUE harness wire. 7. Check to see that the negative (-) Field Terminal on the alternator has been grounded to the negative (B-) terminal of the alternator. If not, use a piece of #16 AWG wire and the ring terminals provided in the hardware kit accomplish this. 8. Attach the ORANGE wire from the Dynamote harness to the #10 stud on the reverse polarity block which is connected to the ACC terminal on the ignition switch. Use ring terminals provided in the hardware kit. 9. Switch battery disconnect located on console inside cab to "BOTH". 4072 F8124 12/81 Figure 3.5.4C DIAGRAMS OF LEECE NEVILLE 4000AA SERIES ALTERNATORS 4073 3.6 CHECKOUT OF HARNESS INSTALLATION AND ALTERNATOR OUTPUT. THE RESULTS OF THIS CHECKOUT PROCEDURE MUST BE RECORDED ON THE WARRANTY INITIATION CARD AND RETURNED TO THE DYNAMOTE OFFICE. FAILURE TO DO SO WILL PREVENT THE INVERTER WARRANTY FROM BECOMING EFFECTIVE. There are two ways to perform the Harness and Alternator Checkout Procedure: (1) Using the 4-2600 Dynamic Inverter Test Module. See Section 3.6.1. (2) Using a standard V 0 M (Volt Ohm Meter) with scales of 15VDC, 50VDC, and 100 VDC. (Fluke 8020A or Simpson 463 or equivalent.) See Section 3.6.2. 3.6.1 CHECKOUT OF HARNESS INSTALLATION WITH DYNAMOTE 4-2600, DYNAMIC INVERTER TEST MODULE. If the Dynamote 4-2600 Dynamic Inverter Test Module is available, perform the following steps for checkout of harness installation. If the 4-2600 is not available, see Section 3.6.2. 1. Follow the instructions in Section 3 to install the inverter harness. 2. Put the test module sequence switch in the OFF position before connecting the module to the Dynamic Inverter. The vehicle ignition should also be in the OFF position. 3. Plug the six-pin test module into the Test Module Receptacle on the inverter front panel. NOTE 1: DO NOT plug the test module into the control head receptacle on the inverter. DO NOT plug the inverter Remote Control head plug into the Test Module Receptacle. NOTE 2: If the BLACK (B+) lead is connected to a battery selector switch, the switch should be in the ON (that is, the B1, B2, or BOTH) position. 4. Follow the steps on the chart on the following pages, Figure 3.6.1A. 4074 Figure 3.6.1A INSTALLATION AND INVERTER CHECKOUT USING 4-2600 DYNAMIC INVERTER TEST MODULE) Switch Position Terminal or Wire Being Read Inverter Start Button Depressed Vehicle Ignition ON Proper Meter Reading Remarks 1 (Red) A+ No No 11-13 VDC 2 Ignition No No 0 VDC Yes No No Yes No No 11-13 VDC 1l-13VDC 0 VDC 10-12 VDC C0-12 VDC If voltage reading is outside proper limits, recheck installation of inverter harness, RED and BLACK wires. Also check at K1 relay, Section 4.3.3 and K3 relay, Sec. 4.3.5. If meter reads battery voltage, then the ORANGE wire is connected to a post which has battery voltage with the ignition ON or OFF. This will allow the battery to drain through the voltage regulator. If the reading with the Auxiliary Start Button depressed is 0, then the harness leads to the K3 relay should be switched. (Orange) 3 B+ (Black) 4 A+ (Red) F Out (Blue) Ignition (Orange) If meter reads any voltage, check out K3 relay, Section 4.3.5. 5 Yes No If voltage reading is outside proper limits; follow-Voltage Regulator Checkout Procedure, Section 4.3.7. 6 No Yes Of meter reading is outside proper limits;, recheck wiring of ORANGE wire to be sure it is wired to a source of battery voltage with the ignition ON. For Switch Positions 7 - 10, start the engine and run at approximately 1500-1800 RPM. Also turn ON vehicle headlights to put some load on the vehicle charging system. 7 B+ No Yes 14.0If meter reading is outside proper limits, (Black) 14.2 follow procedure to check out and adjust VDC Voltage Regulator CB3, Section 4.3.12. 8 A+ No Yes 14.0If meter reading is outside proper limits, (Red) 14.2 repeat test on Position 7. VDC 4075 F8120B 3/83 3.6.1A INSTALLATION AND INVERTER CHECKOUT USING 4-2600 DYNAMIC INVERTER TEST MODULE (continued) Switch Position Terminal or Wire Being Read Inverter Start Button Depressed Vehicle Ignition ON Proper Meter Reading Remarks 9 B+ (Black) Yes Yes 14.014.2 VDC 10 A+ (Red) Yes Yes If meter reading is outside proper limits, per form alternator check given for Switch Pos. 11(below), reading IMPORTANT NOTE: first.. Follow checkout procedure and adjust inverter Voltage Regulator CBI. NOTE: Be sure engine is running at or above the speed at which the voltage reading is at its maximum. This could be higher or lower than 1500 RPM, but will be the point at which increasing the RPM will no longer increase the voltage reading. This reading shows alternator output with inverter ON, divided by 5 that is, the actual voltage is 5 times the reading. If alternator voltage fails to come up to this level, perform alternator check in the next step. 11 A+ (Red) No Yes 11-12 VDC (A30, A60) 8-9 VDC (A40) IMPORTANT NOTE: The test at Switch Position 11 is to check for a faulty alternator. Before moving the switch to Position 11, return the engine to an idle, turn the inverter OFF, and remove the commutation fuses on the inverter front panel. When the switch is in Position 11, the voltage regulator is taken out of the circuit and battery voltage is applied directly to the field of the alternator. This causes the voltage output of the alternator to increase directly with engine RPM. Rotate switch to Position 11, and slowly increase engine RPM until the voltmeter reads 2OVDC. At this point the actual alternator voltage is 1OOVDC (5 times the meter reading). If the alternator will not come up to this voltage, then either the alternator or the installation is faulty. The alternator should be removed and sent to an alternator repair shop. Increase to 20 VDC Read IMPORTANT NOTE above. DO NOT MOVE SWITCH TO OR FROM POSITION 11 WHEN ENGINE IS ABOVE IDLE. Figure 3.6.1A INSTALLATION AND INVERTER CHECKOUT USING 4-2600 DYNAMIC INVERTER TEST MODULE 4077 3.6.1 CHECKOUT OF HARNESS INSTALLATION WITH DYNAMOTE 4-2600, DYNAMIC INVERTER TEST MODULE (continued) — 5. If procedures on Switch Position 1 - 10 check out, you may replace the covers on the inverter. Your electrical system is ready for operation. Any problems found during this test procedure can be discussed with the DYNAMOTE Service Department by calling our toll-free number, 1-800-426-2838. 3.6.2 CHECKOUT OF HARNESS INSTALLATION AND ALTERNATOR OPERATION WITHOUT 4-2600 DYNAMIC INVERTER TEST MODULE NOTE: FOR THIS TEST, DO NOT PUSH OR RELEASE START SWITCH WHEN ENGINE IS RUNNING ABOVE IDLE. Perform the checkout with a V O M capable of reading 15VDC, 50VDC, and 100VDC (Simpson 463, Fluke 802A or equivalent). Access to the terminal posts can be obtained either through the use of a Dynamic Test Strip plugged into the Test Receptacle on the inverter front panel, or by removing the inverter panels carefully and exposing the terminals inside the back of the inverter. TO CHECKOUT THE HARNESS, FOLLOW THIS PROCEDURE: (Colors refer to wires attached to the indicated terminal posts.) — 1.Disconnect the RED wire of throttle control module from the #10 stud of relay K3. — 2.Remove warranty initiation card from Section 1 of the Instruction Manual. Record in pencil the readings from all the following steps. — 3.Turn ignition OFF. Connect harness to inverter at this time. — 4.Connect battery negative ground cable. — 5.A. With ignition OFF and Dynamote Start Button ON, readings should be as follows: Ground (GREEN) post to Battery + (BLACK) post Ground (GREEN) post to Alternator B+ (RED) post Ground (GREEN) post to F Out (BLUE) post Ground (GREEN) post to Ignition (ORANGE) post Ground (GREEN) post to Accessory (BROWN) post B. = 12-12.8V = 0V = 12-12.8V = 0V = 12-12.8V With ignition ON, engine OFF, and inverter Start Button NOT depressed, readings should be as follows: Ground (GREEN) post to F Out (BLUE) post Ground (GREEN) post to Ignition (ORANGE) post = 10-12.8V = 10-12.8V c Copyright 1981, DYNAMOTE CORP. 4078 F2111E 3.6.2 11/82 HARNESS & ALTERNATOR CHECKOUT WITHOUT 4-2600 (continued) Trouble Shooting Steps for Step 5. 1) If GREEN to BLACK is less than 12 volts DC, there could be a faulty ground condition (GREEN wire or battery ground strap). If properly grounded, the battery may be dead or defective. Return battery to a charged state before continuing. If battery is acceptable, the BLACK wire could have faulty connections. 2) If GREEN to RED is greater than zero without K3 Relay, the alternator is still connected directly to the battery. Check to be sure the Dynamote RED harness wire is the only one attached to the output terminal of the alternator. 3) If GREEN to RED is greater than zero with K3 Relay, the K3 Relay is incorrectly installed or not energizing. Refer to Section 3.5.1, Step 3. 4) If GREEN to ORANGE is larger than zero, ORANGE wire is incorrectly connected to the ignition switch. — 6. Start engine and increase engine speed to about 1000 RPM (equivalent to engine speed at about 20 MPH. Voltages should read as follows: Ground (GREEN) post to Battery + (BLACK) post Ground (GREEN-) post to Alternator B+ (RED) postGround (GREEN) post to F Out (BLUE) post - variable up to 14.2V Ground (GREEN) post to Ignition (ORANGE) post Ground (GREEN) post to Accessory (BROWN) post = 13.5-14.2V =13.5-14.2V = 12.0-14.2V = 0V Trouble Shooting Tips for Step 6. 1) If BLACK and RED are greater than 14.2VDC or less than 13.5VDC, adjust the vehicle voltage regulator CB3. If adjusting the CB3 doe* not correct the DC voltage at BLACK, proceed to the applicable step following: a) If BLACK and RED are less than 13.5VDC and BLUE is greater than 13.5VDC, check if BLACK voltage varies with the engine speed. If it does, either the pulley ratio is too low or the alternator is overloaded. Verify that BLUE is the only wire on the alternator positive FIELD terminal, and that the alternator negative FIELD terminal is grounded. If all wiring conditions are correct, then the alternator is faulty or the belts are slipping. b) If BLACK and RED are greater than 14.2VDC and BLUE is greater than 12VDC, verify that BLUE is the only wire connected to FIELD positive terminal. c) If BLACK and RED are less than 13.5VDC and BLUE is less than 100VDC, CB3 is defective and should be replaced. DYNAMOTE CORPORATION, 1200 W. Nickerson, Seattle, WA. 98119 - 206-282-1000 4079 3.6.2 HARNESS & ALTERNATOR CHECKOUT WITHOUT 4-2600 Continued) — 7.With engine still running at about 1000 RPM, remove commutation fuses on inverter, and push Dynamote Start Button. Voltage readings should be as follows: Ground (GREEN) post to Battery + (BLACK) post Ground (GREEN) post to Alternator B+ (RED) post Ground (GREEN) post to F Out (BLUE) post Ground (GREEN) post to Ignition (ORANGE) post Ground (GREEN) post to Accessory (BROWN) post = 12-12.8VDC = 15.0VDC or greater = 12-12.8VDC = 12-12.8VDC =12-12.8VDC Trouble Shooting Tips for Step 7. 1) If BLACK post voltage is above 12.8VDC, harness is wired improperly or K3 Relay is not functioning properly. Correct this defect before proceeding. This step assures proper disconnect of alternator output from vehicle battery when inverter is energized. 2) If RED post voltage reads below 15.0VDC, harness wiring is incorrect or alternator may be defective. Correct wiring defect, if any, at this time. Alternator defect, if any, will be determined in Step 8 below. — 8.DO NOT PUSH OR RELEASE START SWITCH WHEN ENGINE IS ABOVE IDLE FOR THIS TEST With commutation fuses removed and inverter Start Button depressed as in Step 7 above, slowly increase engine speed. Voltage from GREEN post to RED post should increase to about 100VDC at or below 2500 engine RPM. Do not increase engine speed in excess of 100VDC reading, and maintain this condition only long enough to check voltage output. This step assures that alternator diodes are satisfactory and that the alternator can provide the voltage necessary for proper operation of the inverter. Readings should be as follows: Ground (GREEN). post to Battery + (BLACK) post Ground (GREEN) post to Alternator B+ (RED) post Ground (GREEN) post to F Out (BLUE) post Ground (GREEN) post to Ignition (ORANGE) post Ground (GREEN) post to Accessory (BROWN) post NOTE: = 12-12.8VDC = Up to 100VDC = 12- 12.8VDC = 12-12.8VDC = 12-12.8VDC Failure to obtain the specified reading is an indication of improper wiring or a defective alternator. If voltage is above 15VDC at idle but does not increase to 100VDC at higher engine speeds, the alternator is defective, usually caused by open or shorted diodes. The remedy is to replace the faulty alternator diode(s). Most alternators have six diodes, three with forward polarity and three with reverse polarity. It is best to replace a complete set of three diodes when replac-any. Use 200 PIV diodes available from an auto electr or electronic parts supply house. Refer to alternator manufacturer's service manual for details of checking and re- pairing alternator diodes. 4080 F8119 3.6.2 12/81 HARNESS & ALTERNATOR CHECKOUT WITHOUT 4-2600 (continued) -9. Now compare your readings with the following summary, given in Figure 3.6.2A Figure 3.6.2A SUMMARY OF TEST VOLTAGE READINGS -10. Reinstall commutation fuse. If all steps check out correctly, CONGRATULATIONS. The harness is properly attached to the alternator system and the alternator is capable of operating the inverter properly. BE SURE ALL CHECKOUT DATA IS RECORDED ON THE WARRANTY INITIATION CARD BEFORE PROCEEDING. DYNAMOTE CORPORATION, 1200 W. Nickerson, Seattle, WA 98119 - 206-282-1000 4081 3.7.0 CHECKOUT INVERTER OPERATION (Put Auto Manual Switch in Manual position. See 2.2.2.1) 3.7.1 Disengage Automatic Throttle by disconnecting the RED wire of throttle control module from the #10 stud of relay K3. 3.7.2 Check battery charging voltage with inverter OFF. Turn inverter OFF, and increase engine speed to about 1,000 RPM (medium fast idle). Check battery voltage. It should read 13.5 to 14.2 volts DC. If it does not, adjust CB3. 3.7.3 Start Inverter. Start engine, and manually increase engine speed to approximately 1,500 RPM (equivalent to engine speed at about 30 MPH). Depress the start button. The inverter should START, that is, you should hear the inverter "hum", the indicator light should turn ON, the cooling fan should be exhausting air through the fan shroud in the rear chassis panel, and the voltmeter should register AC voltage up to 130 volts. If the inverter does not START, refer to Troubleshooting Section 4. 3.7.4 Check for proper charging voltage with Inverter ON. With vehicle engine still running at approximately 1,500 RPM, and with inverter ON, allow 3-5 minutes of inverter operation for charging voltage to stabilize. With inverter still ON, using an accurate DC voltmeter, check voltage on vehicle system battery. It should read 14.0-14.2 volts DC. If it does not, adjust CB1. If this does not correct the problem, refer to the Troubleshooting Section 4. 3.7.5 Check AC voltage stability under load. With inverter still operating at 120 volts output, apply the normal AC load you intend to operate on the inverter. If actual load is not available, simulate the actual load with an equivalent wattage and type of load (resistive or inductive). If AC load does not operate properly, or if inverter output voltage drops more than 10 volts, or if inverter shuts off when AC load is applied, remove AC load, turn inverter OFF and refer to Troubleshooting Section 4. 3.7.6 Adjust Automatic Throtle. Reconnect the RED wire of the throttle control module to the #10 stud of relay K3. Now, START the inverter. The autothrottle should energize when the inverter starts. Adjust turnbuckle on the autothrottle linkage to minimum engine speed that will maintain usable AC voltage when inverter is operating under normally expected AC load. 4082 F8118 3.8.2 8/84 Models A30-70D A. In these units, AC output is a standard two-wire output, with a hot and neutral lead. ’Only the "hot" lead (AC 1) cannot be grounded. B. The AC receptacles can be used up to their fused capacity of 15 amps per receptacle for all models. C. If permanent connection of inverter is desired, follow these directions: Connect AC leads to external AC junction box, using circuit breaker or fuses for each separate circuit. Only the "hot" (BLACK) wire should not be grounded. 3.9 COMPLETE, SIGN AND MAIL WARRANTY INITIATION CARD The final step is to initiate the inverter warranty. Proper installation is not complete until warranty is properly initiated, as follows: A. Fill in the final customer’s name and address and vehicle data. B. Enter all checkout data from the harness and alternator checkout procedures in Section 6. C. Sign your name and the company name and address, certifying that the installation was properly completed, and enter the date of installation. D. Fill in and sign the Owner’s Certificate of Warranty Initiation card from the first section of the manual. E. Mail the stamped, self-addressed warranty initiation card to DYNAMOTE CORPORATION. DYNAMOTE CORPORATION, 1200 W. Nickerson, Seattle, WA 98119 - 206-282-1000 4083 SECTION IV SERVICE AND TROUBLESHOOTING INSTRUCTIONS FOR DYNAMOTE SERIES "A" DYNAMIC INVERTERS 4.1.0 General Information. PLEASE READ CAREFULLY. The only reason to be at this point in the manual is that the inverter and/or vehicle charging system are not working properly. If this is a new installation and has not yet been in service, be sure to go through the checkout procedures in Section 3.6 before proceeding further. If you have completed the checkout procedure in Sand the inverter still does not work, continue with this section. If the inverter has been in service and working properly prior to this failure, and if the installation has not been tampered with, such as for servicing the vehicle in some way, then the likely cause of failure is in the inverter and can be found through the troubleshooting procedure. It is easiest to troubleshoot the inverter while it is installed in the vehicle or boat, as the electrical system provides a power source to check out all inverter functions. Another alternative is a test bench which includes alternator and battery, and simulates a vehicle or boat electrical system. If neither of these is available, many of the troubleshooting tests can be performed by connecting the inverter harness to a 12 volt battery as follows: GREEN to battery Negative (-) Black to Battery Positive (+) ORANGE to Battery Positive (+) Other wires not connected The Troubleshooting guide is to be found in section 4.3.0. 4.2.0 INVERTER REMOVAL FROM VEHICLE SYSTEM FOR SERVICING. NOTE: DO NOT REMOVE INVERTER UNTIL AFTER THE TROUBLESHOOTING PROCEDURE HAS BEEN COMPLETED AND IT IS DETERMINED THAT THE INVERTER MUST BE REMOVED FOR SERVICE. 1. Remove inverter mounting screws. 2. Turn inverter to gain access to rear panel. Carefully remove rear panel and disconnect harness wires from studs in the inverter. (Mark wires and studs for easy reinstallation.) Loosen harness clamps-on top of inverter and remove harness wires. 3. Remove inverter from vehicle. 4. Tape each ring terminal individually and secure so that terminals do not touch body. 4084 4.2.0 INVERTER REMOVAL FOR VEHICLE SYSTEM FOR SERVICING - Continued Batteries will not charge while inverter is disconnected. Operation of vehicle while inverter is disconnected will result in draining of batteries. 4.3.0 TROUBLESHOOTING GUIDE FOR DYNAMOTE SERIES "A" DYNAMIC INVERTERS Introduction: This troubleshooting section takes the most common symptoms of inverter failure and suggests probable causes and solutions. The objective is to provide relatively simple solutions for 90% of the problems that will be encountered. Only the simplest of tools and instruments are required: a Volt-Ohm Meter which reads to 100 VDC, socket wrenches, and a screw driver. A 10" extension on the socket wrench will be helpful if the cathode leads to the SCRs must be removed. The remaining 10% of the possible problems are often intermittent or less obvious and require more sophisticated instruments and technical expertise to solve. This kind of capability can be found at the DYNAMOTE factory and major warranty and repair centers about the country. If the problem cannot be solved using this troubleshooting guide with approximately 1 hour, then help should be sought from one of these facilities. The inverter electrical schematics, included in Section 4.4.0 will be essential in understanding-the checkout procedures, and the inverter wiring diagrams in Section 4.5.0 will be-useful in locating parts and terminal points. The parts list is also located in Section 4.5.0 and gives Dynamote part numbers for all referenced components for use in ordering replacement parts. 4.3.1 USE OF THE TROUBLESHOOTING GUIDE If the symptom of failure is known, proceed directly to that symptom in the troubleshooting chart, Section 4.3.2. If the symptom is not known, begin the troubleshooting process by going to symptom #1 in the troubleshooting chart, pushing the START button and progressing through the chart steps until the applicable symptom is found. 4.3.2 TROUBLESHOOTING CHART The alternator should be turning approximately 4000 RPM, or about 1500 engine RPM for performing tests to determine the applicable symptom. If the inverter is connected only to a battery and not to an alternator, the test at symptom #3 can be performed as well as the checkout procedures for the voltage regulators, ocillator board, diodes, SCRs, and relays K1, K2 and K3. 4085 Section 4.3.2 TROUBLESHOOTING CHART No. SYMPTOM PROBABLE CAUSE SOLUTION 1 Start button pushed, no response Blown control fuse Check control fuse F5 on inverter front panel. If there is no control fuse on the inverter, go on to the next probable cause. Inoperative K2 Relay. Follow procedure to check out K2 Relay, see Section 4.3.4. 2 Start button pushed, relays will not remain energized but chatter on and off Inverter harness improperly installed with RED wire attached to battery and BLACK wire attached to alternator output. Install RED and BLACK wires properly according to instillation instructions. 3 Start button pushed, relays energize with an audible click, but inverter will not start (Fan does not turn.) Blown commutation fuses fuses, Section 4.3.6. Inoperative K3 Relay Follow procedure to check commutation (ENGINE MUST BE RUNNING APPROXIMATELY 1500 RPM FOR THIS AND REMAINING TROUBLESHOOTING STEPS) 4 Start button pushed, inverter turns on, (fan turns), but stops when start button is released Follow procedure to check K3 Relay, Section 4.3.5. Inverter voltage regulator inoperative or fuse is blown Follow procedure to checkout voltage regulator, Section 4.3.7. Shorted SCR. Follow procedure to checkout SCRs, Section 4.3.9. Oscillator circuit board inoperative. Follow procedure to checkout oscillator board, Section 4.3.8. Diode D5.or D6 open. Follow procedure to checkout Diodes D5 and D6, Section 4.3.10. Diode D3 and/or D4 shorted. Follow procedure to checkout Diodes D3 and D4, Section 4.3.10. Diode D2 is open Replace Diode D2. 4086 F2138C 12/81 No. SYMPTOM PROBABLE CAUSE SOLUTION 5 Low output voltage, AC and DC Loose alternator belts Tighten belts by adjusting alternator bracket. Run engine at faster speed and see if output voltage goes up. Alternator RPM too slow K3 Relay inoperative Inverter voltage regulator out of adjustment. Follow procedure to checkout K3 Relay, Section 4.3.5. Adjust voltage regulator. Shorted or open diodes in the alternator Follow alternator diode test procedure, Section 4.3.11. 6 Inverter will not turn off, high output voltage, AC and DC. Inverter voltage regulator inoperative or shorted. Replace inverter voltage regulator, PCB1. 7 Inverter will not turn off, output voltage normal Inverter voltage regulator inoperative K2 Relay points 3 and 9 not disengaging Follow procedure for voltage regulator checkout, Section 4.3.7. Follow procedure for K2 Relay checkout, Section 4.3.4. 8 Inverter turns on, but will not carry AC load Blocking Diode D5 and/or D6 shorted Follow procedure for Diode D5 and D6 checkout, Section 4.3.10. 9 High AC output voltage, low or normal DC output voltage. Diodes D3 and/or D4 open Check Diodes D3 and D4, according to checkout procedure, Section 4.3.10. 10 High DC output voltage, low AC output voltage Faulty K3 Relay Follow procedure to checkout K3 Relay, Section 4.3.5. 11 Improper or no charging with inverter off, proper operation with inverter on Faulty Vehicle Voltage Regulator, PCB3 Faulty K2 Relay Checkout Vehicle Voltage Regulator according to procedure in Section 4.3.12 Follow procedure to checkout K2 Relay, Section 4.3.4. 4087 4.3.2 TROUBLE SHOOTING CHART (continued) MOST LIKELY FAILURES Based on our experience at DYNAMOTE, the following, in order of descending frequency, are the most likely causes of inverter malfunction. In each case, there is a procedure to check it out. 1. 2. 3. 4. 5. 4.3.3 K3 Relay Blown Commutation Fuses Shorted SCRs. Inverter Voltage Regulator Board - no output. Inverter Oscillator Board. K1 RELAY CHECKOUT PROCEDURE Tools Required: Ohm Meter and Voltmeter with 0-15VDC scale, 7/16" socket or open end wrench, screwdriver. 1) Open the inverter by removing the front, top and back panel fasteners. Carefully lay the front and back panels down and remove the top panel. 2) The engine and ignition should be OFF for the procedure. 3) Locate the K1 Relay, the larger cylindrical silver solenoid contactor on the right side of the inverter near the rear. 4) Depress the START button and there should be an audible click if the relay is operating. 5) With the Ohm Meter, check the resistance across the two large terminals at the top of the relay. WITHOUT depressing the START button the meter should read 100K Ohms to infinity, (∝). WITH the START button depressed, the meter should read less than 5 Ohms. If the K1 Relay does not pass all of these tests, it should be replaced. 4.3.4 K2 CONTROL RELAY CHECKOUT PROCEDURE Tools Required: Voltmeter with 0-15VDC scale, 7/16" socket or open end wrench, screwdriver. 1) If there is a control fuse on the inverter front panel, check it first. 2) Open the inverter by removing the front, top, and back panel fasteners. Carefully lay the front and back panels down and remove the top panel. 3) The engine and ignition should be OFF for this test. DYNAMOTE CORPORATION, 1200 W. Nickerson, Seattle, WA 98119 - 206-282-1000 4088 F2139C 4.3.4 12/81 K2 RELAY CKECKOUT PROCEDURE (continued) 4) Locate the K2 Relay. It is approximately 1"xl"x3", encased in clear plastic and located on the bottom left side of the inverter. 5) Depress and release the start button and visually confirm that the relay contacts are moving. If the contacts do not move, the relay should be replaced. 6) With the START button depressed, check the voltage from the ACC terminal at the rear of the inverter to GROUND. It should read 10 VDC or higher. If not, the relay should be replaced. 7) With the START Button depressed, check the voltage from the F Out terminal at the rear of the inverter to GROUND. It should read 10VDC or higher. If there is no voltage at the F Out terminal, and if the Voltage Regulator has checked good, then replace the K2 Relay. 4.3.5 K3 RELAY CHECKOUT PROCEDURE Tools Required: Volt Ohm Meter with 0-15VDC scale, screwdriver, 12" jumper wire. 1) The K3 Relay is the high amperage bypass relay and is a cylindrical silver solenoid contactor. It is installed either in the 4-2500 Dynamic Installation Kit or independently near the alternator under the hood. It can be found by following the wiring from the POSITIVE (+) terminal of the alternator. 2) The engine and ignition should be OFF for this test. 3) The small terminals on the relay are the coil terminals and the large terminals are the contacts. 4) Check the voltage from the positive to the negative coil terminal of the relay. With the inverter START button depressed, there should be an audible click and the voltage should be 10VDC or higher. Without the START button depressed, the voltage should be 0. If these conditions are present, go on to Step 5. If the voltage is 0 with the START button depressed, carefully check the wiring to the positive relay coil terminal (the one that is not grounded). This should come from the ACC terminal in the rear of the inverter. If the wiring is correct, then go through the K2 Relay checkout procedure to be sure that there is voltage at the ACC terminal when the START button is depressed. 5) Check the voltage from the relay contact that is wired to the alternator POSITIVE (+) terminal to GROUND.. Without the START button depressed, the voltage should be 10VDC or higher. DYNAMOTE CORPORATION, 1200 W. Nickerson. Seattle, WA 98119 - 206-282-1000 4089 4.3.5 K3 RELAY CHECKOUT PROCEDURE (continued) With the START button depressed, the voltage should read 0. Otherwise, replace the K3 Relay. 4.3.6 COMMUTATION FUSE CHECKOUT PROCEDURE Tools Required: Ohm Meter. 1) Commutation fuses are in the larger fuseholders on the front panel of the inverter. commutation fuses on A30s, and four commutation fuses on A40s and A60s. There are two 2) Remove the commutation fuses. They must be checked with an Ohm Meter, as they are solid fuses and visual inspection will not determine if they are good. 3) Check the fuses with the Ohm Meter by placing a probe at each end. If there is no resistance, the fuse is good. If there is high resistance, the fuse is blown. 4.3.7 4) If the fuses are blown, be sure to replace them with the same value fuses. 5) Recheck commutation fuses after new installation. DYNAMIC INVERTER VOLTAGE REGULATOR PCB1 CHECKOUT PROCEDURE Tools Required: Voltmeter with 0-15VDC scale, 7/16" socket or open end wrench, screwdriver. 1) Open inverter by removing the front and top panel fastener. Carefully lay the front panel down on its face and remove the top panel. 2) Locate the inverter voltage regulator CB1 on the left side of the inverter. It is the forwardmost of the two circuit boards, and there are five wires attached to the board, or to a connector that is plugged into the board. 3) The engine and ignition are OFF for this test. 4) If the voltage regulator has a fuse mounted on the circuit board, check the fuse first. 5) With the inverter START button depressed, check the voltage from the BLUE wire on the voltage regulator circuit board to ground. Voltage should read 10 volts or more. If there is no voltage, the voltage regulator has failed in the open position and should be replaced. 6) If voltage at the BLUE wire is 10 volts or more, depress the inverter START button again and check the voltage from the F OUT terminal inside the rear of the inverter to GROUND. If the voltage at this terminal is not the same as the voltage at the BLUE wire on the voltage regulator, then the K2 Relay is faulty and should be replaced. C Copyright 1981, DYNAMOTE CORP. 4090 F2140C 4.3.8 12/81 OSCILLATOR CIRCUIT BOARD CHECKOUT PROCEDURE Tools Required: Voltmeter with 0-15VDC scale, 7/16" socket wrench or open end wrench, screwdriver. 1) Open inverter by removing the front and top panel fasteners. Carefully lay the front panel down on its face and remove the top panel. 2) The engine and ignition should be OFF for this test. 3) Locate the SCR gate leads. These are the small white leads to the SCRs which have a plastic connector in the lead. Separate this lead by disconnecting the plastic connector. 4) With the START button depressed, read the voltage to GROUND from each gate lead connector on the part of the gate lead which is connected to the Oscillator Circuit Board. The voltage should be between 2VDC and 7VDC, and should be equal ±.3VDC for the two leads. If it is not, the oscillator board should be replaced. 4.3.9 SCR CHECKOUT PROCEDURE Tools Required: Ohm Meter or Continuity Tester, 7/16’ socket wrench with extender, 3/4" socket wrench with extender (A40 and A60 only), screwdriver. 1) Prior to checking out the SCRs, be sure that the commutation fuses are good, by following the commutation fuse checkout procedure. 2) Open inverter by removing the front and top panel fasteners. Carefully lay the front panel down on its face and remove the top panel. 3) The engine and inverter are OFF for this test. 4) An SCR (Silicon Controlled Rectifier) is a semiconductor device which will not conduct electricity in either direction unless the GATE is impulsed to turn on the SCR. When the GATE is impulsed, turn the SCR ON, the SCR will conduct from ANODE to CATHODE only. The purpose of this test is to determine if the SCR will conduct (i.e., show low resistance) without the GATE being turned on. If so, the SCR is shorted and should be replaced. DYNAMOTE CORPORATION, 1200 W. Nickerson, Seattle, WA 98119 - 206-282-1000 4091 4.3.9 SCR CHECKOUT PROCEDURE (continued) 5) Remove SCR cathode (ground) leads from ground. These are RED #8 wires for A40/A60, and GREEN wires for an A30, which are attached to the bottom of the inverter with a bolt and 7/16" nut. The SCR does not have to be removed from heat sink for this test. The heat sink and anode are at the same potential. 6) Check resistance across SCR with positive (+) lead. from Ohm Meter on heat sink, and negative (-) lead on the cathode which was removed from ground stud. (See illustration.) If resistance reading is less than 1000 Ohms, the SCR is shorted and should be replaced. A resistance reading of 100, 000 Ohms to infinity (∝) indicates that the SCR is not shorted. NOTE: BE SURE EITHER STUD OR GROUND WIRE OF SCR IS REMOVED BEFORE CHECKING SCR. 7) To replace the SCR, do the following: a) If the inverter has one-inch holes in the slotted area behind the heat sink, pop the plastic plugs out of these holes from the inside with a screwdriver. If the inverter does not have holes in the slotted or louvered area behind the heat sink, then the heat sink must be removed by removing the four screws at the corners. b) Disconnect the small connector in the SCR gate lead. c) Remove the SCR, using the 7/16" socket if it is an A30, or the 3/4" socket for an A40 or A60, leaving as much of the white thermal compound on the heat sink as possible. C Copyright 1981, DYNAMOTE CORP.4092 4092 F2143E 4.3.9 12/81 SCR CHECKOUT PROCEDURE (continued) d) Install the new SCR, making sure that the nut is on very tight. e) Reconnect the Cathode (GROUND) lead. f) Reconnect the gate lead. 4.3.10 DIODE CHECKOUT PROCEDURE Tools Required: Ohm Meter or Continuity Tester, 7/16” socket wrench or open end wrench, screwdriver. 1) Open inverter by. removing the front and top panel fasteners. Carefully lay the front panel down on its face and remove the top panel. 2) A DIODE (Rectifier) is a semiconductor device which functions as an electrical one-way street. For stud-mounted diodes with normal or standard polarity, the stud is the CATHODE, and the tab or flag is the ANODE. See diagram below. For stud-mounted diodes with reverse polarity, the stud is the ANODE and the flag or tab is the CATHODE. See diagram below. DYNAMOTE CORPORATION, 1200 W Nickerson, Seattle, WA 98119 - 206-282-1000 4093 4.3.10 DIODE CHECKOUT PROCEDURE (continued) A diode which is not stud-mounted, but rather has axial leads, conducts in the direction the band on the diode indicating the CATHODE end, the end opposite indicating the ANODE. Following is the polarity of the diodes in the Dynamic Inverters: 3) Diode Polarity D1 D2 D3, D4 DS, D6 D7, D8 D9, D10 Standard Axial Leads Reverse Standard Standard Axial Leads The diodes can be located using the wiring diagram, Figures 4.5.OA to F. Not all models have all ten diodes. 4) Diodes should be removed from the heat sink or chassis before testing. Figure 4.3.IOA on the following page gives the proper Ohm Meter readings. C Copyright 1981, DYNAMOTE CORP. 4094 F8123 12/81 DIODE TEST INSTRUCTIONS NOTE: 1. 2. BE SURE STUD OF DIODE IS REMOVED U13ORE TESTING DIODE. REVERSE POLARITY DIODES WILL HAVE AN "R" IN TIEIR NUMBER (R3720 OR IN1184R), ALSO ALL DIODES MOUNTED A DYNAMOTE CHASSIS WILL BE REVER-SE POLARITY DIODE (EXCEPT THE: PIONEER 205). Figure 4.3.10A DIODE CHECKOUT PROCEDURE AND READINGS 4095 F2144D 11/82 4.3.11 ALTERNATOR DIODE TEST PROCEDURE FOR THIS TEST, DO NOT PUSH OR RELEASE START SWITCH WHEN ENGINE IS ABOVE IDLE. Tools Required: Voltmeter with 0-100 VDC scale. 1) Remove the commutation fuses from the inverter front panel. 2) Start the engine and run at approximately 1500 RPM. 3) Check the voltage from the POSITIVE (+) terminal on the alternator to GROUND. With the START button depressed, the voltage should read 80 to I10VDC. If not, the alternator diodes are bad and should be replaced. This should be done by an alternator repair shop. NOTE : If Step 3 is difficult because of the distance from the alternator to the inverter, the alternator voltage can be read from the A+ terminal inside the rear of the inverter. 4.3.12 VEHICLE VOLTAGE REGULATOR, PCB3, CHECKOUT PROCEDURE Tools. Required: Voltmeter with 0-15VDC scale, screwdriver 1) Remove the Vehicle Voltage Regulator (VVR) box from the front panel of the inverter by removing the four screws at the corners. 2) Remove the VVR Circuit Board from the box by removing the two screws on the outside of the box. 3) Check the fuse on the VVR Circuit Board and replace if blown. If not, proceed to the next step. 4) With the ignition ON, inverter OFF, and the inverter harnesses still connected, check the voltage from the connector pin #4, GREY wire, to GROUND. The pin next to the edge of the circuit board is pin #5. If the voltage reads 10 volts or more, proceed to Step 5. If there is no voltage, the voltage regulator has failed in the open position and should be replaced. 5) To determine if the voltage regulator is regulating properly, start the engine and run at approximately 1500 RPM. Turn on a moderate load, such as the headlights. With the inverter OFF, check the voltage from the inverter B+ (BLACK) terminal post to GROUND (GREEN). If the voltage is other than 13.8 to 14.2VDC, try to adjust it by turning the screw on the grey potentiometer on the vehicle voltage regulator circuit board with a very small screwdriver or knife blade. If the voltage cannot be adjusted to approximately 14.2VDC, the voltage regulator circuit board should be replaced. NOTE: The inverter voltage regulator, PCB1, inside the inverter front panel is identical to the vehicle voltage regulator and can be used to replace the vehicle voltage regulator until another board can be obtained. It can also be used to confirm the diagnosis of a faulty vehicle voltage regulator circuit board. C Copyright 1981, DYNAMOTE CORP. 4096 F2136B Fig. 4.5.0 G 2/84 DYNAMIC INVERTER PARTS LIST Circuit Designation See Pages 4110, 4111 and 4112 Dynamote Part Description Used In: BOOSTED C1 C2 C3 C4 C5 C6, C7 C9 C10 C11 4092-40502 4092-40502 4092-40502 4095-24712 4093-10147 4093-10147 4095-74606 4093-10825 4093-10825 Output Capacitor Output Capacitor XFMR. Input Capac. Commutation Capac. Contactor Suppression Capacitor Circuit Board Filter AC Output Capacitor Boosted. Field Capacitor DC Input Capacitor x x x x x x x x x D1 D2 D3, D4 D3, D4 DS, D6 D5, D6 D8, D9 D10, D12 4121-43700 4121-14005 4121-23720 4121-11183 4121-43700 4121-11186 4121-14005 4121-22030 Unit Isolation Diode K2 Relay Hold-in Diode Battery Charging Diode Battery Charging Diode AC Blocking Diode AC Blocking Diode Spike Suppression Diode Reverse Parallel Diode x x D13 D14, D15 4121-10751 4121-20410 Isolation Diode Rectification Diode x x R1, R2 R3 R4 4681-10025 4681-00247 4681-08020 Stabilizing Resistors Current Limit Resistor VR Stabilizing Resis. x x x R9 F1, F2 Fl, F2, F5, F6 F3, F4 F5 F7 F1, F2 F1, F2, F5, F6 F3, F4 F5 F7 4602-20110 4200-06400 4200-06400 4200-02150 4200-02150 4200-02150 4282-00005 4282-00005 4282-00003 4282-00003 4282-00003 Meter Adjustment Potentiometer Fuses ABU40 Fuses ABU40 Fuses AGC15 Fuses-AGC15 Fuses AGC15 Fuse Holders Large HPC Fuse Holders Large HPC Fuse Holders Small HKP Fuse Holders Small HKP Fuse Holders Small HKP x x K1 K2 K4 K5 4685-43051 4685-01156 4685-02030 4685-42592 Power Relay Control Relay VVR Relay LVCO Relay x x x K3 4685-43051 High Amperage Bypass Relay * A30 * Optional 4097 x x x x x x x x 4.5.0 DYNAMIC INVERTER PARTS LIST (continued) Circuit Designation Dynamote Part Description S1, S2 S4 4721-08411 4721-00256 Start/Stop Switch Field Selection Switch x B1 4046-12337 Fan Motor x M1 4481-20123 Voltmeter x PCB1 PCB2 PCB3 PCB4 2081-00005 2081-00930 2081-00005 2081-00200 Regulator (Unit) Oscillator Regulator (Vehicle) Load Demand x x x * T1 2764-02007 Transformer/Isolated x SCR1, SCR2 2720-40125 Main SCRs x J3 J4 J7 4080-03080 4683-25320 4080-30160 Control Head Receptacle Output Receptacle Test Module Receptacle x x x X1 X2 X3 X1, X2, X3 4080-04014 4080-04013 4080-04015 4442-90000 Quick Disconnect Black Quick Disconnect Red Quick Disconnect Green Quick Disconnect Lugs x x x x *-LD Units Only 4098 Used In: BOOSTED A30 4099 4113 Pages 4100 through 4112 DELETED 3 4115 4 1 Remove the power unit from carton. Visually inspect power unit and confirm that all bolts and screws are securely fastened, and the unit has not been damaged in shipment. 2 Remove nylon caps from 16’ length of twin hose and attach to power unit. Match color code on hose and swivel connections. 4116 14 3 Hand tighten both swivel connections on the hose. 4 Tighten connection using 5/8" open end wrench. 5 Attach strain relief cable with clip through hole at base of power unit. 4117 15 Remove hex bushing (fill cap) and fill hydraulic reservoir with Phosphate Ester based hydraulic fluid (Hurst RT-23/ Aerosafe 2300). Fill to within 1" from the top. Check with dip stick provided. Replace fill cap and tighten by hand. 6 8 Install (optional) caps and plugs in hose connectors. Coil hose and attach to side of power pack roll cage with the two straps provided for this use. 4118 4101 4102 4119 12 Make sure the operating lever on the by pass valve is in the open position (away from the direction of flow) before trying to start power unit. 13 START-UP Begin “start up” sequence. Move the choke lever on the power unit engine control to the closed position. 14 Check operating lever for the governor control. Secure in the “run” position. Pull starter cord several times to prime carburetor, until engine pops. 4120 18 15 Return choke to the "open" position. 16 Hold roll cage with one hand and pull cord with other. Pull cord sharply and the engine should start. If the new engine does not run after several pulls, repeat the starting procedure. 17 Connect the couplings from the tool to the Bruning couplings on the long hoses from the power unit before operating the by pass valve to the closed position. 4121 19 18 Move the operating lever to the closed or run position after power unit is started and tool(s) are connected. 19 Remove hex bushing (fill cap) on power unit and check liquid level in the reservoir. If the liquid level is down, fill to within 1" of top of reservoir. It is not necessary to turn off the power unit to check the fluid level in the reservoir. Replace fill cap and tighten by hand only. Pages 4123 through 4125 DELETED 4122 20 PROBLEM CAUSE REMEDY Engine fails to start or starts with difficulty • No fuel in tank • Shut-off valve closed • Open v• Obstructed fuel line • Clean fuel screen and line. If necessary, remove and clean carburetor • Open vent in fuel tank cap • Drain tank. Clean carburetor and fuel lines Dry spark plug points. Fill tank with clean, fresh fuel • Close fuel shut-off and pull starter until engine starts. Reopen fuel shut-off for normal fuel flow • Adjust carburetor • Tank cap vent obstructed • Water in fuel • Engine overchoked • Improper carburetor adjustment • Loose or defective magneto wiring • Faulty Magneto • Spark plug fouled • Spark plug porcelain cracked • Poor compression • No spark at plug Engine misses under load Engine lacks power Fill tank with clean, fresh fuel • Check magneto wiring for shorts or grounds; repair if necessary • Check timing, point gap, and if necessary, overhaul magneto • Clean and regap spark plug • Replace spark plug • Overhaul engine • Disconnect ignition cut off wire at the engine. Crank engine. If spark at spark plug, ignition switch, safety switch or interlock switch is inoperative. If no spark, check magneto. Check wires for poor connections, cuts or breaks • Spark plug fouled • Spark plug porcelain cracked • Improper spark plug gap • Pitted magneto breaker points • Magneto breaker arm sluggish • Faulty condenser (except on Tecumseh Magneto) • Improper carburetor adjustment • Improper valve clearance • Weak valve spring • • • • • • • Clean and regap spark plug Replace spark plug Regap spark plug Replace pitted breaker points Clean and lubricate breaker point arm Check condenser on a tester, replace if defective Adjust carburetor • • Adjust valve clearance to .010 cold Replace valve spring • Choke partially closed • Improper carburetor adjustment • • Open choke Adjust carburetor Pages 4123 through 4125 DELETED 4126 Engine surges or runs unevenly Engine overheats • Magneto improperly timed • Worn rings • Lack of lubrication • Air cleaner fouled • Valves leaking • • • • • Time magneto Replace rings Fill crankcase to the proper level Clean air cleaner Grind valves and set to .010 cold • Fuel tank cap vent hole clogged • Governor parts sticking or binding • Carburetor throttle linkage or throttle shaft and or butterfly binding or sticking • Intermittent spark at spark plug • Open vent hole • Clean, and if necessary repair governor parts Clean, lubricate, or adjust linkage and deburr throttle shaft or butterfly • Improper carburetor adjustment • Dirty carburetor • Disconnect ignition cut-off wire at the engine. Crank engine. If spark, check ignition switch, safety switch and interlock switch. If no spark, check magneto. Check wires for poor connections, cuts or breaks. Adjust carburetor • Clean carburetor • Engine improperly timed • Carburetor improperly adjusted • Air flow obstructed in shrouds · Cooling fins clogged • Excessive load on engine • • Time engine Adjust carburetor • Remove any obstructions from air passages • • • • Clean cooling fins Check operation of associated equipment Reduce excessive load Remove cylinder head or cylinder and clean carbon from head and piston Fill crankcase to proper level • Carbon in combustion chamber • Lack of lubrication Engine uses excessive • • • Engine speed too fast amount of oil • Oil level too high • • • Oil filler cap loose or gasket damaged causing spillage out of breather • Breather mechanism damaged or dirty causing leakage • Drain hole in breather box clogged causing oil to spill out of breather • Gaskets damaged or gasket surfaces nicked causing oil to leak out • Valve guides worn excessively thus passing oil into combustion chamber • Cylinder wall worn or glazed, allowing oil to bypass rings into combustion chamber • Piston rings and grooves worn excessively • Piston fit undersized • Piston oil control ring return holes clogged • Oil passages obstructed Oil seal leaks • • Crankcase breather • Old seal hardened and worn • Crankshaft seal contact surface is worn undersize causing seal to leak • Crankshaft bearing under seal 4127 25 • Using tachometer adjust engine RPM to spec To check level turn dipstick cap tightly into receptacle for accurate level reading Replace ring gasket under cap and tighten cap securely • Replace breather assembly • Clean hole with wire to allow oil to return to crankcase • Clean and smooth gasket surfaces. Always use new gaskets • Ream valve guide oversize and install 1132" oversize valve • Bore hole, or deglaze cylinder as necessary • Reinstall new rings and check land clearance and correct as necessary Measure and replace as necessary Remove oil control ring and clean return holes Clean out all oil passages • • • • • • Clean or replace breather Replace seal Check crankshaft size and replace if worn excessively • Check crankshaft bearings for wear and is worn excessively, causing crankshaft to wobble in oil seal •·Seal outside seat in cylinder or side cover is damaged, allowing oil to seep around outer edge of seal • New seal installed without correct seal driver and not seating squarely in cavity • New seal damaged upon installation • Bent crankshaft causing seal to leak • Oil seal driven too far into cavity Breather passing oil replace if necessary • • • • • Visually check seal receptacle for nicks and damage. Replace P.T.O. cylinder cover, or small cylinder cover on the magneto end if necessary Replace with new seal, using proper tools and methods Use proper seal protector tools and methods for installing another new seal " Check crankshaft for straightness and replace if necessary Remove seal and replace with new seal, using the correct driver tool and procedures • Engine speed too fast • Loose oil fill cap or gasket damaged or missing • Oil level too high • • • Breather mechanism damaged • Breather mechanism dirty • • • Drain hole in breather box clogged • Piston ring end gaps aligned • • Breather mechanism installed upside down • Breather mechanism loose • • Damaged or worn oil seals on end of crankshaft • Rings not properly seated • • Breather assembly not assembled correctly • Cylinder cover gasket leaking • Check for worn, or out of round cylinder. Replace rings. Break in new rings with engine working under a varying load. Rings must be seated under high compression, or in other words, under varied load conditions. See section on Breather Assembly • Replace cover gasket 4128 26 • • • • Use tachometer to adjust correct RPM Install new ring gasket under cap and tighten securely Check oil level - Turn dipstick cap tightly into receptacle for accurate level reading. DO NOT fill above full mark Replace reed plate assy. Clean thoroughly in solvent. Use new gaskets when reinstalling unit Clean hole with wire to allow oil to return to crankcase Rotate end gaps so as to be staggered 90' apart Small oil drain holes must be down to drain oil from mechanism Install new gaskets and tighten securely or gaskets leaking Replace seals 4129 PRINTED IN USA • 159 R029 00 • 2M1281 • PATENT PENDING Hurst Safety Products reserves the to make changes at any time, without notice or obligation, in prices, materials, equipment or specifications, and to change or discount models. Check with distributor for current information. 4130 4131 4132 2 1 Remove Rescue Tool from carton; Inspect unit and confirm that: all bolts and screws are securely fastened, and the unit has not been damaged In shipment. 2 Attach all sets of Jaws enclosed to both arms to Insure both Interchangeability and fit of Jaws to the arms of the tools. Attach automative Jaws to the tool and Insert Jaw retainer pins. 4133 5 3 Align alot with pin before you connect or disconnect couplings Connect couplings on the short hoses from the tool to the couplings on the long hoses from the power unit. 4 Operate thumb control several cycles until the arms operate smoothly through full range of movement - from open to close. The hydraulic system is self purging and the cycling eliminates air from the system. 5 Move the thumb controls to the left to open or spread the arms of the tool. If the controls do not operate the arms In this manner, the hoses have been connected Incorrectly on either the tool or the power unit. Check the color coding on both and correct. (Turn by-pass valve on the power unit "OFF" before breaking hose connections.) 4134 6 6 To attach chain shackles to the tool, force short jaw retainer pins out of the arm. (Model 28 only) 7 Slip chain shackle over the jaw and Insert long faspin, through hole in the jaw locking shackle to arm. (Model 32B only) 8 Make sure hooks are both facing the same direction, up or down. Attach the chains from the same direction (side) to prevent the arms from twisting. 4135 7 9 So alignment illustration on page 6 step 3 After storage and before re-using the Rescue Tool, disconnect the male and female couplings on the short and long hoses and attach together to connect the power unit to the tool. Make connections BEFORE STARTING THE POWER UNIT. 10 Important: Your Rescue Tool must be registered with HURST to remain in warranty. PLEASE RETURN THE ENCLOSED WARRANTY SLIP TO US IN THE ENCLOSED SELF-ADDRESSED ENVELOPE. Should you have to contact us about your Rescue Tool, refer to the tool serial number (found on the tool). This Identification will expedite any service you may require and will also enable us to keep current your records. 4136 8 AND GENERAL MAINTENANCE* • • in LUBRICATION • • • Grease control spring and links with Hurst’s Shifty Doctor Grease. Spray jaws, Jaw retainer pins, arms, frame and cylinder with silicone lubricant. Excess grease and lubricant should be removed. Check for wear or damage on all parts. Check all nuts, bolts, retainer rings, screws, and pins are place and securely fastened. 6 MONTH OR 50 USE HOURS MAINTENANCE • Pressure check all valve and internal seals. Replace as required. • Check AC and Auto Jaws for damage and wear. Replace as required. • Check hose and couplings for damage, replace as required. • Clean and lubricate. DAILY MAINTENANCE/INSPECTION • Inspect carefully for Hydraulic leaks. • Inspect hoses and couplings for wear or damage. • Check control valve operation for easy operation and free return. • Check inside frame for dirt & debris. • Be sure all parts are clean. • Check jaws for damage. • Check the unit that all nuts, bolts, retainer rings and screws are In place and securely fastened. ANNUAL INSPECTION • Pressure check valves and internal seals. Replace as required. • Check operating pressure, unloaded, through full operating cycle. • Magnaflux or penetrant dye check Auto and AC jaws. • Check force output of tool under load in opening and closing modes, at 18” S 2” open at tip of Jaws. • Replace operating decals. • Replace hoses, couplings and fasteners as required. • Clean and lubricate. STORAGE • Protect unit against or store In location free of moisture. • Store in space adequate to prevent damage to hoses, connectors or tool Itself. • Call your authorized Hurst Distributor for maintenance and annual Inspection care. AFTER USE MAINTENANCE • Clean and lubricate. • Check for wear or damage on all parts. • Check all nuts, bolts, retainer rings, screws, and pins are In place and securely fastened. 4137 9 TROUBLE SHOOTING GUIDE 32B/28 PROBLEM CAUSE REMEDY Tool operates eratically, slowly, or falls to operate • Hydraulic Fluid is low. • • Air In Hydraulic System • • Valve thumb control level loose. • • Leak In valve seals • • Internal 'T' Ring seal failure. • • Piston failure • Replace all "O" rings in valve and between valve and D.P.C.V. valve block* Remove internal seals and replace with new "T, seals*. Remove and replace piston. • Coupling failure - fails to open Internal check when connected. • Pilot operated check valve falls to open. • No flow from Power Unit • Hoses reversed on power supply • Connectors reversed on tool • Replace coupling • Replace dual pilot "O" Rings or springs as required. Check power and repair as required. Reverse hoses from Power Unit. Tool has apparent loss of power Tool falls to operate Tool operates In reverse Jaw Retainer Pin fails to stay In arm • Detent ball on pin is jammed w/dirt or grit • Spring on detent ball broken • Call your authorized Hurst Distributor for maintenance and annual Inspection care. 4138 10 • • Check fluid level in reservoir and add fluid as required. Cycle tool full open to fully closed several times. Tighten or replace screw on thumb control lever, or replace thumb control lever assembly as required. • Reverse connectors on short hose on the tool. • Flush dirt or grit from pin till ball moves freely; replace If necessary. Replace jaw retainer pin. • 1 To raise the car roof, insert the jaws of the Rescue Tool between the roof of the automobile and the top of the door, hinged side, If possible, or any firm surface. Move the operating thumb control to the "open" position, and open the Jaws. The tool will open insuring sufficient opening to survey the interior of the vehicle. 2 Operate the thumb control to open position, opening the jaws only wide enough to grab front edge of door. Close jaws and pinch the door edge. Rotate the tool and open the hinge side of the door. 4139 11 3 After opening the leading edge by pinch pry operation insert the jaws between the body of the car and the door above or below the hinge or lock. Move the operating thumb controls to the "open" position. 4 After the door is open, it may be completely removed by breaking the hinges repeating step 3. 5 Assure additional access by pushing the front seat backward. Insert the jaws of the Rescue Tool between the front door frame and the front edge of the seat and open the Rescue Tool arms. Seat contact should be slightly lower than door frame. 4140 12 13 4141 9 The steering wheel can be displaced several inches by pushing against the rocker panel and column from the inside 14 4142 1 When cutting an access hold through metal with the Hurst Power Rescue Tool, remove the automotive spreading jaws and attach the cutting jaws. Attach the wide, smooth jaw on one arm and the narrow, concave jaw on the other arm. * The tool will cut in the direction of the narrow jaw giving directional cutting. 2 Pierce the material to be cut by using the weight of the tool to force the jaws to penetrate the metal. If more practical, any other piercing tool may be used for initial hole. 15 4143 3 Operate the thumb controls to the “open” position, spreading the 4 Repeat this cutting procedure, opening the tool perpendicular to the first cut. 5 This second cut will provide an "L" shaped cutout in the material to be opened. Remove the narrow cutting jaw and replace with the other wide cutting jaw. 16 4144 6 Pry “open” resulting flap of metal. This opening should afford entry or exit. 7 When it is not possible to force the points of the Rescue Tool through metal, use any existing opening to start cutting with the Rescue Tool. 8 Follow cutting procedures numbers 3 through 7. 4145 17 9 NOTE: Since the narrow cutting jaw has a concave face, the strip removed from the material cut with the Rescue Tool will be coiled. 4146 18 PRINTED IN USA • 159-R022 00 • 5M681 • PATENT PENDING Hurst Safety Products reserves the right to make changes at any time without notice or obligation in prices materials, equipment or specifications and to change or discontinue models. Check with distributor for current information. 4147 PARTNER® K1200 INSTRUCTION BOOK Contents: Safety precautions................................... Identification ............................................ Fitting the cutter arm K1200 .................... Turning the cutter arm K1200 ................. Correct starting position and starting of the saw ................................... Starter unit............................................... Air filter K1200......................................... Carburetor . ............................................. Spark plug ............................................... Working technique . ................................ Maintenance scheme . ............................ Tools . ..................................................... Technical data ........................................ Cutter disc ............................................... Guard ...................................................... Vee-belt K1200........................................ Fuel mixture............................................. Fuel tank.................................................. Controls . ................................................. 4148 Operator Safety Precautions 1 Never operate the machine when you are fatigued 2 Use safety footwear. snug-fitting clothing. safety goggles. and hearing- and headprotection devices and gloves. 3. Always use caution when handling fuel. Move the cutting machine at least 10 feet from the fueling point before starting engine. 4. 5. 12 Never operate a cutting machine that Is damaged. Improperly adjusted. or not completely and securely assembled Be sure that the disc stops moving when the throttle-control trigger Is released 13. Always shut off the engine before setting the machine down. 14 Keep the handles dry, clean, and free of oil or fuel. Do not allow other persons to be near the machine when starting or cutting. Keep bystanders and animals out of the work area. 15 Never start cutting until you have a clear work area and secure footing 6 Always hold the unit firmly with both hands when the engine Is running. Use a firm grip with thumbs and fingers encircling the handles. Operate the machine only in well-ventilated areas. Failure to use the power cutter in a wellventilated area can lead to serious Injury or death. 16. The cutter disc should be removed from the cutting machine when it Is transported or stored. 17. All service other than items listed in the machine builder’s maintenance instructions should be performed by competent service personnel. 18 Do not operate a cutting machine unless specifically trained to do so. 19. For health reasons, never cut material containing asbestos. 20 When cutting concrete, stone, etc, water to bind the dust 6. Always hold the unit firmly with both hands when the engine is running. Use a firm grip with thumbs and fingers encircling the handles. 7 Keep all parts of your body away from the cutter disc when the engine is running. 8 Never operate without the disc guard. 9 Do not cock. wedge or jam the disc in the cut 10 Before starting the engine, make sure that the disc is not contacting anything 11 Always carry the machine with the engine stopped and the muffler away from your body. sprinkle Care of cutter discs All cutter discs are breakable and, therefore, care shall be exercised in their handling and storage to prevent damage. Immediately after unpacking, all discs shall be closely inspected to make certain that they have not been damaged from handling, shipping or other causes. Cutter discs should be laid flat on a flat surface away from excessive heat or moisture. Discs should not be stored subject to: exposure to high humidity, water, other liquids, or freezing temperatures. Discs used on machines on emergency vehicles should be dismounted after use and discared or carefully stored as described In this section. 4149 K1200 Pos. Description 1. Cutter disc 2. Guard 3. Knob for guard 4. Stop control 5. Choke 6. Idling catch 7. Throttle control 8. Starter throttle control 9. Starting handle 10. Starter unit 11. Lock nut for air filter 12. Air filter 13. Spark plug 14. Cylinder 15. Vee-belt 16. Cutting arm 17. Knob for guard 4150 Fitting the cutter arm K1200 Remove both the drive belt protecting casings (4 screws. knob and bushing) (1) Remove the attaching bolt (2) for the cutter arm Fit the bolt on which the knob was placed in the upper hole in the arm and tighten the attaching bolt (2) by hand. Fit the vee-belt and tension it by turning the eccentric (3) to its bottom position (clock- wise) using socket wrench 505381306. Tighten the attaching bolt (4) (anti)clockwise) using socket wrench 505381317. Fit the drive belt protective casings. the bushing and the knob (5) Tension the vee-belt after 1-2 tank refills and thereafter every day See the next page concerning turning the arm. 4151 Turning of the cutting arm When the cutting arm is in Its normal position. the cutter disc Is held in position b) means of a screw with a right-hand thread (a) while the cutter arm attaching screw lb) has a left-hand thread This facilitates cutting close to The cutter arm is loosened in the same way as when changing the drive belt, see page 16. Loosen also the knurled knob and the screw retaining the stay. Turn the protective casing through 1800. Fit the drive belt on the engine and then on the cutter arm so that the screw on the stay fits into the lower hole in the crankcase. I t h d b Fit th The disc is located between the flange hub (a) and the flange washer (b). Turn the flange washer round so that it fits into the flange hub. The cutter disc should be tightened by using the fixed wrench 505381317 that is included in the tool kit. Support the shaft with/ the spark plug wrench. The disc is to be ti ht d l k i b t if th tt Guard Never operate without the disc guard. The guard should be adjusted so that its rear section is close to the workpiece. Particles, dust or sparks from cutting are then collected by the guard and directed away from the operator. By using the knob the guard can be loosened and adjusted to the desired position. 4152 Vee-belt K1200 To stretch the belt, loosen the screw retaining the cutting arm by turning clockwise using the socket wrench included in the tool set and rotate the cutter disc a few turns by hand, When the screw has loosened slightly, stretch the belt by using the automatic belt tensioner. Replacing the vee-belt K1200, To replace the belt, remove both the casings on the cutting arm Loosen the screw (at the arrow) holding the cutting arm Turn the eccentric counter-clockwise by using the spark plug wrench so that the tension on the spring is released The cutting arm can then be pressed back and the belt removed The belt tensioner consists of a powerful spring tensioned by turning the eccentric clockwise as much as possible The belt will then be tensioned by the spring power exactly as much as necessary. A new belt should be tensioned after 1-2 refillings of the fuel tank Thereafter check the tension daily. Fuel mixture The engine is lubricated by the oil in the fuel mixture. Oil 1. Petrol (gasollne) 2 1. Use "regular" petrol (gasoline). Premium grade is not necessary. 3. Fuel tank The fuel tank must be protected from Impurities when filling up with fuel. This decreases the risk of running Interruptions caused by blockage of the fuel tank filter. The filter cartridge cannot be cleaned but must be replaced if it becomes blocked This replacement should be done once a year. For best performance use Partner-oil. Mixture ration 1:50 02 %). If no Partner oil is available, other two- stroke oil of good quality can be used Mixture ratio 1:25 (4 %). Never use multi-grade oil (10W-30) or any oils formulated for 4-cycles engines. The petrol (gasoline) and the oil must be thoroughly mixed before being put into the fuel tank Always shut the engine off before filling the tank. Controls A Stop control. When the button is pressed backwards, the engine stops. The button remains in this position and must be returned to its initial position before the engine is started the next time. B Choke button. A cold engine is to be started with the choke flap closed (the button pressed backwards). A warm engine is as a rule to be started without choke. C Starter throttle catch. Press in the throttle control and thereafter the starter throttle catch. Release the throttle control and the throttle is blocked in half throttle position. The catch is released when the throttle control is pressed in all the way. D Throttle control. The throttle control is used to regulate engine speed and the speed of the cutter disc. E Idling catch. This catch will prevent the throttle from opening accidentally when the engine is at Idling speed. When working with the machine the catch is released by the hand holding the rear handle. 4153 Replacing the starter spring Follow the same procedure as described above for replacement of the starter cord Then loosen the screw holding the spring cassette to the fan casing. Place the eyelet of the spring into the cord before the fitting. In order to guarantee dependable functioning of the starter unit, the cord drum bushing and the starting hooks should be lubricated with silicon oil or similar lubricant at least once a month. Starter unit Replacing the starter cord Loosen the fan casing. Pull out the starter cord a little and prevent the cord drum from rotating back. Place the starter cord in the recess and let the cord drum rotate back. Loosen the lock spring and lift up the cord drum. Pull the new starter cord through the hole In the cord drum and further through the fan casing to the starter handle, where the cord is secured by a knot. Attach the other end to the cord drum. Take up a few turns of the cord and fit the cord drum. Tension the starter spring by giving the cord drum one or two turns clockwise. Pull the starter cord to make sure that the starter unit functions before screwing the fan casing into position. Correct starting position and starting of the machine Due to the setting of the throttle, ’the disc will start to rotate as soon as the engine fires so be sure that you and the machine are firmly positioned when starting. Pull the starter cord out smartly a few times until the engine starts Air filter K1200, The air filter systems consists of a pre-filter (1). a main filter (2) and a spill filter (3) The spill filter may only be replaced by an authorized workshop. The pre-filter can be changed without using any tools and is easy to clean. It protects the main filter from becoming blocked too quickly. Removing the spark plug, K1200/K850: Loosen three screws retaining the cylinder casing. Then lift off the cylinder casing together with the air filter. Loosen the spark plug by using the socket wrench in the tool kit . The pre-filter must be pulled off and shaken clean in connection with every tankning operation. The pre-filter should be thoroughly washed or replaced after 30 hours of operation in steel material or after 20 hours of operation in concrete or similar material which gives rise to intensive dust. Remove the main filter by loosening the nuts retaining the filter housing and lifting off the housing. The main filter is a paper unit of a special quality grade which must not be washed or blown clean. The filter may only be shaken clean. Washing, blowing clean or attempts to clean the filter by using tools damage It to such an extent that it is ruined. When cutting steel, change the filter after about 60 hours of operation and when cutting concrete after about 40 hours of operation. More frequent changing should be carried out when working under more severe conditions. NOTE! Incorrect servicing or neglect to change the pre-filter end main filter at the specified Intervals can result In engine break-down. Carburetor When delivered from the factory the carburetor Is basicly set. This means about ’/4 turns open on both the highspeed screw (H) and the low-speed screw (L). The idling screw (t) is to be screwed in 1/2 turns after contact with the throttle shaft lever. After the saw has been run warm the carburetor is ready for fine adjustment. The lowspeed screw (L) is to be set so that the engine does not stop at idling speed. The high-speed screw (H) is to be set so that the engine runs well at full speed. Then open the screw ’14 turns. The carburetor Is fitted with an excess speed governor to prevent excessively high engine speed, which would result in the cutter disc turning too fast. At full speed and with unloaded disc you can hear clear variations of the engine speed. This is normal and only a sign of the fact that the speed governor is working. The idling screw (t) is set so that the engine runs at Idling speed without the disc rotating. . 4154 Maintenance scheme The following is a summary of various measures mentioned in the book and which Is essential for the correct servicing of the cutting machine The time intervals mentioned should be applied if the cutting machine is used for at least 4 hours every day If the machine is used for a shorter time each day. the shortest intervals can be extended without any ill effects. Unit on cutter Guard Controls Starter unit Air filter Pre-filter Operation Check function Check function Clean and lubricate moving parts Frequency always always every month Shake clean Main filter Spill filter Carburetor Spark plug Clean - replace Clean - replace Check, adjust Check and adjust electrode gap Replace Clean cooling vanes New belt to be tensioned after thereafter check belt tension Replace filter cartridge Check tightening at every tanking operation see page 25 and 27 by authorized workshop when necessary when necessary every other month every other week 1-2 refillings daily at least once a year every week Engine Vee-belt Fuel tank Screws, bolts and nuts 4155 Technical data Engine air-cooled, two-stroke capacity K1200 Ignition system transistor Ignition system spark plug electrode spark gap Electrolux Champion CJ7Y 0.8 mm (.031”) 100 c.c Tilloston HS-175 B 9.600 + 400 Carburetor speed governor range of regulations 4% (1:25) 2% (1:50) 1.0I (1.76 Imp. pints 2.12 US pints) Fuel oil mixture ratio with PARTNER oil tank capacity CUTTING EQUIPMENT Cutter disc Gear ratio Max. peripheral speed 12" (K1200) 1:17 100m/s 4156 100m/s 4157 Table of contents Page no. Foreword ....................................................................................................................................................................4159 Part of the Cut-Off Saw Gasoline ......................................................................................................................................................................4161 Electric 4162 The. Operator Physical condition .......................................................................................................................................................4163 Personal Safety Equipment.........................................................................................................................................4163 Checking the Cut-Off Saw Before Use Attachment ..................................................................................................................................................................4164 Drive Shafts & Flanges................................................................................................................................................4164 Cutter Wheel ...............................................................................................................................................................4164 Cutter Wheel Size .......................................................................................................................................................4164 Reducing Bushings......................................................................................................................................................4164 Blotters 4164 Securing the Cutter Wheel ..........................................................................................................................................4164 Guard...........................................................................................................................................................................4164 V-Belt/Belt Covers .......................................................................................................................................................4165 Handles .......................................................................................................................................................................4165 Vibration Isolating Elements........................................................................................................................................4165 Air Flter 4165 Controls .......................................................................................................................................................................4165 Cooing Passages ........................................................................................................................................................4165 General4165 Cutter Wheels ............................................................................................................................................................4166 Abrasive.......................................................................................................................................................................4166 Areas of Use Masonry.......................................................................................................................................................................4166 Metal Wheels...............................................................................................................................................................4166 Special Wheels............................................................................................................................................................4167 Care and storage of.....................................................................................................................................................4167 Inspection ....................................................................................................................................................................4167 Bursting Wheels ..........................................................................................................................................................4167 Diamond blades ..........................................................................................................................................................4167 Design .........................................................................................................................................................................4167 Characteristics.............................................................................................................................................................4168 Cooling of ....................................................................................................................................................................4168 Direction of Rotation....................................................................................................................................................4168 Protecting your Investment..........................................................................................................................................4169 Carbide Tipped Blade..................................................................................................................................................4169 Special Safety Precautions..........................................................................................................................................4169 Putting the Cut-Off Saw Into Use.............................................................................................................................4170 Fueling.........................................................................................................................................................................4170 Starting ........................................................................................................................................................................4170 4158 Guard...........................................................................................................................................................................4171 Cutter Wheel ...............................................................................................................................................................4171 Working Technique .....................................................................................................................................................4172 Wet Cutting..................................................................................................................................................................4172 Sharpening of the Wheel .............................................................................................................................................4172 Vibrating Wheels .........................................................................................................................................................4172 Reactive Forces ..........................................................................................................................................................4172 Kick-back .....................................................................................................................................................................4173 Pull-in...........................................................................................................................................................................4174 Pinching/Rotation ........................................................................................................................................................4174 Muffler and Exhaust Gases .........................................................................................................................................4175 Maintenance 4175 Safety Regulations ....................................................................................................................................................4176 Foreword Cut-off saws have proven themselves to be very useful and versatile for many jobs - from everyday industrial work where the saw facilitates and makes possible certain jobs, to dramatic rescue work where cut-off saws can save lives. The following Instructions are intended to provide guidelines and advice with respect to the use and handling of the cut-off saw with the accent on safety. The instruction book and the workshop manual provide detailed technical information for each individual model. Due to their special importance, certain sections of this book have been highlighted. However, that does not mean that the remaining text is less important and can be ignored. All instructions should be carefully read and understood. Do not hesitate to call your dealer if you do not fully understand the text or if more information is needed. Since safety regulations can vary between different countries and states, you must always contact the local authorities and carefully follow their regulations. This manual covers both gasoline and electrically powered cut-off saws. When an instruction only applies to one of the two, that will be indicated by a "G" (gasoline) or "E" (electric). All repair work, over and above routine servicing specified in the instruction book, may only be carried out by an authorized service workshop. For safety reasons, only genuine parts should be used for repair purposes. Under no conditions may a cut-off saw be modified from its original design except with the permission of the manufacturer in writing. Non-authorized modifications can lead to serious injury or death to yourself or others. ELECTROLUX MOTOR 3 4159 4160 Parts of the cut-off saw GASOLINE POWERED CUT-OFF SAW Definition: 1. 2. 3. 4. 5. 6. 7. 8. 9. 10. 11. 12. 13. 14. 15. 16. 17. 18. 19. 20. 21. 22. Cutter wheels. Are available in three major types: abrasive wheels, diamond blades, and carbide-tipped blades. Guard. Provide protection against sparks and particles thrown off when cutting. Knob for Guard. Together with 17, the knob locks the guard in position. To adjust the guard, knob 3 and 17 have to be loosened. Front handle. Handle bar for the left hand at the front of the saw. Stop Control. Lever for stop control. When lever is pulled backward, the engine stops. Choke control. Lever for choke control. When lever is pulled backward, the engine is choked. (Starting position, cold engine.) Safety Throttle Lock. Must be depressed before the throttle trigger can be activated. Prevents accidental acceleration. Rear Handle. The support handle for the right hand. Incorporates throttle trigger and safety throttle lock. Vibration Rubber Elements. Isolate the handles from the vibrations of the engine. Throttle trigger. Controls speed of the engine. Starting Throttle Control. To be activated when starting a cold engine. Is released when the throttle trigger is pressed. Drive Flange. Transmits the torque from the drive shaft to the cutter wheel. Starter Grip. The grip of the pull starter which is the device to start the engine. Air Filter. Cleans the incoming air to the cylinder. Muffler. Attenuates exhaust noises and diverts exhaust gases in the required direction. Belt Covers. Protects the operator from getting caught in the V-belt as well as protecting the belt from dust and water. V-belt. Transmits the power from the engine to the cutter wheel. (Not Illustrated.) Cutting Arm. Attaches the cutting equipment to the power head. Knob for Guard. Together with 3, the knob locks the guard in its position. To adjust the guard, knob 3 and 17 have to be loosened. Belt Tensioner. Should be loosened to adjust the belt to proper tension. Clutch. Couples engine to drive wheel when engine is accelerated beyond idle speed (not Illustrated). Fuel Filler Cap. For closing the fuel tank. Note: Different models may have different parts and controls. See your specific model Instruction Book for details. PAGE 4162 DELETED 4161 5 The Operator Physical Condition Never use a cut-off saw without having received Instructions for its use. If not handled properly and with care, a cut-off saw can be a dangerous tool. Operation of a cut-off saw should be restricted to mature, properly Instructed adults. Don’t work when tired under stress, fatigue or under the influence of medicine, drugs or alcoholic beverages. Be alert, If you get tired while operating the cut-off saw, take a break. Tiredness may result in loss of control. Personal Safety Equipment Clothing must be sturdy and snug-fitting but allow complete freedom of movement. Protect your hands with gloves. Heavy duty, non-slip gloves improve your grip and protect your hands. Good footing is most important. Wear sturdy boots with non-slip soles. When working with a carbide tipped blade, steel toed safety boots shall be used. Proper eye protection is a must. Use approved goggles or full face shield. Wear approved helmet to protect your head. Hearing protectors are recommended if the cut-off saw is to be used over an extended period of time (more than 30 minutes per day). A breathing mask should be used if you are cutting material which gives rise to a large amount of dust. Leg protectors can protect your clothes from bums by sparks generated when cutting steel. Checking the cut-off saw before use Checking the cut-off saw before use Competent persons shall be assigned to the inspection and care of the cutting-off machines. Such persons shall be fully instructed in the use, care, and protection of the machines as defined in this manual. Attachment Never modify a cut-off saw in any way. Only attachments supplied by Electrolux Motor or expressly by approved by Electrolux Motor for use with a specific cut-off saw are authorized. Although certain unauthorized attachments may be usable with the powerhead, their use may, in fact, be extremely dangerous. The following inspections should always be carried out on the saw before it is to be used. Drive Shafts and Flanges The drive shaft must be checked to ensure that its threads are not damaged. The contact surfaces on the cutter wheel and flanges must be flat, run true on the arbor, and be free from foreign objects. Do not use flanges that are of different size, warped, nicked, sprung or not clean. Cutter Wheel Check that the wheel you intend to use has been approved for hand-held portable high speed cut-off saws and that the maximum operating speed established for the wheel is PAGE 4162 DELETED 4163 7 not exceeded by the cut-off saw. Immediately before installation, all wheels shall be closely inspected to make sure that they have not been damaged in transit, storage, or otherwise. Cracked wheels or wheels that show any evidence of abusive handling or storage shall not be used. Apart from visual inspection, the following test can be used for abrasive wheels. Support the wheel at the center hole and knock lightly with a piece of wood on the side of the wheel. If there is no ring to the noise, or if the noise sounds cracked, then the wheel is damaged in some way and may not be used. Do not use a wheel that has been dropped. The impact may result In breakage. A diamond or carbide-tipped blade which has lost one or more of its segments (tips) may not be used. Do not discard such a blade. In many cases, it can be repaired. Contact your dealer for more information. Cutter Wheel Size Never use a cutter wheel that is larger than the size for which the guard is dimensioned. The cutter wheel must rotate freely under the guard and must not chafe anywhere. Cutter wheels are normally available in three different sizes of arbor holes (the center hole in the wheel): 20 mm, 7/8" (22.2 mm), and 1" (25.4 mm). The hole and the drive shaft must match each other. There must be a tolerance of 0.2 mm (.010 inch) between the drive shaft and the cutter wheel’s center hole in order to avoid the wheel being subjected to any thrust forces in connection with assembly. If the wheel fits too loosely on the arbor, it can become badly out of true and will noticeably "pound". Do not force a wheel onto the cut-off saw or alter the size of the arbor hole. Do not use a wheel that fits too tight or too loose. If the wheel doesn’t fit the cut-off saw, get one that does. It is also possible on cut-off saws to change the size of the arbor or to use a reducing bushing. Reducing Bushings If a reducing bushing is used in the cutter wheel’s center hole, it must not be wider than the thickness of the cutter wheel and must not come into contact with the flanges. Loose reduction bushings, which are not retained in position mechanically, should not be used together with cutter wheels which are thinner than 3 mm (1/8"). Only an appropriate reducing bushing may be used to compensate for an oversized hole. Blotters Mounting of cutter wheels should incorporate the use of blotters. They should be made of highly compressible material such as blotting paper, and should not exceed 0.5 mm (.020") in thickness. Securing the Cutter Wheel Be sure the flanges are tightened sufficiently to drive the wheel and to prevent slippage, but not too tightly to avoid springing the flanges and changing the pressure area. Guard The guard must be inspected for cracks or other forms of damage. During wet cutting in concrete, the inside of the guard can become clogged by concrete dust. Similar build-up can take place when cutting asphalt or tar paper. The deposits must be removed before a new wheel is installed. Check that the guard moves easily and the locking mechanism functions so that the guard can be moved to different positions and securely locked. Always have the guard property adjusted to the work you intend to carry out 4164 8 V-belt/Belt Covers (G) Keep the V-belt properly tensioned. Too loose or too high tension will drastically reduce the life length of the belt. Always protect yourself and the belt by having the belt covers property mounted. Fingers and/or clothing can get caught in an exposed belt; and as a result, an injury can occur. The covers also protect the belt from exposure to dust, water and other impurities. The protection will increase the life length of the belt. Handles Check that handles are well tightened and not cracked. Keep the handles dry, clean and free from fuel and oil. Vibration Isolating Elements (G) The rubber elements may not be seared or noticeably damaged by exposure to fuel and oil. Damaged vibration elements impair the control of the cut-off saw and may cause you to lose control while working. Air Filter (G) A clean air filter gives the engine more power and reduces the fuel consumption. refueling. Clean prefilter every time when Controls (G) The throttle control must move freely. The carburetor must be adjusted so that idling speed is below clutch cut-in speed. With the wheel off-load and the throttle fully opened, the speed of the cutter wheel must not exceed that in the recommendation. When pulled backward the stop switch must stop the saw. The safety throttle lock may not be put out of service by taping it down or through any other means. (G.E.) Non-working controls imply a safety hazard. You must not run the saw unless all controls work properly. If necessary, have the saw adjusted by an authorized workshop. Cooling Passages Keep all cooling passages and cylinder vanes (G) free from deposits. Clean passages mean lower engine temperature and longer life. General Check power head and the cutter arm for wear and cracks. Check that all the screws are well tightened. Regular maintenance must always be carried out in accordance with the instruction book for each individual model. 4165 9 Cutter Wheels Cutter wheels are available in three basic types: abrasive wheels, diamond blades and carbide-tipped blades. Electrolux Motor branded wheels and blades are specially manufactured for hand-held portable high speed cut-off saws. If another manufacturer’s wheel is used, you must make sure the wheel meets all regulations and standards relating to this kind of hand-held portable high speed equipment. Under no circumstances may the maximum operating speed established for the wheel be exceeded. Certain wheels for special purposes are available which meet the peripheral speed requirements but may not be used for HAND-HELD PORTABLE HIGH SPEED CUT-OFF SAWS. Such wheels may only be used in stationary equipment They may be used together with attachments such as the rail cutting attachment- However, in cams like this, you should always contact your local authorities to make certain that you follow regulations and standards which pertain to your area. ABRASIVE WHEELS The cutting material in abrasive wheels consists of abrasive grains held together by organic bonds. The term reinforced as applied to cutting-off wheels defines a class of organic wheels which have webbing fabric or filament that provides resistance to total breakage at the designated maximum operating speed should the wheel become cracked or damaged. The term reinforced does not apply to wheels which have webbing fabric or filament around the flange area only. The wheel’s performance is determined by: Type of grinding particles Size of grinding particles Type of bonding material Hardness of bonding material An operating condition which causes a wheel to have shorter life and faster cutting rate is said to make the blade act softer. A blade with longer life and slower cutting rate is a harder acting blade. Choice of abrasive wheel should be made according to the best wheel economy. Low priced wheels often have a poor cutting capacity and a short life expectancy. Due to that, their cost per square inch of cut material is very high. The best economy is usually achieved when a high-quality wheel is used. Areas of use Masonry Wheels Can be used to cut concrete, asphalt, stone, masonry, cast iron, aluminum, copper, brass, cables, rubber, etc. This type of wheel is a good all-around wheel with good economy. It can, for example, be used in reinforced concrete with a high content of steel. Water spraying of the wheel during work to decrease dusting is recommended and will increase the life length of the wheel. Metal Wheels Intended for steel, steel alloys and other hard metals. Without competition in this area. The wheel performs poorly in concrete or similar masonry material. Water spraying will decrease the cutting capacity and is not recommended. 4166 10 Special Wheels If your work requires a lot of cutting in the same material, it is often economical to get a wheel that has been specially designed for that kind of material. An example is the rail cutting wheel. This wheel has been specially designed for the quality of the rail material. It provides good life length and high cutting speed. A standard wheel for metal will also cut the rail but much slower and with poor economy. The Care and Storage of Abrasive Wheels Great attention must be paid to the care and storage of abrasive wheels in order to prevent them from being damaged during handling. Thin, abrasive wheels with organic bonding agents must be stored on a level, firm surface and must not be subjected to heat or moisture. If an abrasive wheel is delivered with a fitted cardboard blotter, then a suitable spacer must be placed between the wheels to keep them flat. Abrasive wheels must not be stored in such a way that will expose them to high air humidity, moisture, other fluids or temperatures below the freezing point. Avoid storage at such low temperatures which can result in condensation on abrasive wheels when they are moved from storage to the working site. After the work has been completed, the wheel should be removed after its use and properly stored. If the wheel remains on the cut-off saw, there is a great risk for wheel damage during transport. Inspection Immediately after a pack has been opened, all the abrasive wheels in the pack should be thoroughly inspected in order to determine that they have not been damaged during transport, storage or in any other way. Bursting Wheels Abrasive wheels for use on hand-held portable high-speed cut-off saws belong to a class of extremely strong wheels which are difficult to break under normal conditions. If an abrasive wheel has failed (burst), a thorough investigation must therefor be carried out by the operator to determine the cause of the breakdown so it does not need to happen again. If more assistance is needed, the abrasive wheel manufacturer or the cut-off saw manufacturer must be contacted. Since the more common causes of wheel breakage have been traced to use of wrong wheel, improper mounting, Improper speeds, abusive operation, and/or careless handling of the saw or of the wheel, proper and regular maintenance, service and inspection procedures obviously are of great importance in preventing wheel breakages. Regular inspection and maintenance procedures must, of necessity, be the responsibility of the user. DIAMOND BLADES Used properly, the diamond blades provide both better performance and economy. The diamond blade gives good cutting economy in all masonry materials. Its high cutting capacity also makes the diamond blade suitable for work in reinforced concrete where the blade economy with an abrasive wheel is less beneficial. Normally diamond blades shall-not be used for metal cutting. Design In principle, diamond blades have the same composition as an abrasive disc. Industrial diamonds are held together by a bonding material. Initial cost of a diamond blade is primarily dependent on the diamond content. A popular misconception is that diamond content and performance are directly proportional. This does not always hold true. In 4167 11 practice, there are an optimum number of diamond particles of a specific grit size in a specific metal bond which will provide optimum performance for a specific application. On many applications, lower cutting costs are obtained by using lower, rather than higher, diamond concentration which, in some cases, will not cut at all. Characteristics Compared to an abrasive wheel, a diamond blade has the following features and benefits. Features Benefits Less cost per cut compared to using abrasive wheels Reduced material and labor costs for the contractor Faster cutting than abrasive wheels Less time spent cutting Reduced labor costs Less operator fatigue Increased productivity Substantially reduced number of blade changes compared to abrasive wheels Eliminates wasted labor and time Increased productivity Diamond blade maintains constant depth of cut Eliminates waste caused when abrasive wheels are thrown out before they are completely worn out Increased profits Less dust than high-speed abrasive wheels Improved working conditions Cooling Heat is the number one enemy of a diamond blade. If the heat becomes too high, the joints may melt, and the segment will be thrown away with great force. This implies a safety hazard which may result in possible injuries. Cooling the blade through continuous water sprinkling increases the life expectancy of the diamond blade considerably. This is also true for blades designed for dry cutting. The life length for dry cutting blades can be extended if the work is executed in short cycles where the blade is given an opportunity to cool off somewhat between the work cycles. This is especially true when working in hard materials. To cool the blade periodically by sprinkling water on the blade must be avoided as rapid changes in temperature will shock the diamonds and lower the life of the blade. Direction of Rotation Most diamond blades must run in a specific direction of rotation. Look for an arrow stamped in the blade. If the blade is run in the opposite direction, the blade may be ruined. Protect Your Diamond Blade Investment Your diamond blade will be a good investment only if you take care of it. Do not run the blade in the wrong direction. Do not bump the blade into the workpiece. 4168 12 Do not wedge the blade in the cut. Do not force a blade that has lost its cutting ability. Have it resharpened. See page 16. Do not cool by periodically springling with water. You will only shock the diamonds. Do not keep the blade on the saw during transport. It may be damaged. Do cool the blade by constant water spraying. CARBIDE-TIPPED BLADES Abrasive wheels and diamond blades work primarily through an abrasive action. The carbide-tipped blade has carbide tips brazed to a blade of steel. The cut material is carried away in a cutting action rather than an abrasive action. The blade is suitable for cuts in aluminum, sheet metal, etc., or when you need to cut many different materials at the same time. It is primarily used for rescue work when speed is important, and you have to quickly open an airplane body or make an opening in roofs and doors in fire fighting. It should only be used by specially trained and educated personnel who are familiar with the operation of carbide-tipped blades. Due to its design, the blade can throw large particles of the work piece a long distance. if the blade is forced into the material too fast or if the material suddenly changes hardness; e.g., a heavy nail embedded in a wooden beam, one or more of the tips can come loose. This can happen during normal operation. Those tips or particles from the work piece will be thrown away with great force. If such a tip were to hit an unprotected eye or other exposed part of the body, severe injury could result. This type of blade is more subject to kick back than other cutter wheels Please refer to Page 16 for more detailed information about this safety hazard. Local regulations in certain areas prohibit the use of carbide-tipped blades except when used under special circumstances such as fire fighting or other rescue operations, and no other means are available. Check with your local authorities to conform with all regulations. Special Safety Precautions When using a carbide-tipped blade, the following safety precautions must be followed in conjunction with those mentioned elsewhere in this manual. 1. Only personnel who have received special instruction in the use of carbide tipped blades shall operate the cut-off saw. 2. The carbide-tipped blade shall only be used when the situation warrants such use. 3. The operator must use a helmet with a full face shield. We also strongly recommend approved safety goggles to be used In conjunction with the face shield. Steel toed safety boots shall be used. 4. All personnel assisting the operator must use the same protective equipment. 5. All bystanders not equipped according to (3) above, must be kept at a safe distance as they can be exposed to thrown-away particles. The safety distance should not be less than 30 m. (100 feet). 6. Beware of kick back. Hold the saw firmly with both hands, and encircle fingers around grips, wrapping thumbs on the opposite side from fingers. 7. Special attention should be given to the starting procedure. See Page 14. 8. Do not touch a rotating blade. 9. Carbide tipped blades may only be used on cut-off saws equipped with a slipping clutch. 4169 13 Putting the cut-off saw into use Before the machine is started, the necessary safety checks must be carried out. See Page 7. After ensuring that the saw and the cutter wheel are in good condition and that the maximum cutter wheel speed is not exceeded at full throttle, off load, the saw can then be used. Fueling (G) Your gasoline driven cut-off saw uses an oil/gasoline mixture for fuel. Please refer to your instruction book. Gasoline is an extremely flammable fuel. Use extreme caution when handling gasoline or fuel mix. Do not smoke during fueling or bring any fire or flame near the fuel. Fuel your cut-off saw in well-ventilated areas, outdoors only. Always shut off the engine and allow it to cool before refueling. Relieve fuel tank pressure by loosening fuel cap slowly. Select bare ground for fueling and move at least 3 m. (10 feet) from fueling spot before starting the engine. Wipe off any spilled fuel before starting your saw and check for leakage. Check for fuel leakage while fueling and during operation. If fuel leakage is found, do not start or run the engine until leak is fixed and spilled fuel has been wiped away. Starting (G) Your cut-off saw is a one-person saw. Do not allow other persons to be near the saw. Start and operate your saw without assistance. Place the saw on firm ground or other solid surface in an open area. Maintain a good balance and secure footing. Be absolutely sure that the cutter wheel is clear of you, all other obstructions and objects, including the ground. To start a cold engine, starting throttle (half throttle) must be used. The starting throttle will cause the engine to operate above idle rpm. The engine speed will be fast enough for the clutch to engage the drive wheel and turn the wheel which can cause an accident if the wheel catches something. Hold the saw with a firm grip. When a heavy diamond or carbide-tipped blade is used, the saw can be slightly front heavy. When the saw is placed on its support, it may tilt forward until the blade touches the ground. Before the saw is started, place it on its support to see if it tilts forward. If the saw is front heavy, it should not be placed on the ground after it has been used until the blade has come to a complete stop. During starting, when the saw is placed on the ground, the blade will turn until the starting throttle is released. Do not allow the blade to touch the ground until it has come to a complete stop. (G, E) When you pull the starter grip, don’t wrap the starter rope around your hand. Do not allow the grip to snap back but guide the starter rope fully back to permit the rope to rewind property. Failure to follow this procedure may result in injury to hands or fingers and may damage the starter mechanism. Pull the starter rope out smartly a few times until the engine starts. Your instruction book gives detailed information as to how your specific model shall be started. As soon as the engine starts, the throttle should be squeezed slightly to release the starting throttle. The engine can now assume idle speed. Warning (G) When the throttle control is released, it must move by itself to the idling position. When the engine is idling, the wheel must stop and remain stationary. If the RPM does not return to idle after the throttle is squeezed and released (release of the 4170 14 starting throttle), the cut-off saw must be adjusted. See the appropriate section of your instruction book. Do not drop start. This method is very dangerous because you may lose control of the saw. Never attempt to start the cut-off saw when the wheel is in a cut. This can result in “kick-back” and/or damage to the wheel and implies a safety hazard. Guard The guard must be set so the rear section is close to the work piece. Grinding particles and dust are then trapped by the guard and directed away from the operator. Under no conditions may the guard be modified from its original design except with the permission of the manufacturer in writing. Non-authorized modifications can imply considerable safety risk and cause serious injury. It is strictly prohibited to run the cut-off saw: - Without a guard; - with a guard that is damaged; - with a guard that has an unauthorized modification; - with the guard not properly adjusted. Cutter Wheel When to cutter wheel is new, you should run it at full throttle without load for 30 seconds before putting it to use. The guard must be in place. This test will reveal any hidden defects. If the wheel wobbles or "pounds” or shows any signs of cracks, it must be discarded. Working Technique The different types of wheels have specific characteristics. The following working techniques are of a general nature. Check under the instructions for each type of wheel for their individual characteristics. Best results are obtained if a combination of high wheel speed and high feed pressure are used. Diamond blades require less feed pressure than abrasive wheels. Too high pressure will lower the wheel speed too much. Too high or too light pressure will slow down the cutting speed. The gasoline driven cut-off saw gives best performance around 7000-8500 RPM engine speed. The wheel RPM is always lower due to the belt reduction. Always open the throttle fully before you apply the wheel to the material and regulate the RPM of the cut-off saw by increasing or decreasing the feed pressure. The abrasive cutting operation generates a great deal of localized heat which causes rapid expansion of the piece being cut. Move the wheel slowly backward and forward in the cut to get as small surface area and as high surface pressure as possible. A small surface area reduces friction induced-heat in favor of a more rapid cutting action. That will also ensure conduction of heat away from the wheel. If possible, cool the wheel with water when cutting stone, concrete, etc. The results are less dusting, excellent wheel economy and longer wheel life. Be sure the work piece is securely held down -- both sides of the cut if practical. The work piece should ways be supported so that the cut will open when the cut is executed. Beware of “Pinching”, page 18. Start the cut gently at full throttle. Do not bump or jam the wheel to start a cut. Feed the wheel through the work as fast as possible without slowing the wheel in the cut. Don't baby the wheel through the cut. Do not catch, wedge or jam the wheel in the cut. That will increase the temperature and lower the life expectancy of the wheel. It can also cause an abrasive wheel to break which can lead to possible injury. 4171 15 Wet Cutting Wet cutting is used primarily for two reasons. If the wheel is sprinkled with water, the water will keep the dust down. This is important for the operator as well as the neighborhood. Water sprinkling also cools the wheel which results in a longer life length of the wheel. Wet cutting is thus recommended in masonry materials. Wet cutting is not recommended when metal wheels are used. The disadvantages with wet cutting, except the extra work with hoses and water tanks, are mainly: - the operator will be exposed to water; - problems when working in freezing temperatures; - the mixture of concrete and water could be damaging, for example, to floors. When the work is done and the water sprinkling has stopped, an abrasive wheel should be allowed to run at operating speed for at least 30 seconds before the wheel is stopped. That will allow all water to be thrown off. If a wheel is wet when stored, the water will gather at the lowest part, and the wheel will become out of balance. The imbalance may be so severe that the wheel breaks, you lose control of the saw, or both. In any case, this implies a safety hazard which may result in possible injuries. Due to the risk for electrocution, wet cutting may, under no circumstances, be used in conjunction with any electric cut-off saw. Sharpening of the Wheel The wheels become dull very fast and lose their cutting ability if the bonding material is not worn away at a proper speed. This could happen if a too low feed pressure is used or when cutting in heavily reinforced concrete. The steel will polish the wheel rather than grinding away the binding material. When using a dry cutting diamond blade, it is extremely important that the blade is kept sharp as the risk for too high temperatures is greater during dry cutting. If you continue to force a wheel that has lost its cutting ability, this will result in over heating, and if using a diamond blade, eventually the loss of one or more segments. Dress (cut) on soft material such as sandstone, silica brick, haydite brick, or similar. The wheel may require additional dressing (sharpening) if hard material is still being cut. Vibrating Wheels If the wheel is jammed into the material or too high feed pressure is used, the wheel may become out of round. This will cause the wheel to vibrate. Lower the feed pressure until the vibration has disappeared. When a lower pressure is used, the wheel has a tendency to round itself. If the vibration does not disappear, the wheel has to be discarded. DO NOT DO NOT use a wheel that has been dropped. The impact may result In breakage. DO NOT, under any circumstances, cut with the side of the abrasive wheel. If the side is used, the reinforcing web will be cut off. Due to the high peripheral speed, large sections of the wheel can be broken off and thrown away at high speed. This Is a safety hazard and can cause serious injury to the operator or any bystander. Reactive forces Reactive forces that may occur during any cut are kick-back, pull-in and rotation. Reactive forces can be dangerous. With any cut-off saw, the powerful force used for the cutting operation can be reversed and work against the operator. If the rotating wheel is suddenly stopped by contact with a workpiece, the reactive forces instantly occur. 4172 16 These reactive forces may result in Ioss of control which may, in turn, cause injury. An understanding of the cause of these reactive forces may help you to avoid loss of control. Kick-Back Kick-back may occur when the outer quadrant of the wheel contacts the work piece or is pinched. The reaction of the cutting action of the wheel causes a rotational force of the cut-off saw in the direction opposite to the wheel movement. This may fling the saw in an uncontrolled arc mainly in the plane of the wheel. Under some circumstances, the wheel can move toward the operator and may cause severe injury. The greater the force of kick-back reaction, the more difficult becomes for the operator to control the saw. Many factors influence the occurrence and force of the kick-back reaction. - The speed of contact at which the wheel contacts the object. Kick-back forces increase with rate of impact. - The contact angle between the wheel and the object. Kick-back is most pronounced in the outer quadrant of the wheel. - Type of wheel used. Kick back can occur with any wheel. However, due to its design, carbide tipped blades are more subject to kick back and they also cause a more severe injury if they touch a person. To avoid kick back The best protection from personal injury that may result from kick back is to avoid kick-back situations. 1. Hold the cut-off saw firmly with both hands. Use a grip with the thumb and fingers encircling the handles as shown. 2. Maintain a good balance and secure footing. 3. Avoid cutting with the outer quadrant of the disc. 4. Don’t overreach. 5. Don’t cut off balance. 6. Begin and continue cutting at full throttle. 7. Use caution when reentering a previous cut. 8. Be alert for shifting of the work piece or other forces that may cause the cut to close and pinch the wheel. 4173 17 Pull-in Pull-in occurs when the lower quadrant of the wheel is suddenly stopped or if the cut slowly closes. The reaction of the wheel pulls the cut-off saw forward causing the operator to lose control. To avoid pull-in Same as for avoiding kick back. The reasons for pull in are mostly too low wheel speed or a closing cut. In the latter case, the work piece is not properly supported. See “Pinching" below. Pinching/Rotation Be alert for shifting of the work piece or other forces that may cause the cut to close or pinch the wheel. If the closing forces are strong enough, the wheel cannot work itself away from the work piece as in the case of kick back. When the wheel stops, the reactive forces will, with great force, pull the cut-off saw downwards, rotating around the center of the wheel. 4174 18 To avoid pinching The work piece should always be supported so the cut will open (not close) when the cut is executed. Muffler and Exhaust Gases The noise from a two-stroke engine may cause impaired hearing, especially over a long period of use. Always wear hearing protectors while working with a cutoff saw. The muffler should be in good condition. A cracked or broken muffler increases the noise level which is detrimental both to the operator and the neighborhood. When the engine is running, the muffler is hot and causes bums if touched. The exhaust gases contain poisonous elements such as carbon monoxide. Only run the cut-off saw in welIventilated areas. Special attention must be given to the danger of carbon monoxide poisoning if working in deep excavations and trenches. Such poisoning can be fatal. Maintenance Please refer to the instruction book for your model which lists necessary maintenance and service work that can be performed by the operator. 4175 19 Safety Regulations Any person who is to use and/or be responsible for the maintenance of a cut-off saw must be well acquainted with current safety regulations, the way in which the machine is to be used, and serviced. Use cutter wheels which have been selected and tested for these types of cutoff saws from the viewpoints of safety, cutting capacity and life length. 1. Never use a cut-off saw unless you have been trained for this purpose. If not handled properly and with care, a cut-off saw can be a dangerous tool. Operation of a cut-off saw should be restricted to mature, properly instructed adults. Contact your local authorities and carefully follow their regulations. 4176 20 2. 3. 4. 5. 6. 7. 8. 9. 10. 11. 12. 13. 14. 15. 16. 17. 18. 19. 20. 21. 22. Don’t work when tired, under stress, fatigue or under the influence of medicine, drugs or alcoholic beverages. Do not work alone. Make sure you can contact people in the event of an accident. The following safety equipment must always be used: - Helmet - Hearing protectors - Protective goggles of approved type - Snug fitting clothing - Safety footwear Check out the cut-off saw before it is to be used. Never use a saw that is damaged, faultily adjusted or not completely and securely assembled. The saw must never be used without the guard. The guard must be adjusted so that its rear section is close to the work piece. Only use cutter wheels that have been approved for hand-held portable high-speed cut-off saws. The maximum operating speed established for the wheel may never be exceeded. Inspect all wheels before mounting for possible damage in transit. Do not use a wheel that has been dropped. Always allow newly mounted abrasive wheels to run at operating speed with guard in place for at east 30 seconds before you start to use them. (G) Always be very careful when handling fuel. Move the cut-off saw at least 3 m. (10 feet) from the fueling spot before starting the engine. Do not permit anyone to stand close to the cut-off saw when it is running or in use. Make sure spectators or animals are kept away from the working site. (G) Before starting and using the machine, make sure that you have a secure foot-hold. When the machine starts, the cutter wheel begins to rotate. This makes it important to stand firmly and ensure that the wheel can rotate freely. Do not start cutting until you have a clear work area and secure footing. Always hold the cut-off saw with both hands while the engine is running. Use a firm grip with thumbs and fingers encircling the handles. Keep all parts of your body away from the cutting-off wheel when the engine is running. When the throttle control or switch is moved to the idling position, the cutter wheel must stop and remain stationary. Keep the handles dry, clean and free from oil or fuel. Do not cock jam or wedge the wheel in the cut. Do not grind on the side of a cutting-off wheel. Do not cause sparks in the vicinity of anything that is flammable. After wet cutting, an abrasive wheel should be run at operating speed for 30 seconds after water sprinkling has ceased to allow all water to be thrown off. (G) Exhaust fumes are poisonous. Only use the cut-off saw in well-ventilated places. Failure to use the cut-off saw in well-ventilated areas can lead to carbon monoxide poisoning. The engine must be switched off when the cut-off saw is carried. Make sure the muffler faces away from your body. The cutter wheel must be removed from the cut-off saw when it is transported or stored. All service with the exception of maintenance service described in the instruction book must be carried out by an authorized service workshop. Under no conditions may a cut-off saw be modified from its original deign without the written permission from Electrolux Motor AB. Non-authorized modifications can lead to serious injury or death to yourself or other people. 4177 21 BLACKHAWK Porto-Power Operating Instructions Body Repair Equipment Printed in U.S.A. 1/85 IS-306 4178 PORTO-POWER SOLVES 1,001 FORCE RELATED PROBLEMS • • • • • Auto Body/Frame Repair Heavy Duty Truck Repair & Maintenance Construction - Road Equipment - Building, Etc. Farm - Fleet Equipment Maintenance Rescue And the list could go on and on. Your Porto-Power is the world's finest remote controlled hydraulic jack. Porto-Power, with its wide range of rams and attachments, provides countless combinations for pushing-pulling-spreading clamping and pressing. It has universal application in all of the above mentioned fields. Porto-Power has been designed and engineered with unusual thought and consideration to help you solve difficult problems and make your job easier. The wide variety of field-tested attachments can be assembled into many combinations providing you with 1,001 valuable aids to make your work more efficient. Porto-Power - BIackhawk are registered trade marks 4179 TROUBLE-SHOOT CHART SOLUTIONS 1. 2. Ram won’t extend all the way Usually just low on hydraulic fluid. FILL MARK ON DIP-STICK. DON’T OVERFILL. Ram should be fully retracted to check oil level. This hydraulic unit needs tile prescribed amount of air chambered in the reservoir, as it works on a partial vacuum to avoid venting to the outside. Spongy effect Air trapped in the hydraulic system easily compresses under pressure and causes spongyness. To bleed system: Place pump at a higher elevation than the hose and ram. The objective is to "float" the air bubbles up hill and back to the reservoir where they belong. See figure 1. Figure 2. 3. Figure 1. Close valve and extend ram as far as possible. Open valve fully allowing oil and air to return to reservoir. Repeat this procedure until ram starts to extend on the first stroke of the handle. Usually two or three times will do the trick. Ram won’t retract Usually just too much oil and/or air in the system. Bleed system and fill to proper level. If that doesn’t correct the problem, inspect closely for a bent plunger. If neither of these is the cause, the quick-coupler is probably damaged. Replace it. TROUBLE-SHOOT CHART 4180 4. Ram leaks down under pressure Make sure release valve is fully closed. If it still leaks down, there is probably dirt in the return check ball valve. Flush the system with mineral spirts or kerosene. lf the problem still exists, valve is damaged and unit should go to a Blackhawk authorized repair facility. 5. Handle kick-back Dirt in check valve - flush system. Damaged check valve · should go to Blackhawk authorized repair facility. 6. Works properly one time, but not the next Loose dirt or air bubble In valve system. Flush and refill system. Extreme care should be taken when using extension tubing and/or offset attachments to prevent damage to these Items due to overloading. WARNING DO NOT OVERLOAD RAM. OVERLOADING CAN CAUSE CRACKED CYLINDERS, BLOWN CAPS, BENT PLUNGERS AND RUPTURED HOSES. DO NOT OVER- EXTEND THE RAM. THIS MAY PUSH THE PLUNGER OUT OF THE TOP OF THE RAM WITH !VIOLENT RESULTS. WHEN USING A CHAIN DO, NOT STAND IN LINE WITH THE CHAIN AT ANY TIME. DO NOT CROSS TWIST, KINK, KNOT OR SHORTEN ANY CHAIN WITH A PIN. DO NOT ALLOW RUNNING LOADS TO PASS OVER CHAINS. DO NOT USE CHAINS OVER SHARP CORNERS WITHOUT PROTECTIVE PADDING. DO NOT FORM A LOOP BY PUTTING THE POINT OF A HOOK INTO A LINK. DO NOT USE HEAT NEAR OR ON A CHAIN OR ANY ATTACHMENT. DO NOT USE A CHAIN WHOSE LINKS ARE TWISTED OR BENT, HAVE, NICKS OR GOUGES, SHOWS EXCESSIVE WEAR STRETCH OR SPREAD IN THE LINKS. ANY SUCH CHAIN SHOULD BE REPLACED IMMEDIATELY. FAILURE TO HEED THESE WARNINGS MAY RESULT IN DAMAGE TO THE EQUIPMENT AND/OR FAILURE RESULTING IN PERSONAL INJURY AND/OR PROPERTY DAMAGE. CAUTION: DO NOT USE: BRAKE, TRANSMISSION OR ANY FLUID OTHER THAN A GOOD HYDRAULIC OIL. 67070 BLACKHAWK (LX21) OR EQUIVALENT. FLUIDS OTHER THAN HYDRAULIC OIL MAY DAMAGE CUPS AND PACKINGS, CORRODE METAL PARTS AND VOID YOUR WARRANTY. FOR AIR OPERATED HYDRAULIC PUMPS REFER TO INSTRUCTION MANUAL FOR THAT SPECIFIC PRODUCT. TO USE: Select the best ram suited for your application. Connect it to the pump and hose by placing the male end of the coupler firmly into the ram half. Tighten threaded collar coupler down completely by hand. (Pliers or vise-grips will damage the seat) FUNCTION: Porto-Power equipment Is designed to perform many functions The pump, ram and attachments may be used to: Thread or push on the desired attachments to the ram. To extend the ram close the release valve, located near the hose end of the pump, by turning clockwise until fingertight. It Is not necessary to overtighten this valve as this will cause wear or breakage. To operate the pump hold in the horizontal or vertical (hose end down) position and pump the handle. Porto-Power is available with either threaded/lock-on or SS" slip-on tubing and attachments. Threaded/ lock-on tubing and attachments can be threaded together or "lock-on" connectors can be used. "SS" slip-on tubing and attachments are not threaded and just push together for fast, easy set up. Adaptors are available to connect one to the other. CAUTION: When using threaded extensions and attachments, always thread all the way In. The se offset attachments reduces the capacity of this equipment by one-half. To release the ram and load turn the release knot slowly, counter-clock-wise. 4181 Always position set-up so that the hose and Speed-DCoupler have clearance when the ram is extended. TO PROTECT THIS EQUIPMENT: Guard ram threads with protector ring whenever possible. Protect ram plunger end or threads by using serrated saddle or other pushing attachments. Keep your equipment away from excessive heat and flame such as welding or cutting torches. Such damage may weaken or damage the equipment, expecially hoses and flex heads, and could lead to failure or personal injury. Guard against the entrance of dirt and foreign matter into the system as this may cause pump failure when coupler halves are disconnected always screw on the dust caps. Do not adjust spring retaining screw located in the cylinder wall near the bottom, of the 20 and 50 ton rams. This screw anchors the plunger return spring and is not adjustable. IMPORTANT: When applying off-center loads use extreme caution, and pump carefully. Off-center loads produce strain on the ram plunger, attachments, and extension tubes, which may result in equipment failure. Loads will be off-center when using such attachments as: Notched Pull Toe, Edge Clamp-Pusher-Head, Adjustable Body Spoon and Lift Toe. (See figure 3) MAINTENANCE: As with any fine tool, care must be taken to keep equipment clean. Periodically clean and lubricate all moving parts. Always store equipment in a clean dry area to prevent corrosion. Repair or replace damaged, marred or bent extensions and threads before its next use. One damaged thread and one good thread equals two damaged threads. INSPECTION: Visual inspection should be made before each use of the equipment, checking for leaking hydraulic fluid, damaged, loose, or missing parts. All equipment must be Inspected by a Blackhawk authorized repair facility immediately if accidently subjected to an abnormal load or shock. Any equipment which appears to be damaged in any way, is found to be badly worn, or operates abnormally MUST BE REMOVED FROM SERVICE until necessary repairs are made by a Blackhawk authorized rep r facility. It is recommended that an inspection of the equipment be made by a Blackhawk authorized repair facility once a year, and that any defective parts, decals or warning labels be replaced with manufacturer’s specified parts. A list of authorized repair facilities is available from Blackhawk. Figure 3. OFF-CENTER LOAD REDUCES CAPACITY WARNING HIGH PRESSURE HYDRAULIC OIL CAN CAUSE PERSONAL INJURY. DO NOT HOLD HOSE OR FITTINGS IN YOUR HAND WHILE UNDER PRESSURE. OWNER AND/OR USER RESPONSIBILITY: Owner and/or user must study and keep these instructions for future use. DO NOT DROP HEAVY OBJECTS ON HOSE. A sharp impact can damage wire braid of hose leading to possible failure or personal injury. Avoid sharp kinks and bends in hose. Periodically, inspect hoses for kinks, cuts and bulges. Remove hose from service immediately if the foregoing are observed. Do not carry the pump by the hose. OPERATION: The owner and/or user must have an understanding of these operating instructions and warnings before using this equipment. Warning information is very important and should be fully understood. If the operator speaks or reads a language other than English, these instructions and warnings must be read to and discussed with the operator in the operator’s native language. The purchaser/owner must make sure that the operator understands its contents. 4182 BASIC SET-UPS USING PORTO-POWER RAMS AND ATTACHMENTS. THE PUSH, SPREAD, CLAMP, PULL, AND STRETCH SYMBOLS SHOWN BELOW AND ON THE FOLLOWING PAGES TELL YOU HOW EACH SET CAN WORK FOR YOU. OFFSET LOADS REDUCE CAPACITY BY ONE HALF. 4183 4184 WARRANTY COMMERCIAL WARRANTY: This equipment is warranted by Applied Power Inc. to the original commercial user- owner against defective materials or workmanship for a period of 90 days from the date of delivery. Hand jack models 67225, 67226, 67227, 67228, 67229, 67230, 67237, 87239, 67240, 87242, 67245, 67246 and all Porto- Power- equipment and accessories are warranted for a period on one (1) year from date of delivery. During the warranty period, equipment found to be defective will be repaired or replaced (at the warrantor’s option) without charge. The equipment must be returned, transportation charges prepaid, with proof of delivery date to an Authorized Service Center. The repaired or replaced equipment will be returned with transportation charges prepaid by the Service Center. This warranty does not cover defects in the equipment caused by ordinary wear and tear, abuse, misuse, overloading, accident (including shipping damage), improper maintenance, alteration, use of improper fluids, or any other cause not the result of defective materials or workmanship. REPAIR OR REPLACEMENT IS THE EXCLUSIVE REMEDY FOR DEFECTIVE EQUIPMENT UNDER THIS WARRANTY. THIS WARRANTY IS EXPRESSLY IN LIEU OF ALL OTHER WARRANTIES, INCLUDING ANY IMPLIED WARRANTY OF MERCHANTABILITY OR ANY IMPLIED WARRANTY OF FITNESS FOR A PARTICULAR PURPOSE ON THIS EQUIPMENT. APPLIED POWER INC. SHALL NOT BE LIABLE FOR ANY CONSEQUENTIAL OR INCIDENTAL DAMAGES FOR BREACH OF ANY EXPRESS OR IMPLIED WARRANTY ON THIS EQUIPMENT. Service parts, warranty, and regular repair service for products are available through a nationwide system of Authorized Service Centers which are carefully selected by the Automotive Division. Your distributor or jobber can provide you with a list of Service Centers in your area. For additional PRODUCT AND SERVICE Information Contact: Applied Power Inc. Automotive Division P.O. Box 27207 11 333 W. National Ave. Milwaukee, WI 53227 1-800-558-4558 (Not valid In Wisconsin) PRODUCT REPAIR: Products for repair should be forwarded to the nearest Service Center. PRODUCTS FOR REPAIR SHOULD NOT BE RETURNED TO THE FACTORY. Applied Power Inc. Automotive Division PO 80x 27207 4185 INSTALLATION AND SERVICE INSTRUCTIONS 4186 SECTION I GENERAL DESCRIPTION and radio volume are adjustable by means of a front panel GAIN control. Radio interconnect wires are built in. No additional cables are required. The Model PA300’s 100-watt output is designed to drive a single high power speaker. The Tap II feature allows the driver to change the siren sound from wail to yelp (or vice-versa) via the vehicle’s horn ring. Tap II provides especially effective traffic clearing capability. In addition to Tap II, additional alternate sounds can be activated in two other selector switch positions by depressing and holding the horn ring for as long as the alternate sound is desired. The charts in Section IV of this manual illustrate the operation of these features more fully. Figure 1-1. Mod PA300 Electronic Siren. Other special features of the Model PA300 The Federal Model PA300 (figure 1-1) is a precision built, efficient and economical, full-featured electronic siren of advanced design. It provides wail, yelp and hi-lo siren tones, as well as the Tap II feature, public address (PA), radio rebroadcast and an air horn sound. include: The siren may be installed in positive or negative ground vehicles with 12-volt electrical systems. It is protected against failure modes (including reversed polarity) by a fuse that is replaceable without tools. No components protrude from the bottom of the siren to interfere with mounting arrangements. A noise-cancelling microphone is wired-in to prevent loss or theft. It provides high quality voice reproduction without feedback "squeal". The microphone push-to-talk switch overrides any siren signal for instant PA use. PA 4187 -1- o High degree of reliability is achieved through the use of integrated circuits and silicon output transistors. o Control panel is illuminated with non-glare lighting. o Newly designed printed circuit board provides improved performance and durability under a wide range of environmental conditions. SECTION II SPECIFICATIONS Input Voltage ........................................................................................ 11VDC to 16VDC (16V operation limited to 15 minutes). Polarity.................................................................................................. Negative or positive ground. Standby Current ................................................................................... 50mA max. (not incl. panel light). Operating Temperature Range ............................................................ -300C to +650C. Operating Current (14VDC-Wail mode) ............................................... 10 amperes, max. Frequency Range ................................................................................. 500 to 1500Hz. Cycle Rate ............................................................................................ Wail-10 cycles/min. Yelp-180 cycles/min. Hi-Lo-60 cycles/min. Voltage Output (approx.) ...................................................................... 64V peak-to-peak. Dimensions (HWD) .............................................................................. 2-1/2" (6.35cm) x 6-1/2" (16.51cm) x 8-1/2" (21.59cm). Net Weight (incl. microphone) ............................................................. 4-1/2 lbs. (2.04kg). Shipping Weight ................................................................................... 6-1/2 lbs. (2.94kg). NOTE The following parameters were obtained with the radio input potentiometer and GAIN control set at maximum. Audio Frequency Range....................................................................... 300 to 10,000Hz Harmonic Audio Distortion (300-3,000Hz)............................................ 10% max. all power levels from 1/2 to 50 watts (frequency response ±3dB). Input Impedance (Radio)...................................................................... 2000 ohms Input voltage required to obtain 20VRMS across speaker load (Radio) ................................................................ 0.55VRMS 4188 -2- SECTION III INSTALLATION 3-1. A. Use one of the mounting brackets as a template and scribe two drill positioning marks at the selected mounting location under the dash. UNPACKING. After unpacking the Model PA300, examine it for damage that may have occurred in transit. If the equipment has been damaged, file a claim immediately with the carrier stating the extent of the damage. Carefully check all envelopes, shipping labels and tags before removing or destroying them. 3-2. B. Drill two 1-inch diameter holes at the position marks. C. Secure the mounting bracket to, the dash with (2 each) ¼-20 x 3/4 hex head screws, ¼ split lockwashers and ¼-20 hex nuts as shown in figure 3-1. MOUNTING BRACKET. D. Secure the PA300 unit to the mounting bracket with 1-20 x 3/8 hex head screws and I split lockwashers. The PA300 comes equipped with a swinging bracket which enables it to be mounted in a variety of positions. Positioning the bracket above the unit allows mounting to the underside of the dash. Positioning the bracket below the unit will permit mounting on any horizontal surface or, by the use of Federal’s TU-70 Tunnel Mount on the vehicle’s transmission hump. E. Tilt the unit to the desired position. Tighten the 1-20 x 3/8 hex head screws. NOTE: When installing the PA300 on the transmission hump, a Federal Model TU-70 Tunnel Mount is recommended. The TU-70 Tunnel Mount is drilled and tapped for the PA300 mounting bracket. The unit should be mounted in a position that is both comfortable and convenient to the operator. Keep visibility and accessibility of controls in mind. To install the unit under the dash, determine the mounting location and proceed as follows (see figure 3-1). Follow the installation instructions packed with each unit. 3-3. CAUTION. POWER CABLE INSTALLATION. The power cable included in the carton is equipped with a twelve-prong plug (P5) that mates with the connector (J5) on the rear of the electronic siren (see figure 3-2). The various wires on the connector must be connected as described below. The unit must be installed in an adequately ventilated area. Never install near heater ducts. 4189 -3- C. Horn Ring. In order to utilize the Tap II and Press-and-Hold features of the siren, the following procedure must be performed. 1. Locate the wire that connects the vehicle horn ring switch to the horn or horn relay. Cut this wire. 2. See figure 3-4. Splice the white/yellow control cable wire (P5, pin 7) to the horn ring side of the wire that was cut in step 1. Insulate the splice with the wire nuts (supplied). Figure 3-2. Rear View of PA300. WARNING CAUTION Do NOT connect the siren to the vehicle battery until ALL other electrical connections have been completed. A. The horn ring transfer circuit of the siren is capable of switching a maximum of 2amperes. Some vehicles do not have a horn relay and, consequently, will draw more than 2-amperes when the vehicle horn is activated. Consult your vehicle service manual or a qualified mechanic to determine the current required to activate the horn. If it is less than 2amperes, perform the procedure in step 3. If it is greater than 2-amperes, perform steps 4 through 10. Speaker. The unit is designed to operate with one 11-ohm, high power speaker. A speaker is not included as part of the electronic siren. FEDERAL speakers are weatherproof and may be installed in any convenient location; on the roof, fender, behind the grille, etc. Any special mounting instructions applicable to the type of speaker you have selected will be found in the speaker carton. Connect the speaker leads (18 gauge wire) to the blue power cable leads of P5 (pins 1 and 3) as shown in figure 3-3. B. Radio. To allow incoming radio messages to be rebroadcast over the outside speaker, connect the two brown zip cord leads (P5, pins 9 and 12) across the twoway radio’s speaker. Figure 3-4. Horn Ring Connections. Figure 3-3. Control Cable Wiring Diagram. 4190 -4- 3. Splice the white control cable wire (P5, pin 10) to the horn side of the cut wire. Insulate the splice with a wire nut. When drilling holes on ANY part of the vehicle, ensure that both sides of the surface are clear of parts that could be damaged; such as brake lines, fuel lines, electrical wiring or other vital parts. 4. Obtain a SPST relay of sufficient contact current capacity to activate the vehicle horn. Refer to figure 3-4 while performing the following steps. 5. If your vehicle has a negative ground electrical system, perform the procedure in paragraph 1. Perform the procedure in paragraph 2, if the vehicle has a positive ground system. Mount the relay in a suit- able location. 6. Connect the horn side of the wire cut in step 1 to the relay contact terminal. 1. 7. Determine the "sense" of the vehicle’s horn ring activation circuit, i.e., does the horn circuit require a switched positive voltage or switched ground for activation. a. Connect the green (PS, pin 5) and black (PS, pin 4) control cable leads to the vehicle chassis as close as practical to the siren. Scrape paint away from the selected bolt hole to ensure a good electrical connection to the chassis. 8. Connect the relay wiper terminal to the positive or negative potential determined in step 7. b. Route the red control cable lead (P5, pin 6), through the previously drilled hole, into the engine compartment. Route the wire through existing clamps and holders toward the battery. 9. Connect the white control cable wire to one end of the relay coil. 10. Connect the other end of the relay coil to the opposite potential of that connected to the wiper in step 8. D. Negative Ground. c. To protect the wire when connected to the battery terminal, use an in-line fuseholder and 15-ampere fuse (not supplied). The fuseholder should be installed as close as practical to the battery. If necessary, additional #14 gauge or heavier wire can be spliced to the red lead. Connection to Power Source. The PA300 can operate from any 12-volt positive or negative ground vehicle electrical system. Therefore, before making any electrical connections, determine the polarity of the vehicle electrical system ground. d. Connect the in-line fuseholder lead to the positive (+) battery terminal. 2. Power for the siren can be obtained from the vehicle’s power distribution center (Federal’s Model PDC70 is recommended) or directly from the vehicle battery. If power is going to be obtained directly from the vehicle battery, drill a hole in the vehicle firewall for the power lead to enter the engine compartment. Place a grommet or similar device in the hole to protect the wire against damage from rough edges. Positive Ground. a. Connect the green (PS, pin 5) and red (PS, pin 6) control cable leads to the vehicle chassis as close as practical to the siren. Scrape paint away from the selected bolt hole to ensure a good electrical connection to the chassis. b. Route the black control cable lead (PS, pin 4), through the previously drilled hole, into the engine compartment. Route the wire through existing clamps and holders toward the battery. CAUTION 4191 -5- c. To protect the wire when connected to the battery terminal, use an in-line fuseholder and 15-ampere fuse (not supplied). The fuseholder should be installed as close as practical to the battery. If necessary, additional #14 gauge or heavier wire can be spliced to the red lead. 3-5. After the PA300 is completely installed in the vehicle, set the Selector switch to MANUAL. Depress the microphone push to-talk switch, speak in a normal voice, and adjust the GAIN control for the desired sound level outside the vehicle. Turn on the vehicle’s two-way radio and adjust the volume to a comfortable listening level inside the vehicle. Then set the Selector switch to radio. Stand outside of the vehicle and note the radio rebroadcast loudness. If the sound volume is too loud or too soft, adjust R11 through the hole at the bottom of the siren (see figure 3-6) to the desired sound level. d. Connect the in-line fuseholder lead to the negative (hot) side of the battery terminal. 3-4. AIR HORN MODIFICATION. PRESS AND RELATIVE PA LOUDNESS ADJUSTMENT. HOLD The unit comes from the factory set so that the peak-and-hold sound will be heard when the Selector switch is set to MANUAL and the vehicle horn ring is activated. To change the sound to air horn, merely move jumpers JU1 and JU2 from the "PEAK" position on the P.C. board to the "AIR" position (see figure 3-5). After the adjustment is completed, the loudness of the radio rebroadcast and public address may be varied with the front panel GAIN control. Figure 3-5. Press and Hold Modification. Figure 3-6. Relative PA Loudness Adjustment 4192 -6- SECTION IV OPERATION 4-3. SELECTOR SWITCH. The Selector switch is a five-position rotary switch used to select the mode of operation. The following are positions on the Selector switch. A. RADIO. In this position, incoming radio messages are amplified by the siren and rebroadcast over the outside speaker. B. Figure 4-1. Model PA300 Front View. 4-1. In this position, it is possible to operate the siren by activating the HORN/SIREN switch. The siren can also be activated by means of an auxiliary switch, such as the horn ring button (refer to paragraph 4-6). GENERAL. All controls utilized during normal operation of the Model PA300 are located on the front panel (see figure 4-1). C. WAIL. In this position, the siren produces a continuous "wailing" sound, up and down in frequency. The wired-in noise cancelling micro- phone provides high quality voice reproduction in the public address mode. The microphone push-to-talk switch will overide all siren functions, except radio rebroadcast, for instant PA use. 4-2. MANUAL. D. YELP. In this position, a continuous rapid "warbled" tone is generated. GAIN CONTROL. E. The GAIN control is used to turn the siren on and off. Also, it is used to control the volume when the siren is used for public address or radio amplification. Clockwise rotation of the knob increases voice volume in the public address or radio amplification mode. The GAIN control does not control the volume of the siren signals. HI-LO. In this position, a two-tone sound will be heard. This distinctive tone may be reserved for any special indication or situation. 4-4. HORN/SIREN SWITCH. The HORN/SIREN switch, located on the left side of the front panel, activates the electronic air horn sound (up) or peak-and-hold sound (down) in any siren mode except radio. The maximum clockwise setting of the control will be determined, in most cases, by the point at which feedback or "squeal" occurs. This will depend upon the microphone gain, open windows, speaker placement, proximity of reflecting surfaces (building or other vehicles), etc. Adjust the GAIN control to a position just below the point at which feedback occurs or as desired. 4-5. TAP II FUNCTIONS. Tap II allows the driver to change the audible siren sound via the vehicle’s 4193 -7- horn ring. This feature is especially effective for clearing traffic. The chart below demonstrates how the horn ring can be used to change the siren sound: Selector Switch Position Wail Yelp 4-6. PRESS AND HOLD FUNCTIONS. Additional alternate sounds can be activated in two other Selector switch positions, by depressing and holding the horn ring for as long as the alternate sound is desired. The chart below shows these additional "Press and Hold" functions: TAP II FUNCTIONS First Horn Second Horn Ring Tap Ring Tap Produces Produces Yelp Wail Wail Yelp PRESS AND HOLD FUNCTIONS Selector Switch Position Hi-Lo Manual 4194 -8- Press on Horn Ring Produces Air Horn Peak and Hold or Air Horn Release of Horn Ring Produces Hi-Lo Coast down and silence or silence SECTION V CIRCUIT DESCRIPTION 5-1. GENERAL. The siren rate oscillator consists of an LM556 dual timer configured as two astable oscillators. The first astable oscillator (IC12A) employs analog switches (IC10A, IC10B) to select the resistance for the RC timing network which determines the astable oscillator’s cycling rate. IC10C, another analog switch, connects the discharge pin of IC12A to the RC timing network. When the peak function is called for, the control pin (IC10-6) goes low putting the switch in a high impedance state (OFF), and allows the RC rate capacitor (C11) to charge as the siren tone peaks. The Model PA300 circuitry can be divided into seven functional blocks. Refer to figure 5-1 and 6-4 while reading the following paragraphs. 5-2. RATE OSCILLATORS AND CONTROLLED OSCILLATOR. VOLTAGE The heart of the Model PA300 circuitry is the rate oscillator and VCO sections. The rate oscillator not only determines the cycling rate of each siren tone, but also generates the control voltage that operates the voltage controlled oscillator (VCO). The VCO generates a square-wave output whose frequency is directly proportional to the control voltage. The output of the VCO is coupled to the siren’s power output amplifier. IC12B, another astable oscillator, generates the control voltage required to generate the air-horn sound. Normally, IC 12B is held in the reset state (IC12-10 low) until the air horn control line is pulled high. Figure 5-1. Function Block Diagram. 4195 -9- IC8C, a one-of-two analog switch, selects the siren or air horn control voltage from IC12A or IC12B. IC8B selects either the RC control voltage (manual, wail and yelp modes) or the square wave control voltage (hilo) derived from the output of IC12A. The voltage divider network of R27, R28, R29 and CR8 provides the DC level shifting of the IC 12A output necessary to obtain the desired hi-lo tone frequencies. When the siren is in the wail or yelp mode, the horn ring pulse passes to the input of IC6A, is "debounced", and then applied to toggle flip-flop IC6B. Every time the horn ring is operated, the output of IC6B (pin 5) changes state and inverts the state of the yelp control line. (The exclusive OR gate contained in IC13 functions as a controlled inverter where a logic "1" present on pin 3 forces the output (pin 2) to Y or "yelp not".) IC13, a phase-locked loop, contains the voltage controlled oscillator. C21, R46, R47, R57, and the control voltage on pin 9 determine the output frequency. If the Selector switch mode is changed during a Tap II operation, the circuitry consisting of IC7A, ICSB and IC7C resets the toggle flip-flop (IC6B) and allows the true state of the yelp control line to pass to the rate oscillator section. This is necessary to insure that the Selector switch position corresponds to the audible siren tone produced. As the siren coasts down in the manual mode, the output of the VCO must be disabled to prevent frequencies lower than 350Hz from damaging the amplifier’s output transistors. IC4D, a voltage comparator, compares the VCO control voltage to the low frequency reference voltage set by R40 and R41. When the VCO control voltage drops below the reference, IC4-8 goes high and forces the inhibit pin of the VCO high through OR gate IC9D. The VCO is also inhibited when the radio or microphone push-to-talk input is selected. These logic inputs are gated through IC7B, IC9C and IC9D to the VCO inhibit pin. 5-3. NOTE The reset circuitry relies on the fact that the Selector switch is of the nonshorting type. When the siren is in the manual mode, and JU1 and JU2 are left connected to "PEAK" (factory setting), the window comparator output will be passed through AND gate IC5C to activate the peak siren function, as long as the horn ring switch is depressed. SIREN MODE CONTROL. The siren mode is controlled by the logic levels applied to J2-3, 5, 6, 7, 8 and J3-1, 2 and 7 (via Selector switch SW2), HORN/SIREN switch SW3, and the microphone push-to-talk switch. IC2 buffers the control inputs. IC3 and IC9 provide most of the decoding necessary to control the rate oscillator and analog switching of the audio and VCO control voltages. If manual or hi-lo is the selected mode and JU1 and JU2 are set to "AIR", the window comparator output will be passed through AND gate IC5D to activate the air horn override circuitry (refer to paragraph 5-2). 5-5. 5-4. AUDIO SELECTOR AND POWER AMPLIFIER. TAP II CONTROL. The siren has two audio inputs: rebroadcast and microphone public address. As long as power is applied to the siren circuitry, the vehicle’s horn ring switch will be connected through P3-5 and K1A to the inputs of a window comparator consisting of IC4A and IC4B. A positive or negative horn ring contact will result in a logic "1" pulse of equal duration at the junction of CR1 and CR2. radio The radio input is derived from direct connection to the radio speaker. A fraction of the audio voltage developed across the radio balance potentiometer (R11) is applied to the input of a differential amplifier (IC4C). The differential 4196 -10- amplifier eliminates any ground reference problem that may exist between the PA-300 and various makes of radios. The microphone has a built-in transistor amplifier and therefore requires no external pre-amplifier. Resistor R14 serves as the collector bias resistor for the microphone’s amplifier. The micro- phone output, derived from J2-1, and the radio audio from IC4C are selected via 1 of 2 analog switch IC8A. Normally, the microphone audio is gated through the multiplexer unless the Selector switch is set to the RADIO position. The selected audio is applied to IC11-2. 5-6. IC11 is an audio power amplifier integrated circuit which provides the necessary power gain to drive the push-pull amplifier stages beyond driver .transformer T1. A biasing network consisting of TH1, CR15, Q4, R52, R53 and R54 is activated whenever the radio or the microphone push-to-talk switch is activated. This eliminates all "crossover" distortion associated with the push-pull output amplifier. Q1, Q2, Q3 and associated components form the power-on control circuitry. This network delays the activation of K 1 approximately one-second after B+ is applied. During the interim, all siren control logic stabilizes allowing C 15 to charge, bypassing the primary of driver transformer T1. This circuitry suppresses loud turn-on "thumps" from the loudspeaker and allows the vehicle horn ring switch to operate the siren’s Tap II feature. 8-VOLT REGULATOR, POWER CONTROL AND HORN RING TRANSFER. When the GAIN control (on/off switch) is rotated clockwise, B+ is applied to the circuit board via J3-4 and J4-4. The networks consisting of CR4, C6 and CR10, R36, C17 provide filtering of the B+ voltage for the 8-volt regulator (IC1) and the audio amplifier (IC11). The large capacitances employed insure that all control logic remains stable and prevents "popping" noises heard through the loudspeaker when power is turned off. 4197 -11- SECTION VI SERVICE AND MAINTENANCE 6-1. advisable to use longnose pliers or a similar heat sink on the lead being soldered. GENERAL. Most of the component electronic parts used in the Model PA300 are standard items that can be obtained from any radio or electronics supply shop. In order to reduce equipment down-time, Federal recommends that the entire printed circuit board (Part No. 200C860) be replaced. The printed circuit boards are relatively inexpensive allowing you to keep an adequate supply in your repair shop. If IC13 or C21 are replaced, it may be necessary to adjust R57. With the Selector Switch set to MANUAL, hold the paddle switch in the SIREN position and adjust R57 for 1400Hz at the siren output. B. When removing the chassis for servicing, loosen the two hexagon head screws on the underside of the unit, near the front edge. Slide the entire chassis out of the case as shown in figure 6-1. The diagrams in this section should be an aid to a repairman in isolating a malfunction and locating components. C. The factory can and will service your equipment or assist you with technical problems, should any arise, that cannot be handled satisfactorily and promptly locally. Removal of Circuit Board. The PC board is secured to the chassis by four Phillips head screws. Unplug the four wafer connectors and microphone before removing the screws. Communications and shipments should be addressed to: D. Service Department Federal Signal Corporation 2645 Federal Signal Drive University Park, IL 60466 Replacement of Output Transistors Failure of one or both of the out- put transistors (Q7, Q8) is usually the result of a defective speaker (short circuited voice coil). Rebroadcast of unsquelched radio or music for long periods will also have a detrimental effect on the output transistors, and is therefore not recommended. If any unit is returned for adjustment or repair, it can be accepted only if we are notified by letter or phone in advance of its arrival. Such notice should clearly indicate the service requested and give all pertinent information regarding the nature of malfunction and, if possible, its cause. 6-2. Removal for Servicing. Federal recommends that both output transistors be replaced should only one device prove to be defective. This practice will ensure long periods of service between failures. SIREN. A. When installing new output transistors, ensure that the Sil-Pad insulators are installed between the heatsink and transistors. General. Any competent radio repairman or electronic technician should have little difficulty in tracing and correcting a malfunction, should any occur. For emergency replacement of any of the small components, care must be used when soldering. Heat easily impairs transistors capacitors and circuit boards. It is therefore CAUTION Make certain that the speaker is not defective prior to installing the repaired PA300. 4198 -2- Figure 6-1. Chassis Removal. Figure 6-2. Internal View 4199 -13- Figure 6-3. Component Location Diagram. 4200 -14- Figure 6-4. Schematic Diagram. 4201 -15- Schematic Symbol Description PARTS LIST Schematic Part No. Symbol *RESISTORS R1,4,14,15 R2,5,6,42,45 R3 R7,17,18, 19, 22, 33, 44 R8 R9,12 R 10,13,20 R11 R16,30 R21,55 R23,31,32, 34,38 R24 R25,29 R26 R27,41 R28 R35 R36,49,50 R37 R39 R40 R43,47 R46 R48,51 R52 R53 R54 R56 R57 R58 4700 Ohm,5% 100K Ohm,5% 27K Ohm,5% 10K Ohm 100A298 100A262 100A244 100A207 68K Ohm 36K Ohm,5% 15K Ohm,5% 2K Ohm, Potentiometer 18K Ohm,5% 5600 Ohm 1000 Ohm 100A235 100A709 100A239 106A203A-01 100A258 100A253 100A233 IC1 IC2 IC3,IC9 IC4 IC5 IC6 IC7 IC8 IC10 IC1i IC12 IC13 16K Ohm,2% 100A723 68K Ohm,2% 100A775 270K Ohm,2% 100A720 33K Ohm,5% 100A 771 47K Ohm,5% 100A701 27 Ohm 100A250 10 Ohm 100A251 10K Ohm, Potentiometer 106A116 GAIN 10K Ohm, 5% 100A257 56K Ohm, 5% 100A704 1.5 Megohm, 5% 100A726 82K Ohm, 2% 100A750 150 Ohm 100A238 27 Ohm 100A250 8.2 Ohm, 5% 100A724 270 Ohm, 2 watt, 103A128 Wirewound 2700 Ohm 100A206 100K Ohm,PotentiometeriO6A203A-02 470 Ohm 100A255 *Unless otherwise specified, DS1 all RESISTORS are carbon SW2 type, +10%, 1/4 watt. CR1,2,3,6, 7,8,9,11 CR4,5, 10, 13,14,15 CR16 CR17 Part No. 0.001UF,500V,Disc 10UF,16V,Electrolytic 2.2UF,25V,Electrdytic 1000UF, 35V,Elecytic 10UF,10OV,Tantalum 22UF,16V,Electdytic 0.1UF,35V,Tantalum 6.8UF,15V,Tantalum 0.005UF,1OOV,Disc 150UF,16V,Elect-rytic 0.22UF,Radial Tantalum 0.15UF,5%,100V,Poly 0.005UF, 100V,Disc 500UF, 15V,Electrolytic DIODES TI55 115B101 ED3002S 115B301 IN4738, 8.2V, Zener Rectifier, 6 amp.50V 115A232 115A317 UA78MO8CKC CD4050BE MC14071BCP LM324N MC14081BCP MC14027BCP MC14069UBCP MC14053BCP MC14066BCP LM380N NAT LM556 MC14046BCP 128A097 128A092A-01 128B 082 128A098 128A077 128A044 128A100 128A099 128A047 128A046 128A038-01 128B079 TRANSISTORS Q1 Q2,3,4 Q5,6 Q7,8 TIS93,PNP TIS92,NPN 2N6109,PNP 2N5885,NPN,Power 125B133 125B132 125B431 125B432 MISCELLANEOUS J1,2,3,4 J5 H 1,2,3,4 P5 K1 Z1 RT1 T1 T2 F1 Lamp,14V,#1893 Switch, Rotary SW3 TB 1 CAPACITORS C1,2,18,22,23 C3,20 C4,5,13 C6,17 C7,8,12,16 C9 C10 C11 C14 C 15 C19 C21 C24,25 C26 Description INTEGRATED CIRCUITS 107A263 108A143 108A142 108A149 107A634 108A144 107A1103 107A604 107A211 108A147 107A1101 107A766 107A211 108A122 4202 -16- Connector, Wafer Connector, 12-pin Terminal, Male Plug,12-pin Relay,180 Ohm,12V, DPDT Resistor Network, 9 x 10K Termistor,200 Ohm Transformer, Driver Transformer, Output Fuse,15A,3AG, 32V 8107A085 122B215 Switch Paddle Terminal, Strip Microphone Socket, Transistor (Q7,Q8) Socket, Lamp (DS1) Holder, Fuse (F1) Knob, GAIN control Knob, Selector Insulator (Q7, Q8) Circuit Board (without parts) Circuit Board (with parts installed) Standoff Bracket, Lamp Bracket, Mounting Bracket, Transistor (Q7, Q8) 140A170 139A152 233A106 140A154 131A130A-01 100A801 104A111 120B 145 120C151A-01 148A107 122A214 229A127 258B577 138A 125 138A126B 143A106 141A102 14IAlll 235A123A-01 130C301B 200C860B 230A123 8536A025 8536B 022 8537B303 TM 5-4210-222-14&P-3 By Order of the Secretary of the Army: Official: R. L. DILWORTH Brigadier General, United States Army The Adjutant General DISTRIBUTION: To be distributed in accordance with Special List. U.S. GOVERNMENT PRINTING OFFICE: 1"5 - 38421/01476 JOHN A. WICKHAM, JR. General, United States Army Chief of Staff PIN: 059727-000 This fine document... Was brought to you by me: Liberated Manuals -- free army and government manuals Why do I do it? I am tired of sleazy CD-ROM sellers, who take publicly available information, slap “watermarks” and other junk on it, and sell it. Those masters of search engine manipulation make sure that their sites that sell free information, come up first in search engines. They did not create it... They did not even scan it... Why should they get your money? Why are not letting you give those free manuals to your friends? I am setting this document FREE. This document was made by the US Government and is NOT protected by Copyright. Feel free to share, republish, sell and so on. I am not asking you for donations, fees or handouts. If you can, please provide a link to liberatedmanuals.com, so that free manuals come up first in search engines: <A HREF=http://www.liberatedmanuals.com/>Free Military and Government Manuals</A> – Sincerely Igor Chudov http://igor.chudov.com/