1
Owner's
Manual
Compact
Model
Read,
all Safety
Instructions
using
Too_
No. 320.48277
_k CAUTION!
follow
Laser Measuring
understand
Rules
in this
and
and Operating
Manual
before
this product.
o Warranty
° Safety instructions
o Unpacking
o Description
o Operation
o Maintenance
• Troubleshooting
Sears,
Roebuck
www_craftsman.com
and
Co., Hoffman
Estates,
IL 60179
Warranty
Page 2
Safety Instructions
Page 3
Unpacking
Page 3
Description
Pages 4-8
Operation
Maintenance
Page 20
Trouble Shooting
Page 21
Service Numbers
Back Cover
ONE YEAR FULL WARRANTY ON CRAFTSMAN® PRODUCT
If this Craftsman tool fails to give complete satisfaction within one
year from the date of purchase, return it to any Sears store or other
Craftsman outlet in the United States for' free replacement.
This warranty
lamps,.
does not include expendable
parts, such as blades and
This warranty applies for only 90 days from the date of purchase
product is ever used for commercial
or rental purposes,,
if this
This warranty gives you specific legal rights, and you may also have
other rights, which vary from state to state_
Sears, Roebuck
and Co. Hoffman
Estates,
IL 60179
SAVE THESE INSTRUCTIONS!
READ ALL INSTRUCTIONS!
48277
ManuaLRevlsed_09-O211
Page 2
WARNING:
BE SURE to read and understand all instructions
in this
manual before using this product,, Failure to follow atl instructions may result in
hazardous radiation exposure, electric shock, and/or bodily injury.
,_ CAUTION: Do not attempt to modify the performance of the laser device in
any way., This may result in a dangerous exposure to laser radiation
WARNING:
LASER RADIATION.
Do not stare into beam, CfassII
laser
product.. Turn the laser beam on only when using this tool
_Ik WARNING: Use of controls, adjustments, or the performance of procedures
other than those specified in this manual may result in hazardous radiation exposure,
_k WARNING: The use of optical instruments such as, but not limited to,
telescopes or transits to view the laser beam wilt increase eye hazard.
This measuring toot has a built-in laser light. The laser is a ClassiI and emits
output power of a maximum 1roW and 635 wavelengths These lasers do not
normally present an optical hazard. However, do not stare at the beam, as this
can cause flash blindness,
The following label is on your laser measuring toot., It indicates the location
from which the laser measuring tool emits the laser light, Be aware of the laser
light location when using the tool, Always make sure that any bystanders in the
vicinity of use are made aware of the dangers of looking directly into the laser,
o
Do not remove
or deface any product
o
Avoid direct eye exposure.
cause flash blindness,
labels.
The laser beam can
AVOID EXPOSURE
Lar_er
.
r_dt_tl_
Is oral{ted f_m
_hls *_port_to
The laser measuring toot is not a toy. Always
__
keep it out of the reach of children. The laser
_*_..ADIA_O..OO___"_".._"TgB_
light emitted from this device should never be
.................................
_v r_
directed toward any person for any reason ................
Do not operate the tool around children or allow
children to operate the tool,,
...........
Do not place the tool in a position that may cause anyone to stare at the
laser beam, whether intentionally or unintentionally,
o
Do not use on surfaces such as sheet steel that have shiny, reflective
surfaces The reflective surface could reflect the beam back at the operator,,
Always turn the laser tool off when not in use. Leaving the tool on
increases the risk of someone inadvertently staring into the laser beam,,
Do not attempt to modify the performance
This may result in a dangerous exposure
48277
Manuat_Revised_O9-0211
of this laser device in any way
to laser radiation.
Page 3
•
Do not attempt to repair or disassemble the laser-measuring tool ff
unqualified persons attempt to repair this product, serious injury may occur,,
Any repair required on this laser product should be performed only by
authorized service personnel,
o
13o not operate the tool in combustible
flammable liquids, gases, or- dust.
•
Use of other accessories that have been designed for use with other laser
tools could result in serious injury..
-
Keep batteries
-
For further information regarding lasers, refer to ANSFZ136.1, the Standard
for the Safe Use of Lasers, available from the Laser Institute of America (407)
380-1553
areas, such as in the presence of
out of reach of children.
When unpacking the box, do not discard any packing materials until all of the
contents are accounted for:
1. Carefully lift the laser measuring tool out of the carton and place on a stable,
fiat surface..
2. Open the parts bag to locate the following:
o Laser measuring tool
"
48277
Owner's manual
ManuaLRevised
09-0211
Page 4
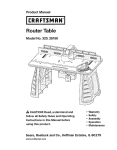
KNOW YOUR LASER MEASURING
TOOL (Fig. 1)
Fig. 1
4
5
_6
i
_7
The laser measuring tool is a highly accurate measuring tool for fast,
easy operation:
o Measure distances from 1 foot to 100 feet with an accuracy of ±1/8 inch,,
a The laser measuring tool is intended for:
o Measuring distances, lengths, heights, and clearances
= Difficult-to-measure
situations: the Pythagorean Theorem mode allows
indirect measurement
o Calculating
,
48277
areas and volumes
Use in interior and exterior conditions,,
ManuaLRevised
09-021t
Page 5
1. LCD display - Large LCD screen with white back lighting helps makes it easy
to read the large-numeral measuring data clearly, even in dark conditions.
2
Keyboard
3. Positioning
pin- for measurement
4. Laser-receiving
5
lens-
from wal_ comers
receives the reflected laser to determine distance
Laser-exit aperture - emits the laser dot.
6. 1/4 inch tripod screw- for use with tripod (available separately)
7. Battery compartment
- for four A,&_,batteries (available separately).
Technical
Recommended
Use
Specifications
Indoors
Power supply
4 "AAA" 1.5-volt batteries (available
separately)
Laser
,k=635nm, Class I[ laser,
maximum
laser output<ImW
Measuring range (typically)
1-100 feet (0.3-30m)*
Measuring accuracy (typically)
±1/8 inch (±3ram)*
Smallest unit displayed
1/16 inch (1ram)
Automatic
-laser: 20 seconds
switch off:
-measuring
tool: 5 minutes
Estimated battery life (use
alkaline AAA batteries)
Up to 5000 single measurements
Optimum
32 to !04°F (0 to 40°C)
operating temperature
Note: The tool's measuring range and accuracy will be reduced when it is used
in unfavorable conditions, such as in bright sunlight or when measuring to poorly
reflecting or very rough surfaces.
48277
Mar_ual
Revised
09-0215
Page 6
KEYBOARD
FUNCTION
(Fig, 2)
Please see the Operation
section of this manual for
information about the following
functions and computations..
1.. Read/Con key -turns on the
laser, takes measurements,
activates the continuous
measurement.
2., Clear key- clears the
measurements, reverts
to single distance
measurement mode,,
3. Max/Min key- activates the Maximum or Minimum measuring
4_ Plus/Minus
key - for addition or subtraction
mode..
of measurements..
5
Mode key- changes the measuring mode among area, volume, single
Pythagorean Theorem, double Pythagorean Theorem, and single distance
measurement mode
6,,
Measuring reference point _ Switches the measuring reference among: the
rear of the toot, the position of the tripod screw, the front of the tool, and the
positioning pin..
7
Unit conversion key- change units: decimal units of feet, t/16-in, increments,
decimal units of inches, 1/16-in, increments of inches, meters, and millimeters,,
Power key- turns on/off the tool..
LCD DISPLAY
Full battery indicator
Empty battery indicator
_
indicates that the measurement
is taken from the positioning
pin..
_!
Indicates that the measurement
is taken from the bottom of the too!..
_J
Indicates that the measurement is taken from the position of the tripod screw.
_'
Indicates that the measurement
is taken from the front of the tool
Laser beam indicator
Single distance measurement
_ZZArea
measurement
Volume measurement
48277
Manual_Revised_09.0211
Page 7
I''-.
Single Pythagorean Theorem measurement
Double Pythagorean Theorem measurement
rain Minimum measurement
max Maximum
....
Continuous
indicator
measurement
indicator
measurement
.................
.....
indicator
.................
.........................................
LJL
Your laser measuring tool is a precision instrument.. Please observe the following
guidelines to ensure optimal performance
o
Do not direct the laser-measuring tool towards the sun or other sources of
bright light This may cause an Error reading or inaccurate measurements.
o
Do not use the laser measuring tool as a leveling tool..
o
Do not operate the laser measuring tool in wet, dusty, sandy, or other
adverse environments. Such conditions may damage inner components
affect measuring accuracy
and
o
When the laser measuring tool is brought into a warm environment from
very cold conditions, or vice versa, allow it to come to the surrounding
temperature before use_
o
Measuring errors can occur when measuring toward colorless liquids (e,g,.,
water), clean glass, Styrofoam, or similar translucent or low-density materials,
o
High-gloss surfaces will deflect the laser beam and result in Error measurements.
a
Very bright surroundings combined with a very low reflecting surface will
reduce the measuring range and accuracy
o
Do not immerse the tool in water, Wipe off dirt with a damp, soft cloth, Do
not use aggressive cleaning agents or solutions Treat the optical surfaces
with the same care that you would apply to eyeglasses or cameras
o
The accuracy of the tool must be checked
dropped or subjected to other mechanical
48277
ManuaLRevised_09,0211
before use after it has been
stresses.
Pa_,e 8
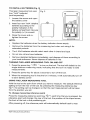
TO INSTALL BATTERIES
(Fig. 3)
This laser measuring tool uses
four "P,AA" batteries
Fig,, 3
O
O
(sold separately),
t., Loosen the screw and open
the battery cover,
2,. Insert four new "AAA "alkaline
batteries according to the
polarity indicators in the
battery compartment, Be sure
the polarity (+/-)is correct!
3
Close the cover and retighten the screw_
NOTE:
=
Replace the batteries when the battery indicator shows empty.
=
Remove the batteries from the measuring tool when not using it for
extended periods
o
o
The 4 AAA batteries should match each other in brand and type.
Do not mix old and new batteries.
o
Remove depleted batteries immediately, and dispose of them according
your local ordinance,, Never dispose of batteries in fire.
TURNING
THE LASER MEASURING
to
TOOL ON AND OFF
I.
Press the power key" _
"to turn on the tool., The tool wil! default to the
single-distance measuring mode, indicating that the tool it is ready to take
measurements
2
Press the power key for about 2 seconds to turn off the tool,
3., When the measuring tool is inactive for 5 minutes, it will automatically
to save battery power
USING THE LASER MEASURING
turn off
TOOL
Hold the too! at the point from which you want to measure., The default reference
setting is from the rear of the toot, By pressing the measuring reference key
"_",
the setting can be changed, so that the next measurement will be taken
from the position you set..
To change measuring
reference point
Press the measuring reference point key "_>"; each time the key is pressed, the
reference point will change: the rear of the tool, the position of the tripod screw,
the front of the tool or the positioning pin.,
After powering off, the reference point wilt automatically
48277
Manual_Revised_09.02!1
default back to rear,.
Page 9
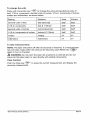
To change the units
Press unit conversion key ,,_mJ,, to change the units among decimal units of
feet, 1/16-in. increments, decimal units of inches, 1/16qn increments of inches,
meters and millimeters as shown below.
Area
Volume
Setting
Distance
decimal units of feet
feet (decimal)
feet 2
feet 3
I/16-in.
feet & 1/16inch
feet =
feeP
decimal units of inches
Inches (decimal)
feet _
feet 3
1/16-in. increments of inches
inches & 1/16inch
feet 2
feet 3
meters
m2
m=
millimeters
m2
m3
increments
meters
millimeters
To take measurements
NOTE: The laser will switch off after 20 seconds of inactivity,
if a measurement
has not been made within the previous 20 seconds, push READ key "_"
again to turn on the laser.
_k WARNING: Do not point the laser dot at persons or animals and do not
stare into the laser' beam or view directly with optical instruments_
Clear function
Push the Clear key "_L_"
previous measurement..
48277 Manual_Revised_09_0211
to erase the current measurement
and display the
Page 10
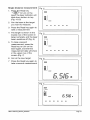
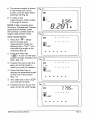
Single distance
measurement
Fig. 4
1,, Press the Read key
"_"
to turn on the
laser; the laser indicator will
blink from bottom to top
(Fig 4 & 5)
2o Aim the laser at the target
you want to measure;
3, Press the Read key again to
take a measurement,,
4 The length is shown in the
lowest row of the screen in
large numerals, and the laser
beam switches off (Fig, 6)
Fig., 5
5 To take a second
measurement, press the
Read key to turn on the
laser again, and the first
measurement data will show
in the upper row of the
screen (Fig 7),
6. Aim at the new target,,
7, Press the Read key again to
take a second measurement,
0.
ooj
Tt
Fig, 7
T,o0:,
5.Sl5.
48277
ManuaLRevised_09,O211
Page 11
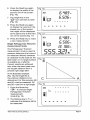
8. The second length is shown
in the lowest row of the
screen, and the laser beam
switches off (Fig 8)..
Fig. 8
f
J-
9. To take a new
measurement, follow steps
5 through 8, above.
NOTE: If after choosing Area,
Volume or Pythagorean Theorem
measurement modes, press
the CLR key to switch back to
single-measurement mode,
5.515.
0 3Ca
o28.P
o2o7 .
Area measurement
1. Press the"
_
" Mode
key to choose area
measurement mode; the
blinking line in "/--7,, icon
indicates the length to be
measured (Fig. 9).
o
2. Press the Read key
"_"
to turn on the laser
beach; the laser indicator will
blink. (Fig. 10).
Fig 10
3. Position the tool to aim the
laser dot at the target to
which you want to measure..
4. Press the Read key to
display the measured length
in first tow of the screen
(Fig.. 11 )o
5. The width line in the ,, _7/,,
icon will start to blink.
6. Position the tool to aim the
laser dot at the width target..
48277
ManuaLRevised_09,02$1
_
.........
J
Fig.. 11
t_
7.795.
Page 12
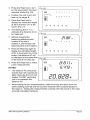
7
Press the Read key again
to display the area in the
lowest row of the screen; the
width will be displayed at the
same time in the second row
Fig 12
,
"lOC
12tJ
"3
a
15.512,,
(Fig 12),
8.. Press the Read key to make
a new measurement
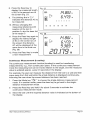
Volume
oZso 000
measurement
1.. Press the Mode key
" [_ "to choose volume
measurement mode, The
blinking line in "_," icon
indicates the length to be
measured (Fig 13).
Fig. t3
I@ ......
2.. Press the Read key to turn
on the laser beam; the laser
indicator will blink from
bottom to top (Fig° t4),
3.. Position the tool to aim the
laser dot at the target to
which you want to measure.
4. Press the Read key to
display the measured length
in the first row of the screen,.
Fig
4
x
I_slr
The width line in the ,,_1,,
icon wilt also start to blink
(Fig I5)..
5
Position the toot to aim the
laser at the target
Fig 15
5.'-189,
lj , ......
48277
Manual
Revised_09,0211
Page 13
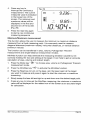
6
Press the Read key again
to display the width in the
second row of the screen
(Fig,. 16);
Fig. 16
F
",
7. The height line in the
,,_t,, icon wiil start to blink
(Fig., 16)..
8., Press the Read key again
to display the volume in the
lowest row of the screen;
the height will be displayed
at the same time in the third
row of the screen (Fig. 17).
Fig
9. Press the Read key to make
a new measurement..
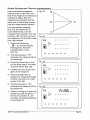
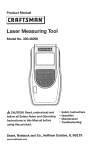
Single Pythagorean Theorem
measurement mode
The Pythagorean Theorem
measurement mode is used to
measure distances that cannot
be measured directly because
an obstacle would obstruct the
laser beam or no target surface
is available as a reflector.
Correct results are achieved
only when the laser beam and
the sought distance form a
precise right angle {90°).
In the illustrated example
(Fig. 18), the length BC is
the unknown distance to be
determined. For this purpose, AB
and AC must be measured.. AC
and BC must form a right angle.
Fig
A
Fig.. 19
f
1. Press the Mode key
"1_ "to choose single
Pythagorean Theorem
measurement
mode (Fig., 19)..
2.. The blinking line in "1___"
indicates the distance AB to
be measured.
48277
ManuaLRevlsed_09-0211
_
o
o
m
_
_
Page 14
3_ Press the Read key to turn
on the laser beam; the laser
indicator blinks (Fig 20).,
Fig, 20
f
I
4, Position the tool to aim the
laser at the target B
laser
I
5, Press the Read key to
display the measured length
of AB in the first row of the
screen (Fig. 21),
6
The blinking line in "!'_."
indicates the distance AC to
be measured.,
7, Without changing the
measuring reference point
location of the too! in
position A, aim the laser dot
perpendicularly to the target C
8, Press the Read key again to
display the calculated length
of BC in the lowest row of the
screen; the distance AC will
be displayed at the same time
in the second row (Fig.,22).
Fig 21
f
292t
El.
011
011
ft
Fi_ r 22
9, Press the Read key to make
a new measurement.,
NOTES:
The distance AC should be
shorter than the hypotenuse
(AB); otherwise the LCD will
display "Err008" reminding
you to re-measure the
distance AC
=
.ooDo
oKo on
When taking the two measurements, make sure they are taken from the
same starting point (A) and the second measurement is perpendicular to
the target C. Taking the measurements correctly will help result in the most
accurate calculated distance
48277
ManuaLRevised_09-0211
Page t5
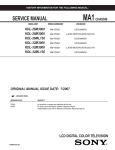
Double Pythagorean
Theorem measurement
Use the double Pythagorean
measurement mode when one
end of the tength to be measured
indirectly is higher than the
measurement position and the
other end of that length is lower
than the measurement position,.
B
Fig.. 23
A
O
in the illustrated example
(Fig, 23), the length BC is
to be determined, A is the
measurement position Fo[ this
purpose, AB, AQ and AC must
be measured.. AO and BC must
form right angles,
1. Press the Mode key
"to choose double
Pythagorean Theorem
measurement mode
(Fig.. 24),,
2, The blinking line in "_"
indicates the distance AB to
be measured,.
3, Press the Read key to turn
on the laser beam; the laser
indicator blinks (Fig,, 25),.
,Fig. 25
f
17
4. Position the tool to aim the
Iaser at the target B,,
5. Press the Read key to
display the measured length
of AB in the first row of the
screen (Fig, 26),
6. The blinking line in "I_"
indicates the distance AO to
be measured.
J
Fig 26
f
14.851.
7., Without changing measuring
reference point location of
the tool in position A, aim
the laser dot perpendicularly
to the target Q,
!
48277
Ma_lual_Revised_O9.021:L
m
m
_
_t_
m
_z_
Page 16
8,. Press the Read key to
display the measured length
of AO in the second row of
the screen (Fig., 27)..
9.
Fig 27
The blinking line in "19"
indicates the distance AC to
be measured.
14.851,,
al
I'...
1/
c LJ'13
O. ,,-,
,t
t0.. Without changing the
measuring reference point
location of the tool in
position A, aim the laser dot
at the target C
11. Press the Read key again to
display the indirect length
of BC in the lowest row of
the screen; the distance
AC will be displayed at the
same time in the third row
(Fig. 28)
12. Press the Read key to make
a new measurement
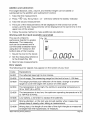
Continuous
Measurement
(Locating)
The continuous measurement function (locating) is used for transferring
measurements, eg., from construction plans, In the continuous measurement
mode the measuring tool can be moved relative to the target, and the measured
value is updated approx., every 0.5 seconds in the display.
For example, the user can measure the distance from the tool to a wall and then
move away from that wall while the actual distance is displayed continuous[y,
informing the user when the correct distance has been reached..
1.
Press the Mode key" I_ "to choose the single-distance measurement
mode. tf in another mode, press the clear key to go back to the singledistance measurement mode,
2.
Press the Read key and hold it for about 3 seconds to activate the
continuous measurement mode.
3,
Move the tool until the required distance value is indicated at the bottom of
the display
48277
Manual_Revised_09°0211
Page 17
4._ Press any key to
interrupt the continuous
measurement. The current
measured value is indicated
in the lowest row of the
screen, The minimum and
maximum values will be
displayed in the first and
second row of the screen
(Fig.. 29)L
5.
Fig, 29
f
3_3
++o9.?95.
:::
13.515.
U¢'!
!U ft
Press the read key again
to start a new continuous
measuring sequence.
Minimum/Maximum
measurement
This function allows the user to measure the minimum or maximum distance
measured from a fixed measuring point.. It is commonly used to measure
diagonal distances (maximum values), horizontal distances, or vertical distance
(minimum values).
The function can be transferred in area, volume, Pythagorean
measurement and single-distance measurement modes..
Theorem
Min!Max function can help eliminate the measuring deviation caused by not
correctly holding the tool and aiming at the target, It can help to get an accurate
calculation of area, volume and indirect length
1.. Press the Mode key "_b
measurement mode,
"to choose area, volume or Pythagorean
2.
Press the Min/Max key "4"
3.
Press the Read key to turn on the laser, aim the laser beam at the target
you want to measure and press it again to start the minimum or' maximum
measuring..
4,
S_owty sweep the rase[ left and right or up and down over the desired target point,.
5.
Press any key to interrupt the Min/Max measuring; the minimum or maximum
value will be displayed on the related row of the screen as an accurate length
for calculation,,
482'/'7
ManuaLRevised
09-02$:L
to activate the MiniMax
Theorem
function,
Page 18
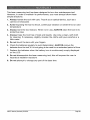
Addition and subtraction
The single-distance, area, volume, and indirect length can be added or
subtracted by the addition and subtraction function
to Take the first measurement..
2. Press "<:_" key; the symbol + or - will show behind the battery indicator
3
Take the second measurement
4. The sum of the measurements will be displayed in the lowest row of the
screen, and the last measurements will be displayed at the same time in the
upper row of the screen.
5.. Follow the same method to make additional calculations
Working with the tripod (available separately)
The use of a tripod is
particularly helpful for greater
distances. The measuring
tool can be screwed onto a
commercially available tripod
using the t/4" thread on the
bottom side of the housing.
t.
Fig. 30
f
Mount the tool to the tripod..
2 Set the measuring reference
to the thread (Fig. 30).
"=
g,
bJJ.
3 Start to take measurements.
Error signals
The following error signals may appear on the screen of your tool:
Code
Explanations
ErrO01
The reflected laser light is too intense.
ErrO02 , Outo.!..range, The.measuring
range for this tool is from t-100 feet. ...............
ErrO03
The target provides poor reflection of the laser; change to another
target or cover the target with a piece of white paper.
ErrO04
The temperature is too high; the optimum operating temperature
32 to 104°F (0 to 40°C).
ErrO05
The temperature is too low; the optimum
to 104°F (0 to 40°C).
ErrO06
Low battery, a reminder to replace the batteries.
ErrO07
Strong vibration, or the toot was moved quickly when measuring;
always keep it steady when taking a measurement.
ErrO08
Wrong input, the length of one side of the right triangle as measured
is longer than the hypotenuse; re-measure.
48277
ManuaLRevised
09-0211
operating temperature
is
is 32
Page 19
This laser measuring tool has been designed to be a low-maintenance tool.
However, in order to maintain its performance, you must always follow these
simple directions.
1. Always handle the tool with care.. Treat it as an optical device, such as a
camera or binoculars.
2, Avoid exposing the tool to shock, continuous
temperature
3. Always store the tool indoors
protective case.
vibration or extreme hot or cold
When not in use, ALWAYS store the tool in its
4. Always Keep the toot free of dust and liquids Use only a clean, soft cloth
for cleaning. If necessary, slightly moisten the cloths with pure alcohol or a
little water.
5,, Do not touch the tens with your fingers..
6. Check the batteries regularly to avoid deterioration. ALWAYS remove the
batteries from the tool, if it is not going to be used for an extended period of time,
7,. Replace the batteries when the battery icon is continuously
on the LCD
empty displayed
8, Do not disassemble the laser measuring tool; this will expose the user to
hazardous radiation exposure.
9. Do not attempt to change any part of the laser lens.
48277
ManuaLRevised_09-02$1
Page 20
PROBLEM
CAUSE
SOLUTION
Too! cannot be
switched on
Batteries are installed
incorrectly
Reinstall the batteries
Batteries are tow
Replace with new batteries
according to the polarity
indicators in the battery
compartment
voltage
LCD displays
"Err001"
The reflected laser light
is too intense
Do not direct the laser at
a highly reflective surface;
cover the surface with
LCD displays "Err002"
The measurement
exceeds the measuring
range of the tool
Take measurement within
the range: t to 100 feet
LCD displays "Err003"
The target does not
adequately reflect the
laser,
Change the measuring
target or cover it with a
3iece of white paper.,
LCD displays "Err004"
The temperature
high,
is too
Wait until the measuring
tool has reached the
operating temperature: 32
to 104°F (0 to 40°C).
LCD displays "Err005"
The temperature
low,
is too
Wait until the measuring
toot has reached the
operating temperature: 32
to 104°F (0 to 40°C).
LCD displays "Err006"
Low battery
Insert new batteries.
LCD displays "Err007"
Excessive vibration;
you moved the tool
quickly when taking a
measurement
Always keep the tool
steady,
LCD displays "Err008"
The length of one side
of the right triangle
measured is longer than
the hypotenuse.
Re-measure; the
hypotenuse is always
longer than the first side
length
white paper if necessary,,
48277
Manual
Revised_09.0211
Page 21
48277
Manual
Revised_O9,0211
Page 22
48277
Manual
Rev}sed_09,021!
Page 23
Get it fixed, at your home or ours!
Your
For expert troubleshooting
Home
and home solutions
manage
advice:
home
WWWmanagernyhome corn
For repair- in your home
of all major brand appliances,
lawn and garden equipment, or heating and cooling systems,
no matter who made it, no matter who sold it !
For the replacement parts, accessories and
owner's manuals that you need to do-it-yourself
For Sears professional installation of home appliances
and items like garage door openers and water heaters
1-800-4-MY-HOME
(1-800-469-4663)
www,,seats.com
®
call anytime, day or night
(U S A and Canada)
www.,sears_ca
Our Home
For repair of carry-in items like vacuums, lawn equipment,
and electronics, call anytime for the location of the nearest
Sears Parts & Repair Service Center
1-800-488-1222
(u s A )
www.sears.corn
1-800-469-4663
(Canada)
www_sears.ca
To purchase a protection agreement on a product serviced by Sears:
1-800-827=6655
(USA)
Pare pedir servicio de reparaciOn
a domicilio, y para ordenar piezas:
1-888-SU-HOGAR®
(1-888-784-6427)
1-800-361-6665
(Canada)
Au Canada pour service en fran_ais:
1*800-LE-FOYER _c
(1-800-5&3-6937)
www sears ca
© Sears Brand&LLC
® Registered Trademark I n,_Trademark / s_ Service Mark of Sears Brands LLC
® Marca Regislrada / _ Marco de F_brica / s_._
Marca de Servicio de Sears Brands LLC
_,_cMarque de commerce / up Marque d_.posee de Sears Brands, LLC
48277
Manual_Revised_09-021$
Pa_e 24