1
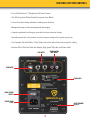
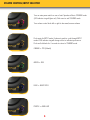
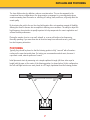
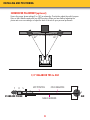
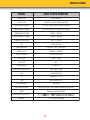
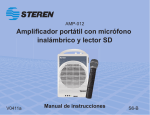
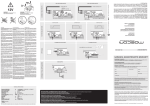
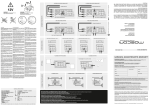
ROCKVILLE ASM5 ACTIVE SERIES
NEAR FIELD STUDIO MONITORS
USER GUIDE
IMPORTANT SAFETY INSTRUCTIONS
CAUTION
TO REDUCE THE RISK OF ELECTRIC SHOCK, DO NOT REMOVE COVER (OR BACK.) NO USER
SERVICEABLE PARTS INSIDE. REFER SERVICING TO QUALIFIED SERVICE PERSONNEL.
Do not place this unit on an unstable cart, stand or tripod, bracket or table. The unit may fall,
causing serious injury to a child or adult and serious damage to the unit. Use only with a cart,
stand, tripod,bracket or table recommended by the manufacturer or sold with the unit. Any
mounting of the device on a wall or ceiling should follow the manufacturer’s instructions and should
use a mounting accessory recommended by the manufacturer.
Do not use this unit near water; for example, near a bath tub,washbowl, kitchen sink, laundry tub, in
a wet basement or near a swimming pool.
The unit should be situated from heat sources such as radiators,heat registers, stoves or other
devices (including amplifiers) that produce heat. The unit should be connected to a power supply
outlet only of the voltage and frequency marked on its rear panel.
The power supply cord should be routed so that it is not likely to be walked on or pinched,
especially near the plug, convenience receptacles, or where the cord exits from the unit.Unplug the
unit from the wall outlet before cleaning. Never use benzine, thinner or other solvents for cleaning.
Use only a soft damp cloth.
DO NOT ATTEMPT SERVICING OF THIS UNIT YOURSELF
REFER SERVICING TO QUALIFIED SERVICE PERSONNEL
Upon completion of any servicing or repairs, request the service shops assurance that only Factory
Authorized Replacement Parts with the same characteristics as the original parts have been
used,and that the routine safety checks have been performed to guarantee that the equipment is in
safe operating condition. REPLACEMENT WITH UNAUTHORIZED PARTS MAY RESULT IN FIRE,
ELECTRIC SHOCK OR OTHER HAZARDS.
2
CONTENTS
ASM5 Introduction
4
ASM5 Features/System Controls
5
ASM5 Volume Control/Input Selector
6
Installing and Positioning
7-8
Specifications
9
Troubleshooting
10
3
INTRODUCTION
The Rockville ASM5 Active Studio Monitor creates a new performance level in
affordable studio monitors. Designed and engineered for refined vocal reproduction, our unique
design eliminates high frequency diffraction while providing full range monitoring accuracy and
enhanced bass response.
Our Neodymium silk soft dome tweeters are bathed in magnetic ferro-fluid keeping them cool even
when your music gets hot! The recessed tweeter bezel design provides an optimal high frequency
wave guide so the sound is focused out towards the listening stage. The high frequency section
features an adjustable equalization circuit so that in-room listening optimization can be easily
achieved.
Using sophisticated computer modeling the ASM5 features rear-firing ports that provide enhanced
bass coupling thereby reinforcing and amplifying low frequency response without affecting accuracy.
You will hear the difference in our design and appreciate the accurate and clean bass performance
with higher, cleaner sound pressure levels.
State-of-the-art amplification, Quad 4 Amplification with OFA
Unlike most studio monitors, the Rockville ASM5 studio monitors feature a Quad Amplifier design in
each pair of monitors. Each woofer and tweeter features their own Frequency Optimized Amplifier,
so there is no wasted energy in the amplification stage and an absolute minimum of hormonic
distortion. The efficiency of our digital Class D design is in excess of 90% with zero discernible hiss
or white noise.
The Input Volume Gain Control provides an adjustable gain range from -30dB to +6dB so that your
ASM5 are compatible with a majority of mixing scenarios. The ASM5 feature various input
connections so they hook-up to any mixing or monitoring system including unbalanced RCA,
balanced 1/4" TRS and USB. In addition, front accessible headphone jacks make the ASM5 even
more versatile.
4
FEATURES/SYSTEM CONTROLS
• Ferro Fluid Enhanced 1" Neodymium Soft Dome Tweeter
• Talc Filled, Injection Molded Graphite Composite Cone Woofer
• Curved front bezel design eliminates standing wave distortion
• Waveguide design provides amazing detail and imaging
• Computer optimized rear-firing port provides low bass extension loading
• Specially wound voice coils produce accurate response along entire frequency spectrum
• One Complete Pair with Master / Slave Output Connection with included noise rejection cabling.
• Includes RCA to Mini Jack Cable with Adaptor, High Speed USB cable, and Power cable.
TRS INPUT
UNBALANCED
RCA INPUT
USB INPUT
EQUALIZER
MAIN POWER
SWITCH
POWER CORD
PORT
LEFT SPEAKER
OUTPUT
5
VOLUME CONTROL/INPUT SELECTOR
Turn on main power switch on rear of unit. Speaker will be in STANDBY mode
(LED indicator ring will glow red). Push once to exit STANDBY mode.
Turn volume control knob left or right to decrease/increase volume.
Push again for INPUT mode. Continue to push to cycle through INPUT
modes. LED indicator ring will change colors to indicate input source.
Push and hold knob for 2 seconds to return to STANDBY mode.
ORANGE = TRS (Default)
GREEN = USB
BLUE = BLUETOOTH
PURPLE = AUXILLARY
6
INSTALLING AND POSITIONING
The close-field monitor, by definition, reduces room interaction. This can be compared to the
conventional stereo configuration or the large monitor arrangement in a recording studio where
sounds emanating from the monitor or reflecting off ceilings, walls, and floors, all greatly affect the
sound quality.
By shortening the path to the ear, the close-field monitor offers a tremendous amount of flexibility,
allowing the sound to become less susceptible to differing room conditions. The ability to adjust the
high frequency characteristics is equally important to help compensate for room irregularities and
achieve the best performance.
Placing the monitor close to a rear wall, sidewall, or a corner will reinforce low frequencies.
Generally speaking, if you move them two to three feet away from walls and corners, you'll hear
less low frequency interaction.
POSITIONING
Typically, they should be placed so that the listening position is fully “covered” with all monitors
resting on the same horizontal plane. For testing, we recommend acoustical music, because it
represents a wide, natural spectrum of sound.
Initial placement starts by measuring out a simple equilateral triangle (all three sides equal in
length) with the apex, at the center of the listening position (as shown below.) In this configuration,
the Left and Right monitors are each placed at a 60°angle, equidistant from the listening position.
60°
60°
7
INSTALLING AND POSITIONING
SUBWOOFER PLACEMENT(optional)
Ensure the proper phase settings(0 or 180) on subwoofer. Then further adjust the sub’s low pass
filter, so that it blends seemly with your ASM5 monitors. When you have finished adjusting the
phase and cross-over settings, re-adjust the level of the sub to your personal preference.
60°
60°
1/4” BALANCED TRS to XLR
T
R
S
STANDARD PHONE
HOT POSITIVE
COLD NEGATIVE
SHIELD GROUND
8
2
1
3
XLR
SPECIFICATIONS
MODEL
ASM5 STUDIO MONITORS
SPEAKER TYPE
2-WAY POWERED
SYSTEM TYPE
NEAR-FIELD ACTIVE STUDIO MONITORS
LOW-FREQUENCY DRIVER
Talc Filled, Injection Molded Graphite Composite
HIGH-FREQUENCY DRIVER
Ferro Fluid Enhanced 1" Neodymium Soft Dome
LOW-FREQUENCY POWER
35WRMS / 70W MAX
HIGH-FREQUENCY POWER
15WRMS / 30W MAX
FREQUENCY RESPONSE
49HZ - 21,000 HZ
SPL
107DB @ 1W/1M
AMPLIFIER CLASS
EFFICIENT CLASS D CIRCUITRY
POWER OUTPUT
50W RMS / 100W MAX
INPUT IMPEDANCE
10K OHMS BALANCED
SYSTEM VOL.
(-30DB - +6DB)
AUTO MUTE
N/A
LED INDICATOR
POWER ON
HIGH FREQ. EQ ADJUSTMENT
-4dB, -2dB 0, +2dB
RCA
UNBALANCED RCA
1/4”
BALANCED 1/4” TRS
USB
HIGH-SPEED USB 2.0
AC POWER INPUT
120V/60Hz
ENCLOSURE MATERIAL
HIGH DENSITY MDF / ANTI-VIBRATION BONDED & BLOCKED
FINISH
DURABLE BLACK VINYL WRAP
DIMENSIONS (H x W x D)
13.4 oz (6lbs.) per pair
WEIGHT
9
TROUBLESHOOTING
Experiencing technical difficulties? Try the following diagnostic tips...
NO POWER
•Ensure power cord is securely connected to its proper port
•AC voltage matches to that of the operating voltage requirements.
•The Rockville logo is illuminated on the front panel of the ASM5. If not, turn the power switch off
and check the fuse(s).
***NEVER USE A LARGER AMPERAGE FUSE THAN IS SPECIFIED
NO SOUND
•Check to see if all other audio devices using the same AC outlet are still operating
•Ensure that the audio source cable is plugged into both the source output and the monitor input.
• The signal source (mixer, work station, CD player, etc.) is turned up to a level that can properly
send a signal to the monitors
• Check each monitor for sound, independently.
• Exchange the audio input cable from the non-working monitor to the working unit. This will
determine whether it's really the monitor, a faulty cable, or some other glitch in the audio system.
• If the monitor is still not responding, it should be returned to an authorized Rockville Dealer.
OUTPUT RANDOMLY DROPS
Your ASM5 monitor provides protection against power surges, amp overdrive, and overheating.
Turn the monitor off then wait 30 minutes to allow the back plate to cool down.
•Carefully check the amplifier’s temperature. If the monitor has been running at its highest power
output for an extended period of time, it could cause the unit to overheated and the protection
circuitry will shut the system down momentarily.
•If the monitor is still not responding, please contact the dealer you purchased it from.
POPS, HISSES, HUMS & OTHER UNWANTED NOISES
•Check the connections between the signal source and the monitor. The ASM5 uses TRS
connectors, which are completely balanced. If you’re connecting an unbalanced output to the
monitor, be sure that you’re using Pin 2 for signal and have Pin 1 and Pin 3 tied together at the
source end.
•All audio equipment should use the same ground point. Check all other devices using the same AC
output in the building such as dimmers, neon signs, TV screens, and computer monitors. These
devices should not be using the same circuit.
10
VISIT US AT:
RockvillePro.com
Due to constant product improvements, these specifications are subject to change without notice
Copyright 2013