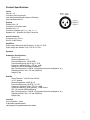
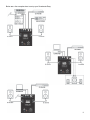
1
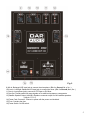
Soundmate Easy
ORDERCODE D3215
Congratulations!
You have bought a great, innovative product from DAP Audio.
The DAP Audio Soundmate Easy brings excitement to any venue. Whether you want simple plug-&-play
action or a sophisticated show, this product provides the effect you need.
You can rely on DAP Audio, for more excellent audio products.
We design and manufacture professional audio equipment for the entertainment industry.
New products are being launched regularly. We work hard to keep you, our customer, satisfied.
For more information: [email protected]
You can get some of the best quality, best priced products on the market from DAP Audio.
So next time, turn to DAP Audio for more great audio equipment.
Always get the best -- with DAP Audio !
Thank you!
DAP Audio
DAP Audio Soundmate Easy™ Product Guide
Warning..…...................................................................................…………………………………………..
Safety-instructions………………………………………………………………………………………….….
Operating Determinations…………………………………………………………………………………….
2
2
3
Description..…..............................................................................……….…………………………………
Features………………………………………………………………………………….………………….….
Overview…………………………………………………………………………………………………..……
4
4
4
Set Up and Operation.....................................................................……..…………………………………
6
Product Specifications.................................................................……………….…….……………….….
7
Set Up Possibilities............................….......................................………..………….…….……………....
8
1
WARNING
CAUTION!
Keep this system away from rain and moisture!
FOR YOUR OWN SAFETY, PLEASE READ THIS USER MANUAL CAREFULLY
BEFORE YOUR INITIAL START-UP!
SAFETY INSTRUCTIONS
Every person involved with the installation, operation and maintenance of this system have to:
be qualified
follow the instructions of this manual
CAUTION! Be careful with your operations.
With a dangerous voltage you can suffer
a dangerous electric shock when touching the wires!
Before you initial start-up, please make sure that there is no damage caused by transportation. Should there
be any, consult your dealer and do not use the system.
If you find items missing, they may have been shipped separately. Please allow several days for the rest of
your order to arrive before inquiring.
RECORD THE SERIAL NUMBER on the enclosed warranty card or below on this manual for your records.
Keep your portion of the card and return the portion with your name and comments to your dealer.
To maintain perfect condition and to ensure a safe operation, it is absolutely necessary for the user to follow
the safety instructions and warning notes written in this manual.
Please consider that damages caused by manual modifications to the system are not subject to warranty.
This system contains no user-serviceable parts. Refer servicing to qualified technicians only.
IMPORTANT:
The manufacturer will not accept liability for any resulting damages caused by the non-observance of
this manual or any unauthorized modification to the system.
•
•
•
•
•
•
•
•
•
•
•
•
•
•
Never let the power-cord come into contact with other cables! Handle the power-cord and all
connections with the mains with particular caution!
Never remove warning or informative labels from the unit.
Do not open the device and do not modify the device.
Never use anything to cover the ground contact.
Never leave any cables lying around.
Never use the device during thunderstorms, unplug the device immediately.
Do not insert objects into air vents.
Do not connect this system to a dimmerpack.
Do not switch the system on and off in short intervals, as this would reduce the system’s life.
Do not open this device. Risk: hazardous radiation exposure.
Do not shake the device. Avoid brute force when installing or operating the device.
Only use system indoor, avoid contact with water or other liquids.
Avoid flames and do not put close to flammable liquids or gases.
Always disconnect power from the mains, when system is not used. Only handle the power-cord by
the plug. Never pull out the plug by tugging the power-cord.
2
•
•
•
•
•
•
•
•
•
•
•
•
•
•
•
•
•
•
•
•
•
•
Make sure you don’t use the wrong kind of cables or defective cables.
Make sure that the signals into the mixer are balanced, otherwise hum could be created.
Make sure you use DI boxes to balance unbalanced signals; All incoming signals should be clear.
Make sure that there is sufficient room on all sides of the system for air circulation
Make sure that the available voltage is not higher than stated on the rear panel.
Make sure that the power-cord is never crimped or damaged. Check the system and the power-cord
from time to time.
The cable insert or the female part in the device must never be strained. There must always be
sufficient cable to the device. Otherwise, the cable may be damaged which may lead to deadly
electrical shocks
Always operate the unit with the AC ground wire connected to the electrical system ground.
Do not drive the inputs with a signal level bigger, than required to drive the equipment to full output.
Please turn off the power switch, when changing the power cord or signal cable, or select the input
mode switch.
In typical use, Please set the volume to 0dB position.
Prevent distortion! Make sure that all components connected to the Soundmate have sufficient
power ratings. Otherwise distortion will be generated because the components are operated at their
limits.
Avoid ground loops! Always be sure to connect the power amps and the mixing console to the same
electrical circuit to ensure the same phase!
If system is dropped or struck, disconnect mains power supply immediately. Have a qualified
engineer inspect for safety before operating.
If the system has been exposed to drastic temperature fluctuation (e.g. after transportation), do not
switch it on immediately. The arising condensation water might damage your system. Leave the
system switched off until it has reached room temperature.
If your DAP Audio device fails to work properly, discontinue use immediately. Pack the unit securely
(preferably in the original packing material), and return it to your DAP Audio dealer for service.
For replacement use fuses of same type and rating only.
The user is responsible for correct positioning and operating of the Soundmate Easy. The
manufacturer will not accept liability for damages caused by the misuse or incorrect installation of
this device.
This device falls under protection class I. Therefore it is essential to connect the yellow/green
conductor to earth.
Repairs, servicing and electric connection must be carried out by a qualified technician.
SAVE YOUR INVOICE. It will be required for warranty service if needed in future.
WARRANTY: Till one year after date of purchase.
OPERATING DETERMINATIONS
If this system is operated in any other way, than the one described in this manual, the product may suffer
damages and the warranty becomes void.
Any other operation may lead to dangers like short-circuit, burns, electric shock, etc.
You endanger your own safety and the safety of others!
Improper installation can cause serious damage to people and property !
3
Description of the device
Features
Soundmate Easy is a complete sound reinforcement solution consisting of:
• 2 mid/high satellite speakers 6,5” 60 Watt / 4 Ohm
• 1 active subwoofer 10” 150 watt / 4 Ohm, equipped with amplifier(s) and all the electronics required to run
the system.
• electronic circuitry has been fine tuned to match the speaker systems
• 2 x 6 m Speakon – cable
• 2 adjustable speakerstands
• 1 carrying bag for speakerstands and cables
• plug and play
Overview
Fig. 1
1) Subwoofer Gain Control: Controls the levels of incoming signal to the subwoofer.
2) Balance: To adjust the relative volume between the left and the right channel.
3) Ground/Lift: Remove ground from circuit to eliminate hum caused by ground loops.
4) LED Indicator:
(Blue)- Power LED: System power supply indicator.
(Green)- Signal LED: Input signal indicator.
(Red)- Protection LED: Amplifier protection indicator.
(Yellow)- Limit LED: Clip indicator.
5) Gain Mic: Controls the levels of input signals from the microphone.
6) Gain Line: Controls the level of LINE-IN signals to avoid distortion.
7) Gain Aux: Controls the level of the AUX-In signals to avoid distortion.
8) Mode: Stereo/Mono: Choose Mono if the input signal is in mono.
This will send the mono signals to both L&R channels.
4
Fig. 2
9) Mic In: Balanced XLR Input jack to connect the microphone. (Pin 1 = Ground; 2= +; 3= - )
10) Line In: Left/Right: Balanced XLR Input jack to connect the mixer. (Pin 1 = Ground; 2= +; 3= - )
11) Aux-In: Input phone jack to connect a CD Player or DJ Mixer.
12) Aux-Out: Sends parallel full range signals out to additional systems or components.
13) Satellite Speaker Output (left/right): Speakon connector output for M/H satellite speakers.
(Use pin +1 & -1)
14) Power Cord Connector: Connect to power with the power cord included.
15) Fuse: Contains the fuse.
16) Power Switch: On/Off switch.
5
Set Up and Operation
Soundmate Easy is a 2 way active satellitesystem with one 10” 300 watt sub-woofer and two 6,5” 75 Watt
mid/high units.
The set comes complete with stands and 2 Speakon cables and is ready to use. The amplifier-section is
build into the subwoofer and consists of 3 separate power-amplifiers. Further built-in are the crossovers,
frequency response correction circuits, breaker circuitry.
The SoundMate system can be used for small live gigs, events and less Mobile DJ’s.
It’s easy to set up; All you have to do is set up the system components, connect the signal-carrying cables
and power cords and you're ready to roll.
Follow the directions below, as they pertain to your preferred operation mode.
Signal Input (10)
This XLR sockets serve as inputs for the audio signal. There are also 2 parallel outputs for connecting
additional power amps.
Speaker Output (13)
It is not possible to connect additional tops to the Speakon socket. You can only connect the 2 speakers via
the 2 Speakon sockets
Make sure that the impedance is not below 4 , otherwise the power amp could be damaged.
Mains Socket (14)
Plug one end of the electric mains power cord into the IEC socket on the unit.
Then plug the other end of the cord into a proper electric power supply socket.
Make sure that the available voltage is not higher than stated on the rear panel.
Before plugging the unit in, always make sure that the power supply matches the product specification
voltage. Do not attempt to operate a 120V specification product on 230V power, or vice versa
Mains Switch (16)
Do not supply power before the whole system is set up and connected properly.
6
Product Specifications
Inputs
Line IN L / R
Connector XLR plug female
Input design electronically balanced & floating
Input impedance 48 k
Outputs
Parallel Out L / R
Connector: XLR socket male
Satellite Out L / R
Connector: Speakon (pin 1+= +; pin 1--= --)
Speaker Out: Speakon NL4 Style Connector
Active Crossover
Crossover freq. 130 Hz
Roll off 24 dB/ Octave
Amplifiers
Power output Subwoofer 300 W (Mono) / 4 at 1% THD
Power output per Satellite 75 W / 4 at 1% THD
Speakers
Subwoofer Specifications
Driver 1x 10"
Nominal impedance 4 Power handling nom. 150 W RMS
Power handling progr 300 W @ 1% THD
Frequency response 40Hz – 130 Hz, ±3dB
Sensitivity 1W/1m axial 96dB (halfspace)
Max. Sound pressure 115dB at 10% harmonic distortion (halfspace/ 1m)
Dimensions 330 x 410 x 510 mm (WXDXH)
Weight 25 Kg
Satellite
Dome Tweeter 1" with CD-Horn 60°x40°
1x 6,5” speaker
Nominal impedance 120W @ 4 Power handling progr. 60 W @ 1% THD
Frequency response 120Hz - 20 kHz, ±3dB
Crossover frequency 3kHz (passive) ; 18dB Octave
SPL 1W/1m axial 93dB (halfspace)
Max. Sound pressure 111dB at 10% harmonic distortion (halfspace/ 1m)
Dimensions 209 x 304 x 215 mm (WXDXH)
Weight 4 Kg
Included
2x 6 m Speakon - cable
2 adjustable speakerstands
carrying bag for speakerstands and cables
7
Below are a few examples how to set up your Soundmate Easy:
8
2005 Dap Audio.