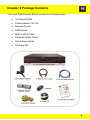
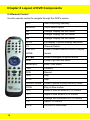
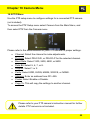
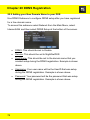
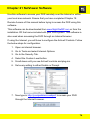
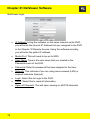
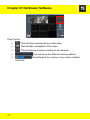
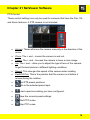
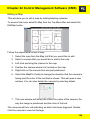
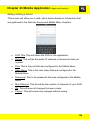
1
Table of Contents Chapter 1 FCC Radiation Norm .............................................................. 5 Chapter 2 Package Contents .................................................................. 6 Chapter 3 System Requirements ............................................................ 7 Chapter 4 Safety Instructions .................................................................. 8 Chapter 5 Troubleshooting .................................................................... 10 Chapter 6 Layout of DVR Components................................................. 12 6.1 Back Panel of DVR ................................................................. 12 6.2 Front Panel of DVR ................................................................. 13 6.3 Mouse...................................................................................... 14 6.4 Remote .................................................................................... 15 Chapter 7 DVR Installation .................................................................... 16 7.1 Connecting the Power Supply................................................. 16 7.2 Connecting the DVR to a TV or Monitor ................................. 17 Chapter 8 Camera Installation............................................................... 18 8.1 Connecting Cameras to the DVR ........................................... 18 8.2 Mounting the Cameras ............................................................ 19 Chapter 9 DVR Start Up ........................................................................ 20 9.1 System Initialization ................................................................ 20 9.2 On-Screen Display .................................................................. 21 Chapter 10 Quick Function Menu.......................................................... 22 Chapter 11 Main Menu .......................................................................... 23 Chapter 12 System Menu ...................................................................... 24 12.1 Time Setting Menu ................................................................ 25 12.1.1 DST Setting Submenu ............................................... 26 12.2 Password Menu .................................................................... 27 12.2.1 User Password Setup Submenu ............................... 28 12.2.2 User Authority Submenu ........................................... 29 2 Table of Contents 12.3 Language Menu .................................................................... 30 12.4 HDD Management Menu ...................................................... 31 12.5 Video Audio Setup Menu ...................................................... 32 12.6 Maintain Menu....................................................................... 33 12.6.1 Load Defaults Submenu ............................................ 34 12.6.2 Log Submenu ............................................................ 35 12.7 Firmware Update................................................................... 36 12.8 System Information Menu ..................................................... 37 Chapter 13 Record Functions Menu ..................................................... 38 13.1 Record Menu ......................................................................... 39 13.1.1 Record Schedule Submenu....................................... 40 13.2 Motion Detect Menu .............................................................. 41 13.2.1 Detection Area ........................................................... 42 13.3 Alarm Setup Menu ................................................................ 43 Chapter 14 Playback Menu ................................................................... 44 14.1 Playback Screen ................................................................... 45 14.2 Detail Files Submenu (Backup Files).................................... 46 Chapter 15 Converting Files to AVI ....................................................... 47 Chapter 16 Camera Menu ..................................................................... 48 16.1 Camera Settings Menu ......................................................... 49 16.1.1 Privacy Zone Submenu ............................................. 50 16.1.2 Color Setup Submenu ............................................... 51 16.2 PTZ Menu.............................................................................. 52 16.3 PTZ Quick Functions............................................................. 53 Chapter 17 Network Menu .................................................................... 55 17.1 Internet/LAN Menu ................................................................ 56 17.1.1 DDNS Submenu ........................................................ 58 3 Table of Contents 17.2 Mobile Menu .......................................................................... 59 17.3 Email Menu ........................................................................... 60 Chapter 18 Remote Access .................................................................. 61 18.1 Connection of DVR and Router/Modem ............................... 62 18.2 Windows Network Configuration ........................................... 63 18.3 Apple (Mac) Network Configuration ...................................... 66 Chapter 19 Port Forwarding .................................................................. 68 19.1 Checking the Ports after Port Forwarding............................. 70 Chapter 20 DDNS Registration ............................................................. 71 20.1 Registering a Free Domain Name ........................................ 71 20.2 Adding your New Domain Name to your DVR ...................... 73 Chapter 21 NetViewer Software ............................................................ 74 Chapter 22 Control Management Software (CMS) ............................... 84 Chapter 23 Mobile Application ............................................................ 106 Chapter 24 Specifications of DVR ....................................................... 118 Chapter 25 Information Log................................................................. 119 Chapter 26 Warranty ........................................................................... 120 Interactive How-To videos are available for the chapters indicated with this icon. You can also visit Night Owl’s website at http://www.nightowlsp.com/Videos 4 Chapter 1 FCC Radiation Norm FCC This equipment has been tested and found to comply with limits for Class B digital device pursuant to Part 15 of Federal Communications Commission (FCC) rules. FCC Compliance Statement These limits are designed to provide reasonable protection against frequency interference in residential installation. This equipment generates, uses, and can radiate radio frequency energy, and if not installed or used in accordance with the instructions, may cause harmful interference to radio communication. However, there is no guarantee that interference will not occur in television reception, which can be determined by turning the equipment off and on. The user is encouraged to try and correct the interference by one or more of the following measures: Reorient or relocate the receiving antenna Increase the separation between the equipment and the receiver Connect the equipment into an outlet on a circuit different from that to which the receiver is connected to. CAUTION! The Federal Communications Commission warns the user that changes or modifications to the unit not expressly approved by the party responsible for compliance could void the user’s authority to operate the equipment. 5 Chapter 2 Package Contents Your new DVR Security Kit will contain the following items. 16 Channel DVR Power Adapter 12V 2A Remote Control USB Mouse BNC to RCA Cable Ethernet (RJ45) Cable Quick Setup Guide Software CD 6 Chapter 3 System Requirements Please be sure the computer that you will use the LTE DVR Security Kit with complies with the following specifications: 7 IBM PCs or 100% Compatible Windows® XP, Vista, 7, and 8 Mac® OS 10.6 and above Internet Explorer 7, 8, 9 and 10 web brower Mac capabilities Safari 5.1 & 6.0 CD-ROM Drive Chapter 4 Safety Instructions Use provided power adapter. Do not use this product with a power source that applies more than specified voltage (100-240V AC). Never insert metal into the DVR case or its openings. Inserting metal into the DVR case may cause electric shock. Do not operate in wet or dusty area. Avoid placing the DVR in areas such as a damp basement or dusty attic. Do not expose the DVR to rain or use near water. If the DVR accidentally gets wet, unplug it and contact technical support immediately. Keep product surfaces clean and dry. To clean the outside case of the DVR, use a lightly dampened cloth. Do not use any cleaning solutions or solvents. Do not install near any heat sources. Do not install the DVR near any heat sources such as Stoves, heat registers, radiators, other apparatus (including amplifier) that produce heat. Unplug the DVR when moving the device. Be sure that the DVR is unplugged before you try to move the device. When moving this device, be sure to handle it with care. Make sure there is good air circulation around the unit. This DVR system uses an internal hard drive, which generates heat during operation, for video storage. Do not block vents on the DVR that reduce the generated heat while the system is running. Place this product in a well-ventilated area. 8 Chapter 4 Safety Instructions Do not attempt to remove the top cover. If any abnormal operation is observed, unplug the DVR immediately and contact technical support. Do not attempt to open the DVR to diagnose the cause of the malfunction yourself. (Warning: You may be subjected to severe electrical shock if you remove the cover of the DVR.) Handle the DVR carefully. If you accidentally drop your DVR on any hard surface, it may cause a malfunction. If the DVR doesn’t work properly due to physical damage, contact an authorized dealer for repair. Recommended to use with an uninterruptable power supply (UPS). Connecting your DVR and cameras to a UPS allows continuous operation even during power outages. The run-time duration will depend on the rating of the UPS used. 9 Chapter 5 Troubleshooting When a malfunction occurs, it may not be serious and can be corrected easily. The following information describes the most common problems with their solutions. Please refer to the following before calling Night Owl Technical Support. 10 Chapter 5 Troubleshooting 11 Chapter 6 Layout of DVR Components 6.1 Back Panel of DVR 12 Chapter 6 Layout of DVR Components 6.2 Front Panel of DVR 13 Chapter 6 Layout of DVR Components 6.3 Mouse You can use a mouse instead of the remote control to navigate through your DVR’s menus. Connect the included mouse to the USB port on the back panel of the DVR. Use the mouse buttons to perform the following: 1. Left Button: Click to select a menu option. During live viewing in split-screen, double-click on a channel to view the selected channel in full-screen; double-click the channel again to return to split-screen view. 2. Right Button: Click to open the quick function menu, or click to return to previous option menu. 3. Scroll Wheel: No function. 14 Chapter 6 Layout of DVR Components 6.4 Remote Control Use the remote control to navigate through the DVR’s menus. 15 REC Start Recording Manually SEARCH Turns Search Menu 2x2 Change Display into 2x2 mode 3x3 Change Display into 3x3 mode 4x4 Change Display into 4x4 mode AUTO Put display in preset display sequence 0-9 Channel Select DISPLAY Press to rotate between different display MODE modes ▲▼◄► Press to navigate in option menus Enter Press to go into sub menu MENU/ESC Enter / Exit Menu FWD Forward REW Rewind PLAY Play STOP Stop PAUSE/FRAME Press to pause or play frame by frame SLOW Play in Slow motion Z+ Z- Zoom in and out when in PTZ control F+ F- Adjust Focus when in PTZ control I+ I- Change the focus point in PTZ control PTZ Open PTZ control LOCK Put DVR in lock mode Chapter 7 DVR Installation 7.1 Connecting the Power Supply 1. Plug the included power supply into the DVR. 2. Plug the other end of the power adapter cable into an available 110/220V wall outlet (or, if you are using an uninterruptable power supply, plug the adapter cable into one of its output sockets). 16 Chapter 7 DVR Installation 7.2 Connecting the DVR to a TV or Monitor Using the supplied BNC to RCA connector 1. Connect the BNC to RCA connector to the back of the DVR’s Video Output port. 2. Connect the other end of the cable to an available RCA video input on your TV or monitor. 3. Select the appropriate video input channel on your TV or monitor to view the DVR. 17 Chapter 8 Camera Installation 8.1 Connecting Cameras to the DVR 1. Your DVR system comes with one 60 foot coaxial cable per camera. Connect each cable to a camera using the BNC connectors (yellow connector) and the DC connectors (red connector). 2. Plug the other end of the cables into the video input ports on the back panel of the DVR. 3. Connect the provided four-way power splitter cable into the DC connectors of the cables. 4. Plug the power splitter into the camera power supply. 5. Plug the camera power supply into an available 110/220V wall outlet or uninterruptable power supply. Ensure all cameras are working (prior to mounting the cameras) by connecting them as described in the section above. Once all cameras are confirmed to be fully operational, you can run the cables and mount the cameras at their final locations. 18 Chapter 8 Camera Installation 8.2 Mounting the Cameras 1. Choose a Position: Decide where you would like to mount the camera. 2. Screw Positions: Mark three holes on the surface where you plan to mount the camera, using the holes in the camera base as a guide. 3. Anchor Screws: Using a drill bit slightly smaller than the included screw anchors, drill into the mounting surface using the guide marks placed in the previous step. Insert the screw anchors. 4. Mount Camera: Hold camera in place and tighten each screw securely into the anchors. 5. Ensure Camera is Secure: Once screwed into place, make sure that the camera is securely mounted by placing gentle pressure on the mount. 6. Adjust: Adjust the camera housing to point the camera lens in the direction you would like to record. Don’t feel like installing the system yourself? Let InstallerNet do the work for you. Contact us at 1-800-806-5513 or visit us at www.nightowlsp.com/ 19 Chapter 9 DVR Start Up 9.1 System Initialization After connecting the power adapter, the system will automatically start up and display the Night Owl logo while initializing the system for use. After initialization, the view of your screen will change to a live camera view, showing all the cameras that are currently connected to the DVR. When there are video inputs, the main interface will display live images from the cameras. Using the mouse: Double-click (with the left button on the mouse) the live image of any channel to maximize the image to a full screen. Double-clicking again to go back to the live split screen, displaying images from all channels. Clicking the right button of the mouse will launch the quick function menu; in this menu, you can use the left button to select menu options. Clicking outside of the menu box will close the quick function menu. When you are inside a menu option, always right click to navigate back to your live screen view. 20 Chapter 9 DVR Start Up 9.2 On-Screen Display The on-screen display will also show the following information. Date & Time: Displays the date and time on the system. Channel Title/Number: Displays the channel name, configurable in the Camera Menu. Record Status: Displays the current recording status of the system: R=Recording M=Motion Recording H= Hard Drive issue By default, passwords are disabled on the system. However, for security purposes, it is highly recommended that you enable a system password (this is discussed in detail later). 21 Chapter 10 Quick Function Menu Use the Quick Function menu to access several system options, including the Main Menu. To open the quick function menu, right-click anywhere on the screen with the mouse or press the Menu button on the remote control. Main Menu: This opens the main system menu. This allows you to access the System Menu, Record Functions Menu, Playback Menu, Camera Menu, and Network Menu. View Options: This allows you to view an individual camera, four cameras, 9 cameras or all 16 cameras at once. PTZ: Opens the Pan, Tilt, Zoom (PTZ) control menu. This option is only for those who have a PTZ Camera. Search: This opens the Playback Menu to search for previously recorded videos. Mute On: This will mute all audio enabled cameras. (Stop) Manual Rec: This stops/starts continuous recording. Start Rotate: This begins sequential channel rotation (a slideshow). Start Cruise: This setting will automatically begin rotating the PTZ camera to the preset points. This is only for those who have a PTZ Camera. 22 Chapter 11 Main Menu Use the Main Menu to access the System Menu, Record Functions Menu, Playback Menu, Camera Menu, and Network Menu. These menus will allow you to change the configurations of the DVR. To access the Main Menu using a mouse: 1. Right click anywhere on the screen to open the quick function menu. 2. Left click the Main Menu option. 3. Left click the menu icon in which you would like to configure. To access the Main Menu using the remote control: 1. Press the Menu button to open the quick function menu. 2. Use the arrow buttons to highlight the Main Menu option. 3. Use the enter button to select the option and enter the Main Menu. 4. Use the arrows to highlight the menu icon in which you would like to configure. 5. Use the enter button to select the menu icon. By default, passwords are disabled on the system. However, for security purposes, it is highly recommended that you enable a system password (this is discussed in detail later). 23 Chapter 12 System Menu System Menu Use this menu to access the Date/Time, Password, Language and Advance menus. Use the Advance menu to access the Hard Drive, A/V Setup, Maintain and Info Menus. Be sure to “Apply” all changes made to the menus. If you do not apply the changes, they will not be saved. You can also select the “Default” button on any page to restore back to DVR default settings. 24 Chapter 12 System Menu 12.1 Time Setting Menu It is highly recommended to set up the Date and Time when first setting up your system. You can also configure Daylight Saving Time (DST) settings. To access the Time Setting menu select System from the Main Menu, and then select Date/Time from the System menu. Date: Enter the current date. Date Format: Select the format you would like the date to be displayed in MM/DD/YY, YY-MM-DD, or DD/MM/YY. Time: Enter the current time. Time Format: Select 12 or 24 hour time format. 24 Hour displays as military time, keep in mind most of the DVR’s functions are set as military time. Time Zone: Select your time zone. NTP: This stands for Network Time Protocol. NTP is used to retrieve and update your DVR’s time. It is only recommended to enable this setting if you are connected to the internet. If you are connected to the internet the DVR can automatically update the time and will automatically update for Day Light Saving Time. NTP Server: Enter the address of an international time server for the DVR to update its time from. DST Setting: Select the DST Setting button to enter the DST Setting Submenu. 25 Chapter 12 System Menu 12.1.1 DST Setting Submenu The DST Setting Submenu is used to configure Daylight Saving Time settings. To access the DST Setting Submenu select System from the Main Menu, and then select Date/Time from the System menu. Select the DST Setting button in the Date and Time Menu. Daylight Saving Time: Enable/disable the DVR’s ability to use DST. Time Offset: Select the number of hours that your time is offset by DST. Daylight Saving Time Mode: Select either Week or Date depending on when DST takes effect. Start Time: When the DVR should begin applying the DST offset. End Time: When the DVR should stop applying the DST offset. Default: Go back to original settings that came installed with the DVR. 26 Chapter 12 System Menu 12.2 Password Menu Use this menu to change the user name, passwords, and permissions of the admin and the users from the User Setup menu. To access the User Setup menu select System from the Main Menu, and then select Password from the System menu. NO.: This is the number of users that can be enabled. User: This will indicate the User’s name when configured. Type: This is the type of each user. Active: This will indicate if each user name and password is enabled/disabled. Sel.: This will allow you check the box next to the user that you want to edit. Edit: This will open a submenu that will allow you change the name and password of a user and enable the users and passwords. Authority: This will open a submenu that will allow the Admin to grant the users access to specific menus of the DVR. Be sure to write down the Admin Password in the Information Log at the end of the manual so that you do not get locked out of your DVR. 27 Chapter 12 System Menu 12.2.1 User Password Setup Submenu Use this submenu to change the user names and passwords and to enable user names and passwords. To access the User Password Setup Submenu select System from the Main Menu, and then select Password from the System menu. Place a check mark into the box for the user you would like to edit and then select the Edit button. User Name: This will indicate what the current user type. User Enable: This will enable/disable the user. User Name: This will be where you can change the user name. Password Enable: This will enable/disable a password for the user. Password: This will be the password assigned to the user name. Confirm: This will confirm the password that was assigned in the Password field. 28 Chapter 12 System Menu 12.2.2 User Authority Submenu Use this submenu to grant the users access to specific menus of the DVR. To access the User Authority Submenu select System from the Main Menu, and then select Password from the System menu. Place a check mark into the box for the user you would like to grant access to and then select the Authority button. Place a check in each box for each menu you would like to grant access into. All: This will select all boxes for each menu. Clear: This will deselect all checked boxes that are currently checked. 29 Chapter 12 System Menu 12.3 Language Menu Use this menu to change the displayed language the DVR’s menus. To access the Language Menu select System from the Main Menu, and then select Language from the System menu. From the drop down menu, click on the language you prefer. You can choose between English, Spanish and French. Select Apply to save the changes and then Exit. When you exit, the DVR will automatically reboot to change the language settings. 30 Chapter 12 System Menu 12.4 HDD Management Menu The HDD Management Menu shows the capacity, available recording time of the installed hard drive(s) (HD) and to configure the hard drive settings. To access the HDD menu select System from the Main Menu, and then select Advance from the System menu, then select Hard Drive. HDD Status: This shows if your HD is working (ok) or not working (no disk). Total/Free Space: This will show the total HD space and how much free space is on the HD. You can install 2 HDs with a maximum capacity of 2 terabytes each. Useable Rec. Time: This shows the number of hours that the HD can record using the free space on the HD. Format: This box needs to be checked to format a HD. Overwrite: This should be set to Auto if you wish to have the HD record over the oldest file on the HD when the HD is full. It is highly recommended that you DO NOT disable this function. When it is disabled it will not record any video when the HD is full. Format HDD: Select this to format the HD. Formatting the HD will erase all data and allow the DVR to read and write the files to and from the HD. USB Format: Select this to format the USB. Formatting the USB will erase all data and allow the DVR to write the files to the USB. 31 Chapter 12 System Menu 12.5 Video Audio Setup Menu Use the Video Audio Setup Menu to set the video system, monitor resolution, output device, rotation time and volume on the DVR. To access the Video Audio Setup Menu select System from the Main Menu, and then select Advance from the System menu, then select A/V Setup from the Advance menu. Video System: This option shouldn’t need to be adjusted. If you have a PAL television, select PAL from the drop-down menu. VGA Resolution: Select the resolution of video output from the VGA port. This option should only be used if you are using a VGA cable (not included). The larger the number the better resolution will be displayed on your TV or monitor. Refer to your TV/monitor manual for which resolution works best. Rotate Time: Adjust the number of seconds to rotate the channels of your DVR. To start rotate, select Start Rotate from the Quick Functions Menu. Volume: This will display the volume of the DVR. Margin: This will change the margins of each channel. Do not set the Video System to PAL unless you have a PAL television! This will disable the viewing of the DVR system. 32 Chapter 12 System Menu 12.6 Maintain Menu Use the Maintain Menu to update the system’s firmware, restore factory default settings, and set an automatic system reboot schedule. To access the Maintain Menu select System from the Main Menu, and then select Advance from the System menu, then select Maintain from the Advance menu. Auto Maintain: With this option enabled, the DVR will reboot automatically on a specified schedule to help prevent system and hard drive failure and to preserve the life your DVR. Auto Reboot: Choose when you would like your system to automatically reboot. Firmware Update: This button is used to perform a firmware update from a USB flash drive. Load Defaults: This will open a submenu that will allow you to choose which menus to load factory default settings. 33 Reboot: Reboots the DVR. Power Off: This will turn the DVR completely off. Log: This will open a submenu that lists all actions of the DVR. Chapter 12 System Menu 12.6.1 Load Defaults Submenu Use this submenu to choose which menus that you would like to load factory defaults. To access this submenu select System from the Main Menu, and then select Advance from the System menu. Select Maintain from the Advance menu, then select Load Defaults. Select each box next to the menu that you would like to restore defaults. Select the Select All button to restore the entire DVR’s default settings. 34 Chapter 12 System Menu 12.6.2 Log Submenu Use this submenu to list all actions of the DVR. To access this submenu select System from the Main Menu, and then select Advance from the System menu. Select Maintain from the Advance menu, then select Log. Log Type: This allows you to search for Operations Setup, Alarm Triggers or All actions of the DVR. Start Time: This will indicate the date that you would like to start the search on. End Time: This will indicate the date that you would like to end the search on. 35 Search: This will show all actions listed on a new screen. Chapter 12 System Menu 12.7 Firmware Update Your system will periodically need a firmware update to ensure optimal performance. Visit www.NightOwlSP.com to check if updates are available for your system. To update firmware: 1. Download and Save the latest firmware update for your system from www.NightOwlSP.com to your desktop. 2. Once you have saved the firmware to your computer, insert an empty USB flash drive into the computer. 3. Locate the file in which you just saved to your desktop and open the folder. 4. This folder will contain a folder titled dvrupgrade and a Word document with instructions. 5. Drag the folder labeled “dvrupgrade” to the empty USB flash drive 6. Safely remove the USB flash drive from your computer. 7. Connect the USB flash drive to the USB port on the back panel of your DVR. 8. Open the Maintain Menu (Main Menu>Advance>Maintain). 9. Select Firmware Update. The DVR will automatically scan the USB flash drive and begin updating the firmware. Do not remove the USB flash drive while the update is taking place. 10. A window will pop up saying do not power off the DVR. It will automatically update and restart. 36 Chapter 12 System Menu 12.8 System Information Menu This menu lists various pieces of information about the DVR system. It is recommended to leave the Device Name and Device ID fields at their default values. To access the System Information Menu select System from the Main Menu, and then select Advanced from the System menu, then select Info from the Advanced menu. Device Name: This represents the type of DVR’s name. Device ID: This represents the number of the DVR if there are multiple DVRs in the one location. Device Type: This represents the type of DVR. MAC Address: This represents the unique identifier that is assigned to the DVR. Firmware Version: This represents the firmware version of your DVR. You will need to refer to this information from time to time to ensure that the DVR’s firmware does not need an update. 37 IE Version: This is the Internet Explorer firmware version. Safari Plugin Ver: This is the Safari firmware version. Hardware Version: This represents hardware version of the DVR. Chapter 13 Record Functions Menu Record Functions Menu Use this menu to access the Record Menu, Time Sechedule Submenu, Motion Menu, Motion Detection Mask Submenu, and the Alarm Menu. Be sure to “Apply” all changes made to the menus. If you do not apply the changes, they will not be saved. You can also select the “Default” button on any page to restore back to DVR default settings. 38 Chapter 13 Record Functions Menu 13.1 Record Menu The Record Menu allows you to create personalized settings to each individual video channel. To access the Record Menu select Record Functions from the Main Menu, and then Record from the Record Functions Menu. Channel: Select the channel to make adjustments. Record: This will enable/disable recording on a channel. Quality: Set the recording quality to Good, Better, or Best. Resolution: Records at CIF (352x240) resolution. Audio: This will enable/disable audio. Record Mode: Choose between Time Schedule or Continuous. Time Schedule will allow you to record motion, continuously or no recording during a specific time. Continuous will record constantly. 39 Schedule Setup: This will open the Record Schedule Submenu. File Size: Choose the maximum recording time of each video. Copy: This allows you to copy settings to other channels. Chapter 13 Record Functions Menu 13.1.1 Record Schedule Submenu Use this submenu to configure the recording schedule of the DVR. To access the Record Schedule Submenu, select Record Functions from the Main Menu. Select Record from the Record Functions Menu, and select the Schedule Setup button when Record Mode is set to Time Schedule. Channel: Select “All” to set one recording schedule for all channels, or select individual channels to set different recording schedules. Days and Times: Allows you to choose times to record and how you would like to record. The days of the week are arranged in rows. The hours of the day are arranged in columns and are set to Military time. Copy Button: Allows to “Copy” the scheduled recording from one day to another. Recording types: o Motion Recording is indicated in Red o Continuous Recording is indicated in Green o No Recording is indicated in Black Check the box next to the desired recording type and left click each box to indicate the type of recording for that hour. The box will change to the color of the indicated recording type. 40 Chapter 13 Record Functions Menu 13.2 Motion Detect Menu The Motion Detect Menu allows you to configure the motion detection settings of the DVR. To access the Motion Detect Menu select Record Functions from the Main Menu, and then Motion from the Record Functions menu. Channel: Select the channel to make adjustments. Motion Detect: This allows you to turn the motion detection settings enable/disable. It is recommended to keep these settings enabled to ensure that videos will be recorded. Sensitivity: This indicates the level of sensitivity of the camera. The lower the sensitivity, the more motion will be needed to start recording. Detection Area: Select the “Setup” button to block out areas that may have constant movement such as trees or roads. Copy: This will allow you to copy settings from one channel to another channel. 41 Chapter 13 Record Functions Menu 13.2.1 Detection Area Submenu The Detection Area Submenu allows you to set the area where you want motion to be detected. To access the Detection Area Submenu select Record Functions from the Main Menu, and then Motion from the Record Functions menu. Select the “Setup” button to enter into the Detection Area Submenu. The video channel is separated into a boxed grid. Red squares indicate where motion will be detected to start recording videos. Transparent squares indicate where motion will be ignored. This allows you to block where there is constant movement such as trees or roads. Hold down the left button on the mouse and drag to select or deselect grid squares. You can also left click each box to select or deselect each square. The DVR will record the entire camera view if motion has been detected anywhere that has been indicated in the Red squares. 42 Chapter 13 Record Functions Menu 13.3 Alarm Setup Menu Use this menu to configure the alarm, pre-recording and post recording settings. To access the Alarm Setup menu select Record Functions from the Main Menu, and then Alarm from the Record Functions menu. Buzzer: This will enable/disable a beeping sound from the DVR if alarms have been detected. MD Alarm: Select each box for each action that you would like to happen when motion has been detected. The first box will be for the buzzer, the second box will be for email alerts, and the third box will enlarge the channel to a full screen. HDD Loss: This will enable the buzzer if the box is checked and the buzzer is on if the hard drive fails. HDD Space: This will enable the buzzer if the box is checked and the buzzer is on if the hard drive is full and not set to overwrite. Video Loss: This will enable the buzzer if the box is checked and the buzzer is on if there is video loss on any channel. Post Recording: Select the duration that the DVR will record after an alarm is triggered. PreRecord: Your DVR will temporarily store the five seconds of video before any alarm is triggered. Enable this option if you would like those five seconds to be saved to your hard drive. 43 Chapter 14 Playback Menu Use the Playback Menu to search and playback previously recorded files. To access the Record Search menu select Playback from the Main Menu. You can also access this menu by selecting Video Search from the Quick Function Menu. Channel: Select the channel to make adjustments. Date: Enter the specific date in which you would like to see recorded videos. Search: Select this button when the specific date has been entered. Recorded Files: The first two rows will indicate the days in the month that you have searched. The following three rows will indicate the hours in the day that you searched. o Motion activated recording is indicated in Red o Continuous Recording is indicated in Green o No recording is indicated in Black To playback the files just simply click on the highlighted hour and the DVR will begin playback. 44 Chapter 14 Playback Menu 14.1 Playback Screen This is the screen you will see during the playback of any recorded videos. To access this screen you will need to search for videos in the Playback Menu and select a time that has recording. The buttons from left to right are as follows: This will rewind the recorded video. This will slow down the recorded video. This will play the recorded video. This will pause the recorded video. This will fast forward the recorded video. This will exit out of the playback screen. 45 Mute: Select this box to mute the sound. This indicates the playback volume. Chapter 14 Playback Menu 14.2 Detail Files Submenu (Backup Files) Use the Detail Files Submenu to backup previously recorded files onto a USB drive. To access the Detail Files Submenu select Playback from the Main Menu and then File List located at the bottom of the Playback Menu. You can also access this menu by selecting Video Search from the Quick Function Menu and then File List located at the bottom of the Playback Menu. First: This button will take you to the first page of the list. Last: This button will take you to the last page of the list. Next: This button will take you to the next page of the list. Back: This button will take you to the previous page of the list. All: This button will select all recorded files on the current page of the list. Backup: This button will copy all currently selected files (indicated by the checkbox to the right of the file in the list) to a USB drive inserted into the USB port on the back panel of the DVR. Exit: This button will exit out of the current screen. 46 Chapter 15 Converting Files to AVI Converting the .246 files to AVI format allows you to playback the recorded files in most multimedia players. AVI conversion involves selecting a file, and then converting the file. Download and install the AVI Generator software from the included CD or from www.NightOwlSP.com. Launch the program and select Open to browse to the .264 recording you would like to convert and then select Open again. Select Save As to specify the location you would like to save the .avi file to once the conversion is complete. You can rename the converted file by using the File Name field. 47 Click Start to begin conversion from .264 to .avi. Chapter 16 Camera Menu Use this menu to access the Camera Settings Menu, Color Setup Submenu, Privacy Zone Submenu, and PTZ Menu. Be sure to “Apply” all changes made to the menus. If you do not apply the changes, they will not be saved. You can also select the “Default” button on any page to restore back to DVR default settings. 48 Chapter 16 Camera Menu 16.1 Camera Settings Menu Use the Camera Menu to customize channel titles, show/hide the date and time in live viewing and playback, and enable/disable channel images. To access the Camera Setting Menu select Camera from the Main Menu, and then select Camera Settings from the Camera menu. Channel: Select the channel to make adjustments. Name: This field allows you to customize the name of the channel. Position: This allows you to customize where the channel name will be displayed. You can choose from (U-L) upper left, (D-L) bottom left, (U-R) upper right, (D-R) bottom right, or OFF. If you select OFF the title will not be displayed for the selected channel. Color: The Setup button will open a submenu that will allow you to change the color settings of each camera. Display Ch Image: This allows you to record a channel but hide it from the live viewing. Display Time: This will enable/disable the time when viewing the channels live. Display Record Time: This will enable/disable the time when recording the cameras. Copy: This will allow you to copy settings from one channel to another channel. 49 Privacy Zone: This allows you to mask certain areas of the screen. Chapter 16 Camera Menu 16.1.1 Privacy Zone Submenu Use the Privacy Zone Submenu to mask certain areas of the screen. To access the Camera Setting Menu select Camera from the Main Menu, and then select Camera Settings from the Camera menu. Select the Privacy Zone button in the lower left corner. Channel: Select the channel to make adjustments. Privacy Zone: This will enable/disable this setting. Mask Area Selection: Check the box, and select Mask Area Setup. This will enter into the channel screen. Drag the privacy box over the area that you would like to mask. You can enlarge the boxes by dragging the lines across the screen to cover the area you would like to mask. Right click the mouse to exit. 50 Chapter 16 Camera Menu 16.1.2 Color Setup Submenu Use this menu to change the hue, brightness, contrast, and saturation color settings of each camera. To access the Camera Setting Menu select Camera from the Main Menu, select Camera Settings from the Camera menu, then select the color setup button. Hue: This adjusts the color of the image such as red, green, blue, and yellow. You can Adjust this from 0 to 63. Brightness: This adjusts the brightness of the image. You can Adjust this from 0 to 63. Contrast: This adjusts the contrast of the colors. You can Adjust this from 0 to 63. Saturation: This adjusts the dominance of the hue colors. You can Adjust this from 0 to 63. 51 Chapter 16 Camera Menu 16.2 PTZ Menu Use the PTZ setup menu to configure settings for a connected PTZ camera (not included). To access the PTZ Setup menu select Camera from the Main Menu, and then select PTZ from the Camera menu. Please refer to the documentation of your PTZ camera for proper settings. Channel: Select the channel to make adjustments. Protocol: Select PELCO-D, or PELCO-P for the selected channel. Baud Rate: Select 1200, 2400, 4800, or 9600. Data Bit: Select 5, 6, 7, or 8. Stop Bit: Select 1 or 2. Parity: Select ODD, EVEN, MARK, SPACE, or NONE. Address: Enter an address from 001~255. Cruise: Select Enable or Disable. Copy To: This will copy the settings to another channel. Please refer to your PTZ camera’s instruction manual for further details. PTZ camera is not included. 52 Chapter 16 Camera Menu 16.3 PTZ Quick Functions Use the PTZ Quick Functions to control a connected PTZ camera (not included). To access the PTZ Quick Functions right click anywhere on the screen with the mouse and then select PTZ, Cruise Setting or Start Cruise. Arrows: These will move the camera manually in the direction of the arrow. Zoom: The Z+ and Z– zooms the camera in and out. Focus: The F+ and F– focuses the camera to have a clear image. Iris: The I+ and I– allow you to adjust the type of lens of the camera to get the best picture in different lighting conditions. Slow / Fast Bar: This changes the speed of the camera when rotating. Pre: This is a position that the camera is at before it moves during the rotation. Stp: This is a position that the camera will move to during the rotation. 53 Chapter 16 Camera Menu 16.3 PTZ Quick Functions Use the PTZ Quick Functions to control a connected PTZ camera (not included). To access the PTZ Quick Functions right click anywhere on the screen with the mouse and then select PTZ, or Start Cruise. This will allow you go to a specific preset point. This will allow you to select a set of specific preset points of a PTZ camera. 1. Select a camera you desire to set a preset point 2. Adjust the camera in a desired direction 3. Click [Set] to set the point as preset point 4. Click [Save] to save the preset point 5. Follow the above steps to add one more preset point. This will allow you delete one selected preset. This will allow you save relative parameters This will allow you exit PTZ control interface Start Cruise When the Cruise Settings are configured, use the Start Cruise option on the Quick Functions Menu to start the cruise. This just means that the camera will constantly rotate to the preset points. 54 Chapter 17 Network Menu Use this menu to access the Internet/LAN Menu, DDNS Submenu, Mobile Menu, and Email Menu. This will explain the informaiton in each menu. Complete step by step instructions on how to connect your DVR to obtain online access can be found in Chapter 18 Remote Access. Be sure to “Apply” all changes made to the menus. If you do not apply the changes, they will not be saved. You can also select the “Default” button on any page to restore back to DVR default settings. 55 Chapter 17 Network Menu 17.1 Internet/LAN Menu Use this menu to configure the type of internet connection, the media and web ports, IP address, Subnet Mask, Gateway, DNS and UPnP settings. To access this menu select Network from the Main Menu and then select Internet/LAN. TCP/IP Type: This gives you the option to choose from DHCP, PPPoE, or Static. o DHCP: (Default setting) This automatically populates the IP Address, Subnet Mask, Gateway, and DNS1 when the DVR is directly connected to a router/modem. o PPPoE: This option will need to be used if you are using broadband dial-up network access. You will have to input a user name and password that is provided by your Internet service provider. o Static: (Best option when configuring the internet settings) This will allow you to manually configure the settings. Media Port: This needs to be set to 09000. It will allow you to access to the DVR through the NetViewer Software, and the Control Management Software (CMS). Web Port: This needs to be set to 00080. This will allow access to the DVR through the Internet. 56 Chapter 17 Network Menu IP Address: This is the identification of the DVR when it is connected to a network. Subnet Mask: This should always be set to 255.255.255.000. It described the range of IP addresses that can be found in the network. Gateway: This is the connection between two networks. This should be the router’s IP Address. DNS1: This stands for Domain Name System. This will vary from city to city. DNS2: This stands for Domain Name System. This will vary from city to city. UPNP: This should be set to Enable if it is not already. This means your router and DVR flawlessly discover each other’s presence on the network and establish a functional relationship for data sharing and communication. DDNS Setup: This will open a submenu. This option allows you to set up a free website address that will point back to the DVR regardless if the IP Address changes. If you do not have a static IP Address it is recommended to use this option. You will have to register a free domain name at http://www.nightowldvr.com. 57 Chapter 17 Network Menu 17.1.1 DDNS Setting Submenu Use this menu to configure DDNS setup after you have registered for a free domain name at http://www.nightowldvr.com. To access this submenu select Network from the Main Menu, select Internet/LAN and then select DDNS Setup at the bottom of the screen. DDNS: This should be set to Enable if you are using a DDNS service. Service: This should be set to NightOwlDVR when using Night Owl’s free domain name service. Host Name: This should be set to the domain name that you created setup during the DDNS registration. Username: Your user name will be the UserID that was setup during the DDNS registration. Password: Your password will be the password that was setup during the DDNS registration. 58 Chapter 17 Network Menu 17.2 Mobile Menu Use this menu to configure the mobile port, mobile user name and mobile password settings. To access this menu select Network from the Main Menu and then select Mobile. Mobile Username: This will be the username that will be entered into the mobile application for your Smartphone and Tablet PC. Mobile Password: This will be the password that will be entered into the mobile application for your Smartphone and Tablet PC. Server Port: This should be set to 02050. This will allow you to access the DVR through the mobile application for your Smartphone and Tablet PC. Write this information in the Information Log at the end of the manual. 59 Chapter 17 Network Menu 17.3 Email Menu Use this menu to configure the email alert settings. To access this menu select Network from the Main Menu and then select Email. Email: This will allow you enable/disable email alerts. If you have the DVR set to motion, you will receive an email alert with an attached image of the object that triggered the alarm. SSL: This will be determined by the settings of your email provider. SMTP Port: This will be determined by the settings of your email provider. SMTP Add: This will be determined by the settings of your email provider. SMTP User: This will be your email address that you would like to send the emails from. SMTP PW: This will be your email address password that you would like to send the emails from. Recv Email: This will be the email that receives the email alerts. Interval: This will be the period in between each email alert that you will receive. Test: This will test the settings to ensure that they work correctly. Please refer to your email provider for the settings of your email account. 60 Chapter 18 Remote Access Use this chapter to connect your DVR to the Internet. This chapter will teach you how to properly connect your DVR to your router/modem, port configuration, Internet configurations, Mobile configurations, and DDNS registration. You will need to ensure the following in order to be able to successfully setup the DVR to the Internet. High-Speed Internet (at least 512K of bandwidth; download and upload speeds) 61 Router or Modem with an open Ethernet port Computer with Internet Explorer 6 or later or Safari 5.1 Ethernet cable (included with the system; see image below) Chapter 18 Remote Access 18.1 Connection of DVR and Router/Modem Use this section to show you how to connect the DVR to the router/modem. DVR 1. Make sure that your DVR is connected to a power outlet. 2. Connect the DVR directly to the router through an open port with the included Ethernet cable. 3. Connect a computer directly to the same router through another open port with an Ethernet cable. Do not connect the DVR to a wireless router. 62 Chapter 18 Remote Access 18.2 Windows Network Configuration Determine Basic Information about Your Network Ensure that the DVR is properly connected to the router/modem and that you have a Windows computer connected to the same router. Follow the next steps to determine the basic information about your network. 1. Select the start menu on your computer screen. Type cmd in the “Search programs and files” field and press enter. On certain computers you can select RUN from the start menu and type cmd and press enter. 2. In the command prompt window, type ipconfig and press Enter. 3. Find the section called “Ethernet adapter Local Area Connection”. 63 Chapter 18 Remote Access 4. Find the IPv4 Address (or may be named IP Address in some versions of Windows). 5. Change the last digits to 150. Example, you wrote down the IP Address 10.1.10.11. When the last digits are changed the IP address will now be 10.1.10.150. 6. Write this number down on a piece of paper. This IP Address is what you will use as the IP address of your DVR in the next section. 7. Find the Default Gateway. 8. Write down the Default Gateway number. This is the IP address of your router. You will need to enter this in the DVR’s network settings for it to work properly. 64 Chapter 18 Remote Access Changing the Network Settings on the DVR Use the information that you just wrote down for the next steps. Access the Internet/LAN Menu by selecting Network from the Main Menu and then select Internet/LAN. TCP/IP Type: Change this setting to Static. Media Port: Ensure that this port is set to 09000. Web Port: Ensure that this is set to 00080. IP Address: Change this to the IP Address that you wrote down from the previous section. You will have to enter a zero in front of any numbers that do not have three digits. Using the example from previous, this would be 010.001.010.150 after adding the necessary zeros. Subnet Mask: This should be set to 255.255.255.000. Gateway: Change this to the router’s IP Address (Default Gateway) that you wrote down from the previous section. You will have to enter a zero in front of any numbers that do not have three digits. DNS1: This will auto populate. DNS2: This will auto populate. UPNP: This should be set to enable if it is not already. Write this information on the Information Log at the end of the manual. Be sure to select Apply and restart the DVR to save all changes. 65 Chapter 18 Remote Access 18.3 Apple (Mac) Network Configuration Determine Basic Information about Your Network Ensure that the DVR is properly connected to the router/modem and that you have an Apple (Mac) computer connecter to the same router. Follow the next steps to determine the basic information about your network. 1. Select the Airport icon on your computer screen. 2. Select the Open Network Preferences option. 3. Select Ethernet (wired). 4. Select the Advanced button in the lower right corner. 5. Select the TCP/IP tab at the top to display your computer's network information. 6. Make note of your IPv4 Address. 7. Change the last digits to 150. Example, you wrote down the IP Address 10.1.10.11. When the last digits are changed the IP address will now be 10.1.10.150. 8. Write this number down on a piece of paper. This IP Address is what you will use as the IP address of your DVR in the next section. 9. Make note of the IP address listed for Router. This is the IP address of your router. You will need to enter this in the DVR’s network settings for it to work properly. 66 Chapter 18 Remote Access Changing the Network Settings on the DVR Use the information that you just wrote down for the next steps. Access the Internet/LAN Menu by selecting Network from the Main Menu and then select Internet/LAN. TCP/IP Type: Change this setting to Static. Media Port: Ensure that this port is set to 09000. Web Port: Ensure that this is set to 00080. IP Address: Change this to the IP Address that you wrote down from the previous section. You will have to enter a zero in front of any numbers that do not have three digits. Using the example from previous, this would be 010.001.010.150 after adding the necessary zeros. Subnet Mask: This should be set to 255.255.255.000. Gateway: Change this to the router’s IP Address (Default Gateway) that you wrote down from the above section. You will have to enter a zero in front of any numbers that do not have three digits. DNS1: This will auto populate. DNS2: This will auto populate. UPNP: This should be set to enable if it is not already. Write this information on the Information Log at the end of the manual. Be sure to select Apply and restart the DVR to save all changes. 67 Chapter 19 Port Forwarding Port Forwarding After you have configured the Network Settings, you will now need to forward the necessary ports to be able to view the DVR over the Internet from anywhere in the world. Refer to the manual/documentation of your router to see the process of port forwarding for your router. This process may be called the Port Forwarding, Port Mapping, or Virtual Server. Below are some general considerations to keep in mind to ensure the appropriate ports are forwarded correctly. 1. Go to http://www.whatismyip.com your IP address will appear at the top of the page. This is your public IP address. 2. Open the Internet Explorer browser and enter http://youripaddress and then press enter. 3. Login into your router using your user name and password. (Contact your Internet Service Provider if you are unsure about the login information) 4. Once you have logged into your router. Go into the section indicated to forward your ports. 68 Chapter 19 Port Forwarding 5. You will need to enter a separate port forwarding entry for each port that your DVR uses – Media Port (9000), Web Port (80), and Server Port (2050). Repeat the below steps for each entry. 6. When entering the port numbers and IP address into your router’s port forwarding section, you will need to do away with the leading zeros (i.e. 09000 becomes 9000, 192.168.001.090 becomes 192.168.1.90, and so on). 7. In the port forwarding section of your router, you will typically be asked to enter the following information in order to forward a port (keep in mind that the wording may change depending on the model of your router): a. Application Name: This can be anything you choose. b. Public Port: This should be set to one of the three ports you need to forward – Media Port (9000), Web Port (80), or Server Port (2050). c. Private Port: This should be set to the same number you entered for the Public Port. d. Port Type: If your router has an option for both, use that setting. If your router only allows either TCP or UDP port types, use TCP. e. Host IP Address: This should be set to the IP address you configured for your DVR earlier (continuing the example used in previous sections, you would enter 10.1.10.150 here). 69 Chapter 19 Port Forwarding 19.1 Checking the Ports after Port Forwarding Once you have forwarded the necessary ports on your router, you should check to ensure that they have been correctly forwarded. 1. Go to http://www.yougetsignal.com/tools/open-ports/. 2. Type in port 9000 and select the Check button to see if the port test as open or closed. 3. Type in port 80 and select the Check button to see if the port test as open or closed. 4. Type in port 2050 and select the Check button to see if the port test as open or closed. 5. All ports should be open as shown in the example below. 6. If any port tests as closed then that port is not forwarded correctly. Write “your external address” in the Information Log at the end of the manual. 70 Chapter 20 DDNS Registration 20.1 Registering a Free Domain Name (DDNS) This option allows you to set up a free website address that will point back to the DVR regardless if the IP Address changes. If you do not have a static IP Address it is recommended to use this option. Follow the below steps to register a free domain name (DDNS) 1. Go to http://www.nightowldvr.com. 2. Select the Registration button located at the top left corner of the page. 3. Complete the New User Registration form. 71 Chapter 20 DDNS Registration 4. Create a domain name. 5. If your domain name that you have chosen is available, you will receive a window that says that your domain was successfully created. 6. Your domain name has now been created. Write this information in the Information Log at the end of the manual. 72 Chapter 20 DDNS Registration 20.2 Adding your New Domain Name to your DVR Use DDNS Submenu to configure DDNS setup after you have registered for a free domain name. To access this submenu select Network from the Main Menu, select Internet/LAN and then select DDNS Setup at the bottom of the screen. DDNS: This should be set to Enable. Service: This should be set to NightOwlDVR. Host Name: This should be set to the domain name that you created setup during the DDNS registration. Example is shown above. Username: Your user name will be the UserID that was setup during the DDNS registration. Example is shown above. Password: Your password will be the password that was setup during the DDNS registration. Example is shown above. 73 Chapter 21 NetViewer Software Use this software to access your DVR remotely over the Internet or within your local area network. Ensure that you have completed Chapter 18 Remote Access of this manual before trying to access the DVR using this software. This software can be downloaded from www.NightOwlSP.com or from the installation CD that came included with your DVR system. This software is also used when accessing the DVR through an Internet browser. If using the Internet, you will have to configure the ActiveX Controls. Follow the below steps for configuration. 1. Open an internet browser. 2. Go to Tools and select Internet Options. 3. Go to the Security Tab. 4. Select the Custom Level button. 5. Scroll down until you see ActiveX controls and plug-ins. 6. Set every setting to either Enable or Prompt. 7. Now type in http://youripaddress:webport to access your DVR through the Internet browser. 74 Chapter 21 NetViewer Software NetViewer Login IP Address: Using the software on the same network as the DVR, you will enter the internal IP Address that you assigned to the DVR in the Chapter 18 Remote Access. Using the software remotely, you will enter the public IP address. Media Port: This will need to be set to 9000. User Name: Type in the user name that you created in the Password menu of the DVR. Password: Enter the password that was assigned to the User. Network: This indicates if you are using same network (LAN) or external networks (Internet). 75 Login: Select this to Login to the DVR. Reset: Select this to reset all information. Open all Channels: This will open viewing on all DVR channels. Chapter 21 NetViewer Software NetViewer Interface Channel Information The channel names, date and time will be indicated on every channel in real time. Menu Bar This will allow you access to the Live Viewing, Playback screen, Remote Setting, Local Setting, Firmware Update and Log Out of the software. 76 Chapter 21 NetViewer Software Play Control This will stop and play the live video feed. This will take a snapshot of the video. This will start and stop recording on all channels. This will show the different viewing options. This will adjust the volume of any audio-enabled channels. 77 Chapter 21 NetViewer Software PTZ Control These control settings can only be used for cameras that have the Pan, Tilt, and Zoom features. A PTZ camera is not included. Arrows: These will move the camera manually in the direction of the arrow. Zoom: The + and – zooms the camera in and out. Focus: The + and – focuses the camera to have a clear image. Iris: The + and – allow you to adjust the type of lens of the camera to get the best picture in different lighting conditions. Speed: This changes the speed of the camera when rotating. Pan&Tilt Pos: This is the position that the camera is at before it moves during the rotation. Set PTZ preset positions. Go to the selected preset spot. Load a previous setting you have configured. Save the current preset settings. Start PTZ cruise. Stop PTZ cruise. 78 Chapter 21 NetViewer Software Playback This screen will allow you to search, playback, and backup recorded videos. To access this menu select the Playback button from the Menu Bar. Calendar (Upper right corner): This will show the days with recordings in bold numbers, select a date to view a file list. Refresh: This will refresh the file list when a day has been selected. All Channel Drop-Down Menu: This will allow you to sort the file list by a certain channel. All Type Drop-Down Menu: This will allow you to sort the file list by a certain type of recording such as alarm (motion detection) and common (continuous). Search: This will search the file list for the indicated channel and recording type. File List: This will list all recordings for the selected day. Recordings will be listed by time with the channel number and size of the file. Download: This will download the selected file to the current computer. 79 Play: This will play the selected file. Chapter 21 NetViewer Software Playback Use the bottom control panel for various video controls. The circle indicator on the bottom bar will show the current location of the video during playback. This button will allow you to play the video. This button will pause the video. This button will stop the video. This button will speed up the video. This button will slow down the video. This button will show each frame during playback. This will adjust the volume on channels with audio. 80 Chapter 21 NetViewer Software Remote Setting This screen will allow you to access all of the DVR setting menus. The menus will include the Record, Network, Camera, and System Menus. To access this menu select the Remote Setting button from the Menu Bar. Record Menu: This will allow you to make changes to the record, motion and alarm settings. Refer to Chapter 13 for details. Network Menu: This will allow you to configure Internet, DDNS, email and mobile settings. Refer to Chapter 17 for details. Camera Menu: This will allow you to configure the camera and PTZ settings. Refer to Chapter 16 for details. System Menu: This will allow you to configure the DST, password, advanced, hard drive, system settings and the info menus. Refer to Chapter 12 for details. 81 Chapter 21 NetViewer Software Local Setting This screen will allow you to choose where recordings, snapshots, and file downloads are saved on the remote computer. To access this menu select the Local Setting button from the Menu Bar. Record Save Path: This will indicate the location on the computer that the recordings will be saved. Snapshot Save Path: This will indicate the location on the computer that the snapshots will be saved. File Save Path: This will indicate the location on the computer that the downloads will be saved. 82 Chapter 21 NetViewer Software Firmware Update This screen will allow you to perform a firmware update to the DVR remotely. To access this menu select Firmware Update from the Menu Bar. Firmware File Path: This will allow you to choose the firmware file that was saved to the computer that will be uploaded. The Progress of Data Transmission: This will show you how long the update will take. 83 Chapter 22 Control Management Software (CMS) Control Management Software (CMS – Video Client) Use this software to access one or more DVRs remotely over the Internet or within your local area network. Ensure that you have completed the Remote Access chapter of this manual before trying to access the DVR using this software. This software can be downloaded from www.NightOwlSP.com or from the installation CD that came included with your DVR system. Key Features of the CMS: Compatible with Windows XP, Windows Vista, Windows 7 3 Users can access the software on one computer Connect over 100 devices with 16 channels View up to 64 channels on one screen Configure DVR settings remotely PTZ controls E-Map 84 Chapter 22 Control Management Software (CMS) Starting the CMS You will have to register an administrator when starting the CMS. User Name: Create a user name with a maximum of 12 characters that you will use to login to the CMS. Password: Create a password with a maximum of 24 characters that you will use with the administrator user name to login to the CMS. Confirm Password: Type the same password that you created in the Password field. 85 Chapter 22 Control Management Software (CMS) Device List This menu will show all DVRs that have been added to the CMS. Search Field: This will allow you to search for a specific DVR. Device List: This will list all DVRs that have been added to the CMS 86 Chapter 22 Control Management Software (CMS) Device List Settings of the Device To access these options, right click on the device you would like to configure. Login: This will log you into the device. Logout: This will log you out of the device. Open All Channels: This will show all channels live. Close All Channels: This will close the live viewing of all channels. Remote Setup: This will open a menu that will allow you to configure the settings of the device. Subscribe Alarm: When checked, the alarms that are triggered will be listed in the Remote activity list. All Main Stream: Select when recording on all channels. This requires a fast network for transmission. All Sub Stream: Select when viewing on all channels. This requires a normal network for transmission and is the default of all channels. This may display poor image quality. 87 Chapter 22 Control Management Software (CMS) Device List Remote Setup To access these menu options, right click on the device you would like to configure and select Remote Setup. The menus listed below will configure the settings on the DVR. Refer to the specific chapters for configuration details for each menu. Display Setup: Refer to Chapter 16.1 for details. Record Setup: Refer to Chapter 13.1 for details. Alarm Parameters: Refer to Chapter 13.3 for details. Basic: Refer to Chapter 17.1 for details. PPPoE: Refer to Chapter 17.1 for details. DDNS: Refer to Chapter 17.1.1 for details. Email Setting: Refer to Chapter 17.3 for details. HDD Information: Refer to Chapter 12.4 for details. PTZ Parameters: Refer to Chapter 16.2 for details. Mobile: Refer to Chapter 17.2 for details. Motion: Refer to Chapter 13.2 for details. System Setting: Refer to Chapter 12.5 for details. User: Refer to Chapter 12.2 for details. DST: Refer to Chapter 12.1.1 for details. Information: Refer to Chapter 12.8 for details. 88 Chapter 22 Control Management Software (CMS) Live Screen To access the live screen menu, right click anywhere on the channel. Capture: This will take a snapshot of the channel you are viewing. You can also use the camera icon in the upper right corner of the channel. Start Record: This will start recording instantly. When this option is checked, you can stop the recording by selecting this option again. You can also use the camcorder icon in the upper right corner of the channel. Stop Playing: This will stop live viewing of the channel. You can select the “x” in the upper right corner of the channel. . 89 Chapter 22 Control Management Software (CMS) PTZ Control These control settings can only be used for cameras that have the Pan, Tilt, and Zoom features. A PTZ camera is not included. Arrows: These will move the camera manually in the direction of the arrow. Circle within the arrows: This will continuously rotate the camera 360 degrees. The + and – zooms the camera in and out. These focus the camera to have a clear image. These allow you to adjust the type of lens of the camera to get the best picture in different lighting conditions. 0-10 Bar: This will increase/decrease the speed of the camera. Preset Tab: This will list all preset PTZ controls that have been configured. Cruise Tab: This will list the preset cruise controls. 90 Chapter 22 Control Management Software (CMS) PTZ Control Preset Tab This will allow you to set specific points to move the camera to from the current position. To add a preset point perform the below steps. 1. Move the PTZ camera to the desired position using the PTZ tab. 2. Highlight a Preset Number that you would like to add. 3. Select the to add the preset position. 4. Select the to confirm the position that you will be adding. 5. If you would like to delete the preset position, select the 91 . Chapter 22 Control Management Software (CMS) PTZ Control Cruise Tab This will allow the camera to move to the preset points that have been configured in the preset tab. To start a cruise route perform the below steps. 1. Ensure that there have been preset points configured under the Preset Tab. 2. Select the to move the camera from one preset point to the next. It will cycle through each preset point until it reaches the initial starting point and then it will repeat the cycle. 3. Select the to stop the cruise cycling. 92 Chapter 22 Control Management Software (CMS) Top Menu Bar Live: This will show live viewing of the channels. Playback: This will open the Playback screen. E-Map: This will open the electronic map. Config: This will open the local parameter configuration menus. Help: This will show the software’s version and name. This will show the person who is logged into the CMS. 93 This will keep the window open but lock all CMS controls. Chapter 22 Control Management Software (CMS) Bottom Menu Bar This will hide/show the side bar. This will allow you to adjust the volume. This will allow you to turn the PTZ controls on/off. This will hide the channel names and dates. This will show videos in real time, default, or smooth levels. This will allow you to choose how the channels are viewed. This will maximize the viewing screen without any controls being shown. These will allow you to switch the viewing pages. This will hide the bottom activity listings. The bottom list will show all activity since you logged into the software. It will show the time of the device, the alarms, channel of the device, and the operation that was performed. 94 Chapter 22 Control Management Software (CMS) Config Device Manage To access this menu select Config from the Top Menu Bar and then select Device Manage. Add: This will allow you to add a new device. Delete: This will allow you to delete an existing device. Change: This will allow you to change the configurations on an existing device. 95 Search: This will allow you to search for a device. Chapter 22 Control Management Software (CMS) Config Adding a Device To add a device select Config, select Device Manage, and select the group where you would like to add the device. Right click the group and select add device or select the Add button. Device Name: This is what you want to name the DVR. HTTP Port: This will be the web port (80). User Name: This will be the user name used to log into the DVR. Device IP: Using the software on the same network as the DVR, you will enter the internal IP Address that you assigned to the DVR in the Chapter 18 Remote Access. Using the software remotely, you will enter the public IP address. Channels: This will indicate the number of channels of the DVR that you are adding. Password: This will be the password assigned to the user name. Auto Login: If enabled, this will automatically connect to the DVR when the CMS opens. Device Manufacturer: Select if the device is new, old, or other. Automatically Identify Device: This will notify you if the DVR is online and configured correctly. 96 Chapter 22 Control Management Software (CMS) Config Changing Channel Information To change the channel information select Config, select Device Manage, and select the device where you would like to change information on the channels. You can either double left click on the channel or highlight the channel and select the Change button. Channel: This will indicate the channel that you are configuring. Name: This will be the name of the channel that will be displayed. Protocol: This should be set to TCP or UDP depending on the router that the DVR is connected to. If you are unsure, contact your Internet Service Provider. Stream Type: Choose either Compound stream or Video Stream. Alarm Time Len(sec): This is the time between alerts in seconds. Pop-up Live: This will expand the channel where an alarm has been triggered to a full screen live image. Volume: This will play a sound (warning volume under path parameters) when the alarm is triggered. Capture: This will take a snapshot when an alarm is triggered. Record: This will begin recording when an alarm is triggered. Apply to: This will apply all of the changes to the current channel or all channels. 97 Chapter 22 Control Management Software (CMS) Config User Parameters To access this menu select Config from the Top Menu Bar and then select User Parameters. Add: This will allow you to add a new user. Change: This will allow you to change the settings on an existing user. Delete: This will allow you to delete an existing user. You will be able to set permissions by placing a check mark in the box for the screens that you would like that user to be able to access. 98 Chapter 22 Control Management Software (CMS) Config Path Parameters To access this menu select Config from the Top Menu Bar then select Path Parameters. Warning Volume: This will allow you to set a warning volume. This must be in .wav format. Download Path: This is where the recorded videos will be saved. Image Capture: This is where the snapshots will be saved. Select Disk: This is the hard drive where files are saved. Loop Recording: This will allow for saving over the oldest files when the reserved space has reached the limit. Reserved Space: This is the space used on the HD for saving files. Switch Time: This is the recording length of each video. File Type: This should be set to 264. Hold Days: This will be how long the files are saved. Save the live window: This will save the current live channel view. Default Stream Set: Select main stream for recording and sub stream for viewing. Language: This is the language that the software is displayed in. Multi-Screen Set: This will allow you to see the software on multiple screens. 99 Chapter 22 Control Management Software (CMS) Playback This screen will allow you to search, playback, and backup videos. To access this menu select the Playback button from the Top Menu Bar. Device: This will allow you to choose one channel of a DVR at one time to playback files. Date (Lower left corner): This will show a calendar; select a date to view online file list. File Type: This will allow you to sort the file list by type of recording such as alarm (motion detection), normal (continuous) or all. Search: This will search the file list for the indicated date, channel and recording type. File List: This will list all recordings for the selected day. Recordings will be listed by time with the size of the file. 100 Chapter 22 Control Management Software (CMS) Playback Use the bottom control panel for various video controls. The bottom bar will turn blue when in playback and backup. The indicator on the bottom bar will show the current location of the video during playback. This button will allow you to play the video. This button will pause the video. This button will stop the video. This button will show each frame during playback. This button will take a snapshot of the image on the screen. This button will allow you to download the recorded video. This indicates the speed of the video during playback. 101 Chapter 22 Control Management Software (CMS) E-Map Configurations This will allow you to add an image of the location where the system is configured. You can place the cameras in the exact locations of where they are installed in the location. To access this menu select the E-Map button from the Top Menu Bar. This will allow you to add layouts to the list and position the cameras. This will zoom into the layout. This will zoom out of the layout. This will display the layout as the full size. This will maximize the layout to view on the full screen with only the menu bar showing. 102 Chapter 22 Control Management Software (CMS) Adding a new Map This will allow you to add a new map to the E-Map. To access this menu select E-Map from the Top Menu Bar and select the EditMap button. Follow the steps below to add a new map. 1. Ensure that the EditMap button has been selected. 2. Right click the Map List located in the right column list. 3. Left click Add Map. This will open a new window. 4. Map Name: Type in the name of the new map. 5. Map Route: Select the Browse button and select a .jpg or .bmp image from your computer to be uploaded. 6. Select Open when you have selected the image. The image will be displayed in the window after you select the open button. 7. If the image shown is correct, select the Ok button. 103 Chapter 22 Control Management Software (CMS) Editing an Map This will allow you to edit a map by adding/deleting cameras. To access this menu select E-Map from the Top Menu Bar and select the EditMap button. Follow the steps below to edit a map. 1. Select the map from the Map List that you would like to edit. 2. Select a camera that you would like to add to the map. 3. Left click and drag the camera to the map. 4. Position the camera where it is located on the map. 5. Right click on the camera that was just positioned. 6. Select the MapPin Config to change the direction that the camera is facing and the color of the text that is shown. This will open a new window. You can also delete the camera by selecting delete. 7. This new window will allow you to edit the name of the camera, the way the image is positioned and the color of the text. The cameras will turn red indicating an alarm has been triggered. Double click the camera to view live footage. 104 Chapter 22 Control Management Software (CMS) Editing the Map List This will allow you to edit the Maps in the Map List. To access this menu select E-Map from the Top Menu Bar and select the EditMap button. The Map List is located in the right column list. Add Derive Map: This allows you to add additional maps to the initial map such as an upstairs and a downstairs for a home. Add Hot Area: This allows you to add an area that will indicate constant movement such as entrance ways. 105 Delete Map: This allows you to delete the map. Property: This allows you to change the name of the map. Chapter 23 Mobile Application (Apple and Android) This mobile application (Night Owl Lite) will offer a number of different features by accessing the DVR remotely on a Tablet or Smartphone. Apple Android Night Owl Lite offers the following features: Live video streaming of your DVR(s) Add multiple DVR systems to this application (i.e. business, home, and vacation home) View multiple channels from one DVR at the same time on one screen (quad view / 4 channels per screen) Capture still images to your photo gallery during live viewing Control your PTZ (Pan, Tilt, Zoom) camera(s) View cameras in portrait mode or in landscape mode No video going through 3rd party servers Ability to change IP address or DDNS (do not include http;//) and port as desired for internal and remote users 106 Chapter 23 Mobile Application (Apple and Android) Device Page This page will allow you to add, edit and delete devices. Ensure that you have completed the Remote Access and Mobile Menu chapters of this manual before trying to access the DVR using this application. This will bring you to a screen that will allow you to add a DVR. This will bring you to a screen that will allow you to change the information for an existing DVR. 107 This will delete an existing DVR from the application. Chapter 23 Mobile Application (Apple and Android) Adding / Editing a Device This screen will allow you to add / edit a device based on information that was gathered in the Remote Access and Mobile Menu chapters. DVR Title: This will name the DVR on the application. Server: This will be the public IP address or the domain that you created. Port: This is the port that was configured in the Mobile Menu. User Name: This is the user name that was configured in the Mobile Menu. Password: This is the password that was configured in the Mobile Menu. Max Channel: This should be the number of channels of your DVR. Ok: This will save all changes that were made. Cancel: This will cancel any changes without saving. 108 Chapter 23 Mobile Application (Apple and Android) Control Panel This will allow you to perform different functions during live viewing on a mobile device. These will move a PTZ camera manually in the direction of the arrow. The + zooms a camera in and the – zooms a camera out. The + and – focuses the camera to have a clear image. These will allow you to adjust the type of lens of the camera. This will play the live video feed. This will take a snapshot of the live video feed. This allows you to view all snapshots. This shows the applications description, features, and compatibilities. 109 This will go to the previous page of videos. This will go to the next page of videos. Chapter 23 Mobile Application (Blackberry, Symbian, Windows Mobile) This mobile application (ASee) will offer a number of different features by accessing the DVR remotely on a Blackberry, Symbian and Windows Mobile device. This application can be found on www.NightOwlSP.com. Blackberry Symbian Windows Mobile Unlimited video on cellular and wifi Support Multi-Channel Digital Video Recorder (DVR). Support for authentication Support for Pan, Tilt, & Zoom control No video going through 3rd party servers Snapshot capability (while viewing live stream) to save to your local photo gallery Support for landscape and portrait mode Ability to change IP address and port as desired for internal and remote users 110 Chapter 23 Mobile Application (Blackberry, Symbian, Windows Mobile) To access on a Blackberry device follow the below steps. 1. Download and install the “Blackberry Desktop Manager” on your computer. 2. Connect your phone to your computer with a USB cable. 3. Open the “Blackberry Desktop Manager”. 4. Choose “Application Loader” from the Main Menu. 5. Under the “Add/Remove Applications” pane, click “Start” Button. 6. Click the “Browse…” button and locate the “ASee.alx” file on the included CD. Select the “ASee” file under “Device application selection” and click “Next”. 7. Follow the installation process and click “Finish” when complete. 111 Chapter 23 Mobile Application (Blackberry, Symbian, Windows Mobile) Using ASee on a Blackberry device. Please ensure you have edited the ASee Application permission. Select “Settings” > “Options” >“Applications”, then highlight the “ASee” application and select “Edit Permissions” in the drop down menu. Make sure Connections, Interactions, and User Data are set to “Allow”. 1. Open the Downloads folder and select the ASee icon to open. 2. Select the “Setup” options and enter the information of the DVR you want to connect in Settings. Name: This will name the DVR on the application. Address: This is the public IP address or the domain that you created. Port: This is the port that was configured in the Mobile Menu. User Name: This is the user name that was configured in the Mobile Menu. Password: This is the password that was configured in the Mobile Menu. Network Type: Select either Wifi or 3G. Login: Select this after the information has been entered to enter into live viewing. 112 Chapter 23 Mobile Application (Blackberry, Symbian, Windows Mobile) User Interface for Blackberry Devices The functions of the various icons are as follow: 1 - Connect/Disconnect 2 - Full screen 3 - Snapshot 4 - Setup 5 - Help 6 - Next Channels/Group 7 - Navigation Controls You can save the connection settings for different DVRs when you give the Settings different names under Settings and click save. To open the list of DVRs that you have connected to, click the “History” button to open the History List. Highlight one record and click the trackball/trackpad to open the History popup menu. When “Open” is selected, system will directly be connected to the DVR. 113 Chapter 23 Mobile Application (Blackberry, Symbian, Windows Mobile) To access on a Windows Mobile device follow the below steps. 1. Install the webcam program that is included on the supplied CD by copying the “Aseesetup.CAB” file to the mobile phone. You can do this by connecting the mobile phone to a computer and copying the file from the CD to the phone. 2. Click the windows mobile folder and choose the file “Aseesetup”. Select the file which will open the window. The file is generally defaulted to save to the Device’s built-in memory, but you can choose to save it to Storage Card. 3. Choose storage location and click “Install” to start the installation. 114 Chapter 23 Mobile Application (Blackberry, Symbian, Windows Mobile) After installation is complete on the Windows Mobile device, select the icon named “Asee” to run the program. This will display the program screen. Select the “Setting” button to enter the Setting menu. Username: This is the user name that was configured in the Mobile Menu. Password: This is the password that was configured in the Mobile Menu. Server: This is the public IP address or the domain that you created. Port: This is the port that was configured in the Mobile Menu. Notes: This will allow you to make a note of what DVR you are configuring. Ok: Select this after the information has been entered to enter into live viewing. Auto Connect: Check this box if you would like to connect to this device when the application is opened. 115 Chapter 23 Mobile Application (Blackberry, Symbian, Windows Mobile) To access on a Symbian device follow the below steps. 1. Install the ASee application that is on the included CD by copying the “ASee_AL_3rd _0901.sisx” file to the mobile phone if you are using Version 3. Copy the file “ASee_AL_5th_0901.sisx” if you are using Version 5. You can do this by connecting the mobile phone to a computer and copying the file from the CD to the phone. 2. Select the copied “.sisx” file on your phone to install it. 3. After the phone finishes copying the file, it will ask for permission to install the program. Select “Continue” to start the installation. 4. Click the “Continue” button on the information box displaying the program and current version. 5. Select the location of where you want to install the program, to phone memory or to the memory card, and then click “Select”. 6. Click “Continue” and wait for the program to install. 116 Chapter 23 Mobile Application (Blackberry, Symbian, Windows Mobile) Once the installation is complete on the Symbian device, go to the Applications folder and select the “Asee” program. Select “Open” to display the software interface, and select the “Setup” button to open the “Setting” screen. IP: This is the public IP address or the domain that you created. Port: This is the port that was configured in the Mobile Menu. User Name: This is the user name that was configured in the Mobile Menu. Password: This is the password that was configured in the Mobile Menu. Channel: Select the channel you want to monitor and click “DONE” to display the screen to start viewing the live image. Alias: This will allow you to make a name of the DVR you are configuring. 117 Option: Click to select whether history list should be included. Chapter 24 Specifications of DVR 118 Chapter 25 Information Log Be sure to write down all of the important information below and place in a secure location. General DVR Information: Admin Password: User Password: Mac Address: Serial Number: Internet Login Information: Internal IP Address: Public IP Address: DDNS Host Name: DDNS User Name: DDNS Password: Media Port: Web Port: Smartphone / Tablet PC Login Information: 119 Public IP Address: Mobile Port: Mobile User Name: Mobile Password: Chapter 26 Warranty NIGHT OWL, LLC (“Night Owl”) provides the following warranty to the original retail purchaser only (the “Purchaser”) with respect to this product (the “Product”): For a period of one (1) year after the date of sale, the Product shall be free from manufacturing defects in material and workmanship. In the event that the Product is defective, the Purchaser must return the Product at Purchaser’s cost (no CODs) to the address below, with the original proof of purchase receipt. In its sole discretion, Night Owl will either repair or replace the Product at no additional cost to the Purchaser. Any replacement Product (or parts) will be covered by the same warranty as the original Product through the expiration date of the original warranty period. Exclusions: This warranty does not apply to the following parts or upon the following events: Bulbs, LEDs and batteries; The Product was not used or installed in the manner described in the installation instructions; Negligent use of the Product, or misuse or abuse of the Product; Electrical short circuits or power surges; Use of replacement parts not supplied by Night Owl; Product is either tampered with, modified, or repaired by another service provider; Product has not been maintained in accordance with the instructions; Accident, fire, flood or other acts of God; Failure to use Night Owl approved accessories; Defects or damages arising by use of the Product in other than normal conditions (including normal atmospheric, moisture and humidity conditions). 120 Except as otherwise prohibited by law, this warranty is in lieu of other warranties, express or implied, and Night Owl neither assumes nor authorizes any person to assume for it any other obligation or liability in connection with the sale or service of the Product. In no event shall Night Owl be liable for any special or consequential damages arising from the use of the Product or arising from the malfunctioning or non-functioning of the Product, or for any delay in the performance of this warranty due to any cause beyond its control. This warranty shall not apply to installation or the removal and reinstallation of products after repair. Night Owl does not make any claims or warranties of any kind whatsoever regarding the Product’s potential, ability or effectiveness to prevent, minimize, or in any way affect personal or property damage or injury. Night Owl is not responsible for any personal damage, loss or theft related to the Product or to its use for any harm, whether physical or mental related thereto. Any and all claims or statements, whether written or verbal, by salespeople, retailers, dealers or distributors to the contrary are not authorized by Night Owl, and do not affect this provision of this warranty. Returns under this Warranty In order to obtain service, please make sure that you have registered your product on-line no later than thirty (30) days after purchase at www.NightOwlSP.com in the warranty registration section or in any other matter described in the instructions. 121 Disclaimer Certain uses, publication and/or distribution of video/audio recordings from security cameras and/or audio devices are prohibited or restricted by federal, state and local laws. When enabling and/or using audio recording features with your hidden security camera, be sure to comply with the laws in your country, state and locality. TOLL FREE CUSTOMER SERVICE North America: 1-866-390-1303 Email: Website: [email protected] www.NightOwlSP.com Rev 07-2012 122 123