1
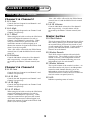
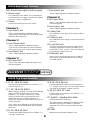
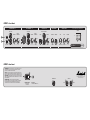
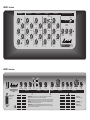
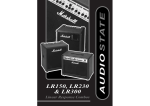
Audiostate
LR150, LR230
& LR300
Marshall Amplification plc
Denbigh Road, Bletchley, Milton Keynes, MK1 1DQ, England
Tel: (01908) 375411
Fax: (01908) 376118
Web Site - http://www.marshallamps.com
Whilst the information contained herein is correct at the time of publication,
due to our policy of constant improvement and development, Marshall
Amplification plc reserve the right to alter specifications without prior notice.
Jan ‘99
Handbook
1
WARNING!
Please read the following list carefully.
A. ALWAYS ensure that a good quality mains plug is fitted to your Audio State™ conforming to the latest
B.S.I. standards (UK only) lead supplied.
B. ALWAYS ensure that the plug is wired in accordance with the regulations of your country.
C. DO NOT attempt to remove the chassis. There are no user serviceable parts inside your Audio State™.
D. ALWAYS have your Audio State™ serviced or repaired by competent, qualified service technicians.
E. NEVER use your Audio State™ in damp or wet conditions.
F. DO NOT obstruct airflow around the amplifier, a clearance of 30cm is required at the top, back and sides.
G. WARNING This apparatus must be earthed.
Introduction
LR300
The Marshall LR300 is a combination of a 5 channel mono mixer, high quality 300
Watt RMS power amp with distortion reducing limiting circuit and a compact high
quality loudspeaker system, intended to provide a very versatile single unit solution
to all applications where linear stage amplification is required. Let us just take a
moment to understand what we mean by Linear Response. Linear response
essentially means getting out what we put in, only louder, without any undue
colouration, distortion, or undesired frequency changes, just as you would expect
from a good PA or HiFi system. Those qualities are desired in a guitar amp, for
instance, but NOT when you are amplifying keyboards, sound modules, pre-recorded
music or vocals. The LR300 allows you to do this with ease as it is self contained in
one package, rather than carrying around (and finding stage space for) the minimum
of three units that would make up a normal PA type set up.
The LR300’s 5 channels come equipped with a variety of input and sound forming
options, plus the power and sonic quality to enable many different live sound uses to
be performed. For instance, the LR300 can be used to mix and amplify up to 5
keyboards, sound modules and/or sequencers, as either a main system at club level
or as a monitor system on louder concert stages. Want to use a guitar as well? No
problem! With the inclusion of the reknowned Marshall loudspeaker emulation
system on channel 4, not only is great clean guitar sound possible, it also allows the
use of external distortion generating effects, i.e. stomp boxes or preamps, without the
sound being harsh and fizzy, unlike a normal PA system or mixer. Great for keyboard
players who double on guitar!
Besides the normal jack line inputs on all channels, channels 1 and 2 also feature
balanced XLR inputs for low impedance microphones for vocal or acoustic instrument
amplifying duties, plus channel 5 also has phono inputs for tape, CD, or even a
computer sound card! Channel 1 also features a dedicated series FX loop, so that you
can add specialised FX to that channel, i.e. how about a harmonizer on your vocals?
With so much versatility on tap the creative horizons of the LR300 are quite
boundless. For example, how about using it as a percussion monitor - miking and
mixing both electronic and acoustic drum sources. Or as a “band in a box” used by
solo/duo artists (or even a full band!) for bar, lounge and cabaret functions where
space and transport is limited, but high quality sound is the order of the day. For the
more technically minded the LR300 also features a 15” premium bass driver and
2
compression driven Constant Directivity high frequency horn with a pro grade
crossover and horn protection circuit. Each channel has 3 band EQ, gain and FX send
controls, whilst the master has a parallel FX loop, spring reverb and line outs to send
the mixed signal to a larger PA system or tape recorder if required.
The LR300 features a protection device fitted to the cross over filter to protect the
horn. If pushed too hard into distortion, the horn will be automatically de-activated.
Once the protection device has cooled down sufficiently it will re-activate the horn.
Besides the rugged side carrying handles, the LR300 has built in castor inserts to suit
the optional Marshall castors, available from your Marshall dealer.
LR230
The Marshall LR230 is a stereo 30 Watt 2x10” combo and is ideal for home practice
use providing the user(s) with the opportunity to mix up to 2 stereo sources such as
keyboards, drum machines, tape decks, CD players and sequencers. Other features
include an internal limiter to prevent distortion, a parallel effects loop and an in-built
spring reverb.
LR150
The Marshall LR150 however is ideal for rehearsals and gigging. This 1x15” with
piezo horn combo provides 150 Watts of power and allows a mix of up to 4 different
inputs. The user(s) can send the mixed signal via the Line Out to a P.A. which is
independent of the combo’s master volume allowing the combo to be used as an
onstage monitor. Other features include an internal limiter to prevent distortion, a
parallel effects loop and an in-built spring reverb.
This handbook is designed to help you get the most from your Marshall Linear
Response amplifier. We would suggest that you read this carefully before plugging in.
AUDIO STATE
LR230
LR230 Front Panel Features
Channel 1
of Line Inputs are Keyboards, drum machines
and sequencers.
1. Phono Input Left
4. Right Jack
This is a high impedance unbalanced input.
Typical uses of Line Inputs are drum machines,
C.D. players, tape deck, 4 tracks and computers.
This is for connection to the left output of
external device used.
For use with the right side of a stereo input when
used in conjunction with item 3. This is a high
impedance unbalanced input.
5. Volume
2. Phono Input Right
Controls individual volume level for channel 1.
Overall volume will be governed by the Master
Volume control (item 20).
This is a high impedance unbalanced input. This
is for connection to the right output of external
device used.
6. Effect & Reverb
3. Left / Mono Jack
When using the in-built reverb on the LR230 this
control will adjust the amount of reverb on
Channel 1. When using an external effects
processor this will control the amount of effected
This is for either a mono input or the left side of a
stereo input if item 4 is used as well. This is a
high impedance unbalanced input. Typical uses
3
signal through Channel 1, as it dictates the
amount of signal to the Effects Send (item 12).
12. Send Jack
Note - this will be effected by the Effect Return
control (item 15) and the Master Reverb control
(item 16).
13. Return Left / Mono Jack
For connection to the input of an external effects
processor (mixed to mono).
For connection to the left output of a stereo
external effects processor or from the output of a
mono effects processor.
Channel 2
7. Mic Input XLR
14. Return Right Jack
Unbalanced low impedance for microphone
input.
For connection to the right output of a stereo
external effects processor.
8. Left / Mono Jack
15. Effect
This is for either a mono input or the left side of a
stereo input if item 9 is used as well. This is a
high impedance unbalanced input. Typical uses
of Line Inputs are Keyboards, drum machines
and sequencers.
Controls the ratio of effected to dry signal in your
overall tone. Further control is given by Effect &
Reverb controls on Channel 1 and Channel 2
(item 5 and item 10).
Reverb
9. Right Jack
For use with the right side of a stereo input when
used in conjunction with item 8. This is a high
impedance unbalanced input.
16. Reverb
Controls master level of internal reverb.
17. Remote Jack
10. Volume
Allows you to switch internal reverb on and off
from remote footswitch (optional extra, model
no. PEDL-00020)
Controls individual volume level for channel 2.
Overall volume will be governed by the Master
Volume control (item 20).
11. Effect & Reverb
Master
When using the in-built reverb on the LR230 this
control will adjust the amount of reverb on
Channel 2. When using an external effects
processor this will control the amount of effected
signal through Channel 2, as it dictates the
amount of signal to the Effects Send (item 12).
18. Low
Controls overall low frequencies of combo.
19. High
Controls overall high frequencies of combo.
20. Volume
Note - this will be effected by the Effect Return
control (item 15) and the Master Reverb control
(item 16).
Controls overall volume of combo. This also
controls the level of the Line Out on the rear
panel.
Effects
21. Power Switch
The LR230 features a parallel effects loop to
allow you to use external effects processors.
Switches the mains power to the combo and
indicates power status.
LR230 Rear Panel Features
1. Mains Input
Line Out
For connection to the mains. We would always
recommend that your plug is wired in accordance
with your country’s regulations.
In some instances you will want to connect the
LR230 to a P.A. system or to recording
equipment. The Line Out level on the LR230 is
controlled by the Master Volume (item 20).
2. Headphone Jack
3. Left
For headphone input when silent practice is the
call of the day.
For connecting the left hand signal to a P.A.
system or recording equipment.
Note - connecting headphones will disconnect
internal speakers.
4. Right
For connecting the right hand signal to a P.A.
system or recording equipment
4
AUDIO STATE
LR150
LR150 Top Panel Features
Channel 1 & Channel 2
Note - this will be effected by the Effect Return
control (item 19) and the Master Reverb control
(item 20).
1. & 5. Low
Controls the low frequencies on Channel 1 and
Channel 2 respectively.
13. & 18. Volume
Controls individual volume level for channel 3
and 4 respectively. Overall volume will be
governed by the Master Volume control (item
21).
2. & 6. High
Controls the high frequencies on Channel 1 and
Channel 2 respectively.
3. & 7. Effect
Master Section
When using the in-built reverb on the LR150 this
control will adjust the amount of reverb on
Channel 1 and Channel 2 respectively. When
using an external effects processor this will
control the amount of effected signal, as it
dictates the amount of signal to the Effects Send
(item 10) on the rear panel.
19. Effect Return
This is the master Effects Return and is an effects
mix control, allowing you to decide when using
an external effects processor how much of your
overall sound will be effected. Further control is
given by the individual Effect control which
features on each channel.
Note - this will be effected by the Effect Return
control (item 19) and the Master Reverb control
(item 20).
20. Master Reverb
The LR150 comes complete with an in-built
spring reverb. The overall reverb level for the
combo is set here, with independent controls
featuring on each channel allowing you to set
independent levels for each channel.
4. & 8.Volume
Controls individual volume level for channel 1
and 2 respectively. Overall volume will be
governed by the Master Volume control (item
21).
21. Master Volume
The overall volume of the combo is set here. As
with effects and reverb, there is an independent
control on each channel allowing you to set
independent volume levels for each channel.
This will not however affect the level of the Line
Out Jack on the rear panel (item 12).
Channel 3 & Channel 4
9. & 14. Low
Controls the low frequencies on Channel 3 and
Channel 4 respectively.
10. & 15. Mid
22. LED
Controls the mid frequencies on Channel 3 and
Channel 4 respectively.
Indicates operating status of combo.
11. & 16. High
Controls the high frequencies on Channel 3 and
Channel 4 respectively.
12. & 17. Effect
When using the in-built reverb on the LR150 this
control will adjust the amount of reverb on
Channel 3 and Channel 4 respectively. When
using an external effects processor this control
will control the amount of effected signal, as it
dictates the amount of signal to the Effects Send
(item 10) on the rear panel.
5
LR150 Rear Panel Features
N.B. Reads from right to left on panel.
1. Mains Input
7. Line Input Jack
This is a high impedance unbalanced input.
For connection to the mains. We would always
recommend that your plug is wired in accordance
with your country’s regulations
Channel 4
8. Mic Input XLR
2. Power
This is a low impedance balanced input for use
with microphones.
Switches the mains power to the combo
9. Line Input Jack
Channel 1
This is a high impedance unbalanced input.
3. Line Input Jack
10. Send Jack
This is a high impedance unbalanced input.
Typical uses of Line Inputs are Keyboards, drum
machines and sequencers.
For connection to the input of an external effects
processor.
11. Return Jack
For connection to the output of an external effects
processor.
Channel 2
4. Line Phono Input
12. Line Out Jack
This is a high impedance unbalanced input.
Typical uses of Line Inputs are drum machines,
C.D. players, tape deck, 4 tracks and computers.
The Line Out jack can be used for connection to
recording equipment for direct recording or for
connection to a P.A. system. This is not effected
by the Master Volume (item 21).
5. Line Input Jack
13. Remote Jack
This is a high impedance unbalanced input.
Allows you to switch internal reverb on and off
from remote footswitch (optional extra, model
no. PEDL-00020).
Channel 3
6. Mic Input XLR
This is a low impedance balanced input for use
with microphones.
AUDIO STATE
LR300
LR300 Top Panel Features
1, 6, 11, 16 & 23. High
4, 9, 14, 21 & 26. Vol
Controls the high frequencies on Channel 1, 2, 3,
4 and 5 respectively.
Controls individual volume level for Channel 1,
2, 3, 4 and 5 respectively. Overall volume will be
governed by the Master Volume (item 30).
2, 7, 12, 19, & 24. Effect
5, 10, 15, 22 & 27. Low
When using the in-built reverb on the LR300 this
control will adjust the amount of reverb on
Channel 1, 2, 3, 4 and 5 respectively. When
using an external effects processor this will
control the amount of effected signal, as it
dictates the amount of signal to the Effects Send
on the rear panel.
Controls the Low frequencies on Channel 1, 2, 3,
4 and 5 respectively.
17. Switch - Speaker Emulator
Switches Speaker Emulator on.
The LR300 features Marshall acclaimed speaker
emulation circuitry on Channel 4. When in
operation, this will re-voice this channel to suit
guitar.
Note - this will be affected by the Effect Return
control (item 28) and the Master Reverb control
(item 29).
18. LED
3, 8, 13, 20 & 25. Mid
Indicates when Speaker Emulator is on.
Controls the middle frequencies on Channel 1, 2,
3, 4 and 5 respectively.
6
28. Effect Return
30. Master Volume
This is the master Effects Return and is an effects
mix control, allowing you to decide when using
an external effects processor how much of your
overall sound will be effected. Further control is
given by the individual Effect control which
features on each channel.
The overall volume of the combo is set here. As
with effects and reverb, there is an independent
control on each channel allowing you to set
independent volume levels for each channel.
This will not however affect the level of the Line
Out Phono on the rear panel (item 11).
29. Master Reverb
31. LED
The LR300 comes complete with an in-built
spring reverb. The overall reverb level for the
combo is set here, with independent controls
featuring on each channel allowing you to set
independent levels for each channel.
Indicates operating status of combo.
LR300 Rear Panel Features
1, 5, 7, 8 & 9. Line Input Jack
11. Line Out Phono
This is a high impedance unbalanced input for
channels 1, 2, 3, 4 & 5 respectively. Typical uses
of line jack type inputs are drum machines and
keyboards.
The Line Out can be used for connection to
recording equipment for direct recording or for
connection to a P.A. system. This is not affected
by the Master Volume.
2. Mic Input XLR - Channel 1
12. Send Jack
This is a low impedance balanced input for use
with microphones.
For connection to the input of an external effects
processor.
3. Effects Send Jack
13. Return Jack
For connection to the input of an external effects
processor. For use on Channel 1 only.
For connection to the output of an external effects
processor.
4. Effects Return Jack
14. Remote Footswitch
For connection to the output of an external effects
processor. For use on Channel 1 only.
Allows you to switch internal reverb on and off
from remote footswitch,
(optional extra, model no. PEDL-00020).
6. Mic Input XLR - Channel 2
15. Power
This is a low impedance balanced input for use
with microphones.
Switches the mains power to the combo.
10. Line Inputs Phono
16. Mains Input
These are high impedance unbalanced inputs.
Typical uses of Line, phono type inputs are drum
machines, C.D. players, tape deck, 4 tracks and
computers.
For connection to the mains. We would always
recommend that your plug is wired in accordance
with your country’s regulations.
7
LR150 - Top Panel
CHANNEL 1
CHANNEL 2
CHANNEL 3
CHANNEL 4
LINEAR RESPONSE AMPLIFIER
ON
1
2
-10dB
+10dB
5
-10dB
LOW
+10dB
6
-10dB
HIGH
+10dB
9
-10dB
LOW
10
+10dB
-10dB
HIGH
+10dB
11
-10dB
LOW
+10dB
MID
-10dB
14
+10dB
15
-10dB
HIGH
+10dB
16
-10dB
LOW
MASTER
-10dB
+10dB
19
+10dB
4
0
10
7
0
EFFECT
10
VOLUME
8
0
10
EFFECT
12
0
10
VOLUME
17
13
0
10
0
EFFECT
10
0
VOLUME
18
10
EFFECT
0
21
HIGH
MID
0
3
20
22
10
EFFECT
RETURN
0
10
MASTER
REVERB
0
10
MASTER
VOLUME
10
AUDIO STATE
VOLUME
LR150
LR150 - Rear Panel
13
12
11
10
9
8
7
6
5
3
4
OUTPUT
150 Watts RMS into 8 Ω
REMOTE
LINE OUT
RETURN
SEND
LINE
MIC
CHANNEL 4
LINE
MIC
CHANNEL 3
LINE
LINE
CHANNEL 2
LINE
CHANNEL 1
2
POWER
1
LR230 - Front Panel
CHANNEL 1
CHANNEL 2
3
L
2
R
VOLUME
EFFECT
& REVERB
7
8
REVERB
MASTER
LINEAR RESPONSE AMPLIFIER
POWER
RETURN LEFT/MONO
LEFT/ MONO
LEFT/ MONO
1
EFFECTS
VOLUME
EFFECT
& REVERB
SEND
13
EFFECT
REVERB
REMOTE
LOW
VOLUME
HIGH
0
14
5
4
LINE INPUT
RIGHT
0
6
10
0
9
10
MIC
10
RIGHT
0
11
10
0
21
15
12
10
RETURN RIGHT 0
1
16
10
0
17
10
18
19
-10dB +10dB
-10dB +10dB
20
0
10
AUDIO STATE
LR230
LR230 - Rear Panel
WARNING!:
SHOCK HAZARD. DO NOT OPEN. TO REDUCE THE RISK OF
FIRE OR ELECTRIC SHOCK DO NOT EXPOSE THIS EQUIPMENT TO RAIN OR
MOISTURE. THIS APPARATUS MUST BE EARTHED.
AVIS!:
RISQUE DE CHOC ELECTRIQUE. NE PAS OUVRIR. POUR EVITER LES
RISQUES D’INCENDIE ET DE DECHARGES ELECTRIQUES, N’EXPOSEZ JAMAIS CET
APPAREIL A L’HUMIDITE OU A LA PLUIE. CONNECTER CET APPAREIL A LA TERRE.
1
CAUTION!: TO REDUCE THE RISK OF ELECTRIC SHOCK DO NOT REMOVE
COVER. NO USER SERVICEABLE PARTS INSIDE. REFER SERVICING TO QUALIFIED
SERVICE PERSONNEL.
ATTENTION!: POUR EVITER LES RISQUES DE DECHARGES
ELECTRIQUES, NE PAS OUVRIR LE COUVERCLE. CET APPAREIL NE COMPORTE
AUCUNE PIECE SUSCEPTIBLE D’ETRE REPAREE PAR VOS SOINS. FAITES
TOUJOURS APPEL A UN TECHNICIEN QUALIFIE POUR TOUTE REPARATION.
Manufactured in England by:
Marshall Amplification plc, Bletchley,
Milton Keynes, England.
LINE OUT
HEADPHONE
MAINS INPUT
230V ~ 50 Hz
100 Watts
OUTPUT
2x30 Watts RMS into 4 Ω
3
2
LEFT
4
RIGHT
LR300 - Top Panel
CHANNEL 1
CHANNEL 2
CHANNEL 3
CHANNEL 4
CHANNEL 5
LINEAR RESPONSE AMPLIFIER
SPEAKER
EMULATOR
POWER ON
MASTER
1
6
-10dB
+10dB
11
-10dB
HIGH
+10dB
-10dB
HIGH
0
10
0
10
0
MID
MID
+10dB
0
0
LOW
+10dB
LOW
+10dB
21
10
0
+10dB
30
MASTER
VOLUME
26
10
0
VOL
10
VOL
27
-10dB
LOW
29
EFFECT
RETURN
MID
22
-10dB
10
28
-10dB
VOL
15
-10dB
0
EFFECT
+10dB
14
10
10
24
10
25
-10dB
VOL
+10dB
0
MID
9
10
VOL
MASTER
REVERB
EFFECT
MID
4
5
10
20
-10dB
+10dB
HIGH
EFFECT
+10dB
31
-10dB
19
13
-10dB
18 23
+10dB
12
8
+10dB
0
-10dB
EFFECT
3
17
HIGH
7
EFFECT
-10dB
+10dB
HIGH
2
-10dB
16
+10dB
-10dB
LOW
+10dB
AUDIO STATE
LR300
LOW
LR300 - Rear Panel
11
14
15
13
12
Made in England by:
POWER
FOOTSWITCH
Marshall Amplification plc,
Bletchley, Milton Keynes,
England.
MAINS INPUT
120V ~ 60 Hz
500 Watts
16
10
RETURN
SEND
MASTER
9
LINE
OUT
LINE
7
8
LINE
CHANNEL 5
6
LINE
LINE
CHANNEL 4
CHANNEL 3
WARNING!: SHOCK HAZARD. DO NOT OPEN. TO REDUCE THE RISK OF FIRE OR ELECTRIC SHOCK DO NOT
EXPOSE THIS EQUIPMENT TO RAIN OR MOISTURE. THIS APPARATUS MUST BE EARTHED.
5
MIC
CHANNEL 2
4
LINE
RETURN
3
2
SEND
1
MIC
LINE
CHANNEL 1
OUTPUT
300 Watts RMS into 4 Ω
AVIS!: RISQUE DE CHOC ELECTRIQUE. NE PAS OUVRIR. POUR EVITER LES RISQUES D’INCENDIE ET DE DECHARGES
ELECTRIQUES, N’EXPOSEZ JAMAIS CET APPAREIL A L’HUMIDITE OU A LA PLUIE. CONNECTER CET APPAREIL A LA TERRE.
CAUTION!: TO REDUCE THE RISK OF ELECTRIC SHOCK DO NOT REMOVE COVER. NO USER SERVICEABLE PARTS
INSIDE. REFER SERVICING TO QUALIFIED SERVICE PERSONNEL.
WARNING!:
ATTENTION!:
AVIS!:
POUR EVITER LES RISQUES DE DECHARGES ELECTRIQUES, NE PAS OUVRIR LE COUVERCLE.
CET APPAREIL NE COMPORTE AUCUNE PIECE SUSCEPTIBLE D’ETRE REPAREE PAR VOS SOINS. FAITES TOUJOURS APPEL
A UN TECHNICIEN QUALIFIE POUR TOUTE REPARATION.
DO NOT
OBSTRUCT GRILLES
NE PAS
OBSTRUER LES GRILLES