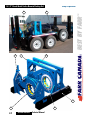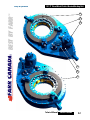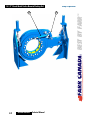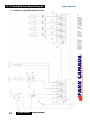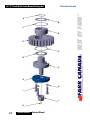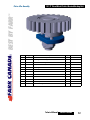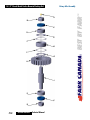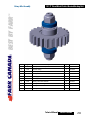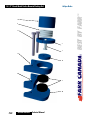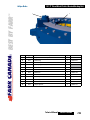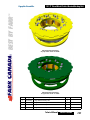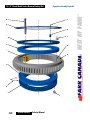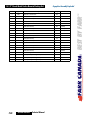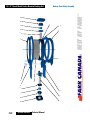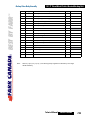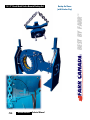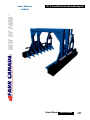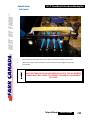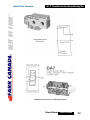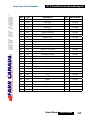
1
CM 14500 14-1/2"
TRAILER-MOUNTED BUCKING UNIT
Technical Manual
BEST BY FARR
TM
14 1/2" Closed Mouth Trailer-Mounted Bucking Unit
© Copyright 2007 Farr Canada (A Division Of McCoy Corporation), all rights reserved. This document
is the property of Farr Canada and is supplied as reference information for users of our products. This
document and the contents within are considered confidential information, not to be disclosed, copied,
transmitted, transcribed in any form, or stored on any type of data storage media without the express
written consent of Farr Canada.
While continually striving to maintain accuracy, Farr Canada hereby states that the information contained in this technical documentation is subject to change without notice. If you feel this document
does not meet your needs, please contact our sales office for the most current available documentation
for your product.
Summary Of Revisions
Date
Section
Page
Dec 2005
N/A
N/A
May 2007
N/A
iii
Description Of Revision
Intial Release
Added Summary Of Revisions table
1
1.4
3
3.6 - 3.10
Corrected lubricant specifications page
Replaced hydraulic schematic, corrected hydraulic component
identification information.
3
3.12 - 3.13
Added jaw part numbers, updated replacement procedures.
7
7.18 - 7.19
Corrected drawing and parts list for hydraulic shifter.
Technical Manual
Section Contents
iii
iv
Section Contents
Technical Manual
Section
1.2
1.3
1.4
Section
Section
3.1
3.6
3.11
3.12
3.14
3.17
3.17
Section
4.1
4.1
4.5
4.5
4.6
Section
5.1
5.2
5.3
5.4
5.5
5.6
5.7
5.8
Section
Section
7.2
7.4
7.6
7.8
7.10
7.12
7.15
7.16
7.17
7.18
7.20
7.22
7.24
7.26
7.28
7.32
7.34
7.36
7.37
7.38
Section
8.1
8.2
8.3
8.4
8.8
One
Two
Three
Four
Five
Six
Seven
Eight
BEST BY FARR
Introduction & Specifications . . . . . . . . . . . . . . . . . . . . . . . . . . . . . . . . . . . . . . . . . . Equipment Dimensions . . . . . . . . . . . . . . . . . . . . . . . . . . . . . . . . . . . . . . . . . . . . . Equipment Specifications . . . . . . . . . . . . . . . . . . . . . . . . . . . . . . . . . . . . . . . . . . . . Lubricant Specifications . . . . . . . . . . . . . . . . . . . . . . . . . . . . . . . . . . . . . . . . . . . . . Tong Assembly . . . . . . . . . . . . . . . . . . . . . . . . . . . . . . . . . . . . . . . . . . . . . . . . . . . . . . Operation . . . . . . . . . . . . . . . . . . . . . . . . . . . . . . . . . . . . . . . . . . . . . . . . . . . . . . . . . . . Major Component Identification . . . . . . . . . . . . . . . . . . . . . . . . . . . . . . . . . . . . . . . Hydraulic Component Identification . . . . . . . . . . . . . . . . . . . . . . . . . . . . . . . . . . . . Hydraulic Connections . . . . . . . . . . . . . . . . . . . . . . . . . . . . . . . . . . . . . . . . . . . . . . Jaw Availability & Installation . . . . . . . . . . . . . . . . . . . . . . . . . . . . . . . . . . . . . . . . . Tong Operation . . . . . . . . . . . . . . . . . . . . . . . . . . . . . . . . . . . . . . . . . . . . . . . . . . . Extreme Cold Weather Operation Procedures . . . . . . . . . . . . . . . . . . . . . . . . . . . Running Pipe . . . . . . . . . . . . . . . . . . . . . . . . . . . . . . . . . . . . . . . . . . . . . . . . . . . . . Maintenance . . . . . . . . . . . . . . . . . . . . . . . . . . . . . . . . . . . . . . . . . . . . . . . . . . . . . . . . . Cleaning . . . . . . . . . . . . . . . . . . . . . . . . . . . . . . . . . . . . . . . . . . . . . . . . . . . . . . . . . Lubrication . . . . . . . . . . . . . . . . . . . . . . . . . . . . . . . . . . . . . . . . . . . . . . . . . . . . . . . Adjustments . . . . . . . . . . . . . . . . . . . . . . . . . . . . . . . . . . . . . . . . . . . . . . . . . . . . . . Recommended Periodic Checks . . . . . . . . . . . . . . . . . . . . . . . . . . . . . . . . . . . . . . Overhaul Procedures . . . . . . . . . . . . . . . . . . . . . . . . . . . . . . . . . . . . . . . . . . . . . . . Problem Diagnostics . . . . . . . . . . . . . . . . . . . . . . . . . . . . . . . . . . . . . . . . . . . . . . . . . . Pump Makes Excessive Noise . . . . . . . . . . . . . . . . . . . . . . . . . . . . . . . . . . . . . . . . Hydraulic System Overheating . . . . . . . . . . . . . . . . . . . . . . . . . . . . . . . . . . . . . . . . Excessive Wear Of Moving Parts . . . . . . . . . . . . . . . . . . . . . . . . . . . . . . . . . . . . . Tong Running Too Slowly . . . . . . . . . . . . . . . . . . . . . . . . . . . . . . . . . . . . . . . . . . . Tong Will Not Develop Sufficient Torque . . . . . . . . . . . . . . . . . . . . . . . . . . . . . . . . Failure Of Jaws To Grip Pipe . . . . . . . . . . . . . . . . . . . . . . . . . . . . . . . . . . . . . . . . . Failure Or Difficulty Of Tong To Shift . . . . . . . . . . . . . . . . . . . . . . . . . . . . . . . . . . . General Comments . . . . . . . . . . . . . . . . . . . . . . . . . . . . . . . . . . . . . . . . . . . . . . . . Storage Recommendations . . . . . . . . . . . . . . . . . . . . . . . . . . . . . . . . . . . . . . . . . . . . Assemblies And Parts . . . . . . . . . . . . . . . . . . . . . . . . . . . . . . . . . . . . . . . . . . . . . . . . Geartrain Layout . . . . . . . . . . . . . . . . . . . . . . . . . . . . . . . . . . . . . . . . . . . . . . . . . . Support Roller Assembly . . . . . . . . . . . . . . . . . . . . . . . . . . . . . . . . . . . . . . . . . . . . Pinion Assembly . . . . . . . . . . . . . . . . . . . . . . . . . . . . . . . . . . . . . . . . . . . . . . . . . . . Pinion Idler Assembly . . . . . . . . . . . . . . . . . . . . . . . . . . . . . . . . . . . . . . . . . . . . . . . Rotary Idler Assembly . . . . . . . . . . . . . . . . . . . . . . . . . . . . . . . . . . . . . . . . . . . . . . Clutch Assembly . . . . . . . . . . . . . . . . . . . . . . . . . . . . . . . . . . . . . . . . . . . . . . . . . . Rotary Gear and Spacers (Tong) . . . . . . . . . . . . . . . . . . . . . . . . . . . . . . . . . . . . . . Rotary Gear and Spacers (Backup) . . . . . . . . . . . . . . . . . . . . . . . . . . . . . . . . . . . . Pipe Size Ranges . . . . . . . . . . . . . . . . . . . . . . . . . . . . . . . . . . . . . . . . . . . . . . . . . . Shifter Assembly . . . . . . . . . . . . . . . . . . . . . . . . . . . . . . . . . . . . . . . . . . . . . . . . . . Tong Outer Body . . . . . . . . . . . . . . . . . . . . . . . . . . . . . . . . . . . . . . . . . . . . . . . . . . Tong Outer Body Detail . . . . . . . . . . . . . . . . . . . . . . . . . . . . . . . . . . . . . . . . . . . . . Caliper Brake Assembly . . . . . . . . . . . . . . . . . . . . . . . . . . . . . . . . . . . . . . . . . . . . . Cageplate Assemblies . . . . . . . . . . . . . . . . . . . . . . . . . . . . . . . . . . . . . . . . . . . . . . Cageplate (CP1) Assembly exploded . . . . . . . . . . . . . . . . . . . . . . . . . . . . . . . . . . Backup Outer Body Detail . . . . . . . . . . . . . . . . . . . . . . . . . . . . . . . . . . . . . . . . . . . Backup Inner Body . . . . . . . . . . . . . . . . . . . . . . . . . . . . . . . . . . . . . . . . . . . . . . . . . Backup & Frame, Mount, and Rotation Stop . . . . . . . . . . . . . . . . . . . . . . . . . . . . . Bucking Unit Weldment . . . . . . . . . . . . . . . . . . . . . . . . . . . . . . . . . . . . . . . . . . . . . Tong & Frame, and Rotation Stop . . . . . . . . . . . . . . . . . . . . . . . . . . . . . . . . . . . . . Hydraulic Motor Service Information . . . . . . . . . . . . . . . . . . . . . . . . . . . . . . . . . . . . Overhaul . . . . . . . . . . . . . . . . . . . . . . . . . . . . . . . . . . . . . . . . . . . . . . . . . . . . . . . . . Special Tools . . . . . . . . . . . . . . . . . . . . . . . . . . . . . . . . . . . . . . . . . . . . . . . . . . . . . Disassembly . . . . . . . . . . . . . . . . . . . . . . . . . . . . . . . . . . . . . . . . . . . . . . . . . . . . . . Reassembly . . . . . . . . . . . . . . . . . . . . . . . . . . . . . . . . . . . . . . . . . . . . . . . . . . . . . . Motor Parts List . . . . . . . . . . . . . . . . . . . . . . . . . . . . . . . . . . . . . . . . . . . . . . . . . . . Table of Contents
TM
14 1/2" Closed Mouth Trailer-Mounted Bucking Unit
BEST BY FARR
TM
Table of Contents
14 1/2" Closed Mouth Trailer-Mounted Bucking Unit
Hydraulic Section . . . . . . . . . . . . . . . . . . . . . . . . . . . . . . . . . . . . . . . . . . . . . . . . . . . . Hydraulic Circuit Schematic . . . . . . . . . . . . . . . . . . . . . . . . . . . . . . . . . . . . . . . . . . Hydraulic Circuit Parts List . . . . . . . . . . . . . . . . . . . . . . . . . . . . . . . . . . . . . . . . . . . Hydraulic Valve Information . . . . . . . . . . . . . . . . . . . . . . . . . . . . . . . . . . . . . . . . . . Hydraulic Valve Service Information . . . . . . . . . . . . . . . . . . . . . . . . . . . . . . . . . . . Hydraulic Valve Parts List . . . . . . . . . . . . . . . . . . . . . . . . . . . . . . . . . . . . . . . . . . . Torque Gauge Service Information . . . . . . . . . . . . . . . . . . . . . . . . . . . . . . . . . . . . . . Parts List . . . . . . . . . . . . . . . . . . . . . . . . . . . . . . . . . . . . . . . . . . . . . . . . . . . . . . . . Torque Gauge . . . . . . . . . . . . . . . . . . . . . . . . . . . . . . . . . . . . . . . . . . . . . . . . . . . . Load Cell . . . . . . . . . . . . . . . . . . . . . . . . . . . . . . . . . . . . . . . . . . . . . . . . . . . . . . . . Load Cell Parts List . . . . . . . . . . . . . . . . . . . . . . . . . . . . . . . . . . . . . . . . . . . . . . . . Trouble Shooting . . . . . . . . . . . . . . . . . . . . . . . . . . . . . . . . . . . . . . . . . . . . . . . . . . Periodic Inspection and Maintenance . . . . . . . . . . . . . . . . . . . . . . . . . . . . . . . . . . Section Nine
9.2
9.3
9.4
9.8
9.9
Section Ten
10.2
10.3
10.4
10.5
10.6
10.7
IDENTIFICATION OF OF WARNINGS AND OTHER NOMENCLATURE OF
IMPORTANCE USED IN THIS MANUAL
Farr Canada uses three subsets to describe items in three degrees of importance.
The highest level of urgency is called a CRITICAL WARNING, and is identified with an exclamation point, has red text, and is surrounded by a double black box. A CRITICAL WARNING denotes
an item of extreme importance, and failure to heed a warning may result in bodily injury, death,
severe equipment damage, or any combination of these.
A STANDARD WARNING is identified with an asterisk, and contains information critical to the
correct assembly or operation of the unit. A STANDARD WARNING may also serve to alert the
user to a potential low-level injury hazard. A STANDARD WARNING is also surrounded by a
double black box, but the text is amber in colour.
An ALERT is identified by black text within a double black box. An alert contains specific information of note that pertains to the correct assembly or operation of the unit.
!
This is how to identify a critical warning
*
This is how to identify a standard warning
This is how to identify an alert
Technical Manual
Section Contents
v
BEST BY FARR
TM
14 1/2" Closed Mouth Trailer-Mounted Bucking Unit
This page intentionally
left blank
vi
Section Contents
Technical Manual
14 1/2" Closed Mouth Trailer-Mounted Bucking Unit
BEST BY FARR
TM
Introduction
Congratulations on the purchase of your new, customized, trailer-mounted FARR 14 1/2” Bucking Unit. Expect many
years of outstanding performance and reliability. This manual will provide you with the information necessary to
adequately care for your new equipment. Performing the simple maintenance procedures in this manual will extend its
life and ensure continuing excellent performance and reliability.
Replacement parts are readily available from FARR Canada Ltd. in Edmonton Alberta. However, many of the consumable parts are common items, and are likely to be found in supply stores or parts depots. In addition, many parts are
transferable between FARR tongs and backups.
Should you need replacement parts, or should you experience any difficulty not covered in this manual, please contact:
FARR CANADA (SALES)
11086 156 Street, Suite 216
Edmonton, Alberta
Canada T5P 4M8
Phone: 780.481.3174
Fax: 780.481.9246
FARR CANADA (ENGINEERING)
14755 121A Avenue
Edmonton, Alberta
Canada T5L 2T2
Phone: 780.453.3277
Fax: 780.455.2432
Email Sales: [email protected]
Email Engineering: [email protected]
Website: http://www.farrcanada.com
Technical Manual
Section Contents
1.1
Dimensional Views
88"
102-1/4"
BEST BY FARR
TM
14 1/2" Closed Mouth Trailer-Mounted Bucking Unit
202"
1.2
Section Contents
Technical Manual
14 1/2" Closed Mouth Trailer-Mounted Bucking Unit
BEST BY FARR
TM
Specifications
Torque Range @ 2,500 PSI: High Gear:
Low Gear:
High:
Low:
Maximum RPM at
50 GPM / 189 LPM
Hydraulic Requirements:
4677 ft.-lb. / 6343 Nm
35000 ft.-lb. / 47360 Nm
40 RPM
8 RPM
50 GPM @ 1000 psi / 189 LPM @ 6.9 MPa
10 GPM @ 2000 psi / 37.8 LPM @ 13.8 MPa
Overall Length:
Overall Width:
102 inches / 260 cm
Overall Height:
74 inches / 188 cm
Space Required On Pipe:
8 inches / 20.3 cm
Maximum Elevator Diameter:
202 inches / 5.13 meters
Unlimited (tong comes off pipe)
Torque arm length:
Weight (Approximate):
36 inches / 91.44 cm
Center Line of Pipe - Center Line of Anchor Handle
Casing Jaws Available (inches): 4-1/2, 5, 5-1/2, 6-5/8, 7, 7-5/8, 8-5/8, 9-5/8,10-3/4, 11-3/4,
13-3/8, & 14-1/2.
4500 lb. / 2043 kg.
Patented & Patents Pending
Technical Manual
Section Contents
1.3
14 1/2" Closed Mouth Trailer-Mounted Bucking Unit
Specifications
Thickener NLGI consistency grade NLGI performance grade Penetration - ASTM D 217 (25°C [77°F] 0.1 mm) worked 60 strokes
Dropping point, °F[°C] - ASTM D2265 High temperature life, hours - ASTM D 3527 Oxidation stability, psi - ASTM D 942 Water washout, percent - ASTM D 1264 Rust and corrosion - ASTM D 1743 Oil separation, percent loss - ASTM D 1742
(24 hours, 25°C [77°F]
Leakage, g lost - ASTM D 4290 Four ball wear test, mm scar - ASTM D 2266 Fretting wear, mg - ASTM D 4170 Four ball EP, kgf - ASTM D 2596
Weld point
Load wear index Timken OK load test, lbs - ASTM D 2509 Low temperature torque, N*m - ASTM D 4693
(-40°C [-40°F])
LT-37 pumpability, g/min (60°F/0°F [16°C/-18°C])
Copper corrosion - ASTM D 4048 Disc brake wheel bearing specifications
Ford ESA-M1C 198A
Chrysler MS-3701 Oil viscosity: 40°C [104°F], cSt
100°C [212°F], cSt 1.4
Flash point, °F[°C] - ASTM 92 Section Contents
Technical Manual
Lithium Complex
2
GC-LB
265-295 minimum
550 [288] minimum
160 minimum
(100 hr/300 hr) 0/3
1.8 max
pass
1.1 max
1.0 max
0.40 max
3.4 max
400 minimum
50 minimum
50
1.3 max
360/7
1B
Yes
Yes
151
19.2
450[232]
BEST BY FARR
TM
Use an EP synthetic grease that meets or exceeds the following specifications:
Specifications
14 1/2" Closed Mouth Trailer-Mounted Bucking Unit
BEST BY FARR
TM
Use a premium quality hydraulic fluid that meets or exceeds the following specifications:
Typical Density (kg/m3) 878
Viscosity - cSt @ 40 °C - cSt @ 100 °C 68.8
8.7
Viscosity Index Pour Point °F [°C] -22 [-30]
Flash Point °F [°C] 432 [222]
Colour, ASTM Neutralization Number Rust Protection - Distilled Water - Sea Water
Hydrolytic Stability - Cu Mass Loss, mg/cm2 Copper Corrosion Test Filterability: Denison - Wet & Dry Afnor - Wet & Dry Cincinatti Milacron Spec Approved Denison HF-0: Denison P-46 Piston Pump:
Denison T6C Vane Pump:
Vickers 35VQ25 Vane Pump Test:
104/105C Vane Pump Test:
Vane pump test total ring and vane wear, mg. Oxidation Stability
Turbine Oil Stability Test Life, hours
Rotary Bomb Oxidation Test, minutes
FZG Spur Gear Test, Failure Load Stage (FLS) 97
1.5
0.40
No Rust
No Rust
0.04
1A
Pass
Pass
P69
Approved
Pass
Pass
Pass
No Data Available
<10
2500+
325
12
Technical Manual
Section Contents
1.5
BEST BY FARR
TM
14 1/2" Closed Mouth Trailer-Mounted Bucking Unit
This page intentionally
left blank
1.6
Section Contents
Technical Manual
BEST BY FARR
TM
Tong Assembly
14 1/2" Closed Mouth Trailer-Mounted Bucking Unit
The Farr Hydraulic Power Tong has been designed such that assembly is simple and can be accomplished without the
use of special tools. The following sequence is presented as a guide only for the technician performing assembly as
it would take place in our plant. Much emphasis has been placed on disassembly and reassembly in the maintenance
and overhaul section of this manual. Therefore, use this assembly section only to aid in familiarization of parts and
their locations, and use the overhaul and maintenance section as a specific guide to assembly.
ASSEMBLY SEQUENCE
1. Position the tong body gear case on a suitable stationary support such that the bottom body plate is
accessible.
2. Install bottom pinion bearing and bearing cap.
3. Install bottom clutch bearing and bearing cap.
4. Install rotary roller shafts, rollers, bearings and spacers.
5. Install rotary drive gear. (Limit grooves should be face side up).
6. Install rotary idler gears, bearings, shafts and spacers, making sure microgrooves in gear are in
upright and proper position. (Micro-groove gear should be located on the gear shift lever side of tong).
7. Install bottom pinion gear (shoulder side down).
8. Install pinion gear shaft into the spline of the bottom pinion gear.
9. Install clutch shaft, needle bearings, bottom clutch gear.
10. Install pinion idler gears, bearings and half shafts.
11. Install shifting collar which will slip over clutch shaft and mesh with low or high clutch gear.
12. Position the shifting shaft (with shifting yoke attached) on the shifting collar.
13. Install top pinion gear (shoulder side up).
14. Install top clutch gear.
15. Position the top plate in its proper location and insert dowel pins.
16. Align mounting holes of pinion idler half shafts with top plate, and install (half moon) pads and bolts.
17. Install top clutch bearing, retainer and bushing.
18. Install clutch drive gear and retainer.
19. Install motor mount.
20. Install shifting cylinder.
21. Install rotary idler pads and nuts, pinion idler shaft nuts, roller shaft nuts, and then secure
the top plate in place with bolts around perimeter of tong.
22. Install top pinion bearing and bearing cap.
23. Install motor and valve assembly.
Technical Manual
Section Contents
2.1
14 1/2" Closed Mouth Trailer-Mounted Bucking Unit
Tong Assembly
24. Install brass ring.
25. Install top cage plate.
26. Install bottom cage plate.
27. Install brake.
2.2
Section Contents
BEST BY FARR
TM
ASSEMBLY SEQUENCE (continued...):
Technical Manual
14 1/2" Closed Mouth Trailer-Mounted Bucking Unit
Setup & Operation
BEST BY FARR
TM
Adequate setup and proper hydraulic connections are essential in ensuring reliable operation of your
tong. For best results and long term reliability, read and obey the start-up instructions in this section.
A. MAJOR COMPONENT IDENTIFICATION
1
2
5
3
4
6
Technical Manual
7
Section Contents
3.1
14 1/2" Closed Mouth Trailer-Mounted Bucking Unit
9
BEST BY FARR
TM
8
Setup & Operation
2
3
10
11
5
3.2
6
Section Contents
Technical Manual
14 1/2" Closed Mouth Trailer-Mounted Bucking Unit
12
BEST BY FARR
TM
Setup & Operation
13
14
15
16
17
Technical Manual
Section Contents
3.3
14 1/2" Closed Mouth Trailer-Mounted Bucking Unit
19
BEST BY FARR
TM
18
Setup & Operation
3.4
Section Contents
Technical Manual
14 1/2" Closed Mouth Trailer-Mounted Bucking Unit
Setup & Operation
BEST BY FARR
TM
Item
Description
Page
1
Tong
3.1
2
Tong Carriage
3.1
3
Frame Weldment
3.1
4
Backup
3.1
5
Backup Spring Return Carriage
3.1
6
Fixed Pipe Roller Stand
7
Tong Door
3.2
8
Rotary Gear Assembly
3.2
9
Tong Door Cylinder
3.2
10
Tong Jaw c/w Dies
3.2
11
Cage Plate Assembly
3.3
12
Brake Band Assembly
3.3
13
Backing Pin Assembly
3.3
14
Motor Mount
3.3
15
Hydraulic Motor
3.3
16
Shift Cylinder Assembly
3.4
17
Control Valve Bank
3.4
18
Backup Door Cylinder
3.5
19
Backup Door
3.5
20
Backup Door Latch Cylinder
3.5
21
Backup Door Latch
3.5
22
Backup Die Holder
3.5
23
Load Cell
3.6
24
Fixed Pipe Roller Gate
3.6
25
Remote Pipe Roller Stand
3.7
26
Pipe Roller Stand Lift Cylinder
3.7
3.1, 3.6
Technical Manual
Section Contents
3.5
14 1/2" Closed Mouth Trailer-Mounted Bucking Unit
B. HYDRAULIC COMPONENT IDENTIFICATION
BEST BY FARR
TM
Setup & Operation
3.6
Section Contents
Technical Manual
14 1/2" Closed Mouth Trailer-Mounted Bucking Unit
BEST BY FARR
TM
Setup & Operation
1
Technical Manual
Section Contents
3.7
14 1/2" Closed Mouth Trailer-Mounted Bucking Unit
BEST BY FARR
TM
Setup & Operation
2
3
4
5
3.8
Section Contents
5
Technical Manual
6
7
14 1/2" Closed Mouth Trailer-Mounted Bucking Unit
BEST BY FARR
TM
Setup & Operation
10
13
11
12
Technical Manual
Section Contents
3.9
14 1/2" Closed Mouth Trailer-Mounted Bucking Unit
Part Number
Page
1
Hydraulic Motor, SAI GM1-250
87-0148
3.7
2
Pressure Gauge 0 - 3000 psig
02-0245
3.8
3
Relief Valve Cartridge, DVA35-MRV-2
10-0062
3.8
4
Inlet Section, DVA35-A880
10-9016
3.8
5
Motor Valve Section, DVA35-MA8
10-9014
3.8
6
Backup Valve Section, DVA35-DA8
10-9019
3.8
7
Outlet Section, DVA35-PB09
08-1825
3.8
8
Relief Valve Cartridge, RPEC-LAN
08-0095
3.9
9
Cross Port Relief Valve Block, Sun YFI
08-1801
3.9
10
Relief Valve Cartridge, DVA20-MRV
10-0025R
3.9
11
Inlet Section, DVA20-A880
10-0025
3.9
12
Double-Action Valve Section, DVA20-DA7
10-0072
3.9
13
Outlet Section, DVA20-TR88
10-0027
3.9
14
Dump Valve, Vickers SV1-16
60-0322
15
Cross-Port Check Valve, CKEB-XCN, c/w body, Sun YEI
08-0481 / 08-1898
3.10
Section Contents
Technical Manual
BEST BY FARR
Description
TM
Item
Setup & Operation
14 1/2" Closed Mouth Trailer-Mounted Bucking Unit
Setup & Operation
BEST BY FARR
TM
C.
HYDRAULIC CONNECTIONS
A pair of hydraulic lines - a 1-1/4” supply line and a 1” return line - connect the bucking unit to the
power unit (see illustration below). Ancillary devices (hydraulic motors, lift cylinders, etc.) are connected through the valve block illustrated below.
Perform any hydraulic connection when the power unit is not running, or when the hydraulic pump is
disengaged. The possibility of error in inter-changing the high pressure supply hose and the low pressure return hose has been eliminated, because the supply side coupling is smaller than the return
side. These hose couplings are self-sealing, and care should be taken to ensure complete engagement to prevent partial closure of the check valve in the coupling. Ensure that the nut (female) side is
completely made up onto the male connector - there is a line on the male fitting that indicates complete make-up. Snug the female fitting right up to the line.
1" INLET
1-1/4" OUTLET
dis-assembled
A
assembled
Technical Manual
Section Contents
3.11
14 1/2" Closed Mouth Trailer-Mounted Bucking Unit
1. AVAILABLE JAWS
TM
TONG JAW AVAILABILITY & INSTALLATION
The following table lists all jaw die kits that are available as standard sizes for this model of tong. If
your desired size is not listed, Farr can engineer custom jaw sizes - contact the sales department for
further information.
Referring to the following table when choosing the required jaw for your application:
RINGS
REQUIRED
NUMBER OF
JAWS
Standard Jaw
12
MASTER RING
BLUE PLATES
Long Jaw
6
Standard Jaw
10
RING A
RED PLATES
Long Jaw
5
Standard Jaw
8
RING B
YELLOW PLATES
Long Jaw
4
Standard Jaw
7
RING C
GREEN PLATES
Long Jaw
7
PIPE RANGE
PIPE RANGE
USE DIE SIZE 5 USE DIE SIZE
TO 4
4-1/2 TO 3-1/2
OD
OD
13-5/8 to 14-5/8 13-1/8 to 14-1/8
OD
OD
12 to 12-1/2
11-5/8 to 12-1/8
OD
OD
11-1/2 to 12-1/2
11 to 12
OD
OD
10-1/4 to 11-1/2
9-3/8 to 10
OD
OD
9-3/8 to 10-3/8
8-7/8 to 9-7/8
OD
OD
7-3/8 to 8-1/8
7-1/8 to 8
OD
OD
7-3/8 to 8-3/8
6-7/8 to 7-7/8
OD
OD
5-3/8 to 6-1/4
5 to 5-7/8
PIPE RANGE
USE DIE SIZE
3-1/2 TO 2-7/8
OD
12-1/2 to 13-1/8
OD
11 to 11-1/2
OD
10-3/8 to 11
OD
8-7/8 to 9-1/2
OD
8-1/4 to 8-7/8
OD
6-1/2 to 7-3/8
OD
6-1/4 to 6-7/8
OD
5-3/8 to 4-5/8
EACH PIPE SIZE REQUIRES A RING AND 5 PLATES FOR THE TONG AND 4
PLATES FOR THE BACKUP, EXCEPT FOR THE 13-5/8 AND ABOVE, WHICH
USES THE MASTER RING IN THE TONG AND BACKUP WITH APPLICABLE DIES
3.12
Section Contents
Technical Manual
BEST BY FARR
D.
Setup & Operation
14 1/2" Closed Mouth Trailer-Mounted Bucking Unit
Setup & Operation
STANDARD JAWS
BEST BY FARR
TM
Description
Part Number
2-7/8" - 3-1/2" Jaw Die Kit
01-JDK-620
3-1/2" - 4-1/2" Jaw Die Kit
01-JDK-625
4" - 5" Jaw Die Kit
01-JDK-630
Jaw Die Kits contain 5 EACH of the following:
01-J-04128 Jaw
Jaw Insert in the specified size
1" Jaw Pin
Insert Screw and matching lock nut
LONG JAWS
Note that there are no Jaw Die Kits Avalailable for the long
jaws. Each "long jaw" accepts one of three different sizes of
inserts, which then defines the pipe size application.
Description
2.
Part Number
Long Jaw
1234-J-1
2-7/8" - 3-1/2" Jaw Insert
12-1009
3-1/2" - 4-1/2" Jaw Insert
12-1010
4" - 5" Jaw Insert
12-1011
JAW INSTALLATION
Remove ringed linchpin, and slide die pin straight up out of the cageplate assembly. Slide out the die
assembly, and disassemble by using an allan wrench to remove the 3/8" cap screw. Use caution not
to lose the nut when removing the capscrew. This procedure is identical for the backup jaws. (see illustration below).
Technical Manual
Section Contents
3.13
14 1/2" Closed Mouth Trailer-Mounted Bucking Unit
E. TONG OPERATION
1. INITIAL START UP & BREAK-IN PROCEDURE
ALTHOUGH YOUR NEW EQUIPMENT HAS BEEN TESTED AND INSPECTED AT
THE FARR FACTORY PRIOR TO SHIPPING, WE ADVISE THOROUGH TESTING
OF YOUR NEW TONG AFTER YOU TAKEN POSESSION IN ORDER TO ELIMINATE
THE POSSIBILITY OF SHIPPING DAMAGE.
Farr recommends that the following pre-operating tests be performed prior to releasing the tong
assemly to a operational environment:
•
Operate the tong at full speed and in high gear for a duration of one-half hour.
•
Switch to low gear and operate for an additional one-half hour at full speed.
•
Inspect all components and hydraulic fittings for possible defects following completion of the tests.
All FARR Tongs have been throughly tested at the factory prior to shipping and any defects may
be the result of shipping damage.
Ensure adequate lube oil and hydraulic oil levels before starting engine. Use start up procedures as
recommended by the power unit engine operator’s manual. Open the Bypass Valve on the hydraulic
system, and inspect all pressure and return line hose connections to ensure correct and secure
installation.
IMPROPERLY SECURED HYDRAULIC CONNECTIONS WILL INTERRUPT
HYDRAULIC FLUID FLOW, AND COULD RESULT IN THE FOLLOWING
FAILURES:
• A restriction in the pressure supply hose will result in high pressure within the
power unit hydraulic system, which will activate the hydraulic governor and
increase the engine speed to as high as maximum RPM.
• A restriction in the return line will result in high pressure within the power unit and
the tong hydraulic system, causing engine speeds as high as maximum RPM, and
possible failure of the motor seal.
3.14
Following inspection of the hoses, start the engine and allow it to idle until warm. Allow hydraulic
fluid to circulate for approximately 10 minutes, then slowly close the Bypass Valve to allow hydraulic fluid to circulate through the hoses and to the tong (circulating pressure should not exceed 200
psi). Place the tong gear shifter in low gear and rotate the tong slowly forward and then reverse
with the throttle valve control lever. Once this has been done and the proper size jaws have been
installed, the tong is then ready to run pipe.
Section Contents
Technical Manual
BEST BY FARR
TM
Setup & Operation
Setup & Operation
BEST BY FARR
TM
14 1/2" Closed Mouth Trailer-Mounted Bucking Unit
2. VALVE OPERATION
4-way proportional valves control operation of hydraulic devices on the bucking unit such as
hydraulic motors and lift cylinders. When any one valve is “centered” or in the detent position,
there is no hydraulic output from the valve. When the valve is pushed forward there is an effect,
and when the valve is pulled back, there is an opposite effect. Several of the valves feature proportional control, which means that further extension of the valve handle (thereby further opening
the valve orifice) results in proportionally higher hydraulic output to the controlled device. In the
case of a tong motor the speed of the motor can be controlled by the position of the valve handle,
in the case of a lift cylinder the rate of extension can be controlled, etc. Some valves are
sequenced valves, meaning that actuating a single valve will control two hydraulic devices in
sequence.
The following illustrations demonstrate the type and effect of the three valves on the valve bank.
TONG MOTOR
This is a proportional valve. Pushing the valve handle forward will cause the tong motor to rotate
in a clockwise direction (as seen from the motor side of the tong). This is the desired direction of
rotation for making up a joint. Pulling the valve handle in the opposite direction results in counter-clockwise rotation, which is the desired direction of rotation for breaking out a joint.
Technical Manual
Section Contents
3.15
Setup & Operation
TONG SHIFT
This is a two-way direct acting valve, without proportional control. When the valve is in the middle
(detent) position, the tong is in “neutral”, or not rotating. Pulling the valve handle backward, or toward
the operator, will cause the tong to begin rotating in low gear. Pushing the valve handle forward
through the neutral position will cause the tong to shift to a higher gear, and increase the rotational
speed. Note that maximum torque can only be applied with the tong in the low gear.
BACKUP
This is a two-way direct acting valve, without proportional control. Pushing the valve handle forward will
cause the backup to engage. Pulling backward, towards the operator, reverses the operation.
3.16
Section Contents
Technical Manual
BEST BY FARR
TM
14 1/2" Closed Mouth Trailer-Mounted Bucking Unit
Setup & Operation
BEST BY FARR
TM
14 1/2" Closed Mouth Trailer-Mounted Bucking Unit
3. GENERAL COMMENTS
a)
b)
Position rotary gear in contact with idler gears prior to breaking out joints or collars where high
torques are required.
When making-up integral (shouldered) joints, it is essential to make up the last turn of the
threads in low gear. This reduces the tendency of an instant stop or a sudden increase in
torque, which induces extremely high stresses on the gear train.
c)
DO NOT employ the “snap break” method of breaking-out joints. By definition, the “snap
break” method is a procedure used by some operators to break-out connections, accomplished by leaving slack in the “jaw-pipe” engagement, and then quickly pulling the throttle
valve control lever allowing the tong to snap into its loaded or high torque condition. Although
this method is very effective in breaking out joints, the extremely high stress placed on the
gear train frequently causes gear breakage.
!
THE “SNAP-BREAK” METHOD IS HAZARDOUS TO OPERATING
PERSONNEL
F. EXTREME COLD WEATHER OPERATION PROCEDURES
1) Consult the power unit engine operator’s manual for all cold weather operating procedures and
precautions.
2) Select gear and bearing lubricants that are compatible with expected climatic conditions.
3) Select hydraulic fluid that is compatible with expected climatic conditions.
4)
Allow hydraulic fluid to circulate for approximately 20 minutes after starting the power unit, prior to
activating the bypass valve to allow fluid to circulate to tong. If the power unit is equipped with an
oil temperature gauge, ensure that the fluid has reached operating temperature as specified by
hydraulic fluid data sheet.
5) Allow for adequate drying of moisture (prior to lubricating) when cleaning tong parts in cold
weather.
G. RUNNING PIPE
Stabilize and level the bucking unit on a secure surface using the four hydraulic jacks.
!
ONCE THE TRAILER JACKS HAVE BEEN ADJUSTED, THE ADJUSTMENT
LEVERS MUST BE LOCKED TO PREVENT ACCIDENTAL ADJUSTMENT
OF JACKS.
Ensure both ends of the pipe are supported and not allowed to deviate from the centerline. Excessive
movement as indicated by the arrows in the illustration will cause increased wear on the backup
guides.
(see illustration following page)
Technical Manual
Section Contents
3.17
Setup & Operation
The bottom plates on all four
hydraulic jacks need to be flat
and secure on a stable surface
before running pipe.
3.18
Section Contents
Technical Manual
BEST BY FARR
TM
14 1/2" Closed Mouth Trailer-Mounted Bucking Unit
BEST BY FARR
TM
Maintenance
14 1/2" Closed Mouth Trailer-Mounted Bucking Unit
Regular maintenance programs are necessary, and must be established to assure dependable and lengthy
operation of your FARR Hydraulic Tong. Use the following cleaning, lubrication, and adjustment recommendations to enhance the life expectancy of the tong and assure safety of operating personnel.
A.
CLEANING
The tong should be thoroughly cleaned with a good petroleum base cleaning agent after each job,
prior to storage. Farr recommends that the motor and valve assembly be periodically removed, along
with the top tong plate, so that guides, rollers and gears can be properly cleaned.
B. LUBRICATION
Use a quality multipurpose bearing lubricant that will remain within its viscosity range at expected
operating temperatures. In addition, Farr recommends the following lubrication procedure at the
completion of each job prior to storage.
1. ROTARY ROLLER BEARINGS
Supply grease to these bearings through the grease fittings in the ends of the rotary roller shafts,
located at the top and bottom face of the tong.
Technical Manual
Section Contents
4.1
Maintenance
BEST BY FARR
2. ROTARY IDLER BEARINGS
Apply grease to these bearings through the grease fittings in the ends of the rotary idler shafts,
located at the top face of the tong.
TM
14 1/2" Closed Mouth Trailer-Mounted Bucking Unit
3. PINION IDLER BEARINGS
Apply grease to these bearings through the grease fittings in the ends of the idler half shafts,
located at the top or bottom face of the tong.
4.2
Section Contents
Technical Manual
14 1/2" Closed Mouth Trailer-Mounted Bucking Unit
4. PINION BEARINGS
Apply grease to these bearings through the grease fittings in the pinion bearing caps, which are
located at the top and bottom face of the tong.
BEST BY FARR
TM
Maintenance
5. CLUTCH SHAFT BEARINGS
Apply grease to these bearings through the grease fittings in the clutch bearing cap which is locat
ed at the bottom face of the tong.
Technical Manual
Section Contents
4.3
14 1/2" Closed Mouth Trailer-Mounted Bucking Unit
Maintenance
BEST BY FARR
TM
6. MOTOR MOUNT HOUSING
Apply grease to the gears in this housing through the grease fitting on top of the motor mount.
7. SHIFTING SHAFT BUSHINGS
Apply grease to the shifting shaft and shifting shaft bushings, which may be accessed
through the cover plate on the side of the tong.
Access shifter components
through this panel
4.4
Section Contents
Technical Manual
Maintenance
14 1/2" Closed Mouth Trailer-Mounted Bucking Unit
BEST BY FARR
TM
LUBRICATION (continued...)
Recommended lubrication amount at the completion of each job:
1. Rotary Roller Bearings
3 shots grease
(Upper and lower)
2. Rotary Idler Bearings
4 shots grease
3. Pinion Idler Bearings
4 shots grease
4. Pinion Bearings
2 shots grease
(Upper and lower)
5. Clutch Shaft Bearings
1 shot grease
6. Motor Mount Housing
10 shots grease
7. Shifting Shaft
as required
Farr recommends that the clutch inspection plate should periodically be removed, and a liberal coating of grease
applied to the clutch, drive gears and shifting shaft.
C. ADJUSTMENTS
1.
BRAKE ADJUSTMENT
The three manual brake calipers must be adjusted as the brake pads wear. All three calipers must be
adjusted equally in order to ensure uniform wearing of the brake pads, and to ensure smooth and
undeviating rotation of the brake ring.
D. RECOMMENDED PERIODIC CHECKS
1.
SHIFTING SHAFT
The shifting yoke is secured to the shifting shaft by one hex jam nut and one locknut on the bottom of
the yoke. Check these nuts after each job. Do this by removing the clutch inspection plate and ensuring a snug fit prior to lubrication.
2.
TORQUE GAUGE ASSEMBLY
Periodic calibration of the torque gauge is recommended to assure accurate torque readings. When
having the torque gauge serviced and calibrated, it is important to note the arm length of the tong, as
indicated on page 2.1.
3. BRAKE PADS
Inspect brake pads regularly for cracks, chips, and excessive wear. Replace pads when wear exceeds
50% of their "new" thickness.
Technical Manual
Section Contents
4.5
14 1/2" Closed Mouth Trailer-Mounted Bucking Unit
Maintenance
The tong may be overhauled using the following instructions, after removing the tong from it's frame
assembly. Access to the gear train is possible by removing the top plate of the tong.
ALL MAINTENANCE AND OVERHAUL SHOULD BE PERFORMED FROM THE TOP.
THEREFORE, THE BOTTOM PLATE OF THE TONG SHOULD NEVER BE
REMOVED FROM THE GEAR CASE HOUSING.
1. Securely support tong from the bottom using sturdy stands.
2. Remove the two 1/2" hex bolts securing the three brake assemblies to the top plate of the tong (six
bolts total).
3. Remove the brake ring.
4. Use the 24 hex bolts securing the cageplate - brake connector ring, and remove the connector ring
and the 24 spacers.
5. Remove the anchor pins from the 12 jaw die pins, and remove the pins and jaw dies.
!
THE CAGE PLATE BOLTS ARE THE ONLY ITEMS FASTENING THE
BOTTOM CAGE PLATE TO THE TONG. SUPPORT THE BOTTOM
CAGE PLATE FROM BELOW PRIOR TO REMOVING CAGE PLATE
BOLTS IN ORDER TO PREVENT DAMAGE TO THE BOTTOM CAGE
PLATE OR PERSONAL INJURY TO THE MECHANIC
6. Remove the twelve 3/4" nylock nuts from the cageplate bolts on the bottom side of the tong. Take
care to support the bottom cageplate and cageplate spacer while removing the last couple of nuts.
7. Remove the sixteen 7/8" nylock jam nuts from the top side of the support rollers.
8. Remove the motor assembly as follows:
a. Remove the five 1/2" bolts which secure the motor to the auxilliary motor mount.
b. Lift off the motor assembly. Inspect the motor gear, located at the bottom of the motor shaft, for
gear excessive gear backlash or tooth damage. Ensure that the motor gear is securely
attached to the motor shaft.
9. Remove the auxilary motor mount and the motor mount by removing the four 1/2" socket head cap
screws. Lift the mounts out of place.
10. Remove the snap ring, allowing disassembly of the top clutch gear.
11. Pull the top bearing cap and spacer for the pinion drive gear by removing the four 1/2" bolts which
secure the bearing cap. Thread two of the removed bolts into the extra holes on top of the bearing
cap, and use them as lifting lugs to lift the bearing cap out of place.
*
4.6
IF THE BEARING REMAINS ATTACHED TO THE GEAR SHAFT
AFTER THE BEARING CAP IS PULLED, FARR SERVICE PERSONNEL
RECOMMENDS LEAVING IT IN PLACE UNTIL THE TOP TONG PLATE
IS REMOVED.
Section Contents
Technical Manual
BEST BY FARR
TM
E. TONG OVERHAUL PROCEDURES
Maintenance
14 1/2" Closed Mouth Trailer-Mounted Bucking Unit
BEST BY FARR
TM
12. Remove the top clutch bearing retainer which is secured by two or three countersunk socket head
screws.
13. Remove the three hex bolts securing each pinion idler pad to the top plate of the tong.
14. Remove the nylock nuts and pads for the rotary and pinion idler gears.
15. Remove the inspection plate at the rear side of the tong. Disconnect shifting shaft from shifting
fork.
16. Remove shifter assembly.
17. Remove the 3/8" socket head cap screws around the perimeter of the tong.
18. The top tong plate can be lifted off providing access to the inside of the gear case.
Technical Manual
Section Contents
4.7
BEST BY FARR
TM
14 1/2" Closed Mouth Trailer-Mounted Bucking Unit
This page intentionally
left blank
4.8
Section Contents
Technical Manual
BEST BY FARR
TM
Troubleshooting
14 1/2" Closed Mouth Trailer-Mounted Bucking Unit
Adequate maintenance and proper fluid selection should keep hydraulic problems to a minimum. If troubleshooting is necessary, ensure that the technician is well-trained in hydraulic systems, and familiar with the equipment
design, assembly and operation. Knowledge of hydraulic circuits and components is essential in isolating trouble
areas and pinpointing particular faults.
The following troubleshooting guidelines are intended to be general in nature. Any faults not solved through the
use of this guide should be referred to our engineering department for their evaluation and recommendations.
A. PUMP MAKES EXCESSIVE NOISE
1. POSSIBLE PROBLEM: Plugged or restricted intake line.
SOLUTION: Clean intake line.
2. POSSIBLE PROBLEM: Plugged reservoir air vent.
SOLUTION: Clean or replace.
3. POSSIBLE PROBLEM: Fluid viscosity too high due to ambient temperature.
SOLUTION: Replace fluid with a type that maintains the proper viscosity range in the
operating environment.
4.
POSSIBLE PROBLEM: Air leaking into system.
SOLUTION: Ensure oil pickup is well below oil surface level in reservoir. Check pump packing and line connections on intake side by pouring oil over the suspected leak. If the noise
stops, the leak has been located. Tighten joints or change packing or gaskets where
necessary.
5. POSSIBLE PROBLEM: Loose or worn parts.
SOLUTION: Replace parts. NOTE: Improper selection of hydraulic fluid may result in prema
ture wear.
6. POSSIBLE PROBLEM: Pump misalignment with motor.
SOLUTION: Check alignment.
7. POSSIBLE PROBLEM: Pump running in excess of rated speed.
SOLUTION: Check manufacturer’s recommended speed. Check pulleys, gears, power take
off, or drive motor.
Technical Manual
Section Contents
5.1
14 1/2" Closed Mouth Trailer-Mounted Bucking Unit
Troubleshooting
2. POSSIBLE PROBLEM: Fluid viscosity too high or too low due to extreme ambient
temperatures.
SOLUTION: Replace fluid. (Check pump and motor manufacturer’s recommendations.)
3. POSSIBLE PROBLEM: Excessive internal leakage.
SOLUTION: Repair or replace any worn parts (loose packing, etc.)
4. POSSIBLE PROBLEM: Excessive friction.
SOLUTION: Check pump for part interference. Pump may be assembled too tightly.
5. POSSIBLE PROBLEM: Leaks in pump check valve or relief valve.
SOLUTION: Repair or replace.
6. POSSIBLE PROBLEM: Fluid level in reservoir too low for proper cooling.
SOLUTION: Maintain proper oil level.
7.
POSSIBLE PROBLEM: Pump discharge being restricted.
SOLUTION: Check operation of throttle valve. Check relief valve. Do not allow larger pump
volumes to remain at high pressure for long periods of time. Check all self-sealing hose
connections for proper engagement.
8. POSSIBLE PROBLEM: Hydraulic system valves restricted.
SOLUTION: Clean valves and piping.
9. POSSIBLE PROBLEM: Heat exchanger not cooling hydraulic fluid.
SOLUTION: • Hydraulic circuit through heat exchanger is obstructed.
• Cooling coils in heat exchanger may be coated with a layer of dust.
• Airflow through heat exchanger may be obstructed.
• Cooling fan may be malfunctioning
5.2
Section Contents
Technical Manual
BEST BY FARR
1. POSSIBLE PROBLEM: Excess discharge pressure (relief valve set too high).
SOLUTION: Reset relief valve in accordance with maximum pressure required. Check
manufacturer’s recommendations.
TM
B. HYDRAULIC SYSTEM OVERHEATING
Troubleshooting
14 1/2" Closed Mouth Trailer-Mounted Bucking Unit
BEST BY FARR
TM
C. EXCESSIVE WEAR OF MOVING PARTS
1. POSSIBLE PROBLEM: Abrasive contaminants entrained in the fluid.
SOLUTION: Change fluid more frequently. Replace filter element. Be sure filter is proper
size.
2. POSSIBLE PROBLEM: Misalignment of moving parts.
SOLUTION: Inspect and realign.
3. POSSIBLE PROBLEM: Operating pressure rises above manufacturer’s recommendations.
SOLUTION: Check relief valve and reset.
4. POSSIBLE PROBLEM: Viscosity of fluid too low at working temperature.
SOLUTION: Ensure fluid is compatible with operating temperature.
5. POSSIBLE PROBLEM: Air in system.
SOLUTION: Bleed air and check for leaks in system.
6. POSSIBLE PROBLEM: Excessive wear of bearings.
SOLUTION: Inspect alignment of moving parts, vibration or excessive side thrusts on shafts.
Technical Manual
Section Contents
5.3
14 1/2" Closed Mouth Trailer-Mounted Bucking Unit
Troubleshooting
2. POSSIBLE PROBLEM: Reservoir oil level too low.
SOLUTION: Add oil.
3. POSSIBLE PROBLEM: Air leak in pump intake line.
SOLUTION: Repair leak.
4. POSSIBLE PROBLEM: Pump speed too slow.
SOLUTION: Check manufacturer’s speed recommendations.
5. POSSIBLE PROBLEM: Excessively worn or damaged pump or tong.
SOLUTION: Replace worn parts by following manufacturer’s recommendations.
6. POSSIBLE PROBLEM: Fluid viscosity too high.
SOLUTION: Some pumps will not prime if the fluid is too heavy.
*
BYPASS ALL TONG CIRCUITRY TO TEST PRESSURE AND
VOLUME. IF FLOW AND PRESSURE ARE TESTED OFTEN,
FARR RECOMMENDS CONSTRUCTION OF A TEST RIG THAT
CAN EASILY BE CONNECTED TO THE PUMP SUCTION AND
DISCHARGE PORTS
7. POSSIBLE PROBLEM: Restriction in line between power unit and tong.
SOLUTION: Check self-sealing couplings to insure they are properly engaged.
8. POSSIBLE PROBLEM: By-pass valve not functioning.
SOLUTION: Check and repair.
5.4
Section Contents
Technical Manual
BEST BY FARR
1. POSSIBLE PROBLEM: Pump intake line plugged.
SOLUTION: Clean intake line.
TM
D. TONG RUNNING T00 SLOWLY
Troubleshooting
14 1/2" Closed Mouth Trailer-Mounted Bucking Unit
BEST BY FARR
TM
E. TONG WILL NOT DEVELOP SUFFICIENT TORQUE
1. Malfunctioning relief valve on unit or tong.
a. POSSIBLE PROBLEM: Relief pressure set too low.
SOLUTION: Increase setting. To check, block the oil line beyond the relief valve and
determine pressure with a gauge.
b. POSSIBLE PROBLEM: Valve is stuck.
SOLUTION: Check for contamination of oil that may inhibit the way the valve actuates.
Remove valve and clean, ensuring that the valve spring operates smoothly.
c. POSSIBLE PROBLEM: Valve is leaking.
SOLUTION: Check valve seat for scouring. Check oil seals. Check for particles stuck
under the valve system.
2. POSSIBLE PROBLEM: Worn or damaged pump parts.
SOLUTION: Inspect and clean, replace all worn or broken parts.
3. POSSIBLE PROBLEM: Pump speed too slow.
SOLUTION: Check motor speed.
4. POSSIBLE PROBLEM: Fluid viscosity too high.
SOLUTION: Pump may not prime if fluid is too heavy. Replace with proper viscosity fluid.
5. POSSIBLE PROBLEM: Viscosity of fluid too low.
SOLUTION: System may overheat. Replace with proper viscosity fluid.
6. POSSIBLE PROBLEM: Fluid by-passed to reservoir.
SOLUTION: Check relief valve for proper operation. Check directional valve. Neutral posi
tion should return fluid directly to the reservoir.
7. POSSIBLE PROBLEM: Worn or damaged tong motor causing slippage.
SOLUTION: Replace or repair worn or damaged parts.
8. POSSIBLE PROBLEM: Damaged bearings or gears causing excessive drag.
SOLUTION: Repair or replace worn parts.
9.
POSSIBLE PROBLEM: Poor hydraulic pressure at the tong or excessive back pressure in
the return line.
SOLUTION: Restriction in line between power unit and tong. Inspect integrity of selfsealing couplings.
10. POSSIBLE PROBLEM: Defective torque gauge or load cell.
SOLUTION: Replace defective components. Ensure dampening screw has been adjusted.
Ensure gauge has been calibrated to proper torque arm length.
Technical Manual
Section Contents
5.5
14 1/2" Closed Mouth Trailer-Mounted Bucking Unit
Troubleshooting
2. POSSIBLE PROBLEM: Brake band insufficiently adjusted, not allowing jaws to cam properly.
SOLUTION: Adjust brake bands to give proper resistance to cage plates.
3. POSSIBLE PROBLEM: Jaw roller broken or worn.
SOLUTION: Replace roller.
5.6
Section Contents
Technical Manual
BEST BY FARR
1. POSSIBLE PROBLEM: Dies have become too dull.
SOLUTION: Replace dies.
TM
F. FAILURE OF JAWS TO GRIP PIPE
Troubleshooting
14 1/2" Closed Mouth Trailer-Mounted Bucking Unit
BEST BY FARR
TM
G. FAILURE OR DIFFICULTY OF TONG TO SHIFT
1. POSSIBLE PROBLEM: Bent or broken shifter handle.
SOLUTION: Replace shifter handle.
2. POSSIBLE PROBLEM: Bent or broken shifter yoke.
SOLUTION: Inspect and replace shifter yoke.
3. POSSIBLE PROBLEM: “Frozen” or hard-to-move shifter handle.
SOLUTION: Grease shifter shaft through grease zert.
4. POSSIBLE PROBLEM: Bent shifter shaft.
SOLUTION: Replace.
5. POSSIBLE PROBLEM: Tong pops out of gear
SOLUTION: Ensure that detent ball & spring assembly has been correctly set.
Technical Manual
Section Contents
5.7
14 1/2" Closed Mouth Trailer-Mounted Bucking Unit
Troubleshooting
The following factors contribute highly to inefficient hydraulic operation:
1. Failure to change fluid frequently enough, or inadequate fluid filtration.
2. Unsuitable hydraulic fluid.
3. Defective packing or seals in components of the hydraulic system.
4. Poor or incomplete understanding of hydraulic system components and/or operation
of the equipment.
5.8
Section Contents
Technical Manual
BEST BY FARR
TM
H. GENERAL COMMENTS
BEST BY FARR
TM
Storage Recommendations
14 1/2" Closed Mouth Trailer-Mounted Bucking Unit
A. Store tong in a clean, dry, ventilated area.
B. Ensure adequate lubrication before placing in storage (See lubrication section of manual).
C. Coat spare moving parts (gears, shafts, etc.) with a good corrosion inhibitor if required to
remain in storage for long periods of time. Store parts in a clean, dry area.
D. Store all o-rings, seals, packings, gaskets, etc. in strong moisture proof, airtight containers.
Ensure that these items are not crushed, nicked, or otherwise damaged.
E. Generously lubricate all bearings (cam followers, roller bearings, etc.) and store in a dust
free box or container, protected from moisture.
IF PROTECTED STORAGE OF THE TONG IS NOT AVAILABLE (FOR
EXAMPLE, FORCED STORAGE OUTSIDE ON A DRILL SITE IN DUSTY
CONDITIONS), FARR RECOMMENDS TAKING THE FOLLOWING STEPS:
1. Generously apply grease to all fittings so that excess grease pumped through
bearings acts as a seal against dust.
2. Cover or wrap tong with tarp or plastic to prevent wind-blown dust from getting
into gears. If a tong has been exposed to extreme dust conditions, Farr recom mends following these instructions before use:
1.
2.
3.
4.
5.
6.
7.
Suspend tong by body lug, remove clutch inspection plate and thoroughly
wash & flush interior with solvent, diesel fuel or equivalent.
Attach hydraulic hose and slowly rotate rotary gear, washing teeth of rotary
and idler gears as they become exposed.
Wash all sand and grit from cam follower grooves in rotary and cage plates.
Wash and lubricate exposed end of shifting shaft.
Wash and lightly grease cam surfaces of rotary gear.
Grease teeth of rotary gear.
Give every grease nipple a few shots of grease to displace any grit or sand
which may have remained in bearings.
Technical Manual
Section Contents
6.1
BEST BY FARR
TM
14 1/2" Closed Mouth Trailer-Mounted Bucking Unit
This page intentionally
left blank
6.2
Section Contents
Technical Manual
BEST BY FARR
TM
14 1/2" Closed Mouth Trailer-Mounted Bucking Unit
Assemblies And
Parts Lists
Technical Manual
Section Contents
7.1
Geartrain Layout
D
C
G
B
F
E
A
ISO View
TOP View
7.2
Section Contents
Technical Manual
BEST BY FARR
TM
14 1/2" Closed Mouth Trailer-Mounted Bucking Unit
14 1/2" Closed Mouth Trailer-Mounted Bucking Unit
BEST BY FARR
TM
Geartrain Layout
Item
Type
A
Part
B
Description
Qty
Part Number
Rotary Gear
1
AQ01-001
Assembly
Support Rollers
16
AQ03-100 (Page 7.4)
C
Assembly
Rotary Idlers
2
AQ01-100 (Page 7.10)
D
Assembly
Pinion Idlers
2
AQ01-120 (Page 7.8)
E
Assembly
Pinion
1
AQ01-150 (Page 7.6)
F
Assembly
Clutch
1
AQ01-200 (Page 7.12)
G
Part
Motor Gear
1
997-151-04
Technical Manual
Section Contents
7.3
14 1/2" Closed Mouth Trailer-Mounted Bucking Unit
A
B
C
D
E
F
G
7.4
Section Contents
Technical Manual
BEST BY FARR
TM
Support Roller Assembly
14 1/2" Closed Mouth Trailer-Mounted Bucking Unit
BEST BY FARR
TM
Support Roller Assembly
Item
Type
Assembly
Description
Qty
Part Number
Support Rollers
16
AQ03-100
A
Part
Grease Fitting
2
02-0097
B
Part
7/8"-UNF Jam Nut
2
09-5722
C
Part
Roller Cap Spacer
2
997D21-140
D
Part
Bearing Retainer Ring
2
02-0013
E
Part
Bearing MU1206UM
2
02-0014
F
Part
Roller Cap
2
997-D21-135
G
Part
Roller Shaft
1
997-D21-131
Technical Manual
Section Contents
7.5
14 1/2" Closed Mouth Trailer-Mounted Bucking Unit
A
B
C
D
E
F
G
H
I
F
E
D
C
B
A
7.6
Section Contents
Technical Manual
BEST BY FARR
TM
Pinion Assembly
14 1/2" Closed Mouth Trailer-Mounted Bucking Unit
BEST BY FARR
TM
Pinion Assembly
Item
Type
Assembly
Description
Qty
Part Number
Pinion
1
AQ01-150
A
Part
Grease Fitting
4
02-0097
B
Part
1/2" NC x 1-1/4" hex bolt
8
09-1168
C
Part
1/2" lock washer
8
09-5110
D
Part
Pinion Bearing Cap
2
997-89
E
Part
Pinion Bearing Spacer
2
1400-89A
F
Part
Bearing
2
NSK6307
G
Part
Low Pinion Gear
1
997-A5-88
H
Part
Pinion Gear
1
997-A7-86B
I
Part
High Pinion Gear
1
997-A4-87B
Technical Manual
Section Contents
7.7
14 1/2" Closed Mouth Trailer-Mounted Bucking Unit
A
B
C
D
E
C
C
B
F
G
H
I
J
K
7.8
Section Contents
Technical Manual
BEST BY FARR
TM
Pinion Idler Assembly
14 1/2" Closed Mouth Trailer-Mounted Bucking Unit
BEST BY FARR
TM
Pinion Idler Assembly
Item
Type
Description
Qty
Part Number
Assembly
Pinion Idler Assembly
1
AQ01-120
A
Part
Bearing Retainer Ring
1
02-0008
B
Part
Pinion Idler Bearing Seal
2
02-0010
C
Part
Pinion Idler Gear Retainer
2
02-0009
D
Part
Bearing
1
02-0011
E
Part
Pinion Idler Gear
1
997-A2-119B
F
Part
Idler Half Shaft
1
997-D17-105
G
Part
Pinion Idler Pad
1
1400-109
H
Part
5/8" Lock Washer
3
09-5114
I
Part
5/8"-NC x 2" hex bolt
3
09-1234
J
Part
1-1/2" Nylock Nut
1
09-5840
K
Part
Grease Fitting
1
02-0097
Technical Manual
Section Contents
7.9
14 1/2" Closed Mouth Trailer-Mounted Bucking Unit
B
C
D
E
F
G
F
E
H
I
D
C
B
7.10
Section Contents
Technical Manual
BEST BY FARR
A
TM
Rotary Idler Assembly
14 1/2" Closed Mouth Trailer-Mounted Bucking Unit
BEST BY FARR
TM
Rotary Idler Assembly
Item
Type
Assembly
Description
Qty
Part Number
Rotary Idler Assembly
1
AQ01-100
A
Part
Grease Fitting
1
02-0097
B
Part
1-1/2" Nylock Nut
2
09-5840
C
Part
Rotary Idler Pad
2
1400-125
D
Part
Bearing Spacer
2
997-D20-121
E
Part
Bearing Seal
2
997-A2-119B
F
Part
Rotary Idler Gear Retainer
2
02-0011
G
Part
Rotary Idler Bearing
1
1400-109
H
Part
Rotary Idler Gear
1
997-A2-119C
I
Part
Rotary Idler Shaft
1
997-D19-117
Technical Manual
Section Contents
7.11
Clutch Assembly
BEST BY FARR
TM
14 1/2" Closed Mouth Trailer-Mounted Bucking Unit
7.12
Section Contents
Technical Manual
14 1/2" Closed Mouth Trailer-Mounted Bucking Unit
BEST BY FARR
TM
Clutch Assembly
Item
Type
Assembly
Description
Qty
Part Number
Clutch
1
AQ01-200
A
Part
Drive Gear
1
997-HT-61
B
Part
Top Clutch Bearing
1
02-0002
C
Part
Bearing Retainer
1
997-HT-59
D
Part
Low Clutch Gear
1
997-HT-52
E
Part
Clutch Gear Bearing
4
02-0003
F
Part
Shifting Collar
1
997-HT-62
G
Part
Bottom Clutch Bearing
1
02-0004
H
Part
Bottom Clutch Bearing Cap
1
997-HT-54
J
Part
3/8"-NC x 1" hex bolt
4
09-1046
K
Part
Retainer Ring
1
02-0001
L
Part
Top Clutch Bearing Bushing
1
997-HT-60
M
Part
No. 10 x 3/4" Cap Screw
2
N
Part
Clutch Shaft Bearing Retainer
1
1400-59a
P
Part
Splined Shaft
1
997-HT-50
Q
Part
High Clutch Gear
1
997-HT-51B
R
Part
Clutch Bearing Spacer
1
1400-54A
S
Part
3/8" Lock Washer
4
09-5106
T
Part
Grease Fitting
1
02-0097
Motor Gear
1
997-A10-149
Not Shown
Technical Manual
Section Contents
7.13
14 1/2" Closed Mouth Trailer-Mounted Bucking Unit
Retainer Clip & Cross Flat
Countersunk Screw
Minimum 2 per Spacer Ring
Spacer Ring C (AQ01-030)
Pipe Size 6 1/4" to 8 3/8"
Spacer Ring B
(AQ01-020)
Pipe Size 8 1/4" to
10 3/8"
Spacer Ring A
(AQ01-010)
Pipe Size 10 3/8"
to 12 1/2"
Rotary Gear (AQ01-001)
Pipe Size 12 1/2" to 14 5/8"
Rotary Gear & Inserts
7.14
Section Contents
Technical Manual
BEST BY FARR
TM
Rotary Gear And Spacers (Tong)
14 1/2" Closed Mouth Trailer-Mounted Bucking Unit
BEST BY FARR
TM
Rotary Gear And Spacers (Backup)
Retainer Clip & Cross Flat
Countersunk Screw
Minimum 2 per Spacer Ring
Spacer Ring C
(AQ01-030)
Pipe Size 6 1/4"
to 8 3/8"
Spacer Ring B
(AQ01-020)
Pipe Size 8 1/4"
to 10 3/8"
Spacer Ring A
(AQ01-010)
Pipe Size 10 3/8"
to 12 1/2"
Rotary Gear (AQ10-004)
Pipe Size 12 1/2" to 14 5/8"
Technical Manual
Section Contents
7.15
Ranges For Pipe Size Combinations
RINGS
REQUIRED
NUMBER OF
JAWS
Standard Jaw
12
MASTER RING
BLUE PLATES
Long Jaw
6
Standard Jaw
10
RING A
RED PLATES
Long Jaw
5
Standard Jaw
8
RING B
YELLOW PLATES
Long Jaw
4
Standard Jaw
7
RING C
GREEN PLATES
Long Jaw
7
PIPE RANGE
PIPE RANGE
USE DIE SIZE 5 USE DIE SIZE
TO 4
4-1/2 TO 3-1/2
OD
OD
13-5/8 to 14-5/8 13-1/8 to 14-1/8
OD
OD
12 to 12-1/2
11-5/8 to 12-1/8
OD
OD
11-1/2 to 12-1/2
11 to 12
OD
OD
10-1/4 to 11-1/2
9-3/8 to 10
OD
OD
9-3/8 to 10-3/8
8-7/8 to 9-7/8
OD
OD
7-3/8 to 8-1/8
7-1/8 to 8
OD
OD
7-3/8 to 8-3/8
6-7/8 to 7-7/8
OD
OD
5-3/8 to 6-1/4
5 to 5-7/8
PIPE RANGE
USE DIE SIZE
3-1/2 TO 2-7/8
OD
12-1/2 to 13-1/8
OD
11 to 11-1/2
OD
10-3/8 to 11
OD
8-7/8 to 9-1/2
OD
8-1/4 to 8-7/8
OD
6-1/2 to 7-3/8
OD
6-1/4 to 6-7/8
OD
5-3/8 to 4-5/8
EACH PIPE SIZE REQUIRES A RING AND 5 PLATES FOR THE TONG AND 4
PLATES FOR THE BACKUP, EXCEPT FOR THE 13-5/8 AND ABOVE, WHICH
USES THE MASTER RING IN THE TONG AND BACKUP WITH APPLICABLE DIES
7.16
Section Contents
Technical Manual
BEST BY FARR
TM
14 1/2" Closed Mouth Trailer-Mounted Bucking Unit
BEST BY FARR
TM
14 1/2" Closed Mouth Trailer-Mounted Bucking Unit
This page intentionally
left blank
Technical Manual
Section Contents
7.17
14 1/2" Closed Mouth Trailer-Mounted Bucking Unit
Shifter Assembly
BEST BY FARR
TM
A
B
C
D
E
F
G
H
J
K
L
M
N
P
Q
R
S
T
7.18
Section Contents
Technical Manual
14 1/2" Closed Mouth Trailer-Mounted Bucking Unit
BEST BY FARR
TM
Shifter Assembly
Item
Type
Description
Qty
Part Number
Assembly
Shifter Assembly
1
AQ01-050
A
Weldment
Shifter Barrel
1
1116-71-01
B
Part
1/2" NC Nylock Nut
1
C
Part
Shifter Cylinder Piston
1
1037-103-03B
F
Part
Shifting Shaft
1
997-71-01
J
Part
Cylinder Gland
1
1037-103-04
K
Part
Shifting Collar
1
997-HT-62
N
Part
Coupling
1
1393-71R-03
Part
1/4" x 0.25" Unbrako Cone Point Set Screw (not shown)
2
P
Part
Cylinder Shaft Guide
1
1393-71R-02
Q
Part
Shifting Fork
1
997-HT-72
R
Part
5/8" Flat Washer
1
S
Part
5/8 UNF" Jam Nut
1
T
Part
Bottom Bushing
1
SEAL KIT FOR SHIFT CYLINDER (Contains the following items)
1482-71-SK
D
Seal
PSP-218 Seal (Piston)
1
E
Seal
2-112 Rubber O-Ring (Piston)
1
G
Seal
8-125 Backup Ring (Gland)
1
H
Seal
2-125 Rubber O-Ring (Gland)
1
L
Seal
12501000-250E1 Polypak (Gland)
1
M
Seal
940-9 Shaft Wiper (Gland)
1
Technical Manual
1064-B1-95
Section Contents
7.19
Tong Outer Body
K
P
L
Q
M
N
K
7.20
Section Contents
Technical Manual
BEST BY FARR
A
B
C
D
E
F
G
H
J
TM
14 1/2" Closed Mouth Trailer-Mounted Bucking Unit
14 1/2" Closed Mouth Trailer-Mounted Bucking Unit
BEST BY FARR
TM
Tong Outer Body
Item
Type
Description
Qty
A
Assembly
Motor Mount Assembly
1
Part Number
AQ15-000
B
Assembly
Motor-Side Tong Pivot Assembly
1
C
Assembly
Shifter Assembly
1
AQ01-050
D
Assembly
Pinion Idler Assembly
2
AQ01-120
E
Assembly
Rotary Idler Assembly
2
AQ01-100
F
Part
SAI GM1-200 (13 cu. in) Motor
1
87-0149
G
Assembly
Pinion Assembly
1
AQ01-150
H
Assembly
Turn Counter Assembly
1
J
Assembly
Rotary-Side Tong Pivot Assembly
1
K
Part
3/8"-NC x 2" hex bolt
68
L
Part
Top Plate
1
AQ07-102
M
Part
Body Side Panel
1
AQ07-103
N
Part
Bottom Plate
1
AQ07-101
P
Part
Clutch Access Plate
1
AQ07-107
Q
Part
3/8"-NC x 1" hex bolt
2
NOTE: Parts M and N are typically supplied from the factory as a single welded assembly
Technical Manual
Section Contents
7.21
14 1/2" Closed Mouth Trailer-Mounted Bucking Unit
C
D
E
F
P
Q
G
H
J
K
L
M
N
7.22
Section Contents
Technical Manual
BEST BY FARR
B
TM
A
Tong Outer Body Detail
14 1/2" Closed Mouth Trailer-Mounted Bucking Unit
BEST BY FARR
TM
Tong Outer Body Detail
Item
Type
Description
Qty
A
Part
Motor Gear
1
997-151-04
997-150
B
Part
Motor Mount
1
C
Part
1/2"-NC x 1-1/2" hex bolt
5
D
Part
SAI GM1-200 (13 cu. in) Motor
1
E
Part
1/2"-NC x 3-1/2" hex bolt
4
F
Part
Auxilliary Motor Mount
1
G
Part
1/2"-NC x 1-1/2" hex bolt
8 (4 on bottom)
H
Part
Bearing Cap - Pinion
2 (1 on bottom)
J
Part
3/4"-NC x 2" hex bolt
6
K
Part
Pinion Idler Pad
2
L
Part
1-1/2" Nylock Nut
2
M
Part
1-1/2" Nylock Nut
4 (2 on bottom)
N
Part
Rotary Idler Pad
4 (2 on bottom)
P
Part
3/8"-NC x 1" hex bolt
2
Q
Part
Turn Counter Cover
1
Technical Manual
Section Contents
Part Number
87-0149
997-151-01A
997-89
997-D17-109
997-D20-125
1314-03
7.23
Caliper Brake
C
D
E
F
G
J
H
K
L
M
7.24
Section Contents
Technical Manual
BEST BY FARR
TM
14 1/2" Closed Mouth Trailer-Mounted Bucking Unit
14 1/2" Closed Mouth Trailer-Mounted Bucking Unit
Caliper Brake
B
BEST BY FARR
TM
A
Item
Type
A
Assembly
B
Description
Qty
Part Number
Caliper Brake Assembly
3
AQ29-100
Part
Brake Ring
1
AQ29-001
C
Part
Brake Cup
1
AQ29-102
D
Part
Disc Spring, 2.5" OD, 1.5" ID, 1/8" T
6
E
Part
1/2"-NC x 4" hex bolt
2
F
Part
Lock Disc
1
AQ29-108
G
Part
Brake Pin
1
AQ29-106
H
Part
Piston
1
AQ29-103
J
Part
Brake Top
1
AQ29-105
K
Part
Brake Spacer
1
AQ29-104
L
Part
Brake Pads, MICO
2
20-060-037
M
Part
Caliper Spacer
1
AQ29-101
Technical Manual
Section Contents
7.25
Cageplate Assemblies
CP1 Cage Plate Assembly
for pipe sizes 12-1/2" to 14-5/8"
CP2 Cage Plate Assembly
for pipe sizes 10-3/8" to 12-1/2"
7.26
Section Contents
Technical Manual
BEST BY FARR
TM
14 1/2" Closed Mouth Trailer-Mounted Bucking Unit
14 1/2" Closed Mouth Trailer-Mounted Bucking Unit
BEST BY FARR
TM
Cageplate Assemblies
CP3 Cage Plate Assembly
for pipe sizes 8-1/4" to 10-3/8"
CP4 Cage Plate Assembly
for pipe sizes 6-1/4" to 8-3/8"
Item
Type
Description
1
Assembly
Cage Plate Assembly CP1
1
2
Assembly
Cage Plate Assembly CP2
1
3
Assembly
Cage Plate Assembly CP3
1
4
Assembly
Cage Plate Assembly CP4
1
Technical Manual
Qty
Part Number
Section Contents
7.27
Cageplate Assembly Exploded
A
J
B
K
L
C
D
M
E
N
F
G
H
L
7.28
Section Contents
Technical Manual
BEST BY FARR
TM
14 1/2" Closed Mouth Trailer-Mounted Bucking Unit
14 1/2" Closed Mouth Trailer-Mounted Bucking Unit
BEST BY FARR
TM
Cageplate Assembly Exploded
Item
Type
A
Part
B
C
D
E
Part
Part
Part
Assembly
G
H
Qty
Part Number
Die Pin CP1 (shown)
12
AQ20-001
CP2 (not shown)
10
(same)
CP3 (not shown)
8
(same)
CP4 (not shown)
7
(same)
Connector Ring CP1 (not shown)
1
AQ20-103
Connector Ring CP2 (not shown)
1
AQ20-203
Connector Ring CP3 (not shown)
1
AQ20-303
Connector Ring CP4 (not shown)
1
AQ20-403
Cage Plate Reinforcement CP1 (shown)
1
AQ20-102
Cage Plate Reinforcement CP2 (not shown)
1
AQ20-202
Cage Plate Reinforcement CP3 (not shown)
1
AQ20-302
Cage Plate Reinforcement CP4 (not shown)
1
AQ20-402
Cage Plate CP1 (shown)
1
AQ20-101
Cage Plate CP2 (not shown)
1
AQ20-201
Cage Plate CP3 (not shown)
1
AQ20-301
Cage Plate CP4 (not shown)
1
AQ20-401
CP1 Jaw Assembly
12
Part
Die Holder
Part
Die
Assembly
F
Description
CP2 Jaw Assembly
10
Assembly
CP3 Jaw Assembly
8
Assembly
CP4 Jaw Assembly
7
Cage Plate CP1 (shown)
1
AQ20-101
Cage Plate CP2 (shown)
1
AQ20-201
Cage Plate CP3 (shown)
1
AQ20-301
Cage Plate CP4 (shown)
1
AQ20-401
Linch Pin
12
CP2 (not shown)
10
CP3 (not shown)
8
CP4 (not shown)
7
Cage Plate Back Up CP1 (shown)
1
AQ20-105
Cage Plate Back Up CP2 (not shown)
1
AQ20-205
Cage Plate Back Up CP3 (not shown)
1
AQ20-305
Cage Plate Back Up CP4 (not shown)
1
AQ20-405
Part
Part
Part
cont'd next page
Technical Manual
Section Contents
7.29
Item
Type
J
Part
K
L
M
N
7.30
Description
Cageplate Assembly Exploded
Qty
Part Number
24
CP2 (not shown)
20
CP3 (not shown)
16
CP4 (not shown)
14
Brake Spacer
24
AQ20-003
CP2 (not shown)
20
(same)
CP3 (not shown)
16
(same)
CP4 (not shown)
14
(same)
3/4"-NC Nylock Nut
24
CP2 (not shown)
20
CP3 (not shown)
16
CP4 (not shown)
14
Spacer Pin
12
AQ20-002
CP2 (not shown)
10
(same)
CP3 (not shown)
8
(same)
CP4 (not shown)
7
(same)
Part
Master Ring Gear
1
AQ01-001
Part
CP2 Spacer (See Page 6.14)
1
AQ01-010
Part
CP3 Spacer (See Page 6.14)
1
AQ01-020
Part
CP4 Spacer (See Page 6.14)
1
AQ01-030
Part
Part
Part
Section Contents
Technical Manual
TM
3/8"-NC x 2" hex bolt
BEST BY FARR
14 1/2" Closed Mouth Trailer-Mounted Bucking Unit
BEST BY FARR
TM
14 1/2" Closed Mouth Trailer-Mounted Bucking Unit
This page intentionally
left blank
Technical Manual
Section Contents
7.31
14 1/2" Closed Mouth Trailer-Mounted Bucking Unit
A
B
B
C
D
E
F
F
B
G
B
F
F
H
J
K
7.32
B
L
Section Contents
B
Technical Manual
E
E
D
BEST BY FARR
TM
Backup Assembly
14 1/2" Closed Mouth Trailer-Mounted Bucking Unit
BEST BY FARR
TM
Backup Assembly
Item
Type
Description
Qty
Part Number
Assembly
Back Up
1
AQ10-000
A
Assembly
Load Cell
1
LC99-100
B
Part
Linch Pin, McMaster Carr 90170A212
6
C
Part
Back Up Lug Pin, Tall
1
AQ10-007
D
Part
Back Up Pin Spacer
2
AQ10-011
E
Part
1-1/2"-UNF Nylock Jam Nut
4
F
Part
Back Up Cylinder Washer
4
AQ10-009
G
Assembly
Hydraulic Cylinder
1
1037-103-22
H
Part
Back-up Cage Plate Peg
1
AQ10-006
J
Part
Back Up Lug Pin, Short
1
AQ10-008
K
Part
Load Cell Pin, Frame
1
AQ10-002
L
Part
Load Cell Pin, Cage Plate
1
AQ10-001
Technical Manual
Section Contents
7.33
14 1/2" Closed Mouth Trailer-Mounted Bucking Unit
A
B
J
C
D
H
F
E
F
K
G
H
L
D
M
C
7.34
B
N
A
E
Section Contents
Technical Manual
BEST BY FARR
TM
Backup Outer Body Assembly
14 1/2" Closed Mouth Trailer-Mounted Bucking Unit
BEST BY FARR
TM
Backup Outer Body Assembly
Item
Type
A
Part
Back Up Float Plate
2
AQ10-013
B
Part
Back Up Float Plate Boss
2
AQ10-012
C
Part
Back Up Support Bushing, Brass
2
AQ10-019
D
Part
Back Up Pivot Support
2
AQ10-103
E
Part
Back Up Pivot Axis
2
AQ10-105
F
Part
Back Up Rotary Plate
2
AQ10-003
G
Part
3/8"-NC x 2" hex bolt and 3/8"-NC nut
4
H
Part
Back-up Frame
2
AQ10-101
J
Part
Back Up Housing
1
AQ10-102
K
Part
Grease Fitting, 1/8" NPT
4
02-0005
L
Part
Rotary Gear
1
AQ10-004
M
Assembly
Rotary Plate Lug Assembly
1
AQ10-001
Part
Rotary Plate Lug
2
AQ10-006
Part
Spacer Tube
2
AQ10-010
Pivot Support & Rotation Locks
1
Part
Pivot Support
1
AQ10-104
Part
Lock Pin Block
2
AQ10-106
Part
Lock Pin
4
AQ10-107
N
Note:
Assembly
Description
Qty
Part Number
Parts D (x 2), E (x 2), H (x 2), J, and N are typically supplied from the factory as a single
welded assembly.
Technical Manual
Section Contents
7.35
Backup And Frame
(with Rotation Stop)
BEST BY FARR
TM
14 1/2" Closed Mouth Trailer-Mounted Bucking Unit
7.36
Section Contents
Technical Manual
14 1/2" Closed Mouth Trailer-Mounted Bucking Unit
BEST BY FARR
TM
Frames, Weldments,
and Rollers
Technical Manual
Section Contents
7.37
Tong And Frame
(with Rotation Stop)
BEST BY FARR
TM
14 1/2" Closed Mouth Trailer-Mounted Bucking Unit
7.38
Section Contents
Technical Manual
14 1/2" Closed Mouth Trailer-Mounted Bucking Unit
BEST BY FARR
TM
Hydraulic Trailer
Jack Controls
1.
Ensure hitch pins have been removed from trailer jacks before actuating control levers.
2.
Adjust trailer jacks in small increments until the assembly has been aligned to the proper
requirements.
!
ONCE THE TRAILER JACKS HAVE BEEN ADJUSTED, THE ADJUSTMENT
LEVERS MUST BE LOCKED TO PREVENT ACCIDENTAL ADJUSTMENT
OF JACKS.
Technical Manual
Section Contents
7.39
BEST BY FARR
TM
14 1/2" Closed Mouth Trailer-Mounted Bucking Unit
This page intentionally
left blank
7.40
Section Contents
Technical Manual
Hydraulic Motor Service Information
BEST BY FARR
TM
14 1/2" Closed Mouth Trailer-Mounted Bucking Unit
A. OVERHAUL SAI Motor
The instructions contained in this section cover a complete disassembly and assembly of the
piston type fluid motor.
Drain all fluid from the motor and thoroughly clean the exterior surface. Prepare a clean, lintfree surface on which to lay the internal parts of the motor.
1.
STANDARD TOOLS
1. 7/32” Allen wrench
2. Arbor Press
3. Awl
4. 1-1/2” dia. steel ball
5. Bearing puller (Owatonna Tool Co.,MD-959 or equivalent)
6. Clean lintless cloths
7. Deburring tool (an old file with the cutting teeth ground off)
8. Machinist’s hammer
9. Soft hammer
10. Loctite stud lock (red)
11. Loctite oil seal retainer (purple)
12. Medium grit carborundum stone
13. Oil and grease
14. Snap ring pliers
15. Prick punch
16. Sharp razor blade
17. Scale (1/32” or 1/64” graduations)
18. Small screwdriver
19. Torque wrench
20. Vise with 6” minimum open spread
Technical Manual
Section Contents
8.1
14 1/2" Closed Mouth Trailer-Mounted Bucking Unit
B. SPECIAL TOOLS
DIRECTION OF SHAFT ROTATION
All motors are bidirectional. The direction of shaft rotation is determined by the direction of oil flow. Standard motors
are supplied so that flow entering in port A causes the shaft to rotate clockwise (as seen from the shaft side of the
motor). Flow entering port B causes anticlockwise rotation. To invert the direction of rotation of the shaft, invert the
direction of the flow, or invert port A and port B tube connections, or invert the phase of the distributor (see motor order
codes, see the maintenance manual or contact SAI).
2. DISASSEMBLY
NOTE: On assembly at the factory one of the distributor closing bolts is lead sealed. The number on the seal is a factory reference
number and should not be removed. The guarantee, where applicable, on motors returned for repairs is only valid if this seal is intact.
A. PRELIMINARY STEPS
8.2
Drain the motor casing of oil. In order to be able to re-assemble the distributor in the same position it is
advisable to mark the alignment of the distributor ports with respect to the drain-line holes. To help with
fault diagnosis it is advisable to mark also the position of the motor cover with respect to the motor body
and, after step 3, the position of each of the cylinders with respect to the motor body.
Section Contents
Technical Manual
BEST BY FARR
TM
Hydraulic Motor Service Information
Hydraulic Motor Service Information
BEST BY FARR
TM
14 1/2" Closed Mouth Trailer-Mounted Bucking Unit
B. REMOVING THE DISTRIBUTOR
Remove the 5 closing bolts of the distributor. Lift off the distributor cover and the distributor rotary [1]. Take
out the distributor drive pin and the distributor centering bush. If the distributor is of the type with the
bronze bearing disc, remove also the two locating pins.
IMPORTANT: The working surfaces of distributor rotary, distributor
disc & motor cover must not be scratched or damaged in any way.
C. REMOVING THE MOTOR COVER
Remove motor cover closing bolts. With an appropriate jacking plate, using the distributor bolt holes and
levering on the shaft through the distributor drive pin hole, lift off the motor cover. Remove the motor cover/
body seals and locating pins.
See Section 8.1.B, Page 8.2, Special Tool #1
D. REMOVING THE REAR RETAINING RINGS
Using appropriate snap ring pliers, remove the retaining clip. Take off the spring and the retaining ring.
E. REMOVING THE CYLINDERS
Rotate the shaft so that the piston of the cylinder to be removed is fully extended. By hooking a finger
under the piston lift up the piston, tapping the cylinder trunnion with a rubber hammer to loosen the piston
from the shaft. Lift out the cylinder and piston. The piston may be extracted for inspection of seals and
working surfaces.
See Section 8.1.B, Page 8.2, Special Tool #2
F. REMOVING THE SHAFT
It is advisable to place a protective covering over the spline of the shaft (e.g., tape) before extraction to
avoid damaging the shaft seal. Motors with roller bearings: lift out the shaft. Motors with ball bearings:
remove the shaft by tapping on the end of the shaft with a rubber hammer.
G. REMOVING THE SHAFT BEARINGS
If it is necessary to replace the shaft bearings, the bearing races can be removed from the shaft or from
the motor cover or body using appropriate extractor jacks.
IMPORTANT: If the bearings do not need to be replaced it is recommended that the bearing races are not removed from the motor
cover or body.
Technical Manual
Section Contents
8.3
14 1/2" Closed Mouth Trailer-Mounted Bucking Unit
Hydraulic Motor Service Information
With GM-series motors the shaft and cylinder sub-assemblies are mounted on the motor cover and not in the
motor body as with M-series motors. Before proceeding with the reassembly of the motor:
• Ensure that the lubrication channels in the cylinder trunnion seats of both motor body and cover are clean.
• Check that the distribution plane on top of the motor cover is perfectly flat and smooth.
A. SHAFT SEAL
B. BEARING ASSEMBLY
Ensure that the shaft seal in the motor body has not been damaged. Replace if necessary.
To avoid the possibility of damage to the bearing seat in the motor cover or the motor body caused by edges on the external diameter of the bearing race the motor body or cover should be heated to a temperature of 80°C before inserting the bearing. Alternatively smooth down any edges, even slight ones and especially in the area of the corner fillets, that may have remained after the machining processes. Roller bearings: to avoid the possibility of axial shocks the outer bearing race should be placed in the motor cover or
body and the inner race should be assembled to the shaft. Ball bearings: these should be inserted in the motor body or cover (and not assembled to the shaft).
C. SHAFT ASSEMBLY
D. CYLINDER ASSEMBLY
Replace the piston retaining ring, spring and C-clip to the rear-side of the piston support ring. Dislodge the
C-clip from the front-side of the piston support ring. Insert the shaft in the bearing seat in the motor cover,
in the case of ballbearings using a rubber hammer to tap it home. (Keep shaft shoulder 0.250 away from
bearing race.)
Insert O-ring and plastic slipper seal in the cylinders. Insert O-ring, plastic ring seal, steel ring and shaped
insert into the cylinder trunnions. Insert the pistons in the cylinders. Place the longer cylinder trunnion containing the seal into the trunnion seat in the motor cover. Slide the piston out onto the piston support ring
and place the lip of the piston foot between the piston retaining ring and the piston support ring. Using an
appropriate lever ensure that the piston foot comes into full contact with the piston support ring. It may be
necessary to lift the cylinder and shaft out of their seats a little to facilitate the operation. Repeat for all five
cylinders. Position the front retaining ring and spring over the piston feet and insert C-clip. By tapping lightly with a rubber hammer on the cylinder trunnions and shaft-end ensure that cylinders and shaft are prop
erly seated.
E. MOTOR BODY AND COVER ASSEMBLY
Grease all the motor cover and body O-ring seats, position O-rings, and insert the locating pins. Position
the motor body aligning the trunnion seats with the cylinder trunnions and gently lower the motor body into
place, taking care not to damage the shaft seal. For motors with the O-rings between the cover and body,
it is advisable to insert the bolts in the cover to ensure that the O-rings are correctly positioned when closing the motor. Turn the motor over so that the shaft points downwards, insert and tighten the motor cover
closing bolts.
IMPORTANT: Do not hammer the distribution surface in the center
of the motor cover. Using an appropriate lever inserted in the
distributor drive-pin slot ensure the shaft rotates through 360°
without excessive or variable resistance.
8.4
See Section 8.1.B, Page 8.2, Special Tool #3
Section Contents
Technical Manual
BEST BY FARR
TM
3. REASSEMBLY
Hydraulic Motor Service Information
BEST BY FARR
TM
14 1/2" Closed Mouth Trailer-Mounted Bucking Unit
F. SETTING THE DIRECTION OF MOTOR SHAFT ROTATION
For the motor shaft to rotate as described in the section "Direction of Shaft Rotation" on page 4, the
motor has to be put "in phase" before the distributor is assembled.
If there are no reference marks on the shaft: Position the reference cylinder as described before. Rotate the shaft so that the distributor drive pin slot is perpendicular to the line between the center of
the motor and the reference cylinder. Closing one of the cylinder feed channels to the left of the reference cylinder, rotate the shaft a quarter turn anti-clockwise. The motor is in phase if suction of the cylinder is felt with a finger. The motor is out of phase if the cylinder compression is felt with a finger.
Return the lever to the starting position. If the motor was out of phase, rotate the shaft 180° to put it in
phase, or vice-versa.
To set the motor "in phase": Choose any one of the cylinders of the motor (termed the "reference cylinder"). Rotate the motor so that in relation to the center of the motor and the viewpoint of the operator, the reference cylinder is on the opposite side of the motor and in line with the operator. With an
appropriate lever inserted in the distributor drive pin slot in the end of the shaft, rotate the shaft until
the reference mark to one side of the slot is positioned on the same side as the reference cylinder.
Keeping note of the reference cylinder proceed with the assembly of the distributor. To set the motor
"out of phase": Position the reference cylinder as described above. Rotating the shaft so that the reference mark is on the opposite side and in line with the reference cylinder (rotated 180° from the in
phase position) the motor will be out of phase and the shaft will rotate in the opposite direction from
that indicated above.
H. DISTRIBUTOR ASSEMBLY
IMPORTANT: To avoid seriously damaging the motor, do not attempt to place a distributor cover pre-assembled with rotary
valve and disc directly onto the motor cover. The internal components of the distributor must be assembled separately from
the distributor cover.
IMPORTANT: Ensure that no objects (e.g., locating pins) fall into
cylinder feed holes in the motor cover. If this happens it will be
necessary to dismantle the motor to remove the object.
See Tool #3.
ROTARY VALVE SUB-ASSEMBLY: Insert the O-ring and plastic slipper with the concave side on the
O-ring side in the seat in the top side of the distributor rotary. The plastic seal should be assembled by first
placing the positioning lug in its seat. For versions with the steel ring; first place the O-ring, then the plastic
seal (without lug) and then the steel ring.
Technical Manual
Section Contents
8.5
Hydraulic Motor Service Information
DISTRIBUTOR COVER SUB-ASSEMBLY: Insert the distributor/motor cover O-ring in the seat in
the bottom of the distributor cover. For distributors with the bronze disc; insert the O-ring and
the plastic slipper with the chamfer on the side of the bottom of the distributor.
ROTARY GROUP ASSEMBLY: Insert distributor drive pin in shaft through the central hole in
motor cover.
NOTE: Ensure that no objects fall into cover. If this happens it
will be necessary to dismantle the motor to remove the objects.
Insert the locating pins in their holes in the motor cover.
Place the disc on cover, positioning it with the locating pins. Motors without the disc do not have
locating pins.
NOTE: Motors produced before 7/87 used .236 inch pins. Motors produced after 7/87 use .196 inch pins. A certain number of discs produced have holes for both types of pin and it is important when
placing the disc that it is positioned using the correct holes. The
disc must sit flush with the motor cover. It does not need to be
pressed on and the five oil feed holes must line up with the holes
in the motor cover. Once positioned it must not be able to rotate
or to move laterally. Insert the centering bush in the disc
Position the distributor rotary on the disc with the side containing the seals on top and with the three radial holes to the left
of the reference cylinder and the three axial holes to the right.
DISTRIBUTOR COVER ASSEMBLY: Place the distributor cover over the rotary, aligning the bolt
holes in the distributor cover and the motor cover. The distributor can be placed in any one of
the five positions. Screw in and tighten the five bolts.
8.6
Section Contents
Technical Manual
BEST BY FARR
TM
14 1/2" Closed Mouth Trailer-Mounted Bucking Unit
14 1/2" Closed Mouth Trailer-Mounted Bucking Unit
BEST BY FARR
TM
Hydraulic Motor Service Information
Technical Manual
Section Contents
8.7
Hydraulic Motor Service Information
BEST BY FARR
TM
14 1/2" Closed Mouth Trailer-Mounted Bucking Unit
8.8
Section Contents
Technical Manual
BEST BY FARR
TM
14 1/2" Closed Mouth Trailer-Mounted Bucking Unit
HYDRAULIC SECTION
Technical Manual
Section Contents
9.1
Hydraulic Circuit Schematic
BEST BY FARR
TM
14 1/2" Closed Mouth Trailer-Mounted Bucking Unit
9.2
Section Contents
Technical Manual
14 1/2" Closed Mouth Trailer-Mounted Bucking Unit
BEST BY FARR
TM
Hydraulic Circuit Schematic
Item
Description
Part Number
Page
1
Hydraulic Motor, SAI GM1-250
87-0148
3.7
2
Pressure Gauge 0 - 3000 psig
02-0245
3.8
3
Relief Valve Cartridge, DVA35-MRV-2
10-0062
3.8
4
Inlet Section, DVA35-A880
10-9016
3.8
5
Motor Valve Section, DVA35-MA8
10-9014
3.8
6
Backup Valve Section, DVA35-DA8
10-9019
3.8
7
Outlet Section, DVA35-PB09
08-1825
3.8
8
Relief Valve Cartridge, RPEC-LAN
08-0095
3.9
9
Cross Port Relief Valve Block, Sun YFI
08-1801
3.9
10
Relief Valve Cartridge, DVA20-MRV
10-0025R
3.9
11
Inlet Section, DVA20-A880
10-0025
3.9
12
Double-Action Valve Section, DVA20-DA7
10-0072
3.9
13
Outlet Section, DVA20-TR88
10-0027
3.9
14
Dump Valve, Vickers SV1-16
60-0322
15
Cross-Port Check Valve, CKEB-XCN, c/w body, Sun YEI
08-0481 / 08-1898
Technical Manual
Section Contents
9.3
Hydraulic Valve Information
DVA35-A880 Inlet Valve
DVA35-MA8 Parallel Circuit, Low-Boy Work Section
DVA35-DA8 Parallel Circuit, Low-Boy Work Section
9.4
Section Contents
Technical Manual
BEST BY FARR
TM
14 1/2" Closed Mouth Trailer-Mounted Bucking Unit
14 1/2" Closed Mouth Trailer-Mounted Bucking Unit
BEST BY FARR
TM
Hydraulic Valve Information
DVA35-PB09 Pressure
Beyond Valve
DVA20-DA7 Parallel Circuit, Low-Boy Work Section
Technical Manual
Section Contents
9.5
Hydraulic Valve Information
BEST BY FARR
TM
14 1/2" Closed Mouth Trailer-Mounted Bucking Unit
DVA20-TR88 Outlet Valve, Tank Return Type
DVA20-A880 Inlet Valve
9.6
Section Contents
Technical Manual
BEST BY FARR
TM
14 1/2" Closed Mouth Trailer-Mounted Bucking Unit
This page intentionally
left blank
Technical Manual
Section Contents
9.7
Hydraulic Valve Service Information
BEST BY FARR
TM
14 1/2" Closed Mouth Trailer-Mounted Bucking Unit
9.8
Section Contents
Technical Manual
BEST BY FARR
TM
Hydraulic Valve Service Information
14 1/2" Closed Mouth Trailer-Mounted Bucking Unit
VA20 / VA35 Valve Sections
Parallel Section Seals
Item
Type
Description
Qty
Part Number
1
Part
Square Seal For Parallel Lo-Boy Valve Section
1
02-0080
2
Part
Square Seal For Parallel Lo-Boy Valve Section
3
02-0081
PARALLEL SECTION COMPONENT PARTS - See figures 3 & 4
4
Part
Back Cap Screw
2
02-0084S
5
Part
Back Cap
1
02-0084
6
Part
Retainer Plate
3
02-0086
7
Part
Back-Up Ring
2
02-0087
8
Part
Spool Seal
2
02-0088
9
Part
Retainer Plate Screw
2
02-0086S
10
Part
Check Valve Cap
1
11
Part
Check Valve O-Ring Seal
1
12
Part
Check Spring
1
13
Part
Check Valve Poppet
1
Parts 14 through 20 no longer available individually, must be ordered as a Spring Return kit
Kit
Spring Return Kit
14
Part
Stripper Bolt
1
15
Part
Centering Spring
1
16
Part
Spring Guide
2
17
Part
Detente Sleeve
1
18
Part
Detente Ball
2
19
Part
Detente Spring
1
20
Part
Detente Poppet Retainer
1
Technical Manual
02-0090K
Section Contents
9.9
BEST BY FARR
TM
14 1/2" Closed Mouth Trailer-Mounted Bucking Unit
This page intentionally
left blank
9.10
Section Contents
Technical Manual
14 1/2" Closed Mouth Trailer-Mounted Bucking Unit
BEST BY FARR
TM
Torque Gauge Service Information
TENSION TORQUE GAUGE - LOAD CELL ASSEMBLY
39” Tourque Arm, 60000 Ft.-Lbs. Face
ITEM
1. PART N0.
QTY.
10-0008 1
DESCRIPTION
Tension Cylinder- Assembly 4.00
(Load cell Assmembly)
2. 02-0078 2
Shackle Assembly, 16 ton
3. 1
Gauge Assembly, 50,000 ft.-lbs.
4. 01-0087 1
Torque Gauge Flange
5. 02-0069 1
Hose Assembly
6. 09-0037 3
1/4” Lock Washer, Cadium Plated
7.
09-0032 3
1/4”-20 x 1/2” Lg. Hex Head Machine
Screw, Cadium Plated
Technical Manual
Section Contents
10.1
Torque Gauge Service Information
BEST BY FARR
TM
14 1/2" Closed Mouth Trailer-Mounted Bucking Unit
10.2
Section Contents
Technical Manual
BEST BY FARR
TM
Torque Gauge Service Information
14 1/2" Closed Mouth Trailer-Mounted Bucking Unit
Item
Type
Description
Qty
Part Number
1
Part
6" Gauge Case
1
02-0053
2
Part
Case Ring
1
02-0054
3
Part
Flex Cover wtih Red Pointer
1
02-0055
4
Part
Movement
1
02-0056
5
Part
Linkage
1
02-0057
6
Part
Damper Assembly
1
02-0058
7
Part
Pointer, 6" Black
1
02-0059
8
Part
Bourdon Tube
1
02-0060
9
Part
Dial Face, 12,000
1
10-0042
9a
Part
Dial Face, 20,000
1
10-0044
10
Part
Gasket
1
02-0062
13
Part
Case O-Ring
1
02-0063
14
Part
1/4-20 x 1-1/4" Screw
2
09-0036
15
Part
1/4" Nom. Lock Washer
2
09-0037
16
Part
Tube Mount Screws
3
09-0038
17
Part
O-Ring
3
02-0064
18
Part
Movemount Mount Screws
2
09-0039
19
Part
Dial Screws
5
09-0040A
20
Part
3/4" Lockwashers
5
09-0041
21
Part
Case Ring Pins
4
09-0042
22
Part
3/4" NC x 7-1/2" Hex Cap Screws
1
09-0043
23
Part
3/16" Tubing Kit
1
02-0066
24
Part
Tee
1
08-0022
25
Part
1/4 - 18 NPT Elbow
1
08-0023
26
Part
Nipple
2
08-0027
27
Part
3/8" Female Coupling
1
08-0025
28
Part
Gauge Face Oil
1 Qt
02-0067
29
Part
Plug
1
08-0021
30
Part
O-Ring
1
02-0068
Technical Manual
Section Contents
10.3
14 1/2" Closed Mouth Trailer-Mounted Bucking Unit
Load Cell
assembled
A
B
C
F
D
G
H
E
J
K
M
L
Load Cell
exploded
10.4
Section Contents
Technical Manual
BEST BY FARR
TM
Torque Gauge Service Information
14 1/2" Closed Mouth Trailer-Mounted Bucking Unit
BEST BY FARR
TM
Torque Gauge Service Information
Item
Type
Description
Qty
Part Number
Assembly
Tension Load Cell
1
TC107
A
Part
Cylinder Head
1
02-0070
B
Part
Flange Gasket
1
02-0073
C
Part
Piston
1
02-0072P
D
Part
O-Ring
1
02-0076
E
Part
O-Ring
1
02-0075
F
Part
1/4” - 18 NPT Elbow
1
08-0023
G
Part
Cylinder Body
1
02-0070
H
Part
O-Ring
1
02-0077
J
Part
Dust Seal
1
02-0074
K
Part
Cylinder Rod
1
02-0072R
L
Part
Screw
1
09-0045
M
Part
Set Screw
2
09-0046
Technical Manual
Section Contents
10.5
Torque Gauge Service Information
*
IF TROUBLESHOOTING REVEALS THAT THERE IS INSUFFICIENT
FLUID IN THE SYSTEM, BEFORE RECHARGING, CHECK THAT
ALL SYSTEM COMPONENTS ARE FREE FROM DAMAGE. THIS
WILL ENSURE THAT FLUID LOSS WILL NOT
CONTINUE AFTER RELOADING.
1. PROBLEM: POSSIBLE SOLUTIONS:
No indication on gauge.
Obstruction in hose.
Loss of hydraulic fluid.
Gauge internal mechanism damaged.
2. PROBLEM: Gauge indication too high.
POSSIBLE SOLUTIONS: Excessive hydraulic fluid.
Internal mechanism of gauge is damaged.
3. PROBLEM:
POSSIBLE SOLUTIONS:
Gauge indication too low.
Insufficient hydraulic fluid.
Snub line not at right-angle to tong handle.
Gauge internal mechanism damaged.
4. PROBLEM:
POSSIBLE SOLUTIONS:
Erratic or sluggish gauge indication.
Pointer rubbing glass or dial.
Insufficient hydraulic fluid.
Dirty gauge movement.
Improper pointer damper adjustment.
Gauge internal mechanism damaged.
10.6
Section Contents
Technical Manual
BEST BY FARR
TROUBLESHOOTING
Under normal operating conditions, and with proper maintenance, the torque gauge and load cell system are
designed to give lasting trouble-free performance. Faulty indication on the gauge will very often define a fault
within the gauge.
TM
14 1/2" Closed Mouth Trailer-Mounted Bucking Unit
14 1/2" Closed Mouth Trailer-Mounted Bucking Unit
BEST BY FARR
TM
Torque Gauge Service Information
PERIODIC INSPECTION AND MAINTENANCE
1. MAINTENANCE
A. Tong Torque Systems are built to give years of trouble-free service with minimum
maintenance. Periodic inspections of the load cell, and hydraulic lines and fittings, are
recommended in order to keep the system in top operating condition. A thorough inspec
tion should be made at each rig-up.
B. Recharge hydraulic system with W15/16 fluid via the filling connection at the top of the
indicating gauge. Recharging must only be performed when there is no load on the load
cell.
Procedure:
1. Connect hand pump to filling connection on gauge.
2. Fill hand pump bowl with W15/16 hydraulic fluid and pump fluid into the system until
the piston rod on the load cell extends no more than 1/2” from the body.
*
3. Loosen vent screw on load cell body to permit trapped air to escape during loading.
MAINTAIN GREATER-THAN HALF FULL FLUID LEVEL IN THE
HAND PUMP BOWL TO AVOID PUMPING AIR INTO THE SYSTEM.
DO NOT ALLOW THE LEVEL TO FALL BELOW ONE-HALF FULL
4. Retighten load cell vent screw when the system has been adequately recharged
C. Load cell and indicator gauge should be returned to authorized repair facility for any
repairs or calibration required.
Technical Manual
Section Contents
10.7