1
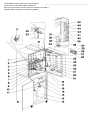
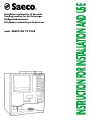
mod. SAECO DA 7P PLUS
INSTRUCTION FOR INSTALLATION AND USE
Distributore automatico di bevande
Vending machine for hot beverages
Heißgetränkeautomat
Distributeur automatique de boissons
Italiano pag. 5 ÷ 18
Indice
1 - Informazioni generali .................................................
2 - Avvertenze di sicurezza ..............................................
3 - Avvertenze per facilitare la lettura ...............................
4 - Caratteristiche tecniche ...............................................
5 - Marcatura ed identificazione ......................................
6 - Immagazzinamento e disimballo .................................
5
5
5
6
6
7
Index
1 - General information ................................................. 19
2 - Safety warnings ....................................................... 19
3 - Symbols special attention .......................................... 19
4 - Technical specifications ............................................. 20
5 - Label and identification............................................. 20
6 - Storage and unpacking ............................................ 21
Inhaltsverzeichnis
1 - Allgemeine Informationen ......................................... 32
2 - Sicherheitshinweise................................................... 32
3 - Hinweise zur Handhabung der Bedienungsanleitung .. 32
4 - Eigenschaften, technische Daten ................................ 33
5 - Kennzeichnung und Identifikation .............................. 33
6 - Aufbewahrung und Auspacken ................................. 34
Sommaire
1 - Données générales ................................................... 46
2 - Normes de sécurité ................................................... 46
3 - Pour faciliter la lecture du présent manuel .................. 46
4 - Caractéristiques techniques ....................................... 47
5 - Marquage et identification ........................................ 47
6 - Stockage et déballage .............................................. 48
7 - Comandi ed informazioni ......................................... 7
8 - Installazione ............................................................. 8
9 - Impiego e caricamento ........................................... 14
10 - Pulizia e manutenzione ........................................... 14
11 - Demolizione della macchina ................................... 18
English page 19 ÷ 31
7 - Controls ................................................................. 21
8 - Installation ............................................................. 22
9 - Operation and re-filling products ............................ 28
10 - Cleaning and maintenance ..................................... 29
11 - Proper disposal of machine ..................................... 31
Deutsch Seite 32 ÷ 45
7 - Bedienungselemente und Informationen ................... 34
8 - Aufstellung ............................................................. 35
9 - Bedienung und Befüllung ........................................ 41
10 - Reinigung und Wartung ......................................... 42
11 - Entsorgungshinweise .............................................. 45
Français page 46 ÷ 59
7 - Commandes et instructions ...................................... 48
8 - Installation ............................................................. 49
9 - Emploi et remplissage ............................................. 55
10 - Nettoyage et entretien ............................................ 56
11 - Destruction de la machine ....................................... 59
Comandi distributore automatico predisposto per monetiera tipo NRI G 13
Controls relevant to a vending machine suitable to a NRI G13 coiner
Bedienungselemente des Automaten, vorbereitet für den Einsatz eines Münzprüfers des Typs NRI G 13
Commandes distributeur automatique pour monnayeur de type NRI G 13
Comandi distributore automatico predisposto per monetiera tipo NRI G 26
Controls relevant to a vending machine suitable to a NRI G26 coiner
Bedienungselemente des Automaten, vorbereitet für den Einsatz eines Münzprüfers des Typs NRI G 26
Commandes distributeur automatique pour monnayeur de type NRI G 26
Legenda
1.
2.
3.
4.
5.
6.
7.
8.
9.
10.
11.
12.
Contenitore caffè in grani
Contenitori polveri
Coperchi contenitori polveri
Coperchio per imbuto
Imbuto per polveri
Contenitore di miscelazione
Tubi di erogazione
Tramoggia di scarico fondi
Imbuto raccogligocce
Vasca raccogligocce
Tubo di scarico
Tanica di scarico
Legend
1.
2.
3.
4.
5.
6.
7.
8.
9.
10.
11.
12.
1.
2.
3.
4.
5.
6.
7.
8.
9.
10.
11.
12.
13.
1.
2.
3.
4.
5.
6.
7.
8.
9.
10.
11.
12.
Tanica acqua potabile
Tubo di scarico
Cassetto fondi
Cassetto moneta
Ponticello per lavaggio miscelatori
Convogliatore per monete
Monetiera tipo G 26
Tubi per bicchieri
Protezione per cucchiaini
Contenitore per bustine di zucchero
Manopola di regolazione macinatura
Paratia mobile
25.
26.
27.
28.
29.
30.
31.
32.
33.
34.
35.
36.
Chiave nazione
Pulsante programmazione
Pulsante
Pulsante per il "RESET"
Connettore per programmatore
Porta seriale
Coperchio contenitore caffè in grani
Apertura azionamento micro
Chiave per l'azionamento del micro
Vano di erogazione
Apertura distribuzione cucchiaini
Pulsante distributore cucchiaini
37.
38.
39.
40.
41.
42.
43.
44.
45.
46.
13.
14.
15.
16.
17.
18.
19.
20.
21.
22.
23.
24.
Fresh water tank
Filling tube
Dump box
Coin box
Automatic rinsing jumper
Coin conveyor
G 26 type coiner
Cup tubes
Stirrer container cover
Sugar packet dispenser
Grinder adjusting ring
Closure slide
25.
26.
27.
28.
29.
30.
31.
32.
33.
34.
35.
36.
14.
15.
16.
17.
18.
19.
20.
21.
22.
23.
24.
25.
Frischwasserschlauch
Satzschublade
Kasse
Schaltbrücke für die automatische
Spülung
Münzschacht
Münzwechsler G 26
Becherspender
Abdeckung des Rührstäbchenspenders
Zuckerbeutelbehälter
Drehring für die Mahlgradeinstellung
Verschlußschieber
Nationenschlüssel
26.
27.
28.
29.
30.
31.
32.
33.
34.
35.
Nation key
Programming button
Button
"RESET" button
Connector for programmer
Serial port
Coffee hopper cover
Sensor switch
Sensor operation key
Dispensing point
Stirrer dispenser slot
Stirrer dispenser button
37.
38.
39.
40.
41.
42.
43.
44.
45.
46.
Programmiertaste
Spül-Taste
RESET-Taste
Anschlußbuchse für die
Programmiereinheit
Serieller Anschluß
Deckel des Kaffeebohnenbehälters
Öffnung für die Betätigung des
Mikroschalters
Schlüssel für die Betätigung des
Mikroschalters
Getränkeausgaberaum
Öffnung für Rührstäbchen
13.
14.
15.
16.
17.
18.
19.
20.
21.
22.
23.
24.
Bidon eau potable
Tuyau de remplissage
Tiroir à marc
Tiroir à pièces
Pont pour lavage mélangeurs
Convoyeur pour pièces
Monnayeur type G 26
Tubes porte-gobelets
Carter pour cuillères
Récipient pour sachets de sucre
Bouton de réglage mouture
Cloison mobile
25.
26.
27.
28.
29.
30.
31.
32.
33.
34.
35.
36.
Clef nation
Bouton programmation
Bouton
Bouton de “REMISE A ZERO”
Connecteur pour programmateur
Prise port série RS 232
Couvercle réservoir café en grains
Fente d’actionnement du micro
Clef technicien
Plat de distribution
Fente de distribution cuillères
Bouton distributeur de cuillères
Sugar dispensing slot
Coin return button
Coin slot
Display
Red led "WATER EMPTY"
Green led "READY FOR USE"
Red leds
Green leds
Beverage selection button
Coin return slot
Deutsch
36.
37.
38.
39.
40.
41.
42.
43.
44.
45.
46.
Knopf des Rührstäbchenspenders
Zuckerentnahmefach
Münzrückgabetaste
Münzeinwurfschlitz
Display
Rote Kontrollampe “WASSER LEER”
Grüne Kontrollampe “BETRIEBSBEREIT”
Rote Kontrollampen
Grüne Kontrollampen
Getränkewahltaste
Münzrückgabefach
Français
Commandes distributeur automatique pour monnayeur de type NRI G 26
Réservoir café en grains
Bacs produits
Couvercles bacs produits
Couvercle d’entonnoir
Entonnoir à produits
Récipient de mélange
Tuyaux de distribution
Bac d’égouttement
Entonnoir d’égouttement
Plat d’égouttement
Tuyau de vidange
Bidon de vidange
Sportello prelievo zucchero
Pulsante recupero monete
Apertura inserimento monete
Display
Spia rossa "MANCA ACQUA"
Spia verde "PRONTO PER L'USO"
Spie rosse
Spie verdi
Pulsante di selezione della bevanda
Vano recupero monete
English
Bedienungselemente des Automaten, vorbereitet für den Einsatz eines Münzprüfers des Typs NRI G 26
Kaffeebohnenbehälter
Behälter für Instantgetränkepulver
Verschlußklappe Instantbehälter
Trichterdeckel
Pulvertrichter
Mischbehälter
Getränkeauslaufrohre
Kaffeesatzbehälter
Trichter für Tropfwasser
Abtropfschale
Abflußschlauch
Kanister für Tropfwasser
Trinkwasserkanister
Légende
13.
14.
15.
16.
17.
18.
19.
20.
21.
22.
23.
24.
Controls relevant to a vending machine suitable to a NRI G26 coiner
Coffee bean hopper
Instant product bins
Instant product bin covers
Whipper cap
Instant product whipper
Mixing chamber
Dispensing tubes
Drip tank
Drip funnel
Drip tray
Drain tube
Drain tank
Legende
Italiano
Comandi distributore automatico predisposto per monetiera tipo NRI G 26
37.
38.
39.
40.
41.
42.
43.
44.
45.
46.
Compartiment sucre
Bouton de retour pièces
Fente d’introduction de pièces
Ecran
Voyant rouge “MANQUE D’EAU”
Voyant vert “PRET POUR L’EMPLOI”
Voyants rouges
Voyants verts
Bouton de sélection boisson
Retour pièces
Legenda
1.
2.
3.
4.
5.
6.
7.
8.
9.
10.
11.
12.
Contenitore caffè in grani
Contenitori polveri
Coperchi contenitori polveri
Coperchio per imbuto
Imbuto per polveri
Contenitore di miscelazione
Tubi di erogazione
Tramoggia di scarico fondi
Imbuto raccogligocce
Vasca raccogligocce
Tubo di scarico
Tanica di scarico
Legend
1.
2.
3.
4.
5.
6.
7.
8.
9.
10.
11.
12.
1.
2.
3.
4.
5.
6.
7.
8.
9.
10.
11.
12.
13.
1.
2.
3.
4.
5.
6.
7.
8.
9.
10.
11.
12.
Tanica acqua potabile
Tubo di carico
Cassetto fondi
Cassetto moneta
Ponticello per lavaggio miscelatori
Convogliatore per monete
Monetiera tipo G 13
Tubi per bicchieri
Protezione per cucchiaini
Contenitore per bustine di zucchero
Manopola di regolazione macinatura
Paratia mobile
25.
26.
27.
28.
29.
30.
31.
32.
33.
34.
35.
36.
Chiave nazione
Pulsante programmazione
Pulsante
Pulsante per il "RESET"
Connettore per programmatore
Porta seriale
Coperchio contenitore caffè in grani
Apertura azionamento micro
Chiave per l'azionamento del micro
Vano di erogazione
Apertura distribuzione cucchiaini
Pulsante distributore cucchiaini
37.
38.
39.
40.
41.
42.
43.
44.
45.
13.
14.
15.
16.
17.
18.
19.
20.
21.
22.
23.
24.
Fresh water tank
Pump suction tube
Dump box
Coin box
Automatic rinsing jumper
Coin conveyor
G 13 type coiner
Cup dispensing tubes
Stirrer container cover
Sugar packet dispenser
Grinder adjusting ring
Closure slide
25.
26.
27.
28.
29.
30.
31.
32.
33.
34.
35.
36.
14.
15.
16.
17.
18.
19.
20.
21.
22.
23.
24.
25.
Frischwasserschlauch
Satzschublade
Kasse
Schaltbrücke für die automatische
Spülung
Münzschacht
Münzprüfer G 13
Becherspender
Abdeckung des Rührstäbchenspenders
Zuckerbeutelbehälter
Drehring für die Mahlgradeinstellung
Verschlußschieber
Nationenschlüssel
26.
27.
28.
29.
30.
31.
32.
33.
34.
Nation key
Programming button
Button
"RESET" button
Connector for programmer
Serial port
Coffee bean hopper cover
Sensor switch
Sensor operation key
Dispensing point
Stirrer dispenser slot
Stirrer dispenser button
37.
38.
39.
40.
41.
42.
43.
44.
45.
Programmiertaste
Spül-Taste
RESET-Taste
Anschlußbuchse für die
Programmiereinheit
Serieller Anschluß
Deckel des Kaffeebohnenbehälters
Öffnung für die Betätigung des
Mikroschalters
Schlüssel für die Betätigung des
Mikroschalters
Getränkeausgaberaum
13.
14.
15.
16.
17.
18.
19.
20.
21.
22.
23.
24.
Bidon eau potable
Tuyau de remplissage
Tiroir à marc
Tiroir à pièces
Etrier pour lavage mixeurs
Goulotte-pièces
Monnayeur type G 13
Tubes porte-gobelets
Carter pour cuillères
Récipient pour sachets de sucre
Bouton de réglage mouture
Cloison mobile
25.
26.
27.
28.
29.
30.
31.
32.
33.
34.
35.
36.
Clef nation
Bouton programmation
Bouton
Bouton de “REMISE A ZERO”
Connecteur pour programmateur
Prise port série RS 232
Couvercle réservoir café en grains
Fente d’actionnement du micro
Clef de technicien
Grille pour gobelets
Fente de distribution cuillères
Bouton distributeur de cuillères
Sugar dispensing slot
Coin return button
Coin slot
Display
Red led "WATER EMPTY"
Green led "READY FOR USE"
Red leds
Green leds
Beverage selection button
Deutsch
35.
36.
37.
38.
39.
40.
41.
42.
43.
44.
45.
Öffnung für Rührstäbchen
Knopf des Rührstäbchenspenders
Zuckerentnahmefach
Münzrückgabetaste
Münzeinwurfschlitz
Display
Rote Kontrollampe “WASSER LEER”
Grüne Kontrollampe “BETRIEBSBEREIT”
Rote Kontrollampen
Grüne Kontrollampen
Getränkewahltaste
Français
Commandes distributeur automatique pour monnayeur de type NRI G 13
Réservoir café en grains
Bacs produits
Couvercles bacs produits
Couvercle d’entonnoir
Entonnoir à produits
Récipient de mélange
Tuyaux de distribution
Bac marc
Entonnoir à égouttures
Bac égouttures
Tuyau de vidange
Bidon eaux usées
Sportello prelievo zucchero
Pulsante recupero monete
Apertura inserimento monete
Display
Spia rossa "MANCA ACQUA"
Spia verde "PRONTO PER L'USO"
Spie rosse
Spie verdi
Pulsante di selezione della bevanda
English
Bedienungselemente des Automaten, vorbereitet für den Einsatz eines Münzprüfers des Typs NRI G 13
Kaffeebohnenbehälter
Behälter für Instantgetränkepulver
Verschlußklappe Instantbehälter
Trichterdeckel
Pulvertrichter
Mischbehälter
Getränkeauslaufrohre
Kaffeesatzbehälter
Trichter für Tropfwasser
Abtropfschale
Abflußschlauch
Kanister für Tropfwasser
Trinkwasserkanister
Légende
13.
14.
15.
16.
17.
18.
19.
20.
21.
22.
23.
24.
Controls relevant to a vending machine suitable to a NRI G13 coiner
Coffee bean hopper
Instant product bins
Instant product bin covers
Whipper cap
Instant product whipper
Mixing chamber
Dispensing tubes
Drip tank
Drip funnel
Drip tray
Drain tube
Drain tank
Legende
Italiano
Comandi distributore automatico predisposto per monetiera tipo NRI G 13
37.
38.
39.
40.
41.
42.
43.
44.
45.
Compartiment sucre
Bouton de retour pièces
Fente d’introduction de pièces
Ecran digital
Voyant rouge “MANQUE D’EAU”
Voyant vert “PRET POUR L’EMPLOI”
Voyants rouges
Voyants verts
Bouton de sélection boisson
English
"DA 7P PLUS" HOT BEVERAGE VENDING MACHINE
1 - GENERAL INFORMATION
• This manual provides all technical information necessary for the correct installation, maintenance and operation of the machine.
• Always consult this manual before carrying out any operation or procedure.
• Do not discard this manual. Keep it for future reference.
• This manual is of the utmost importance to operators, therefore it should always be kept with the equipment.
☞
ATTENTION
To allow a better understanding of the technical information, the machine has been described and shown
with its own floor cabinet.
Customers are reminded that the floor cabinet is an optional accessory supplied upon request.
2 - SAFETY WARNINGS
Always turn off the machine before carrying out any procedure inside the machine.
• Do not unscrew the back cover of the machine. Components inside the back cover of the machine should not be tampered with
by the user.
Should it be necessary, call your distributor (see the last page of the manual for contact information).
• Routine operations and cleaning can be performed by trained personnel, according to the regulations in force.
• The coin acceptor is not incorporated into the manufacturing process of the machine at the factory. The coin acceptor is assembled
onto the machine by the import distributor or the local distributor upon special request.
The manufacturer declines any liability for damages to the equipment or to people resulting from a faulty
installation of the payment system. The installer shall be directly liable.
• The machine must be installed in a closed, dry, dust-free location, with a temperature ranging between 10 and 40° C.
• A general maintenance check should be carried out once a year by skilled personnel who should test the equipment and its
compliance with the current local codes.
Handling
• During handling and transportation, the machine must be kept in an upright position, according to the instructions printed on
the box.
• Handle the machine carefully during loading and unloading operations.
• Lift the machine by the handles fitted on the side of the box.
• Do not lift the machine with forklift clamps.
• Do not shake the equipment.
Do not pour water or other fluids over the machine, and do not immerse the machine in water.
3 - SPECIAL ATTENTION SYMBOLS
The warning triangle highlights safety instructions.
Pay particular attention to the instructions following a warning triangle.
The first page shows figures relevant to the text. Always keep it open for reference while reading
the operating instructions.
Numbers or letters indicate corresponding figures, controls and machine components.
☞
This symbol shows messages requiring particular attention.
19
English
4 - TECHNICAL SPECIFICATIONS
• The DA 7 PLUS vending machine is designed to automatically dispense coffee and hot beverages.
It offers the selection of 7 different beverages, obtained either through the brewing of freshly ground coffee beans or soluble products.
☞
Beverages should be consumed shortly after dispensing; they should not be preserved and/or packed.
This machine should be supplied exclusively with products suitable for vending machines.
Beverages should be dispensed in open containers (cups).
Dimensions ....................................................... See Figure 1
....................................................................... See Figure 2
Equipment weight ....................................................... 42 kg
Cabinet weight ........................................................... 22 kg
Nominal power ....... see rating plate on the back of the machine
Nominal current ...... see rating plate on the back of the machine
Cable length ............................................................ 150 cm
Water supply ............ Internal water tank with a capacity of 20l,
or cold-water line connection, with a water
pressure ranging between 1 and 8 bar
Capacities
Coffee beans ............................................................. 1,6 kg
Soluble products ..................................................... 0,8-2 kg
Stirrers ..................................................................... N° 220
Cups ........................................................................ N° 240
Sugar packets ........................................................... N° 250
G 13 Model
Fig. 1
G 26 Model
Fig. 2
4.1 Payment system
• DA 7P PLUS vending machine has been manufactured to accept the assembly of either the PARALLEL TYPE NRI G 13 coiner, G26
EXECUTIVE coiner, or other payment systems, such as SAECO CARD and banknote readers.
Saeco Card will be supplied with a kit and assembly instructions.
5 - LABEL AND IDENTIFICATION
• The serial number of the equipment is found inside the machine on the top right
side; the same number can also be found on the rating plate. The rating plate (see
figure) must not be removed or damaged, since all information relevant to the machine is printed on it, thus allowing the manufacturer to obtain certain information.
The voltage and power requirement for the machine can also be found on the rating plate.
Voltage rating and nominal
power for the proper functioning
of the machine
20
Fig. 3
English
6 - STORAGE AND UNPACKING
Storage
• The machine is packed into a sturdy cardboard box with a reinforced platform, as shown in figure 4. The boxed machine can
be stored in cool, dry, dust-free locations.
Warning : Do not stack more than one box on top of another.
Unpacking
• Place the boxed machine on the installation site, cut the straps
andremove the box.If the machine was delivered with its optional
matching cabinet, unpack and assemble the cabinet. Make sure
MACHINE
CABINET
that the floor is flat, dry, and able to withstand the weights ot the
Fig. 4
machine and cabinet. Check the contents of the accessories bag,
usually found in the dump box of the machine. Remove the bag.
List of accessories supplied :
• Cup reduction ring Ø 58 mm (Paragraph 9.2)
• Safety sensor key (Paragraph 10)
• G 13 coin conveyor supplied with coin channel, fastening screws and nuts (Paragraph 8.2)
• G 26 coin conveyor supplied with coin channel, fastening screws and nuts (Paragraph 8.2)
• No. 4 fastening screws and nuts for the coiner (Paragraph 8.6)
• No. 1 metal adhesive cable stopper for the G 26 coiner cables (paragraph 8.7)
• Product labels, adhesive price labels and operating instruction label (Paragraph 8.9)
• No. 1 brew group key (Paragraph 10)
• No. 1 whipper fan key (Paragraph 10.2)
• No. 1 nation key (paragraph 8.4)
• No. 1 operating and maintenance manual
• No. 1 graphic image (Paragraph 8.9)
7 - CONTROLS
• Controls
COINS ACCEPTED
• Main switch: on the backside of the machine, bottom right (Fig. 3-7).
• Selection panel: consists of 7 buttons (45) corresponding to the number of
beverages, identified respectively as A - B - C - D - E - F - G (fig. 5).
• Display (40): shows the sum of the coins inserted.
• Green LEDs (44) beside the beverage selection buttons : they turn on when
the corresponding selected beverage can be dispensed (i.e. when coins
inserted reach or exceed the price shown).
N.B. Should the machine be programmed to dispense beverages free of
charge, the green LEDs will always be on.
• Red LEDs (43) beside the beverage selection buttons : they turn on when
the corresponding beverage is empty.
• Green LED (42) "READY FOR USE": Shows the machine is ready to operate.
The green leds light up intermittently.
• Red LED (41) "WATER EMPTY":
Shows the machine cannot operate because the water tank is empty.
• Coin return button (38): Press the button for coin return, or if applicable,
for change.
• Stirrer dispenser button (36): Press the button to dispense a stirrer (35).
COINS ACCEPTED
ESPRESSO
❋
ESPRESSO
❋
LONG
ESPRESSO
❋
LONG
ESPRESSO
❋
ESPRESSO WITH
A DASH OF MILK
❋
ESPRESSO WITH
A DASH OF MILK
❋
CAPPUCCINO
❋
CAPPUCCINO
❋
CHOCOLATE
CHOCOLATE
LEMON TEA
LEMON TEA
MILK
MILK
machine can be programmed to set both the coin value and the
☞ The
price.
The first 4 buttons (highlighted by the ❋ symbol) are used for
programming operations; entered data are shown on the display
40.
For additional instructions, see paragraph 8.6.
G 13 Model
Fig. 5
G 26 Model
Fig. 5
21
English
8 - INSTALLATION
• Remove the cabinet from the box, taking out all parts packed inside it.
• Insert the drip funnel (40) into the surface of the cabinet and connect it to the drain tube
(41) (Fig. 6).
• Insert the end of the drain tube into the drain tank.
40
41
WARNING: Strong magnetic fields as well as electrical equipment generating strong noises and located nearby the machine might cause trouble to
the electronic control.
Fig. 6
8.1 Preliminary operations
Fig. 7
• Make sure the machine is delivered in its original box, closed by straps to avoid
tampering during transport.
Remove the machine from its original box ; keep the box for future use. Comply with
current local environmental codes if the box is discarded. Place the machine on top of
the cabinet. To meet ventilation requirements, it is advisable to position the equipment
so that there is a minimum distance of 8 cm between the back of the machine and the
wall.
• Insert the suction tube contained in the cabinet into the connection fitted under the
equipment (Fig. 7).
• Fill the 20 l tank with fresh, cold water, then insert the tube into the tank plug.
• Remove the plug in the drip tray by carefully punching the plug out (Fig. 8) ; make sure
the hole is aligned with the drip funnel.
Fig. 8
8.2 Water connection (for machine directly connected to cold water line only)
Connect the machine to a water main, whose pressure is between 1.5 and 8 bar. Use a
suitable filling tube and connect it to the G 3/4" coupling fitted on the rear panel of the
machine (Fig. 9).
0
• Place dump box extension (8) over hole cutout on the bottom of the equipment. Angular
side should face brew group (Fig. 10).
• Fit the coin conveyor (18) into the recess and fasten it with supplied screws, washers
and nuts (Fig. 10).
1
Fig. 9
G 26 Model
22
Fig. 10
☞
G 13 Model
Fig. 10
The equipment is supplied with
the specific conveyor suitable to
the coiner.
English
8.3 Electrical connection
The equipment has been manufactured for a single-phase voltage, as shown on the rating plate (Fig. 3).
Before plugging in the machine, make sure that :
1. The rating plate specifications correspond to the electrical supply voltage (within a tolerance of approx.10% from
the rated value).
2. The machine has a dedicated circuit that meets all the requirements necessary to support the maximum load.
Make sure the machine is correctly grounded.
The electric system must comply with the current safety regulations and electrical codes. Refer to an electrician if there is any doubt
about the eletrical system
Never use extension cords or adapters.
8.4 Inserting the nation key
When inserting this key, make sure the machine is turned off (position "0") and the power cord is unplugged.
• When inserted, the NATION KEY allows the programming of the following data:
1) Min. and max. coin values
2) Min. and max. prices
3) Fifth display digit (ITALIA equipment only).
The above mentioned specifications can also be found on the label of the accessories
case.
Fig. 11
machine will not operate unless the NATION KEY has been previously
☞ The
inserted.
• To insert key, remove the three screws fastening the coiner plate and turn the latter (Fig.
11) in order to gain access to the connector fitted on the selection panel board. The key
must be inserted into this connector fitted on the selection panel board (Fig.12).
Fig. 12
8.5 Initial operating procedure
1
2
Filling watertank :
• Fill the cabinet water tank (except for models supplied with direct water line connection),
the bean hopper (1) and instant product bins (2), making sure the latter do not exceed
the 2/3 of their max. capacity; replace them properly (Pos. 1 tea or other instant
products, Pos. 2 chocolate or other instant products, Pos. 3 milk) (Fig. 13).
3
Fig. 13
23
English
• Turn the machine on (main switch on back of the machine to position "1"), then run a
rinse cycle through the water system, following the procedure below :
• Open the door and insert key (33) into slot (32) enabling safety sensors (Fig. 14).
WARNING: Altough the front door of the machine is open, the key (33)
enables the machine to remain in operating mode. Refer to authorized service
personnel or use extreme caution when carrying out all procedures with the opened door.
Fig. 14
10
8
Priming :
• Keep button (27) pressed until a regular jet of water streams out of one of the dispensing
tubes (7).
Grinder adjustment :
• The grinder can be adjusted to one of the following suggested values by turning the
grinder adjusting ring (23) (Fig. 15):
Italy: 4-7 Spain: 5-8 France - Switzerland: 5-8
Germany - Austria: 6-9 USA - Canada: 6-14
6
Fig. 15
• To check beverage dispensing quality insert coins, press the button corresponding to the desired beverage, and wait until beverage
has been dispensed. Should coffee be dispensed too slowly, adjust the grinder to a coarser setting ; should coffee be dispensed too
quickly, adjust the grinder to a finer setting (lower numbers=finer grind / higher numbers = coarser grind).
Attention : following the grinder adjustment, brew at least two coffees to evaluate the change.
• Make sure the instant product bin latches are open, remove the safety key (33) and close the door.
• Wait until the green LED "Ready for use" comes on.
☞
All machine data, including beverage counts, system data, etc. can be obtained with use of the handheld 7P Programmer.
The 7P Programmer is an accessory and must be purchased separately.
8.6 Assembly of the PARALLEL NRI G 13 coiner
☞
Only a parallel type coiner can be used with this equipment.
- Remove the front adhesive panel on the door covering the coiner recess.
- Fasten the coiner to the door with the 4 screws and nuts supplied (Fig. 16).
- Connect the flat cable to the coiner (Fig. 17).
• To prevent the coiner from accepting a type of programmed coin, push up the corresponding dip-switch (46) (Fig. 17).
Fig. 16
Once the coiner has been assembled, program the channel coin values and prices
according to the following instructions :
• Press button (26), which activates the programming mode. The machine will not
dispense beverages. To perform programming operations, use the first four buttons on
the front panel. Data menu changes can be read from the display. Symbols showing
the button functions have been placed beside the corresponding button.
Fig. 17
24
English
COINS ACCEPTED
ESPRESSO
UP button
LONG
ESPRESSO
DOWN button
ESPRESSO WITH
A DASH OF MILK
CLEAR button
ENTER button
CAPPUCCINO
Fig. 18
Button functions
1st BUTTON (UP button) : It is used to scroll up the menus and to increase the values
displayed during programming.
2nd BUTTON (DOWN button) : It is used to scroll down the menus and to reduce the
values displayed during programming.
3nd BUTTON (CLEAR button) : It is used to return to main programming menu 000. If
pressed during the programming mode, it reduces the value displayed to its minimum.
4th BUTTON (ENTER button) : It is used to display the values contained in the various menus, which can then be modified using the
UP and DOWN buttons. The same button is used to enter any changes. By pressing this button from the initial menu 000, it is possible
to exit the programming mode and the machine will be ready to dispense beverages.
Programming mode
To enter the programming menu, press button 26. The display reads 000. Beverage dispensing or any other machine function is no
longer possible. The machine will automatically exit the programming mode if it has been idle for about 1 minute and return to beverage
dispensing mode.
Programming menu configuration
Values can be programmed in the following menus:
000 Power on/power off menu. It is accessed by pressing button 26 ; access to the other menus is possible using the UP button. To
quit this menu, press the ENTER button.
001 Price 1 (low price) menu. By pressing the ENTER button from this menu, the price 1 value is shown and can be modified.
002 Price 2 (high price) menu. By pressing the ENTER button from this menu, the price 2 value is shown and can be modified.
A-1 Channel 1 coin value menu. By pressing the ENTER button from this menu, the value of the coin accepted by the coiner channel
1 is shown and can be modified.
A-2 Channel 2 coin value menu. By pressing the ENTER button from this menu, the value of the coin accepted by the coiner channel
2 is shown and can be modified.
A-3 Channel 3 coin value menu. By pressing the ENTER button from this menu, the value of the coin accepted by the coiner channel
3 is shown and can be modified.
A-4 Channel 4 coin value menu. By pressing the ENTER button from this menu, the value of the coin accepted by the coiner channel
4 is shown and can be modified.
A-5 Channel 5 coin value menu. By pressing the ENTER button from this menu, the value of the coin accepted by the coiner channel
5 is shown and can be modified.
A-6 Channel 6 coin value menu. By pressing the ENTER button from this menu, the value of the coin accepted by the coiner channel
6 is shown and can be modified.
U Multi-product dispensing menu. This menu activates the standard or multi-product dispensing mode. By pressing the ENTER button,
the display reads 0, showing the standard dispensing mode. By pressing the UP button, the display reads 1, activating the multi-product
dispensing mode.
☞
With G13 coiners, the DA7P PLUS machine can be activated both into the multi-product dispensing and standard
dispensing mode. With G26 coiners, the DA7P PLUS can be activated into multi-product dispensing mode only. When
installing SaecoCard, the equipment automatically sets to the multi-product dispensing.
Exit programming
Programming can be exited by pressing the ENTER button from the 000 menu. To enter the 000 menu, use either the DOWN button
to scroll down menu by menu, or the CLEAR button to have immediate access from any other menu to the 000 menu.
Selling price programming
Program price 2 first and then price 1.
From the 000 menu, press the UP button twice.The display will show 002.
Press the ENTER button to display and be able to modify the price 2 value.
By pressing the UP button, the value will be changed from 000 to the minimum coin value pre-set by the nation key corresponding
to the country of usage.
After entering the required value, press ENTER to confirm. The entered value is stored in the system memory and the display
automatically shows 002 again.
25
English
To program price 1, press the DOWN button. The display will show 001. Press the
ENTER button to display and modify the price 1 value.
Follow the same procedure to modify price 2, if desired.
To set the value to 000, press the CLEAR button. Should the machine be programmed
UP button
ESPRESSO
to have two different prices, price 1 should always be lower than or equal to price
LONG
2.
DOWN button
ESPRESSO
If a few products will be dispensed free-of-charge and others will have prices,
ESPRESSO WITH
CLEAR button
program by assigning a free-vend value 000 to price 1 and the required payment
A DASH OF MILK
value to price 2 ; then use the machine programmer to assign price 1 to the free-ofENTER button
CAPPUCCINO
charge products.
To program the machine to have one price only, enter the same value for both price
Fig. 18
1 and price 2, then use the machine programmer to program all the products to have
either price 1 or price 2. The machine will automatically set both price 1 and price 2 to 000; therefore, if the two values are not changed,
the machine will continue to dispense only free-of-charge products.
COINS ACCEPTED
Price “2” programming example
• Press the UP button. The message 000 is displayed.
• Press the UP button twice. The display will show the menu 2 (price 2).
• Press the ENTER button. The display will show 000.
• Press the UP button. The display will show the lowest possible setting.
• Press the UP button until the required value is reached (e.g. 800).
• Press the ENTER button to save the value. The display will show menu 2 again.
• Press the CLEAR button to go back to the initial menu.
• Press ENTER to quit the programming mode.
To assign the beverage price, use the 7P Programmer.
Programming the coin value
The coin value must be changed according to the coiner programming.
Set the values relevant to each coin recognised by the coiner (see the table on the coiner), according to the limits set forth on the
label of the nation key envelope. To program values, follow the procedure below :
• From the 000 menu, press the UP button to move to the A-1 menu.
• Press the ENTER button to display and modify the value of the coin accepted by coiner channel 1.
• By pressing the UP button, the displayed value is increased; it is decreased by pressing the DOWN button.
• After having set the required value, press ENTER to confirm. The value is stored and A-1 is automatically displayed again.
• In order to program the channel 2 coin value, press the UP button; the display will show A-2.
• Press ENTER to display and modify the value of the coin accepted by channel 2.
• The CLEAR button may be pressed to set the value to the smallest coin accepted by the coiner. The equipment is pre-set to the
coin values shown on the coiner data plate. Tokens are assigned a value which is equal to that of the smallest coin accepted by
the coiner.
☞
26
The RS 232 male serial connector (30) is used to operate SAECO CARD only.
English
8.7 Assembly of the NRI G26 coin changer
☞
Only an executive type coiner can be used with this equipment.
• Assemble the metal cable stopper supplied with the equipment.
• Pass the coiner cables trough the cable stopper, making sure they do not block the coin
inlet or prevent the correct operation of the coiner release lever (Fig. 19).
• Fasten the coiner to the relevant plate with the three pins already fitted on the plate.
Keep the coiner release lever pressed to make the coiner fitting easier (Fig. 20).
• Connect the 2 coiner cables supplied with connectors to the cables already fitted on
the machine.
Fig. 19 The third coiner cable with serial connection is not currently used. When the coiner has
been assembled, program sale prices according to the procedure previously described
above for the G13 coiner.
The coiner channels have been pre-set for coin values. The user does not need to program
these values.
☞
This coiner is automatically programmed in the MULTI-PRODUCT dispensing
function, as previously described (menu "U").
Fig. 20
For further information relevant to the coiner, see the instruction manual of the coiner.
8.8 Connecting the Personal Computer to the Machine (Fig. 21)
G 26 model serial port
Fig. 21
G 13 model serial port
Fig. 21
Please note: Special software is required.
To connect a PC to the machine, use a 3wire (inverting) serial connection cable,
equipped with two 9-pole connectors.
Make sure both the machine and the PC are
off, then carry out the cable connection,
through the serial port 30, shown in Fig.
21.
Start the machine first and then the PC; this
will establish a connection and enable realtime data exchange.
8.9 Inserting labels
Separate product labels along the perforations. Stick the adhesive price labels on the
product labels. Slide labels into their proper positions. Remove frame knobs, lift the
transparent panel (Fig. 22) and insert the graphics. Instructions to operate the
equipment should be applied below the graphic.
Fig. 22
27
English
9 - OPERATION AND RE-FILLING PRODUCTS
9.1 Beverage dispensing
• Insert the correct amount of change (40) corresponding to the price of the beverage selected.
• If coins inserted (39) exceed the amount required, the surplus amount will be stored for approx. 3 minutes and can be used for
another beverage (with G13 multi-product dispensing coiner).
For G 13 coiner without multi-product dispensing function insert only correct amount of coins. If the equipment is supplied with a
coin changer, the change can be recovered by pressing button (38).
• Take a cup and position it at the dispensing point (34).
• Press the button corresponding to the desired beverage.
• Take the sugar packet out of the sugar dispenser (37) and the stirrer by pressing button (36).
Warning: Do not remove cup until the green ready light is on again.
9.2 Re-filling products
• As needed, re-fill the instant products, coffee beans, water (if using internal tank), stirrers, cups and sugar packets.
Instant product bins:
• Close bin latches.
• Remove bins (2) from their housing (Fig. 23)
• Fill with instant product; do not exceed 2/3 of the max. capacity of the bins.
• Replace covers and replace bins into their housing, making sure they are properly
positioned (Fig. 13).
Fig. 23
Water tank:
• Remove water tank (13) by accessing the top of the machine
• Fill it with fresh, cold water and replace it, making sure it is properly positioned.
Bean hopper:
• Lift the top cover (31) and the hopper cover (47) (Fig. 24) and fill the hopper (1) with
coffee beans.
Fig. 24
☞
Attention: Do not fill with ground or instant coffee.
1,3
,5
9
Stirrer dispenser:
• Open front door.
• Remove the stirrer container cover (21)
and the metal weight.
• Fill with perfectly aligned stirrers, replace
the weight and the cover (Fig. 25)
• Close door and check proper functioning
by pressing button to dispense a stirrer.
04
1
0÷
9
Fig. 25
Fig. 26
Warning: The stirrer dispensing device works exclusively with the type of stirrers shown in figure 26. The use of even slightly different
stirrers may cause jamming.
Cup dispenser:
• Place cups in the tubes (20) fitted on the interior side of the door.
28
English
Attention: Cup tubes have dimensions suitable for cups with a max. diameter of 70 mm;
cups having a diameter of 58 mm (fig. 27) can also be used by inserting the necessary
reduction rings (48).
Sugar packet dispenser:
• Fill the dispenser fitted on the inside of the door with sugar packets.
Attention: Do not use loose sweetener (i.e. sugar cubes). Use only packets.
9.3 Stop counter reset
Fig. 27
• Electronic counters stop the beverage dispensing before the product (i.e. coffee, instant products, water) runs out if stop values have
been programmed. Data has to be entered with the 7P Programmer. Stop values of 000 disable the stop function.
• Therefore, it is advisable to reset the counters with the 7P Programmer (see the relevant manual) immediately after the machine has
been re-filled with products.
9.4 Troubleshooting
• Red LEDs will advise when products need re-filling :
• Red LED "Water empty" on: the machine has run out of water, thus preventing beverages from being dispensed. Fill the tank and,
by keeping button 28 pressed, operate button 27 until water streams out of the dispensing tubes. This procedure primes the system.
When the red LED is off, the machine is ready to dispense beverages again.
• Red A-B-C-D beverage LEDs on: the machine has run out of coffee beans, thus preventing the corresponding beverages from being
dispensed. Fill the bean hopper and, by keeping button 28 pressed, press any A-B-C-D beverage button. When the LEDs are off,
the machine is ready to work again.
• Red E or F beverage LEDs on: the machine has run out of the instant product corresponding to the LED, thus preventing the machine
from dispensing the beverage. Fill the bin with product and, by keeping button 28 pressed, press the button corresponding to the
led. When the LED is off, the machine is ready to work again.
10 - CLEANING AND MAINTENANCE
Before cleaning, turn the machine off (position "0") and unplug the cord.
Do not clean or service the machine if the safety key (33) is still
in place. Remove the safety key.
1
☞
2
3
Rinse above mentioned parts with clean, hot water. Do not use detergents or
abrasive sponges.
Fig. 28
• To obtain the maximum quality of the dispensed beverages and ensure the best operation of the equipment, follow the cleaning and
maintenance procedure bellow:
Warning: Exercise caution when using the key to adjust the brew group.
• Brew group:
• Remove the brew group by pressing down and keeping the lever on position 3 (Fig. 28). Rinse the brew group with warm water,
dry it thoroughly and replace it thoroughly, always holding the lever on position 3. The brew group should fit snuggly into place
with a slight clicking sound.
☞
Warning: When replacing the brew group, make sure the timing arrows are aligned; otherwise, re-align them by using
the key (Fig. 29).
29
English
Mixers and dispensing tubes:
• Remove the dispensing tubes (7) paying particular attention to the end gaskets. Remove
the whipper cap (4) and separate the whipper (5) from the underlying part, also
removing the nozzle with silicone tube (Fig. 30). Turn the whipper chamber (6) clockwise
and remove it. Clean the mixing fan with a non-abrasive sponge soaked with lukewarm
water, without exerting excessive pressure which might damage the sealing gasket.
• Rinse thoroughly with warm water all parts and replace them, carrying out the above
mentioned operations in reverse order. Pay particular attention when assembling the
nozzle with silicone tube, making sure it has been properly fitted.
Fig. 29
Instant product bins:
• Instant product bins do not require particular maintenance. Nevertheless it is advisable
to thoroughly clean them at least once a month, making sure they are thorougly dry
when filling them. Bins can be separated from the front and rear bushes by turning the
latter counterclockwise, thus allowing the removal of both the rear pin and spring. Clean
with a dry cloth or compressed air and replace by carrying out the above mentioned
operations in reverse order, making sure the sealing ring of the rear pin has not been
damaged.
Fig. 30
Fig. 31
Coffee hopper:
• Coffee hopper must be periodically cleaned in order to remove any accumulated oil
deposited by beans. Pull the closure slide outwards (24) to prevent coffee from spilling
out (fig. 31) around. Remove the hopper from its housing, rinse it with lukewarm water,
dry and replace it.
• Fill it with coffee beans and push the closure slide inwards.
Cabinet water tank:
• The water tank has to be emptied and cleaned any time you proceed
to product filling.
• Rinse the following parts with lukewarm water : drip funnel (9), dump box (15), drip tray (10), dispensing point (34) with drain tank
(12). Thorougly dry all parts before replacing them.
☞
The manufacturer declines any liability whatsoever for machine malfunctioning resulting from incorrect or poor
maintenance.
• Automatic rinsing cycle:
• The machine can be programmed with an automatic rinsing program which rinses hot
water through all the lines. The period of time between rinses can be programmed (see
the 7P programmer manual). This function can be enabled by closing the jumper (17)
on the electronic board (see the enlargement of Fig. 32).
Warning: Danger of electric shock: before carrying out the above
procedure, make sure the machine is turned off and the power
cord is unplugged.
Fig. 32
10.1 Auxiliary functions
• The machine is supplied with some additional controls allowing operations to :
• Test front panel LEDs.
• Descale hydraulic circuit.
• Adjust the specific weight of the soluble products.
Access to special controls:
Warning: The procedure below disables the safety sensor when the door is open. The machine will still be powered on and
mechanical components could be activated. It is therefore important that the procedure be carried out by trained personnel only.
30
English
• Switch off the machine, open the door, introduce key 33 into the sensor switch, and then simultaneously turn on the machine and
press button 28. The first 5 LEDs will light up, and the "Ready for use" and "Water empty" LEDs will alternately blink.
Front panel LEDs check:
• Once the "access to special controls" procedure has been performed, press the first selection button (beverage A). One by one, the
buttons next to the green LEDs will light up. As soon as the test has been completed, all red LEDs next to the buttons will light up.
Descaling (machine supplied with water tank only):
• Fill the water tank with approx. 1 l of water mixed with a descaling solution and approved for food-service use. Follow the mixing
instructions printed on the package of descaling solution.
• Once the "Access to special controls" procedure has been performed, press the second selection button (beverage B) to activate the
descaling cycle.
• The solution is automatically pumped into the boiler (400 cc. approx.) for about 15 minutes at a temperature of 40°C, the correct
temperature for this procedure. The solution is automatically drained and fresh solution is pumped into the boiler for another15 minutes.
After the entire solution has run through the system, clean the system by removing the water tank, rinsing it thouroughly, and filling
it with fresh water. The clean water will automatically run through the system to rinse it. The machine will return to the starting condition.
• Remove key (33) and close the door. The machine is ready to dispense beverages again.
Adjusting the specific weight of the soluble products:
COINS ACCEPTED
ESPRESSO
UP button
LONG
ESPRESSO
DOWN button
ESPRESSO WITH
A DASH OF MILK
CLEAR button
CAPPUCCINO
ENTER button
Fig. 18
• Always turn off the equipment before carrying out any operation on cables or ecific
weights of soluble products on hand at the time of programming. However, the
machine allows you to re-program the specific weights to correspond with the
soluble products being used in the machine.
• Once the "Access to special controls" procedure has been performed, press the
ENTER button. The green LEDs corresponding to the last 3 products will light up.
Hold a container (e.g. a cup) under a bin dispenser, press the button corresponding
to a soluble product beverage and check the weight of the dispensed product. To
calculate the average weight, perform several tests. The average value obtained
should be entered with the 7P Programmer (see the Programmer instruction
manual, paragraph 3.2).
Remove key 33 from the sensor switch to restore the safety mechanism.
10.2 Mixer fan blade replacement
Before starting this procedure, turn the machine off (main switch to position
"0") and unplug the power cord.
Remove the old fan blade and assemble the new one onto the shank. Position the key on
the fan flange, then press following the axial direction, until the key is flush with the motor
flange (Fig. 33).
Fig. 33
11 - PROPER DISPOSAL OF MACHINE
Disposal of machine parts must be carried out in accordance with local environmental regulations to avoid polluting earth, water and
air. Please comply with the law in force in your country. The machine should be made non-functional by cutting the power cord. The
non-functional machine should then be taken to a suitable collecting centre.
The manufacturer reserves the right to modify the contents of this manual without prior notification. It is strictly forbidden to copy in
any way the contents of this manual, or any part thereof, without prior written permission from the manufacturer.
The translation of this manual into any other language is not allowed. The manufacturer shall not be held liable for any errors resulting
from print or copy errors.
31