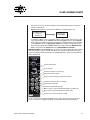
1
SI-MT/SI-MKB/SI-HTB www.wpiinc.com Signal Conditioning Amplifier System for Muscle Testers INSTRUCTION MANUAL Serial No._____________________ 040214 World Precision Instruments SI-H Muscle Testers Other Popular WPI Products Biofluorometer Now more reliable, simplified and affordable The new SI-BF-100 is an LED-based fluorometer for life science applications. It is ideally suited for ratiometric calcium detection (FURA-2) and ATPase detection (via NADH fluorescence). With up to seven LED modules (wavelengths), the SI-BF-100 covers many fluorometric applications in neuroscience and cell biology. • • • LED light sources require less power, give off less heat and are more compact and affordable Sampling rates up to 1kHz (1,000 ratios/second maximum). At lower speeds, signal averaging is used for noise reduction. Two auto ranging photomultiplier inputs allow you to monitor multiple wavelengths from a single emission output that can be comprised of any wavelength of light for which an LED module is available • Using a separate reference channel, ultra-stable, continuous ratio calculations automatically compensate for LED intensity drift. This ensures less noise and produces more accurate measurements. • Application-specific probes are available for existing tissue baths and cuvette systems. • Ratio noise is <0.05 peak to peak, drift is less than 0.1 unit/hour • The warm up time of less than one minute is a dramatic improvement over the common 20–60 minutes required by xenon or mercury light sources • Replace the emission filter easily or change the LED modules to transform the SI-BF-100 into a general purpose fluorometer for many other applications Tip Profile: Tip Profile: 2.3 cm Recent advancements in optics and LED technology simplify ratiometric calcium imaging, making this equipment more affordable. A breakthrough in WPI patented technology allows the SI-BF-100 to use wavelengths below 380nm and produce more light in those spectra. This technology significantly cuts the cost of photometric calcium imaging without sacrificing resolution or quality. Iris Scissors, stainless steel McPherson-Vannas Scissors Length: Blades: Tips: 8 cm (3 in.) straight 5 mm 0.1mm Length: Blades: Tips: 8 cm (3 in.) curved 5 mm 0.1mm Tip Profile: Length: 11.5 cm (4.5 in.) Blades: straight, Tungsten Carbide Standard: 500216 German: 500216-G Length: 11.5 cm (4.5 in.) Blades: curved, Tungsten Carbide 1:1 Standard: 500217 German: 500217-G II WORLD PRECISION IN STRU MENTS SI-MT/SI-MKB/SI-HTB CONTENTS ABOUT THIS MANUAL ............................................................................................................................... 1 INTRODUCTION ........................................................................................................................................... 2 Features ...................................................................................................................................................... 3 Cautions and Warnings ........................................................................................................................ 3 Parts List ..................................................................................................................................................... 3 Unpacking ................................................................................................................................................. 3 INSTRUMENT DESCRIPTION .................................................................................................................... 4 Signal Conditioning Amplifier for the SI-MT/SI-MKB/SI-HTB .................................................. 4 Front Panel .......................................................................................................................................... 4 Back Panel ........................................................................................................................................... 5 SI-BAM21-LCB .......................................................................................................................................... 6 Features ................................................................................................................................................ 6 How the Amplifier Works ............................................................................................................... 6 Notes and Warnings ........................................................................................................................ 6 Front Panel .......................................................................................................................................... 7 SI-AOSUB ................................................................................................................................................... 8 Front Panel .......................................................................................................................................... 8 SI-SARCAM ................................................................................................................................................ 9 Front Panel ........................................................................................................................................11 SI-MOTDB ................................................................................................................................................12 Features ..............................................................................................................................................13 Front Panel ........................................................................................................................................14 SI-TCM2B .................................................................................................................................................15 Features ....................................................................................................................................................15 Front Panel ........................................................................................................................................15 SI-COLUB ..................................................................................................................................................16 Connecting the Signal Conditioning Amplifier System ............................................................21 OPERATING INSTRUCTIONS...................................................................................................................24 Turning the System On .......................................................................................................................24 Using the SI-BAM21-LCB ....................................................................................................................24 Calibrating the SI-BAM21-LCB ...................................................................................................24 Making Measurements .......................................................................................................................27 Setting System Gain Factor ..........................................................................................................27 Using the Anti-Oscillation Unit .........................................................................................................27 Adjusting the Anti-Oscillation Filter...........................................................................................27 Using the Sarcomere Length Unit ...................................................................................................29 Setup ....................................................................................................................................................29 Choosing a Display Mode ............................................................................................................30 Setup Menu .......................................................................................................................................30 Turning On/Off the Laser .............................................................................................................30 Adjusting the CCD Offset ..............................................................................................................31 Copyright © 2014 by World Precision Instruments, Inc. All rights reserved. No part of this publication may be reproduced or translated into any language, in1:1 any form, without prior written permission of World Precision Instruments, Inc. WORLD PRECISION IN STRU MENTS iii SI-H Muscle Testers Setting the Tissue Distance ..........................................................................................................31 Adjusting the CCD Sensitivity ......................................................................................................31 Setting the Camera (CCD) Mode ................................................................................................32 Aligning the Laser and the Camera ..........................................................................................32 Calibrating the Camera .................................................................................................................33 Display Laser Diffraction Pattern on an Oscilloscope ........................................................34 Understanding the Display ..........................................................................................................35 Setup ....................................................................................................................................................36 Choosing a Display Mode ............................................................................................................36 Setup Menu .......................................................................................................................................36 Adjusting the Setpoint ...................................................................................................................36 Setting Alarms ..................................................................................................................................37 Changing the Backlight Level for the Display.......................................................................37 Enabling/Disabling the Alarms...................................................................................................38 Using the USB Port Output ..........................................................................................................38 MAINTENANCE............................................................................................................................................39 ACCESSORIES ...............................................................................................................................................39 TROUBLESHOOTING .................................................................................................................................40 SPECIFICATIONS ..........................................................................................................................................41 INDEX .............................................................................................................................................................43 WARRANTY ..................................................................................................................................................44 Claims and Returns ..............................................................................................................................44 IV WORLD PRECISION IN STRU MENTS SI-MT/SI-MKB/SI-HTB ABOUT THIS MANUAL The following symbols are used in this guide: This symbol indicates a CAUTION. Cautions warn against actions that can cause damage to equipment. Please read these carefully. This symbol indicates a WARNING. Warnings alert you to actions that can cause personal injury or pose a physical threat. Please read these carefully. NOTES and TIPS contain helpful information. Fig. 1 (Left) SI-MT is a convenient platform for all standard mechanical experiments on intact muscle preparations. Fig. 2 (Right) The SI-MKB platform can be used for mechanical and optical studies of intact or skinned muscle fibers using optional electronic components that are discussed in this manual. WORLD PRECISION IN STRU MENTS 1 SI-H Muscle Testers Fig. 3 The Signal Conditioning Amplifier System is a flexible chassis that is specifically configured for an SI-MT, SI-HTB or SI-MKB system (Muscle Testers). INTRODUCTION The Signal Conditioning Amplifier System provides a flexible electronic platform intended to process the transduction of mechanical signals, the filtering of transducer outputs and the control of motor positions. The system consists of an 8-slot, rack-mountable frame that includes an ultra quiet, shielded power supply. Outputs are routed internally to the inputs of other modules. If you prefer, the module outputs may be routed to external outputs on the front panels. The system has a small footprint and may be stacked to provide as many optional modules as you need. When the system is ordered with an SI-MT, SI-HTB or SI-MKB (Muscle Tester) system, the Signal Conditioning Amplifier System (chassis) is configured with an SI-BAM21-LCB. Optional modules include an SI-TCM2B Temperature Control Module, an SI-MOTDB Linear Motor Controller, an SI-AOSUB Anti Oscillation Unit, the SI-SARCAM Sarcomere Spacing Module and the SI-COLU Constant Load Unit. The Temperature Control Module, Linear Motor Controller and Sarcomere Spacing Module require two slots each on the chassis backplane. NOTE: The system is flexible and configurable. A variety of modules are available for the Signal Conditioning Amplifier System, and you can mix and match the modules to suit your requirements. For this manual, we will only discuss the modules used with an SI-MT, SI-HTB or SI-MKB system. 2 WORLD PRECISION IN STRU MENTS SI-MT/SI-MKB/SI-HTB Features This Signal Conditioning Amplifier System offers eight expansion slots, configured at the factory to meet your requirements. NOTE: The system is configured at the factory. If you need to add additional modules, contact Technical Support at 941.371.1003 or [email protected]. Cautions and Warnings WARNING: TURN OFF THE SIGNAL CONDITIONING AMPLIFIER SYSTEM AND UNPLUG IT FROM THE POWER OUTLET BEFORE REMOVING OR INSTALLING ANY MODULE IN THE UNIT. Parts List After unpacking, verify that there is no visible damage to the instrument. Verify that all items are included: (1) Signal Conditioning Amplifier System with an SI-BAM21-LCB (1) Power cord (1) Instruction Manual OPTIONAL COMPONENTS: (1) SI-TCM2B Temperature Control module (1) SI-MOTDB Linear Motor Control module (1) SI-AOSUB Anti-Oscillation module (1) SI-SARCAM Sarcomere Spacing module (For use with the Muscle Tester only.) (1) SI-COLU Constant Load Unit Unpacking Upon receipt of this instrument, make a thorough inspection of the contents and check for possible damage. Missing cartons or obvious damage to cartons should be noted on the delivery receipt before signing. Concealed damage should be reported at once to the carrier and an inspection requested. Please read the section entitled “Claims and Returns” on page 44 of this manual. Please contact WPI Customer Service if any parts are missing at 941.371.1003 or [email protected]. Returns: Do not return any goods to WPI without obtaining prior approval (RMA # required) and instructions from WPI’s Returns Department. Goods returned (unauthorized) by collect freight may be refused. If a return shipment is necessary, use the original container, if possible. If the original container is not available, use a suitable substitute that is rigid and of adequate size. Wrap the instrument in paper or plastic surrounded with at least 100mm (four inches) of shock absorbing material. For further details, please read the section entitled “Claims and Returns” on page 44 of this manual. WORLD PRECISION IN STRU MENTS 3 SI-H Muscle Testers INSTRUMENT DESCRIPTION Signal Conditioning Amplifier for the SI-MT/SI-MKB/SIHTB Front Panel Optical Anti Transducer Oscillation Amplifier Unit Sarcomere Spacing Module Temperature Control Module Linear Motor Controller Power Switch Fig. 4 The front panel of a Signal Conditioning Amplifier System configured for a Muscle Tester shows the SI-BAM21-LCB, the SI-AOSUB, The SI-SARCAM, the SI-MOTDB and the SI-TCMB2. Optical Transducer Amplifier–The SI-BAM21-LCB powers the force transducer and converts the output of the transducer to an amplified analog voltage that is proportional to the force applied to the transducer. The output signal can be multiplied by a factor of 1, 2, 5 or 10 to provide better resolution for a minimal change in applied force. Anti-Oscillation Unit (SI-AOSUB)–Each force transducer has a resonance frequency at which it vibrates. The SI-AOSUB, when properly tuned to that resonance frequency, removes the resonance noise from the output signal of SI-BAM21-LCB transducer amplifier. An SI-AOSUB is necessary when a linear motor is used. Sarcomere Spacing Module–Sarcomere spacing measurement requires a system with an optical cuvette (cuvette with a window). A laser passes through the muscle, and the diffracted light is captured with a CCD camera. By monitoring the diffraction pattern, the length of the sarcomeres can be calculated. Linear Motor Control Module–When a linear motor is required, this module powers the motor and provides an output indicating the actual motor position. It connects to an analog to digital converter output of the data acquisition system (like LabTrax 8/16) to control the waveform and timing for the motor control. The output connects with an analog input of the data acquisition system to monitor the sensor feedback from the motor. 4 WORLD PRECISION IN STRU MENTS SI-MT/SI-MKB/SI-HTB Temperature Control Module–When temperature control is required, the SI-TCM2 is used. It can control two cuvettes simultaneously, using digital control to maintain a constant temperature. It has both high and low alarm warnings which can be user defined. Constant Load Module–(Not pictured in the unit here.) It is often important to maintain a constant sarcomere length rather than keep the total length of the preparation constant during an isometric contraction. For example, if the muscle is fixed with its tendons, the muscle contraction elongates these tendons. Even though the distance between the ends of the muscle is kept constant, the muscle contraction effects an internal shortening of the sarcomeres of the muscle. In order to get a true isometric muscle contraction, the sarcomere length must be kept constant during the contraction. For this purpose the output signal of the camera (SI-SARCAM) can be fed into the feedback controlling the linear motor position using the SI-COLU. The feedback system controls the linear motor so that the sarcomere length is held constant. Expansion Slots–Empty slots (not shown) on the back plane are filled with expansion slots which can be replaced at a later time when other modules are added to the system. Power Switch–This system has two power switches, one on the back panel and one on the front. Both switches must be on to power the system. Back Panel Power Connector Fuse Housing Master Power Switch Fig. 5 The back panel of the Signal Conditioning Amplifier System has a master power switch that is usually left on. Power Connector–Insert the power cord into the power connector, and plug the cord into a standard wall AC outlet. Fuse Housing–This housing contains the fuse for the chassis system. Master Power Switch–The signal conditioning chassis distributes sub-regulated DC power (12V) to the individual modules through a backplane of the chassis. For convenience, the unit has two power switches, and both must be on to power the system. All the modules power on/off simultaneously. When your system is set up, just leave this power switch in the on (I) position WORLD PRECISION IN STRU MENTS 5 SI-H Muscle Testers NOTE: The 16 plugs marked with A or B are for future development. They are not used at this time. SI-BAM21-LCB The SI-BAM21-LCB KG Optical Force Transducer Amplifier is used in conjunction with the SI-H tissue bath and muscle physiology systems. The SI-BAM21-LCB powers the force transducer and converts the output of the transducer to an amplified analog voltage that is proportional to the force applied to the force transducer. The output signal can be multiplied by a factor of 1, 2, 5 or 10 to provide better resolution for a minimal change in applied force. NOTE: An optional factory setting increases the multiplier by a factor of 10, allowing the signal to be multiplied by 10, 20, 50 and 100. NOTE: The SI-BAM21-LC is the standalone version of this optical force transducer amplifier. Features The SI-BAM21-LCB amplifier works with KG optical force transducers to: • Generate an analog output (-10VDC to +10VDC) that is proportional to the force applied to the tissue sample. • Supply a DC voltage that powers the KG force transducer to which it is connected. How the Amplifier Works In a typical setup, a muscle is held by a force transducer. The force transducer is connected to the SI-BAM21-LCB. As the muscle contracts or releases, the force transducer converts the force into an electrical current signal which is proportional to the force applied to the force transducer. The SI-BAM21-LCB converts the current signal into a voltage signal that can be displayed on the screen of the recording device. Before initiating an experiment, the SI-BAM21-LCB must first be zeroed. This sets the baseline for measurements to follow. The output signal is buffered and multiplied by 1, 2, 5 or 10, depending on the Gain switch setting on the front panel of the amplifier module. The X10 setting is useful when output signals are extremely small. Finally, the force proportional signal is sent through the output amplifier circuit. The analog output has a range of –10V to +10V that drives a data acquisition system, multimeter or oscilloscope. Notes and Warnings NOTE: The SI-BAM21-LCB is only designed for use with KG optical force transducers. Use with any other type of transducer may cause damage to either the transducer or the amplifier or both. 6 WORLD PRECISION IN STRU MENTS SI-MT/SI-MKB/SI-HTB Front Panel Offset Adjustment LEDs Offset Adjustment Switch Zeroing LED Zero Button Gain Indicator LEDs Gain Switch Data Acquistion Output Force Transducer Connection Digital Interface Connection Gain Calibration Potentiometer Fig. 6 SI-BAM21-LCB KG Optical Force Transducer Amplifier Zero Button–When pressed, the SI-BAM21-LCB output comes close to zero and the Zeroing LED illuminates. Before any measurements are taken, the SI-BAM21-LCB should be zeroed to establish a baseline value for the force transducer. Offset Adjustment Switch–This toggle switch permits the position of the baseline to be adjusted after the baseline is zeroed. Press and hold the toggle switch to the left if you want to raise the baseline. Or, press and hold the toggle switch to the right to lower the baseline. If the baseline is more that 0.3V above zero, the High LED illuminates, and if it is less than –0.3V, the Low LED illuminates. When the baseline is within 0.3V of zero, the LEDs are off. Gain Switch–Under normal conditions, the Gain switch is set to X1. The output of the force transducer can be amplified by a factor of 2, 5 or 10. Press the Gain switch to toggle between the gain settings. A Gain Indicator LED illuminates to show which gain factor is applied. Larger gains are essential when working with extremely small forces. Gain Calibration Potentiometer– This potentiometer can be used to maximize the output of the amplifier for the anticipated range of forces to be measured. Use the provided potentiometer adjustment tool (WPI#13661) to calibrate the output of the amplifier to the range of forces that will be measured by the transducer. See "Calibrating the SI-BAM21LCB" on page 24. WORLD PRECISION IN STRU MENTS 7 SI-H Muscle Testers Data Acquisition Output–Connect a data acquisition system like WPI’s Lab-Trax-8/16 to this BNC connector to record the raw SI-BAM21-LCB voltage output. For test purposes, a multi-meter or oscilloscope may be connected using a standard BNC cable (WPI #2851). Force Transducer Connection–An SI-KG force transducer is plugged into this DIN connector. Align the pins, and insert the connector until it is fully seated. Digital Interface–This connection is a legacy interface for classic SI-H equipment. NOTE: When the SI-MT or SI-MKB electronics are configured at the factory for the muscle Tester systems, the signal is routed internally from the SI-BAM21-LCB module to the SI-AOSUB module. The Force Output connection on the front of the SI-BAM21-LCB module also shows the raw unfiltered signal from the transducer, but it does NOT need to be connected externally. SI-AOSUB Every force transducer has a resonance frequency at which it vibrates. The SI-AOSUB allows you to locate that frequency and filter the signal to mitigate the noise of the resonance frequency. Since each force transducer is unique, the anti-oscillation unit must be calibrated for each force transducer. Likewise, the tissue mounting hardware affects the resonance frequency. Therefore, the system must be calibrated with the mounting hardware attached to the force transducer. Front Panel Anti-Oscillation Frequency Adjustment Potentiometer Signal Amplitude LED Array Pulser Amplitude Adjustment Knob Pulser Port External Input Port Filtered Signal Output Port Fig. 7 8 SI-AOSUB Anti-Oscillation Module WORLD PRECISION IN STRU MENTS SI-MT/SI-MKB/SI-HTB Pulser Port–Connect the Pulser cable to this port when you need to calibrate the system for a force transducer. The force transducer fits inside the Pulser, and the Pulser uses a strong electro-magnet to exert small square-wave forces on the force transducer. Pulser Amplitude Adjustment Knob–When calibrating a force transducer, this knob adjusts the amplitude of the pulser waveform so the display registers on the Signal Amplitude Array. Signal Amplitude Array–The 10-position LED array indicates the amplitude of the transducer's response to the pulser's excitations. The LED array indicates when the frequency of the square wave is equal to the resonance frequency of the force transducer. Anti-oscillation Frequency Adjustment potentiometer– Use the included potentiometer adjustment tool (WPI #13661) to rotate the potentiometer until the force transducer resonates. During this procedure, the number of segments in the Signal Amplitude LED array that light up increases as the resonance frequency approaches that of the force transducer. External Input Port–The output signal from the transducer amplifier comes into the SI-AOSUB through this port. If the signal is not routed along the backplane, connect the SI-BAM21-LCB Force Output to this port. SI-SARCAM Skeletal and heart muscles are composed of basic contractile units called sarcomeres. Sarcomeres give these muscles their characteristic striated appearance. Z-Lines Sarcomere Length Fig. 8 Sarcomere units are arranged one after another within a muscle as shown schematically here. When a laser light is shined through the muscle fibers, the light is diffracted in a pattern, which is determined by the spacing between the muscle fibers (sarcomeres). Because of the sarcomere structure, the diffraction pattern looks similar to the pattern created by a grating placed in front of the light source. In muscle preparations, the monochromatic light (from the laser), which strikes the muscle preparation on the perpendicular, is diffracted according to the distance between the Z-lines of the muscle fibers. Since the Z-lines are like the bars in a grating filter, the diffraction distance is also know as the grating constant. (Fig. 9) Muscle Fiber Second Order of Diffraction First Order of Diffraction Laser No Diffraction (center beam) First Order of Diffraction Second Order of Diffraction Fig. 9 As the light shines through the muscle fiber, the sarcromeres diffract the light in a pattern. WORLD PRECISION IN STRU MENTS 9 SI-H Muscle Testers A red laser diode (=650nm) is used. A one-dimensional (linear) CCD camera with a time resolution of 1ms scans the light intensity of the diffraction pattern beginning 6.8mm from the center beam. The camera scans only half the diffraction pattern, assuming that the pattern is symmetrical with respect to the center beam. When the scan arrives at the part of the CCD chip which is hit by the first order diffraction of the pattern, the output voltage increases to a peak level, and the first order of diffraction is captured (Fig. 10). Then, the intensity signal decreases again. The sarcomere length is calculated from the first order diffraction distance. Laser Muscle Tissue Center Laser Beam First Order of Diffraciton CCD Camera D Fig. 10 (Left)The distance between the center laser beam and the first order diffraction is captured with a one-dimensional CCD camera. Then, the sarcomere spacing is calculated. Fig. 11 (Right) The output voltage of the camera peaks as it scans over the spot where the first order diffraction hits the CCD screen. The sarcomere spacing can be specifically calculated using geometry: s = x D2/L2+1 = wavelength of the laser (650nm) s= grating constant (The grating constant is the sarcomere length.) D=distance from the muscle to the camera L=measured distance from the center beam of the laser to the first order of diffraction The results of this calculation are shown on the LCD display of the SI-SARCAM module. For a quick approximation, the sarcomere length can be calculated using the formula: s = x (D/L). The sarcomere lengths reported by the analog outputs are approximations using this formula. Fig. 12 The geometry of the system is shown above NOTE: If the sarcomeres all have the same length, the laser diffraction line is very narrow. When the sarcomere order is more random, wider diffraction lines result from the lines of 10 WORLD PRECISION IN STRU MENTS SI-MT/SI-MKB/SI-HTB the shorter sarcomeres superimposed on the lines of the longer sarcomeres. This provides a qualitative method for judging how much the sarcomeres get disordered during a contraction. Broadening of the sarcomere distribution indicates increased sarcomere disarray. Often this is not reversible and indicates loss of sarcomere integrity and reduced viability of the muscle preparation. Reduction in peak force and simultaneous increased resting tension can then be further indication of a dying muscle; the preparation needs to be replaced. NOTE: Often it is important to keep the sarcomere length constant, as opposed to the total length of the preparation, during an isometric contraction. If, for instance, if the muscle is fixed with its tendons, the muscle contraction elongates the tendons. Even though the distance between the ends of the muscle is kept constant, the muscle contraction effects an internal shortening of the sarcomeres of the muscle. In order to get isometric contractions of the muscle, the sarcomere length must be kept constant during the contraction. In this case, the output signal of the camera is used with additional feedback system electronics to control the linear motor position. The feedback system controls the linear motor so that the sarcomere length is held constant. This is referred to as sarcomere clamping and is implemented in the SI-COLU constant load unit. With this unit, clamping can be around force, overall muscle length and sarcomere length in tonically contracting striated muscle. Front Panel WARNING: DO NOT EXPOSE YOUR EYES TO LASER LIGHT. EVEN REFLECTED LASER LIGHT MAY BE HARMFUL. ALWAYS WEAR PROTECTIVE LENSES WHEN WORKING WITH LASERS. LCD Display Laser Intensity Sync Output Video Output USB Port Analog Outputs Configuration Buttons Laser Connection Camera Connection Fig. 13 SI-SARCAM Sarcomere Spacing Module WORLD PRECISION IN STRU MENTS 11 SI-H Muscle Testers LCD Display–Upon startup, this display shows the version of the software the SI-SARCAM is running. During normal operations, this display can show the calculated (actual) sarcomere spacing, the first order diffraction distance or the signal amplitude. During configuration, this display shows parameters and confirmation messages. Laser Intensity–Rotate this dial to change the intensity of the laser's power output. Sync Output–This digital output is used for synchronizing the video with a timing reference. Connect this BNC port to an oscilloscope channel used as a synchronization source (trigger). Video Output–Connect this BNC port to an oscilloscope to monitor the output of the linear camera. USB Port–This port is reserved for future development. Analog Outputs–The Sarcomere and Distance analog outputs can be connected to a data acquisition system to monitor the sarcomere spacing and measured distance: • Approximate sarcomere spacing length can be accessed from the Sarcomere analog output. 1.0V corresponds to 500nm sarcomere length. This output uses the equation described on the preceding page: s = x (D/L). The actual sarcomere length is calculated and displayed on the digital display. Press the Display button until "Sarcomere Space" appears. • The measured distance between the center beam and the first order diffraction can be read from the Distance analog output BNC connection. 10.0V corresponds with a first order diffraction distance of 40mm from the center beam. The sarcomere length can be calculated from this value using the equation: s = x D2/L2+1. The measured distance is shown on the digital display. Press the Display button until "First Order Dist" appears. Configuration Buttons–The Display button is used to toggle the display between the first order of diffraction distance and the signal amplitude. The Setup button rotates through the array of configurable parameters. The Up and Down buttons are used to adjust the parameters. Laser Connection–The cord from the laser plugs into this connection to power the laser. Camera Connection–The cord from the linear, CCD camera plugs into this connection to power the camera. SI-MOTDB The SI-H Linear Motor Controller is designed for use with the SI-H line of muscle physiology research platforms. For systems that require a linear motor, this unit provides the precision control of the motor. A linear motor is required for measuring mechanical muscle properties such as slack-test, isotonic release, constant velocity release, stretch release, vibration studies, after-loaded contractions and eccentric contractions (intact muscle). 12 WORLD PRECISION IN STRU MENTS SI-MT/SI-MKB/SI-HTB Fig. 14 The Linear Motor is an optional part for the SI-MT or SI-MKB systems. The position of the linear motor is determined by a combination of the data from the controller indicating the current position and the DC value applied to the front panel at the Position In port. The applied Position In signal can be provided by a data acquisition system. The data acquisition analog output signal is set to define the waveform and timing pattern of force to be applied to the sample. The Linear Motor Controller has been designed with an automatic shutoff feature. That means that the voltage driving the motor automatically shuts off if the motor draws too much current. After less than a second, the motor cycles back on again. If the setup still draws too much current, it repeats the power down cycle. This could happen if too much force is being applied to the sample. The system continues to cycle the motor off and on until the force on the motor is reduced. If this happens, the motor hums as if it is trying to work, but the motor produces no force output. If an auto-shutdown occurs, adjust the experiment and force tension on the motor. NOTE: Use of a linear motor with a muscle testing platform creates vibration which excites the sensor's resonant frequency and requires an anti-oscillation unit (SI-AOSUB) for best results. This linear motor control unit is only available as a module for the Signal Conditioning Amplifier System backplane. Features The SI-MOTDB Linear Motor Controller has the following features: • Powers the motor and provides an output indicating the actual motor position • Connects to Analog to Digital Converter output of the computer or data acquisition system (like LabTrax 8/16) to allow the programming to control the waveform and timing of the motor control • Input range of ±10VDC • Over current protection that automatically shuts down when the supply voltage dips below the reference value • Linear motor position is determined by a DC value applied from the Position In port WORLD PRECISION IN STRU MENTS 13 SI-H Muscle Testers Front Panel Motor Connection Port Position In Port Position Out Port Power LED Fig. 15 The Linear Motor Controller Motor Connector–Use this port to connect the linear motor used with the SI-MT or SIMKB muscle testers. The motor is setup and calibrated to the Linear Motor Controller that is shipped with it. The motor and controller have a maximum range of motion of ±3.5mm from the center of travel. Position In–This BNC interface provides for an external position command input. The input rage is ±10VDC. The signal presented at the input will affect the length of motor travel. The motor/controller combination are calibrated for travel of 1.0mm/2.0VDC. For example, +7VDC translates to +3.5mm of travel from the center, and –7VDC equals –3.5mm of travel from the center. Position Out–This BNC output provides a signal proportional to the sensor feedback from the motor. Connect this port to a data acquisition system to track the motor position over time. Power–This LED Indicates that the controller has power from the Signal Conditioning Amplifier System. 14 WORLD PRECISION IN STRU MENTS SI-MT/SI-MKB/SI-HTB SI-TCM2B The SI-H Temperature Control Unit is designed for use with the SI-H line of muscle physiology research platforms. It maintains the temperature of an SI-H cuvette up to 45ºC. This unit is available in a standalone model or as a module for the Signal Conditioning Amplifier System backplane. Features The SI-TCM2B temperature controller: • Controls two cuvettes simultaneously • Uses digital control to maintain a constant temperature • Has both high and low alarm warnings which can be user defined Front Panel LED Display USB Port Configuration Buttons Cuvette Connections Fig. 16 The SI-TCM2B temperature controller can control two cuvettes simultaneously. LED Display–Upon startup, this display shows the version of the software the SI-TCM2 is running. During normal operations, this display shows the temperature of the cuvette attached to the channel 1 port, channel 2 port or both. During configuration, this display shows parameters and confirmation messages. USB Port–This port can be used to connect to a computer to log the temperature history. In order to communicate with the computer, a terminal emulation program is required. Several third party options are available, including: Hyperterminal, Real Term (realterm. sourceforge.net) or Cool Term (freeware.the-meiers.org). WORLD PRECISION IN STRU MENTS 15 SI-H Muscle Testers Configuration Buttons–The Display button is used to toggle the display between Channel 1 temperature, Channel 2 temperature and both. The Setup button rotates through the array of configurable parameters. The Up and Down buttons are used to adjust the parameters. Cuvette Connections–Use these ports to connect SI-H cuvettes used with the SI-MT and SI-MKB platforms. SI-COLUB The SI-COLUB Constant Load Module can be used in one of three different modes. In its primary mode (Constant Load), the unit can perform constant load experiments. In its primary mode (Constant Load) the unit takes an external trigger command from the force transducer to perform a constant load cycle. In addition, the module allows for a different external trigger, or you can completely bypass the module without having to switch cabling. The SI-COLUB Constant Load Module can be used to maintain a constant force on a muscle, muscle length or sarcomere length rather than the constant length of the muscle preparation. This is accomplished using a feedback loop. The SI-COLUB is set to monitor a specific parameter, like force or sarcomere length, and it uses that value to create a motor position control signal that adjusts the position of the motor. The SI-COLUB also receives a feedback signal that it uses to create control signals that constantly adjust the position of the motor until the commanded setpoint is reached. Through MDAC software, the LabTrax 8/16 can be programmed to create position, stimulation, and command protocols for muscle experiments. In simple experiments, the protocols would move the motor to stretch or release a muscle and stimulate it to contract. In more complex experiments, MDAC and the LabTrax 8/16 might be used to control a module like the SI-COLUB Constant Load Module that monitors the load on the muscle or the length of its sarcomeres. Voltage Pulse Train from LabTrax 8/16 Force Output of the Tissue Sample Force F0 kF0 Isometric Force Development Slack Period Restretch Fig. 17 The digital output from the LabTrax 8/16 data acquisition unit sends a capture command to the SI-COLUB to slack or restretch the muscle as it is maintained under load. 16 WORLD PRECISION IN STRU MENTS SI-MT/SI-MKB/SI-HTB In constant load experiments, the initial length of the muscle is set using the manual adjustments of the muscle research platform. While the muscle is held at its initial length, it is stimulated with tetanizing pulses so that the muscle develops its isometric force. These stimulus pulses are controlled by the stimulation protocol created in MDAC and sent from the analog stimulus output of the LabTrax 8/16. Once isometric tension is established in the muscle, the capture command created in MDAC is sent from one of the digital outputs of the LabTrax 8/16 to the SI-COLUB module. This command triggers the SI-COLUB to read the initial force (F0) in the muscle and monitor the actual muscle tension through feedback provided by the force transducer and its amplifier (SI-BAM21LCB) or its anti-oscillation unit (SI-AOSUB). The SI-COLUB analyzes the inputs that it receives and calculates the command that needs to be sent to the SI-MOTDB Linear Motor Controller to maintain a load on the muscle as it slacks and reaches the force (kF0), where k is set by the Force Step dial. The time it takes to reach this force is determined by the Slack potentiometer. Once kF0 is reached, the SI-COLUB sends position commands to the motor to maintain that force. When the desired time at kF0 is elapsed, MDAC sends another command through the same digital output of the LabTrax 8/16 to the SI-COLUB module to return the muscle to its original length and force (F0). The restretch time is determined by the Restretch potentiometer. The SI-COLUB offers three modes of operation: Constant Load, External Loop and Bypass. Constant Load Mode External Loop Mode Bypass Mode Measured Force (from SI-AOSUB or SI-BAM21-LCB) External Trigger (Like SI-SARCAM Camera) SI-COLUB Force Step ×k Capture Command Bypass Linear Motor Feedback Fig. 18 This block diagram graphically shows the three modes of operation in the Constant Load module. WORLD PRECISION IN STRU MENTS 17 SI-H Muscle Testers • Constant Load–This mode maintains a constant load on the tissue sample. If capture command triggered, Capture sets F0 at level of captured F LabTrax 8/16 triggers Capture Command Force Step sets k (%) CL Command receives F measurement Force measured by SI-KG force transducer (signal may go through SI-AOSUB) Linear Motor response changes force on muscle k×F0 calculated Control Loop calculates Linear Motor command LabTrax 8/16 signal determines setpoint (F0 or k×F0) The SI-AOSUB Corrected Output, representative of the force transducer output, is the SI-COLUB feedback input. The SI-AOSUB Corrected Output is connected to the CL CMD (constant load command). The digital output of the data acquisition system (LabTrax 8/16) that carries the capture command is connected to the Capture BNC port on the SI-COLUB. When the voltage of the capture command goes from low (0V) to high (5V), the SI-COLUB reads the force (F0) in the muscle, analyzes the feedback signal, and slacks the muscle until it reaches kF0. When the voltage of the capture command goes from high to low, the SI-COLUB controls the restretch of the muscle to F0. • External Loop–In this mode, an external signal other than one from the force transducer (Constant Load mode) is used as the feedback signal for the SI-COLUB to control the position of the motor. LabTrax 8/16 triggers Capture Command CL Command receives measurement Alternate Feedback parameter measured (ex.: Sarcomere Length) If capture command triggered, Capture sets setpoint at level of captured measurement Linear Motor response changes monitored parameter Control Loop calculates Linear Motor command When using an External Loop to control the position of the motor, an output of the LabTrax 8/16, as programmed by MDAC, is connected to the CL CMD input of the SI-COLUB. This sets the desired level of force (F0) that this module will try to maintain using the feedback signal to control the motor position command (MOT POS CMD OUT) sent to the SI-MOTDB. The output of the SI-SARCAM is a good example of a feedback signal from an external source that would be used to control the position of the motor. Feeding the output of the SI-SARCAM into the ALT FB input of the SI-COLUB module will control 18 WORLD PRECISION IN STRU MENTS SI-MT/SI-MKB/SI-HTB the motor so that the sarcomere length is held constant while trying to study true isometric contractions • Bypass–In this mode, the Constant Load Module is completely bypassed. Bypass Motor Command received from LabTrax 8/16 Command sent to Linear Motor To use Bypass Mode, send a continuous voltage of at least 3.0V from one of the analog or digital outputs of the LabTrax 8/16 to the CL Bypass inputs of the SI-COLUB. In this mode, the motor is moved by connecting the analog position protocol output of the LabTrax 8/16 to the Bypass MOT CMD of the module. The signal in the position protocol programmed by MDAC will drive the motor when the MOT POS CMD OUT is connected to the Position In of the SI-MOTDB Motor Controller. IMPORTANT NOTE: THE SI-COLUB unit can only be used on tonically contracting muscle tissue (for example, during a tetanic contraction). For equivalent experiments in cardiac muscle and skeletal twitch contractions, the AFTERLOAD unit is needed. Contact WPI for further information. Stretch Control Knob Force Step Dial Restretch Potentiometer (Restretch) Slack Potentiometer (Slack) External Command Toggle Switch (EXT CMD/CL) Constant Load Bypass BNC (CL BYPASS) Capture BNC (CAPTURE) C A Alternate Feedback BNC (ALT FB) Motor Position Command Output BNC (MOT POS CMD OUT) M Bypass Motor Command BNC (BYPASS MOT CMD) B Constant Load Command BNC (CL CMD) Fig. 19 The SI-COLU Constant Load Module can be used to switch from an isometric to an isotonic contraction by engaging a feedback around a reduced constant measured force. WORLD PRECISION IN STRU MENTS 19 SI-H Muscle Testers Stretch Control Knob–This 12-position dial adjusts the response time of the stretch and slack periods of the tissue sample. The setting you choose depends on the sensitivity of your force transducer and the strength of your sample tissue. Force Step Dial–During a tonic contraction, activation of the SI-COLUB unit causes the force to drop to the level, which is set using with the Force Step dial. The numbers on the vernier dial correspond to the percentage of the force (Fo) gained by the muscle up to the point where the SI-COLUB module is triggered. The number 10.0 corresponds with 100% of the force. For example, adjusting the potentiometer to 5.0 means that the applied force drops to 50% of the original force Fo. When the lever on the top right of the vernier dial is in the lower position, the value of the dial is locked in place. Restretch Velocity Potentiometer–Use a small screwdriver or POT tweeker to adjust the speed at which the muscle returns to the original force. Slack Poteniometer–Use a small screwdriver or POT tweeker to adjust the speed at which the muscle is relaxed after the unit is triggered. External Command Toggle Switch–When using the Constant Load mode, set this switch to CL (down). When using the External Loop mode, set it to EXT CMD (up). It is not used with Constant Load Bypass mode. Constant Load Bypass BNC–This input determines whether or not the SI-COLUB is in Bypass mode. When you want to use Bypass mode, connect this BNC terminal to an output from LabTrax 8/16 and supply a continuous high voltage (greater than 3V) to it. When using the other modes, this connection is not used. If desired, it could be tied to ground or a 0.0V load could be placed on it. Capture BNC–In the Constant Load mode, connect this port with the control signal from the LabTrax 8/16. A digital output "High" signal allows the Force Step setting to slack. A digital output "Low" signal sends the starting force stretch command. Alternate Feedback BNC–This connection is only used for the External Command mode. It connects the Constant Load Unit with the alternate feedback source, like the SISARCAM camera. For example, a signal from the SI-SARCAM camera can be connected to this input to be used as the parameter being driven to a desired commanded level. Motor Position Command Output BNC–For all three modes, this port connects with the Position In port on the SI-MOTDB Linear Motor controller. In the Bypass mode, the signal that comes into the Bypass Motor Command input is transferred directly to the Motor Position Command Output and sent to the SI-MOTDB Linear Motor Controller without any modifications. Bypass Motor Command BNC–This connection is only used in Bypass mode. It receives input from the LabTrax 8/16. That signal goes directly to the Motor Position Command Output and is sent to the SI-MOTDB Linear Motor Controller without any modifications. Constant Load Command BNC–When in Constant Load mode, connect this BNC to the Corrected Output on the SI-AOSUB. In External Loop mode, connect this input to an output of the LabTrax 8/16 that is programmed to drive the motor and set the desired level of force that is to be maintained during the experiment. 20 WORLD PRECISION IN STRU MENTS SI-MT/SI-MKB/SI-HTB Connecting the Signal Conditioning Amplifier System Force Transducer 5-pin cable Linear Motor Data Acquisition Analog Input Data Acquisition Analog Input (Force recording channel) (Sarcomere channel) Laser Fig. 20 Data Acquisition Data Acquisition Analog Input Analog Output (Distance channel) Camera (Motor Position Control channel) Data Acquisition Analog Input (Motor Position Control channel) Computer (data logging through terminal emulation program) SI-H Cuvettes Connect the system as shown above. 1. Connect the 5-pin connector on the force transducer to the port labeled Transducer on the front panel of the SI-BAM21-LCB transducer amplifier. For information on using the amplifier, see "Using the SI-BAM21-LCB" on page 24. 2. (Optional) Make the linear motor connections, if a motor is used. • Connect the linear motor to the port labeled Motor Connector on the SIMOTDB. • Using a standard BNC cable, connect the analog output of the data acquisition system (like LabTrax8/16) that controls the linear motor input to the Position In port on the SI-MOTDB. • Using a standard BNC cable, connect the Position Out port on the SI-MOTDB to a second analog input of the data acquisition system that monitors the motor feedback. 3. (Optional) If a motor is used, an anti-oscillation unit is necessary to minimize vibration. When the SI-MT or SI-MKB electronics are configured at the factory with an SI-AOSUB, the signal is routed internally from the SI-BAM21-LCB module to the SI-AOSUB module. The Force Output connection on the front of the SI-BAM21-LCB module shows the raw unfiltered signal from the transducer, but it does NOT need to be connected externally. WORLD PRECISION IN STRU MENTS 21 SI-H Muscle Testers • IF the SI-BAM21-LCB transducer amplifier module and the SI-AOSUB antioscillation module are not connected to each other through the backplane of the Signal Conditioning Amplifier System, these two modules must be connected through ports on the front panels of the modules. Use a BNC-BNC cable to connect the Force Output port on the front panel of the SI-BAM21-LCB module to the Input port on the front panel of the SI-AOSUB module. • If a SI-AOSUB is being used because the system has a motor, then use a BNC cable to connect the Corrected Output port of the SI-AOSUB module to the analog input of the data acquisition system, which is designated as the force recording channel. The Corrected Output is the signal from the transducer amplifier that exists after the resonance frequency of the transducer was removed from the raw transducer signal by the anti-oscillation filter. For information on using the SI-AOSUB, see "Using the Anti-Oscillation Unit" on page 27. 5. (Optional) If a Sarcomere Length Unit Is included, connect the SI-SARCAM as follows: • Connect the cord from the laser to the Laser connection port. • Connect the cord from the camera to the CCD connection port. • (Optional) Connect the Video BNC port to an oscilloscope to display the laser diffraction pattern. • To monitor the approximate sarcomere length over time, connect the Sarcomere BNC connector to an analog input on your data acquisition system. • To track the distance from the center laser beam to the first order of diffraction, connect the Distance BNC connector to an analog input on your data acquisition system. For information on using the SI-SARCAM, see "Using the Sarcomere Length Unit" on page 29. 6. (Optional) If cuvette temperature control is required, connect the SI-TCM2B as follows: • Line up the cuvette connector on the heating cable of the cuvette with the CH1 or CH2 port on the SI-TCM2B, press it into place and screw the outer ring of the connector to secure the connector. A second cuvette may be connected to the other port, if necessary. • To monitor the temperature over time, use a USB cable to connect a computer's terminal emulation program using the USB port on the SI-TCM2B. For information on using the SI-TCM2B, see "Using the Temperature Control Module" on page 35. 7. 22 (Optional) If a Constant Load Module is installed, the connections that are made depend upon the mode of operation. Three modes are available (Constant Load, External Loop and Bypass). Make the connections according to the following table: WORLD PRECISION IN STRU MENTS SI-MT/SI-MKB/SI-HTB Constant Load Ext Cmd CL Bypass External Loop EXT CMD (toggle switch–up position) This connection is not used. IF desired, you can apply a 0.0V continuous signal or tie it to ground. Output (AO or DO) This connection is not from LabTrax 8/16 that used. IF desired, you can generates a continuous apply a 0.0V continuous high voltage of at least signal or tie it to ground. 3.0V Capture Control signal from one of the digital outputs of the LabTrax 8/16. A low to high signal sends _ a capture and slack command. A high to low signal sends a restretch command. ALT FB Feedback from the monitored parameter. For example, the Sarcomere BNC on the – SI-SARCAM provides the sarcomere length reading from the sarcomere camera MOT Position In BNC on the Position In BNC on the POS SI-MOTDB Linear Motor SI-MOTDB Linear Motor CMD Controller. This sends Controller. This sends OUT the signal to drive the the signal to drive the motor. motor. Bypass MOT CMD – CL CMD 8. Bypass CL (toggle switch–down position) Corrected Output BNC on the SI-AOSUB. This is the corrected force transducer output. This provides the feedback information for the motor position. – Control signal from any output of the LabTrax 8/16 that can be used to set the desired value to which the feedback signal is driven to create a change in the Motor Position Command Output. – _ – Position In BNC on the SI-MOTDB Linear Motor Controller. This is the same signal that comes in through the BYPASS MOT CMD input. An output from LabTrax 8/16 which will drive the motor can be routed in here. It is sent through the MOT POS CMD OUT to the SI-MOTDB Position In BNC. – Verify that the Power switches on the back panel and on the front panel of the Signal Conditioning Amplifier System are in the on (I) position. WORLD PRECISION IN STRU MENTS 23 SI-H Muscle Testers OPERATING INSTRUCTIONS Turning the System On For convenience, the Signal Conditioning Amplifier System has two power switches, and both must be on to power the system. One is located on the back panel, and one is on the front. Both switches must be on to power the system. Verify that the power cord is properly installed and plugged into an AC power outlet. All the modules power on/off simultaneously. When the system is setup, just leave the back power switch in the on (I) position. Using the SI-BAM21-LCB Calibrating the SI-BAM21-LCB Before taking measurements, the SI-BAM21-LCB must be calibrated. Each SI-KG force transducers shown responds linearly within its respective measurement ranges. Consequently, the SI-BAM21-LCB can be calibrated using only two reference points. Force Transducer SI-KG2 SI-KG2A SI-KG4 SI-KG4A SI-KG7 SI-KG7A SI-KG7B SI-KG20 Force Range 0-2N 0-0.5N 0-50mN 0-20mN 0-5mN 0-5mN 0-10mN 0-0.2N Range (g) 0-200 0-50 0-5 0-2 0-0.5 0-0.5 0-1.0 0-20 Noise (µN) 250 300 15 4 0.2 0.4 1 80µN Compliance Resonance (nm/mN) Frequency 150 1.3kHz 0.5 1 10 5 1.5 1.2kHz 1.2kHz 250Hz 500Hz 550Hz 590Hz Under ideal conditions, use a model of SI-KG transducer that has a full-load range that is no more than 120% of the maximum force that is anticipated. For example, if the greatest force to be measured is 4g, use a transducer that has a full-load range of 5g, like the SI-KG4 transducer. To use the transducer at its full-load range, set the gain of the SI-BAM21LCB to X1. Higher resolutions are possible using the other gain settings (X2, X5, or X10). However, using a gain of X10 allows only a tenth of the full-load range of the transducer to be displayed as an output. In general, it is best to choose a gain factor that does not need to be changed during an experiment, since each gain factor can have slight variances in its offset. If it is necessary to switch between gain ranges during an experiment, check the offsets in each of the ranges after the calibration and before conducting the experiment. Then, use the Offset Adjustment switch to set the minimum average offset between the ranges. NOTE: Before calibrating the SI-KG transducer or setting its anti-oscillation frequency with an SI-AOSUB module, position the tissue mount being used on the actuator rod of the transducer. During the calibration, place the weight on the tissue mount at the same position where the tissue will be attached. The basic procedure for calibrating the SI-BAM21-LCB involves: 24 WORLD PRECISION IN STRU MENTS SI-MT/SI-MKB/SI-HTB 1. Setting a zero reference point with the force transducer un-loaded. 2. Applying a load with a known mass to the tissue mount on the transducer. 3. Choosing one of the two calibration methods to best serve the application. Use the Gain Calibration Potentiometer to adjust the amplifier’s output range to: • Maximize the resolution for the intended measurement range. For the greatest precision, maximize the resolution of the SI-BAM21-LCB by calibrating the 10.0V output of the amplifier to 10-20% above the maximum expected force. For example, if the maximum expected value is 4.0-4.5g, set the SI-BAM21-LCB so that a 5g mass yields a 10.0V output. The maximum expected output would then be 9.0V, with a 4.5g applied load. • Numerically correlate the force with a voltage output. For quick visualization, you may choose to establish a numerical correlation by calibrating the SI-BAM21LCB so that a force like 5.0g generates a 5.0V output. The following calibration procedure may be used with any SI-KG force transducer. For illustration purposes, a SI-KG4 force transducer is used in the example. Note that a 5g mass is the maximum force that a SI-KG4 can measure. If a gain of X10 is used with theSI-KG4 transducer, then 0.5g, which is about 10% of the total range of the SI-KG4 force transducer, is the largest mass that can be used with this force sensor. 1. 2. Connect the force transducer to the transducer input of the SI-BAM21-LCB. Connect the output of the SI-BAM21-LCB, or the Corrected Output of the SI-AOSUB module if it is being used, to an input of a data acquisition system or a digital multimeter. See "Setup" on page 5. • If a multimeter is used to track the output of the amplifier or the anti-oscillation filter, set the scale of the meter to measure DC voltages between -10.0 and +10.0VDC. • If a computerized data acquisition system, like a LabTrax 8/16, is used to record the output of the amplifier or filter, use the autoscale feature of the recording software to track the changes in the output voltage as the calibration is performed. Mount the force transducer on the calibration stand on the base of the SI-MT, SIMKB or SI-HTB system. NOTE: The calibration stand holds the force transducer and its tissue mount in the proper orientation for an accurate calibration. This angle is critical in establishing a proper calibration ratio. When gravity pulls the mass hung on end of the tissue mount down, the actuator rod of the transducer is pulled in the same direction as the force created by the tissue used in the experiment. If the force is not pulling on the tissue mount in this direction, the output signal has to be adjusted correspondingly. WORLD PRECISION IN STRU MENTS 25 SI-H Muscle Testers Force Transducer Assembly Tissue Mounting Hook Calibration Stand Fig. 21 When the force transducer is properly mounted in the calibration stand on the muscle tester, the force transducer is held at the same angle used when making measurements. 3. Set the Gain switch on the front panel of the SI-BAM21-LCB to the gain (X1-X10) that is suitable for the mass being used for the calibration of the selected transducer. 4. With no weight suspended from the transducer, press and release the Zero button on the SI-BAM21-LCB. Use the multimeter or data acquisition system to monitor the transducer output signal from the SI-BAM21-LCB or the SI-AOSUB. A reading of 0.0VDC ±50mV should be seen. Remember that the zeroing error is larger with higher gains. Use the Offset Adjustment switch to move the baseline of the recording closer to zero if a smaller offset error is desired. NOTE: When the Zero button is pressed, the zeroing LED illuminates to indicate that the zeroing function is processing. 5. Use the Offset Adjustment switch to adjust the baseline to zero. Press and hold the toggle switch up, if you want to raise the baseline. Or, press and hold the toggle switch down to lower the baseline. If the baseline is more than 0.3V above zero, the High LED illuminates, and if it is less than –0.3V, the Low LED illuminates. When the baseline is within 0.3V of zero, the LEDs are off. NOTE: Once the baseline is zeroed to the desired position, do not touch the Offset Adjustment switch until the calibration procedure is completed. 6. From the point on the tissue mount of the transducer where the tissue will be attached, suspend a known mass that is close to the maximum range for the amplification factor and force transducer being used. In the example for the SI-KG4 force transducer, a weight less than 5.0g is used for X1 or less than 0.5g for X10. NOTE: Mass in grams can be converted to force in Newtons (N) by multiplying the weight hung on the transducer by gravitational acceleration. Since force equals mass times acceleration (F=ma), a 0.5g weight is equal to 4.9mN (0.0005kg * 9.8m/s2 = 0.0049N). Make sure that the mass used to calibrate the transducer amplifier creates a force that falls within the operating range of the force transducer and amplification factor you selected. 7. 26 After the suspended mass becomes motionless, monitor the output of the amplifier or the corrected output of the anti-oscillation filter while adjusting the Gain Calibration potentiometer on the SI-BAM21-LCB. Use a potentiometer adjustment tool to adjust the Gain Calibration potentiometer to any desired value up to the limit of 10.0V. WORLD PRECISION IN STRU MENTS SI-MT/SI-MKB/SI-HTB 8. If you intend to use multiple amplification factors, cross-check your calibration. For example, if a 0.5g mass was used to calibrate the SI-BAM21-LCB as close as possible to 10.0V at a gain of X10, then at a gain of X1, the monitor should display an output very close to 1.0V for the same 0.5g calibration mass. Making Measurements After the SI-BAM21-LCB has been calibrated, measurements may be taken. 1. Turn the SI-BAM21-LCB Power switch on (I). NOTE: Allow the system to stabilize for about 30 minutes. This allows all the components to reach thermal equilibrium, minimizing measurement changes due to thermal variations. 2. Turn on the data acquisition system. 3. Press the Zero button to set the baseline value for the measurements. NOTE: When the Zero button is pressed, the zeroing LED illuminates to indicate that it is functioning properly. 4. Measurements may be taken. Setting System Gain Factor The SI-BAM21-LCB gain multiplier setting is selected with an internal jumper that is configured at the factory for use with the muscle tester system of your choice (SI-MT, SI-MKB, SI-HTB). The X1 setting (SI-MT/SI-HTB) allows for 1X, 2X, 5X and 10X gains. The X10 setting (SI-MKB) allows for 10X, 20X, 50X and 100X gains that may be needed when recording passive tension or small muscle contractions. 1. Turn off the Signal Conditioning Amplifier System and unplug it from the power outlet. 2. Remove the two screws on the face of the SI-BAM21-LCB module. 3. Gently slide the module out of the Signal Conditioning Amplifier System frame. 4. Locate the 3-pin jumper J16. Jumper pins 1 and 2 to use the SI-BAM21-LCB with X1 gain multiplier, or jumper pins 2 and 3 for use with X10 gain multiplier. 5. Reinstall the module into the frame and secure it with the screws. Using the Anti-Oscillation Unit Adjusting the Anti-Oscillation Filter The anti-oscillation filter is adjusted at the factory using the transducer that is supplied with the SI-MT, SI-MKB, SI-HTB, or SI-CTS system. Normally, the filter does not need to be reset, unless a different force transducer is connected to the unit. To adjust the antioscillation filter properly, the transducer is excited at its resonance frequency using a magnetic driver or pulser (WPI #97204). WORLD PRECISION IN STRU MENTS 27 SI-H Muscle Testers Fig. 22 (Left) This pulser assembly has no force transducer mounted in it. Fig. 23 (Right) A force transducer is mounted in the SI-AOSUB pulser assembly. Keep in mind that: • The closer the anti-oscillation frequency matches the resonance frequency of the force transducer, the more the ringing phenomenon is removed from the force signal. • The resonance frequency can be evoked at anti-oscillation frequencies that are multiples of the resonance frequency. For example, if the resonance frequency of the transducer is 200Hz, it can also be evoked when the anti-oscillation frequency is set to 400 or 600Hz. The anti-oscillation filter works best when the anti-oscillation frequency is set at the actual resonance frequency of the transducer. 1. Slide the force transducer, with its tissue mount in position, forward into the pulser (magnetic driver assembly) until it rests against the stop at the front of the pulser. See Fig. 23. 2. Attach the cable of the pulser to BNC connector of the Pulser Output on the front of the Anti-Oscillation module (SI-AOSUB). 3. Using the potentiometer adjustment tool provided with the signal conditioning amplifier system, rotate the calibration screw of the Anti-oscillation Frequency Adjustment potentiometer completely to the left (counter-clockwise). The antioscillation frequency is now set to the lowest possible level. 4. Turn the Pulser Amplitude Adjustment knob completely to the left (counter-clockwise). The amplitude of the anti-oscillation frequency is now set to the lowest possible level. Then, slowly turn the Pulse Amplitude Adjustment knob to the right until a couple of bars on the Signal Amplitude LED array are illuminated. 5. Using the potentiometer adjustment tool, slowly turn the calibration screw of the Anti-oscillation Frequency Adjustment potentiometer to the right (clockwise) while observing the Signal Amplitude LED array. As the calibration screw is turned to the right, the anti-oscillation frequency gets closer to the resonance frequency of the transducer, and the transducer begins to oscillate at higher amplitude as indicated by the increased number of lights in the LED array that illuminate. 28 WORLD PRECISION IN STRU MENTS SI-MT/SI-MKB/SI-HTB 6. Continue to rotate the calibration screw of the Anti-oscillation Frequency Adjustment potentiometer to the right (clockwise) until the greatest number of bars on the Signal Amplitude LED array are illuminated. If the Signal Amplitude LED array becomes fully illuminated as the anti-oscillation frequency is increased, decrease the pulse amplitude by turning its control knob to the left (counterclockwise). Turn the knob to the left until some of the bars at the top of the Signal Amplitude LED array are no longer illuminated. 7. Repeat Step 6 until the greatest number of bars on the Signal Amplitude LED array is illuminated without the signal amplitude being saturated. When this occurs, the anti-oscillation frequency has been set equal to the resonance frequency of the transducer. NOTE: If the Signal Amplitude LED array is saturated at any time during the frequency calibration, reduce the pulse amplitude by rotating Pulser Amplitude Adjustment knob to the left until some of the bars at the top of the array are no longer illuminated. Fig. 24 The upper trace is a force transient obtained directly from the bridge amplifier output, and the lower trace shows the signal after it passes through the “anti oscillation” unit. Using the Sarcomere Length Unit Setup 1. Turn on the system. See "Turning the System On" on page 24. 2. Line up the laser connector with the port labeled Laser on the SI-SARCAM module and press it into place. 3. Line up the camera connector with the port labeled CCD on the SI-SARCAM module and press it into place. 4. Press the Setup button to toggle through the setup parameters. WORLD PRECISION IN STRU MENTS 29 SI-H Muscle Testers 5. Press the Display button to save the configuration and return to the normal display. NOTE: The unit remembers the state of all the parameters, even after it is powered off. To reset the factory defaults, turn the unit off, press both the Up and Down buttons simultaneously while you turn the system back on. NOTE: For safety reasons, the laser is always disabled at startup. Choosing a Display Mode The default display is two lines and shows the calculated (exact) sarcomere spacing, first order diffraction distance that is used to calculate the sarcomere spacing and the signal amplitude, which is used when you are aligning the camera. To toggle through the display modes, press the Display button. Press one time to see the first order diffraction distance. Press it again to view the signal amplitude. Press it a third time to return to the sarcomere spacing display. Setup Menu Press the Setup button to toggle through the Setup menu and cycle through the list of available parameters. Parameters are shown in Fig. 25. Laser Off/On LASER DISABLED CCD Offset CCD Offset Backlight Level (1–8) Backlight Level CCD Mode (263Hz/1KHz) CCD Mode Tissue to CCD Distance Tissue Distance CCD Sensitivity (1–10) CCD Sensitivity Fig. 25 The Setup button lets you toggle through the list of parameters. Turning On/Off the Laser For safety reasons, the laser is always disabled at startup. 1. Press the Setup button. The state of the laser displays (LASER DISABLED or LASER ENABLED). LASER DISABLED Fig. 26 Press the Up or Down button to change the laser state. 2. Press the Up or Down button to change the laser state. 3. Press the Display button to save the configuration and return to the normal display. 30 WORLD PRECISION IN STRU MENTS SI-MT/SI-MKB/SI-HTB Adjusting the CCD Offset CAUTION: The CCD offset should not be modified from the factory default of 6.8mm unless you have a reason to place the zero order laser spot at a different location other than the cross hair mark on the cuvette. 1. Press the Setup button until "CCD Offset" appears. This is the distance between the crosshair marking on the cuvette and the first pixel of the CCD camera. CCD Offset 6.8 mm Fig. 27 Press the Up or Down button to adjust the offset. 2. Press the Up or Down button to adjust the offset. 3. Press the Display button to save the configuration and return to the normal display. Setting the Tissue Distance CAUTION: The default value for the tissue distance is 36.0mm. This value should not be modified. 1. Press the Setup button until "Tissue Distance" displays. This is the distance between the muscle tissue sample and the CCD camera (D). Tissue Distance 36.0 mm Fig. 28 Press the Up or Down button to set the tissue distance. 2. Press the Up or Down button to adjust the distance. 3. Press the Display button to save the configuration and return to the normal display. Adjusting the CCD Sensitivity 1. Press the Setup button until “CCD Sensitivity" displays. The camera's sensitivity can range from 1 (minimum) to 10 (maximum). By default the sensitivity is set to the minimum (1). To modify the sensitivity, press the Setup button. CCD Sensitivity Min=1 1 Max=10 Fig. 29 Press the Up or Down button to adjust the camera sensitivity. 2. Press the Up or Down button to adjust the sensitivity. 3. Press the Display button to save the configuration and return to the normal display. WORLD PRECISION IN STRU MENTS 31 SI-H Muscle Testers Setting the Camera (CCD) Mode 1. Press the Setup button until “CCD Mode" displays. Two options are available: • If you set the system to 263Hz (default), the full display of the CCD is used and the camera operates at 263Hz. • For faster operations (1KHz), set the system to 1KHz. At the faster speed, only the first quarter of the CCD camera display is used for making measurements. CCD Mode 263 Hz Fig. 30 Press the Up or Down button to change the CCD mode. NOTE: The update rate is only supported on the analog outputs. The LCD display update rate is much slower. 2. Press the Up or Down button to change the CCD mode. 3. Press the Display button to save the configuration and return to the normal display. Aligning the Laser and the Camera WARNING: DO NOT EXPOSE YOUR EYES TO LASER LIGHT. EVEN REFLECTED LASER LIGHT MAY BE HARMFUL. ALWAYS WEAR PROTECTIVE LENSES WHEN WORKING WITH LASERS. 1. Turn on the system. See "Turning the System On" on page 24. 2. Enable the laser. By default, the laser is always disabled on startup. See "Turning On/ Off the Laser" on page 30. When the laser is enabled, a red dot (the laser beam) appears near the cross hair mark on the front of the camera. 3. The laser beam (center beam) must hit the cross hair mark on the CCD camera front plate. Fig. 31 The cross hair mark is etched on the front of the camera, which is mounted just behind the optical cuvette. 32 WORLD PRECISION IN STRU MENTS SI-MT/SI-MKB/SI-HTB SI-SARCAM Front SI-SARCAM Back Camera CCD Detector Chip Cross Hair Mark Optical Cuvette AVOID III Laser diode 5mW Class MaxOut: aperatu from this emittedto the beam e m Laser radiation direct exposur th: 630–680n Avoid waveleng A Laser Product E EXPOSUR re Laser Laser X-Y Adustment Knob Camera X-Y Adustment Knob Camera Height Adustment Knob Laser Height Adustment Knob Fig. 32 The front and back of an SI-SARCAM system is shown mounted on an SI-MKB platform. To adjust the laser: • Use the Camera X-Y Adjustment Knob and the Camera Height Adjustment Knob for coarse alignment of the position of the camera. • Verify that the camera's front plate is perpendicular to the main laser beam. • Use the Laser X-Y Adjustment Knob and the Laser Height Adjustment Knob for the fine alignment of the horizontal and the vertical position of the laser. • When the camera is properly aligned the light of the first order diffraction hits the sensitive area of the CCD detector chip. It may be necessary to adjust the vertical position (not the horizontal position) of the camera for a maximum signal. To do this, press the Display button on the controller to view the signal amplitude. This shows the detected first order diffraction of the laser pattern. This amplitude is maximal if the focused light hits the sensitive area of the detector chip. To keep the signal from saturating the CCD and giving erroneous signals, adjust the amplitude so that it is as close to 3.0V as possible. Using the Laser Power knob on the controller and the Camera X-Y Adjustment Knob, you can precisely position the CCD camera and control the laser power so that a desirable signal is achieved. Calibrating the Camera Your Sarcomere Length Unit comes with several calibration gratings. These are clear plastic films with an embedded grid (Fig. 33). When exposed to the laser, the grating acts in place of the muscle to create a consistent diffraction pattern that is used to calibrate the camera. WORLD PRECISION IN STRU MENTS 33 SI-H Muscle Testers Fig. 33 (Left) The sarcomere grating fits into the cuvette and provides a foolproof calibration method. Fig. 34 (Right) The grating is position in the optical cuvette to calibrate the camera. 1. Turn on the system. See "Turning the System On" on page 24. 2. Enable the Laser. For safety reasons, the laser is always disabled on startup. See "Turning On/Off the Laser" on page 30. When the laser is enabled, a red dot (the laser beam) appears near the cross hair mark on the front of the camera. 3. Position a calibration grating inside the optical cuvette so that the laser beam shines through the grating and casts a diffraction pattern on the camera lens (Fig. 34). 4. Adjust the zero order laser spot (the center beam) so that it hits the cross hair mark on the camera. See "Aligning the Laser and the Camera" on page 32. 5. Using the Camera Height Adjustment Knob and the Laser Power Knob on the controller to display the ideal signal for the first order signal. 6. Read the sarcomere length on the LCD display. 7. Use the Camera X-Y Adjustment Knob to adjust the horizontal position control on the camera until the sarcomere is displayed at 2.0µm. Display Laser Diffraction Pattern on an Oscilloscope 1. In order to display the laser diffraction pattern on an oscilloscope connect the Sync BNC connector with the external trigger input of an oscilloscope. The trigger signal is 5.0V. It jumps high when the scan begins. Fig. 35 The top trace shows the timing reference to the video. The camera signal is shown in the bottom trace. 34 WORLD PRECISION IN STRU MENTS SI-MT/SI-MKB/SI-HTB 2. Adjust the trigger level on the oscilloscope. 3. Connect the Video BNC connector to the analog input of the oscilloscope. 4. Set the time scale of the oscilloscope to display the desired portion of the video signal. The scan of the photodiodes lasts 1ms in 1KHz mode or 3.8ms in 263Hz mode. NOTE: If the scanned signal is less than 1.0V, the sarcomere length may be incorrectly calculated. NOTE: If no oscilloscope is available, view the signal amplitude by pressing the Display button. Adjust the amplitude by adjusting the Laser Power knob. If the laser pattern becomes weak compared to the background (peak height less than twice the maximum background), then check the quality of the laser pattern with an oscilloscope as described above. Using the Temperature Control Module Understanding the Display The default display is two lines and shows the temperature of both channels. If you prefer, you may display information from a single channel, either Channel 1 or Channel 2. Channel 1 Information Channel 2 Information CH 1 = 36.9º C OK ј CH2 = 37.0º C OK Heating/Cooling Indicator Alarm State Live Temperature Readout Fig. 36 Two Channel display mode provides live data on both channels. Channel 1 Information Alarm State Fig. 37 CH 1 Temp 36.9º C ** OK ** ј Live Temperature Readout Heating Indicator One channel display mode provides live data on a single channel. Live Temperature Readout–The temperature of the cuvette connected to Channel 1 displays in the first line, and the Channel 2 cuvette temperature appears in the second line. NOTE: The maximum temperature the sensor can monitor is 62.9ºC. If a channel has no cuvette plugged in, the display will default to the maximum temperature display. Alarm State–If the temperature of the cuvette is within the defined range, OK displays on the screen. If the temperature falls below the defined range, a low alarm sounds and LO appears on the display. HI appears on the display and a high alarm sounds if the temperature exceeds the defined range. If the alarm is not enabled, no audible alarm is heard. WORLD PRECISION IN STRU MENTS 35 SI-H Muscle Testers Heating Indicator–A flashing arrow pointing up (↑) indicates that the cuvette is heating. Setup 1. Turn on the system. 2. Line up the cuvette connector with the port on the SI-TCM2, press it into place and screw the outer ring of the connector to secure the connector. 3. Press the Setup button to toggle through the setup parameters. 4. Press the Display button to save the configuration and return to the normal display. NOTE: The unit remembers the state of all the parameters, even after it is powered off. To reset the factory defaults, turn the unit off, press both the Up and Down buttons simultaneously while you turn the system back on. Choosing a Display Mode To toggle through the display modes, press the Display button. Press one time to see the Channel 1 Only display. Press it again to see the Channel 2 Only display. Press it a third time to return to the Two Channel display. Setup Menu Press the Setup button to toggle through the Setup menu and cycle through the list of available parameters. Parameters are shown in Fig. 38. Channel 1 Setpoint CH1 Setpoint CH 2 Alarm Enable CH2 Alarm CH 1 Alarm Enable CH1 Alarm Backlight Backlight Level CH2 Low Alarm Setpoint CH2 Low Alarm CH 1 High Alarm Setpoint CH1 High Alarm CH 1 Low Alarm Setpoint CH1 Low Alarm Channel 2 Setpoint CH2 Setpoint CH2 High Alarm Setpoint CH2 High Alarm Fig. 38 The Setup button lets you toggle through the list of parameters. Adjusting the Setpoint 1. 36 Press the Setup button. The Channel 1 setpoint displays. To modify the Channel 2 setpoint, press the Setup button until “CH2 Setpoint” displays. WORLD PRECISION IN STRU MENTS SI-MT/SI-MKB/SI-HTB CH 1 Setpoint 37.0º C Fig. 39 Press the Up and Down buttons to adjust the Channel 1 Setpoint. 2. Press the Up or Down button to adjust the setpoint. The maximum setpoint allowed is 45ºC. 3. Press the Display button to save the configuration and return to the normal display. Setting Alarms Both Channel 1 and Channel 2 have high and low alarm values. By default, the low alarms are set at 36ºF, the high alarms are set at 38ºF and the alarms are disabled. 1. Press the Setup button: • Twice to display the Channel 1 High Alarm • Three times to display the Channel 1 Low Alarm • Five times to display the Channel 2 High Alarm • Six times to display the Channel 2 Low Alarm The alarm setting displays. CH 1 High Alarm 38.0º C Fig. 40 Press the Up and Down buttons to adjust the alarm setting. 2. Press the Up or Down button to adjust the alarm setting. 3. Press the Display button to save the configuration and return to the normal display. Changing the Backlight Level for the Display By default the backlight level is set at 4. To make the display brighter, increase the level up to a maximum of 8. To dim the display, choose a lower level. 1. Press the Setup button until “Backlight Level” appears on the screen. Backlight Level Min=1 4 Max=8 Fig. 41 Press the Up or Down buttons to adjust the backlight level. 2. Press the Up or Down button to adjust the backlight level. 3. Press the Display button to save the configuration and return to the normal display. WORLD PRECISION IN STRU MENTS 37 SI-H Muscle Testers Enabling/Disabling the Alarms By default the alarms are disabled. When enabled, the unit will emit a beep when an alarm state occurs. 1. Press the Setup button until “CH1 Alarm” or “CH2 Alarm” appears on the screen. CH1 Alarm DISABLED Fig. 42 By default the alarms are disabled. 2. Press the Up or Down button to enable or disable the alarm. 3. Press the Display button to save the configuration and return to the normal display. Using the USB Port Output The USB port can be used to connect to a computer to log the temperature history. In order to communicate with the computer, a terminal emulation program is required. Several third party options are available, including: Hyperterminal, Real Term (realterm. sourceforge.net) or Cool Term (freeware.the-meiers.org). 1. When you use a standard USB cable to connect the SI-TCM2 to your computer, the computer will automatically install the necessary drivers. 2. Set up your terminal emulation program using the following parameters: 3. 38 • Baud rate: 38400 Bd • Data: 8 bits, (1 start, 1 stop) • Parity: None The comma delimited, output file logs the temperature 10 times a second. WORLD PRECISION IN STRU MENTS SI-MT/SI-MKB/SI-HTB MAINTENANCE The Signal Conditioning Amplifier System is maintenance free. However, to protect it, follow these guidelines: • Place the Signal Conditioning Amplifier System in a clean, dry location. • Keep liquids away from the Signal Conditioning Amplifier System connections. ACCESSORIES SI-BAM21-LCB Accessories Part Number Description 13661 2851 LABTRAX-8/16 SI-KG2 SI-KG2B SI-KG4 SI-KG4A SI-KG7 SI-KG7A SI-KG7B LAB-TRAX-8/16 SI-FS Potentiometer Adjustment Tool (Tweaker) BNC Cable SI-H Data Acquisition/Analysis System 0-2N Force Transducer 0-0.5N Force Transducer 0-50mN Force Transducer 0-20mN Force Transducer 0-5mN Force Transducer 0-5mN Force Transducer 0-10mN Force Transducer 8-Channel Data Acquisition System Electrode for field stimulation SI-TCM2B Accessories Part Number Description LABTRAX-MDAC 8-Channel Data Acquisition System SI-MOTDB Accessories Part Number Description 2851 LABTRAX-MDAC BNC Cable 8-Channel Data Acquisition System SI-AOSUB Accessories Part Number Description 2851 97204 LABTRAX-MDAC BNC Cable Pulser – SI-AOSUB Calibration Unit 8-Channel Data Acquisition System WORLD PRECISION IN STRU MENTS 39 SI-H Muscle Testers TROUBLESHOOTING Resonance noise still exists on the transducer output signal SI-BAM21-LCB has no output signal (0.0V DC) Chassis has no power Issue Possible Cause Solution One of the two power switches is off. Verify that the power switch one the back of the chassis and the power switch on the front panel are both in the on (I) position. The power cord is loose or not connected properly to the AC wall outlet Unplug the power cord from the wall and the chassis and re-install it. Poor force transducer connection Verify that the cables are securely connected to the SI-BAM21-LCB. BNC cable is bad Try substituting a different BNC cable to troubleshoot the cause. Transducer failed Try substituting a different force transducer to troubleshoot the cause. Anti-oscillation frequency is not Repeat the adjustment of the antiset properly oscillation filter. See "Adjusting the AntiOscillation Filter" on page 27. Verify that the pulser amplitude is reduced below maximum before trying another anti-oscillation frequency. NOTE: If you have a problem/issue with that falls outside the definitions of this troubleshooting section, contact the WPI Technical Support team at 941.371.1003 or [email protected]. 40 WORLD PRECISION IN STRU MENTS SI-MT/SI-MKB/SI-HTB SPECIFICATIONS This instrument conforms to the following specifications: Chassis Maximum Power Consumption 1.3A at 115V 50/60Hz, 1.8A at 230V 50/60Hz BAM21-LCB Specifications Input Configuration Gain Output Impedance Power Requirements Output Range Current to voltage converter 1X, 2X, 5X, 10X - Switch slectable 470 12V DC provided by the chassis ±10V DC SI-SARCAM Specifications Input Configuration Laser Laser Wavelength Camera Power Requirements Current to voltage converter Red laser diode 650nm Linear CCD Camera 12V DC provided by the chassis SI-TCM2B Specifications Input Configuration Operating Temperature Range Display Precision Controller Resolution Cuvette Temperature Sensor Power Requirements Current to voltage converter Room temperature 0.1ºC 0.1ºC 1000 RTD (1000 at 0ºC) 12V DC provided by the chassis SI-MOTDB Specifications Power Input 12V DC provided by the chassis ±10V DC SI-AOSUB Specifications Power Input 12V DC provided by the chassis ±10V DC 97204 Pulser Specifications Pulser Output Damping Frequency Range Output Range 0–10V DC adjustable 85Hz–1.0KHz 85Hz–1.0KHz ±10V SI-COLUB Specifications Command Request Feedback Motor Output Power Requirements ±10V ±10V ±10V 12V DC provided by the chassis WORLD PRECISION IN STRU MENTS 41 SI-H Muscle Testers 42 WORLD PRECISION IN STRU MENTS SI-MT/SI-MKB/SI-HTB INDEX expansion slots 5 F 500216-G ii 500217 ii 500217-G ii feedback 11 filter 8, 27 force transducer 6, 7, 8, 21, 40 fuse 5 A G alarm 15, 37 amplifier 6 amplitude 9 analog voltage 6 anti-oscillation 21, 27 anti-oscillation unit 4, 8 gain 7 gain factor 6 grating 9, 10, 33, 34 Symbols B backlight level 37 backplane 5 baseline 6, 7 Biofluorometer ii BNC 22, 40 buffer 6 C calibration potentiometer 8 camera 10, 12, 29, 33 CCD camera 10, 12 CCD Mode 32 CCD offset 31 CCD Sensitivity 31 cnstant load 5 constant 11 constant load 16, 22 corrected output 22 D data acquisition 6, 8 diffraction 10, 34 diffraction distance 30 diffraction pattern 33 digital interface 8 DIN 8 diode 10 E equation 12 WORLD PRECISION IN STRU MENTS I Iris Scissors ii L laser 9, 10, 12, 29, 30, 32 laser diffraction 34 legacy 8 linear motor 4, 11, 13, 21 linear motor controller 12 M magnetic driver assembly 28 maintenance 39 McPherson-Vannas Scissors ii measurements 27 motor 4 N noise 40 O raw signal 22 raw unfiltered signal 8 resonance frequency 4, 8, 9, 28 restretch 20 returns 3 S sarcomere 9 sarcomere length 10, 22 sarcomere spacing 4, 12, 30 saturate 29 setpoint 36 SI-AOSUB 8, 13, 28 SI-BAM21-LC 6 SI-BAM21-LCB 4, 6 SI-COLU 16 signal 8, 40 signal amplitude 30 SI-LMC 12 SI-SARCAM 9, 29 SI-TCM2 35 SI-TCM2B 15 square wave 9 T temperature control 5, 15, 22 Tissue Distance 31 trace 29 troubleshoot 39 tweaker 39 offset adjustment 7 optical force transducer amplifier 6 oscilloscope 12, 34 output 8 output signal 40 U P W parts list 3 power 24, 40 power supply 2 power switches 5 pulser 9, 28 unfiltered signal 8 unpacking 3 V vibrate 8 vibration 13 wavelength 10 Z zero 6, 7 zero switch 7, 9 R 43 SI-H Muscle Testers WARRANTY WPI (World Precision Instruments, Inc.) warrants to the original purchaser that this equipment, including its components and parts, shall be free from defects in material and workmanship for a period of one year* from the date of receipt. WPI’s obligation under this warranty shall be limited to repair or replacement, at WPI’s option, of the equipment or defective components or parts upon receipt thereof f.o.b. WPI, Sarasota, Florida U.S.A. Return of a repaired instrument shall be f.o.b. Sarasota. The above warranty is contingent upon normal usage and does not cover products which have been modified without WPI’s approval or which have been subjected to unusual physical or electrical stress or on which the original identification marks have been removed or altered. The above warranty will not apply if adjustment, repair or parts replacement is required because of accident, neglect, misuse, failure of electric power, air conditioning, humidity control, or causes other than normal and ordinary usage. To the extent that any of its equipment is furnished by a manufacturer other than WPI, the foregoing warranty shall be applicable only to the extent of the warranty furnished by such other manufacturer. This warranty will not apply to appearance terms, such as knobs, handles, dials or the like. WPI makes no warranty of any kind, express or implied or statutory, including without limitation any warranties of merchantability and/or fitness for a particular purpose. WPI shall not be liable for any damages, whether direct, indirect, special or consequential arising from a failure of this product to operate in the manner desired by the user. WPI shall not be liable for any damage to data or property that may be caused directly or indirectly by use of this product. Claims and Returns • Inspect all shipments upon receipt. Missing cartons or obvious damage to cartons should be noted on the delivery receipt before signing. Concealed loss or damage should be reported at once to the carrier and an inspection requested. All claims for shortage or damage must be made within 10 days after receipt of shipment. Claims for lost shipments must be made within 30 days of invoice or other notification of shipment. Please save damaged or pilfered cartons until claim settles. In some instances, photographic documentation may be required. Some items are time sensitive; WPI assumes no extended warranty or any liability for use beyond the date specified on the container. • WPI cannot be held responsible for items damaged in shipment en route to us. Please enclose merchandise in its original shipping container to avoid damage from handling. We recommend that you insure merchandise when shipping. The customer is responsible for paying shipping expenses including adequate insurance on all items returned. • Do not return any goods to WPI without obtaining prior approval and instructions (RMA#) from our returns department. Goods returned unauthorized or by collect freight may be refused. The RMA# must be clearly displayed on the outside of the box, or the package will not be accepted. Please contact the RMA department for a request form. • Goods returned for repair must be reasonably clean and free of hazardous materials. • A handling fee is charged for goods returned for exchange or credit. This fee may add up to 25% of the sale price depending on the condition of the item. Goods ordered in error are also subject to the handling fee. • Equipment which was built as a special order cannot be returned. • Always refer to the RMA# when contacting WPI to obtain a status of your returned item. • For any other issues regarding a claim or return, please contact the RMA department Warning: This equipment is not designed or intended for use on humans. * Electrodes, batteries and other consumable parts are warranted for 30 days only from the date on which the customer receives these items. World Precision Instruments, Inc. USA: International Trade Center, 175 Sarasota Center Boulevard, Sarasota FL 34240-9258 USA Tel: 941-371-1003 • Fax: 941-377-5428 • E-mail: [email protected] • Internet: http://www.wpiinc.com Germany: Zossener Str. 55, 10961 Berlin, Germany • Tel: 030-6188845 • Fax: 030-6188670 • E-mail: [email protected] 44 China & Hong Kong: WPI Shanghai Trading Co., Ltd. • Tel: +86 21 6888 5517 • E-mail: [email protected] UK: 1 Hunting Gate, Hitchin, Hertfordshire SG4 0TJ England • Tel: 44 (0)1462 424700 • E-mail: [email protected] WORLD PRECISION IN STRU MENTS