1
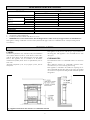
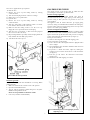
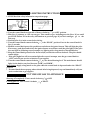
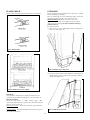
Senator
Vent-free Room Heater
Model 276N - For Natural Gas
Model 276P - For LPG (Propane Gas)
INSTALLATION AND
OPERATION MANUAL
Please read this manual before installing
and operating your heater.
Please keep this manual for future
reference.
This appliance is an unvented gasfired heater. It uses air (oxygen)
from the room in which it is
installed. Provisions for adequate
combustion and ventilation air
must be provided.
WARNING: If the information in this manual is
not followed exactly, a fire or explosion may result
causing property damage, personal injury or loss of
life.
- Do not store or use gasoline or other flammable
vapors and liquids in the vicinity of this or any
other appliance.
- WHAT TO DO IF YOU SMELL GAS
• Do not try to light any appliance.
• Do not touch any electrical switch; do not use
any phone in your building.
• Immediately call your gas supplier from a
neighbor’s phone. Follow the gas supplier’s
instructions.
• If you cannot reach your gas supplier, call the
fire department.
- Installation and service must be performed by a
qualified installer, service agency or the gas
supplier
600A584/06
LIST OF CONTENTS
Safety Information ............................................................................................................................................................................................................................................................
Appliance Specifications .........................................................................................................................................................................................................................................
Installation ...................................................................................................................................................................................................................................................................................
• Codes .......................................................................................................................................................................................................................................................................................
• Clearances .........................................................................................................................................................................................................................................................................
• Venting ...................................................................................................................................................................................................................................................................................
• Pre-installation Checks ....................................................................................................................................................................................................................................
• Equipment needed for Installation ....................................................................................................................................................................................................
............................................................................................................................................................................................................................................................
• Pack Contents
• Wall Mounting ...........................................................................................................................................................................................................................................................
• Gas Connection .......................................................................................................................................................................................................................................................
• Gas Pressure Check ..............................................................................................................................................................................................................................................
• Fitting Cast-iron Mantle ...............................................................................................................................................................................................................................
• Control Operation Check ...........................................................................................................................................................................................................................
Lighting Instructions ..................................................................................................................................................................................................................................................
.......................................................................................................................................................................................................................................................
• Safety Warnings
..............................................................................................................................................................................................................................................................................
• Lighting
• To turn Off .....................................................................................................................................................................................................................................................................
Flame check ..............................................................................................................................................................................................................................................................................
Cleaning .......................................................................................................................................................................................................................................................................................
Servicing .......................................................................................................................................................................................................................................................................................
• Replacement parts ..................................................................................................................................................................................................................................................
....................................................................................................................................................................................................................
• Notes for Service Engineer
2
Page
3
4
4-8
4
4
5
5
5
6
6
6
7
8
9
10 -11
10
11
11
12
12
13
13
13
SAFETY INFORMATION
IMPORTANT: Please read and understand this manual before installing and operating your heater. Please keep
this manual for reference. It is the basis for safe and proper operation of your heater.
WARNING!
This heater must have fresh air for proper operation. If not, poor fuel combustion could result. Read the venting
section in this manual.
When used without fresh air this heater may give off carbon monoxide, an odorless, poisonous gas.
Early signs of carbon monoxide poisoning resemble the flu, with headaches, dizziness and/or nausea. If you have
these signs the heater may not be working properly. Get fresh air at once! Turn off the heater and have it serviced.
Some people (such as pregnant women, persons with heart or lung disease, anemia, those under the influence of
alcohol, those at high altitudes) are more affected by carbon monoxide than others.
WARNING: Any change to this heater or its controls can be dangerous. Improper installation, adjustment,
alteration, service or maintenance can cause injury or property damage. Refer to this manual. For assistance or
additional information, consult a qualified installer, service agency or your gas supplier.
This appliance must not be installed in a bathroom or bedroom or recreational vehicle
This appliance is a room heater. It is not intended to be used for any other purpose. Do not use this appliance for
hanging clothes etc. to dry or any other purpose except heating the room.
If this heater is for use with propane gas, locate
propane supply tank outdoors.
Young children should be carefully supervised when
in the same room as the heater.
Installation or repair should be performed by a
qualified service person in strict accordance with
local codes and ordinances. The heater should be
inspected before use and at least annually by a
professional service person. More frequent cleaning
may be required due to excessive lint from
carpeting, bedding, furnishing materials, etc. It is
imperative that the control valve compartment,
burners and circulating air passageways of the
heater are kept clean.
If the cast-iron mantle or mesh guard are removed
for service or cleaning, make sure that they are put
back in place before operating the heater.
Do not use this room heater if any part has been
under water. Immediately call a qualified service
technician to inspect the room heater and to replace
any part of the control system and any gas control
which has been under water.
As with any new gas burning appliance, a slight odor
may be noticeable when first operated due to the
newness of the components. This is harmless and
will disappear after the first few hours of use.
Due to high temperatures, locate the heater out of
traffic. Keep curtains, clothing, furniture and all
other flammable materials at least 36ins from all
surfaces of the heater.
If the heater shuts off automatically, provide fresh
outside air before attempting to relight.
For your safety, the heater has a sensor which
detects a lack of oxygen and will shut off the
appliance is there is not enough fresh air for proper
combustion. If the heater keeps shutting off get
advice from your installer.
Do not locate the heater in an area exposed to high
drafts or winds.
Keep children and adults away from the heater
surfaces which become very hot when in use. The
cast-iron mantle openings, mesh guard and burners
operate at high temperatures. The heater will
remain hot for some time after shutdown. Allow the
heater to cool before touching.
Do not use this heater for burning trash. Never
place any garbage or other material on top of the
log or in the flames.
3
APPLIANCE SPECIFICATIONS
FEATURE
MODEL
276N
276P
GAS
NATURAL
PROPANE
INLET PRESSURE
MAX
10.5
14
(Ins w.c.)
MIN1
5
11
MANIFOLD PRESSURE
MAX
4.2
9.7
(In w.c.)
MIN
3.8
9.3
INPUT MAX (Btu/h)
25,000
28,000
HEIGHT (Ins.)
263/8”
WIDTH (Ins.)
25
DEPTH (Ins.)
83/8”
BLOWER ACCESSORY2
VF171 or VFT171
Notes:
1.
For purposes of input adjustment.
2. Contact your dealer for details of the blower accessory.
3. WARNING: Do not use a blower insert, heat exchanger insert or other accessory not approved for use with this heater
This appliance is design certified for use in the USA by International Approval Services to ANS Z21.11.2b - 1998 (Unvented gas fired
room heaters).
INSTALLATION
This appliance is only for use with the type of gas indicated on
the rating plate. This appliance is not convertible for use with
other gases.
CODES
Installation requirements vary with the locality. The installation
must conform with local codes or, in the absence of local codes,
with the latest edition of the National Fuel Gas Code ANSI
Z223.1. This appliance may be installed in an aftermarket
manufactured (mobile) home where not prohibited by state or
local codes.
Aftermarket: Completion of sale, not for purpose of resale, from the
manufacturer.
CLEARANCES
The minimum clearances to combustible surfaces are shown in
figure 1.
Allow sufficient clearances for comfortable operation of the
controls and easy access for cleaning and servicing.
If the appliance is intended to be installed on carpeting, tile or
other combustible flooring other than wood, it must be installed
on a metal or wood panel extending the full width and depth of
the appliance.
Fig. 1 Appliance dimensions and clearances to combustible materials
4
VENTING
PRE-INSTALLATION CHECKS
This heater shall not be installed in a confined space unless
provisions are provided for adequate combustion and ventilation
air.
The National Fuel Gas Code defines a confined space as a space
whose volume is less than 50 cubic feet per 1,000 Btu per hour
(4.8m3) of the aggregate input rating of all appliances installed in
that space and an unconfined space as a space whose volume is
not less than 50 cubic feet per 1,000 Btu per hour (4.8m3) of the
aggregate input rating of all appliances installed in that space.
Rooms communicating directly with the space in which the
appliances are installed, through openings not furnished with
doors, are considered a part of the unconfined space.
If there are no other appliances in the area, the minimum
volume which can be defined as an unconfined space for the
appliances covered by this manual is as follows:Model
Minimum
unconfined
space (cu. ft)
276N
1250
276P
1400
If there are other appliances in the area, add 50 cu. ft. to the
above figure for every 1,000Btu/h of total maximum input rating
of these appliances.
Do not include any direct vent appliances in the calculation.
Direct vent appliances draw air from and exhaust combustion
products directly to the outdoors.
WARNING: If the area in which the heater may be operated is
smaller than that defined as an unconfined space, provide
adequate combustion and ventilation by one of the methods
described in the National Fuel Gas Code, ANSI Z223.1, 1992,
Section 5.3.
Check gas type. Use only with the gas type indicated on the
appliance rating label. If the gas type indicated on this label is not
your type of gas supply do not install! Contact your dealer for
the proper model.
Check gas line pressure. Check that the pressure is no greater
than the maximum shown in appliance specification table. This
will prevent damage to the regulator fitted to the appliance.
Propane appliances require an external regulator to reduce the
supply tank pressure to the maximum of 14 inches w.c. This is in
addition to the regulator fitted to the appliance.
WARNING: Connecting directly to an unregulated
Propane tank can cause an explosion!
EQUIPMENT
NEEDED
FOR
INSTALLATION (not included with appliance)
a) Pipe sealant resistant to the gas used and all its constituents.
Note that natural gas can contain some LP gas during peak
supply periods.
b) Piping. We recommend using only new black iron or steel
pipes. Copper tubing may be acceptable - check local codes.
If copper tubing is used, it must be internally tinned or
equivalently treated to resist corrosion by sulfur compounds.
c) Manual shut-off valve.
d) Union, drip leg and 1/8" NPT plugged tap for test gauge
connection.
e) Pipe wrenches.
f) Pressure test gauge equipment.
5
UNPACKING
The heater is supplied in two packs.
Pack 1 Contains the cast-iron mantle fully assembled.
Pack 2 Contains
1 Heater unit fitted with elbow gas inlet connector
1 Straight gas inlet connector alternative
1 Top connector plate - heater to wall
2 Connecting brackets for cast-iron mantle.
2 Machine screws for mantle securing
2 Thread cutting screws for fixing top connector to
heater top
2 Screws for wall fixing
2 Wall anchors.
Check the contents for shipping damage. If damaged, inform
your dealer. Do not install! Damage causing a safety hazard may
have occurred.
5.
Place the heater unit back in position. Attach the heater top
to the connector plate with the two thread cutting screws
supplied.
If blower accessory VF171 or VFT171 is to be fitted
Connect blower in accordance with the instructions
supplied with the accessory. Attach the connector plate
through the two holes nearest the back of the heater (See
figure 4).
If blower accessory VF171 or VFT171 is not to be
fitted
Attach the connector plate through the two holes nearest
the front of the heater (See figure 4).
WALL MOUNTING
1.
2.
Place the heater unit against the wall in the position in
which it is intended to be installed.
Mark the mounting hole positions through the heater back
on to the wall (See figure 2).
Figure 4 Heater to top connector fixings
GAS CONNECTION
Gas connection is ½”NPT near the rear right corner.
The appliance is supplied fitted with an elbow connector. This
connector can be rotated to allow supply pipe connection from
the left or right side or from below the heater. For rear
connection, the pack includes an alternative straight connector to
replace the elbow.
The gas supply line must be sized and installed to provide a
supply of gas sufficient to meet the maximum demand of the
appliance (see specification table) without undue loss of
pressure.
Always use pipe compound. Apply compound lightly to the
male threads to ensure excess does not enter gas lines. The
compound must be resistant to LP gas.
A plugged 1/8in.NPT tapping should be installed upstream of
the connection to the appliance. The tapping should be
accessible for test gauge connection.
We also recommend the installation of a sediment trap upstream
of the appliance. This will trap any solid or liquid contaminants
which may otherwise enter the heater causing poor
performance.
Appliance shut-off valve (Figure 5)
This heater incorporates a shut-off valve. The valve is located at
the bottom front corner, at the upstream end of the pipe running
to the thermostat.
Figure 2 Wall fixing positions
3.
4.
Drill the wall at the marked centers. The hole size will
depend on the type of wall and fixing method. The heater
is supplied with #8 woodscrews and anchors suitable for
solid and plasterboard walls. These anchors require a ¼"
hole size.
Secure the top connector plate to the wall using the
woodscrews (and anchors where necessary). See figure 3.
Figure 3 Top connector plate - Wall fixing
6
The valve is supplied in the open position.
To shut the valve:
1) Remove the screw cap and sealing washer by turning
counterclockwise
2) Turn the slotted plug clockwise as far in as it will go.
3) Replace the screw cap and washer.
To open the valve :
1) Remove the screw cap and sealing washer by turning
counterclockwise.
2) Turn the slotted plug counterclockwise until it is almost
level with the outer face of the valve body.
3) Make sure that the sealing washer is over the screw cap.
Engage the screw cap bar into the slot in the plug.
4) Turn the screw cap clockwise so that it turns the plug and
then screws into the valve body.
5) Keep turning until the cap is fully sealed. The plug inside the
body will then be at the fully open position.
6) Check for leaks at the cap seal.
GAS PRESSURE CHECK
The supply pressure to the heater must be within the inlet
pressure figures stated in the specification table.
Pressure testing supply line
The appliance and its individual shutoff valve must be
disconnected from the gas supply piping system during any
pressure testing of that system at test pressures in excess of
½psig (3.5kPa).
The appliance must be isolated from the gas supply piping
system by closing its individual manual shutoff valve during any
pressure testing of the gas supply piping system at test pressures
equal to or less than ½psig (3.5kPa).
Pressure testing burner manifold
The burner manifold pressure is controlled by a regulator within
the thermostat unit. The manifold pressure must be within the
figures stated in the specification table. The pressure test tapping
point is at the right side of the burner unit (see figure 6).
Check pressure as follows
1) Remove the hexagonal screw from the tapping point.
2) Fit a manometer to the tapping.
3) Turn control to Pilot. Press igniter button to light pilot then
turn to “High”.
4) The manifold pressure should be within the limits shown in
the specification table.
5) If pressure is outside the limits, adjust by turning the
regulator screw located on the front face of the thermostat
(see figure 6).
6) Turn the gas off, remove the manometer and refit the
tapping screw
7) Check for leaks under tapping screw head.
Figure 5 Shut off valve operation
Check for gas leaks
Always check for gas leaks after installation or servicing. When
testing for leaks:1. Make sure that the heater control is at the “off” position.
2. Open the manual shutoff valve.
3. Test for leaks by applying a liquid detergent to all joints.
Bubbles forming indicate a leak.
Never use an open flame to check for a leak!
4. Correct any leak detected immediately.
Figure 6 Manifold pressure test tapping & pressure
adjusting screw
7
4.
FITTING CAST-IRON MANTLE
1. Remove the two rectangular plates at back of the casting near
the bottom (see figure 7). The plates and washers will not be
needed for this appliance but save the screws.
2. Fit the two mantle connecting brackets in place of the
rectangular plates using the screws removed from the plates
(see figure 7).
Lift the mantle. Hook the top of the mantle over the heater
unit so that the two flanges at back of the mantle top are
behind the channel at top of the heater unit (see figure 8).
Lower the mantle as far as possible to fully engage over the
heater.
Figure 8 Mantle top location.
Figure 7 Fitting mantle connecting brackets
3. Pull off the sealing rope at back of the mantle (See figure
7A). This rope is not needed for the “Senator”
Figure 7A Rope seal
8
5. Swing the bottom of the mantle back. The mantle
connecting brackets should be outside the heater sides. Align
the holes in the brackets with the threaded holes in the
heater sides. Fit the two machine screws supplied and
tighten. See figure 9.
Note If the mantle sides are not square with the top, they can be realigned
by loosening the hexagonal bolts connecting the cross grills (See figure 10).
CONTROL OPERATION CHECK
Check the pilot ignition and thermostat control operation - See
Lighting instructions.
Figure 9 Mantle lower connections
Figure 10 Mantle side/grill bolts (for realigning sides)
9
FOR YOUR SAFETY READ BEFORE LIGHTING
WARNING: If you do not follow these instructions exactly, a fire or explosion may result
causing property damage, personal injury or loss of life.
A. This appliance has a pilot which must be lighted by hand. When lighting the pilot, follow these
instructions exactly.
B. BEFORE LIGHTING smell all round the appliance area for gas. Be sure to smell next to the floor
because some gas is heavier than air and will settle on the floor.
WHAT TO DO IF YOU SMELL GAS
● Do not try to light any appliance.
● Do not touch any electric switch; do not use any phone in your building.
● Immediately call your gas supplier from a neighbor’s phone. Follow the gas supplier’s instructions.
● If you cannot reach your gas supplier, call the fire department.
C. Use only your hand to push in or turn the gas control knob. Never use tools. If the knob will not
push in or turn by hand,
don’t try to repair it, call a qualified service technician. Force or
attempted repair may result in a fire or explosion.
D. Do not use this appliance if any part has been under water.
Immediately call a qualified service
technician to inspect the appliance and to replace any part of the control system and any gas
control which has been under water.
10
LIGHTING INSTRUCTIONS
1. STOP! Read the safety information on previous page.
2. Turn the control knob on right side of heater clockwise
to “OFF” position.
3. Wait five (5) minutes to clear out any gas. Then smell for gas, including near the floor. If you smell
gas, STOP! Follow “B” in the safety information on previous page. If you don’t smell gas, go to the
next step.
4. Find the pilot. It is in the center below the log.
5. Turn the control knob counterclockwise
to the “PILOT” position. Press in the control knob for
five (5) seconds.
6. With the control knob pressed in, push down and release the ignitor button. This will light the pilot.
If necessary, push down and release the ignitor button several times until the pilot lights. If the pilot
does not light at all during several attempts, try lighting with a long match as described below.
7. Keep the control knob pressed in for about ten(10) seconds then release the knob. The pilot should
remain alight
• If the pilot lights but will not remain alight after several attempts, turn the gas control knob to
“OFF” and call your service technician or gas supplier.
8. Turn the control knob counterclockwise
to your desired heating level. The main burner should
light. Set the knob to any level between “LOW” and “HIGH”.
Match lighting: Apply a long match to the pilot while the control knob is depressed and at the “PILOT”
position.
• If control knobs do not pop up when released after being depressed, stop and immediately call your
service technician or gas supplier.
TO TURN OFF GAS TO APPLIANCE
Shutting off completely: Turn control clockwise
Leaving pilot on: Turn control clockwise
to OFF.
to PILOT.
11
FLAME CHECK
CLEANING
Make a visual check of the pilot and main burners periodically.
The gas should be turned off and the heater allowed to cool fully
before attempting any cleaning.
The case should only need occasional dusting with a soft cloth or
wiping using a mild soap. Do not use abrasive cleaners.
Burner cleaning If the flames do not have the correct
appearance or the burners do not light properly, the burner
orifices may need cleaning. The burners should be cleaned by a
qualified technician.
To clean the burners
1) Remove the two screws attaching the mantle side brackets to
the heater sides (Figure 13).
Figure 11 Pilot flame
Figure 13 Mantle side connections
2) Swing the bottom of the mantle slightly forward and lift it so
that the flanges at back clear the heater top channel. Lift the
mantle away (Figure 14).
Figure 12 Main burner correct flame
Pilot flame
The pilot flame should always be alight when the heater is in
operation. The pilot flame should appear as shown in figure 11.
Main burner flame
Check the main burner at “high” control setting. After
operating for approximately 15 minutes, the main flames should
appear as shown in figure 12.
Natural gas models - The flames should be approximately 2
inches above the log.
Propane models - The flames should be between half way up the
log and the top of the log.
Figure 14 Mantle top removal.
12
3) Remove the two screws securing the upper corners of the
mesh guard (figure 15).
NOTES FOR SERVICE ENGINEER
1.
2.
3.
If the thermostat is removed and refitted or replaced, make
sure that there is an air space between the inner side of the
thermostat block and the fire box channel plate. This
space is maintained either by the screwed bushes
projecting through the channel plate or by star washers
spacing the thermostat away from the plate. The air space
is required to keep the thermostat block temperature
within its safe working limit. If star washers were fitted,
make sure that they are replaced. Don’t use solid washers.
Star washers are used to minimize the heat transfer area.
If the mesh guard is removed, make sure it is replaced the
correct way up. If it is fitted upside down, the mesh will
considerably reduce the visibility of the burner flames (See
figure 16).
The top surface of the stainless steel channel below the
mesh grill will color with use. This is quite normal. The
channel will not need to be changed. The channel surface
is only visible when the cast-iron mantle is removed.
Figure 15 Mesh guard screws
4) slide the guard up and remove it from the heater.
5) Remove dust and loose particles from the log and burner
using a vacuum cleaner.
6) Replace the guard and mantle. Make sure the guard is
replaced the correct way up. If it is fitted upside down, the
mesh will considerably reduce the visibility of the burner
flames (See figure 16).
7) If the heater still does not operate correctly, get exert advice.
SERVICING
Figure 16 Mesh guard - Checking for correct way up
This appliance should have a regular 12 monthly inspection and
service. The inspection should include
• Checking burner rail aeration inlets , gas inlet and exit
orifices.
• Checking pilot orifice, thermocouple tip condition and pilot
unit performance.
• Checking for any log degradation.
Repair and replacement work should only be undertaken by a
qualified service person.
Please always quote Appliance model and serial number when
requesting work.
REPLACEMENT PARTS
Contact your dealer for replacement parts.
If you are unable to obtain the part from your dealer, contact:GASM,
Post Office Box 604
Portland, TN 37148
Phone (Toll free): 1-800-892-8136
Fax (Toll free): 1-800-872-8062
Please always quote Appliance model and serial number on all
communications.
Refer to the separate repair parts list supplied with this heater for
repair parts.
13
LIMITED WARRANTY POLICY
Valor warrants this appliance and all components for a period of three years from date of purchase against defects in material
or workmanship. The purchaser’s exclusive remedy against Valor for any breach of warranty shall be, at Valor’s option, the
repair, replacement, or return for credit of the appliance. This warranty does not extend to (i) appliances damaged by
accident, neglect, misuse, abuse, alteration, negligence of others, including the installation thereof by unqualified installers,
or (ii) the costs of removal, reinstallation or transportation of defective parts on the appliance unit. This warranty only
applies to the original consumer purchaser.
THIS WARRANTY IS EXPRESSLY IN LIEU OF ALL OTHER
WARRANTIES, EXPRESSED OR IMPLIED,
INCLUDING THE WARRANTIES OF MERCHANTABILITY OR FITNESS FOR A PARTICULAR PURPOSE AND ALL
OTHER OBLIGATIONS OR LIABILITIES. VALOR DOES NOT ASSUME, NOR HAS IT AUTHORIZED ANY PERSON
INCLUDING ITS SALES REPRESENTATIVES TO ASSUME FOR IT, ANY OTHER OBLIGATION OR LIABILITY IN
CONNECTION WITH THE SALE OR USE OF THIS APPLIANCE. IN NO EVENT WILL VALOR BE LIABLE TO THE
PURCHASER OR ANY OTHER PERSON FOR DIRECT OR INDIRECT, CONSEQUENTIAL, INCIDENTAL OR
SPECIAL DAMAGES, OTHER THAN AS SPECIFIED ABOVE.
The appliance must be installed by a qualified installer in accordance with the instructions furnished with the appliance. Any
defective appliances or parts of the defective appliances covered by this warranty should be returned at your expense to the
dealer from where the product was purchased or an authorized service agent. Any products presented for warranty repair
must be accompanied by the sales invoice evidencing proof of purchase and date of purchase.
Some states do not allow the exclusion on limitation of incidental or consequential damages, or on how long an implied
warranty lasts, so the above limitations may not apply to you. This warranty gives you specific legal rights, and you may also
have other rights, which may vary from state to state.
Manufactured by
VALOR HEATING
BIRMINGHAM, ENGLAND
Distributed in the USA by
GASM
Portland, TN 37148
Because our policy is one of constant development and improvement, details may vary slightly from those in this publication.
© Valor Heating
14