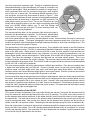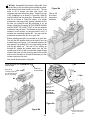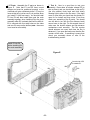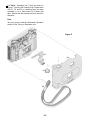
1
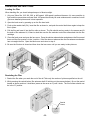
35mm CAMERA KIT
MODEL AK-540 / FUN-545
Assembly and Instruction Manual
WARNING: CHOKING HAZARD- SMALL PARTS NOT FOR CHILDREN UNDER 3 YEARS.
Elenco Electronics, Inc.
Copyright © 1997 Elenco Electronics, Inc.
Revised 2001
REV-C
753035
PARTS LIST
Qty.
1
1
1
1
1
1
1
1
1
1
0
1
1
0
1
1
1
1
1
1
1
1
1
1
1
1
1
1
1
1
1
9
0
Name
Description
A1
A2
A3
A4
A5
A6
A7
A8
A9
A10
B1
B2
B3
B4
C1
C4
C5
D5
D6
D7
D8
E1
E2
E3
E4
F1
F2
F3
F4
G1
G2
G3
Small Screwdriver
Film advance
Film advance base
Film advance shaft
Film holder
Wide clip
Film holder shaft
Thin clip
Wide spring
Film advance knob
Film counter reset spring (SEE NOTE AT BOTTOM)
Shutter control
Film counter frame (SEE NOTE AT BOTTOM)
Film counter reset (SEE NOTE AT BOTTOM)
Thin spring
Rewind base
Rewind shaft
Film door latch
Shutter release
Lens frame
Lens
Lens Guard
Large viewfinder lens
Small viewfinder lens
Film door
Rear case
Lens cover
Shutter release button
Strap
Front case
Camera frame
Small-head screw (actual number included will vary with model)
Medium-head screw (SEE NOTE AT BOTTOM)
Part #
NOTE: Items A10, B3, and G3 may have come pre-installed onto item B2.
-1-
6AK54001
6AK54002
6AK54009
6AK54003
6AK54004
6AK54024
6AK54005
6AK54025
6AK54026
6AK54006
6AK54007
6AK54008
6AK54027
6AK54010
6AK54013
6AK54015
6AK54016
6AK54017
6AK54040
6AK54041
6AK54033
6AK54034
6AK54019
6AK54020
6AK54018
6AK54014
6AK54022
6AK54023
6AK54021
6AK54032
-
PARTS IDENTIFICATION
Film Advance
A1
Film Advance
Base
A2
Film Advance
Shaft
A3
Film Holder
A4
Wide Clip
A5
Film Holder
Shaft
A6
Thin Clip
A7
Wide Spring
A8
Film Advance
Knob
A9
Film Counter
Reset Spring
A10
Shutter Control
B1
Film Counter
Frame B2
Film Counter
Reset
B3
Thin Spring
B4
Rewind Base
C1
Rewind Shaft
C4
Film Door Latch
C5
Shutter Release
D5
Lens Frame
D6
Lens
D7
Lens Guard
D8
Large Viewfinder Lens E1
Film Door
E3
Rear Case
E4
Lens Cover
F1
Front Case
F4
Camera Frame
G1
Small-Head Screw
G2
Small Viewfinder Lens E2
Shutter Release
Button
F2
Strap
F3
Medium-Head Screw
G3
-2-
INTRODUCTION
The AK-540 is a mechanical camera kit that you put together. It uses standard 35mm film, requires no focusing,
and has a built-in lens cover. It is manually operated and requires no batteries. It does not have flash and so
is best for outdoor use, but can be used indoors with proper lighting. Nothing is needed for assembly as it even
comes with its own screwdriver.
Recommended for ages 10 and up.
WARNING:
This kit contains small parts and should be kept out of the reach of small children.
THEORY OF OPERATION
Lenses:
When light, whether from the sun or from a light bulb,
shines on an object (or a person) some of the light is
absorbed into the object and some is scattered in all
directions (see Fig. 1). If any of the scattered light
reaches your eyes then you can “see” the object, the
colors you see are the colors that were scattered. The
amount of light which reaches your eyes (the
“brightness”) depends on how strong the original light
source was and how much of that light was absorbed or
scattered by the object. You see white when something
scatters all of the light reaching it and absorbs none,
you see bright colors (like orange, yellow, pink, light
green, and light tan) when most of the light is scattered,
you see dark colors (like blue, purple, brown, dark red,
and dark green) when most of the light is absorbed, and
black when all the light is absorbed. At night, objects
with bright colors are easier to see than objects with
dark colors because they scatter more of what little light
is present. Light which is absorbed is changed into
heat; notice how sunlight warms you and how actors
and singers can get very warm under studio lights. Also
notice how you feel much cooler wearing a white shirt
on a hot sunny day than wearing a black shirt (because
white scatters the light while black absorbs it).
Figure 1
Scattered Light
Sunlight
Rock
Just as some of the scattered light reaches your eyes, some also reaches your AK-540 camera. When you
press the button to open the shutter light passes through the lens to the film. When a beam of light passes
through the lens its angle is changed (it is “bent”) since light travels differently through the lens than through air,
in the same way as it does between water and air. (For example, try looking through a clear glass of water to
something on the other side. You won’t be able to see it clearly). The lens is used to concentrate (“focus”) light
onto a single point so that an image may be produced (the same thing happens inside your eyes). The focus
point is where you want to place the film for the best image. Unfortunately, the focus point depends on how far
away from the camera your subject is, as shown in Figure 2. Take something small (your finger or your camera)
and hold it about 4 inches from your eyes. Then try to look at it and at something on the other side of the room
at the SAME time so that neither is blurred. You can’t do it; your eyes can only focus on one or the other. The
same is true for all cameras - you cannot get clear pictures of close and distant objects at the same time.
Fortunately, since the lens and film must fit in a small camera and so will usually be less than an inch apart (the
focal length), the best focus point for anything more than a few feet from the camera doesn’t change much (see
Fig. 2c). This allows cameras to be designed using a fixed focus setting (around 10 feet usually) while still
producing good pictures (at any distance above 4 feet). These popular cameras are generally referred to as
-3-
Focal Length
Figure 2a
Figure 2
Focus Point
Close Subject
Best Focus
Place
Focal Length
Figure 2b
Best Focus
Place
Figure 2c
Focal Length
Distant Subject
Best Focus
Place
“point and shoot” cameras (because they are easy to use) and includes your AK-540. More advanced cameras
have a knob for you to adjust the focus or use infrared light and sensors to measure the distance to their subject
and then automatically adjust the focus. While automatic focus adjustment usually works great, in a crowded
scene it may not always select the subject you wanted it to focus on.
Your eyes are amazing instruments and can quickly focus on whatever interests you, but even they are not
perfect. Most people cannot focus on something 3 inches away. Someone who is nearsighted may be able to
focus on something 2 inches away but won’t be able to focus across the room.
In a perfect lens, the focused light would all come to a single point. But we cannot build perfect lenses.
Construction defects cause the bending of light to vary slightly throughout the lens. The shape and thickness
of the lens produce different bending effects on light (see Figure 3 for examples), and construction defects
cause these to vary. Despite the use of lens covers, dust can get on the lens and distort the focus. In advanced
cameras, lens design and construction are very complex. Lenses come in a wide range of shapes to produce
different bending effects on light. Most cameras use a combination of several lenses to reduce the effects of
construction defects.
Figure 3
The length from the lens to the film is called the focal length. If this length can
be changed, while keeping focus on the same subject, then our subject would
appear to be larger or smaller (as if we moved closer to or farther away from it).
See Figure 4. Reducing the focal length (so that the subject appears to be
farther away) is called “zooming-out” and increasing the focal length (so that the
subject appears to be closer) is called “zooming-in” or “telephoto”. This is done
by changing lenses or using an adjustable (“zoom”) lens. Focus is kept by using
several lenses (only changing the focal length for some of them) and by other
adjustments. Notice that zooming-in is similar to using a magnifying glass.
Since you want to know what will be in your pictures before you take them, you
have a viewfinder. The viewfinder on your AK-540 uses two lenses (one
diverging and one combination, see Figure 3) to create a picture that, combined
with your eyes, has the same view and focus as what will appear on film (except
at very close, since your eyes can adjust focus while the camera cannot). Notice
that everything seen through the viewfinder appears to be only about half its true
size. The reason for this is that your eyes see things the way a 50mm (2 inch)
focal length does but your AK-540 camera has only a 27mm (about 1 inch) focal
length. 50mm lenses are unpopular because their field of view is too small (most
cameras use 35mm). This field of view is not a problem for our eyes because
-4-
Types of Lenses
Thin Lens
Thick Lens
Diverging Lens
Converging Lens
Combined Lens
Figure 4 - ZOOM
they are constantly looking around and have a limited
ability to see things outside their main field of view
(this is called our peripheral vision), but it is a problem
when taking photographs. For closer pictures, 70mm
(2.8 inches) lenses are more popular than 50mm.
Start
4a
Equivalent to, but subject
has not moved.
Light and Film:
After the lens, the light passes through the small
plastic hole (in the back of lens frame D6) and reaches
the film. As seen in Figure 5, the image will be upside
down after passing through this hole. This hole is
called the aperture. It controls the amount of light
reaching the film. Advanced cameras (and our eyes,
in a similar manner) measure the light present and
adjust the aperture size to give best results.
4c
4b
“Zoom-Out”
Change focal length & refocus
“Zoom-In”
4d
4e
Change focal length & refocus
To demonstrate this, take a close look at your pupils
(the large black dots in the center of your eyes) using
a mirror or with a friend. The pupil acts like an aperture.
Darken the room (by dimming the lights or shading your
eyes) so that you can barely see your pupils and observe
their size. Now make the room very bright (go next to a
bright light or shine a flashlight in your eyes) and see if your
pupils have changed. They should be large when the room
is dark and small when the room is bright. You may also
have seen your eyes take a few seconds to adjust after
moving from a very bright room to a very dark room or the
reverse.
The aperture (along with the focus distance and the lens
focal length to lesser degrees) also controls the “depth of
field”, which is how far around the focus distance things
appear to be reasonably in focus. For small apertures,
such as for point and shoot cameras, the depth of field
is very large (anything greater than 4 feet will be in
focus). But for large apertures the depth of field may
only be a few feet in front of and behind the subject.
This effect is used to blur distracting objects close to the
camera or in the background, and is often used in
advertising. See Figure 6 for an example.
Equivalent to, but subject
has not moved.
Figure 5 - Inverting Light as it Passes
Through Aperture
Film
Aperture
Lens
Shutter
The movement of lens shutter D1 to allow light to pass to
the lens and film needs to be very fast. If the camera
(due to shaking) or anything in the picture is moving then
the light pattern reaching the film will vary and as a result
the photograph will be blurred, the same as if it were out
of focus. The shutter speed is also another way of
controlling the amount of light reaching the film. Your AK540 has a shutter speed of 1/125 seconds.
What is film and how is it developed? The answers to
these two questions are very long and complex, and
would quickly put most people to sleep. Please refer to
the “For Further Reading” section if you would like to
know more. Basically film is light-sensitive material that
retains an image after it has been exposed to light. The
material consists of silver compounds which change
-5-
Figure 6
Photo taken out of John Hedgecoe’s Complete Photography Course. Hedgecoe J. (1979)
Mitchell Beazley Publishers Limited
into silver metal when exposed to light. Through a complicated process,
called photofinishing or photo development, the image is converted to an
image on special paper. Black-and-white film consists of a single layer of
silver compounds while color film consists of three layers, each sensitive
only to blue, red, or green light. By combining different amounts of blue,
red, and green, any color may be produced as shown in Figure 7. Note
that white is produced when all three colors are at full brightness and black
is produced when all three have no brightness (no light is present). The
same idea is used in your color TV set. Turn on your TV and look at it very
closely with a magnifying glass (if you don’t have a magnifying glass then
place your AK-540 camera against your TV and look through the
viewfinder). You will see that your entire TV screen consists of blue, red,
and green dots of varying brightness.
BLUE
MAGENTA
CYAN
WHITE
RED
YELLOW
GREEN
Film remains sensitive after it is first exposed to light and must be kept in
Figure 7
darkness until photofinishing is complete. For this reason, photofinishing
work is done in a room called a “darkroom”. In very unusual situations,
such as for special effects in the movies, a second exposure is used. If done correctly, this may be used to give
the appearance of ghosts. “Time-lapse” photography uses many exposures spread over a long time or one
continuous exposure (with the background and light conditions the same) to show how something moves. This
could be used to show the growth of a plant.
The light-sensitivity of the silver compounds can be varied. This is called the film “speed” or the ASA (American
Standards Association) rating. (The ISO, for International Standards Organization, rating is also used and is the
same as the ASA scale). Slower speeds, such as ASA 100 or lower, are less sensitive to light and have the
advantages of giving more detailed pictures (very important if you plan to make big enlargements), can use
slower shutter speeds, and are less expensive. Faster speeds, such as ASA 400 or higher, are more sensitive
to light. They have the advantage of requiring less light and can use faster shutter speeds. This is very
important for action shots where the subject is moving. The more the subject moves while the shutter is open,
the more blurred the final picture will be. Your AK-540, as with most point and shoot cameras, works with speeds
of ASA 100, 200, or 400 (400 is preferred).
The most common problem with taking good pictures is difficult light conditions. Even the best cameras have
a harder time with lighting than your eyes do. Pictures of people come out best with normal daylight, but
sunshine, shade, sun glare, bright colors, dark colors, and house lights make things difficult. Movie studios,
television studios, and concert halls have bright lights to ensure good results. Pictures of sunrises and sunsets
are challenging because the sky is bright while the ground is very dark.
You now know three ways to take good pictures in low light: larger aperture, faster lens shutter speed, and faster
film speed. Unfortunately, only advanced cameras allow you to change aperture size or shutter speed, and you
can only have one speed of film in your camera at a time. However, since most simple cameras are used to
take pictures of people at close distances, the “flash” feature was developed. Flash cameras produce a burst
of light (the “flash”) towards the subject just before the picture is taken. This makes sure that the subject (usually
people) has enough light to photograph well.
Mechanical Operation of the AK-540:
(This section is easier to understand if you read it after building the camera.) Turning the film advance knob A9
turns film advance A1 which has tabs that pull the film out of its cartridge. The “teeth” on the lower section of
the film advance knob interlock with those on film holder shaft A6, turning it and film holder A4, which wraps up
the exposed film. The small tab at the top of film advance shaft A3 advances the film counter (part of B2) one
count for each picture taken. After turning once around, the film advance knob A9 has a tab which locks on
shutter control B1 until a picture is taken. Advancing the film also stretches spring B4, which is attached to B1.
When the shutter button is pressed to take a picture, stretched spring B4 is released moving shutter control B1
back to the side of the camera. Part of B1 extends downward and catches briefly on lens shutter D1, opening
it briefly and exposing the film. The movement of B1 also releases the lock between it and film advance knob
A9, so the film may be advanced for the next shot.
-6-
Film counter frame B2 includes a spring which stretches as the film is advanced. While closed, the film door E3
pushes film counter reset B3 against the film counter (part of B2) and prevents its spring from resetting the
count. If the film door is opened B3 releases the film counter and its spring resets the count to zero.
Pressing the rewind button (film advance shaft A3 sticking out of the camera bottom) releases the film advance
mechanism and allows the rewinder (shaft C4 and handle C2) to rewind the film back into its cartridge.
The lens cover switch uncovers the lens (but does not open the shutter) when opened and protects the lens and
locks the shutter button (to prevent accidental pressing of the shutter button) when closed.
ASSEMBLY INSTRUCTIONS
Install parts that have the same letter in their name in numerical order (install B2, then B3, then B4, etc.)
unless otherwise stated.
1. Match parts: Match up all of the parts to their pictures in the Parts List. (Check to see that nothing was
damaged during shipping.) After the part bags are open, you should store the parts on a plate or shoe box
since the small parts are easy to lose.
2. A Parts: Assemble the A parts as shown
in Figure A in the following order:
A5 • A4 • A6 • A1 • A2 • A3 • A8 • A9 • A7
A6
A2 should fit snugly into G1; if it is loose and
falls out, then use glue to hold it in place.
Figure A
Tab points
as shown
The tabs on the tops of A3 and A9 should be
pointed away from A6, as shown.
A9
A9 may initially be very loose but if pressed
down will align with A6 and be able to turn it.
Goes Inside
A5
A7 will rest against A9.
A8
A4
A7
Tab points
as shown
A7
A3
Note: The camera frame (G1) is
sometimes packaged alongside
the rear case (E4). In rare cases,
they may have snapped together
during shipping.
G1
If so, CAREFULLY snap them
apart as per Figure E on page 10.
A1
A2
(Use glue if A2 is loose).
-7-
3. B Parts: Assemble B1 as shown in Figure Ba. Note
that the tabs on A3 and A9 must be pointed as shown.
Press down A9 and then hold B1 on top of it. The two
holes in B1 fit around two tabs (one round, one
rectangle) and can slide along them. Place B2 on top
of B1, snapping it in as shown in Figure Bb. Both B1
and B2 should now be laying flat. Assemble A10, B3
and G3 as shown in Figure Bc (these, or a similar
mechanism, may have come already installed on B2).
Be sure you install B2 with B3 positioned in G1 as
shown. Install the G2 screws IN THE ORDER SHOWN
and BE SURE THEY ARE TIGHT or the film-advance
mechanism may not work. The third screw shown is not
needed in most models, you should install it only if it
extends into something besides B2. You may use the
screwdriver included with this kit or your own.
Figure Ba
B1
Tabs on A3
& A9 must
be pointed
as shown
Before installing spring B4, you should do a quick test.
Turn A9 (the film advance knob) to the right (it won’t go
the other way) until it stops. (If it is already stopped, you
can release it by pulling B1 to the right using the tab
that B4 will attach to). The tab on A3, sticking up
through B2, should be pointed away from the film
counter (part of B2). If this is correct then install B4 and
continue with step 4; if this is wrong, remove B1 and B2
and re-orient the tabs on A3 and A9 because your film
counter reset may not work.
Now install B4 as shown in Figure Bc.
Install this screw first.
Must be tight.
May not be
needed, install only
if it extends beyond
B2 into something.
Bent side of A10 goes around the post as shown.
G2
Install this
screw second.
G3
B3
B4
*
B2
A10
Straight side of
A10 goes
behind the post
as shown.
A10, B3 and
G3 may be
pre-installed
Figure Bc
Figure Bb
the tab of B3 into
* Slide
the slot of G1 shown
here.
-8-
4. C Parts: Assemble the C parts as shown in Figure C.
5. D Parts: Assemble the D parts as shown in Figures Da, Db, and Dc.
C4
Figure C
C1
G1
C5
G1
D5
Figure Da
-9-
Notes:
a) Before assembling D6, you may want to take a closer look at the lens.
Insert the lens into D6 with the dome side of the lens pointed out as shown in Figure Db.
b) Place D8 over D7 as shown in Figure Db. Twist D8 in the direction shown and lock it into place.
Figure Db
D6
D7
Dome Side
D8
Figure Dc
Lens Shutter D1
(pre-installed)
G2
-10-
6. E Parts: Assemble the E parts as shown in
Figure E. Note that E1 and E2 have curved
shapes and must be positioned properly or the
viewfinder will give a distorted picture. E1 may be
loose at this time, just be sure it is in position when
you install F4 (the front case). You should install
E3 into E4 and then install them onto the main
assembly together, since installing E4 to the main
assembly when E3 is already there will be difficult.
E4 is secured with four snap holes on the sides
and one G2 screw on the bottom (note: the screw
is not used on all models).
7. Test It: Now is a good time to test your
assembly. Press down on shutter release D5 (to
take a picture) and you should hear a click as D1
(the lens shutter) rocks back and forth briefly
allowing light to pass to the film area. If the back
cover is open then you should see the shutter D1
open for an instant and then close (if not then
check your assembly of the D parts). You should
now be able to turn A9 (the film advance knob)
around once to the right. Do this several times to
make sure the shutter release and film advance
mechanisms work smoothly. The film counter
should advance one count each time the film is
advanced. If you open the back cover then the film
counter will be reset. If something is wrong then
check your assembly above or refer to the
troubleshooting section.
Install E3 into E4
before installing E4
into main assembly.
Figure E
E4
Curved side of E2
is towards E1.
E3
G2
-11-
E2
E1
8. F Parts: Assemble the F parts as shown in
Figure F. You may find it easier to lay F4 face-down
with F1, F2, and F3 in it and then drop the main
assembly in, or to hold button F2 in place with
tape. Secure with four screws and your camera is
complete.
Note:
You may wish to read the Mechanical Operation
section of the Theory of Operation now.
Figure F
F1
F4
F2
F3
-12-
OPERATING INSTRUCTIONS
Loading the Film:
When handling film you should always keep out of direct sunlight.
1. Only use 35mm film, ISO 100, 200, or 400 speed. 400 speed is preferred because it is more sensitive to
light, and this camera does not have flash. 100 speed should only be used outdoors and in sunshine, but will
give more detailed pictures and is less expensive.
2. Open the back cover by pressing up on the film door latch.
3. Push up the rewind shaft (C4), insert the film as shown in, and push the rewind shaft down again to keep the
film in place.
4. Pull the film and insert it into the film roller as shown. The film should now lay evenly in the camera and fit
the teeth of film advance A1; if there is slack then use the film rewinder to wind the excess back into the film
cartridge.
5. Close the back cover and open the lens cover. Press the shutter release button and advance the film several
times until the film counter is in the 1 position. If the film does not advance then the film advance mechanism
has not caught the film. Open the back cover and return to step 4.
6. Be sure the film door is closed and then close the lens cover until you are ready to take pictures.
FILM
FILM
Rewinding the Film:
1. Rewind the film when you reach the end of the roll. Take only the number of pictures specified on the roll.
2. While pressing the rewind button (film advance shaft A3 sticking out the camera bottom), flip out the rewind
handle as shown and turn it clockwise (same as the arrow on it) until it locks. The film counter should now
be in the “S” position.
Rewind
Button
-13-
3. Open the film door by pressing up on the film door latch.
4. Push up the rewind shaft and remove the film. It is ready to be developed. Take it to a local photofinisher.
5. Push down the rewind shaft and close the back cover unless you are ready to insert a new roll of film at this
time.
Holding the Camera:
To get good pictures you must hold the camera properly. Your pictures will be out of focus if you move the
camera even slightly while pressing the shutter button. For best results, hold the camera in both hands with one
elbow against your body and be sure that the lens and viewfinder are not blocked by your hands or hair.
Taking Pictures:
1. Open the lens cover.
2. Look through the viewfinder and compose your picture as desired. You must be at least 4 feet away from your
subject. BE SURE YOU HAVE PLENTY OF LIGHT, ESPECIALLY WHEN TAKING PICTURES INDOORS.
Since this camera does not have flash, NORMAL ROOM LIGHTING IS NOT ENOUGH.
3. Press the shutter button gently to take your picture. DO NOT SHAKE THE CAMERA while doing this.
4. Turn the film advance to the right (same as the arrow on it) until it locks (once around). The film counter will
have advanced by one. Check to see if you have used up all of the pictures on your roll of film.
5. Close the lens cover when finished taking pictures.
These Suggestions Will Help You Take Much Better Pictures:
By changing the camera’s position, you can influence how your subject is represented.
1. This camera does not have flash, SO BE SURE YOU HAVE PLENTY OF LIGHT WHEN TAKING PICTURES.
NORMAL ROOM LIGHTING IS NOT ENOUGH.
2. Position yourself at your subject’s eye level. This is particularly important when taking pictures of children.
3. Keep unnecessary elements (such as passing cars, other people, signposts, telephone wires, etc.) out of the
picture.
4. Be in a low position to intensify action and drama.
5. Use a vertical shot to emphasize the height of a subject (such as a waterfall).
6. To emphasize the background (such as for pretty scenery), place your subject off-center.
7. Be close to your subject, especially when taking pictures of people.
8. You do not need to limit yourself to only taking pictures on special occasions.
Handling Precautions:
1. You should never open the back cover except when you are changing film, since this will expose the film to
light.
2. This camera is not waterproof and should not be used in rain or snow. If it is accidentally dropped in water
then the camera will be all right after it has dried out, although any film in it may be ruined.
3. Be careful when using this camera around sand, as blowing sand may get inside and disrupt operation.
4. Do not store your camera or film where they may get very hot, such as the rear window shelf of a car on a
hot day, or in direct sunlight.
5. Be very careful when cleaning the lens, as any dust or stains from cleaning fluid will show up in your pictures.
-14-
TROUBLESHOOTING GUIDE
Contact Elenco Electronics (our address/phone/e-mail is on the back of this manual) if you need additional
assistance. DO NOT contact your place of purchase as they will not be able to help you.
Symptom: Camera does not take pictures (shutter does not work).
• Be sure the lens cover is open.
• Check your assembly of the D parts in step 5 of the assembly instructions.
• Be sure shutter control B1 is installed correctly.
Symptom: Film does not advance.
• Check that the G2 screws installed in assembly step 3 are in tight.
• Check the assembly of shutter control B1, spring B4, and film counter frame B2 in assembly step 3.
• Check your assembly of the A parts in step 2 of the assembly instructions.
Symptom: Film does not rewind.
• Re-read the operating instructions to make sure you are rewinding it properly.
• Check your assembly of the C parts in step 4 of the assembly instructions.
Symptom: Film counter does not count.
• Be sure the film door is properly closed.
• Be sure film counter reset B3 and spring A10 (or similar substitutes) are installed correctly. When the film door
is closed B3 will lean against the film counter and prevent it from resetting.
• Be sure the tab on the top of film advance shaft A3 turns and advances the film counter one count each time
the film is advanced.
Symptom: Film counter does not reset.
• The film counter should be reset (to zero) whenever the back cover is open.
• Be sure B3 and A10 (or similar substitutes) are installed correctly. When the film door is open B3 should not
touch the film counter.
• Be sure the tab on the top of film advance shaft A3 does not touch the film counter except briefly when the
film is being advanced.
Symptom: All pictures developed were blurred.
• Make sure that you are not shaking the camera when taking pictures.
• Re-read the “Suggestions for Taking Better Pictures” section of the operating instructions. Be sure you have
enough light, especially indoors.
• Be sure the lens is clean. Make sure there are no stains on it from improper cleaning.
• Be sure you are using standard 35mm film. The film has an expiration date that refers to how long it may be
stored before being used and developed; make sure your film’s expiration date has not already passed. You
should only be using film speeds of ASA 100, 200, or 400.
• Make sure that lens shutter D1 is working properly (you can check this without having film in the camera).
-15-
GLOSSARY
Absorbed
Sucked into.
Aperture
A small hole near the lens of a camera that controls the amount of light reaching the film.
ASA
American Standards Association, a rating system for film speeds.
Beam of Light
Very narrow band of light.
Blurred
When something cannot be seen clearly.
Bright
When something is producing or scattering a lot of light.
Brightness
The amount of light being produced by or scattered by something.
Camera
A device for taking photographs.
Converging Lens
A lens which makes beams of light come together.
Darkroom
A room where photofinishing work is done, lights are kept off to protect exposed film.
Depth of Field
How far around the focus distance things appear to be reasonably in focus.
Diverging Lens
A lens which makes beams of light separate.
Enlargements
Larger-than-normal pictures produced from film. Usually anything larger than 4”x6”.
Exposure
When light reaches film, producing an image.
Field of View
What a camera (or your eyes) can see without moving.
Film
A material used to store images.
Film Speed
A measure of a film’s sensitivity to light.
Flash
A camera feature that provides a burst of light toward the subject just before a picture is taken.
Focal Length
The length between the lens and the film in a camera.
Focus
To concentrate all of the light from an object into one point so that an image of the object may be produced.
in-focus
When a clear image of an object is produced.
out-of-focus
When a blurred image of an object is produced.
Focus Point
The point where beams of light from a converging lens meet. Place the film here for the best image.
Image
The pattern of light which is formed after light from something passes through a lens.
Infrared Light
A type of invisible light.
ISO
International Standards Organization, a rating system for film speeds.
Lens
A piece (or multiple pieces mounted together) of polished glass used to bend light.
Lens Shutter
The part of a camera that is opened to allow light to reach the film. Similar to the window shutters in some
houses.
Magnifying Glass
A lens which is used to produce an enlarged image of something. Uses the same concepts as described here
for cameras.
Nearsighted
Someone who cannot see distant objects clearly.
Photo Developing
Same as photofinishing.
Photofinishing
The process in which images on film are converted into pictures on special paper.
Photography
Producing images on light-sensitive material.
Point and Shoot
Camera
Easy to use cameras that have a fixed focus setting or automatic focus adjustment.
Scattered
Spread around.
Shutter Speed
How quickly the lens shutter opens and closes, allowing light to reach the film.
Silver Compounds
A light-sensitive material used to make film.
Subject
What you are taking a picture of.
Telephoto
A close-up photograph, the same as zooming-in.
Time-Lapse
Photography
Using several exposures spread over time or one continuous exposure to show how something moves.
Viewfinder
The part of a camera that allows you to see what you are taking a photograph of.
Zoom
A lens in which the focal length may be adjusted while keeping focus on the subject.
Zooming-in
Increasing the focal length so that the subject appears larger.
Zooming-out
Decreasing the focal length so that the subject appears smaller.
-16-
QUIZ
1. The color of something is really the color of light that was __________ by it.
2. On a cold but sunny day, someone wearing a dark purple shirt will be __________ than someone wearing
a white shirt.
3. The focus point is where you want to place the __________ for the best image.
4. “Zooming-in” means we are __________ the focal length.
5. Your eyes see things the same way as using a lens with a __________ focal length.
6. The __________ controls the amount of light reaching the film.
7. When taking pictures of subjects that are moving it is best to use a __________ shutter speed and a
__________ film speed.
8. The only colors used on a TV screen are __________, __________, and __________.
9. Faster speed film is __________ sensitive to light than slower speed film.
10. To get better pictures of people at close distances but in low light you can use __________, a larger
aperture, a faster shutter speed, or __________ film.
Answers: 1. scattered; 2. warmer; 3. film; 4. increasing; 5. 50mm or 2 inch; 6. aperture; 7. fast, fast;
8. blue, red, and green; 9. more; 10. flash, faster.
FOR FURTHER READING
(try your local bookstore or library)
R. Woodson (1996). The Complete Idiot’s Guide to Photography. Alpha Books.
M. Langford (1992). Learn Photography in a Weekend. Knopf.
M. Joseph & D. Saunders (1993). The Complete Photography Course. Penguin Books.
J. Hedgecoe (1993). John Hedgecoe’s Photography Basics. Sterling Publishing.
J. Schaefer (1992). An Ansel Adams Guide: Basic Techniques of Photography. Little, Brown, & Co.
J. Hedgecoe (1992). The Photographer’s Handbook. Knopf.
-17-
Here are some other exciting projects from Elenco you can build.
SOLDERLESS KITS
Talking Clock Kit
Radio Control Car Kit
with training course
with training course
Model AK-220
Model AK-870
This easy-to-build kit will teach you how electronic voices
are made. Model AK-220 uses analog hands to display time
and has hourly reports. Wake up to a rooster crowing in the
morning.
Radio control cars are the hottest thing going, and you can
build your own from the ground up. The Turbo King is our
newest solderless kit. You’ll learn all about gears, motors,
RF frequency and more from our detailed assembly manual.
Before you know it, you’ll be ready to race!
ELECTRONIC KEYBOARD KIT
Have you ever wondered how musical instruments work? Well now we can teach you.
Our new Electronic Keyboard Kit has 37 mini keys, 8 different tempos and timbre, 4
custom drummers and even a demonstration song. After following our detailed
assembly manual, you will be ready to play all of your favorite songs. Requires 6 “AA”
batteries.
Model AK-900
-18-
Elenco Electronics, Inc.
150 W. Carpenter Avenue
Wheeling, IL 60090
(847) 541-3800
Fax: (847) 520-0085
http://www.elenco.com
e-mail: [email protected]
Technical Assistance Hotline: (800) 533-2441