1
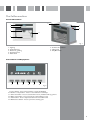
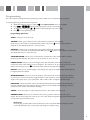
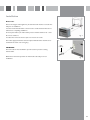
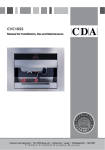
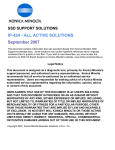
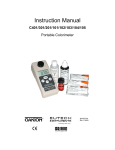
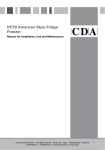
CVC11SS
Manual for Installation, Use and Maintenance
Passionate about style
Customer Care Department • The
Group Ltd. • Harby Road • Langar • Nottinghamshire • NG13 9HY
T : 01949 862 012 F : 01949 862 003 E : [email protected] W : www.cda.eu
Important
The CDA Group Ltd cannot be held responsible for injuries or losses caused by incorrect use or installation of this product.
Please note that CDA reserve the right to invalidate the guarantee supplied with this product following incorrect installation
or misuse of the appliance.
Under no circumstances should any external covers be removed for servicing or maintenance except by suitably
qualified personnel.
Appliance information:
Please enter the details on the appliance rating plate below for reference, to assist CDA Customer Care in the event of a fault
with your appliance and to register your appliance for guarantee purposes.
Appliance Model
Serial Number
CE Declarations of Conformity:
This appliance has been designed, constructed and marketed in compliance with safety requirements of EEC Directive
2006/95/EEC (Low voltage) and requirements of EMC Directive 2004/108/EEC.
This appliance has been manufactured to the strictest standards and complies with all applicable legislation, including
Electrical safety (LVD) and Electromagnetic interference compatibility (EMC). Parts intended to come into contact with
food conform to EEC/89/109.4
IMPORTANT INFORMATION FOR CORRECT DISPOSAL OF THE PRODUCT IN ACCORDANCE WITH EC
DIRECTIVE 2002/96/EC.
At the end of its working life, the product must not be disposed of as urban waste. It must be taken to a special local
authority differentiated waste collection centre or to a dealer providing this service.
Disposing of a household appliance separately avoids possible negative consequences for the environment and health
deriving from inappropriate disposal and enables the constituent materials to be recovered to obtain significant savings in
energy and resources. As a reminder of the need to dispose of household appliances separately, the product is marked with
a crossed-out wheeled dustbin.
Please note:
This appliance is designed solely to produce coffee and steam. Other types of use are not permitted and may prove
dangerous. The CDA Group Ltd will not be held liable for any damage caused by incorrect use of the appliance
• Read all instructions thoroughly before use.
• To protect against fire, electrical shock and injury to persons do not immerse cord or plugs in water or other liquid.
• The use of accessory attachments not recommended by The CDA Group Ltd may result in fire, electric shock or injury.
1
The Coffee machine
Front and Overall View
6
1
2
7
8
3
4
5
fig. 1
6 - Coffee bean container
7 - Water tank
8 - On/Off switch
1 - Lighting
2 - Steam dispenser
3 - Holder for grinding
4 - Coffee dispenser
5 - Water tank
Control Buttons and Display Panel
9
10
11
12
13
14
fig. 2
9 - Power button - Press to turn machine on and off (Standby)
10 - Number of cups button - Press to select between 1 and 2 cups
11 - Coffee size button - Press to select between short, medium and long options
12 - Make coffee button - Press to begin the coffee making process
13 - Steam button - Press to dispense steam from the steam nozzle
14 - Maintenance button - Press to perform a cleaning cycle
2
First use
This coffee machine has one water heater, which allows for ideal temperatures for coffee and steam for cappuccino. The
steam can also be used to preheat the cups.
This coffee machine can grind coffee beans when they are needed, ensuring they are freshly ground for the very best
flavour.
To stop the coffee machine dispensing – if less than the preset amount is required – simply press
coffee is dispensing.
at any point when the
The grinding level of the coffee beans can be adjusted depending on personal preference to either a coarser or finer grind.
Before first use:
1.
Pull the machine out of its housing by lifting the handle of the machine and pulling it towards you.
2.
Fill the water tank (if the coffee machine is not to be plumbed in to the mains water supply) and the coffee
container (as described below).
3.
Turn on the machine at the switch on the top right side of the machine.
4.
Push the machine back into the housing.
5.
Switch on the machine by pressing
6.
With a cup or container in place, press to dispense a cup of hot water through the steam nozzle.
7.
The machine is now ready for use.
The water tank
It is possible to use the coffee machine without connecting it to the mains water supply. There is an integral water tank
which can be used in this instance. To ensure the best results from your coffee, it is recommended that the water tank be
emptied frequently and refilled with fresh water, and no water be left in the tank for long periods.
When the water tank is empty, the message WATER MISSING will show on the display.
To fill the water tank:
1.
Pull the machine out of its housing by lifting the handle of the machine and pulling it towards you.
2.
Open the lid of the water tank and fill it until the water is 4cm from the top level. Then close the lid.
3.
Push the machine back into the housing.
Please note:
You should only use cold drinking water in this coffee machine, with water hardness level less than 7˚F.
The water tank can be removed for cleaning, following the steps above, and then lifting it out of the machine.
The coffee container
You should use only beans for espresso coffee in this machine. Other substances, such as ground coffee, instant coffee,
beans treated with caramel, sugar or similar substances should not be used as they can damage the grinder or machine.
When the coffee container is empty, the message COFFEE MISSING will show on the display.
To fill the coffee container:
3
1.
Pull the machine out of its housing by lifting the handle of the machine and pulling it towards you.
2.
Remove the lid of the coffee container and fill it until the coffee beans are 2cm from the top level. Then
replace the lid.
3.
Push the machine back into the housing.
The Coffee Machine
Press to switch on the coffee machine
After a few seconds, GOOD MORNING or GOOD AFTERNOON will show on the display.
The machine will heat up, and COFFEE and STEAM will flash on the display. Once the machine is ready for use, COFFEE and
STEAM will illuminate constantly, as will the size and number of the coffees last selected (for example 1 SHORT). If COFFEE
continues to flash, add coffee beans to the container. If STEAM continues to flash (non-mains plumbed coffee machines only)
add water to the water tank.
Making espresso coffee
1. Select the number of coffee cups
The coffee machine can prepare one or two cups of coffee simultaneously.
To select the number required, press
.
2. Select the coffee size
The coffee machine is equipped with three preset coffee size.
to select from the following options:
To select the size required, press
SHORT - 52ml
NORMAL - 67ml
LONG - 145ml
FINE
It is possible to programme into the memory the amount of coffee dispensed for each of the sizes of coffee cup. To do so follow
the steps below.
1. When the coffee is being made, press until the required amount has been dispensed.
2. The display will show MEMO?
to select the size that is to be set.
3. Press
to confirm the setting. Wait for the coffee machine to beep twice and the display to stop
4. Press and hold
flashing before releasing the button.
3. Make the coffee
1.
2.
Place the cup or cups under the dispenser spout.
Press to start dispensing. The coffee machine will dispense the selected amount of coffee. To stop the coffee machine dispensing before the end of the preset programme, press again.
Dispensing steam
1.
2.
3.
Press to select steam and wait for STEAM to stop flashing on the display.
Place the cup or container under the steam nozzle.
Press and hold to dispense the steam. Release the button when sufficient steam has been dispensed.
Please note:
Ensure that the spout is placed in a cup or container before pressing , as hot steam can cause scalding.
Always use the handle to move the water spout.
4
5. Make a cappuccino
We recommend preparing cappuccinos individually so as to ensure best flavour.
1. Make a medium espresso as described above in a large cup.
2. Press to select steam and wait until STEAM stops flashing.
3. Before putting the container under the steam nozzle, place a spare cup under the steam nozzle then, press
and hold for approximately five seconds, to flush out any water remaining in the pipes.
4. Fill a 50cl stainless steel container with 10cl milk.
5. Put the steam nozzle into the container so it is at the bottom of the container.
6. Press and hold to steam the milk for a few seconds. Do not heat the milk excessively as this will prevent froth from forming.
7. After a few seconds, lower the container so the steam nozzle is on the surface of the milk and continue to
steam until sufficient froth is obtained. Release to stop the steam dispensing.
8. Slowly pour the frothed milk onto the coffee.
5
Programming
The coffee machine is equipped with a programming mode to enable you to set the following as required:
To enter programming mode follow the steps below:
1 Whilst the machine is off, press and hold until PROGRAMMING shows on the display
or
until the required programme shows on the display.
2. Press
3. To change the setting, press or until the required setting shows on the display.
4. Press to exit programming mode.
Programming options are:
CLOCK – allows you to set the clock.
AUTO ON – allows you to set the time the coffee machine will switch on automatically.
Please note: you can switch on/off the Automatic switch on by pressing when the coffee machine is switched off. The display will show an * next to the time.
AUTO OFF – allows you to set the time the coffee machine will switch off automatically.
Please note: you can switch on/off the Automatic Off by pressing when the coffee machine is switched off.
The display will show an * next to the time.
AUTO SHUT DOWN – allows you to set the number of minutes the coffee machine will be on before
switching off automatically. The options are 15, 30, 45, 60, 75, 90, or 0 for off.
POWER SAVING – allows you to set the length of time after which the coffee machine reduces the
temperature of the water heater to lower consumption. The options are 15, 30, 45, 60, 75, 90, or 0 for off.
When power saving is on, press to return the water heater to the required temperature.
DISPLAY – allows you to set the language on the display. The options are English, Italian, French, Spanish,
Portuguese, German or Dutch..
WATER HARDNESS – allows you to set the hardness of the water used. To find out the water hardness
in your area, you can use the test strip supplied with the coffee machine or you should contact your water
supplier. The options are 0, 5, 10, 15, 20, 25˚dh. 1˚dh = 1.786˚F = 1.25˚e = 17.86ppm = 0.1786mmol/l)
DESCALING – shows the number of litres of water that have been dispensed and the theoretical level of
limescale build up based on the water hardness programmed. 100% indicates that descaling needs to be
carried out. This number will reset after descaling.
COFFEE – shows the number of coffees made since first use. This number cannot be reset.
GROUND COFFEE – allows you to set the time the coffee is ground to make the coffee stronger or
weaker. The selection ranges from 3.0 to 5.0 sec – the coffee will be stronger the higher the number and 4.5
corresponds to the preset factory level.
Please note:
Increasing the grind time will increase the amount of coffee consumed. Make any changes in small increments and make a cup of coffee after each change to check the setting.
6
Programming
GRINDER SET - Allows you to set the coarseness of the coffee grind. The selection ranges from -----0 (most
fine) to 0+++++ (most coarse) and 0 corresponds to the preset factory level.
Please note:
Increasing the coarseness will increase the amount of coffee consumed. Make any changes in small increments and make a cup of coffee after each change to check the setting.
To prevent a fault where the coffee cannot be compressed, you should decrease the grinding time as you
increase the fineness of the grind. Make any changes in small increments and make a cup of coffee after each
change to check the setting.
COFFEE TEMPERATURE – allows you to set the temperature for coffee. The selection ranges from 85ºC to
95ºC and 90ºC corresponds to the preset factory level.
STEAM TEMPERATURE – allows you to set the temperature for steam. The selection ranges from 110˚C to
130˚C and 120ºC corresponds to the preset factory level.
7
Care and Maintenance
DO NOT PERFORM ANY MAINTENANCE OR CLEANING WITHOUT FIRST SWITCHING OFF THE
POWER SUPPLY AT THE MAIN ISOLATION SWITCH ON THE LEFT HAND SIDE.
THE COFFEE MACHINE WILL BE HOT IMMEDIATELY AFTER USE. ALLOW IT TO COOL BEFORE CLEANING.
As the coffee machine has a stainless steel and glass surface, you should use a nonabrasive cleaner. Any abrasive cleaner
(including Cif) will scratch the surface and could erase the control panel markings. Stainless steel can be effectively
cleaned by simply using a dilute solution of water and mild detergent and drying to a shine with a clean cloth.
Remove the drip tray grid and the inner tray from the drip tray drawer and the water tank. These can be cleaned with a
soft sponge and sanitising detergent solution.
The steam nozzle can be unscrewed and removed for cleaning. This should be cleaned with a soft sponge and hot
water, or can be placed in a dishwasher. After frothing milk, it is advisable to flush the spout by dispensing a small
amount of steam to remove any residues of milk or froth.
A cleaning cycle should be performed both before and after a prolonged period without use. To run a cleaning cycle,
press and hold for three seconds. The coffee machine will then run a cycle by passing only water through the pipes.
Emptying the coffee grounds
COFFEE GROUNDS will show on the display after 20 coffees have been made. The coffee ground container should be
emptied before a further five coffees are made or the coffee machine will stop working.
Please note: The coffee grounds container must be emptied regularly to prevent formation of bacteria and mould.
1. Open the drip tray drawer
2. Remove the drip tray grid
3. Remove the coffee grounds container and the water container and empty and clean them both.
4. Replace the containers and the drip tray grid.
5. Close the drip tray drawer.
until the coffee machine beeps.
6. Press and hold
IMPORTANT:
Steam cleaners must not be used when cleaning this appliance.
Ensure that all parts are correctly replaced after cleaning.
8
Care and Maintenance
Descaling
If the display shows DESCALING then the coffee machine needs to be descaled to ensure best performance.
Please note:
You should use cleaning products that are appropriate for use with coffee machines.
Do not use lemon-based products to descale the coffee machine as these can cause irreparable damage to the coffee
machine.
Failure to descale your coffee machine constitutes misuse and may invalidate your guarantee.
To descale the coffee machine, follow the steps below:
1.
If the coffee machine is plumbed into the mains water supply, turn off the tap.
2.
Open the drip tray drawer and remove the drip tray grid.
3.
Remove any water from the drip tray and coffee grounds from the container. Then close the drip tray drawer without replacing the grid.
4.
Position the steam nozzle so that any water drips into the drip tray.
5.
Switch on the coffee machine and wait until STEAM has stopped flashing in the display.
6.
Switch off the coffee machine.
7.
Press
8.
Select the descaling function by pressing
9.
Press and hold
until PROGRAMMING shows on the display.
or
and together and then press
until DESCALING shows on the display.
until the coffee machine beeps.
10. When DESCALING STAGE 01 shows on the display, fill the tank half full with descaling product, then press .
11.
When DESCALING STAGE 02 shows on the display, press and hold
.
12. When DESCALING STAGE 03 shows on the display, the coffee machine will dispense water from both the
coffee dispenser and steam nozzle and keep pressed to the end of the cycle.
13. When DESCALING STAGE 04 shows on the display, refill the water tank with at least one litre of fresh water, then press .
14. When DESCALING STAGE 05 shows on the display, the coffee machine will start the cleaning cycle. Keep
pressed until the fresh water has been dispensed.
15. Fill the water tank and wait for the coffee machine to confirm both coffee and water temperatures have
been reached.
Your coffee machine is now descaled and ready for normal use.
IMPORTANT: if the coffee machine is plumbed into the mains water supply, it must be installed with a
mains water isolation valve and 150 micron filter.
9
Troubleshooting
The coffee machine does not
switch on.
The coffee will not dispense or dispenses
only in slow drips.
The machine is not fully back in its housing.
Push the coffee machine back fully.
There is a problem with the electricity
supply.
Check that the mains supply has not
been switched off.
Check that the fuse in the spur has
not blown.
The coffee grind is too fine.
Adjust the grind to be coarser.
There is not enough water in the water
tank.
Fill the water tank or check there
is no fault with the mains water
supply.
The internal pipes are obstructed.
The coffee dispenses too fast and is not
creamy.
The pump makes a loud noise when
dispensing coffee.
The coffee grind is too coarse.
Adjust the grind to be finer.
The coffee is too old.
Replace the coffee beans with fresh
beans.
Coffee blend.
Change the coffee beans for those
appropriate for use.
There is not enough water in the water
tank.
Fill the water tank or check there
is no fault with the mains water
supply.
The coffee grind is too coarse so the pressure in the filter holder is too low.
Adjust the grind to be finer.
Milk froth does not form.
Check the flow of steam is suitable.
The coffee machine is equipped with an auto-diagnostic system to recognise and advise on how to deal with faults.
These alerts will show on the display.
Machine on/off
Display shows
Solution
OFF
DESCALING
Descale the coffee machine
ON
AFTER SALES SERV
0-3-4
Press then twice to switch the coffee machine off and on. If the fault persists, call CDA Customer Care
ON
WATER PRESSURE
1
Check the water tank is full or that there is no problem with the mains water
supply. Then press then twice to switch the coffee machine off and on. If the
fault persists, call CDA Customer Care.
ON
GRINDER LOCK
2
Check the grinder for any foreign bodies (e.g. impurities or stones) before calling
CDA Customer Care.
ON
AFTER SALES SERV
5
If the grind is set too fine and the coffee grind time is not reduced accordingly,
After Sales 5 may show on the display to indicate that the coffee machine cannot
compress the ground coffee sufficiently. To address this, either decrease the grind
time or set the grind to be more coarse.
The serial port on the left side of the coffee machine is for diagnostic purposes only.
10
Installation
IMPORTANT: THIS APPLIANCE SHOULD BE FITTED BY SUITABLY
QUALIFIED PERSON.
542
1.
2.
3.
4.
5.
6.
7.
Slide the base unit into the housing ensuring the dimensions are
correct as per figure 3.
Fix the base unit in place by attaching the 10 screws in to the holes as shown in figure 4 and figure 5. If the sides of the base are not flush with the sides of the housing, then use the shims provided.
Push the runners fully closed on the base unit.
Connect the plug to the plug socket. This must be accessible after the appliance has been installed.
Using an appropriate supply pipe, connect one end of the hose to the threaded inlet of the valve on the dispenser, located at the rear of the appliance.
Insert the flow restrictor between two rubber washers, then connect the other end of the pipe to the mains water supply (drinking water only)
Insert the appliance into the housing, ensuring that the runners on the machine are located in the runners on the base unit. Then slide the appliance fully into the housing.
320 min
320
fig. 3
fig. 4
Please note:
If the coffee machine is to be connected to the mains water supply
then it is not suitable for installation in a wall unit. The minimum
depth of the unit in this instance is approximately 400 mm
(dependent on the water connection pipe used).
fig. 5
11
Installation
Please note:
Due to the weight of this appliance, the furniture unit must be secured to the
wall prior to installation.
You must ensure that all water connections are sound and check there are no
leaks before completing installation.
For best performance, the mains water pressure must be between 0.1 - 3 bar.
Do not use outdoors.
fig. 6
To reduce the risk of electric shock, do not mount over a sink.
The water supply should be located in a place that allows the machine to be
isolated in the event of an emergency.
IMPORTANT
flow
reducer
The flow reducer must be fitted to prevent excessive pressure causing
internal leaks.
CDA will not be held responsible for water leaks caused by incorrect
installation.
fig. 7
12
Electrical information
Warning! This appliance must be earthed.
The mains lead of this appliance has been fitted with a BS 1363A 13 amp fused plug. To change a fuse in this type of plug,
follow the steps below:
1. Remove the fuse cover and fuse.
2. Fit replacement 13A fuse, ASTA approved to BS 1362 type, into the fuse cover.
3. Replace fuse cover.
Important: Do not use the appliance without the fuse cover in position.
How to connect an alternative plug
If the fitted plug is not suitable for your socket outlet, then it should be cut off and disposed of safely to avoid the risk of
electric shock. A suitable alternative plug of at least 13 Amp rating to BS 1363 should be used.
As the colours of the wires in the mains lead of this appliance may not correspond with the
coloured markings identifying the terminals in your plug, proceed as follows:• The wire which is coloured GREEN and YELLOW must be connected to the terminal which is marked with letter (E) or
by the Earth symbol
or coloured GREEN and YELLOW.
• The wire which is coloured BLUE must be connected to the terminal which is marked with the letter (N), or coloured BLACK.
• The wire which is coloured BROWN must be connected to the terminal which is marked with the letter (L) or coloured RED or BROWN.
If in doubt regarding the electrical connection of this appliance, consult a qualified electrician. Do not shorten the supply cable, the appliance may require removing for servicing.
N.B. Ensure that the plug socket is situated in an easily accessible place.
13
14
To contact our Customer Care Department, or for Service,
please contact us on the details below.
Passionate about style
Customer Care Department • The
Group Ltd. • Harby Road • Langar • Nottinghamshire • NG13 9HY
T : 01949 862 012 F : 01949 862 003 E : [email protected] W : www.cda.eu