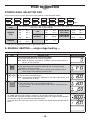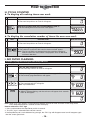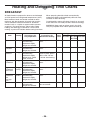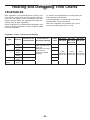
1
Operating Instructions Commercial Microwave Ovens Models No. NE-12521 / NE-12523 / NE-17521 / NE-17523 / NE-17723 / NE-21521 / NE-21523 *Model No. NE-17723 Please read these instructions carefully before using this product and save this manual for future use. Before Calling for Service: If failure code “F” appears in the display, unplug oven and wait for 5 seconds before reconnecting. If normal operation does not resume, call the service agent with the information of failure code. Contents page PRECAUTIONS TO AVOID POSSIBLE EXPOSURE TO EXCESSIVE MICROWAVE ENERGY . . . . . . . . . . . . . . . . . . . . . . . . . . . . . . . . . . . . . . . . . . . . . . . . . . . . . 3 IMPORTANT SAFETY INSTRUCTIONS . . . . . . . . . . . . . . . . . . . . . . . . . . . . . . . . . . . . . . . . 3 Installation and GROUNDING INSTRUCTIONS . . . . . . . . . . . . . . . . . . . . . . . . . . . . . . . . . . 4 Caution . . . . . . . . . . . . . . . . . . . . . . . . . . . . . . . . . . . . . . . . . . . . . . . . . . . . . . . . . . . . . . . . . . 4 ATTENTION . . . . . . . . . . . . . . . . . . . . . . . . . . . . . . . . . . . . . . . . . . . . . . . . . . . . . . . . . . . . . . 5 Self Diagnostics Failure Code Explanation. . . . . . . . . . . . . . . . . . . . . . . . . . . . . . . . . . . . . . . 6 If a “U” Appears In The Display. . . . . . . . . . . . . . . . . . . . . . . . . . . . . . . . . . . . . . . . . . . . . . . . 6 Power Source Voltage Adjustment . . . . . . . . . . . . . . . . . . . . . . . . . . . . . . . . . . . . . . . . . . . . . 7 How Does The Microwave Work?. . . . . . . . . . . . . . . . . . . . . . . . . . . . . . . . . . . . . . . . . . . . . . 7 Outline Diagram . . . . . . . . . . . . . . . . . . . . . . . . . . . . . . . . . . . . . . . . . . . . . . . . . . . . . . . . . . . 8 SD Memory Card . . . . . . . . . . . . . . . . . . . . . . . . . . . . . . . . . . . . . . . . . . . . . . . . . . . . . . . . . . 9 How to Operate POWER LEVEL SELECTOR PAD . . . . . . . . . . . . . . . . . . . . . . . . . . . . . . . . . . . . . . . . . . 10 A. MANUAL HEATING . . .single stage heating . . . . . . . . . . . . . . . . . . . . . . . . . . . . . . . . 10 . . . . . . . . . . . . . . . . . . .2 to 5 stage heating . . . . . . . . . . . . . . . . . . . . . . . . . . . . . . . . 11 B. PROGRAMMED HEATING . . . . . . . . . . . . . . . . . . . . . . . . . . . . . . . . . . . . . . . . . . . . . 12 C. PROGRAMMING NUMBER/MEMORY PADS . . .single stage heating . . . . . . . . . . . . 12 . . . . . . . . . . . . . . . . . . . . . . . . . . . . . . . . . . . . . . .2 to 5 stage heating . . . . . . . . . . . . 13 D. PROGRAMMING DOUBLE OR TRIPLE QUANTITY PAD. . . . . . . . . . . . . . . . . . . . . . 14 E. PROGRAM LOCK . . . . . . . . . . . . . . . . . . . . . . . . . . . . . . . . . . . . . . . . . . . . . . . . . . . . 14 F. BEEP TONE. . . . . . . . . . . . . . . . . . . . . . . . . . . . . . . . . . . . . . . . . . . . . . . . . . . . . . . . . 15 G.PROGRAM LIST . . . . . . . . . . . . . . . . . . . . . . . . . . . . . . . . . . . . . . . . . . . . . . . . . . . . . 17 H. CYCLE COUNTER . . . . . . . . . . . . . . . . . . . . . . . . . . . . . . . . . . . . . . . . . . . . . . . . . . . 18 I. AIR FILTER CLEANING. . . . . . . . . . . . . . . . . . . . . . . . . . . . . . . . . . . . . . . . . . . . . . . . 18 J. OVEN LAMP . . . . . . . . . . . . . . . . . . . . . . . . . . . . . . . . . . . . . . . . . . . . . . . . . . . . . . . . 19 Installation Instructions for Stacking . . . . . . . . . . . . . . . . . . . . . . . . . . . . . . . . . . . . . . . . . . . 21 Sanitary Counter Top Seal . . . . . . . . . . . . . . . . . . . . . . . . . . . . . . . . . . . . . . . . . . . . . . . . . . 21 Care of Your Oven . . . . . . . . . . . . . . . . . . . . . . . . . . . . . . . . . . . . . . . . . . . . . . . . . . . . . . . . 22 Cleaning and Maintenance procedures . . . . . . . . . . . . . . . . . . . . . . . . . . . . . . . . . . . . . . . . 23 Heating and Defrosting Time Charts . . . . . . . . . . . . . . . . . . . . . . . . . . . . . . . . . . . . . . . . . . 24 PANASONIC COMMERCIAL MICROWAVE OVEN WARRANTY . . . . . . . . . . . . . . . . . . . . 38 Technical Specifications . . . . . . . . . . . . . . . . . . . . . . . . . . . . . . . . . . . . . . . . . . . . . . . . . . . . 40 See page 6 before calling Owner’s Record Toll Free Service Information Model No. Serial No. The serial number of this product may be found on the side of the oven. Date of Purchase Dealer’s Name Dealer’s Address To locate a convenient service agent call 1-888-350-9590 Chef Support: 201-348-7305 www.panasonic.com/cmo Virtual Test Kitchens -2- PRECAUTIONS TO AVOID POSSIBLE EXPOSURE TO EXCESSIVE MICROWAVE ENERGY (c) Do not operate the oven if it is damaged. It is particularly important that the oven door close properly and that there is no damage to the : (1) door (bent) (2) hinges and latches (broken or loose) (3) door seals and sealing surfaces. (d) The oven should not be adjusted or repaired by anyone except properly qualified service personnel. (a) Do not attempt to operate this oven with the door open since open-door operation can result in harmful exposure to microwave energy. It is important not to defeat or tamper with the safety interlocks. Under normal conditions, the oven will not operate with the door open. (b) Do not place any object between the oven front face and the door, or allow soil or cleaner residue to accumulate on sealing surfaces. IMPORTANT SAFETY INSTRUCTIONS Your microwave oven is a cooking device and you should use as much care as you use with a stove or any other cooking device. When using this electric appliance, basic safety precautions should be followed, including the following: WARNING—To reduce the risk of burns, electric shock, fire, injury to persons or exposure to excessive microwave energy: 1. Read all instructions before using the appliance. 2. Read and follow “PRECAUTIONS TO AVOID POSSIBLE EXPOSURE TO EXCESSIVE MICROWAVE ENERGY,” found above. 3. This appliance must be grounded. Connect only to a properly grounded outlet. See “Grounding Instructions” found on page 4. 4. Install or locate this appliance only in accordance with the provided installation instructions found on page 4. 5. Do not cover or block any openings on this appliance. 6. Do not store or use this appliance outdoors. Do not use this product near water for example, near a kitchen sink, in a wet basement, or near a swimming pool, and the like. 7. Use this appliance only for its intended use as described in this manual. Do not use corrosive chemicals or vapors in this appliance. This type of oven is specifically designed to heat, or cook food. It is not designed for industrial or laboratory use. 8. When cleaning surfaces of door and oven that come together on closing the door, use only mild, non-abrasive soaps or detergents applied with a sponge or soft cloth. 9. As with any appliance, close supervision is necessary when used by children. 10. Do not operate this appliance if it has a damaged cord or plug, if it is not working properly, or if it has been damaged or dropped. 11. Do not immerse cord or plug in water. 12. Keep cord away from heated surfaces. 13. Do not let cord hang over edge of table or counter. 14. This appliance should be serviced only by qualified service personnel. Contact the nearest authorized service facility for examination, repair or adjustment. 15. Some products such as whole eggs and sealed containers (for example, closed glass jars) may explode and should not be heated in this oven. 16. To reduce the risk of fire in the oven cavity: (a) Do not overcook food. Carefully attend appliance if paper, plastic, or other combustible materials are placed inside the oven to facilitate cooking. (b) Remove wire twist-ties from paper or plastic bags before placing bag in oven. (c) If materials inside the oven should ignite, keep oven door closed, turn oven off, and disconnect the power cord, or shut off power at the fuse or circuit breaker panel. (d) Do not use the cavity for storage purposes. Do not leave paper products, cooking utensils, or food in the cavity when not in use. 17. Liquids, such as water, coffee, or tea are able to be overheated beyond the boiling point without appearing to be boiling due to surface tension of the liquid. Visible bubbling or boiling when the container is removed from the microwave oven is not always present. THIS COULD RESULT IN VERY HOT LIQUIDS SUDDENLY BOILING OVER WHEN A SPOON OR OTHER UTENSIL IS INSERTED INTO THE LIQUID. To reduce the risk of injury to persons: (a) Do not overheat the liquid. (b) Stir the liquid both before and halfway through heating it. (c) Do not use straight-sided containers with narrow necks. (d) After heating, allow the container to stand in the microwave oven for a short time before removing the container. (e) Use extreme care when inserting a spoon or other utensil into the container. SAVE THESE INSTRUCTIONS For proper use of your oven read remaining safety cautions and operating instructions. -3- Installation and GROUNDING INSTRUCTIONS Placement of the Oven Locate the oven on a smooth, flat and stable surface. There should be no gap between the table surface and the bottom of the oven. Do not place the oven in a hot or damp area, ie. near a stove, sink or directly above heat lamps on a serving line. Free airflow around the oven is important. There is a possibility of a small amount of interference with weak broadcast signals if the microwave oven is too close to a radio or TV. Grounding Instructions This oven must be grounded electrically. In the event of an electrical short circuit, grounding reduces the risk of electric shock by providing an escape wire for the electric current. The appliance is equipped with a cord having a grounding wire with a grounding plug. The plug must be plugged into an outlet that is properly installed and grounded. WARNING — improper use of the grounding plug can result in a risk of electric shock. Consult a qualified electrician or service person if the grounding instructions are not completely understood, or if doubt exists as to whether the appliance is properly connected. If it is necessary to use an extension cord, use only a three wire extension cord that has a three blade grounding plug, and a three slot receptacle that will accept the plug on the appliance. The marked rating of the extension cord should be equal to or greater than the electrical rating of the oven. A. For Models No. NE-12521/NE-12523 The oven must be on a SEPARATE, 20 amp, 60 Hz-120 V GROUNDED CIRCUIT. NEMA# 5-20P 120 V Grounded Outlet NEMA# 5-20R B. For Models No. NE-17521/NE-17523/NE-17723/ NE-21521/NE-21523 1. This oven must be on a separate, 60 Hz GROUNDED CIRCUIT - minimum 15 amps for Models No. NE-17521/NE-17523/NE-17723; minimum 20 amps for Models No. NE-21521/ NE-21523. 2. The microwave ovens are built to operate on 2 different voltages (230-240 V or 208 V). Models No. NE-17521/NE-17523/ NE-17723 NEMA# 6-15P 208 V/230-240 V Grounded Outlet NEMA# 6-15R or 6-20R Protective Film Removal A blue protective film is used to prevent scratching of the outer case during transportation. Peel the film from the exterior of the oven before installation or use. Models No. NE-21521/NE-21523 NEMA# 6-20P 208 V/230-240 V Grounded Outlet NEMA# 6-20R Wiring Requirements No other appliance should share the circuit with the microwave oven. If it does, the branch circuit fuse may overload and either cause the oven to heat slower than expected or blow the fuse. Caution 1. Do not attempt to tamper with or make any adjustments or repairs to the door, control panel housing, safety interlock switches or any other part of the oven. Do NOT remove the outer panel of the oven. Repairs should only be done by a qualified service person. 2. Do NOT operate the oven empty. The microwave energy will reflect continuously throughout the oven if no food or water is present to absorb energy. 3. If a fire occurs in the oven, press the Stop/Reset pad and LEAVE THE DOOR CLOSED. Disconnect the power cord, or shut off the power at the fuse or circuit breaker panel. 4. Do NOT attempt to dry clothes, newspapers or other materials in the oven, as they may catch on fire. 5. Do NOT use recycled paper products, as they may contain impurities which may cause sparks and/or fires. 6. Do NOT use newspapers or paper bags for cooking. 7. Do NOT hit or strike the control panel. Damage to controls may occur. 8. POT HOLDERS may be needed when removing food from the oven. Heat is transferred from the hot food to the container. 9. Do NOT store flammable materials next to, on top of, or in the oven. It could be a fire hazard. 10. Do NOT operate the oven without the spatter shields (located in the top of inner cavity) in place. -4- ATTENTION PLEASE READ THE FOLLOWING CAUTIONS BEFORE USING THIS MICROWAVE OVEN Failure to follow these instructions and properly maintain this unit may lead to premature failure of the Microwave and may void the warranty. Please read the following guidelines along with the included owner’s manual prior to operating this unit. s 5 NITMUSTBEPLACEDINANOPENAREAMAKINGCERTAINTHATTHEREISADEQUATECLEARANCEANDVENTILATIONINTHEBACK and front of the unit. s & ILTERSMUSTBECLEANEDANDREINSTALLEDONAREGULARSCHEDULEINORDERTOPROVIDEPROPERAIRFLOWTHROUGHOUTTHE unit. Failure to properly maintain the filters will result in the Microwave overheating and possible early component failure. s 4 OP3PLATTERSHIELD-534BEINSTALLEDATALLTIMESWHENUNITISINOPERATION&AILURETOINSTALLTHESPLATTERSHIELD will result in food buildup on the inside top of the cavity and will eventually lead to arcing and the eventual destruction of the cavity and will void the warranty. s $ ONOTSCRAPORPEELOFFRUBBERGASKETAROUNDTHEBASEOFTHEBOTTOMPLATEASTHISWILLALLOWSPILLAGEUNDERTHE bottom plate and may lead to destruction of the cavity. s $ ONOTSLAMDOORSHUTORPULLDOWNONTHEDOORASTHISMAYDAMAGETHEDOORLATCHMECHANISMANDORHINGES and render the Microwave inoperative. s $ ONOTOVERFILLPANSASSPILLAGEMAYOCCUR)FSPILLAGEDOESOCCURPLEASEWIPEITUPIMMEDIATELY&OLLOWTHE guides on pages 22 to 23 for proper cleaning instructions. s $ ONOTPLACEUNITNEAROTHERSOURCESOFHEATSUCHASSTOVESHEATLAMPSOROVENSASTHISMAYSHORTENTHELIFEOF the Microwave oven components and render the unit inoperative. s $ ONOTPLACEMETALOBJECTSSUCHASALUMINUMFOILMETALPANSORMETALUTENSILSASTHISWILLDAMAGEBOTHTHE inside of the cavity as well as electronic components. IF BOTTOM PLATE BREAKS or CRACKS, or THERE IS SPARKING IN THE CAVITY WHILE HEATING FOOD, DO NOT CONTINUE TO USE OVEN CONTACT AUTHORIZED SERVICE AGENCY IMMEDIATELY!! 1-888-350-9590 -5- Self Diagnostics Failure Code Explanation This oven monitors its operation and displays a Failure Code in Digital Display Window when a problem occurs. What to do when a Failure Code appears: When “F” is displayed, remove the plug, wait 5 seconds, and reinsert. If “F” is displayed again, call the service agent. Note: Not all codes displayed in the Digital Display Window indicate a failure. If a “U” Appears In The Display A fault will also show as a Failure Code in the display window (it will appear as a “U” then a two digit number). Follow the steps in the following chart: CODE U16 WHAT TO DO Remove the SD Memory Card and check whether it is locked. Replace the SD Memory Card when finished. Slide this up to unlock. LOCK PROBLEM Cannot write because the SD Memory Card is locked. *SD Memory Card information can be read. Recipe Card U17 U19 U30 An SD Memory Card other than the card provided is in use. SD Memory Card is not inserted. Memory cooking has exceeded the maximum time during Double Quantity and Triple Quantity settings. Use the provided SD Memory Card. Remove the SD Memory Card Cover and insert an SD Memory Card. Check and change the time. —See page 11, step 5 “Note”. -6- Power Source Voltage Adjustment Models No. NE-17521/NE-17523/NE-17723/NE-21521/NE-21523 The microwave automatically detects 208 V and 230 V–240 V. Insert the plug, and if the Digital Display Window goes blank 10 seconds after use, unplug and insert the plug again. How Does The Microwave Work? Microwaves are a form of high frequency radio waves similar to those used by a radio including AM, FM, and CB. They are, however, much shorter than radio waves. Electricity is converted into microwave energy by the magnetron tube. From the magnetron tube, microwave energy is transmitted to the oven cavity where it is: reflected, transmitted and absorbed. Reflection Microwave are reflected by metal just as a ball is bounced off a wall. A combination of stationary (interior walls) and rotating antenna, located underneath the bottom shelf and above the ceiling cover assure that the microwaves are well distributed within the oven cavity to produce even heating or cooking of foods. Transmission Microwave pass through some materials such as paper, glass and plastic much like sunlight shining through a window. Because these substances do not absorb or reflect the microwave energy, they are ideal materials for microwave oven heating containers when covered. Absorption During heating, microwaves will be absorbed by food. They penetrate to a depth of about 3⁄4 to 11⁄2 inches. Microwave energy excites the molecules in the food (especially water, fat and sugar molecules), and causes them to vibrate at a rate of 2,450,000,000 times per second. This vibration causes friction, and heat is produced just as you will feel heat produced if you vigorously rub your hands together. The internal heating of larger foods is done by conduction. The heat which is produced by friction is conducted to the center of the food. Foods also continue to heat by conduction during standing time. (“carry-over” cooking) Because microwave dissipate, much like sunlight as it reaches the Earth’s surface, they are not stored in food. Radio Inference 1. Operation of the microwave oven may cause interference to your radio, TV or similar equipment. 2. When there is interference, it may be reduced or eliminated by taking the following measures: a. Clean door and sealing surfaces of the oven. (See Care of Your Microwave Oven found on page 22.) b. Place the radio, TV, etc. away from the microwave oven as far as possible. c. Use a properly installed antenna, on the radio to obtain stronger signal reception. -7- Outline Diagram (2) (3) (4) (5)(6) (1) (7) (8) (9) (12) (13) (10) (11) (1) (2) (3) (4) (5) (6) (7) Digital Display Window (see below) Program pad Shift (A/B/C) pad Power Level Selector pad Double Quantity pad Triple Quantity pad s.UMBER-EMORYPADS sTime input A B C D (8) (9) (10) (11) (12) (13) Stop/Reset pad Start pad Door Handle Air Filter SD Memory Card Cover* Splatter Shield (top of inner cavity) A – Program Display B – Heating Time Display (“min. sec.” or “hour min.”) #ns-EMORYPAD.UMBER$ISPLAY s(EATING3TAGE)NDICATOR D – Pattern of buzzer sound settings %nsCalling Programmed Heating: Stage Number Indicator sProgrammed Heating in Progress: Operation Indicator s"EEPTONESETTINGS3CALE)NDICATOR E This oven is preset at the factory as follows: Number/Memory pads preset HIGH power at the indicated heating times for single stage heating (See pages 10-13) 1 = 10 sec. 2 = 20 sec. 3 = 30 sec. 4 = 40 sec. 5 = 50 sec. 6 = 1 min. 7 = 1 min. 15 sec. 8 = 1 min. 30 sec. 9 = 1 min. 45 sec. 0 = 2 min. s-ODEL.O.% M emory numbers are displayed using 1 digit for 1 to 9, 2 digits for 10 to 99, and 3 digits for 000 to 999. Additionally, there are three sides, A (00 to 99), B (00 to 99) and C (00 to 99). s/THERMODELS There are three sides, A, B and C. Only A-side is preset. Program Unlocked (See pages 14-15) Double Quantity = 1.6 Triple Quantity = 2.2 (See page 14) Oven Lamp When the door is open = ON Blinking at the end of heating cycle = OFF Decrease brightness during cooking = OFF (See pages 19-20) The default filter cleaning time is set to “0”. If you wish to change these settings, please consult the operating instructions for programming procedure. (See page 18) *In this manual, illustrations of Model No. NE-17723 is used for explanation purposes. Model numbers other than NE-17723 do not have SD Memory Card functions. -8- SD Memory Card *Model No. NE-17723 only (An SD Memory Card is included in the unit purchased.) s ! N3$-EMORY#ARDISINCLUDEDINTHEUNITPURCHASED)TALLOWSYOUTOSTOREUPTO-EMORY0ROGRAMMES in the oven. s 5SETHECARDWHENSTORINGORRECALLING-EMORY0ROGRAMMES How to insert / remove the SD Memory Card *Before you insert / remove an SD Memory Card, always disconnect the oven from the power supply. If this is not possible, the display window should be blank, otherwise, the data on the SD Memory Card may be damaged. How to remove 1. Use a coin or tool to remove the screw from the SD Memory Card Cover. 2. Push the SD Memory Card with your finger to draw it out. Then, remove it. How to insert 1. Insert an SD Memory Card with its label facing up as indicated by until it snaps into place. mark 2. Fit the left edge of the SD Memory Card Cover. Screw to close at the right-hand side. Caution: 1. Always close the SD Memory Card Cover except when an SD Memory Card is inserted/removed in order to prevent water or dust from entering. 2. Insert only an SD Memory Card specified for this oven. Do not use any other type or substitute SD Memory Card. 3. Keep the removed SD Memory Card away from static electricity. 4. Do not disassemble or modify SD Memory Cards. 5. Do not apply a physical shock to SD Memory Cards. Do not bend, drop, or get them wet. 6. Do not touch the metal terminals of an SD Memory Card with your hand or metal. 7. Do not remove the label. Do not paste another label onto the SD Memory Card. 8. Do not leave SD Memory Cards in locations subject to high temperatures or direct sunlight and corrosive gases. 9. If the SD Memory Card is lost or becomes faulty, please contact a Service Engineer to obtain a replacement. -9- How to Operate POWER LEVEL SELECTOR PAD Each time the pad is pressed, the Power Level switches as the illustration below. P10 P9 P8 P7 P6 P5 P4 P3 P2 P1 P0 PU1 PU2 PL1 PL2 P10 HIGH MEDIUM HIGH MEDIUM again. P10: Models No. NE-12521 / NE-12523 (1200 W), NE-17521 / NE-17523 / NE-17723 (1700 W), NE-21521 / NE-21523 (2100 W) P9: 95 % P8: 85 % P7: 75 % P6: 65 % P5: 55 % P4: 45 % LOW P3: 35 % P2: 25 %* DEFROST P1: 340 W — P0: 0% HEAT FROM TOP DOWN PU1: 50 % PU2: 25 % HEAT FROM BOTTOM UP PL1: 50 % PL2: 25 % *: “LOW (P2)” for Model No. NE-12521 / NE-12523 is 30%. A. MANUAL HEATING — single stage heating — Example: To cook food at HIGH power for 2 minutes PAD INSTRUCTION 1 Place food inside the oven and close the door. The oven lamp will turn on and “0” will appear. Note: While “0” appears, operation is available. 1 minute after the door is closed, “0” will disappear. 2 Press Power Level Selector pad once. The selected power level will be indicated and 1st Stage Heating Indicator “1” will start to blink. Note: Each time the pad is pressed, the Power Level switches as the above Power Level Selector pad illustrates. 3 Press Number/Memory pads “2”, “0” and “0”. The set heating time will appear. Note: The maximum set time for “DEFROST” and “P0” is 30 minutes, and 15 minutes for all others. 4 Press Start pad. The oven lamp will turn on and heating will start. During operation, the indicator appears from the left and heating time will count down. s 7 HENALLTIMEEXPIRESBEEPTONEWILLSOUNDANDHEATINGWILLSTOP4HEOVENLAMPWILLTURN off. “0000” will blink until the door is opened. 1 minute later, cooling fan will stop. s / PENTHEDOORANDTAKETHEFOODOUT4HEOVENLAMPWILLTURNON$IGITAL$ISPLAY7INDOW will show the originally selected time and power stage. s # LOSETHEDOOR4HEOVENLAMPWILLTURNOFFMINUTELATER$IGITAL$ISPLAY7INDOWWILLGO blank. - 10 - DIGITAL DISPLAY WINDOW How to Operate A. MANUAL HEATING — 2 to 5 stage heating — Example: To cook food at HIGH power for 2 minutes and at LOW power for 1 minute PAD INSTRUCTION DIGITAL DISPLAY WINDOW Follow steps 1 to 3 on page 10. 4 Press Power Level Selector pad. Each time the pad is pressed, the Power Level switches as the Power Level Selector pad illustration on page 10. The selected power level will be indicated and 2nd Stage Heating Indicator “2” will start to blink. 5 Press Number/Memory pads “1”, “0” and “0”. The set heating time will appear. Note: The maximum set time for “DEFROST” and “P0” is 30 minutes, and 15 minutes for all others. However, the TOTAL TIME can be set up to 25 minutes for continuous heating (1 to 5 stage heating) that excludes “DEFROST” and “P0”. 6 Press Start pad. The oven lamp will turn on. The total time is displayed. During operation, the indicator appears in order from the left and heating time for the first stage will count down. s ! FTERTHEFIRSTSTAGEHEATINGBEEPTONEWILLSOUND4HE(EATING3TAGE)NDICATORhvARE displayed and heating time will count down. s 7 HENALLTIMEEXPIRESBEEPTONEWILLSOUNDANDHEATINGWILLSTOP4HEOVENLAMPWILLTURN off. “0000” will blink until the door is opened. 1 minute later, cooling fan will stop. s / PENTHEDOORANDTAKETHEFOODOUT4HEOVENLAMPWILLTURNON$IGITAL$ISPLAY7INDOW will show the originally set time and Heating Stage Number. s # LOSETHEDOOR4HEOVENLAMPWILLTURNOFFMINUTELATER$IGITAL$ISPLAY7INDOWWILLGO blank. Note: Repeat the above procedure to set Heating for the third stage and later stages. SPECIAL NOTE: For both single and 4 stage heating 1. While heating, one press on Stop/Reset pad stops the operation. You can restart it by pressing Start pad or a second press on Stop/Reset pad will cancel the selected program. 2. While not heating, one press on Stop/Reset pad cancels the selected program. 3. When heating is complete, you can repeat exactly the same manually selected heating time by pressing only Start pad you use the oven again within 1 minute. 4. 1 minute later of non-use with door closed, the repeat feature will be cancelled. - 11 - How to Operate PROGRAM MEMORY Model No. NE-17723 (1300 memory): 1 digit input = 0 to 9, 2 digit input = 00 to 99, 3 digit input = 000 to 999 and A00 to C99 Other models (30 memory): A0 to C9 *For only A0 through A9 settings, you do not need to press Shift (A/B/C) pad. To change the number of memory digits: 1. Press “Start” + “0” while the door is open. 2. Press the number of digits you want to set. (1 digit=1, 2 digits=2, 3 digits=3) 3. Press “Prog”. Note: The Digital Display Window illustration here is Model No. NE-17723. The Digital Display Window differs for other models. B. PROGRAMMED HEATING )N0ROGRAM5NLOCK-ODE Example: To select Number/Memory pads “1” and “3” at A side in which your desired heating program (at HIGH power for 3 min., single stage heating) is set PAD INSTRUCTION 1 Place food inside the oven and close the door. The oven lamp will turn on and “0” will appear. Note: While “0” appears, operation is available. 1 minute after the door is closed, “0” will disappear. 2 Press Shift (A/B/C) pad, the desired Number/Memory pads “1” and “3”. The currently programmed information will be indicated. Note: All models except Model No. NE-17723 display the memory number and time. 3 Press Start pad. The oven lamp will turn on and heating will start. The heating time will count down. DIGITAL DISPLAY WINDOW s 7 HENALLTIMEEXPIRESBEEPTONEWILLSOUNDANDHEATINGWILLSTOP4HEOVENLAMPWILLTURN off. “0000” will blink until the door is opened. 1 minute later, cooling fan will stop. s /PENTHEDOORANDTAKETHEFOODOUT4HEOVENLAMPWILLTURNON s #LOSETHEDOOR4HEOVENLAMPWILLTURNOFFMINUTELATER$IGITAL$ISPLAY7INDOWWILLGO blank. )N0ROGRAM,OCK-ODE Just press the desired Number/Memory pad. Heating will automatically start without pressing Start pad. (See page 14) For Double (or Triple) Quantity heating: Press Double (or Triple) Quantity pad before pressing the desired Number/Memory pad. C. PROGRAMMING NUMBER/MEMORY PADS — single stage heating — THE OVEN CAN NOT BE PROGRAMMED WHEN PROGRAM LOCK IS ACTIVATED! (See pages 14-15) Example: To program cooking at DEFROST power for 1 minute into Number/Memory pads “1” and “5” at A side PAD INSTRUCTION 1 Open the door and leave it open. The oven lamp will turn on, and “0” will appear. 2 Press Prog pad. “PROG” will start to blink. - 12 - DIGITAL DISPLAY WINDOW How to Operate PAD 3 INSTRUCTION Press Shift (A/B/C) pad, Number/Memory pads “1” and “5”. The selected pad number will appear and currently programmed information will be indicated. 4 Press Power Level Selector pad. Each time the pad is pressed, the Power Level switches as in the Power Level Selector pad illustration on page 10. The selected power level will be indicated, 1st Stage Heating Indicator “1” will start to blink. 5 Press Number/Memory pads “1”, “0” and “0”. The set heating time will appear. Note: The maximum set time for “DEFROST” and “P0” is 30 minutes, and 15 minutes for all others. 6 Press Prog pad. “PROG” and 1st Stage Heating Indicator “1” will stop blinking. This means that you have completed programming. DIGITAL DISPLAY WINDOW s SECONDSLATERhvWILLAPPEAR Note: s 0ROGRAMTHEREMAINING.UMBER-EMORYPADSASDESIREDBYREPEATINGSTEPSABOVE s 7HENh02/'vISBLINKINGIN$IGITAL$ISPLAY7INDOWTHEPROGRAMCANBECANCELLEDANDORONEPRESSON Stop/Reset pad erases the programmed Number/Memory pad number. C. PROGRAMMING NUMBER/MEMORY PADS — 2 to 5 stage heating — THE OVEN CAN NOT BE PROGRAMMED WHEN PROGRAM LOCK IS ACTIVATED! (See pages 14-15) Example: To program cooking at DEFROST power for 1 minute and at HIGH power for 2 minutes into Number/Memory pads “1” and “5” at A side PAD INSTRUCTION DIGITAL DISPLAY WINDOW Follow steps 1 to 5 above. 6 Press Power Level Selector pad once. The power level for 2nd stage will be indicated, 2nd Stage Heating Indicator “2” will start to blink. 7 Press Number/Memory pads “2”, “0” and “0”. The set heating time will appear. Note: The maximum set time for “DEFROST” and “P0” is 30 minutes, and 15 minutes for all others. However, the TOTAL TIME can be set up to 25 minutes for continuous heating (1 to 5 stage heating) that excludes “DEFROST” and “P0”. 8 Press Prog pad. “PROG” and 2nd Stage Heating Indicator “2” will stop blinking. The total time for both stages will appear. This means that you have completed programming. s SECONDSLATERhvWILLAPPEAR Note: s 0ROGRAMTHEREMAINING.UMBER-EMORYPADSASDESIREDBYREPEATINGSTEPSABOVE s 7HENh02/'vISBLINKINGIN$IGITAL$ISPLAY7INDOWTHEPROGRAMCANBECANCELLEDANDORONEPRESSON Stop/Reset pad erases the programmed Number/Memory pad number. s 2EPEATTHEABOVEPROCEDURETOSET(EATINGFORTHETHIRDSTAGEANDLATERSTAGES - 13 - How to Operate D. PROGRAMMING DOUBLE OR TRIPLE QUANTITY PAD THE OVEN CAN NOT BE PROGRAMMED WHEN PROGRAM LOCK IS ACTIVATED! (See pages 14-15) Example: To program 1.5 times of heating time for double quantity into Number/Memory pads “1” and “5” at A side PAD INSTRUCTION 1 Open the door and leave it open. The oven lamp will turn on, and “0” will appear. 2 Press Prog pad. “PROG” will start to blink. 3 Press Shift (A/B/C) pad, Number/Memory pads “1” and “5”. The selected pad number will appear and currently programmed information will be indicated. 4 Press Double Quantity pad. The currently programmed magnification number will appear. Note: 1.6 times is preset at factory. (Triple Quantity pad is 2.2.) 5 Press Number/Memory pads “1” and “5” for 1.5 times. The programmed magnification number will appear. If A15 is programmed for 3 minutes, the time for the double quantity will be 4 minutes and 30 seconds. Available range is 0.1-3.0 times. 6 Press Prog pad. “PROG” will stop blinking. This means that you have completed programming. DIGITAL DISPLAY WINDOW s SECONDSLATERhvWILLAPPEAR Note: If you want to program your desired magnification number for triple quantity, repeat as above, using Triple Quantity pad instead of Double Quantity pad. All models except Model No. NE-17723 also display the memory number in steps 4, 5, and 6. E. PROGRAM LOCK 4O!CTIVATE0ROGRAM,OCK PAD INSTRUCTION 1 Open the door and leave it open. The oven lamp will turn on, and “0” will appear. 2 While pressing Start pad, press Prog pad until “PROG”, “P” and “L” appear. (more than 2 seconds) “PROG”, “P” and “L” will appear. 3 seconds later, “0” will appear. DIGITAL DISPLAY WINDOW In Program Lock mode: s 4HEOVENISSTARTEDBYPRESSINGTHEDESIRED.UMBER-EMORYPAD4HEREISNONEEDTOPRESS3TARTPAD s 4HEOVENCANNOTBEPROGRAMMEDORRUNMANUALLYUNTILTHEPROGRAMLOCKISRELEASED - 14 - How to Operate 4O2ELEASE0ROGRAM,OCK PAD INSTRUCTION 1 Open the door and leave it open. The oven lamp will turn on, and “0” will appear. 2 While pressing Start pad, press Prog pad until “PROG” and “P” appear. (more than 2 seconds) “PROG” and “P” will appear. 3 seconds later, “0” will appear. DIGITAL DISPLAY WINDOW In Program Unlock mode: s /VENREVERTSTOATWOPRESSOPERATINGMODE.UMBER-EMORYPAD3TARTPAD s 2EPEATANDINTERRUPTFEATUREAREOPERATIONAL s .UMBER-EMORYPADSCANBEPROGRAMMED s 4ONELOUDNESSCONTROLLENGTHCONTROLANDPITCHCONTROLBEEPTONEATTHEENDOFHEATINGCYCLEFILTERCLEANING alarm) are operational. F. BEEP TONE THE OVEN CAN NOT BE PROGRAMMED WHEN PROGRAM LOCK IS ACTIVATED! (See pages 14-15) The loudness of beep tone, the length of beep tone at the end of heating cycle, the pitch of beep tone at the end of heating cycle and the pitch of filter cleaning alarm can be set. Begin with step 1 and follow the procedure to change either the length of beep tone at the end of heating cycle, the pitch of beep tone at the end of heating cycle or the pitch of filter cleaning alarm. Example: Change the volume to “middle (2bEEP)”, the length of beep tone at the end of heating cycle to 2nd, the pitch of beep tone at the end of heating cycle to “Low”, and the pitch of filter cleaning alarm to “Low”. PAD INSTRUCTION 1 Open the door and leave it open. The oven lamp will turn on, and “0” will appear. 2 Press Prog pad. 3 Press Start pad. “PROG” will start to blink. The display changes to “3bEEP”, “2bEEP”, “1bEEP”, and “0bEEP” each time the Start pad is pressed and the settings change. DIGITAL DISPLAY WINDOW *The loudness of beep tone 3bEEP: loudest, 2bEEP: middle, 1bEEP: quietest, 0bEEP: silent 4 Press Prog pad. “PROG” will stop blinking, and the set loudness of beep tone will appear for 3 seconds. Then “0” will appear. To proceed to Step 5, press Start pad before “0” is displayed after Step 4. - 15 - Continue How to Operate PAD 5 INSTRUCTION DIGITAL DISPLAY WINDOW Within 3 seconds after pressing Prog pad at step 4, press Start pad. “PROG” will start to blink. The display changes to 1st, 2nd, and 3rd each time the Start pad is pressed and the settings change. *The length of beep tone at the end of heating cycle 1st : 3 beeps 2nd : short beeps for 60 seconds 3rd :“Beep” sounds for 5 seconds, and then 3 beeps sound 30 seconds later and again 60 seconds later. (Buzzer reminder functions to prevent food forgotten in the oven) 6 Press Prog pad. “PROG” will stop blinking, and the set length of beep tone at the end of heating cycle will appear for 3 seconds. Then “0” will appear. To proceed to Step 7, press Start pad before “0” is displayed after Step 6. 7 Within 3 seconds after pressing Prog pad at step 6, press Start pad. “PROG” will start to blink. The display changes to “ ”, “ ”, and “ ” each time the Start pad is pressed and the settings change (Under the “bE” in “bEEP”). *The pitch of beep tone at the end of heating cycle : Low, : Normal, : High 8 Press Prog pad. “PROG” will stop blinking, and the set pitch of beep tone at the end of heating cycle will appear for 3 seconds. Then “0” will appear. To proceed to Step 9, press Start pad before “0” is displayed after Step 8. 9 Within 3 seconds after pressing Prog pad at step 8, press Start pad. “PROG” will start to blink. The display changes to “ ”, “ ”, and “ ” each time the Start pad is pressed and the settings change (Under the “EP” in “bEEP”). *The pitch of filter cleaning alarm : Low, : Normal, : High 10 Press Prog pad. “PROG” will stop blinking, and the set pitch of filter cleaning alarm will appear for 3 seconds. Then “0” will appear. Note: When the filter cleaning alarm counter setting is “0”, you cannot perform steps 9 and 10. - 16 - How to Operate G. PROGRAM LIST PAD INSTRUCTION 1 Open the door and leave it open. The oven lamp will turn on and “0” will appear. 2 While pressing Start pad, press Number/Memory pad “1”. All currently programmed information (the program set into each Number/Memory pad (000 to 999), Beep Tone, Program Lock, Oven Lamp settings when the door is open, Oven Lamp blink settings at the end of heating cycle and Oven Lamp reduction settings during cooking information) will continuously appear. Note: When the filter cleaning alarm counter is set, this appears after Program Lock. How to erase memory content 1. Open the door (keep it open) and press Prog pad. 2. Select the memory number you want to erase, and press the Power Level Selector pad. 3. Press the Stop/Reset pad, and “0” is displayed to indicate that memory is erased. *Memory content is automatically erased if overwritten. - 17 - DIGITAL DISPLAY WINDOW e.g. How to Operate H. CYCLE COUNTER 4ODISPLAYALLCOOKINGTIMESEVERUSED PAD INSTRUCTION 1 Open the door and leave it open. The oven lamp will turn on and “0” will appear. 2 While pressing Start pad, press Number/Memory pad “3”. All the cooking times that were ever used appear. DIGITAL DISPLAY WINDOW e.g. 4ODISPLAYTHECUMULATIVENUMBEROFTIMESTHEOVENWASUSED PAD INSTRUCTION 1 Open the door and leave it open. The oven lamp will turn on and “0” will appear. 2 While pressing Start pad, press Power Level Selector pad. The number of cycles that the oven has been used will appear. Note: The last two digits are dropped from the cumulative number of times the oven was used, which is displayed in units of 100 when used over 100 times. DIGITAL DISPLAY WINDOW e.g. I. AIR FILTER CLEANING Example: To program cleaning Air Filter every 600 hours PAD INSTRUCTION DIGITAL DISPLAY WINDOW 1 Open the door and leave it open. The oven lamp will turn on and “0” will appear. 2 While pressing Start pad, press Number/Memory pad “7”. The currently programmed hour will appear. e.g. 3 Press Number/Memory pads “6”, “0” and “0”. The programmed hour will appear. Note: up to 9999 hours e.g. 4 Press Prog pad. “PROG” will stop blinking, and the set hours will appear for 3 seconds. Then “0” will appear. e.g. Note: When “FILt” sign appears in Digital Display Window, remove Air Filter and clean it with soapy water. Press Stop/Reset pad for 2 seconds to clear the display. How to release the “FILt” sign 1. Press and hold down the Stop/Reset pad for 2 seconds. 2. The “FILt” sign is released and the buzzer sounds. *If the Stop/Reset pad is not held down long enough, the “FILt” sign will disappear once but will reappear again after the screen goes blank. - 18 - How to Operate Example: To display the filter cleaning alarm counter PAD INSTRUCTION 1 Open the door and leave it open. The oven lamp will turn on, and “0” will appear. 2 While pressing Start pad, press Number/Memory pad “5”. The cumulative total cooking time starts over and displayed after it is cleared. DIGITAL DISPLAY WINDOW e.g. s SECONDSLATERhvWILLAPPEAR J. OVEN LAMP THE OVEN CAN NOT BE PROGRAMMED WHEN PROGRAM LOCK IS ACTIVATED! (See pages 14-15) /VEN,AMPSETTINGSWHENTHEDOORISOPEN Example: To turn Oven Lamp settings OFF PAD INSTRUCTION 1 Open the door and leave it open. The oven lamp will turn on, and “0” will appear. 2 While pressing Start pad, press Number/Memory pad “9”. “PROG” will start to blink. The previously set Oven Lamp settings are displayed. 3 Press Start pad. “on” “oFF” “on” is repeated each time the pad is pressed. 4 Press Prog pad. “PROG” will stop blinking, and the Oven Lamp settings will appear for 3 seconds. Then “0” will appear. DIGITAL DISPLAY WINDOW To proceed to Step 5, press Start pad before “0” is displayed after Step 4. - 19 - Continue How to Operate /VEN,AMPBLINKSATTHEENDOFHEATINGCYCLE Example: To turn the blinking Oven Lamp ON at the end of heating cycle PAD INSTRUCTION 5 Within 3 seconds after pressing Prog pad at step 4, press Start pad. “PROG” will start to blink. The previously set Oven Lamp blink settings are displayed. 6 Press Start pad. “oFF” “on” “oFF” is repeated each time the pad is pressed. 7 Press Prog pad. “PROG” will stop blinking, and the Oven Lamp blink settings will appear for 3 seconds. Then “0” will appear. DIGITAL DISPLAY WINDOW To proceed to Step 8, press Start pad before “0” is displayed after Step 7. !DJUSTING/VEN,AMPBRIGHTNESSDURINGCOOKING Example: To decrease brightness of the inner cavity during cooking PAD INSTRUCTION 8 Within 3 seconds after pressing Prog pad at step 7, press Start pad. “PROG” will start to blink. The previously set Oven Lamp reduction settings are displayed. 9 Press Start pad. “oFF” “on” “oFF” is repeated each time the pad is pressed. 10 Press Prog pad. “PROG” will stop blinking, and the Oven Lamp reduction settings will appear for 3 seconds. Then “0” will appear. - 20 - DIGITAL DISPLAY WINDOW Installation Instructions for Stacking IMPORTANT PREPARATION 1. Disconnect the power cord from the wall socket before attempting installation. 2. For stacking installation, you must use the PANASONIC Joint Plate (sold separately). 3. The combination of the units for stacking is limited to only the following PANASONIC models: Models No. NE-12521, NE-12523, NE-17521, NE-17523, NE-17723, NE-21521, NE-21523 4. The maximum stacking height is the total heights of two units. Be sure the oven cavity is empty. Be sure surfaces where ovens meet is clean and sanitized. INSTALLATION 1. 2. 3. 4. 5. Stack the units and remove five screws (a) as shown in Fig.1. Loosen the screw (b). Projection on Joint Plate must face away from the oven. Place Joint Plate on the screw (b). Attach and tighten five screws (a) and the screw (b). See Fig.2. Ensure the top oven is at a safe and workable height. (b) Joint Plate Joint Plate Projection Projection (a) Fig. 2 Fig. 1 Sanitary Counter Top Seal When microwave oven units are stacked on a counter top, their base must be sealed in accordance with NSF Standards as per the following instructions. 1. Microwave oven should be located on a level counter top surface. Complete the electrical connections. 2. Thoroughly clean the microwave oven bottom perimeter and the counter top area around the microwave oven perimeter. 3. Lay generous bead of silicone seal around the entire perimeter of the base of each microwave oven unit. 4. Smooth the silicone seal into the crevice with finger or tool to provide a cove seal. Note: Remove the Air Filter from the front of the oven before applying silicone. DO NOT FORGET to re-install the Air Filter after applying silicone. - 21 - Silicone Sealant Counter Top Care of Your Oven 1. Remove the plug from the electrical socket before cleaning. 2. Keep the inside of the oven clean. If pieces of food or spilled liquids stick to the oven walls, or between door seal and door surface, they will absorb microwaves and may cause arcing or sparks. Wipe up all spills with a damp cloth. Kitchen detergent or an approved sanitizing solution may be used if the oven gets very dirty. Do not use harsh detergents or abrasives. 3. The outside surface of this microwave oven should be cleaned with soap and water, then dried with a soft cloth. Make sure that water does not get into the back ventilation or control panel opening since this can damage the unit. 4. The window of the door should be washed with very mild soap and water. Be sure to use a soft cloth. Never use window clearer. The front door can be scratched by harsh soap or cleaners. CLEANING OF THE SPLATTER SHIELD CLEANING THE AIR FILTER Clean the Air Filter daily according to the following instructions. The oven may have problems when the Air Filter becomes clogged with dust.(*) 1. Remove Air Filter from the front bottom skirt by turning the right screw to the left. Then slide the filter to the right and lift it off the post at the left. 1. Hold snap in-snap out side stoppers of splatter shield with both hands and pull them in and down. Then take the splatter shield out of the oven cavity. splatter shield stopper screw post 2. Rinse splatter shield in soapy water and an approved sanitizing solution. 3. Be sure to replace the shield before using the oven. CAUTION Splatter shield must be in place securely when you use the oven. 2. Wash this filter in warm soapy water, rinse and allow to dry. 3. Be sure to replace Air Filter before using the oven. (*) If Air Filter becomes clogged with debris this will cause an overheating problem on the oven.See Failure codes on page 6. - 22 - Cleaning and Maintenance procedures ALWAYS COVER pan(s). Use a ½ Pan for smaller portions and add a little water in pan to create steam. DO NOT stack pans. DO NOT OPERATE EMPTY! ALWAYS clean oven interior DAILY with rag SOAKED with Sanitizer, set Microwave for 1 minute and 30 seconds-this softens any hardened residue inside oven. DO NOT HEAT BAGGED PRODUCTS! Place the food in a microwave-safe container with a lid and heat or defrost. The rag will now be very hot. CAREFULLY, and without scraping, wipe interior with the cloth using tongs. DO NOT use utensils or metal objects to clean interior of oven. DO NOT use oven as a Timer. ALWAYS remove bottom filter screens and clean daily. DO NOT OPERATE OVEN EMPTY OR WITHOUT FILTER SCREENS. Vent holes behind filters should be open & clean. Use a small brush to clean as necessary. DO NOT operate with Metal pans. Use covered Amber “H” type pans or microwaveable containers only! IF BOTTOM PLATE BREAKS or CRACKS, DO NOT CONTINUE TO USE OVEN CONTACT AUTHORIZED SERVICE AGENCY IMMEDIATELY!! 1-888-350-9590 - 23 - Heating and Defrosting Time Charts TABLE OF CONTENTS MICROWAVE BASICS . . . . . . . . . . . . . . . . . . . . . . . . . . . . . . . . . . . . . . . . . . . . . . . . . GENERAL GUIDELINES FOR HEATING IN PANASONIC MICROWAVE OVEN. . . . . APPETIZERS . . . . . . . . . . . . . . . . . . . . . . . . . . . . . . . . . . . . . . . . . . . . . . . . . . . . . . . . BAKED GOODS AND DESSERTS. . . . . . . . . . . . . . . . . . . . . . . . . . . . . . . . . . . . . . . . BREAKFAST . . . . . . . . . . . . . . . . . . . . . . . . . . . . . . . . . . . . . . . . . . . . . . . . . . . . . . . . . FISH AND SEAFOOD . . . . . . . . . . . . . . . . . . . . . . . . . . . . . . . . . . . . . . . . . . . . . . . . . . GRAVIES, SAUCES AND SOUPS . . . . . . . . . . . . . . . . . . . . . . . . . . . . . . . . . . . . . . . . PLATED MEAT AND POULTRY ENTREES . . . . . . . . . . . . . . . . . . . . . . . . . . . . . . . . . RICE AND PASTA . . . . . . . . . . . . . . . . . . . . . . . . . . . . . . . . . . . . . . . . . . . . . . . . . . . . . SANDWICHES . . . . . . . . . . . . . . . . . . . . . . . . . . . . . . . . . . . . . . . . . . . . . . . . . . . . . . . VEGETABLES . . . . . . . . . . . . . . . . . . . . . . . . . . . . . . . . . . . . . . . . . . . . . . . . . . . . . . . . CASSEROLES . . . . . . . . . . . . . . . . . . . . . . . . . . . . . . . . . . . . . . . . . . . . . . . . . . . . . . . 25 25 26 27 28 30 31 32 33 34 35 37 Note: All heating times in the following charts are “approximate”. We recommend you test your own recipe items and plating techniques in this oven to establish the correct heating times for your recipe items. Maximum programmable time for each stage heating is “DEFROST” and “P0”: 30 minutes others: 15 minutes. Example: For items that cook longer than 15 minutes on 50 % power, please program oven for two or three stage cooking. For example: To program 35 minutes on 50 % 1st stage: Program on 50 % 15 minutes 2nd stage: Program on 50 % 15 minutes 3rd stage: Program on 50 % 5 minutes TOTAL TIME on 50 % power is 35 minutes - 24 - Heating and Defrosting Time Charts MICROWAVE BASICS GENERAL GUIDELINES FOR HEATING IN A PANASONIC MICROWAVE OVEN Fundamental principles determine the success of microwave food preparation. They include: For specific time, see each food category for appropriate heating techniques, plus necessary prepreparation of foods. 1. TEMPERATURE OF FOODS – Frozen or refrigerated food items will require longer heating times to reach a desired serving temperature than foods from room temperature. HEATING FOODS FROM REFRIGERATED TEMPERATURE 2. FOOD COMPONENTS – Foods high in sugar, salt, fats and moisture content heat faster because these properties attract microwave energy. Denser foods high in protein and fiber, absorb microwave energy slower which means a lengthier heating time. 3. BULK/VOLUME – The greater the mass of food, the longer it takes to heat. 4. CONTAINERS – Ceramic, paper, china, styrofoam, glass and plastic are suitable for use in microwave ovens with the following caution. DO NOT HEAT foods in a SEALED container or Heating foods with either high sugar or high fat content should be done. ONLY in high temperature-resistant containers since these foods get very hot. Using styrofoam containers for these foods will cause the styrofoam to warp. Other low temperature restaurant glass or plastic platters may crack or wrap under similar conditions. Foods stored in the refrigerator (< 40˚F) should be covered before reheating with the exception of breads, pastries or any breaded product, which should be heated uncovered to prevent sogginess. Most conventionally prepared foods should be slightly undercooked, and held in the refrigerator, so that overcooking does not occur during microwave heating. Cooked items, such as vegetables, may be portion plated and covered for reheating without loss of color, texture or nutritional content. HEATING FOODS FROM ROOM TEMPERATURE Food items such as canned items, fresh vegetables, etc. will require significantly less heating time than those from refrigerated temperatures. IMPORTANT RECOMMENDATIONS bag. Foods expand when heated and can break the container or bag. 5. AVOID METAL because it “bounces” the microwaves, causing uneven heating and sometimes even flashes, which may pit or mar the interior of the oven, the metal container or plate trim. 6. Heated liquids can erupt if not mixed with air. Do not heat liquids in your microwave oven without first stirring. 1. For best results it is recommended that foods conventionally prepared be slightly undercooked when subsequently heated in this oven. 2. REMEMBER that after the heating cycle has been completed, internal food temperatures continue to rise slightly in foods heated in this oven. 3. A major abuse of microwave applications is the category of breads, pastries and pies are drier than insides or fillings, they heat more slowly. Therefore, baked goods should ONLY be heated until the crust is warm to the touch (120˚F-130˚F). 4. DO NOT OVERHEAT YOUR FOOD: 99% of all food quantity complaints of microwave heated foods can be traced to overheating. Finally times given are approximate always follow USDA/FDA temperature and operational gridlines when cooking. - 25 - Heating and Defrosting Time Charts APPETIZERS Quantities of appetizers can be prepared conventionally in advance and refrigerated until needed. Most appetizers, with the exception of “nacho” platters and potato skins, should be heated covered. Appetizers of the same basic shape and size can be reheated together. Item BBQ Ribs Chicken Wings Chili con Queso Meatballs Nachos Potato Skins Quantity Instructions for Pre-preparation 8 oz. (224 g) Prepare conventionally, refrigerate, covered. 5-6 oz. Prepare (140-168 g) conventionally, refrigerate, covered. 8 oz. Prepare (224 g) conventionally, refrigerate, covered. 4-5 oz. Prepare (112-140 g) conventionally, refrigerate, covered. 4 oz. For Best Results(112 g) Prepare when ordered or only a short time before serving to keep chips crisp. 8 oz. Prepare skins (224 g) conventionally, refrigerate, covered. Rumaki 4 oz. (112 g) Shrimp de Jonghe 4 oz. (112 g) Prepare conventionally, refrigerate, covered. Prepare conventionally, refrigerate, covered. Most cooked appetizers heat on HIGH power, between 7 and 11 seconds per ounce depending on weight, density, and bone content. “Nacho’s” need 30 to 37 seconds per ounce depending on the amount of topping. All heating times listed in the chart are from refrigerated temperatures (40˚F) except for “nacho” chips. Place on plate, cover. Approximate Times Power NE-12521 NE-17521 NE-21521 Level NE-12523 NE-17523 NE-21523 NE-17723 HIGH 60 sec. 45 sec. 35 sec. Place on plate, cover. HIGH 50 sec. 35 sec. 25 sec. Place in small bowl, cover. HIGH 1 min. 15 sec. 50 sec. 40 sec. Place on plate, cover. HIGH 50 sec. 35 sec. 25 sec. Spread refried beans on each individual nacho. Arrange on platter. Sprinkle with Cheddar cheese. DO NOT COVER. Arrange skins on platter. Sprinkle with shredded Cheddar cheese and cooked, crumbled bacon. DO NOT COVER. Place on plate, cover. HIGH 50 sec. 35 sec. 25 sec. HIGH 60 sec. 45 sec. 35 sec. HIGH 35 sec. 25 sec. 20 sec. HIGH 55 sec. 40 sec. 30 sec. Instructions for Microwave Heating Place on small plate, cover. - 26 - Heating and Defrosting Time Charts BAKED GOODS AND DESSERTS Breads, pastries and pies should be heated uncovered, at HIGH power. They should be placed on absorbent material, such as a napkin or paper towel to prevent sogginess. DO NOT OVERHEAT breads and pastries. Baked goods should only be heated until the crust feels warm to the touch (120˚F-130˚F). Item Bread, miniloaf white or wheat Coffee cake frozen Muffins, fruit Quantity Instructions for Pre-preparation Because crusts of breads, pastries and pies are drier than insides or fillings, they heat more slowly. After heating let rest about 1 minute for equalization of temperature. If product is overheated, the end result will not be satisfactory. Heating times for sweet baked goods and desserts are relatively short because of the high sugar content. Instructions for Microwave Heating Approximate Times Power NE-12521 NE-17521 NE-21521 Level NE-12523 NE-17523 NE-21523 NE-17723 HIGH 25 sec. 15 sec. 10 sec. 8 oz. (224 g) Prepare Place on paper conventionally, store towel, uncovered. at room temperature. 3 oz. (84 g) Place on paper towel, uncovered. HIGH 20 sec. 13 sec. 7 sec. 2 ea. Place on paper towel, or napkin, uncovered. HIGH 20 sec. 13 sec. 7 sec. Place on paper towel, or napkin, uncovered. HIGH 30 sec. 20 sec. 15 sec. Place on plate, uncovered. HIGH 25 sec. 15 sec. 10 sec. Place on paper towel, uncovered. After heating, let rest 1 minute. Place on paper towel, uncovered. After heating, let rest 1 minute. Place on paper towel, uncovered. After heating, let rest 1 minute. HIGH 25 sec. 15 sec. 10 sec. HIGH 25 sec. 15 sec. 10 sec. HIGH 25 sec. 15 sec. 10 sec. Prepare conventionally or defrost, store at room temperature. 6 ea. Prepare conventionally or defrost, store at room temperature. Pie, fruit 5 oz. Prepare (1 slice 140 g) conventionally, refrigerate, covered. Rolls, hard 4 ea. Room temperature. Rolls, soft 6 ea. Room temperature. Rolls, sweet 6 ea. Room temperature. - 27 - Heating and Defrosting Time Charts BREAKFAST All foods listed are prepared in advance and reheated at HIGH power from refrigerated temperatures (40˚F). Most breakfast foods are heated covered to retain moisture, with the exception of breads and pastries, which should be heated uncovered on absorbent material such as a napkin or paper towel to prevent sogginess. For poached eggs, pierce yolks before heating and allow eggs to stand for 1 minute after cooking so pressure subsides before cutting into them. Item Quantity Bacon 4 strips Bacon, Canadian 4 slices Eggs, poached 2 eggs Eggs, scrambled 2 eggs Eggs, scrambled with bacon 2 eggs 4 strips Eggs, scrambled with sausage links French toast 2 eggs 4 links 3 slices Instructions for Pre-preparation Prepare conventionally, undercook slightly, refrigerate, covered. Prepare conventionally, refrigerate, covered. Prepare conventionally, undercook slightly, refrigerate in salted water, covered. Prepare conventionally, undercook slightly, refrigerate, covered. Prepare conventionally, undercook slightly, refrigerate, covered. Prepare conventionally, undercook slightly, refrigerate, covered. Prepare conventionally, refrigerate, covered. When preparing breakfast foods conventionally, undercook slightly and immediately chill and store, covered, for later reheating. Cured breakfast meats will reheat faster than uncured meats because salt readily absorbs microwave energy. WARNING: Never cook or reheat eggs in the shell. They may explode when interior pressure builds up. Instructions for Microwave Heating Place on plate and cover. Approximate Times Power NE-12521 NE-17521 NE-21521 Level NE-12523 NE-17523 NE-21523 NE-17723 HIGH 30 sec. 20 sec. 15 sec. Place on plate and cover. HIGH 30 sec. 20 sec. 15 sec. Remove from water. Place on plate, pierce yolks, cover. Let rest 1 minute after heating. HIGH 30 sec. 20 sec. 15 sec. Place on plate and cover. HIGH 30 sec. 20 sec. 15 sec. Place on plate and cover. HIGH 35 sec. 25 sec. 20 sec. Place on plate and cover. HIGH 45 sec. 30 sec. 20 sec. Place toast on plate. Heat uncovered. HIGH 35 sec. 20 sec. 15 sec. - 28 - Heating and Defrosting Time Charts Item Quantity French toast with bacon French toast with sausage Ham steak 2 slices 4 strips Hash, corned beef, canned Pancakes Pancakes with bacon Pancakes and sausage patty Potatoes, hashed brown Sausage links Sausage patties 2 slices 4 links 4 oz. (112 g) 3 oz. (84 g) Instructions for Pre-preparation Instructions for Microwave Heating Prepare conventionally, refrigerate, covered. Prepare conventionally, refrigerate, covered. Prepare conventionally, refrigerate, covered. Place toast on plate in single layer. Cover Prepare conventionally, refrigerate, covered. 4 ea. Prepare conventionally, refrigerate, covered. 4 ea. Prepare 4 strips conventionally, refrigerate, covered. 4 oz. Prepare (4 ea. 112 g) conventionally, refrigerate, covered. 41⁄2 oz. (126 g) 4 links 4 patties Prepare conventionally, refrigerate, covered. Prepare conventionally, undercook slightly, refrigerate, covered. Prepare conventionally, undercook slightly, refrigerate, covered. Approximate Times Power NE-12521 NE-17521 NE-21521 Level NE-12523 NE-17523 NE-21523 NE-17723 HIGH 45 sec. 35 sec. 30 sec. Place toast on plate in single layer. Cover HIGH 45 sec. 35 sec. 30 sec. Place on plate and cover. Let rest 1 minute after heating. Place on plate and cover. HIGH 40 sec. 30 sec. 25 sec. HIGH 45 sec. 30 sec. 25 sec. HIGH 35 sec. 20 sec. 15 sec. HIGH 45 sec. 35 sec. 30 sec. Place on plate in single layer. Cover. HIGH 45 sec. 35 sec. 30 sec. Place on plate and heat, uncovered. HIGH 40 sec. 30 sec. 25 sec. Place on plate. Cover. HIGH 40 sec. 30 sec. 25 sec. Place on plate. Cover. HIGH 35 sec. 25 sec. 20 sec. Place on plate in single layer. Heat uncovered. Place on plate in single layer. Cover. - 29 - Heating and Defrosting Time Charts FISH AND SEAFOOD Defrost Fish and seafood can be defrosted and heated successfully in this microwave oven. To defrost evenly, fish should be arranged in a single layer in container and should only be thawed to the point of being flexible so it does not begin to cook at the edges. Primary Cooking Cooking individual portions demands close attention as well as slight undercooking. Delicate fish and shellfish should always be cooked covered and should rest after heating. Fish/Seafood—Primary Cooking Instructions for preparation Instructions for Microwave Heating Place on plate, brush with butter and cover. Place in microwave pan and brush with butter and herbs. Place on plate, brush with butter and cover. Place in microwave pan, dot with butter and cover. Place on plate and cover. Place on plate, brush with butter and herbs and cover. Place on plate and cover. Item Quantity Lobster Tail 8 oz. (224 g) 7 oz. (196 g) Defrost. Refrigerate, covered. Defrost. Refrigerate, covered. Salmon Steaks Scallops, Bay 8 oz. (224 g) 5 oz. (140 g) Defrost. Refrigerate, covered. Defrost slightly. Refrigerate, covered. Shrimp, large Snapper, Red fillets 6 oz. (168 g) 5 oz. (140 g) Defrost. Refrigerate, covered. Defrost. Refrigerate, covered. Sole, stuffed with crabmeat 6 oz. (168 g) Defrost. Refrigerate, covered. Perch fillets Approximate Times Power NE-12521 NE-17521 NE-21521 Level NE-12523 NE-17523 NE-21523 NE-17723 HIGH 3 min. 2 min. 1 min. 30 sec. 30 sec. 30 sec. HIGH 1 min. 50 sec. 40 sec. 15 sec. HIGH 1 min. 45 sec. 35 sec. HIGH 45 sec. 35 sec. 30 sec. HIGH 45 sec. 35 sec. 30 sec. HIGH 1 min. 45 sec. 35 sec. HIGH 1 min. 15 sec. 50 sec. 40 sec. Fish/Seafood, Frozen—Defrosting (To calculate time, use 15 seconds times (x) ounce) Item Quantity Lobster Tail (frozen) 8 oz. (224 g) Perch, fillets (frozen) 1 lb. (450 g) Shrimp, large (frozen) 6 oz. (168 g) Instructions for preparation Instructions for Microwave Heating Power Level Place on plate and DEFROST cover. After DEFROST cycle, let rest 5 min. and refrigerate or cook. DEFROST Place in microwave pan and cover. Halfway through defrost, turn over and if possible, rearrange fillets. After DEFROST cycle, let rest 5 min. and refrigerate or cook. Place on plate and DEFROST cover. After DEFROST cycle, refrigerate or cook. - 30 - Approximate Times NE-12521 NE-17521 NE-21521 NE-12523 NE-17523 NE-21523 NE-17723 Use calculation Above Use calculation Above Use calculation Above Heating and Defrosting Time Charts GRAVIES, SAUCES AND SOUPS Some water-based gravies, sauces and soup mixes may be prepared in large portions using this oven to heat water and thicken the blended mixes. Refrigerated gravies, sauces and soups can be reheated quickly at HIGH and requires stirring during heating to produce an even temperature. Gravies Item Brown gravy Chicken gravy Approximate Times Power NE-12521 NE-17521 NE-21521 Quantity Level NE-12523 NE-17523 NE-21523 NE-17723 Place in microwave HIGH 7 min. 5 min. 4 min. 1 qt. Prepare 30 sec. 30 sec. conventionally, or heat pan. Cover, stir midway and cover. ingredients in 1 qt. HIGH 5 min. 5 min. 4 min. microwave, if 30 sec. recommended. Refrigerate gravy. Instructions for preparation Instructions for Microwave Heating Sauces Item Quantity Au jus 1 qt. Cheese sauce Espagnole (stock base) Mushroom sauce Tomato sauce White sauce (Bechamel) White sauce (stock base) 1 qt. 1 qt. 1 qt. 1 qt. 1 qt. Approximate Times Power NE-12521 NE-17521 NE-21521 Level NE-12523 NE-17523 NE-21523 NE-17723 HIGH 7 min. 5 min. 4 min. 30 sec. 30 sec. HIGH 8 min. 6 min. 5 min. 30 sec. 30 sec. HIGH 7 min. 5 min. 4 min. 30 sec. 30 sec. Prepare HIGH 7 min. 5 min. 4 min. conventionally, or heat Place in microwave 30 sec. 30 sec. ingredients in pan. Cover, stir midway microwave, if HIGH 7 min. 5 min. 4 min. through heating. recommended. 30 sec. 30 sec. Refrigerate sauce. HIGH 7 min. 5 min. 4 min. 30 sec. 30 sec. Instructions for preparation Instructions for Microwave Heating 1 qt. HIGH 7 min. 5 min. 30 sec. 4 min. 30 sec. Soups Item Beef broth Chicken Noodle soup Clam chowder Approximate Times Power NE-12521 NE-17521 NE-21521 Quantity Level NE-12523 NE-17523 NE-21523 NE-17723 HIGH 1 qt. Prepare 1 qt. HIGH conventionally, or heat Place in microwave 5 min. 4 min. ingredients in pan. Cover, stir midway 7 min. 30 sec. 30 sec. microwave, if through heating. recommended. 1 qt. HIGH Refrigerate soup. Instructions for Pre-preparation Instructions for Microwave Heating - 31 - Heating and Defrosting Time Charts PLATED MEAT AND POULTRY ENTREES Meat and poultry can be reheated successfully in this oven. Undercook meat slightly. Arrange meat or poultry slices in single layer, overlapping pieces as little as possible. CAUTION Pork products must be fully cooked prior to reheating. When appropriate, cover meats or poultry evenly with sauces. Approximate Times Power NE-12521 NE-17521 NE-21521 Item Quantity Level NE-12523 NE-17523 NE-21523 NE-17723 Beef, prime 12 oz. Prepare conventionally, Place on plate and top HIGH 2 min. 1 min. 1 min. rib au jus (336 g) refrigerate, covered. meat with au jus. Cover. 20 sec. Beef stew 8 oz. Prepare conventionally, Put in small bowl, stir HIGH 1 min. 45 sec. 35 sec. (224 g) refrigerate, covered. midway through heating, cover. Beef 8 oz. Prepare conventionally, Place on plate and HIGH 35 sec. 45 sec. 15 sec. stroganoff (224 g) refrigerate, covered. cover. with noodles Chicken, 9 oz. Prepare conventionally, Place on plate, cover. HIGH 1 min. 1 min. 45 sec. BBQ (252 g) refrigerate, covered. After 30 sec. of heating, 30 sec. spoon additional sauce evenly over chicken, if desired. Chicken, 8 oz. Prepare conventionally, Place on plate, HIGH 1 min. 45 sec. 35 sec. breaded, (224 g) refrigerate, covered. uncovered. fried 1 ⁄2 ea. Prepare conventionally, Place on plate and HIGH 1 min. 1 min. 45 sec. Chicken, refrigerate, covered. cover. 30 sec. broiled Chicken 12 oz. Prepare all Place on plate, depress HIGH 3 min. 2 min. 1 min. pieces, with (336 g) components potatoes and cover. 30 sec. potatoes, conventionally, dressing refrigerate, covered and gravy Cornish 1 ea. Prepare conventionally, Place on plate and HIGH 2 min. 2 min. 1 min. hen (22 oz.) refrigerate, covered. cover. 30 sec. 30 sec. 1 ⁄2 ea. Prepare conventionally, Place on plate and HIGH 3 min. 2 min. 1 min. Duck refrigerate, covered. cover. 30 sec. Burrito 8 oz. Prepare conventionally, Place on plate and HIGH 1 min. 45 sec. 35 sec. (224 g) refrigerate, covered. cover. Meat loaf 7 oz. Prepare conventionally, Arrange slices in single HIGH 1 min. 50 sec. 45 sec. with gravy (196 g) refrigerate, covered. layer on plate, cover 10 sec. with gravy. Cover Green 6 oz. Prepare conventionally, Place on plate and HIGH 1 min. 1 min. 50 sec. peppers, (168 g) refrigerate, covered. cover. 45 sec. 15 sec. stuffed Pork chop, 7 oz. Prepare conventionally, Place on plate and MEDIUM 2 min. 1 min. 1 min. stuffed (196 g) refrigerate, covered. cover. 30 sec. 10 sec. Ribs, short 8 oz. Prepare conventionally, Place on plate and HIGH 1 min. 45 sec. 35 sec. (224 g) refrigerate, covered. cover. Ribs, spare 16 oz. Prepare conventionally, Place on plate and HIGH 2 min. 1 min. 1 min. (448 g) refrigerate, covered. cover. 30 sec. 10 sec. Salisbury 7 oz. Prepare conventionally, Place on plate and MEDIUM 2 min. 1 min. 1 min. steak (196 g) refrigerate, covered. cover. 30 sec. 10 sec. Turkey, 12 oz. Prepare conventionally, Arrange slices in single HIGH 1 min. 50 sec. 45 sec. sliced with (336 g) refrigerate, covered layer on plate and 10 sec. gravy with gravy. Cover. cover. Instructions for Pre-preparation Instructions for Microwave Heating - 32 - Heating and Defrosting Time Charts RICE AND PASTA For best results: reheat covered at HIGH power. Adding moisture, such as a sauce, can facilitate reheating though its not essential. Rice and pasta dishes with cheese sauce, require more stirring than tomato-based sauces to avoid overheating and stringiness of cheese. Rice Item Quantity Chicken rice pilaf 4 oz. (112 g) Rice, long grain and wild rice 4 oz. (112 g) Instructions for Pre-preparation Prepare conventionally, undercook slightly, refrigerate, covered. Prepare conventionally, undercook slightly, refrigerate, covered. Instructions for Microwave Heating Place on plate and cover. Place on plate and cover. Approximate Times Power NE-12521 NE-17521 NE-21521 Level NE-12523 NE-17523 NE-21523 NE-17723 HIGH HIGH 50 sec. 35 sec. 25 sec. Pasta Item Quantity Lasagna 8 oz. (224 g) Macaroni and cheese 8 oz. (224 g) Noodles 4 oz. (112 g) Ravioli 6 oz. (168 g) 12 oz. (336 g) Spaghetti with meat sauce 12 oz. (336 g) Instructions for Pre-preparation Prepare conventionally, undercook slightly, refrigerate, covered. Prepare conventionally, undercook slightly, refrigerate, covered. Prepare conventionally, undercook slightly, refrigerate, covered. Prepare conventionally, undercook slightly, refrigerate, covered. Prepare conventionally, undercook slightly, refrigerate, covered. Prepare conventionally, keeping spaghetti and sauce separate, refrigerate, covered. Instructions for Microwave Heating Place on plate and cover. Cut in half, let rest 1 min. after heating. Place on plate and cover. Let rest 1 min. after heating. Approximate Times Power NE-12521 NE-17521 NE-21521 Level NE-12523 NE-17523 NE-21523 NE-17723 HIGH 2 min. 1 min. 1 min. 30 sec. 30 sec. MEDIUM 1 min. 1 min. 50 sec. 30 sec. HIGH 1 min. 1 min. 50 sec. 30 sec. 10 sec. Place on plate and cover. HIGH 45 sec. 30 sec. 20 sec. Arrange in single layer on small place and cover. HIGH 55 sec. 40 sec. 30 sec. Arrange in single layer on small place and cover. HIGH 2 min. 1 min. 45 sec. 1 min. 10 sec. Place on plate and cover with sauce. Cover. HIGH 1 min. 50 sec. 1 min. 30 sec. 1 min. 15 sec. - 33 - Heating and Defrosting Time Charts SANDWICHES Preassembled sandwiches can be heated quickly and easily in this microwave oven. For best results, assemble sandwiches no more than 3 hours in advance. Meat fillings such as hamburgers and sausage should be precooked and preferably not be more than 1⁄2 inch thick. Thin sliced means, lightly packed, allow for more even heating. Place meat over bread. All but openfaced sandwiches should be heated uncovered on absorbent material such as paper towel or napkin to prevent sogginess. Day-old, toasted breads, or breads whose formula is enriched with egg or fat are advantageous because they tend to become less soggy when heated. Item Quantity BBQ beef on bun 6 oz. (168 g) Corned beef on rye French dip 5 oz. (140 g) 6 oz. (168 g) Grilled cheese 4 oz. (112 g) Hamburger, plain with cheese 5 oz. (140 g) 5 oz. (140 g) 3 oz. (84 g) Hot dog Pastrami on rye Reuben 5 oz. (140 g) 6 oz. (168 g) Roast beef, open-face with gravy 8 oz. (224 g) Sausage, Italian on sub roll 51⁄2 oz. (154 g) Turkey, open-face with gravy 8 oz. (224 g) Instructions for Pre-preparation Prepare beef conventionally, refrigerate, covered. Toast bun. Assemble, refrigerate, covered. Assemble, refrigerate, covered. Prepare conventionally, refrigerate, covered. Prepare burger conventionally, Toast bun. Assemble, refrigerate, covered. Prepare conventionally. Toast bun. Assemble, refrigerate, covered. Assemble, refrigerate, covered. Prepare conventionally, refrigerate, covered. Prepare beef and gravy conventionally, refrigerate, covered. Toast bread. Prepare sausage conventionally. Toast roll. Assemble, refrigerate, covered. Prepare turkey and gravy conventionally, refrigerate, covered. Toast bread. Instructions for Microwave Heating Assemble, place on paper napkin on plate, uncovered. Place on paper towel, uncovered. Place on plate with au jus over beef and on side, uncovered. Place on paper towel, uncovered. Place on paper towel, uncovered. Approximate Times Power NE-12521 NE-17521 NE-21521 Level NE-12523 NE-17523 NE-21523 NE-17723 HIGH 60 sec. 45 sec. 35 sec. HIGH 60 sec. 45 sec. 35 sec. HIGH 60 sec. 45 sec. 35 sec. HIGH 60 sec. 45 sec. 35 sec. HIGH 60 sec. 45 sec. 35 sec. HIGH 50 sec. 40 sec. 40 sec. 30 sec. Wrap loosely in plastic. HIGH 1 min. 5 sec. 55 sec. Place on paper towel, uncovered. Place on paper towel, uncovered. HIGH 60 sec. 45 sec. 35 sec. HIGH 60 sec. 45 sec. 35 sec. Assemble, plate, cover. HIGH 60 sec. 45 sec. 35 sec. Place on paper towel, uncovered. HIGH 60 sec. 45 sec. 35 sec. Assemble, plate, cover. HIGH 60 sec. 45 sec. 35 sec. - 34 - Heating and Defrosting Time Charts VEGETABLES Most vegetables, small and bulk portions, defrost, heat, and cook very successfully in the microwave, retaining fresh color and texture as well an nutritional value. The thicker and more fibrous the vegetable, the longer the cooking time. (ie. Root vegetables) Frozen vegetables can be defrosted and heated in one step. One to two tablespoons of water should be added to frozen vegetables. Icy sections should be broken up during heating for even temperature distribution. Canned vegetables can be heated using HIGH in approximately 1 minute per pound. Most fresh vegetables are prepared with a small amount of cooking liquid such as water. Vegetables, Frozen—Defrosting and Heating Item Beans, green Cauliflower Broccoli Carrots, sliced Quantity 1.8 kg (4 lb.) 2.7 kg (6 lb.) 1.8 kg (4 lb.) 2.7 kg (6 lb.) 1.8 kg (4 lb.) 2.7 kg (6 lb.) Instructions for Pre-preparation NONE NONE NONE NONE Instructions for Microwave Heating Power Level Place in a microwave safe 6” half pan. Add one to two tablespoons of water. Cover with lid. Let stand, covered, 2 minutes. HIGH HIGH HIGH HIGH NONE HIGH NONE HIGH - 35 - Approximate Times NE-12521 NE-17521 NE-21521 NE-12523 NE-17523 NE-21523 NE-17723 4 min. 3 min. 2 min. 30 sec./kg 20 sec./kg 10 sec./kg (4 min./lb.) (3 min./lb.) (2 min./lb.) Heating and Defrosting Time Charts Vegetable, Fresh—Heating Item Instructions for Pre-preparation Instructions for Microwave Heating 1.8 kg (4 lb.) 2.3 kg (5 lb.) 2.7 kg (6 lb.) 3.2 kg (7 lb.) Peel carrots; cut into 1⁄8˝ slices. 1.8 kg (4 lb.) 2.3 kg (5 lb.) 2.7 kg (6 lb.) 3.2 kg (7 lb.) Peel carrots; cut into 1⁄8˝ slices. Wash vegetables well. Cut into uniform size pieces. Place in microwave safe Cambro 4˝ half pan. Cover with lid. Stir midway through heating. After heating, let stand, covered, 2 minutes. Wash vegetables well. Cut into uniform size pieces. Place in microwave safe Cambro 4˝ half pan. Add 3 to 4 tablespoons of water. Stir midway through heating. After heating, let stand, covered, 2 minutes. Quantity Carrots (cook) & other root vegetables (blanch) Approximate Times Power NE-12521 NE-17521 NE-21521 Level NE-12523 NE-17523 NE-21523 NE-17723 HIGH 8 min. 6 min. 5 min. HIGH 10 min. 12 min. 7 min. 30 sec. 9 min. 6 min. 30 sec. 8 min. HIGH HIGH 13 min. 30 sec. 10 min. 30 sec. 9 min. 30 sec. HIGH 6 min. 4 min. 3 min. HIGH 8 min. 50 sec. 10 min. 5 min. 30 sec. 7 min. 4 min. 30 sec. 6 min. 11 min. 30 sec. 8 min. 30 sec. 7 min. 30 sec. HIGH HIGH Vegetable, Fresh—Primary Cooking Item Quantity Broccoli 1.35 kg (3 lb.) Baked Potatoes 8 pcs. (100 ct.) Refried beans 3.2 kg (7 lb.) (#10 can) Instructions for Pre-preparation Rinse broccoli. Cut into spears. Instructions for Microwave Heating Power Level Place in a microwave safe Cambro 6˝ half pan. Add 2 tablespoons of water. Cover. After cooking, let stand, covered, 2 minutes. Place in a microwave safe Cambro 6˝ half pan. Add 2 tablespoons of water. Cover. After cooking, let stand, covered, 2 minutes. Place in a microwave safe Cambro 6˝ half pan. Cover with lid. After cooking, let stand 2 minutes. HIGH - 36 - Approximate Times NE-12521 NE-17521 NE-21521 NE-12523 NE-17523 NE-21523 NE-17723 10 min. 7 min. 5 min. HIGH 8 min. 7 min. 6 min. HIGH 8 min. 6 min. 30 sec. 5 min. Heating and Defrosting Time Charts CASSEROLES Food-Service casseroles can be cooked successfully in this microwave oven. For best results, follow instructions below. Preparation Remove all casseroles from their foil baking trays, while still frozen and place in a microwave safe 4-inch half pan. Place in refrigerator and thaw for about 30 minutes per ounce. Let stand 15 minutes before serving. Casseroles, Frozen—Heating Item Vegetable Lasagna Spinach Souffle Deep Dish Cherry Crisp Macaroni and Cheese Burritos Approximate Times Power NE-12521 NE-17521 NE-21521 Level NE-12523 NE-17523 NE-21523 NE-17723 Calculate Place in 4˝ half pan. Cover with lid. 1st min./kg Thaw in refrigerator for Let stand 15 minutes Stage (min./lb.) approx. 4 days. before serving. HIGH 2nd Stage MEDIUM Calculate Place in 4˝ half pan. Cover with lid. 1st min./kg Thaw in refrigerator for Let stand 15 minutes Stage 1 min. 1 min. 2 min. (min./lb.) approx. 2 days. before serving. MEDIUM 50 sec. 40 sec. 10 sec. 2nd per kg per kg per kg Stage 2 min. 1 min. 1 min. HIGH 30 sec. 30 sec. per lb. Calculate Place in 4˝ half pan. Sprinkle with HIGH per lb. per lb. min./kg Thaw in refrigerator. 2 tablespoons of sugar. (min./lb.) Calculate Place in 4˝ half pan. Cover with lid. Stir after HIGH min./kg Thaw in refrigerator for cooking. (min./lb.) approx. 2 days. Calculate Place on paper towel. Heat covered. HIGH min./kg (min./lb.) Quantity Instructions for Pre-preparation Instructions for Microwave Heating ( )( )( Instructions for all casseroles & large items (4 lbs. or more) that are ordinarily baked: 1) Defrost (see defrost method on page 35). 2) Heat: From refrigerated temperatures (< 40˚F and > 32˚F) Stage 1 = High time per kg (lb.) Stage 2 = Medium time per kg (lb.) - 37 - ) Limited Warranty (ONLY FOR U.S.A. AND PUERTO RICO) Panasonic Consumer Marketing Company of North America, Division of Panasonic Corporation of North America One Panasonic Way, Secaucus, New Jersey 07094 Panasonic Pro 1 Commercial Microwave Oven Limited Warranty Limited Warranty Coverage (For USA and Puerto Rico Only) If your product does not work properly because of a defect in materials or workmanship, Panasonic Consumer Marketing Company (referred to as “the warrantor”) will, for the length of the period indicated on the chart below, which starts with the date of original purchase (“warranty period”), at its option either (a) repair your product with new or refurbished parts, (b) replace it with a new or a refurbished equivalent value product, or (c) refund your purchase price. The decision to repair, replace or refund will be made by the warrantor. Product or Part Name Labor Parts NE-12521 NE-17521 NE-21521 1 Yr. 1 Yr. Magnetron: 3 Years NE-12523 NE-17523 NE-17723 NE-21523 3 Years 3 Years Magnetron: 3 Years (As examples, this excludes damages for lost time, travel to and from the servicer, loss of or damage to media or images, data or other memory or recorded content. The items listed are not exclusive, but for illustration only.) ALL EXPRESS AND IMPLIED WARRANTIES, INCLUDING THE WARRANTY OF MERCHANTABILITY, ARE LIMITED TO THE PERIOD OF THE LIMITED WARRANTY. Some states do not allow the exclusion or limitation of incidental or consequential damages, or limitations on how long an implied warranty lasts, so the exclusions may not apply to you. This warranty gives you specific legal rights and you may also have other rights which vary from state to state. If a problem with this product develops during or after the warranty period, you may contact your dealer or Service Center. If the problem is not handled to your satisfaction, then write to: Consumer Affairs Department Panasonic Consumer Marketing Company 661 Independence Pkwy Chesapeake, VA 23320 PARTS AND SERIVCE, WHICH ARE NOT COVERED BY THIS LIMITED WARRANTY, ARE YOUR RESPONSIBILITY. Statute of Limitations During the “Labor” warranty period there will be no charge for labor. During No suit shall be brought on an alleged breach of The Warrantor warranty more than one (1) year following expiration of the relevant the “Parts” warranty period, there will be no charge for parts. This warranty only applies to products purchased and serviced in the warranty period. United States or Puerto Rico. This warranty is extended only to the original Customer Services Directory (United States and Puerto Rico) purchaser of a new product which was not sold “as is”. Service: On-site service in the continental U.S.A. can be obtained during the warranty period from a Panasonic authorized service center. Call 1-888 350 9590, toll free, to locate an authorized service center. Defects must be communicated to The Warrantor by the Purchaser no later than thirty (30) days from the date the defect appears. If the Product shall prove, in the sole judgment of The Warrantor, to be defective in materials or workmanship during the warranty period, The Warrantor shall repair the Product within a reasonable time after notification from the Purchaser to The Warrantor. If the Product cannot be repaired after a reasonable number of attempts, The Warrantor shall provide, at The Warrantor’s sole discretion, either a refund of the purchase price or a replacement unit. IF REPAIR IS NEEDED DURING THE WARRANTY PERIOD, THE PURCHASER WILL BE REQUIRED TO FURNISH A SALES RECEIPT/PROOF OF PURCHASE INDICATING DATE OF PURCHASE, AMOUNT PAID AND PLACE OF PURCHASE. CUSTOMER WILL BE CHARGED FOR THE REPAIR OF ANY UNIT RECEIVED WITHOUT SUCH PROOF OF PURCHASE. Limited Warranty Limits And Exclusions This warranty ONLY COVERS failures due to defects in materials or workmanship, and DOES NOT COVER glass, plastic parts, temperature probes (if included) and normal wear and tear or cosmetic damage. The warranty ALSO DOES NOT COVER damages which occurred in shipment, or failures which are caused by products not supplied by the warrantor, or failures which result from accidents, misuse, abuse, neglect, bug infestation, mishandling, misapplication, alteration, faulty installation, set-up adjustments, maladjustment of consumer controls, improper maintenance, power line surge, lightning damage, modification, rental use of the product, service by anyone other than an authorized servicer, or damage that is attributable to acts of God. THERE ARE NO EXPRESS WARRANTIES EXCEPT AS LISTED UNDER “LIMITED WARRANTY COVERAGE”. THE WARRANTOR IS NOT LIABLE FOR INCIDENTAL OR CONSEQUENTIAL DAMAGES RESULTING FROM THE USE OF THIS PRODUCT, OR ARISING OUT OF ANY BREACH OF THIS WARRANTY. Obtain Product Information and Operating Assistance, locate your nearest Dealer or Service Center, by visiting our Web Site at: http://www.panasonic.com/cmo You may also contact us directly at: 1-877-CMO-OVEN (1-877-266-6836) Monday-Friday 9am-9pm For hearing or speech impaired TTY users, TTY: 1-877-833-8855 Accessory Purchases (United States and Puerto Rico) Purchase Parts, Accessories and Instruction Books online for all Panasonic Products by visiting our Web Site at: http://www.pstc.panasonic.com Or, send your request by E-mail to: [email protected] You may also contact us directly at: 1-800-332-5368 (Phone) 1-800-237-9080 (Fax Only) (Monday-Friday 9am-9pm EST) Panasonic National Parts Center 20421 84th Avenue South Kent, WA 98032 (We accept Visa, MasterCard, Discover Card, American Express) For hearing or speech impaired TTY users, TTY: 1-866-605-1277 - 38 - As of Feb 2012 Note - 39 - Technical Specifications NE-12521 / NE-12523 Model No. Power Source Required Power (Voltage) 120 V, 60 Hz., single phase 17.3 A (120 V) Receptacle Required Output HIGH (approx.) MEDIUM HIGH MEDIUM LOW DEFROST — HEAT FROM TOP DOWN HEAT FROM BOTTOM UP Frequency Outer dimensions (W x D x H) Cavity dimensions (W x D x H) Net weight (approx.) 20 AMP NEMA #5-20R (P10) (P9) (P8) (P7) (P6) (P5) (P4) (P3) (P2) (P1) (P0) (PU1) (PU2) (PL1) (PL2) 1200 W* 30 % 340 W NE-17521 / NE-17523 NE-21521 / NE-21523 NE-17723 208 V / 230 V, 60 Hz., single phase 13.6 A (208 V) 16.3 A (208 V) 12.2 A (230 V) 14.9 A (230 V) 15 AMP NEMA #6-15R 20 AMP NEMA #6-20R 20 AMP NEMA #6-20R 1700 W* 2100 W* 95 % 85 % 75 % 65 % 55 % 45 % 35 % 25 % 25 % 340 W 340 W 0% 50 % 25 % 50 % 25 % 2450 MHz 165⁄8˝ x 20˝ x 131⁄4˝ (422 mm x 508 mm x 337 mm) 13˝ x 127⁄32˝ x 67⁄8˝ (330 mm x 310 mm x 175 mm) 56 lbs. (25.5 kg) 61 lbs. (27.5 kg) 65 lbs. (29.5 kg) *IEC Test Procedure *In this manual, illustrations of Model No. NE-17723 is used for explanation purposes. Model numbers other than NE-17723 do not have SD Memory Card functions. Specifications subject to change without notice. 19⁄16˝ (40 mm) 11⁄32˝ (26 mm) 165⁄8˝ (422 mm) 20˝ (508 mm) 1831⁄32˝ (482 mm) 1529⁄32˝ (404 mm) 177⁄32˝ (437 mm) 3523⁄32˝ (907 mm) 131⁄4˝ (337 mm) 181⁄4˝ (464 mm) 11 32 ⁄ ˝ (9 mm) www.panasonic.com/cmo Panasonic Consumer Electronics Company, Division of Panasonic Corporation of North America One Panasonic Way Secaucus, New Jersey 07094 Or Call (201) 348-5377 © Panasonic Corporation 2012 A00033E80AP F0612-0 Printed in Japan