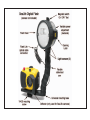
1
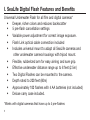
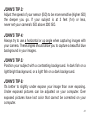
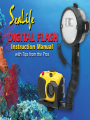
DIGITAL FLASH
Instruction Manual
with Tips from the Pros
Contents:
I. SeaLife Digital Flash Features and Benefits .......PAGE 2
III. Picture samples .....................................................PAGE 5
IV. Preparing your Digital camera and Flash............PAGE 7
V. How to use Digital Flash underwater ..................PAGE 25
VI. Tips from the Pros .................................................PAGE 31
VII. Care and maintenance ..........................................PAGE 42
VIII. Glossary ..................................................................PAGE 44
IX. Troubleshooting Guide ..........................................PAGE 46
X. Accessories, and Related Products.....................PAGE 51
XI. Warranty Statement and service..........INSIDE BACK COVER
www.sealife-cameras.com/onlineguide/manuals.html
Español - Deutsch - Français - Italiano
1
I. SeaLife Digital Flash Features and Benefits
Universal Underwater Flash for all film and digital cameras*
•
Deeper, richer colors and reduces backscatter
•
5 pre-flash cancellation settings
•
Variable power adjustment for correct image exposure.
•
Flash Link optical cable connection included
•
Includes universal mount to adapt all SeaLife cameras and
other underwater camera housings with tripod mount.
•
Flexible, rubberized arm for easy aiming and sure grip.
•
Effective underwater distance range up to 8 feet (2.5m)
•
Two Digital Flashes can be mounted to the camera.
•
Depth rated to 200 feet (60m)
•
Approximately 100 flashes with 4 AA batteries (not included)
•
Deluxe carry case included.
*Works with digital cameras that have up to 4 pre-flashes
2
Without Digital Flash
With Digital Flash
Novice and experienced dives alike know that the deeper you dive the
less light penetrates the water column. While this descending drama
adds to your excitement as a diver, you will find that it also will challenge you as an Underwater Digital Photographer. Having an external
Digital Flash allows you to carry your own supplemental light with you.
3
The SeaLife Digital Flash is fully adjustable allowing you to control the
brightness of your “sun” as you need.
The variable power adjustment lets you accent
colors and bring out the brightness of a reef
scene or the brilliant blue and yellows of an
Angelfish gliding by you. Plus, the SeaLife
Digital Flash allows you also to choose a preflash setting that will synchronize your cameras’
flash system with that of the SeaLife Digital
Flash making your underwater images sharper
than ever.
By reading and following the simple instructions in this manual you will
be able make your images come to life with colors and details more
brilliant than ever.
4
III. Picture samples – you can do this!
5
Photos by John Chandler with SeaLife DC310 digital camera, Wide-Angle Lens and Digital Flash
6
IV. Preparing your camera and SeaLife Digital Flash
Prepare your camera for use underwater. Here is a simple checklist
that is useful for most popular digital cameras and their housings.
• Insert blank memory card. It’s good practice
to regularly format the memory card. Make
sure card is blank before formatting.
• Insert freshly charged batteries. High mAh
batteries are suggested. Such as the SeaLife
NiMH AA rechargeable batteries.
• Turn camera power on
• Set SeaLife digital cameras to External Flash
exposure mode (see camera instruction
manual for details)
For non-SeaLife camera’s:
• Set ISO (start with 200 ISO)
• Set White Balance to AUTO
• Set camera’s Flash to ON (Turn off pre-flash, if possible)
7
• Important: Turn off camera’s red-eye reduction.
• Select your desired image resolution.
• Use camera’s manual exposure mode to control aperture and shutter
speed, if possible.
• Read your digital camera instruction manual for how to adjust the
above mentioned cameras settings.
• Inspect and clean camera housing and main O-ring (Make sure
O-ring is not damaged and perfectly clean).
• Insert camera into housing and seal.
• Test fire the
camera to
make sure
camera’s
flash fires.
8
Prepare your Digital Flash
Open latch as shown below to access battery compartment and preflash cancellation setting.
Important: Make sure the Flash
(and you) are perfectly dry before
opening compartment
9
Caution:
Discharge flash.
Before opening flash housing door, make sure to discharge the
flash by moving the power switch to the “TEST” position, and then
to the “OFF” position.
Magnetic switch.
The switch has small magnet inside to turn flash power ON/OFF
and TEST. Keep away from compasses and electronics to avoid
magnetic interference. Do not force switch beyond its stop point
to avoid damaging the switch.
Sealing Latch.
Grab the sides of the latch in order to open the battery compartment. Make sure the latch is properly closed before each use. DO
NOT apply external force to latch or hinge area to avoid damage.
Check O-Ring to ensure it is clean and not damaged.
10
Insert new or freshly charged AA batteries. Use SeaLife NiMH
rechargeable batteries for best results.
To replace batteries, gently press down on the
top front of the battery magazine and slide the
magazine cover down. Replace all 4 batteries
with Alkaline or NiMH type batteries ensuring
the polarity is properly observed. NiMH recycle time and life depends on mAh rating of the
battery. A 2300 mAh NiMH battery will last
longer and recycle faster than a regular alkaline battery. There is also newer high energy
Alkaline batteries available that will have
longer battery life than regular alkalines.
Note: You can remove the entire battery compartment for easy access
to batteries, or for replacement purposes. Push down release tab next
to battery compartment and slide the entire compartment towards the
release tab.
11
Setting the preflash cancellation switch.
For all SeaLife digital and film camera’s, set switch to “0” position. For
all non-SeaLife digital cameras, set switch to the # 4 position to start.
• Turn Digital Flash power ON.
Wait for the “ready light” to
illuminate.
• Turn on your digital camera
and take a test picture of the
Digital Flash. Aim camera at the
Digital Flash light sensor.
• Review image on the camera
and see if the Digital Flash firing
is visible in the picture.
If you see the Digital Flash firing
in the picture, keep the switch
set a #4 (this indicates that your
camera uses 4 pre-flashes).
12
• If you do not see the Digital Flash firing in the picture, set the switch
to the #3 position and repeat the above test.
• Continue moving switch down one position until you see the Digital
Flash firing in the picture – This will be your permanent pre-flash cancellation setting.
Note: For the above test, keep the shooting distance between the
camera and Digital Flash at about 5 feet (1.5 m). Do this test in low light
conditions, away from bright or direct light. Make sure that one of the
light sensors is exposed (not obstructed) for above test.
Important: If you are using a digital camera other than SeaLife, disable
the camera’s Red-Eye reduction. Set your camera flash to FLASH ON.
Check the camera’s instruction manual for details.
Tip: If you are using a digital camera other than SeaLife, disable the
camera’s PRE-flash, if possible. Check the camera’s instruction
manual for details. This will allow you to use the #0 pre-flash cancellation setting.
13
Pre-flash cancellation settings:
The Pre-Flash cancellation switch setting matches the number of preflashes of your camera:
Switch position
14
Description of setting
0
Instant synchronization mode.
For cameras with No pre-flash.
Use “0” setting for all SeaLife cameras an
other brands that allow you to disable the
camera’s pre-flash.
1
One pre-flash
2
Two pre-flashes
3
Three pre-flashes
4
Four pre-flashes
Close and seal battery compartment as shown. Make sure O-ring
is perfectly clean and undamaged.
Note: Inspect O-ring for cuts, tears, dirt or other damage. Clean or
replace as necessary. See page 43 for O-Ring care instructions.
15
Carefully inspect that the latch is closed and the O-ring is
completely seated into the housing.
16
Attach camera (housing) to DIGITAL FLASH mounting base. Hand
tighten screw – Do not over tighten!
Caution:
A) Only attach mounting screw to housings with standard 1/4 - 20 tripod mount
adapter.
B) The tripod mount adapter thread depth
MUST be at least 0.250” (6.4mm). Never
force or over tighten screw, or this may
permanently damage the housing seal or
threads.
17
Attach Flash Link optical cable to Digital Flash head and camera
Refer to the Flash Link instruction manual for details. The Flash Link
optical cable will transfer the flash from the inner camera to the light
sensor of the Digital Flash.
18
Test Flash
Turn ON/OFF switch on top of flash to “ON”. When green flash-ready
light is on, turn switch to TEST. This will test fire the flash. New or
freshly charged batteries will yield about 100 flashes.
Important: Do not force switch beyond stop point
19
Test Pictures
Turn on camera and Digital Flash and take some test pictures to make
sure camera’s flash and Digital Flash fires together. Check that both the
“ready lights” of the camera and Digital Flash are illuminated.
Digital Flash-Ready Light:
Light off – Indicates flash is charging or flash is turned off
Light Steady on - Indicates flash is charged and ready
Light fast blinking (4 seconds) - Indicates flash has just fired
Light slow blinking - Indicates flash battery power is low
Aim Digital Flash head towards the subject. If using the SeaLife
macro lens, make sure to aim the flash downward and toward the subject. For 8X and 16X lenses, aim flash down and toward the end of the
macro wand. For 3X Close Up lens, aim flash to a point about 3 ft in
front of the camera.
20
The flexible arm consists of seven 1-inch (2.5cm) links covered by a
foam rubber sleeve. You can bend the flexible arm in any direction. If
you want to take the arm off or apart, you can bend it beyond the point
of resistance, until the link separate. The links can easily be reconnected by pushing them together until they snap in.
The maximum reach of your flash output is
about 6 to 8 feet and depends on the reflection of the subject, angle to the subject,
color of the subject and water visibility. The
SeaLife Digital Flash is fully adjustable from
a maximum output of 20 guide number
(100%) down to a minimum output of 1.6
guide number (8%).
Refer to Section V for more information on the
adjustable features of your Digital Flash.
21
The built-in flash of the camera should
be covered by a flash deflector to prevent unwanted backscatter of light
caused by a reflection from particles
floating in front of the camera lens. All
SeaLife cameras come with custom
made deflectors that attach to the bottom of the flash base and align over the
camera’s flash. For non-SeaLife cameras, remove the deflector. Use the
black sticker provided with the Flash
Link to cover the camera’s flash and
secure the optical cable. See Flash Link
instructions for details.
Tip: Use the SeaLife Flash Diffuser (SL968) to reduce flash output
by about 60% and “soften” the light intensity.
22
Use of a second Digital Flash. In order to avoid shadows and to
further intensify brightness and color, you may mount a second identical flash. Remove the attachment knobs from both flashes. Place a
longer mounting screw through both base mounting brackets and into
the camera housing. Rotate both flash heads to point in the direction
of the subject and parallel to the lens of the camera.
23
A camera with two Digital Flashes
This double flash system can also be used with the SeaLife Macro
Lenses at a distance of 8” to 48” (20cm-120cm). A good way to avoid
overexposing close range images will be to illuminate the background
with one flash at full power setting while illuminating the foreground
and subject with the other flash with a lesser power setting. A SeaLife
diffuser may be used on both flashes to prevent overexposure of closeup subjects.
Note: A longer mounting screw is required when mounting two
Digital Flash flash units. Contact your local dealer to order.
Item #SL96022—for two flashes
Item #SL06026—for two Digital Flash units and macro wand
24
V. How to use the Digital Flash underwater
Making camera adjustments for proper image exposure is easy with
a little practice and knowledge. Just follow these few guidelines with
your SeaLife camera or other digital cameras (in a suitable housing).
Overexposed picture
Properly exposure picture
You can adjust your camera setting and/or Digital Flash settings to
achieve the best image exposure
25
Adjusting camera settings
For SeaLife digital cameras, set the camera to External Flash mode.
For more details refer to your SeaLife camera instruction manual.
For non-SeaLife cameras, set-up the digital exposure settings as recommended here.
ISO Choose and set an ISO appropriate to the conditions you expect
on your dive. The deeper you go means less light. You can adjust for
this by adjusting the sensitivity of your camera’s sensor (ISO).
26
Depth
Visibility
Light
ISO
15-30 feet (5-10m)
20+ ft. (6m +)
bright, sunny
100
30-60 feet (10-20m)
10-20 ft. (3-6m)
medium, cloudy 200
60-90 feet (20-30m)
0-10 ft. (0-3m)
dark, night
200 or 400
You notice the deeper you go, the lower the visibility. The darker the
light conditions are, the higher the ISO. This makes your camera more
sensitive to light and will serve to compensate for the absorption of
light at depth.
Exposure Value (EV) also allows you to increase, or decrease, the
camera’s light sensitivity. Increase EV to brighten images, and decrease
EV to darken pictures. You may choose to increase the EV setting
depending on depth, visibility or ambient light.
Depth
Visibility
Light
EV
15-30 feet (5-10m)
20+ ft. (6m +)
bright, sunny
-2
30-60 feet (10-20m)
10-20 ft. (3-6m)
medium, cloudy
-1
60-90 feet (20-30m)
0-10 ft. (0-3m)
dark, night
0
NOTE: The color of your object will effect the brightness of your subject
and the selection of your ISO or EV may be effected. Check you camera
instructions for more information about ISO and EV
27
White Balance (WB). This setting will match the color temperature (not
heat) of the light source to your camera’s sensor. Before using the
SeaLife Digital Flash set your WB to AUTO. Set White Balance to
FLASH, if available.
Manual exposure controls Most digital cameras also offer a manual
mode that allows you to adjust the aperture and shutter speed. This
provides the best overall exposure control but requires some experimentation and a little knowledge of basic photography principles. Refer
to your camera instruction manual for details.
Once you have your camera exposure settings adjusted, take some
test pictures to become comfortable with the use and handling of the
Digital Flash. Remember that the flash reaches about 8X farther on land
than underwater. Consider this fact when taking test pictures on land
and make sure your subject is father away. The best practice is taking
underwater pictures.
TIP: Once you have settings that give acceptable results, note the settings. Experiment to see how changes affect image exposure.
28
Using the Digital Flash variable power
adjustment:
If the test image is over exposed (white or
washed out colors), turn the power adjustment clockwise to the first “bar” and take
another picture. Do this until the image
exposure is satisfactory. If the test image is
under exposed (dark), make sure the
power adjustment is on full power (completely counter clock-wise). If the power
adjustment is turned to full power, and the
image is under exposed, it normally indicates the subject is too far away, beyond
the reach of the Digital Flash or the flash
did not fire. The maximum reach is 6 to 8ft
(2.5m) depending on water visibility.
Note: If the Digital Flash did not fire, refer to the trouble shooting guide
in section IX.
29
Important: For SeaLife digital cameras, make sure camera is set
to External Flash mode. See camera instructions for more details.
Tip: For SeaLife DC300 and DC310 Digital cameras, press the
LCD button once to set the camera to “FAR FLASH”. This will
increase the sensitivity of the camera and brighten the image. This
is helpful for longer shooting distances. Press the LCD button
again to set the camera to “MACRO FLASH”. This will reduce the
sensitivity of the camera and darken the image. This is helpful for
proper image exposure for short distances (Macro shots)
30
VI. Tips from the Pro’s
STEPHEN FRINK
Stephen Frink is the world’s most widely published underwater photographer. With a career spanning over two
decades, his photos have appeared in a wide variety of
dive journals and magazines world-wide, and he has provided stunning
imagery for hundreds of promotional campaigns. For more information about
Stephen Frink Photography, please visit www.stephenfrink.com.
Digital Photography underwater is a very powerful medium. With obvious advantages like greater capacity per dive and immediate review of
photos taken, the learning curve is tremendously accelerated for most
shooters. Add powerful accessories like the SeaLife Digital Flash and
accessories such as the wide angle lens and macro accessories and
digital rules the underwater imaging scene.
31
Still, there are a few principles that can make even digital photography
better:
STEPHEN’S TIP 1: MINIMIZE BACKSCATTER
Backscatter is the most important variable in point-and-shoot photography because the strobe is near the lens with most systems. Particles
in the water are front-lit by the flash and appear as specks of “backscatter.” These are some of the best ways to eliminate backscatter:
• Work in the clearest possible water.
• If the water is dirty, find a busy, visually confusing background that
may hide particles.
• Avoid shooting into the open water column, which will accentuate
particles.
• Don’t make backscatter worse with poor buoyancy skills. Avoid
stirring the sand on the bottom or dislodging the silt on a sponge.
32
• One important advantage with the SeaLife Digital Flash, is that when
particles are illuminated, it is with rim-light rather than front-light, and
the backscatter effect is minimized.
• Position your strobe high and to the side, pointing down to the
subject.
STEPHEN’S TIP 2: SHRINK THE WATER COLUMN
Water — 800 times denser than air — quickly absorbs light and is a
massive cyan (blue-green) filter. So, to achieve rich, vibrant colors in
underwater photography, you must:
• Use artificial light (a strobe).
• Work close. Choose a point-and-shoot that focuses to at least two
feet with a primary lens, or has an easy system of adding supplemental lenses to get close.
33
STEPHEN’S TIP 3: CHOOSE THE RIGHT SUBJECT
Because the best results will be obtained when working close, there is
a limited universe of subjects possible with these cameras. With the
normal lens on a SeaLife digital camera a full-figure shot of divers must
be taken from eight to 10 feet away, making the shot inevitably monochromatic blue. Applying the “get close” axiom, a head-and-shoulders
shot taken from three feet away will be better. Or, add the Wide Angle
lens to photograph large subjects from a near distance. The normal
lens is usually good for fish portraits, whereas the wide angle lens helps
for large marine life such as dolphins, reef scenes, and photographs of
your dive buddy.
34
STEPHEN’S POINT-AND-SHOOT WORKSHOP
This series of four
photos taken with the
SeaLife flash shows
the tremendous effect
water has on color
saturation. In the first
photo (above right) the subject is approximately five feet away. Note
the dull, muted colors. In the second photo (above right), from about
three feet away, colors are more authentic.
As the photographer
moves progressively
closer, the colors are
richer. The blue filtration of seawater is
reduced, and resolution and contrast is enhanced. Get close for
optimal results!
35
CATHY CHURCH
Cathy Church has been photographing the beautiful underwater
world since 1967. She has a Masters degree in Marine Biology,
and is recognized as one of the world’s foremost teachers and
authors on underwater photography. She was inducted into the
Woman Divers Hall of Fame in 2000. She was a photo editor for Skin Diver
magazine for 15 years and her work has appeared in dozens of books and
magazines, including five of her own popular books (co-authored with Jim
Church) on photo technique and an instructional video. For more information
about Cathy Church and available underwater photography programs, please
visit www.cathychurch.com
CATHY’S TIP 1:
If your pictures are pale blue even when you are using a strobe, try
these tips to reduce the over-exposed sunlight and increase the proportion of colorful strobe light in your photos:
• Set the EV or exposure compensation for –2. (The icon is +/-.)
• Set the ISO for 100, or any setting but auto.
36
• Get closer with your strobe.
• Shoot in deeper water or on darker days.
• Use manual control to make backgrounds darker and strobe brighter
• When shooting close, use a fast shutter speed such as
1/500th second.
• Use the smallest aperture on your camera (usually around
an f8.)
• Take a picture; adjust the strobe power setting up or down
as needed.
• If your camera indicates overexposure, use a faster shutter
speed or aim away from the bright sunlight. (Use your
camera owner’s manual to find the exposure information.)
CATHY’S TIP 2:
Don’t stir up sand where you are shooting.
• Adjust your weights so that you can float without moving.
• On sandy bottom, kneel or stand but don’t kick.
37
• If you fall forward when kneeling, move your weights toward your
back.
• If you use integrated weights, put part of them on a belt on your back
to prevent falling forward.
CATHY’S TIP 3: Get close for better color
• Use wide add-on lenses or the widest zoom setting to allow you to
get close to medium and large subjects.
• Use close-up lenses or close-focusing cameras to fill the frame with
small subjects.
• Know the minimum focus distance of the camera and get as close
as possible to any subject that does not move away.
• Use the telephoto zoom as little as possible, and only for those subjects that will not allow you to get close.
CATHY’S TIP 4: Aim the strobe correctly
• Things look closer underwater than they really are. Subjects four feet
away will look like they are only three feet away. Don’t let it fool you—
aim your strobe beyond the false (apparent) image that you see.
38
• Aim your strobe straight out, rather than tilted down, for subjects
beyond a foot from the camera.
• Extend your strobe as far away from the lens as possible to reduce
backscatter.
CATHY’S TIP 5: Set the white balance for cloudy to increase color.
Experiment with other settings for your conditions. For example, the
flourescent setting may give better results in green colored water.
CATHY’S TIP 6: Don’t scare the fish
• When you see a turtle, don’t swim directly at it. If it is eating,
approach slowly and let him get used to you. If it is moving, swim
quickly at an angle to a position in front of it. Sometimes they will
swim right into you.
• When working with fish near coral heads, have a buddy swim to the
other side of the coral head and encourage, not chase, the fish to
your side.
39
JOHN CHANDLER
John has been a certified PADI Divemaster since 1982
and has remained active in leading dive trips around the
world. In 1996, John took some time off to earn his PADI
Open Water Instructor certification. He has since added
the experience of advancing through Master Scuba Diver Trainer, IDC Staff
Instructor and since May of 1998 the distinction of Master Instructor with more
that 900 certifications. John reserves most of his time now for teaching
Underwater Photography as he realizes the new joy of helping others capture
their memories on film.
JOHN’S TIP 1:
Ensure your batteries are either new, or freshly re-charged before each
dive. Do not save money only to lose great underwater images.
JOHN’S TIP 2:
Align your flash head(s) to be exactly parallel to the direction of your
camera lens. Only point the flash down and inward when taking CloseUp or MACRO images.
40
JOHN’S TIP 3:
Adjust the speed of your sensor (ISO) to be more sensitive (higher ISO)
the deeper you go. If your subject is at 3 feet (1m) or less,
never set your camera’s ISO above 200 ISO.
JOHN’S TIP 4:
Always try to use a horizontal or up angle when capturing images with
your camera. These angles should allow you to capture a beautiful blue
background in your images.
JOHN’S TIP 5:
Position your subject with a contrasting background. A dark fish on a
light/bright background, or a light fish on a dark background.
JOHN’S TIP 6:
It’s better to slightly under expose your image than over exposing.
Under exposed pictures can be adjusted on your computer. Over
exposed pictures have lost color that cannot be corrected on your
computer.
41
VII. Care and Maintenance
1. After each use, Digital Flash and camera housing must be soaked
in fresh water immediately to
remove salt and dirt. Keep housing
and flash sealed.
2. Never
3.
4.
42
use any detergents, cleaners,
solvents or chemicals to clean the
flash. The mask bucket on a boat is
full of detergent – do not use this.
Let the water drain out of the flash
arm (which has small drainage holes)
thoroughly before storage. Flash arm
links can be separated to remove
excess water.
Remove all batteries. Make sure flash (and you) are dry before opening compartment door) Insert fresh Moisture-Muncher desiccant
capsules (item # SL911), and hang it up to dry in a well ventilated
place similar to drying your wet suit.
5. Always keep the compartment cover O-ring clean, dry and free from
obstructions. Latch and inspect the compartment door.
6. Inspect
O-ring for cuts, tears, dirt or other damage. Clean
O-ring with damp cloth and allow to dry. Replace O-ring if
damaged.
7. Replace all worn or damaged parts. Contact your local dive shop,
or the SeaLife website for available replacement parts.
Tip: Also use the larger Moisture Muncher (1oz/28g bag) when storing
your camera, flash and accessories. Electronics will last longer in a dry
storage environment in a closed container. See Item# M101 page 23.
43
VIII. GLOSSARY
ISO. International Standards Organization. This term ISO relates the
ability (speed) of the camera’s sensor to accept light. Higher the ISO
the more sensitive the camera is to light resulting in a brighter, but more
grainy image.
Exposure Value (EV). EV setting controls the camera sensitivity to light.
A positive EV means a brighter photo, while a negative EV will produce
a darker image.
Pre-flash. Most digital cameras have a preflash to assist in autofocus/autoexposure setting of the camera. These brief, flashes can
errantly trigger an external flash before the camera captures the image.
Aperture. Like the pupil of your eye, this is the opening behind the
lens that permits light to pass through the lens and on to the camera’s
sensor. An aperture of f2.8 is a larger opening and allows more light to
reach the camera’s sensor. f8 is a small opening and allows less light
to reach the camera’s sensor.
44
Shutter speed. The amount of time the camera shutter opens to
permit light through the aperture and on the image sensor.
Fast shutter speed (125/sec and above) will stop action. Slower than
(60th/sec) will be blurry, unless the camera is held very steady or on a
tripod. As a general rule, use shutter speed values between 1/90 to
1/500 for underwater.
Backscatter: Fine particles of sand or plankton suspended in the
water that appear as small dots in your picture. It looks like it’s snowing in the water. Move flash head as far away from camera lens as possible. Direct outer rim of flash beam at your subject, so you do not illuminate the water between the camera and the subject.
45
IX. Trouble Shooting Guide
1. Digital Flash does not fire when switch is turned from “ON” to
“TEST.”
a. Wait until the green flash-ready light is on. If ready light does not
turn on, check that batteries are inserted correctly.
b. Test or replace batteries, if necessary.
c. Test in dark area. Direct sunlight on light sensors may prevent
flash from firing.
d. If above does not correct the problem, contact SeaLife Service
Center in your country or email to [email protected]
2. Digital Flash fires as tested above, but does not fire when
triggered by camera
a. Make sure Digital Flash power is turned on and green flash-ready
light is on.
b. Test that your camera’s inner flash fires.
c. Make sure camera settings are correct.
46
i. For SeaLife digital cameras, set to External Flash mode.
Make sure camera’s ready-light is on.
ii. For other camera brands, set camera to Flash ON. Make
sure Red-Eye reduction is turned off. Refer to your camera
instructions for problems related to the camera.
d. Make sure the Digital Flash’s pre-flash cancellation switch is
properly set. Refer to page 12 for details.
e. If using Flash Link optical cable, make sure cable is properly
connected. Refer to trouble shooting guide in Flash Link
manual. Remove Flash Link sensor adapter and see if Digital
Flash fires when Flash Link is not connected. Test in a dark room.
3. Flash does not fire all the time.
a. Make sure Flash Link is correctly installed. The ends of the optical
cable must be in the correct position.
• The open end of the optical cable must be directly in front of
the camera’s flash.
• The flash sensor adapter must be centered over the Digital
Flash’s light sensor.
47
b. Make sure flash sensor cover is covering light sensor farthest
from camera.
c. Refer to Flash Link instructions for correct installation procedures.
4. Dark areas in your pictures.
a. Direct the flash head closer to the center of your picture frame to
have a more even light coverage.
b. Areas further away from the camera will appear darker than closer
objects. Maximum shooting distance is 6 to 8’ depending on
water visibility and the reflectivity of your subject.
c. Check the Digital Flash variable power adjustment. Turn counterclockwise to increase flash brightness. Turn clockwise to
decrease flash brightness.
d. For close-up shots that have dark areas try using the SeaLife
Diffuser (item # SL968). This will diffuse and soften the flash
intensity. Refer to the accessories located in section X of
this manual.
48
e. The reflectivity of your subject will cause some areas to appear
brighter than other areas. For example, dark coral needs more
light than would white coral. Adjust flash intensity accordingly.
f. The further the flash head is away from the camera lens, the
bigger will be shadows due to the angle of light (flash) in relation
to the subject. The closer it is, the more backscatter you
may see in your image caused by small particles in the water. If
you have absolutely clear water without plankton or sand, you
may move the flash head closer to the camera lens.
g. In order to eliminate unwanted shadows you may consider these
two suggestions:
i. Remove the flash deflector (clear water only)
ii. Add a second Digital Flash.
5. Flash arm is loose and does not maintain correct aiming
position.
a. Soak the arm in warm fresh water and flex the arm until all links
are clean and free of detergents or lubricants.
b. Never use detergents when cleaning the flash arm.
49
c. Test flash arm flexibility underwater. The flash arm will become
stiffer underwater.
6. Rust accumulating around power on and test swtich. The switch
is magnetic and will attract metal debris, like rust, from a shipwreck.
Clean off rust and metal debris with a brush.
7. For more trouble shooting information, refer to the SeaLife
website at www.sealife-cameras.com or contact your local SeaLife
service center for help.
50
X. Accessories, Spare Parts and Related Products
to use with your SeaLife Digital Flash
Spare Parts:
Item #SL96012: Digital Flash (head only)
Item #SL9605:
O-Ring Replacement Kit (authorized service only)
Contains 1 O-Ring and 1 gasket
Item #SL9604:
Battery Magazine and Cover
(batteries not included)
Item #SL962:
New! SeaLife® Flash Link
Optical Cable connection for all SeaLife flashes.
Ensure firing of SeaLife flashes in all light conditions
and flash aiming positions allowing you more freedom to control your lighting.
51
Item SL968:
SeaLife® Diffuser: Softens the light from SeaLife
External Flash to prevent over-exposure of close-up
subjects. Results in richer color balance of pictures
and softer shadows. Fits on both SeaLife Digital and
Standard Flashes.
Item SL970:
SeaLife® Wide Angle lens: Widen your underwater
photos with the SeaLife wide-angle lens. Just snap
it onto the front of your SeaLife camera and increase
your shooting angle by about 50%. Fits all SeaLife
cameras.
52
Item SL972:
New! SeaLife® Lens Dock
Protects and stores wide angle lens while diving.
Lens quickly slides in and out for instant access.
Quickly and easily attaches to the bottom of SeaLife
cameras or flashes.
Item SL190:
SeaLife® Re-chargeable batteries, charger and
international adapter kit:
Avoid paying “island prices” for AA batteries that
don’t hold up. The kit comes with four rechargeable
Ni-MH batteries, wall charger and three international
adapters that cover you around the world! Perfect
for the world traveler who needs affordable power
instantly! Purchase two kits and power your external
flash and SeaLife camera. Always have a fresh set of
batteries ready to go.
53
Item SL951:
SeaLife® Macro 3X Close-Up Lens & U/W filter:
Close-up shots are the keys to good pictures, especially with less then perfect water visibility. For
greater underwater photos at a comfortable range of
2 to 4 ft, snap on the SeaLife Macro 3X Close-up
Lens. This color-corrected lens is designed to
enhance the quality photos of your diving and
snorkeling adventures. Fits all SeaLife cameras.
Item SL959:
SeaLife® Close-Up Set: Take underwater pictures
like a Pro with the new SeaLife Close-Up Set.
Capture the vibrant color and close-up details of
your underwater world. Close-Up Set includes the
8X and 16 X color corrected macro lenses for shooting distances of 8” to 16”. Set includes the MACRO
Wand distance-measuring device that ensures the
correct shooting distance. Quickly and easily
change macro lenses underwater. Macro Wand folds
out of the way when not in use.
54
Two neoprene protective lens covers included. Fits
all SeaLife cameras.
Item SL194:
SeaLife® Sunshade: Prevents sun glare so you can
see the LCD monitor on your SeaLife digital camera.
Works in the absolute brightest light conditions,
above and below water. Quickly attaches to the
SeaLife housing LCD monitor frame. Made of soft
rubber material. Fits on SeaLife ReefMaster Digital
camera models; DC100, DC200, DC250, DC300,
DC310.
Item SL966:
SeaLife® Buoyancy Weight: Reduces the positive
buoyancy of SeaLife cameras and External Flashes.
Allows for easy, more balanced handling underwater.
Attaches to accessory mount under all SeaLife cameras and flashes. Rubber armored. Weighs 13
ounces.
55
Item SL911:
Moisture Muncher Capsules: Absorbs moisture
to prevent fogging and corrosion of your SeaLife
camera. Each capsule contains 1 gram of color indicating crystals. When crystals turn from blue to pink
color, it’s time to replace the capsule. Fits inside all
SeaLife cameras. Contains Ten 1-gram capsules.
Item M101:
Moisture Muncher Bags: Absorbs moisture to
prevent fogging and corrosion of your valuable electronics and cameras. Use inside an airtight storage
case or container to create a perfect dry environment for your valuable items. Each bag contains 1
ounce of powerful moisture absorbing granules and
color indicating crystals. When crystals turn from
blue to pink color, it’s time to replace the bag.
Contains Three 1-ounce bags
56
XI. Warranty statement and service
This product will be repaired or replaced free of charge within 1 year
from the purchase date in the case of a manufacturing defect, if the
complete defective product is sent freight prepaid at the sender’s risk
to: Pioneer Research, 97 Foster Road, Suite 5, Moorestown, NJ 08057
or to the importer, in a different country. Contact the service center to
obtain a return authorization # before shipping product. Include a letter
describing the damage or defect, your return address (no PO Box),
daytime phone # and a copy of the original purchase receipt or proof
of purchase with the purchase date. Excluded are any consequential
damages, cosmetic damages, damages to products which show
abuse, non-conformance with the instructions, particularly water
damage due to a damaged O-ring or any particles wedged between
the housing and the O-ring, or tampering and attempted repair of the
product. Excluded are scratches on lenses or damaged lens coatings.
Products used in rental operations are excluded from this warranty.
IMPORTANT DO NOT send any non-SeaLife cameras housings or
other equipment.
Shipments other than manufacturers equipment will be promptly
returned in their entirety at the owners expense.
The USA Service Center is open M - F, 8:30 am to 5:00 pm (EST). You
may contact the service center at (856) 866-9192 or email us at
[email protected]
Pioneer Research, 97 Foster Road, Moorestown, NJ 08057
www.sealife-cameras.com
Phone (856) 866-9191 Fax (856) 866-8615
www.sealife-cameras.com/onlineguide/manuals.html
Español - Deutsch - Français - Italiano