1
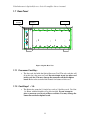
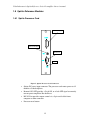
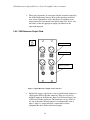
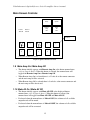
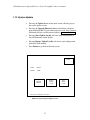
Owner’s Manual
For
Spirito
Reference Series Preamplifier
Viola Laboratories Spirito Reference Series Preamplifier Owner's manual
Table of Contents
Introduction......................................................................................................................... 1
The Spirito Reference Preamplifier .................................................................................... 2
Important Safety Instructions.............................................................................................. 3
1.1
Additional Points of Concern and Attention....................................................... 4
Unpacking Your Preamplifier............................................................................................. 5
System Set-up and Installation............................................................................................ 6
1.2
Breaking in Your New Preamplifier ................................................................... 6
1.3
Placement Considerations................................................................................... 6
1.3.1
Ventilation................................................................................................... 6
Special Design Features...................................................................................................... 8
1.4
Balanced design .................................................................................................. 8
1.5
Use of Adaptors .................................................................................................. 9
1.6
Front Panel .......................................................................................................... 9
1.6.1
Power Indicator Light ............................................................................... 10
1.6.2
IR Window................................................................................................ 10
1.6.3
Display and touch screen .......................................................................... 10
1.6.4
Volume Control ........................................................................................ 10
1.6.5
Balance Control ........................................................................................ 10
1.7
Rear Panel ......................................................................................................... 11
1.7.1
Processor Card Bay:.................................................................................. 11
1.7.2
Card Bays 1 – 10:...................................................................................... 11
1.8
Spirito Reference Modules ............................................................................... 12
1.8.1
Spirito Processor Card .............................................................................. 12
1.8.2
V20 Reference Input Card ........................................................................ 13
1.8.3
V30 Reference Output Card...................................................................... 14
Main Screen Controls ....................................................................................................... 15
1.9
Main Amp On / Main Amp Off ........................................................................ 15
1.10 Mute All On / Mute All Off.............................................................................. 15
1.11 Board Icons ....................................................................................................... 16
1.12 Setup Menu ....................................................................................................... 16
1.13 System Update .................................................................................................. 17
1.14 V20 Reference Input Card ................................................................................ 18
1.15 V30 Reference Output Module......................................................................... 19
i
Viola Laboratories Spirito Reference Series Preamplifier Owner's manual
Table of Figures
Figure 1: Lightening Flash With Arrowhead - "Dangerous Voltage" ................................ 3
Figure 2: Explanation Point - Important Operating and Maintenance Instructions............ 3
Figure 3: Spirito Front View............................................................................................... 9
Figure 4: Spirito Rear View.............................................................................................. 11
Figure 5: Spirito Processor Card Connectors.................................................................... 12
Figure 6: Spirito Reference Input Card Connectors ......................................................... 13
Figure 7: Spirito Reference Output Card Connectors....................................................... 14
Figure 8: Spirito Main Screen Icons ................................................................................. 15
Figure 9: Spirito Status Display screen............................................................................. 16
Figure 10: System Update Display screen ........................................................................ 17
Figure 11: Reference Input Menu Screen ......................................................................... 18
Figure 12: Buss Pair Assignment...................................................................................... 19
Figure 13: V30 Main Screen............................................................................................. 19
ii
Viola Laboratories Spirito Reference Series Preamplifier Owner's manual
Introduction
Congratulations on your selection of a Viola Audio Laboratories product. Viola Audio
Labs is devoted to the design and manufacture of the world’s best audio equipment. It is
our goal to provide you with the equipment that will offer you the most pleasurable
listening experiences of your life. This component is designed to have the highest degree
of compatibility with most other high-end components, regardless of manufacturer.
However, it is one part of a Viola system that was designed to work together for
maximum compatibility. The reference system consists of the Spirito Reference
Preamplifier, Bravo Reference Amplifier, the Basso and Allegro modular speaker
components and a choice of highest quality interconnects (Blues Silver and Swing
Copper) and the Jazz Reference Speaker Wire. We encourage you to try all components
of this system.
1
Viola Laboratories Spirito Reference Series Preamplifier Owner's manual
The Spirito Reference Preamplifier
Spirito is a modular designed preamplifier that utilizes open architecture to provide you
with maximum flexibility for customization, upgrading and expansion.
The Spirito is a mainframe preamplifier with a separate power supply chassis. The Spirito
mainframe has ten open card slots that load from the rear and permit you to configure the
preamp as you wish. The Spirito is a Class a preamplifier with discrete circuitry and fully
balanced throughout. The basic model has one V20 reference input card and one V30
reference output card. Future development will provide opportunity for phono stages,
DAC and EQ stages.
2
Viola Laboratories Spirito Reference Series Preamplifier Owner's manual
Important Safety Instructions
WARNING: To reduce the risk of fire or electrical shock, do not expose
this appliance to rain or moisture.
CAUTION: To reduce the risks of electrical shock do not remove the
cover from this product. There are no user serviceable parts within this
product. Refer all servicing to qualified and authorized personnel.
Figure 1: Lightening Flash With Arrowhead - "Dangerous Voltage"
The symbol shown in figure 1, a lightning flash with an arrowhead within
an equilateral triangle, is intended to alert the user to the presence of noninsulated "dangerous voltage" within the preamplifier's enclosure. This
voltage may be of sufficient amplitude to constitute a risk of serious
electric shock to the user.
Figure 2: Explanation Point - Important Operating and Maintenance Instructions
The exclamation point within an equilateral triangle is intended to alert the
user to the presence of important operating and maintenance (servicing)
instructions in this manual.
Note: The "CE" symbol indicates compliance of this device with the EMC
Electromagnetic Compatibility (EMC) and Low Voltage Directive (LVD)
standards of the European Community.
Notice: This equipment has been tested and found to comply with the
limits for a Class AB analogue device, pursuant to Part XV of the FCC
Rules. These limits are designed to provide reasonable protection against
harmful interference in a residential installation. This equipment
generates, uses and can radiate radio frequency energy and, if not installed
and used in accordance with these instructions, may cause harmful
interference to radio communications. There is, however, no guarantee
that interference will not occur in a particular installation. If this
equipment does cause interference to radio or television reception, which
can be determined by turning the equipment on and off, the user is
3
Viola Laboratories Spirito Reference Series Preamplifier Owner's manual
encouraged to try to correct the interference by one or more of the
following measures:
•
•
Reorient or relocate the receiving antenna
Increase the separation between the equipment and the receiver
Please read all instructions and precautions carefully and completely
before operating your preamplifier.
•
Connect the equipment into an outlet on a separate circuit from that to which
the receiver is connected.
Consult the dealer or an experienced radio/TV technician for help.
Caution: Changes or modifications to this equipment not expressly
approved by the manufacturer could void the user's authority to operate
the equipment.
•
The information contained in the manual is subject to change without notice. The
most current version of this manual will be posted on our web site at
http://www.violalabs.com.
1.1 Additional Points of Concern and Attention
Always disconnect your entire system from the AC mains before connecting or
disconnecting any cables, or when cleaning any component.
1)
This product must be terminated with a three-conductor AC mains power cord,
which includes an earth ground connection. To prevent shock hazard, all three
connections must always be used.
2)
3)
AC extension cords are not recommended for use with this product.
4)
Never use flammable or combustible chemicals for cleaning audio components.
5)
Never operate this product with any covers removed.
6)
Never wet the inside of this product with any liquid.
7)
Never pour or spill liquids directly onto this unit.
8)
Never block airflow through ventilation slots or heat sinks.
9)
Never bypass any fuse.
10)
Never replace any fuse with a value or type other than those specified.
Never attempt to repair this product. If a problem occurs, contact your Viola
retailer.
11)
12)
Never expose this product to extremely high or low temperatures.
13)
Never operate this product in an environment with flammable fumes in the air.
14)
Always keep electrical equipment out of the reach of children.
15)
Always unplug sensitive electronic equipment during lightning storms.
4
Viola Laboratories Spirito Reference Series Preamplifier Owner's manual
Unpacking Your Preamplifier
Caution: Do not attempt to unpack your Viola Spirito preamplifier
unassisted! Personal injury and damage to the product is quite likely to
occur unless the procedures and recommendations listed below are
strictly complied with.
Your new Viola Spirito preamplifier is very heavy. The shipping weight of
the Spirito is approximately 121 pounds (55 kg) .We highly recommend
the use of two people to unpack this unit safely.
•
Exercise care lifting your preamplifier from its packing carton [unassisted].
•
Never attempt to lift your preamplifier while bending from the waist.
•
Always stand as straight as possible and use your leg muscles to lift your
preamplifier and supply.
After unpacking your Viola Spirito preamplifier, store all packing
materials for future use during transport. In the event that shipment of
your preamplifier is ever required, only the original, product specific
shipping carton is acceptable for safe transport. Any other method of
shipping this heavy product will almost certainly result in damage to the
preamplifier. Please note that any such damage will not be covered by the
terms of the product warranty.
Note: Please inspect your preamplifier for any obvious damage due to
shipping. If you discover any problems, contact your VIOLA dealer
immediately so an appropriate freight claim can be made.
5
Viola Laboratories Spirito Reference Series Preamplifier Owner's manual
System Set-up and Installation
1.2 Breaking in Your New Preamplifier
Although your Viola Spirito preamplifier delivers outstanding
performance straight out of the box, you should expect to hear it continue
to improve as it reaches its normal operating temperatures and its various
components "break-in". It has been our experience that the greatest
changes occur within the first 25-50 hours, but that the preamplifier will
continue to improve in sound quality for about 300 hours, after which time
it remains quite constant.
The only exception to this rule is if power is removed from the unit,
allowing it to cool down. This can occur due to extended power outages,
unplugging the preamplifier supply from the wall during a vacation, or by
leaving the preamplifier in sleep mode rather than in standby. In these
cases you should expect a brief warm-up period before the amplifier's
sound quality is at its best. Fortunately, you will never have to repeat the
full 300-hour break-in period.
1.3 Placement Considerations
1.3.1 Ventilation
Important! For your protection, please review "Important Safety
Instructions", Section 1 above, before installing your preamplifier.
Your Viola Spirito preamplifier is specifically designed to accommodate a
wide range of installation options. This preamplifier may be placed near
the amplifiers or at an established distance. They may be located on
shelves, if indeed the shelves are sturdy enough to support the weight of
the preamplifier. The ventilation system employed by the Viola Spirito
preamplifier will maintain optimal operating temperatures even if the
preamplifier and supply are stacked one above the other.
The preferred configuration is to locate the preamplifier near the listening
position. This approach provides maximum comfort for the listener and
may necessitate longer interconnecting cables from the preamplifier to the
power amplifier. The advantage of this strategy lies in the fact that the
interconnecting cables carry low current signals that are more readily
transmitted over distances with great accuracy than are the necessarily
high current signals required between the amplifier and the loudspeakers.
Please note that adequate clearance for the AC cord and connecting signal
cables must be left behind your preamplifier. We suggest leaving at least
six inches (15 cm) of clearance behind your preamplifier so all cables have
sufficient room to bend without crimping or being subjected to undue
strain.
6
Viola Laboratories Spirito Reference Series Preamplifier Owner's manual
Mechanical drawings are included in this manual to facilitate special
installations where necessary. Please see "Dimensions" at the end of this
manual.
7
Viola Laboratories Spirito Reference Series Preamplifier Owner's manual
Special Design Features
Congratulations on your purchase of a SPIRITO Reference Preamplifier
by Viola Audio Labs. While your new preamplifier is straightforward in
everyday use, it includes several design features that are responsible for its
outstanding performance.
The Spirito preamplifier is a two box set, a stereo preamplifier with
separate power supply. The separate power supply assures complete
freedom from electro-magnetic interference (EMI) produced by the
electromagnetic power supply components, i.e. the power transformer and
inductor (or choke).
The inductor (choke) input filter power supply design was chosen because
it produces far less EMI than conventional capacitor input systems. The
inductor (choke) input filter system greatly reduces the electrical stress
placed on the power supply components. Therefore, this greatly increases
the life span and reliability of the power supply components. Capacitor
lifespan in particular can be increased by at least an order of magnitude.
The virtual elimination of the high peak ripple currents also minimizes
intermodulation distortion on the power supply “rails” and ground returns.
Additional power factor (PF) correction circuitry increases the PF from .9
(typical for “choke” input supplies) to .96 (a power factor of 1 [unity] is
considered ideal).
The power supply utilizes large, conventional components instead of a
switching power supply because they can operate at power levels several
times their continuous power ratings for longer periods. Given the duty
cycles found in even the most demanding music, large conventional
magnetic components can be used in audio preamplifiers whose
continuous sine wave power ratings would otherwise require a switching
power supply rated at 3 times that of the conventional type.
The conventional magnetic supply used for this preamplifier does not
utilize high frequency switching and therefore is devoid of any high
frequency noise. It offers much higher reliability and does not have to be
derated nearly as much as an equivalent switching power supply for a
given ambient temperature.
1.4 Balanced design
A truly balanced input topology eliminates the need for an input buffer
amplification stage and allows the first stage differential amplifier to be
driven directly by the source. Matched impedances are presented to the
source and both signals travel through identical circuit paths. A balanced
input signal remains balanced throughout the voltage gain stages.
8
Viola Laboratories Spirito Reference Series Preamplifier Owner's manual
Rejection of common mode noise and distortion is achieved in the final,
current gain stage.
1.5 Use of Adaptors
Your Spirito preamplifier uses state of the art balanced circuit topology.
When using an adaptor to go from the Spirito balanced output to an
unbalanced input, pin 1 and pin 3 must be connected together. Pin 2 is
the non-inverting output and pin 1 and 3 are ground. The same
configuration is true when connecting an unbalanced source to a Spirito
balanced input. The V20 Reference Input Card does provide one
unbalanced RCA input. Whenever possible use balanced connections to
the Spirito.
1.6 Front Panel
Volume
Power
IR
Touch Screen
Balance
Figure 3: Spirito Front View
9
Viola Laboratories Spirito Reference Series Preamplifier Owner's manual
1.6.1 Power Indicator Light
•
•
•
•
•
The ring around the power button is an LED that shows the operational
status of your preamplifier:
Completely off indicates that the amplifier is not connected to the AC
Mains. Note: If the amplifier will not turn on, you should check your AC
connections and inspect the fuses.
Green indicates that the Spirito is on and ready to be used.
Amber indicates that the Spirito is in standby mode. The display backlight
turns off and the outputs are muted.
Red indicates high AC line voltage or over temperature. Check that the
AC voltage on the supply is set to the proper voltage and that the Spirito
has proper ventilation.
.
1.6.2 IR Window
•
IR communication is full duplex. The Spirito can send and receive data
across the IR. The Palm OS program that comes with the Spirito is used to
turn a Palm OS device into a remote control and also to update the Palm
when you add more modules.
1.6.3 Display and touch screen
• The Spirito incorporates a touch screen for various functions. Soft keys are
used for the onscreen controls. This allows for new onscreen controls when future
modules are added.
1.6.4 Volume Control
•
The Spirito volume control is used for several functions depending on the
mode of operation. It is used for main volume, setting the channel volume
offsets and to scroll through the ASCII character set for board and channel
names.
1.6.5 Balance Control
•
The Spirito balance control functions, if enabled through the V30 output
screen, as a true pan pot type balance control. The balance control will
shift the image to the right or left with no increase in volume. The balance
control also is used to advance the cursor when renaming board or channel
names.
10
Viola Laboratories Spirito Reference Series Preamplifier Owner's manual
1.7 Rear Panel
Processor
Card Bay
Card Bay 10
Card Bay 1
Figure 4: Spirito Rear View
1.7.1 Processor Card Bay:
•
The first card slot holds the Spirito Processor Card. The only card that will
fit in this slot is the processor card. Do not attempt to put any other card
in this card slot. You may damage the connectors on the backplane
board. Refer to the section of this manual for features of this card.
.
1.7.2 Card Bays 1 – 10:
•
The Spirito has room for 10 single bay cards or 5 dual bay cards. Card slot
1 is shown with the blank bay rear plate installed. Do not attempt to
place a processor card in any of these card slots. You may damage the
connectors on the backplane board.
11
Viola Laboratories Spirito Reference Series Preamplifier Owner's manual
1.8 Spirito Reference Modules
1.8.1 Spirito Processor Card
DC Power Input
Remote ON / OFF
RS-232 Port
Reset
Figure 5: Spirito Processor Card Connectors
•
Spirito DC power input connector. The processor card routes power to all
modules via the backplane.
•
Remote ON / OFF provides +12vdc ON, or +0vdc OFF signal to remotely
turn on power amplifiers like the Bravo.
•
RS-232 Port provides remote control via a 9 pin serial cable from a
computer or other controller
•
Processor reset button
12
Viola Laboratories Spirito Reference Series Preamplifier Owner's manual
1.8.2 V20 Reference Input Card
Balanced Input 1
.
2
Board Icon
Balanced Input 2
Unbalanced Input 3
Figure 6: Spirito Reference Input Card Connectors
•
Spirito will accept a signal from a source with balanced outputs via
a high quality XLR or Fischer connector. There are two sets of
balanced inputs on the Reference Input Card. Balanced input 1 has
a XLR and a Fischer connector. The connectors are in parallel so
use one or the other. Balanced input 2 is configured the same as
input 1. Input 3 is single ended for a connection to source
equipment that does not have balanced outputs.
•
The pin assignment of the common Preamplifier XLR-type female
input connector is.
Pin 1
Pin 2
Pin 3
Connector ground lug or case connection
13
Signal Ground
Signal +
Signal Chassis Ground
Viola Laboratories Spirito Reference Series Preamplifier Owner's manual
•
These pin assignments are consistent with the standards adopted by
the Audio Engineering Society. Refer to the operating manual of
your source equipment to verify- that the pin assignments of its
output connectors correspond to the Spirito input card. If not, wire
the cables so that the appropriate output pin connects to the
equivalent input pin.
1.8.3 V30 Reference Output Card
.
Balanced Output 1
2
Board Icon
Balanced Output 2
Unity Gain
Unbalanced Output
Figure 7: Spirito Reference Output Card Connectors
•
Spirito will accept a signal from a source with balanced outputs via
a high quality XLR or Fischer connector. There are two sets of
balanced inputs on the Reference Input Card. Balanced input 1 has
a XLR and a Fischer connector. The connectors are in parallel so
use one or the other. Balanced input 2 is configured the same as
input 1. Input 3 is single ended for a connection to source
equipment that does not have balanced outputs
14
Viola Laboratories Spirito Reference Series Preamplifier Owner's manual
Main Screen Controls
Main
Volume
Balance
-20.0 dB
0.0 dB
Setup
Update
Remote
Amp
ON
Mute
All
OFF
Module Icon
Locations
.
.
2
2
6
4
5
9
10
2
7
8
Please press the Buttons for Actions
Figure 8: Spirito Main Screen Icons
1.9 Main Amp On / Main Amp Off
•
This button initially appears with Remote Amp On as the button nomenclature
(refer to figure 8 above). When this button is selected, the nomenclature will
toggle from Remote Amp On to Remote Amp Off.
•
When Remote Amp On is selected there is +12 volts dc at the remote connector
and the main amps will be activated.
•
When Remote Amp Off is selected there is 0 volts dc at the remote connector and
the main amps will be deactivated.
1.10 Mute All On / Mute All Off
•
This button initially appears with Mute All OFF as the displayed button
nomenclature (refer to figure 8 above). When this button is selected, the
nomenclature will toggle from Mute All OFF and Mute All ON.
•
If selected when the nomenclature is Mute All ON, the volumes of all available
output boards will be muted.
•
If selected when the nomenclature is Mute All OFF, the volumes of all available
output boards will be un-muted.
15
Viola Laboratories Spirito Reference Series Preamplifier Owner's manual
1.11 Board Icons
•
Board icons occupy the lower half of the main screen. When the Spirito is turned
on the processor will poll each of the ten card slots. When a module is found an
icon for the board type is displayed on the main screen, refer to figure 8. Selecting
a board icon will display a menu for that module. Selecting the input module icon
brings you to the following screen.
1.12 Setup Menu
•
Pressing the Setup button on the main screen will take you to the
setup menu screen.
•
Pressing the Brightness button will highlight the surrounding box.
Use the volume control to adjust the screen brightness. When
finished press the brightness again to deselect.
•
The Calibrate Touch Screen button will bring you to a calibration
screen. Follow the instruction on the calibrate screen. When you
finish you will be returned to the setup menu. The screen
calibration is set at the factory and should not need
adjustment. If you feel the calibration is off you can use the
button to perform a fresh calibration.
•
Press Return to go back to the main screen.
Main Setup
Brightness
Volume
Balance
-20.0 dB
0.0 dB
Calibrate
Touch
Screen
Please press the Buttons for Actions
Figure 9: Spirito Status Display screen
16
Return
Viola Laboratories Spirito Reference Series Preamplifier Owner's manual
1.13 System Update
•
Pressing the Update button on the main screen will bring you to
the system update screen.
•
Pressing the Upgrade Firmware button will initiate a firmware
upgrade thru the RS-232 port on the processor card. New firmware
downloads will be available on our website, www.violalabs.com.
•
Pressing Store Update Locally will store your configuration to
local flash memory on the Spirito.
•
Pressing Restore Update Locally will restore your configuration
from local flash memory.
•
Press Return to go back to the main screen
.
Firmware Version 1.1
SYSTEM UPDATE
Return
Volume
Balance
-20.0 dB
0.0 dB
Restore
Update
Locally
Upgrade
Firmware
Please press the Buttons for Actions
Figure 10: System Update Display screen
17
Store
Update
Locally
Viola Laboratories Spirito Reference Series Preamplifier Owner's manual
2 Ch Input STATUS
Board
Name
Volume
Balance
-20.0 dB
0.0 dB
Input
Bus
Pair
Return
Active
XLR/Fischer
T
Yes
XLR/Fischer
M
No
RCA
B
No
Output
2 Ch Output
Please press the Buttons for Actions
Figure 11: Reference Input Menu Screen
1.14 V20 Reference Input Card
•
The input group allows you to select any one of the three inputs. As shown in
figure 11, the top balanced input is active. This is the default channel selection on
power up. Selecting a box under the active column will activate the channel to the
left.
•
The output box displays, which output module, has been assigned to this input
module. Up to four V30 reference output modules can be assigned to one V20
input module. This can be used for multi room applications.
•
Tap inside the board name to highlight the box. While the box is highlighted
turning the volume will scroll through the ASCII character set. The balance
control will move the curser to the next character position. When you are done
un-highlight the box and the new name will appear in the board name field at the
top right of the display.
•
Selecting the bus pair icon will bring you to the bus pair screen shown in Figure
4. This is where the module bus routing is configured. The V20 input module can
be assigned to all four-bus pairs. This feature is useful for multi-room and
surround applications with multiple V30 output modules. Highlight the bus pair
box you want and then with the box highlighted hit the return box.
18
Viola Laboratories Spirito Reference Series Preamplifier Owner's manual
Main Setup
Return
1&2
3&4
5&6
7&8
Please press the Buttons for Actions
Figure 12: Buss Pair Assignment
1.15 V30 Reference Output Module
2 Ch Output STATUS
Board
Not
Muted
Tape
Off
Volume
Balance
-20.0 dB
0.0 dB
Channel
Board
Name
Bus
Pair
Return
Volume
Balance
Mute
L
+0.0 dB
No
No
R
+0.0 dB
No
No
Please press the Buttons for Actions
Figure 13: V30 Main Screen
19
Viola Laboratories Spirito Reference Series Preamplifier Owner's manual
•
Tape On/Off box enables or disables signal at the tape outputs. The
signal at the tape output is a fixed output, the volume and balance
control have no effect on this signal.
•
Board Not Muted will mute only the local V30 module. This is
used if you have multiple V30 modules and want to mute only one
of them in the system.
•
Board Name box is used to rename the V30 module. Highlight the
box, a cursor will appear. Use the volume control the cycle through
the ASCII character set and the balance to move the cursor one
position to the left or right. When you are through un-highlight the
box and the new name will appear at the top of the screen and in
the V20 output box.
•
Bus Pair box works the same as the V20 bus pair box. The only
difference is that only one V30 can be on the same bus at one time.
The software will not allow more than one bus pair box to be
enabled.
•
Return will bring you to the previous menu.
•
The Channel group contains the individual channel names. The
names can be renamed using the same method as the board name.
•
The Volume group is used to put in a volume offset. Highlight the
box, use the volume control to put in the offset then unselect the
box. The volume offset will now track with the main volume
control.
•
Balance group enables or disables the balance control for the local
V30. This feature is useful in multi-room applications.
•
Mute is used to mute an individual channel.
20