1
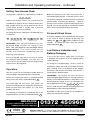
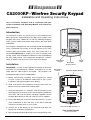
CA2000KP - Wirefree Security Keypad
Installation and Operating Instructions
These instructions should be read in conjunction with your
system Installation and Operating Manual and retained for
future reference.
Introduction
The CA2000KP enables any authorised user to Arm and Disarm the
Alarm System by simply entering a four digit 'Access Code' at the
Keypad, and is only suitable for use with the following Response
alarm systems: CA610, E100, E200, S100 variants, SA1, SA2, S200
and WA510.
The Keypad is designed for wall mounting inside the property
within a protected area (usually in the Hall adjacent to the main
entrance door) and therefore always arms your system with a 15
second Entry/Exit Delay, to enable you to leave the property after
arming, and to enter the property and disarm at the keypad during
the Entry Delay period. The keypad also incorporates a ‘PANIC’
facility to initiate a full alarm in the event of threat or danger.
Push Button
keypad
Installation
IMPORTANT: DO NOT fix the Keypad to metalwork or locate the
unit within 1m of metalwork (ie. radiators, water pipes etc.) as this
could affect the radio range of the keypad. This Keypad is not
weatherproof and must be installed indoors.
Anti Tamper
Switch
1
2
3
4
ON
OFF
Back-plate
Securing Screw
On-Air
Light
9 Volt PP3 Alkaline Battery
1. Before commencing installation of the keypad you should
set your system to Test/Service mode (refer to your system
Installation and Operating Manual for details).
2. Undo and remove the back-plate securing screw from the
bottom of the unit and remove the back-plate.
3. Using the back-plate as a template, mark the positions of the
two fixing holes on the wall, remove the back-plate and drill two
4mm holes and insert the plastic wall plugs supplied. Secure
the back-plate directly to the wall using the screws supplied.
ON
1
2
3
4
5
6
7
8
4. Using a ball point pen set the miniature dip switches 1- 8 to the
same combination of ‘ON’ and ‘OFF’ as the House Code dip
switches in the other items in your system.
House Code Dip Switches 1-8
5. Connect the 9 Volt battery to the connector and place the
battery into the battery compartment.
View Inside Keypad
(Viewed upside down)
6. Fit the Keypad to the back-plate and secure using the fixing screw.
Installation and Operating Instructions - continued
Setting Your Access Code
The Keypad is supplied with a preset Access Code of:
2
1
3
4
However, for security reasons, it is essential that you
immediately change the Access Code to another four
digit number which only you and other users of the
system know (usually a number with a personal
significance is easier to remember).
To change the Access Code, press the following keys
in sequence:
ON
1
2
3
4
ON
OR Current Access Code
?
?
?
?
ON
New Access Code
IMPORTANT: When using the Keypad the keys must
be pressed firmly and within five seconds of each
other. Use your finger tip, not your finger nail to
operate the keys. If you make a mistake, wait five
seconds and recommence programming from the
beginning of the sequence.
Ensure the ‘On Air’ light flashes five times to confirm
the setting has been accepted. If the light does not
flash, wait five seconds and re-enter the programming
sequence from the beginning.
Operation
Take the system out of Test/Service mode (Refer to
your Installation and Operating Manual for details).
To Arm your system (only with a 15 second Entry/Exit
Delay), enter your Access Code followed by ON .
The On-Air light will flash once; your system will
commence arming and you should leave the premises
before the Exit Delay time expires, or a full alarm
condition will occur.
On returning to the premises; immediately go to the
Keypad and enter your Access Code followed by OFF .
HELPLINE
If you need help, just dial for
expert technical support
0359
RADIO DEVICES FOR USE IN THE UK
WA_08.04
Note: The Keypad may be used in conjunction with a
hand-held Remote Control, so that the system can be
armed via the Keypad, and disarmed via the Remote
Control before re-entering the premises. However,
arming via the Remote Control and disarming at the
Keypad may not be possible if the Remote Control
does not have an Entry/Exit Delay arm facility.
Personal Attack Alarm
A full alarm condition can be initiated from the keypad
in the event of threat or danger by pressing and
holding the ON and OFF buttons together for two
seconds. To silence the alarm enter your Access
Code followed by OFF .
Low Battery Indication and
Battery Changing
If the On-Air light flashes rapidly when the Keypad
is operated, this indicates that the Keypad battery
needs replacing.
To change the Keypad battery, set the system to
Test/Service mode and undo and remove the backplate securing screw at the bottom of the Keypad.
Disconnect and remove the battery and connect a
new 9 Volt PP3 Alkaline battery.
IMPORTANT: The Keypad will retain the Access
Code setting for approximately 15 seconds whilst the
battery is removed and replaced. If the battery is left
disconnected for longer, or has run completey flat
the Keypad will revert to the 1
2
3 4 preset
Access Code and will need to be reprogrammed as
detailed above, after replacing the battery.
Remember to take your system out of Test/Service
mode after refitting the Keypad.
01372 450960
(Lines open 9.00am to 6.00pm, Monday to Friday).
Wireless Alarms. 17 Church Road, Great Bookham, Surrey KT23 3PG
Telephone: 01372 450960 E-mail: [email protected] www.wireless-alarms.net
CA2000KP