1
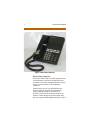
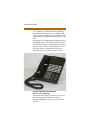
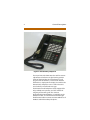
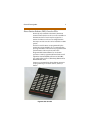
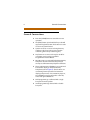
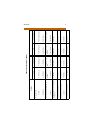
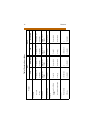
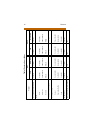
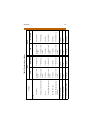
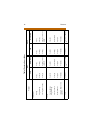
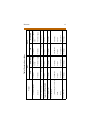
Feature Package 3 DHS /DHS-E TM TM The Answer To Your Company’s Growing Communication Needs User Guide Feature Package 3 STARPLUS®DHS/DHS-E™ User Guide Issue #1 - March 2000 P/N: 7052-03 I Release Date Changes 1 12-95 Initial release of product. 2 7-97 Includes Feature Package 2 <FP2> enhancements. 3 3-00 Includes Feature Package 3 <FP3> enhancements. Content contains extensive revisions. LIFE SUPPORT APPLICATIONS POLICY VODAVI Technology, Inc. products are not authorized for and should not be used within Life Support applications. Life Support systems are equipment intended to support or sustain life and whose failure to perform when properly used in accordance with instructions provided can be reasonably expected to result in significant personal injury or death. VODAVI Technology, Inc. warranty is limited to replacement of defective components and does not cover injury to persons or property or other consequential damages. Copyright © 2000 VODAVI Technology, Inc. All Rights Reserved This material is copyrighted by VODAVI Technology, Inc. Any unauthorized reproductions, use or disclosure of this material, or any part thereof, is strictly prohibited and is a violation of the Copyright Laws of the United States (17 U.S.C. Section 101 et. seq.). VODAVI reserves the right to make changes in specifications at any time and without notice. The information furnished by VODAVI in this material is believed to be accurate and reliable, but is not warranted to be true in all cases. STARPLUS® and DHS/DHS-E™ are registered trademarks of VODAVI Technology, Inc. CLD/2000 Contents General Description ............................................................... 1 Digital Key Telephones ...............................................................................1 Basic Key Telephone ........................................................... 1 Enhanced Key Telephone ................................................... 2 Executive Key Telephone .................................................... 3 Direct Station Selector (DSS) Console <FP3> .....................................5 General Conventions ............................................................. 6 Soft Button Prompts ....................................................................................7 Features .................................................................................. 8 Account Code ..............................................................................................18 Forced Verified .................................................................. 18 Unforced/Unverified ........................................................ 19 Alarm - Station .............................................................................................19 Canceling an Alarm ........................................................... 20 Attendant Administration .......................................................................21 System Service Mode ........................................................ 21 System Date and Time ...................................................... 22 System Speed Dial Numbers ............................................ 22 Additional information for Speed Dial ............................ 23 Authority Code - Traveling Class of Service ......................................23 Automatic Busy Redial ..............................................................................25 Automatic Line Selection .........................................................................25 Canceling an Automatic Line Selection .......................... 26 Background Music ......................................................................................27 Call Back .........................................................................................................27 Call Forward ..................................................................................................29 Display <FP3> .................................................................... 29 Station ................................................................................ 30 Caller Identification ....................................................................................31 Name/Number Caller ID <FP3> ...................................... 31 Answered Call Table <FP3> .............................................. 32 Unanswered Call Table ..................................................... 33 Review Call Information ................................................... 34 Call Park ..........................................................................................................35 Answer ................................................................................ 35 Call Pickup .....................................................................................................36 Direct .................................................................................. 37 Group ................................................................................. 37 ii March 2000 Call Waiting ...................................................................................................37 Camp On ........................................................................................................39 Busy CO Line ...................................................................... 39 Busy Station ....................................................................... 40 Conference ....................................................................................................41 Supervised .......................................................................... 41 Unsupervised ..................................................................... 43 Directory Dial <FP3> .................................................................................44 Distinctive Ringing - Station <FP3> .....................................................45 Do Not Disturb (DND) ...............................................................................46 DND Override .................................................................... 47 Direct Station Selector (DSS) Console <FP3> ...................................48 Hold .................................................................................................................52 Abandon (Loop Supervision) ........................................... 52 Automatic ........................................................................... 53 Call Answer/Select ............................................................ 53 Exclusive ............................................................................. 53 Reminder Time .................................................................. 54 System ................................................................................ 54 Intercom Call ................................................................................................54 Other Displays: .................................................................. 55 Message .........................................................................................................56 Outgoing ............................................................................ 56 Executive Notify ................................................................. 58 Message Waiting .........................................................................................59 Music-on-Hold (MOH) ...............................................................................61 Night Service ................................................................................................61 Page .................................................................................................................62 Pause ...............................................................................................................63 Redial—Last Number(LNR) .....................................................................63 Save Dialed Number (SDN) .....................................................................64 Speed Dial .....................................................................................................65 Station Feature Status Check .................................................................67 Transfer ...........................................................................................................68 User Saved Number Redial (USNR) .......................................................69 Voice Announce (Hands-Free or Privacy) ...........................................69 Operation ........................................................................... 70 Voice Mail Integration ...............................................................................70 March 2000 iii Voice Mail Button .............................................................. 71 Voice Mail Monitor ........................................................... 71 Voice Over Busy ...........................................................................................73 Conditions ......................................................................... 74 Voice Recorder .............................................................................................74 Single Line Telephone .........................................................76 Figures Basic Key Telephone .....................................................................................2 Enhanced Key Telephone ...........................................................................3 Executive Key Telephone ............................................................................4 DSS Console .....................................................................................................5 Soft Buttons .....................................................................................................7 F3 Soft Button ...............................................................................................31 Tables Feature Access Codes ...................................................................................9 System Numbering Plan ............................................................................18 Call Forward Programming ......................................................................30 Call Pickup Priority List ...............................................................................36 CO Line Flex Button Codes .......................................................................49 Dial Pad Key Programming ......................................................................57 Available Outgoing Pre-Programmed Messages .............................57 Available Executive Notify Pre-programmed Messages ................59 Voice Announce ...........................................................................................69 SLT Feature Access Codes ........................................................................77 iv March 2000 General Description Digital Key Telephones The DHS and DHS-E support three proprietary digital key telephones (Basic, Enhanced and Executive). These key telephones support a hot-keypad for dialing digits at any time. Basic Key Telephone The basic key telephone (refer to Figure 1) is equipped with a speaker for monitoring call progress and receiving call announcements but is not equipped with a microphone for Hands-Free (HF) reply. The basic key telephone has 16 buttons, 8 of which are fixed function buttons to control settings and primary key telephone call processing operations: HOLD, TRANS (Transfer), FEAT (Feature), CLEAR, MUTE, SPKR (Speaker), and Volume UP/DN. Eight buttons are user-programmable feature buttons, that are equipped with dual color LED with preassigned default settings for quick power up operation. These buttons are arranged in two rows and four columns. Beginning at the top left button they are assigned the following default values: CO line 1, CO line 2, CO line 3, CO line 4, CO line 5, CO line 6, HF/Tone and Message Waiting. 2 General Description Figure 1: Basic Key Telephone Enhanced Key Telephone The Enhanced Key Telephone is fully equipped for HF, and speakerphone operation. This key telephone is expanded to 28 buttons. Eight fixed function buttons remain consistent with those of the Basic Key Telephone. Twenty buttons are user-programmable feature buttons equipped, and dual color LED with preassigned default settings for quick power up operation. These buttons are arranged in five rows and four columns. Beginning at the top left button they are assigned the following default values: Station General Description 3 10 - 21, CO line 1-6, HF/Tone and Message Waiting. The Enhanced Key Telephone also is equipped with a 12-key Dial Pad for dialing intercom numbers, system feature codes and telephone network numbers on CO lines. Each telephone is equipped with an Additional Device Port (ADP) located on the underside of the phone for user-friendly connection of analog devices (answering machines, faxes, modems, cordless telephones, etc.). An analog adapter is required for this port to be equipped for use as an extension of the system. Figure 2: Enhanced Key Telephone Executive Key Telephone The Executive Key Telephone model has a 2 x 16, 32character Super Twist LCD display, with three interactive Soft Buttons to enhance system features operation. 4 General Description Figure 3: Executive Key Telephone The Super Twist LCD eliminates the need for contrast adjustment and enhances angled viewing position clarity of displayed data. A visual reference to call progress and call duration, as well as time and date information, is displayed. The display also enables the Executive Key Telephone user to send and receive visual advisory and call-back messages. The Executive model telephone is fully equipped for HF, speakerphone operation, and also enables HF outgoing and incoming calls. The same 20 Programmable Feature Buttons are available on the Executive model, as on the Enhanced model. Eight fixed function buttons remain consistent with those of the Basic and Enhanced Key Telephone. General Description 5 Direct Station Selector (DSS) Console <FP3> Previously only available on the DHS-E, the Direct Station Selector (DSS) Console is now also available on the DHS. One DSS Console may be assigned to a station. Each DSS Console uses one Digital Station Port. Up to 12 DSS Consoles can be installed on a DHS system. The DSS Console buttons are programmed by the Station User using the FEAT + # + 5 command, then pressing the button on the DSS to be programmed. All system feature codes may be stored on the Programmable Feature Buttons for one-button operation. Certain programmed feature buttons will light when activated (DND, Call Forward, DSS/BLF, etc.), while others such as Call Pick-Up, BGM and Last Number Redial don’t. Features are separated into three distinct categories for programming on a button: CO line, station, or feature. Figure 4: DSS Console 6 General Conventions General Conventions Press the [CLEAR] button to cancel the current operation. The [FEAT] button joined with dial key codes will appear throughout the text. This button is used to access most system features. System resources are accessed using directory numbers to dial access the resource (station numbering, Hunt Group numbering, etc.). Any feature or resource code may be stored for one-button access under an available Programmable Feature Button. Operation steps are oriented for the Executive Key Telephone since the interactive LCD prompts encompass all Executive Key Telephone functions. Three LCD interactive Soft Buttons are positioned beneath the display on the Executive Key Telephone (refer to Figure 5). These buttons are used during feature operation for interactive display prompt menus. For orientation purposes, the Soft Buttons may be referred to as the left, center and right Soft Buttons. Valid programming is confirmed with a single beep tone from the speaker. Invalid programming is alerted with a double beep tone. General Conventions 7 Soft Button Prompts OCT 1 STATION FRI 8:00 10 Figure 5: Soft Buttons bksp: The user may press the [bksp] button to erase the last data entered and either re-enter, or return to the previous prompt. save: The station user must press the [save] button to confirm an entry and continue with the next prompt. chg: Press the change [chg] button to modify the current item. If the data/message to be changed is generated by the system itself, the current programming item will be replaced by new data (toggled between YES and NO, or cycled through several data/messages) when the user presses the [chg] button. next: Press the [next] button to present the next selection or the next programmable item within the current category. back: Press the [back] button to view the previous programming category, or the previous programming item within the current category. show: Press the [show] button to enter into detailed item feature programming of a specific category, or to display current programmed content of the feature. clear: The [clear] button can be used at anytime in system programming. Press this button to abort any programming in progress and return the Executive Key Telephone to an idle state. 8 Features Features The System and Key Station features of the STARPLUS® DHS/DHS-E™ Systems are listed and described in this section. An abbreviated feature index is provided in Table 1: Feature Access Codes, fullfeature descriptions are provided alphabetically following Table 2: System Numbering Plan. The following variables apply to the Feature Access Code table (refer to Table 6). aaa = account code (up to 24 digits) cc = DHS CO numbers ccc = DHS-E CO numbers dd=00-99 F = indicates press the [FEAT] button before dialing code. g = Group numbers hh = hour H-T-P = Hands Free - Tone - Privacy mm = minute n = number nn = bin number nnn = new password pppp = current password ss = DHS sss = DHS-E Attendant Administration Unavailable F#+[0]+pppp F+[9]+[5] F+[7]+[8] F+[5]+[5] F+✳+[9]+[2] F+[9]+[2] + hh mm F+[7]+[1]+✳ F✳[9]+[5] F+[9]+[5] Automatic Line Selection Non-Display F+[7]+[1]+aaa+sav e DHS F✳[9]+[5] F+[7]+[8] Automatic Busy Redial Cancel F+[5]+[5] F+✳+[9]+[2] Authority Code - Traveling Class of Service Cancel F+[9]+[2] + soft button F+[7]+[1]+✳ Unforced Alarm Station (Hour/Minute) F+[7]+[1]+aaa LCD Forced Account Code Feature Table 1: Feature Access Codes F#+[0]+pppp F✳[9]+[5] F+[9]+[5] F+[7]+[8] F+[5]+[5] F+✳+[9]+[2] F+[9]+[2] + soft button F+[7]+[1]+✳ F+[7]+[1]+aaa+✳ LCD Non-Display Unavailable F✳[9]+[5] F+[9]+[5] F+[7]+[8] F+[5]+[5] F+✳+[9]+[2] F+[9]+[2] + hh mm F+[7]+[1]+✳ F+[7]+[1]+aaa+save DHS-E Features 9 82-89 CO line button Make an outside line call F+[5]+[2] LCD Hunt Group soft button Idle /Busy F+[2] + soft button F+[2] + soft button Busy Busy/No Answer (x = 0-4) Call Forward F✳[9]+[1] Cancel Call Intercom Call Background Music (1 and 2 Toggle) Feature Non-Display F+[2] + [5] + ss + x F+[2] +[1] + ss F[9]+[1] F✳[9]+[1] CO line button 82-89 F+[5]+[2] DHS Table 1: Feature Access Codes F+[2] + soft button F+[2] + soft button soft button F✳[9]+[1] CO line button 800-807 F+[5]+[2] LCD Non-Display F+[2] + [5] + ss + x F+[2] +[1] + ss F[9]+[1] F✳[9]+[1] CO line button 800-807 F+[5]+[2] DHS-E 10 Features F+[7]+[3] + ss F+#+[6] F+[2] + soft button F+[2] + soft button F+[7]+[3] + ss Display <FP3> Idle No Answer (x = 0/1/2/3/4) F+[7]+[3] + cc F+[7]+[3] + ss Answer by CO Line By Station Call Park F+[2] + [4] + ss + x F+[2] + soft button Direct (all modes) F+[7]+[3] + ss F+[7]+[3] + cc F+[2] +[0] + ss F+#+[6] F+[2] + [2] + ss F+[2] F+[2] Cancel F+[2] +[3] + ss Non-Display F+[2] + soft button LCD DHS Calls From Station Feature Table 1: Feature Access Codes F+[7]+[3] + sss F+[7]+[3] + ccc F+[7]+[3] + sss F[2] + soft button F+[2] + soft button F+#+[6] F+[2] + soft button F+[2] F+[2] + soft button LCD Non-Display F+[7]+[3] + sss F+[7]+[3] + ccc F+[7]+[3] + sss F+[2] + [4] + sss + x F + [0] + sss F+#+[6] F+[2] +[2] + sss F+[2] F+[2] +[3] + sss DHS-E Features 11 Unavailable F+[6]+[8] Call Waiting Allow F+#+[9] Unanswered Call Table soft button F+[9]+[3] Busy Station CO Line Camp On F+#+[9] Answered Call Table <FP3> F+[9]+[3] 2 Unavailable Unavailable HOLD + ss + TRANS HOLD + ss + TRANS Call Transfer Caller ID F+[5]+[4] F+[5]+[4] Group F+[5]+[3] + ss Non-Display F+[5]+[3] + ss LCD DHS Directed Call Pickup Feature Table 1: Feature Access Codes F+[9]+[3] soft button F+#+[9] F+#+[9] F+[6]+[8] HOLD + sss + TRANS F+[5]+[4] F+[5]+[3] + sss LCD Non-Display F+[9]+[3] 2 Unavailable Unavailable Unavailable HOLD + sss + TRANS F+[5]+[4] F+[5]+[3] + sss DHS-E 12 Features F+[3] F+[3] F+[7]+[7] Unavailable F+#+[7] F+[4] F+[7]+[4] + cc F+[7]+[4] + ss F+[6]+[0] soft button F+[7]+[7] F+[7]+[9] F+#+[7] F+[4] Forced Release CO Forced Release Station Supervised Talk Privately Unsupervised Directory Dial <FP3> Distinctive Ringing Station <FP3> Do Not Disturb F+[5]+[7] F+[6]+[0] F+[7]+[4] + ss F+[7]+[4] + cc F+[7]+[4] F+[7]+[4] F+✳+[9]+[3] Non-Display F+✳+[9]+[3] LCD DHS Forced Release Conference CO Line Flash Cancel Feature Table 1: Feature Access Codes F+[4] F+#+[7] F+[7]+[9] F+[7]+[7] soft button F+[6]+[0] F+[7]+[4] + sss F+[7]+[4] + ccc F+[7]+[4] F+[3] F+✳+[9]+[3] LCD Non-Display F+[4] F+#+[7] Unavailable F+[7]+[7] F+[5]+[7] F+[6]+[0] F+[7]+[4] + sss F+[7]+[4] + ccc F+[7]+[4] F+[3] F+✳+[9]+[3] DHS-E Features 13 HOLD 10-81 HOLD 10-81 Retrieve F+[9]+[6] F+#+[2] [0] F+[9]+[6] F+#+[2] [0] Send Night Service Operator (dial operator station) Unavailable F+[9]+[0] Executive Notify F+✳+[9]+[6] F+✳+[9]+[6] Cancel Message Waiting FEAT + HOLD FEAT + HOLD Exclusive F+[9]+[4] F+#+[5] Non-Display F+[9]+[4] F+#+[5] LCD DHS Auto Intercom call (2 or 3 digits) Hold DSS Console Button Program Feature Table 1: Feature Access Codes [0] F+#+[2] F+[9]+[6] F+[9]+[0] F+✳+[9]+[6] 100-195 HOLD FEAT + HOLD F+[9]+[4] F+#+[5] LCD Non-Display [0] F+#+[2] F+[9]+[6] Unavailable F+✳+[9]+[6] 100-195 HOLD FEAT + HOLD F+[9]+[4] F+#+[5] DHS-E 14 Features F+[5]+[0]+[3] + g F[7]+[0] F+[8] F+[5]+[1] F+[9]+[9] F+[5]+[0] + soft button F+[5]+[9] F+[5]+[0] + soft button F[7]+[0] F+[8] F+[5]+[1] Deny External Paging Speakers Meet Me Answer Station Group (g=group number) Pause - Displays (P) Redial - Last Number Save Dialed Number (SDN) F+[5]+[9] F+[5]+[0]+[1] F+[9]+[9] F+[5]+[0]+[2] F+[5]+[0] + soft button All (Station and External) F+[5]+[0]+[0] Non-Display F+[5]+[0] + soft button LCD DHS All Stations Page Feature Table 1: Feature Access Codes F+[5]+[1] F+[8] F[7]+[0] F+[5]+[0] + soft button F+[5]+[9] F+[5]+[0] + soft button F+[9]+[9] F+[5]+[0] + soft button F+[5]+[0] + soft button LCD Non-Display F+[5]+[1] F+[8] F[7]+[0] F+[5]+[0]+[3] + g F+[5]+[9] F+[5]+[0]+[1] F+[9]+[9] F+[5]+[0]+[2] F+[5]+[0]+[0] DHS-E Features 15 F+#+[1] F+#+[1] Programming Storing (dd = 00-99) F+#+[3] F+#+[8] F+[9]+# F+[9]+[8] F+[9]+[7] Feature Button Programming Feature Check Headset Mode Intercom Mode Select (H-T-P) Lock Station F+[1] LCD Dialing Speed Dial Feature Non-Display F+[9]+[7] + pppp +# F+[9]+[8] F+[9]+# Unavailable F+#+[3] F+#+[1] + dd + n + HOLD F+#+[1] F+[1] DHS Table 1: Feature Access Codes F+[9]+[7] F+[9]+[8] F+[9]+# F+#+[8] F+#+[3] F+#+[1] F+#+[1] F+[1] LCD Non-Display F+[9]+[7] + pppp + # F+[9]+[8] F+[9]+# Unavailable F+#+[3] F+#+[1] + dd + n + HOLD F+#+[1] F+[1] DHS-E 16 Features F+[5]+✳ F+[6]+[4] F+[5]+✳ F+[6]+[4] User Saved Number Redial (Memo pad saved number) Voice Mail Monitor F+[7]+[2] F+✳+[9]+✳ F+[7]+[2] Deny Voice Recorder F+✳+[9]+✳ F+[9]+✳ Allow F+[9]+✳ Soft Button (while busy tone is heard) F+[5]+[6] Unavailable F+#+✳ + pppppp System Programming Voice Over Busy F+[9]+[7] + pppp F+[9]+[7] Unlock F+[9]+[7] + pppp + nnnn Non-Display F+[9]+[7] LCD DHS Password Change Feature Table 1: Feature Access Codes F+[7]+[2] F+✳+[9]+✳ F+[9]+✳ Soft Button F+[6]+[4] F+[5]+✳ F+#+✳+ pppppp F+[9]+[7] F+[9]+[7] LCD Non-Display F+[7]+[2] F+✳+[9]+✳ F+[9]+✳ F+[5]+[6] F+[6]+[4] F+[5]+✳ Unavailable F+[9]+[7] + pppp F+[9]+[7] + pppp + nnnn DHS-E Features 17 18 Features Table 2: System Numbering Plan DHS DHS-E PARAMETERS 01-12 700-717 CO Line Range 10-81 100-195 Station Numbers 82-89 800-807 Hunt Groups / Voice Mail Group 9/0 9/0 CO Line Group Access Code (9 is the default code for CO Line access) 0/9 0/9 Operator Code (0 is the default system Operator Attendant code) Account Code Forced Verified Description When enabled, you must dial an account code in order to make an outgoing call on a CO line. The system compares the code you dialed with those in the Account Code Table to verify. Operation 1. Press an idle CO line button. 2. When you hear a tone, dial a valid account code. 3. Upon hearing confirmation tone and dial tone, you may now dial on the line. 4. The account code will be displayed in the SMDR call record printout. 5. If an error occurs, you may re-dial a new account code by returning to Step 1. Conditions If you dial an invalid account code, you will hear error tone and will not be able to access the line. An Executive telephone will display CALL RESTRICTED. Features 19 When you dial a valid account code, your telephone is still monitored for toll restriction according to the Class of Service (COS) assigned to your telephone. Unforced/Unverified Description You may dial a personal or departmental account code for future tracking of time spent on customer accounts. Operation 1. Press an idle line button. 2. Press [FEAT]. 3. Dial [7] +[1]. 4. Dial account code. 5. From an Enhanced Telephone, press [✳]. From an Executive Telephone, press [save]. 6. If an error occurs, you may re-dial a new account code by returning to Step 1 in this procedure. At an Executive Telephone, you may press [bksp] to erase each number in the account code, or press [chg] to erase the entire account code. Alarm - Station Description You may activate your own private alarm on your telephone to remind you of special appointments, events, etc. Operation Basic and Enhanced Telephones To turn ON a signaling alarm: 1. 2. 3. Press [FEAT] Dial [9] + [2] Dial HHMM where HH is hour, MM is minute (24hour clock). 20 Features To turn OFF a signaling alarm: When the alarm time is reached, you will hear tone ringing. 1. 2. Press [FEAT] Dial [✳ ]+ [9] +[2] Executive Telephones To turn ON a signaling alarm: 1. 2. 3. 4. Press [FEAT] Dial [9] + [2] Press CHG Dial HHMM where HH is hour, MM is minute (24hour clock). 5. Press [SAVE] To turn OFF a signaling alarm: When the alarm time is reached, you will hear tone ringing and the display will show: AL AR M ack 1. R EACH ED Press [ack] Canceling an Alarm To cancel a programmed alarm: 1. 2. Press [FEAT] Dial [✳] + [9] +[2]. An Executive Telephone will display ALARM DELETE. The Alarm Clock feature code may be programmed on any programmable feature button. Conditions The alarm clock will be canceled automatically after the alarm time is reached. SLT stations do not have this feature. Features 21 Attendant Administration Description Attendant Administration is used to set the features Service Mode (Day/Night/Time), System Date and Time, and System Speed Dial. Operation 1. Press [FEAT] 2. Dial [#] + [0]. The display shows: C HK PS W D :__ bksp save chg 3. 4. Dial the password. Press [save]. The display shows: SE LE C T F U N CT I ON svc t ime spd 5. You have three programming choices: System Service Mode System Date and Time System Speed Dial Numbers System Service Mode 1. Press [svc]. The display shows: SE R VICE : DAY ba ck nex t chg 2. 3. Press [chg] to select between DAY, NITE, and TIME. Press [CLEAR] to exit programming or [back] to change other features. 22 Features System Date and Time 1. Press [time]. The display shows: SYS TE M TI ME ba ck nex t show 2. Press [show]. The display indicates: YEA R ba ck : YR nex t chg 3. 4. If the year is correct, press [next]. If you are programming a new year, dial the numbers for the current year. 5. Press [save] 6. Press [next] to continue programming System Date and Time. 7. Press [back] or [next] to return to the main Attendant Administration menu. The display will show: SE LE C T F U NC T ION svc t ime spd System Speed Dial Numbers 1. Press [spd]. The display shows: SYS TE M S PEE D N O bksp show chg 2. Dial the System Speed Dial bin [20-99] to be changed. 3. Press [show]. The display will show what is currently stored in the speed bin: EM PT Y back n ex t chg Features 23 4. Press [chg]. The display will show: _ back 5. 6. 7. n ex t s how Dial the number to be stored in the bin. Press [save] Press [back] to return to Step 4 and continue programming speed dial numbers or press [next] to return to the main menu, or press [chg] if the speed dial number was incorrectly entered. Additional Information for Speed Dial To enter a CO Line Flash in a Speed Dial bin, enter [FEAT] + [3]. The display shows “\”. To enter a Pause in a Speed Dial bin, enter [FEAT] + [7]+[0]. The display changes to “P”. To enter a bin chaining command in a Speed Dial bin enter [FEAT]+1+nn. When the code [FEAT] + [7]+[0] or [FEAT] + [3] is entered into a speed dial bin they occupy one digit position. When the code [FEAT]+ [1]+nn is entered into a speed dial bin it occupies 3 digit positions. System Speed Dial bin 99 is reserved for External Call Forward, if available on your system. Press [CLEAR] at any time to exit the programming mode. The Attendant Administrator code may be programmed on any programmable feature button. Authority Code - Traveling Class of Service Description If you have extended dialing privileges, you may access your same COS at a telephone without extended dialing privileges. Long distance and 24 Features restricted CO line calls can be made from telephones that are normally restricted. Operation At the telephone without extended dialing privileges: 1. 2. 3. Press [FEAT] Dial [5] + [5] Dial your station number. 1. 2. 3. Perform the Operation Steps 1-3. Dial your password. You may now dial according to your COS. 1. 2. Perform the Operation Steps 1-3. An Executive Telephone will display: Basic and Enhanced Telephones Executive Telephones AUT HOR IT Y CD __ bksp save chg 3. 4. 5. Press [save] Dial your password. Press [save]. The display shows: AUT HOR IT Y 6. ACC EPT You may now dial according to your COS. Conditions When setting Traveling COS, the temporary COS accessed will be effective for one minute before the original station COS is restored. Features and programming, such as line access/ ring/receiving assignment are not transferred with temporary COS use. Features 25 Automatic Busy Redial Description Automatic Busy Redial (ABR) may be used to redial the last number. The system will automatically dials the number and then monitors the line for a busy signal. If a busy signal is detected, the system ends the call and attempts to dial the number again. The redial cycle will continue until the maximum number of attempts designated in programming is reached. Operation 1. Press [FEAT] 2. Dial [7] + [8]. An Executive Telephone will display: CO LI N E X - - >1/10 The system will continue redial attempts until busy tone is no longer detected, or the maximum number of attempts is reached, or any other feature is used on the telephone. ABR requires the Option Module on the DHS for operation. Automatic Line Selection Description This feature allows you to access a specific outside line or intercom (ICM) automatically when you lift the handset or press [SPKR]. A line will not be accessed automatically when your telephone is receiving an incoming call (outside or intercom) or a line is recalling at your telephone. However, you may override this incoming call priority operation by pre-selecting an outgoing line before lifting the handset. 26 Features Operation Basic and Enhanced Telephones 1. 2. 3. Press [FEAT] Dial [9] + [5] Dial the following codes to select the item you want the telephone to access automatically: [0] intercom, [1] - any outgoing line, [2] + [x] - any specific line, where x is that line dial [0] (0-9 for line 10, [✳] for line 11, [#] for line 12). 1. 2. Press [FEAT] Dial [9] + [5]. The display will show: Executive Telephones SE LE CT 3. : ICM ch g Press the [chg] button to select between ICM, OUTG LN (any outgoing line), CO LN (for each of the equipped lines). Canceling an Automatic Line Selection Basic and Enhanced Telephones 1. 2. Press [FEAT] Dial [✳] + [9] + [5] Executive Telephones 1. Select [empty] during Step 3 of the programming sequence. Conditions When Automatic Line Selection is set to EMPTY, you will not hear a dial tone when you lift the handset or press [SPKR]. However, you may still dial intercom numbers. Features 27 Background Music Description When your telephone is idle and the feature is enabled and activated, you can hear background music (BGM) through the loudspeaker. Operation To enable/disable: 1. 2. Press [FEAT] Dial [5] + [2] If a feature button is programmed for BGM, the lamp for that button will not light to indicate BGM is activated. Hearing the BGM will be your confirmation that the feature is activated. The DHS requires the Option Module to support the second BGM Channel. The DHS-E supports 2 BGM Channels. Call Back Description This feature allows you to queue a station which is busy, in Do Not Disturb (DND), or idle. When you send a Call Back to a busy station, the Call Back process will begin when the busy station hangs up. Operation Call the station that you want to queue. An Executive Telephone will display the following according to the status of the telephone you are calling: CAL L IN G cbck msg 3. S TA xx Station you are calling is in Tone Ringing mode. S TA xx BUS Y cbck msg nex t 28 Features 4. Station you are calling is busy. S TA xx WA IT cbck msg Basic and Enhanced Telephones To send a Call Back: 1. Press [FEAT] 2. Dial [9] + [1] To answer a Call Back: 1. When the Call Back process begins, your telephone will ring a special Call Back ring for 30 seconds. Lift the handset or press [SPKR]. Executive Telephones To send a Call Back: 1. Press [cbck]. The display will show either: CBCK TO STA xx or C AL L BACK D EN IE D To answer a Call Back: 1. When the Call Back process begins your, telephone will ring a special Call Back ring for 30 seconds. The display will show: C AL L BACK TO xx re ply d el 2. Lift the handset or press [SPKR], OR Features 29 Press [reply] to continue the Call Back. The display will show: C AL L IN G STA cb ck msg 3. xx If you press [del] in Step 2, the Call Back will be canceled and the display will show: C AL L BACK DE L ET E To cancel a Call Back: 1. 2. Press [FEAT] Dial [✳] + [9] + [1] Conditions The station you are calling must be busy or in the Tone Ringing mode. Call Back will be denied when there is already a Call Back request at the called station. Call Forward Display <FP3> Description When any type of station call forwarding is invoked, the LCD display will normally indicate the call forwarding mode at all times. This enhancement has been made to make the call forwarding mode display optional. The Call Forward Display defaults to ON. Operation 1. Press [FEAT] 2. Then dial [#]+[6] 3. The setting is a toggle; the LCD shows either “FWD MSG DSP ON” or “FDW MSG DSP OFF.” 4. When OFF, the LCD will show normal Time and Date display even when Call Forwarding is invoked. 30 Features Station Description There are many Call Forward choices: Forward calls when your telephone is idle. Forward calls when your telephone is busy. Use the Follow Me feature to receive calls at a temporary location and activate the feature remotely from another station. Forward your calls when there is no answer. Combine busy and no answer call conditions for forwarding calls. Forward Intercom calls, incoming CO and transferred CO calls. Regardless of whether the station where calls are being forwarded is a key telephone or single line telephone, the user at the forwarded station will hear special Intercom Reminder tone signifying that Call Forward is activated. Use the following programming code combinations to activate the desired Call Forward feature. Table 3: Call Forward Programming * Idle Call Forward Press [FEAT] + [2] + [0] + Station number Busy Call Forward Press [FEAT] + [2] + [1] + Station number All Call Forward Press [FEAT] + [2] + [2] + Station number Follow Me Call Forward Press [FEAT] + [2] + [3] + Station number + password No Answer Call Forward Press [FEAT] + [2] + [4] + Station number + [x]* Combined Busy/No Answer Press [FEAT] + [2] + [5] + Station number + [x] x = 0, 1, 2, 3, or 4 where (0-4) = (10-50) seconds). Features 31 Call Forward cannot be activated at a telephone in Do Not Disturb (DND). Only one type of Call Forward can be active at a station at any time. Call Forward cannot be programmed for more than three stations in a series. Caller Identification Name/Number Caller ID <FP3> Description The calling party numbers should be displayed if available on incoming caller ID calls, in addition, the user may toggle between the number and the name while the call is ringing by pressing the <F3> Soft Button. OCT 1 STATION FRI 8:00 10 F3 Soft Button Figure 6: F3 Soft Button Operation 1. Incoming call originally appears as shown): CO LI N E 2 Vo davi 0 0:0 3 32 Features 2. Press the <F3> Soft Button while the call is ringing, and the following display shows: CO LI N E 2 0 0:0 3 2 0 2 -1 2 3 -4 5 6 7 1. OR After call is answered, press the <F3> Soft Button to toggle between the incoming call number and name. Answered Call Table <FP3> Description Caller Identification information for up to 200 answered calls is stored in a system-wide Answered/ Unanswered Call Table. While reviewing the answered calls, you will have the option to dial a number, obtain more information for a particular call, or delete a call. Operation 1. Press [FEAT]. 2. Dial [#] + [9]. The display will show: AN S CA L L TA BL E USE VOL +/- KEYS 3. Press either the [volume up] or [volume down] button to begin reviewing calls. VODAVI more d el ✱ d ia l Answered Calls are displayed with an asterisk in the upper right of the display screen. Answered/Unanswered calls are combined into one table that can accommodate up to 200 total calls. Features 33 To dial the name/number displayed (long distance call): 1. Press [dial]. VODAVI lo ngd loca l 2. Press [longd]. The number 1 will be dialed followed by the telephone number. To dial the name/number displayed (local call): 1. Press [dial]. VODAVI lo ngd 2. loca l Press [local]. The area code will not be dialed. Unanswered Call Table Description Caller Identification information for 200 unanswered calls is stored in a system-wide Unanswered/ Answered Call Table. While reviewing the unanswered calls, you will have the option to dial a number, obtain more information for a particular call, delete a call, etc. Operation 1. Press [FEAT]. 2. Dial [#] + [9]. The display will show: U N AN S C AL L TAB LE USE VOL +/- KEYS 3. Press either the [volume up] or [volume down] button to begin reviewing calls. VODAVI d ial more d el 34 Features To dial the name/number displayed (long distance call): 1. Press [dial]. VODAVI lo ngd loca l 2. Press [longd]. The number 1 will be dialed followed by the telephone number. To dial the name/number displayed (local call): 1. Press [dial]. VODAVI lo ngd 2. loca l Press [local]. The area code will not be dialed. Review Call Information 1. Press [more]. Continue pressing the button to review information such as, the telephone number of the caller, the date, time of the call and name of the caller. Press [CLEAR] at any time to exit the Caller ID Unanswered Call Table. Conditions Any Executive telephone user can review the Caller ID Unanswered Call Table, but the table can be reviewed by only one telephone at a time. A call answered by voice mail or auto attendant device is considered an answered call by the system and will not appear in the unanswered call table. Features 35 Call Park Description This feature allows you to have calls parked at your telephone that can be retrieved from any telephone in the system. Calls are parked and retrieved by dialing the Call Park code followed by the pre-assigned station number. Operation During a call on Line 1: 1. Dial [FEAT] + [7] + [3]. At an Executive Telephone, the display will show: C AL L PAR K 2. Dial the station number. For example, if station 12 is dialed, the display at an Executive Telephone will show: C AL L PAR K TO 1 2 3. If a call is currently parked at station 12, the display will show: PARK 12 IS BUS Y The Call Park feature code may be programmed on any programmable feature button. Answer You may retrieve a parked call by using one of the three following methods: Dial [FEAT] + [7] + [3] followed by the associated station number DHS (10-82) and DHS-E (100-195), 36 Features Dial [FEAT] + [7] + [3] followed by the CO line number (1-12 DHS) (700-717 DHS-E), Press the flashing CO line button (if the CO line for the parked call appears on the telephone). To retrieve a parked call: (Executive Telephones ONLY) 1. 2. Press [FEAT]. Dial [7] + [3]. At an Executive Telephone, the display will show: C AL L PAR K AN SW E R 3. Dial the station number where the call is parked. Call Pickup Description You may answer calls ringing at another station using the Direct Call Pick Up or Group Call Pick Up feature. Table 4: Call Pickup Priority List CO LINE CALLS ICM CALLS 1. Camped-On 1. Incoming 2. Recalling 2. Voice Call 3. Transferred 4. Incoming If several calls of the same priority are ringing at the station, the calls are answered in the order they are received. Features 37 Direct 1. 2. Press [FEAT] Dial [5] + [3]. At an Executive Telephone, the display will show: DI RE CT PI CKUP 3. Dial the station number to pick up the call. Group 1. 2. Press [FEAT]. Dial [5] + [4]. The Call Pickup feature code may be programmed on any programmable feature button. Call Waiting Description You will hear a notification tone through the speaker whenever an inside caller is waiting and this feature is enabled. Operation 1. To enable Call Waiting, Press [FEAT]. 2. Dial [6] + [8]. The display will show: C AL L WAIT AL LO W To disable Call Waiting: 1. Follow Steps 1 and 2 above to also disable the feature. The display will show CALL WAIT DENY. Using Stations 12 and 16 as an example, while Station 16 is busy: 1. Station 12 makes an intercom call to Station 16. 38 Features 2. Station 12 hears a ringback tone and the display shows: STA cbck 3. 16 msg WAIT Station 16 hears one ring tone and the display shows: STA reply 12 WA IT rej ec t 4. Station 16 can either reply or reject the call: To reply: Press [reply]. The display at Station 16 shows: CON NE CT STA 1 2 The original call at Station 16 is placed on Hold automatically if Auto Hold Allow is enabled, or disconnected if not enabled. The display at Station 12 shows: CON NE CT STA 1 6 To reject: 1. Press [reject]. Station 12 hears busy tone and the display shows: STA cbck 1 6 B USY msg nex t The Call Waiting feature code may be programmed on any programmable feature button. Features 39 Camp On Busy CO Line Description This feature allows you to Camp On a busy CO line and reserve that CO line for use when it becomes available. This feature eliminates the need for you to continually observe the line status for availability. You may only have one Camp On active at any time. Operation Basic and Enhanced Telephones 1. Press the busy line button. You will hear busy tone. 2. Press [FEAT]. 3. Dial [9] + [3]. You will hear error tone if the line is already camped-on. You will hear ringing when the line becomes available and the lamp for the line will flash. 4. Press the line button or lift the handset. Executive Telephones 1. Press the busy line button. The display shows: CO LI N E ca mp 2. x Press [camp]. The display shows: C AM P ON CO L N 3. BUS Y x If the line is already camped-on, the display shows: C AM P O N FAI LU R E 40 Features 4. You will hear ringing when the line becomes available and the display will show: LN x 5. Press the line button or lift the handset. The display shows: CO LI N E x To cancel: 1. 2. Press [FEAT]. Dial [✳] + [9] + [3]. At an Executive Telephone, the display will show: CO LI N E C AM P D EL Conditions Stations can Camp On one busy CO line at a time. The Camp On Alerting Ring Time is 30 seconds. If the camp on goes unanswered during the 30 second ring time, the camp on is canceled. Busy Station Description Camp On is used to privately alert a busy station for immediate consultation. Camp On alert tone is heard at the busy station every 30 seconds as a reminder. The party currently speaking with the busy station does not hear the tone. Operation Basic and Enhanced Telephones 1. While listening to the busy tone after calling a station, dial [2]. Executive Telephones Features 41 1. While listening to the busy tone after calling a station, the display will show: STA cbck 2. xx BUS Y msg nex t Press [next]. The display will show: STA camp xx vo ice BUS Y Press [camp]. The display will show: C AM P ON TO xx You will hear a confirmation tone, followed by, MusicOn-Hold (if equipped) until your Camp On is answered. When the camped-on station places the current call on hold, or hangs up, the Camp On will ring at the station. 3. If the camped-on station has already received a Camp On from a different station, your Camp On will be denied; you will hear an error tone and the display will show: C AM P O N FAILU R E Conference Supervised Description The system can accommodate 8 four-member (party) conferences simultaneously. Conference combinations may consist of two CO lines maximum and any number of stations to a maximum of four members. 42 Features To establish a conference while on a line: 1. 2. 3. 4. 5. Press [HOLD]. The current call is placed on hold and intercom dial tone is heard. Press another line button (or dial a DHS system station and go to step 4). Dial the second party. (Repeat Steps1-3 to add a third party). To join the parties in a conference, Press [FEAT]. Dial [6] + [0]. The display shows: CON FER EN C E 6. You will hear a confirmation tone and momentarily the display will change to: L Nx s s private f orced To add a fourth party: 1. Press [HOLD] 2. Dial the fourth party. 3. Press [FEAT] 4. Dial [6] + [0] The conference initiator may force-release a conference member or talk privately with a conference member. Basic and Enhanced Telephones To force-release: 1. 2. 3. Press [FEAT] Dial [7] + [4] Dial the station number or press the line button to release. To talk privately: 1. 2. Press [FEAT] Dial [5] + [7] Features 43 3. Dial the station number or press the line button to talk privately. Executive Telephones To force release or talk privately: 1. 2. Press [private] or [forced]. Dial the station number or press the line button to release or talk privately. Any conference feature code may be programmed on any available programmable feature button. Conditions The station who establishes a conference is called the controlling party, and only the controlling party is allowed to invite or forcibly release any attending internal or external party, or to setup a private talk with any one attending party. When the controlling party exits a conference, the newest invited internal party is designated as the new controlling party. Unsupervised Description This feature allows you (as the conference controller) to exit a conference, yet enable two outside lines also engaged in the conference to continue their conversation. Unsupervised Conference requires the Option Module for operation on the DHS system. Operation 1. Two CO lines are conferenced (F+[6]+[0]) at your station: L Nx L Nx private fo rced 44 Features 2. 3. Press [FEAT] Dial [7] + [7]. At an Executive Telephone, the following display will be seen momentarily. UN SUPE R VIS ED CN F 4. If no further action is taken, the display returns to idle status. At this time, the two lines are conferenced. To rejoin the unsupervised conference: 1. 2. At your station, press [FEAT]. Dial [6] + [0] Directory Dial <FP3> Description Enables station users to obtain a directory of station users and have the system dial the extension shown in the display. The DHS system provides locations for up to 200 names each consisting of a maximum of 12 characters. Directory Dial also enables users to program a name along with a speed dial bin for use in later locating a speed dial number. Operation 1. Press [FEAT] 2. Dial [7]+[9] bk sp 3. show chg Enter name using the key pad (refer to Table 6: Dial Pad Key Programming) or use volume keys to scroll through names. Features 45 4. Press the soft key <show> to locate the most likely entry and volume keys to scroll the names, until you locate the one you were trying to find: C HAR L ES _ bk sp show chg Then press any soft key to dial, once the desired name is displayed. C HAR L ES _ 15 ICM To execute a speed dial number using directory dial: 1. If the destination is a speed dial number, the number stored in the speed dial bin will be displayed C HAR L ES _ 1 2 3 45 6 7 2. S PD Press a soft key C AL L IN G STA 1 5 cbck msg 3. Once an idle line is accessed, the number displayed is dialed. Distinctive Ringing - Station <FP3> Description You may choose from four distinctive ringing tones to signal incoming calls. This allows you to easily distinguish your calls from calls ringing at other stations near you. Operation Basic and Enhanced Telephones 1. Press [FEAT] 46 Features 2. 3. Dial [#] + [7] Dial a ringing tone code (1-5). The Distinctive Ring code #5 results in no ringing; it turns the ringer off. Executive Telephones 1. 2. Press [FEAT] Dial [#] + [7]. You will hear the current ringing tone. The display will show: R IN G 3. T YPE : 1 chg Press [chg]. You will hear the new ringing tone. The display will show: R IN G T YPE : 2 chg The Distinctive Ringing feature code may be programmed on a programmable feature button. Do Not Disturb (DND) Description DND allows you to temporarily block and discontinue ringing from incoming CO calls and intercom calls. You can activate DND while your telephone is idle or busy. Some stations with a higher COS may override a station's DND condition. Operation 1. Press [FEAT] Features 47 2. Dial [4]. You will hear a confirmation tone on an Executive Telephone displays: DO N OT D IST UR B 3. Repeat Steps 1 and 2 above to cancel DND. You will hear a confirmation tone on an Executive Telephone. The display the will show the following prior to returning to the idle display message: DN D DE L ET E The DND feature code may be programmed on a programmable feature button. Conditions May cause analog VM integration situations, such as recalling at main attendant instead of the intended voice mailbox. DND Override Description If you have an Executive Telephone you may override a station in DND if you have a higher COS. When you override a station in DND that station will hear tone ringing. Operation Let’s assume Station 16 is in DND: 1. Call Station 16. You will hear a DND tone and your display shows: STA 16 DN D overr ide 48 Features The Override option is displayed only if your COS is higher than the Station 16 COS. 2. Press [override]. If Station 16 is idle, your display shows: CAL L IN G STA xx cb ck msg 3. OR If Station 16 is busy, your display shows: STA xx cbck msg 4. BUS Y nex t OR If Station 16 is busy with Call Wait enabled, your display shows: STA cbck xx msg WA IT Direct Station Selector (DSS) Console <FP3> Description One DSS console may be assigned to a station. Each DSS Console uses one digital station port. Up to 24 DSS consoles may be installed on a system. Features are separated into three distinct categories for programming on a button: CO line, station, or feature. Operation Enhanced Telephones To program DSS console buttons: 1. Press [FEAT] 2. Dial [#] + [5] 3. Press a Programmable Feature Button. To program a system feature button: 1. Dial [2] Features 49 2. Press [FEAT] 3. Dial the system feature code. 4. Press [HOLD] To program a BLF/DSS button: 1. Dial [1] 2. Dial the station number. 3. Press [HOLD] To program a CO line button: 1. 2. Dial [0] Dial the CO line number or code for a CO line group. Table 5: CO Line Flex Button Codes. 3. Press [HOLD] Table 5: CO Line Flex Button Codes 00 =Any Group 4 = CO Line 4 01 = CO Line Grp 1 5 = CO Line 5 02 = CO Line Grp 2 6 = CO Line 6 03 = CO Line Grp 3 7 = CO Line 7 04 = CO Line Grp 4 8 = CO Line 8 05 = ICM (Intercom) 9 = CO Line 9 1 = CO Line 1 10 = CO Line 10 2 = CO Line 2 11 = CO Line 11 3 = CO Line 3 12 = CO Line 12 To erase the contents of a programmable feature button: 1. 2. Press [FEAT] Dial [#] + [5] 50 Features 3. 4. 5. Press the Programmable Feature Button. Dial [0] Press [HOLD] Executive Telephones To program DSS console buttons: 1. 2. Press [FEAT] Dial [#] + [5]. The display shows: PR ES S DS S K EY 3. Press a programmable feature button. The current contents of that button is displayed. F9 6 show 4. chg Press [show]. The name of the current feature stored is displayed. M ESS AG E WAI T IN G 5. Press [chg]. The display shows the following (DHS): SE LE C T F U N CT I ON CO LN S TA FE AT Or on the DHS-E: SE LE C T F U N C T ION D IR f eat Two feature button categories are available for feature button programming on the DHS-E; DIR (directory) and feat (feature). Features 51 To program a CO line button: 1. Press [DIR]: DI R N O. : _ _ bk sp save chg 2. Dial the CO line number (700-717). CO L I NE _ _ _ bk sp s ave chg 3. Press [save] To program a BLF/DSS button: 1. 2. 3. 1. On the DHS, press [STA], then chg. Dial the Station number. Press [save] OR On the DHS-E, Press [DIR]. The display shows: DI R N O. : 1 0 2 bk sp save chg 2. Dial the station number. 3. Press [save] To program a system feature: 1. 2. 3. 1. On the DHS, press soft key [feat], then [chg]. Dial the Feature code number. Press [save] OR On the DHS-E, press soft key [feat]. The display shows: FTR COD E:__ bk sp save chg 52 Features 2. Press [FEAT]. F will appear on the display: FTR COD E: F50 bk sp save chg 3. Dial the feature code. 4. Press [save] To erase the contents of a programmable feature button: 1. Press [save] instead of dialing a code. If you dial an invalid code, you will hear error tone and an Executive Key Telephone display will show CODE UNAVAILABLE. Hold Abandon (Loop Supervision) Description Each CO line has a programming option that directs the system to monitor distant party disconnect or False Hold conditions. Operation 1. While connected to any CO line: CO LI NE 1 2. xx:xx Press [HOLD] Conditions Certain COs do not provide loop supervision. Call abandon is enabled for all CO lines, by default. If using CO lines for paging or ancillary devices, assign devices to lowest available line. Features 53 Automatic Description You may enable this feature on your telephone to simplify call handling, avoid accidental lost calls, and assist call transfers. Operation To enable/disable: 1. Press [FEAT]. 2. Dial [9] + [4]. During a telephone conversation: 1. Press a different line button. The first call is automatically placed on Exclusive Hold. The Automatic Hold feature places a call on Exclusive Hold. Call Answer/Select Description Call Answer allows a user to place and retrieve calls ON and OFF of hold by simply pressing the HOLD button. Operation 1. Press [HOLD]. A currently connected call will be placed on hold. If there was a previously held call, this call is now connected. Exclusive Description When using the [FEAT] button and the [HOLD] button together, you may place an outside call on private hold. The held line will appear in use at other stations. Operation 1. Press [FEAT] 2. Press [HOLD] Conditions A CO line call will be placed on System Hold after the Exclusive Hold (programmable for up to 8 54 Features minutes) time expires. You will hear a tone alerting you that the timer has expired and your call is now on System Hold. The green lamp at your telephone will flash slowly and the red lamp at other stations will begin to flash slowly. Exclusive Hold is used only for CO line calls. Reminder Time Description The system provides a programmable timer to remind you that a call has been left on System or Exclusive Hold. System Description You may place any CO line on System Hold by one button operation of [HOLD]. Operation While on a line, the green lamp for that line is I-Use flashing (double wink rate): 1. Press [HOLD]. The green lamp now flashes at a slow rate and the call is placed on System Hold. Intercom Call Description All intercom calls are made by dialing the station unique 2-digit DHS or 3-digit DHS-E intercom number. If a station feature button is programmed as a BLF/DSS button, it may be used to place an intercom call. Operation To place an ICM call: 1. Dial the DHS 2-digit or DHS-E 3-digit station number on the telephone dial pad. CAL L IN G STA xx cbck msg Features 55 2. Ringback tone is heard or if the called station is in Voice Announce mode, a connection is automatically selected. VOIC E C ALL xx ms g 3. If the called station is busy, busy tone is heard. STA cbck 4. xx msg BUS Y nex t If the called busy station has Call Wait enabled, ringback tone is heard. STA cbck xx msg WA IT Other Displays: When the station is in DND: STA xx DN D If the station number dialed is not connected: OUT OF S ER VI CE If the called station is your own station number. YOUR NUM BER 56 Features Message Outgoing Description You may send a message waiting, a customized message, or one of 6 pre-programmed messages to other Executive Key Telephone users on the system. Operation When you dial another Executive Key Telephone, you will be given the option to leave a message: C AL L IN G 1. S TA xx M SG Press [msg] and the display changes to: M ESS AG E T YPE C AL L M E PR EP R OG To send a Message Waiting: 1. Press [call me]. To send a customized message: 1. Press [preprog]. EM PT Y send nex t chg 2. Press [chg]. _ bksp save ch g 3. Spell the message (16 letters/symbols maximum) using the dial pad keys. 4. For instance, to select the letter H, press dial pad key [4] twice. Features 57 Table 6: Dial Pad Key Programming * † ‡ Depressions: 1 2 3 4 5 6 7 8 9 S 0 # 1st * A D G J M P T W † Q ‡ 2nd B E H K N R U X 3rd C F I L O S V Y Z Dial Key [1] is used to select special characters. Dial [✻] before a Dial Key to insert the number on the dial pad key instead of a letter in this character position. When [✻] is pressed after a letter has been selected for this character position, the selected letter is forced to lower case. In some cases, you may wish to select letters accessed by the same dial pad key. After you select the first letter, dial [#] to accept that letter and advance to the next position to dial the next letter. For instance, to spell TOM you would dial [8] + [6] + [6] + [6] + [#] + [6]. Dial [#] to insert a space. To send a pre-programmed message: 1. Press [next]. The display shows: CALL OPE R ATOR send nex t 2. Continue pressing [next] until the desired message is displayed: Table 7: Available Outgoing Pre-Programmed Messages CALL OPERATOR VISITORS WAITING CALL HOME URGENT CALL SCHOOL COME SEE ME 58 Features 3. Press [send]. To view a message: 1. The Message Wait button will flash and the display shows: M SG FR OM S TA x x s how d el 2. Press [show] to display the message sent to you. Executive Notify Description Executive Notify provides you with a method to inform intercom callers of the reason you are away from your telephone. Operation To program a message: 1. 2. Press [FEAT]. Dial [9] + [0]. The display will show: M SG FR OM S TA x x s how d el To customize a message: 1. 2. Press [chg]. Use the dial pad keys to enter your personalized message. Table 6: Dial Pad Key Programming to determine how to select desired letters. To select a pre-programmed message: 1. Press [next]. O U T F O R LUN C H sto re nex t 2. Continue pressing [next] until the desired message is displayed. The pre-programmed messages are as listed in Table 4-10: Features 59 Table 8: Available Executive Notify Pre-programmed Messages OUT FOR LUNCH IN A MEETING BE BACK SOON OUT OF OFFICE LEFT FOR THE DAY ON VACATION 3. Press [store]. When another Executive Key Telephone user calls you, the message OUT FOR LUNCH will be displayed on the caller’s telephone display:. O U T F O R LUN C H cbck msg The caller has the option of using the Call Back feature or leaving a message for you. Message Waiting Description A busy or unattended station may be notified of a call attempt via the Message Waiting feature. Operation Basic and Enhanced Telephones To send a Message Waiting: 1. 2. 3. Press [FEAT]. Dial [9] + [6]. Dial the station number where the message is to be left. To answer a Message Waiting: 1. 2. Press [FEAT]. Dial [9] + [6] or press a flashing MESSAGE WAIT button (if a feature button has been programmed for Message Wait). 60 Features Executive Telephones To send a Message Waiting: Upon calling Station xx and receiving no answer or busy: C AL L IN G STA cbck msg xx OR STA cbck xx msg BUS Y nex t [cbck] won't be displayed unless called station is in tone mode. 3. Press [msg]. M ESS AG E T YPE ca ll me prepro g 4. Press [call me]. You will hear confirmation tone. M SG TO STA xx To answer a single Message Waiting: 1. Your telephone display shows the following and the Message Waiting lamp (if a button is programmed) will flash: M SG FR OM S TA reply 2. nn d el Press [reply] to answer the message or [del] to delete the message without replying. Features 61 To answer multiple Message Waitings: 1. Your telephone display shows the following: M SG FR OM S TA mo re reply xx d el 2. Press [more] to review the other messages. To cancel a Message Waiting: 1. 2. 3. Press [FEAT]. Dial [✻] + [9] + [6]. Dial the station number where the message was left. Conditions The system will allow a total of 48 messages waiting in the system at any one time. Music-on-Hold (MOH) Description Any intercom or CO line call placed on Hold will hear music, if the system is equipped with an External Music Source. Use of certain music sources for BGM or MOH may violate copyright laws. Night Service Description The system can be programmed for Night Service operation which affects incoming CO line ringing and receive assignments. Operation At any telephone, while in the idle state: 1. 2. Press [FEAT] Dial [#] + [2] 62 Features Conditions Each time the Night Service code is entered, the system mode of operation changes to the opposite mode. When the system is in the Night Service mode, all Executive Key Telephones will display night. Page Description You can perform several types of pages: Internal Paging - page a group or place a systemwide internal page. External Paging - access external/ancillary paging equipment. All Call Paging - access all paging zones (internal and external). Operation Basic and Enhanced Telephones To perform All Call paging (internal and external): 1. 2. Press [FEAT]. Dial [5] + [0] + [2]. Executive Key Telephones 1. 2. Press [FEAT]. Dial [5] + [0]. This display will show: PAG IN G a ll ex ter n n ex t To perform All Call paging (internal and external): 1. Press [next]. The display shows: PAG IN G bot h grou p 2. Press [both]. Features 63 Pause Description You can insert a pause to generate an intentional delay in dialing on outgoing CO line calls. Operation 1. During dialing on any CO line or when programming a Speed Dial bin (refer to “Speed Dial”), press [FEAT]. 2. Dial [7] + [0] . P Pause may be stored on a programmable feature button and is also used in programming fields that accept a Pause character. Redial—Last Number(LNR) Description The Last Number Redial (LNR) feature automatically dials the last number dialed from your telephone. Operation You may either choose a specific CO line for use with LNR by first pressing that CO line button or you may allow the line to be selected automatically by the LNR feature. 1. 2. 3. Press a line button. Press [FEAT] Dial [8]. The previously dialed number is dialed on the CO line selected. 4. In the event that all CO lines are busy, you will hear busy tone and if you have an Executive Telephone, it will display: AL L CO L IN E S BUSY 64 Features 5. If the Last Number Redial memory is empty, you will hear error tone and an Executive Telephone will display: L NR EM PT Y The LNR feature code may be programmed on a programmable feature button. Conditions Last Number Redial cannot be applied to intercom calls. Save Dialed Number (SDN) Description Save Dialed Number (SDN) is normally used whenever you want to retain a telephone number to be dialed later. Operation After dialing a number that is busy or is not answered: 1. 2. Press [FEAT] Dial [5] + [1]. At an Executive Key Telephone, the display shows: SAVE D IAL E D N UM To dial a saved number: 1. 2. Press [FEAT] Dial [5] + [1]. The telephone attempts to access the same CO line used when the number was saved. If it is busy, another CO line in the same group is accessed and the number is dialed. Features 65 Conditions The SDN is a maximum of 16 digits. Save Dialed Number feature code may be stored on any feature button. Speed Dial Description Speed Dial allows you to store frequently dialed numbers. These numbers are selected for dialing by the appropriate bin number. The feature code and bin number (00 - 19) may be stored (up to 16 digits each) on any feature button for instant, one-button operation. Operation Basic and Enhanced Telephones To store a telephone number in a personal Speed Dial bin: 1. 2. 3. Press [FEAT] Dial [#] + [1] Dial the bin number (00-19) in which to store the telephone number. 4. Dial the telephone number. 5. Press [HOLD]. You will hear confirmation tone. Speed bins may be chained. Pauses and Flashes may be stored in Speed Dial. Chaining Pauses and Flashes each occupy one character position: Pause = [feat] + [7] + [0] = P; Flash = [feat] + [3] To erase the contents of a Speed Dial bin: 1. 2. 3. Press [FEAT] Dial [#] + [1] Dial the bin number (00-19) to erase. 66 Features 4. Press [HOLD]. You will hear confirmation tone. Executive Key Telephone To store a telephone number in a personal Speed Dial bin: 1. 2. Press [FEAT] Dial [#] + [1]. The display shows: SP EED N O : __ bksp s how chg 3. Dial the bin number (00-19) where you want to store the telephone number. (You can press [bksp] and [chg] to correct errors.) 4. Press [show]. The display shows the current contents of that bin: EM PT Y chg 5. Press [chg]. The display shows: __ bk sp s ave chg 6. Dial the telephone number to be stored (up to 16 digits). 7. Press [save] To continue storing telephone numbers in additional bins: 1. Repeat Steps 3 through 5 (for basic and enhanced telephones) and 3 through 7 (for executive telephones). To erase the contents of a Speed Dial bin: 1. Press [save] instead of dialing a number in Step 4 (basic/enhanced) and Step 6 (executive). To exit speed dial programming: 1. Press [CLEAR] Features 67 To chain together Speed Dial bins: 1. Enter [FEAT] + [1] + [BIN #] as part of the number in any speed bin to dial that bin contents, after the contents of the current bin. 1 6 0 25 5 5 1 2 1 2 @ 0 0 ch g To dial a number stored in Speed Dial: You may choose to first press an idle [CO line] or you may let the system automatically select the line. 1. 2. Press [FEAT]. Dial [1]. At an Executive Key Telephone, the display shows the following: SP EED N O 3. : __ Dial the desired bin number (00-99). Station Feature Status Check Description The Executive Key Telephone user can quickly determine the status of all user-controlled features. Operation 1. Press [FEAT] 2. Dial [#] + [8]. The display shows the contents of the Last Number Redial memory. 5 5 5 12 1 2 LNR 3. nex t Press [next]. The display shows the contents of the Save Dialed Number memory. 5 1 8 00 5 5 1 2 1 2 S DN nex t 68 Features 4. Continue pressing [next] to display the status of the remaining features: User Saved Number Day COS Night COS Auto Hold Phone Lock Voice Announce Call Wait Setting Page Receive Night Station Transfer Description There are three types of transfer you may use: screened, un-screened, and one-button. Operation To perform an Unscreened transfer: 1. Press [HOLD] 2. Dial the transfer to-station/Hunt Group number. 3. Press [TRANS] to transfer the call unscreened. To perform a Screened transfer: 1. Press [HOLD] 2. Dial the transfer to-station/Hunt Group number. 3. Wait for the person you called to answer. 4. Press [TRANS] to complete the call transfer. To perform a One-button transfer: 1. Press the DSS button of the desired target station. 2. Hang up to complete the transfer. To transfer to Voice Mail: 1. 2. Press the [Voice Mail] button. Dial the 2-digit station number of the target mailbox. 3. Hang up to complete the transfer. Features 69 User Saved Number Redial (USNR) Description When on a CO Call, the user can enter numbers (telephone number, FAX number, or even bank account number), as a scratch pad entry for future use. Operation To store a USNR number while on a call: 1. 2. Press [FEAT] Dial [5] + [✳]. At an Executive Key Telephone, the display shows: SAVE U SN R N U M 3. Enter the number to be stored (up to 16 digits). 4. Press [SAVE] To Dial: 1. 2. Press [FEAT] Dial [5] + [✳] Voice Announce (Hands-Free or Privacy) Description Intercom calls can be received in Voice Announce Hands-Free mode (VA-HF).. Table 9: Voice Announce BUTTON LAMP DISPLAY TONE HEARD Voice Announce Hands-Free Green VA-HF Mode Long steady Voice Announce Private Red VA-Privacy Mode Single burst Tone Ring No lamp lit Tone Ring Mode Double burst MODE 70 Features Operation When your telephone is set for VA-HF mode: 1. The call is automatically connected and your display shows: STA 2. 14 CA LL The display at the calling station reads: VOICE CA L L 11 In VA-Privacy mode, the call can come in with mute on. Turn off must to use the speakerphone or then lift the handset. Voice Mail Integration Description An ancillary voice mail device may be connected to the system. Operation When the Voice Mail system has messages for any station, the Voice Mail button will flash. The display at Executive Key Telephones will show: VM FR OM M AI L BOX R EP LY To retrieve a voice mail message: 1. 2. Press the [Voice Mail] button or press the [reply] button on an Executive Key Telephone model. The system will dial the appropriate numbers (according to programming) to the Voice Mail system. Dial your password. Features 71 You may forward calls to the Voice Mail system using Call Forward and the Voice Mail Hunt Group number. To turn ON the VM indicator lamp: 1. Dial [#] + [9] + [6]. 2. Dial station number. To turn OFF the lamp: 1. 2. Dial [#] + [✳] + [9] + [6]. Dial station number. Conditions When an answering machine is connected to the system via a 2 Port Analog Adapter and In-Band (DTMF/Touch Tone) digits must be sent to the answering machine to control its functions, the SLT port must be programmed as type VM. If no Voice Mail button is programmed, it will default to flex button 20 on your telephone. Voice Mail Button Description Voice Mail button is used to retrieve voice mail messages, and will flash an LED indicator when there are messages. Operation 1. Press [feat] + [#] + [3] 2. Press soft button you wish to program for the message waiting indicator. 3. Press [chg] 4. Press [feat] + [6] + [4] 5. Press [save] Voice Mail Monitor Description Similar to a basic answering machine, you can monitor your forwarded calls at the telephone where they were forwarded during the first few seconds after they are answered by a voice mail port. 72 Features Operation When you hear the alert tone (double beep) while on a call: 1. 2. 3. Press [HOLD] or disconnect [CLEAR]. Press [FEAT] Dial [6] + [4]. An Executive Telephone will display: M ONI TOR yes 4. VM C AL L no Press [yes] to monitor the caller leaving a message or [no] to return to idle. When [yes] or [no] is selected, the caller continues to leave a message, unaware of the monitor feature operation. 5. If [yes] is selected, the display changes to: M ONI TOR a nswer 6. MOD E exit Monitor mode is established. You may then: Retrieve the caller from Voice Mail by pressing [answer]. Return to idle and allow the caller to continue leaving a message by pressing [exit]. Basic and Enhanced Telephones To enable monitoring: 1. Dial [1]. The MUTE lamp will light. 2. Dial [3] to allow the caller to exit. 3. Dial [1] to be connected to the call. To disable monitoring: 1. Dial [3]. The telephone returns to an idle condition. Conditions You may press [MUTE] while monitoring a call to be connected to the caller. Features 73 Voice Over Busy Description If your telephone is busy you may still receive a voice announcement from a calling station. Operation Basic and Enhanced Telephones To place a Voice Over Busy: 1. After dialing a busy station and listening to busy tone, press [FEAT]. 2. Dial [5] + [6] To reject a Voice Over Busy: 1. 2. Press [FEAT] Dial [5] + [6] Executive Telephones To place a Voice Over Busy: 1. Call any busy telephone. You will hear busy tone and your telephone displays: STA cbck 2. xx msg BUSY nex t Press [next]. The display shows: STA xx ca mp voice 3. BUSY Press [voice]. The display shows: VOICE TO STA xx 4. If the Voice Over Busy is rejected, the display will read VOICE REJECTED. To accept a Voice Over Busy: 1. While listening to the calling party, press [MUTE] (Use [MUTE] to switch your transmitter between the original call and the Voice Over Busy initiator). 74 Features To reject a Voice Over Busy: 1. The display shows: S TA 2. xx rej ec t VOI CE Press [reject]. The display shows: R EJECT VOICE To allow Voice Over Busy calls: 1. Press [FEAT]. 2. Dial [9] + [✳]. To deny Voice Over Busy calls: 1. 2. Press [FEAT]. Dial [✳] + [9] + [✳]. The Voice Over Busy feature code may be programmed on a programmable feature button. Conditions Voice Over Busy is not possible when the Call Waiting, Busy Forward or Busy No Answer Forward features are enabled. If you are on a line and have Mute activated, the line will remain muted until the Voice Over Busy is complete. Voice Recorder Description If you have an integrated voice mail system, this feature will allow you to record internal and external conversations. When the Voice Recorder is activated, a conference is established between the call and the system voice mail group. The conversation is recorded in your voice mail box when the feature is enabled. Features 75 Operation During a conversation: 1. 2. Press [FEAT] Dial [7] +[2]. An Executive telephone will display: R ECOR DE R SE TUP 3. Once the Voice Recorder connection is established, the display will show: R ECOR DI NG 4. Disable the feature at any time by Steps 1 and 2 above or by pressing a [programmed feature button]. Use of this feature may be interpreted as a violation of federal, state or local laws, and an invasion of privacy. Check applicable laws in your area before using this feature. 76 Single Line Telephone Single Line Telephone The System and Single Line Telephone Features of the STARPLUS® DHS/DHS-E™ Systems are listed and described in alphabetical order. Features described here pertain to Single Line Telephones and Analog devices (FAX, modem, cordless phone, etc.) connected to the DHS/DHS-E via the 2-Port Analog Adapter and 2-Port Analog Expander. An abbreviated feature index is provided; refer to Table 10: SLT Feature Access Codes. The following variables apply to the Feature Access Code table (refer to Table 7). bb = Bin Number C(CC) = Central Office F = Flash g = Group n = Number PPPP = Password pppp = New Password SS(S) = Station T = Time Single Line Telephone 77 Table 10: SLT Feature Access Codes FEATURE DHS DHS-E Authority Code #55+ SS +PPPP #55 + SSS+ PPPP Call Back #91 #91 #✳91 #✳91 F F Busy #21 + SS #21 + SSS Busy/No Answer #25 + SS + T #25 + SS + T Cancel #2 #2 Direct (all modes) #22 + SS #22 + SSS Follow Me Forward #23 + SS + PPPP #23 + SSS + PPPP Idle #20 + SS #20 + SSS No Answer #24 + SS + T #24 + SSS + T Call—Hunt Group 82-89 800-807 Call Operator 0 0 Call Park Answer by CO Line #73 + 0 + C #73 + 0 + CCC Direct #53 + SS #53 + SSS Group #54 #54 Cancel Call Brokering Call Forward Call Pickup 78 Single Line Telephone Table 10: SLT Feature Access Codes FEATURE DHS DHS-E Camp On Busy Station 2 2 CO Line #93 #93 Cancel #✳93 #✳93 9 9 Line Group ✳4 + (g) ✳4 + (g) Specific Line ✳3 + C ✳3 + C Do Not Disturb (Set/Clear) #4 #4 Hold F + wait F + wait Retrieve ✳6 ✳6 Retrieve from Another Station ✳7 + SS ✳7 + SSS Cancel ##4 ##4 CO Line ##4 + T +✳3 + n ##4 + T + nnn (nnn = 700-717) External Page ##4 + T + #501 ##4 + T + #501 Internal All Call Page ##4 + T + #500 ##4 + T + #500 Internal Station Group Page ##4 + T + #503 + g ##4 + T + #503 + g Line Group ##4 + T +✳4 + n ##4 + T + nnn (nnn = 200-207) CO Line Access Hot Line Single Line Telephone 79 Table 10: SLT Feature Access Codes FEATURE DHS DHS-E Speed Bin ##4 + T +✳1 + nn ##4 + T +✳1 + nn Station ##4 + T + SS ##4 + T + SSS System All Call Page ##4 + T + #502 ##4 + T + #502 Intercom Call (two or three digits) 10-81 100-195 Last Number Redial #8 #8 Line Flash CO/PBX F + #3 F + #3 Cancel #✳96 + SS #✳96 + SSS Send #96 + SS #96 + SSS Page All Internal #500 #500 External—Paging Speakers #501 #501 Meet Me Answer (Meet Me Page) #59 #59 Station Group #503 + g #503 + g System All Call #502 #502 Dialing ✳1 + bb ✳1 + bb Storing #1 + bb + n + F #1 + bb + n + F Message Waiting Page Speed Dial 80 Single Line Telephone Table 10: SLT Feature Access Codes FEATURE DHS DHS-E Station Alarm Cancel #✳92 #✳92 Set #92 + hhmm #92 + hhmm #97 + PPPP + # #97 + PPPP + # Password Change #97 + PPPP + pppp #97 + PPPP + pppp Unlock #97 + PPPP +✳ #97 + PPPP +✳ Voice Mail #64 #64 Transfer F + SS F + SSS Voice Over Busy Originate #56 #56 Station Lock Index A Account Code 18 Alarm Station 19 Attendant clear 7 CO Line Transfer 68 Conference Supervised 41 Unsupervised 43 Administration 21 Authority Code COS 23 Automatic Busy Redial 25 Automatic Line Selection 25 D DHS Digital Key Telephones 1 Dial B back 7 Background Music (BGM) 27 Basic Key Telephone 1 bksp 7 C Call Forward Display 29 Station 30 Call Park 35 Answer 35 Call Pickup Direct 37 Group 37 Call Waiting 37 Caller Identification (ICLID) Answered Call Table 32 Calling Number/Name Display 31 Review Call Information 34 Unanswered Call Table 33 chg 7 Class Of Service (COS) Authority Code 23 Save Number (SDN) 64 Digital Key Telephones 1 Basic 1 Enhanced 2 Executive 3 Directory Dial 44 Distinctive Ring 45 Do Not Disturb (DND) 46 Override 47 E Enhanced Key Telephone 2 Executive Key Telephone 3 F Features 8 G General Conventions 6 General Description 1 H Hands-Free refer to Voice Announce vi March 2000 Hold Abandon(Loop Supervision) 52 Automatic 53 Exclusive 53, 68 Reminder Time 54 System 54 Soft Button Prompts 7 Speed Dial 65 Pause 63 Station Distinctive Ring 45 T Transfer 68 L Last Number Redial (LNR) 63 U User M Saved Number Redial (USNR) 69 Message Executive Notify 58 Outgoing 56 Waiting 59 Music On Hold (MOH) 61 N next 7 P Page 62 Pause 63 Privacy refer to Voice Announce Programming Soft Button Prompts 7 S save 7 show 7 Single Line Telephone (SLT) Feature Access 77 V Voice Announce 69 Voice Mail Button 71 Integration 70 Monitor 71 Voice Over Busy 73 Voice Recorder 74 www.vodavi.com ©2000 Vodavi Technology, Inc. Vodavi is a registered trademark of Vodavi Technology, Inc. SP7052-00