1
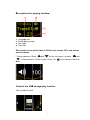
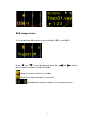
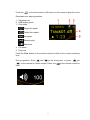
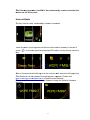
Reference 8 music player
SAFETY INSTRUCTION
To avoid personal injury or damage to equipment, please ensure that you
read this manual in its entirety before attempting to operate the
equipment. Please retain this manual for future reference.
TO PREVENT THE RISK OF ELECTRIC SHOCK, DO NOT UNDER ANY
CIRCUMSTANCES REMOVE ANY PARTS OF THE EQUIPMENT COVER.
THERE ARE NO USER SERVICEABLE PARTS INSIDE. ALL SERVICING
MUST BE CARRIED OUT BY QUALIFIED SERVICE PERSONNEL.
This icon marks a presence of un-insulated “dangerous voltage” within
the product's enclosure that may be of sufficient magnitude to constitute a risk
of electric shock to persons.
This icon marks important operating, maintenance and service
information that should be read to prevent possible personal injury
WARNINGS
Do Not Disassemble
•
•
•
•
Do not attempt to service the equipment beyond that described in this
manual. Touching the equipment’s internal parts could result in severe
personal injury. All other servicing or problems as listed below should be
referred to qualified Consonance service technicians:
The power supply cord or plug has been damaged
Objects have fallen or liquid has been spilled into the equipment
The equipment does not appear to function normally or exhibits a marked
change in performance
The equipment has been dropped or the enclosure damaged
Do not under any circumstances allow anyone to modify your Consonance
equipment without first checking with Opera Audio, your dealer, or your
distributor. Unauthorized modifications will invalidate your guarantee.
1
Power Source
The equipment should be connected to a power supply only of the type
described in this manual or as marked on the equipment.
Grounding or Polarization
Power supply cords should be routed so that they are not likely to be
walked on or pinched by items placed upon or against them, paying
particular attention to cords and plugs, convenience receptacles, and the
point where they exit from the amplifier.
Ventilation
The equipment should be situated so that its location or position does not
interfere with its proper ventilation.
1. The equipment must not be placed on bed, sofa, or similar surfaces, that
may block the ventilation openings,
2. The equipment must not be placed in a built-in installation, such as a
bookcase or cabinet that may impede the flow of air.
3. The equipment should be situated away from heat sources such as
radiators, heat register, stoves, or other electronic appliances that produce
heat. This equipment is not intended for commercial use.
Water and Moisture
The equipment should not be used near water, e.g., near a bathtub,
washbowl, kitchen sink, laundry tub, in a wet basement, or near a
swimming pool etc. Similarly, do not placed objects filled with liquid, such
as vases on top of the equipment.
Lighting
Consonance hi-fi system can be damaged by lightning. Power amplifiers
are particularly at risk and therefore should be turned off when there is risk
of lightning strike. For complete protection all mains plugs and any aerial
cables should be disconnected when not in use.
Power Lines
In case of connecting a tuner, an outdoor antenna should be located away
from power lines. If an outside antenna is connected to the system, be sure
the antenna is grounded so as to provide some protection against voltage
surges and built up of static charges.
Cleaning
Never clean with furniture polish, benzene, or volatile liquids. Dust
periodically with a clean, soft paint brush. Fingerprints can be removed with
a moist polishing cloth.
2
Table of Contents
Introduction……………………………………………………………………… 5
Before Use ……………………………………………………………………… 6
How to Use ……………………………………………………………………… 7
Reference8 Specification …………………………………………………… 16
Warranty ………………………………………………………………………… 17
3
Please check the following Appendix ments are complete:
n Remote control
1pcs
o Power Cable
1pcs
p Instructions for use
1pcs
q X3 Repeater
1pcs
4
Introduction
1.
2.
3.
4.
5.
6.
Display screen
IR sensor
USB2.0 jack
Left/Right switch
Enter/Back switch
Power switch
7. AC Power Socket
8. Fuse
9. RCA Vacuum Analog outputs
10. RCA Analog outputs
11. USB 1.1 jack for external DVD-ROM
12.USB 2.0 jack
13.USB DC5V power port
14. eSATA power port
15. Serial port for on-line Debug
16. Ethernet RJ-45 LAN interface
17. RCA Coaxial Digital intput 1
18. RCA Coaxial Digital intput 2
19. RCA Optical input
20. RCA Coaxial Digital outputs
21. RCA Analog Balance outputs
5
Before Use
Connect the Reference 8 to WIFI router through network wire
before power on.
If the Reference 8 can not connect to WIFI router through
network wire then use the X3 repeater.
The first time to use X3 repeater connect to WIFI router by
WPS quick connection:
1. Connect the X3 to the DC5V USB power supply(Refernce
8 rear Panel No.13 port);
2. Use the network wire connect X3 and Reference 8;
3. Press the WIFI router WPS button;
4. Press the X3 repeater WPS button;
5. Wait 30sec the X3 WPS LED will be lighting, the network
is working.
When finish the first time connection. The X3 will connect
to WIFI router automatically.
1.
2.
3.
4.
5.
WPS status LED
WPS/RESET button
Data status LED
Ethernet port
USB power supply
6
H
How
to Use
Switch
h on.
Allow about 1 minute. For proper warrm up
then you may b
begin.
W until the
Wait
t networkk logo turn
ns green
T DLNA
The
A APP is necessary to control the Reference 8.
APP Guide
A
e LINK:
h
http://www
w.opera-co
onsonanc
ce.com/pro
oducts/dig
gital/Referrence8.htm
m
i
iOS:
8Pla
ayer (We re
ecommend
d you purchase the o
official vers
sion)
iMeda
ashare forr iOS (for trransfering music stre
eam from iPhones
i
to the
e Reference
e 8)
A
Android:
:
Bubb
bleuPnP (R
Recommen
nded)
7
D
DLNA
Play Mode
e
P
Press
the
or press OK on the
t remote
e control. Enter
E
the D
DLNA mode
e.
DLNA Playing interfa
ace.
W recomm
We
mend that all songs are
a controllled by pho
one or Pad
d.
P
Press
EXIT
T on the re
emote conttrol or pres
ss
P
Press
the
and
to quit
q the normal mode
e.
on the
e front pane
el or presss the
an
nd
b
buttons
on the remotte control to
o scan for options.
P
Press
on the fro
ont panel or
o press OK
K on the re
emote conttrol to choo
ose.
P
Press
on the fro
ont panel or
o press
on the re
emote con
ntrol to back
8
D
Descript
tions for playing interface
e
1
2
2.
3
3.
4
4.
Samplin
ng rate
DLNA playing
p
mo
ode
File nam
me
Play tim
me
The remotte control will be blo
T
ock in DLNA mode except “E
Exit” and volume
v
c
control
bu
uttons.
. During op
peration, Press
P
and
on the front panel o
or press
on th
he remote to volume control. Press the
M
Mute
Enter to the USB
B storage
e play function.
T screen
The
n will show
w:
9
and
on the remote co
ontrol for
U
USB
storrage dev
vice
If it is a ha
ard disk witth partitions, there wiill show US
SB-1 and U
USB-2.
on the fro
Press
P
and
ont panel or
o press the
e
o the rem
on
mote contro
ol to choose
e the folde
ers.
and
bu
uttons
Mean
ns the current selection is a fold
der
Mean
ns the curre
ent selectio
on is a music file.
Meanss the file orr folder num
mber is in its current selection.
10
Press the
on the front panel or OK button on the remote to play the music.
Descriptions for playing interface
1. Sampling rate
2. USB playing mode
3. Play mode
Single file repeat
Folder files repeat
No repeat
Random play
Sequence
4. File name
5. Play time
Press the Time button on the remote control to switch to the current remaining
time.
During operation, Press
and
on the front panel or press
on the remote to volume control. Press the
Mute
11
and
on the remote control for
The follow
T
wing opera
ation can ONLY
O
be performed
d by remo
ote controll or the
b
button
on the front panel.
I
Internet
Radio
T play internet radio
To
o needs sttable Intern
net connecction.
T
There
are some
s
pre-programmed internet radio stattions alrea
ady in the Ref
R 8.
Press
P
p
play.
on the fro
ont panel or
o press th
he OK butto
ons on the remote co
ontrol to
A
After
a few
w seconds of
o buffering
g time the internet ra
adio selection will beg
gin play.
The iRadio
T
o list can be
e updated through firrmware up
pgrade. Ple
ease visit
h
http://www
w.opera-con
nsonance.ccom to gett firmware package.
P
Please
kee
ep Referen
nce 8 connect to interrenet durin
ng the radio
o list firmw
ware
u
updating.
12
D
DAC
Mod
de
T Refere
The
ence 8 can
n be used as
a a high quality
q
DAC
C.
Reference 8 can be use
ed as DAC,supports PCM
P
44.1K
K、48K、88.2K、96K、176.4K
a 192K. There
and
T
are thrree icons in this mode ,choose it by
b the remotte control an
nd the
s
switch
on the front pane
el .
1 Digita
1/2
al Input
C
Coaxial
1
C
Coaxial2
13
Optical Inpu
O
ut
The swiitch
and the remote control ke
ey
.
“Green “ is locked in
Press th
he switch
“
“key ba
ack to main menu
and the “exit
14
S Up
Set
S
SETUP
OP
PTION: Briightness, Update
U
and
d About.
1 Brightn
1.
ness
T
There
are 3 levels off adjustmen
nt.
2 Update
2.
e
The system
T
m supportss firmware upgrade.
C
Copy
the update
u
firm
mware docu
ument
(
(ending
witth *.pkg) when
w
using a USB stick.
P
Plug
the USB into US
SB HOST port, choos
se
it through the
t Fraxel
3 Aboutt
3.
Enter, to check
c
firmw
ware versio
on.
15
Reference8 Specification
1. 32Bit/384KHz PCM music playback
1Bit/2.82MHz DSD64 music playback
2. Internet radio.
3. Upgradeable firmware through USB memory device
4. Support play DFF/DSF/WAV/FLAC/ALAC/ACC etc, digital music format
5. 10/100Mbps LAN,RJ-45 port, support TCP/IP,UPnP, UDP, RTSP, DHCP,
PPPoE, HTTP etc, support NAS and PC sharing, support MMS,RTSP,HTTP
etc, stream media protocol
6. 2.4 inch TFT nature color full screen, support IR remote control, iphone and
Android phone/pad control
7. USB2.0 portx3 for hard disk up to 4TB, eSATA power port,USB1.1 port for
external CD-ROM
8. Analog output : 2.3RMS(RCA,XLR)
Distortion: <0.0025% (XLR output),<0.003%(RCA output),
<0.06%(Vacuum output)
SNR: >110dB(RCA,XLR)
Digital input jacks: Coaxial RCA(75 ohm)x2,Optical x1, USB port x3,
eSATA power portx1,LANx1
Digital output jack: Coaxial x1 (0.5Vpp)
Analog output jacks: Vaccum RCA x1, RCA x1 ,XLR x1
Size:13.7cm x44cm x44cm (HxWxD)
Weight: 9kg(wooden top cover) 13kg (aluminium top cover)
16
Warranty
Opera audio guarantees each product manufactured by us to be free from
defects in materials and workmanship under normal use. Our obligation under
this warranty is limited to making good at our factory any part or parts thereof
which shall, within 1 year after delivery to the original purchaser, be returned to
us with transportation charges prepaid, and which an examination shall
disclose to have been thus defective; this warranty being expressly in lieu of all
other warranties expressed or implied and of all other obligations or liabilities
on our part. This warranty shall not apply to any Opera audio product which
shall have been repaired or altered outside of our factory in any way so as to
affect its stability, nor which has been subject to misuse, negligence or accident.
Warranties of the vacuum tubes are by the respective manufacturers, usually
90 days.
Please mail or e-mail the Registration Card to the address as follows:
The Opera Audio Co., Ltd.
No.2 JiuXianQiaoLu
ChaoYang District
Beijing, China
Tel: 86 10 59789215
Fax: 86 10 59789265
[email protected]
www.opera-consonance.com
Registration Card
Name
Address
City
State
Zip
Email
Telephone
Model
Serial Number
Purchase Date
Dealer
17