1
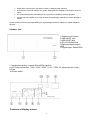
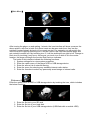
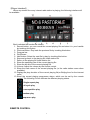
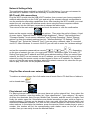
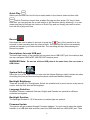
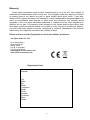
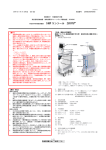
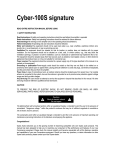
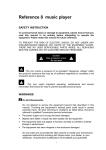
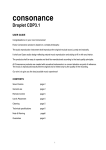
D-Linear7
High Definition digital music interface
SAFETY INSTRUCTION
To avoid personal injury or damage to equipment, please
ensure that you read this manual in its entirety before
attempting to operate the equipment. Please retain this
manual for future reference.
TO PREVENT THE RISK OF ELECTRIC SHOCK, DO NOT
UNDER ANY CIRCUMSTANCES REMOVE ANY PARTS OF
THE EQUIPMENT COVER. THERE ARE NO USER
SERVICEABLE PARTS INSIDE. ALL SERVICING MUST BE
CARRIED OUT BY QUALIFIED SERVICE PERSONNEL.
This icon marks a presence of un-insulated “dangerous voltage” within the product's enclosure
that may be of sufficient magnitude to constitute a risk of electric shock to persons.
This icon marks important operating, maintenance and service information that should be
read to prevent possible personal injury
WARNINGS
Do Not Disassemble
Do not attempt to service the equipment beyond that described in this manual. Touching the
equipment’s internal parts could result in severe personal injury. All other servicing or
problems as listed below should be referred to qualified Consonance service technicians:
•
The power supply cord or plug has been damaged
•
Objects have fallen or liquid has been spilled into the equipment
•
The equipment does not appear to function normally or exhibits a marked change in
performance
• The equipment has been dropped or the enclosure damaged
Do not under any circumstances allow anyone to modify your Consonance equipment without
first checking with Opera Audio, your dealer, or your distributor. Unauthorized modifications
will invalidate your guarantee.
1
Power Source
The equipment should be connected to a power supply only of the type described in this
manual or as marked on the equipment.
Grounding or Polarization
Power supply cords should be routed so that they are not likely to be walked on or pinched by
items placed upon or against them, paying particular attention to cords and plugs,
convenience receptacles, and the point where they exit from the amplifier.
Ventilation
The equipment should be situated so that its location or position does not interfere with its
proper ventilation.
1. The equipment must not be placed on bed, sofa, or similar surfaces, that may block the
ventilation openings,
2. The equipment must not be placed in a built-in installation, such as a bookcase or cabinet
that may impede the flow of air.
3. The equipment should be situated away from heat sources such as radiators, heat
register, stoves, or other electronic appliances that produce heat. This equipment is not
intended for commercial use.
Water and Moisture
The equipment should not be used near water, e.g., near a bathtub, washbowl, kitchen sink,
laundry tub, in a wet basement, or near a swimming pool etc. Similarly, do not placed objects
filled with liquid, such as vases on top of the equipment.
Lighting
Consonance hi-fi system can be damaged by lightning. Power amplifiers are particularly at
risk and therefore should be turned off when there is risk of lightning strike. For complete
protection all mains plugs and any aerial cables should be disconnected when not in use.
Power Lines
In case of connecting a tuner, an outdoor antenna should be located away from power lines. If
an outside antenna is connected to the system, be sure the antenna is grounded so as to
provide some protection against voltage surges and built up of static charges.
Cleaning
Never clean with furniture polish, benzene, or volatile liquids. Dust periodically with a clean,
soft paint brush. Fingerprints can be removed with a moist polishing cloth.
2
Table of Contents
SAFETY INSTRUCTION
1.
INTRODUCTION
4
2.
UNPACKING & SET-UP
4
3.
GENERAL WARNINGS
4
4.
TROUBLESHOOTING GUIDE
4
5.
OPERATING TIPS
5
6.
REMOTE CONTROL
9
7.
TECHNICAL SPECIFICATION
14
8.
WARRANTY
15
3
Introduction
Thank you for the purchase of the High Definition digital music interface. Opera Audio welcomes you
to the growing number of discerning audiophiles who own Opera Audio products. This manual has been
prepared to help you to maximize your enjoyment of the performance and features of your new
Consonance equipment. Please study this manual carefully and become acquainted with all the features,
operation and capabilities of your new Consonance equipment. Should you have any questions, or desire
information on other Opera Audio products, please contact your local Opera dealer.
Unpacking & Set-up
Unpacking
Before any Opera Audio product leaves the factory it is carefully inspected for physical imperfections as a
routine part of Opera Audio's stringent systematic quality control. After you have unpacked the equipment,
carefully inspect for any physical damage. Save the shipping carton and packing materials as they are
essential for future use to reduce the possibility of transportation damage.
Set-up
Check Equipment Voltage
Ensure that the operating voltage of the amplifier, check the shipping carton label and/or owners manual,
conforms to the delivery voltage of your local power supply (i.e. 240V / 230V / 220V / 115V / 100V AC
dependent on country).
General Warnings
Every piece of Consonance equipment is designed to produce the finest sound quality that can be
achieved, by avoiding compromise wherever possible. This can lead to circumstances that may be
unfamiliar to the equipment owner. The material that follows contains advice specifically related to
Consonance equipment as well as more general warning about the use of domestic audio products.
Troubleshooting Guide
Equipment problem could also be caused by fault in any part of the system or its installation. As Legal
consumer protection varies from country to country, you should always first consult the local dealer for
any technical problems that you may experience. Please contact your local distributor or Opera Audio at
the address in the back of this manual for any difficulties that cannot be resolved.
Certain Consonance equipment is made in special versions for different territories as a result it is
impracticable to arrange international guarantees. Please establish appropriate guarantee arrangements
with your own dealer at the time of sale. We are always available to offer help and advice. It is essential
that repairs and updates are only carried out by authorized Consonance dealer or Opera Audio factory.
As many Consonance components are custom made and specially matched, the replacement parts must
be ordered through Opera Audio or its representative. Our dealer will have all relevant information about
the service in your area and will ensure that you equipment is serviced without delay.
If for some reason, there are no service facilities available in your area, please ship the equipment to the
address listed at the back of the manual.
Please note that you are responsible for all shipping charges, insurance, and re-importation to your
country, and duty arrangements.
When shipping a product back to factory for service, always include the following:
4
•
Sales slip or other proof of purchase if repair is claimed under warranty.
•
A proforma invoice with value of the goods, stating that the amplifier is returned to china for
repair.
•
An accompanying letter describing faults, symptoms or problems with the amplifier.
•
Always ship the amplifier in its original carton and packaging material to prevent damage in
transit.
Opera Audio will not accept responsibility for any damage caused in transit, no matter whatever
caused.
GENERAL TIPS
1.Display touch screen
2.USB HOST jack
3.USB HOST jack
4.RJ-45 LAN interface
5.Balanced digital output
AES
6.Digital output Phono/RCA
7. Unbalanced analog outputs Phono/RCA right/left.
8. AC Power connection 240V / 230V / 220V / 115V / 100V AC dependent on country.
9.Fuse
10.Power switch
Features of display screen
5
【Main Menu】
After turning the player on and waiting 1 minute, the icon interface will show up as per the
above picture, with five in total. Only three icons can be seen each time, they can me
switched (moved) simply by touch or by remote control. For example, you can switch the
icons from left to right by touching icon 1 and as a result, this icon will become larger and
get centrally located; but if by touching icon 3, it will be switched from right to left. Change to
each icon by touching it only once. As long as you touch icon 2 while it is in the center
location, the player will begin the function that that icon indicates.
The icons of this interface indicate the following functions:
1. System settings list or view system properties
2. Enter the option menu of the player HDD or USB storage device.
3. Enter the source list of network sharing.
4. Enter the menu for selecting any available internet radio station.
5. Enter the favorites to select any personally saved songs or internet radio.
【Submenu】
Enter the option menu of HDD or USB storage device by touching the icon, which includes
the below functions:
1. Enter the file list in your SD card
2. Enter the file list of your hard disk.
3. Enter the file list of your USB storage device (USB flash disk or mobile HDD).
6
【Player Interface】
When any stored file or any internet radio station is playing, the following interface will
be available.
Each indicates the function as follows:
1. Record button: you can record the current playing file and store it in your hardisk
by touching this button.
2. Previous button: Play back the previous file by touching this button.
3. Progress bar
4. Play/Pause
5. Next button: Select the next file to play by touching this button.
6. Stop and go back to the playing file /radio station list.
7. Return to the playing file /radio station list
8. Show the sampling rate of the current playing file.
9. Show the bit rate of the current playing file.
10. Volume: Adjust the volume by the remote control.
11. Show the track name of the current playing file (or the radio station name when
available).
12. Display the play duration of the current playing file(or Beijing time for the internet
radio)
13. Show the current playing programme status, which can be set by the remote
control. The following 5 icons indicate the different playing status:
Single repeat play
all cycle play
non-repetitive play
random play
sequence play
REMOTE CONTROL
7
The remote control uses two 1.5-volt LR03 AAA batteries.
Mute
Standby :After powered on, the remote control
will go into standby status until powered off. It will take 3
seconds to power off by pressing this key.
Record:Press this key to record any radio
station high quality audio broadcast, the recorded file is
automatically named and saved in the mobile storage
device.
Play/Pause
Back:Return to the previous menu or list
operation.
Timing mode:Timing mode choice, order, or
reverse.
Functional key:Press this button for pop-up
copy, paste, cut or delete files menu.While the player in
playing,to select digital de-emphasis.
opening.
pass,
Fast Forward
Reverse
Internet radio:In the main menu interface, press this key and go directly to the
list of Internet radio stations.
Play function switch:Block play, press this button to switch tracks, all repeat,
no repeat, sequence playback or random playback mode.
8
Add/Open Favorites:Press this key to save a currently playing file or Internet
radio station to your favorites for later playback directly.
Ok : Serves as an enter key for system settings, operation or file selections.
Vol+/Up:Increases the volume per touch, or hold down to make the volume
gain continuously. As a file list search function key, press the button up to select a file, press
and continue until you reach the desired track.
Vol-/Down:Reduces the volume per touch, or hold down to decrease the
volume continuously. As a file list search function key, press the key down to select a file,
press and continue until you reach the desired track.
Last:Pressing this key returns you to the previous file or radio broadcast.
Next:Pressing this key will take you to the next file or radio broadcast.
Stop:Press once to pause, and then again to continue play.
Go Play interface:Pressing this key can return you to main interface that is
currently being broadcast.
Digital filter response:Press the button from to select digital filter response
of the five kinds of effects.
,
,
,
,
After turning on the unit located on the back of the player the following picture will appear on
the display screen.
After a moment, the screen will indicate” PLEASE WAIT SYSTEM STARTING” and
once the system starts completely, the main interface will be permitted to display. It will take
30 seconds for full start-up.
9
on the remote control for 2 seconds it will take you into standby
By pressing
status.
WARNING: During playback of USB mobile HDD files, be sure to touch the icon
of the touchscreen interface or
key on the remote control to stop and exit to
go into standby status, otherwise it is possible to damage the HDD.
Start the system as long as you press the Standby key.
Playing external USB removable storage files
Touch the main interface icon to centralize it, then touch the icon again, or press the remote
control "OK button", to go into the external USB mobile storage device selection menu.
Centralize the default external/mobile hard drive icon, this time directly touch the icon or
press the remote control "confirm button" to go directly into the external hard disk file list.
When you select a file, enter the track file list. At this time select a remote file and click the
confirmation button, then enter the file playback interface.
If a USB mobile HDD is selected, the operation is the same as that of the local disk. For a
storage device such us USB flash disk, please enter the file directly.
10
Network Settings Help
The machine has been enabled by default DHCP in the factory, if you can not connect to
the network IP address it can be set manually to connect to the network.
WI-FI and LAN connections
Plug the WI-FI module into the USB HOST interface, then connect your home computer's
network cable directly into the "LAN" port and set up the relevant network configuration to
use the machine's networking capabilities. Note: After inserting the WI-FI module, you must
restart the unit, and select the wireless mode; when using the home computer network
cable directly into the LAN port, remember to choose the cable mode.
Then return to the main menu interface and touch the screen or click the confirmation
button on the remote control to
set options,Then enter the set list of items. A total
of seven topics: "Network Select" "the backlight brightness", "Select" "the backlight time,"
"Firmware Update" "touch screen calibration" and "System Properties." Select "Internet
options" to enter the network settings item list: "Wireless Settings" "IP Settings" "DHCP"
"Network Type." Select the "Network Type" if you are using a network cable, if connected
via WI-FI, select Wireless. If connect via WI-FI you will have to enter the "wireless settings"
and set the connection password(use remote
,
and
,
).Depending
on the type of network you use, you must enter "DHCP" and select Open, or to enter "IP
Setting" and enter the IP address and DNS server address setting. When you select Open
network, the DHCP can not connect via an IP address, you must manually connect to the
network by using the remote control number keypad to enter an IP address. For Network
set up, go into the main menu interface, select the network resource list, select the file you
want to play, then enter the file playback interface.
Play the files shared over network
To achieve a network share, first of all make sure all music files in PC disk files or folders is
set to shared state.
Play internet radio
For playing Internet radio stations you must have set up the network first, then select the
main menu interface, enter the station list: "Area classification", "type category." By region
of Africa, the Americas, Asia, Europe, Middle East, Oceania, and the country or region, and
finally the station name list. Sub-stations are divided according to types, such as region or
musical category. Choices can be based on their own path, select the desired station and
entered the broadcast interface. You can use the numeric keypad on the remote control to
select stations, in the station list interface, press the remote control number keys to enter a
number, this number will list the corresponding radio station name on the left of each
number, then you can easily choose the desired station.
11
Quick Play
Select your favorite file in the file list or radio station in the internet radio and then click
Add to Favorites ,choose their suitable file type and then press “Ok” key to finish.
After that, you can play the file or radio station in the Favorites just by selecting it. You can
create one play list through the function of Quick Play and you simply just need to select
from this list to play next time.
Record
Hold down the icon for about 2 seconds or press the
key of the remote for a few
seconds to start recording from the internet radio. The recorded file will be automatically
named and saved in your external hard disk. The recording will stop after pressing the
Record key again.
Descriptions for each USB port
The lower right corner of the machine's front panel has a USB HOST port, the machine also
has two rear panel USB HOST USB DEVICE Interface ports.
WARNING Note: Do not run all three USB ports at the same time, this can cause a
USB failure.
System Settings
Select the icon in the main menu to enter into the System Settings, which includes the other
six setting functions as follows except the above-mentioned Network Settings.
Backlight Brightness
There are 4 levels of LCD brightness. Select the suitable level by touch screen or by remote
control, with the forth level as the brightest.
Language Selection
Simplified Chinese, traditional Chinese, English and German are optional for different
countries and regions.
Backlight Duration
The Backlight Duration:5,10,30 seconds or constant light are optional.
Firmware Update
The system can get updated through Firmware Updates. You just need to save the update
firmware in a USB flash disk and then insert the USB flash disk into USB HOST port. Then
12
select Firm Update by touch screen or pressing the remote control to start updating. Do not
pull out the USB flash disk during updating until the screen displays” The update is done”.
The update is completed before the system automatically restarts.
Touch Screen Calibration
To ensure the touch screen sensitivity, please select Touch Screen Calibration prior to initial
use or when you want to change this sensitivity setting. The screen will display one “+” in
the calibration interface, you then need to touch this icon, the “+” will jump to a corner and
then the next one will jump to another corner and finally go back to the center.
The D-linear7 has one RCA standard SPDIF (Digital signal level is 0.5Vpp when terminated
in 75 ohm load )and one AES Digital signal level that is 3Vpp when terminated in 110 ohm
load )digital audio outputs. This is the standard load impedance of external DAC's and other
recording equipment.
Key Features:
¾ Digital music player(24 Bit/192KHz WAVE/FLAC))
¾ High-performance independent D/A converter(24 Bit/192 KHz)
¾ Digital stream Hard Disk recorder( 24 Bit/ 96KHz)
¾ WI-FI;LAN Internet radio
Network Features:
¾ Support cable network: Ethernet cable network 10/100Mbps, RJ-45 interface;
¾ Support wireless network: IEEE 802.11 b/g/ with a maximum transmission speed of
54Mbps;
¾ 4.3 inch TFT true-color touch screen operation;
¾ Support TCP/IP, UPnP, UDP, RTSP, DHCP, PPPoE and HTTP network protocols and
media sharing between NAS (Network Attached Storage) and PC;
¾ Support MMS, RTSP and HTTP stream media protocols;
¾ More than ten thousand radio channels from all over the world are built internally and
you can hear anywhere of the world;
¾ Support three USB2.0 HOST
¾ Advanced IR remote-control;
TECHNICAL SPECIFICATIONS
Supports the decoding of various main stream digital audio formats, including WAV, WMA,
APE and FLAC etc.;
Analog Signal output level : 2.5V RMS ( RCA)
Analog outputs: Gold plated RCA / phono unbalanced
Distortion :Less than 0.002%
Signal-to-noise ratio More than 120dB
Digital output signal level : 0.5Vpp (RCA),3Vpp(AES)
Digital output impedance:75ohm(RCA),110ohm(AES)
Digital outputs: Gold plated RCA and gold plated XLR balanced
Digital inputs: 3 USB HOST, 1 LAN
Dimensions / Weight :100mm x 225mm x 320mm (HxWxD) / 1.5 kg (net)
13
Warranty
Opera audio guarantees each product manufactured by us to be free from defects in
materials and workmanship under normal use. Our obligation under this warranty is limited
to making good at our factory any part or parts thereof which shall, within 1 year after
delivery to the original purchaser, be returned to us with transportation charges prepaid, and
which an examination shall disclose to have been thus defective; this warranty being
expressly in lieu of all other warranties expressed or implied and of all other obligations or
liabilities on our part. This warranty shall not apply to any Opera audio product which shall
have been repaired or altered outside of our factory in any way so as to affect its stability,
nor which has been subject to misuse, negligence or accident. Warranties of the vacuum
tubes are by the respective manufacturers, usually 90 days.
Please mail or e-mail the Registration Card to the address as follows:
The Opera Audio Co., Ltd.
No.2 JiuXianQiaoLu
ChaoYang District
Beijing, China
Tel: 86 10 59789461
Fax: 86 10 59789265
[email protected]
www.opera-consonance.com
Registration Card
Name
Address
City
State
Zip
Email
Telephone
Model
Serial
Number
Purchase
Date
Dealer
14