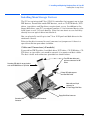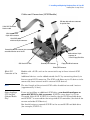
1
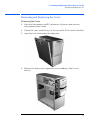
www.hp.com/go/vectrasupport hp vectra vl800 minitower user’s guide Notice The information contained in this document is subject to change without notice. Hewlett-Packard makes no warranty of any kind with regard to this material, including, but not limited to, the implied warranties of merchantability and fitness for a particular purpose. Hewlett-Packard shall not be liable for errors contained herein or for incidental or consequential damages in connection with the furnishing, performance, or use of this material. Hewlett-Packard assumes no responsibility for the use or reliability of its software on equipment that is not furnished by Hewlett-Packard. This document contains proprietary information that is protected by copyright. All rights are reserved. No part of this document may be photocopied, reproduced, or translated to another language without the prior written consent of Hewlett-Packard Company. Adobe®, Acrobat® and Acrobat® Reader™ are trademarks of Adobe Systems Incorporated. Microsoft®, MS®, MS-DOS®, Windows®, and Windows NT® are U.S. registered trademarks of Microsoft Corporation. Pentium® is a registered trademark of Intel Corporation. Rambus® and RDRAM® are registered trademarks of Rambus Inc. Direct Rambus™, Direct RDRAM™ and RIMM™ are trademarks of Rambus Inc. Sound Blaster® is a registered trademark of Creative Technology Limited. NVIDIA™, GeForce2 GTS™ and GeForce2 MX™ are registered trademarks or trademarks of NVIDIA Corporation. HP France Business Desktop Division (BDD) 38053 Grenoble Cedex 9 France 2001 Hewlett-Packard Company Feb. 2001 User’s Guide Contents Important Warnings . . . . . . . . . . . . . . . . . . . . . . . . . . . . . . . . . . . . . . . v Information and Help . . . . . . . . . . . . . . . . . . . . . . . . . . . . . . . . . . . . . vii Information on Ergonomic Aspects . . . . . . . . . . . . . . . . . . . . . . . . . viii Technical Information . . . . . . . . . . . . . . . . . . . . . . . . . . . . . . . . . . . . . ix 1 Setting Up and Using Your PC . . . . . . . . . . . . . . . . . . . . . . . . . Connecting Devices . . . . . . . . . . . . . . . . . . . . . . . . . . . . . . . . . . . . . . Starting and Stopping Your PC . . . . . . . . . . . . . . . . . . . . . . . . . . . . . Using Your HP Enhanced Multimedia Keyboard (some models only) . . . . . . . . . . . . . . . . . . . . . . . . . . . . . . . . . . . . Viewing the Summary Screen . . . . . . . . . . . . . . . . . . . . . . . . . . . . . . Using the HP Setup Program. . . . . . . . . . . . . . . . . . . . . . . . . . . . . . . Setting Passwords in the HP Setup Program . . . . . . . . . . . . . . . . . Using Power Management. . . . . . . . . . . . . . . . . . . . . . . . . . . . . . . . . Manageability . . . . . . . . . . . . . . . . . . . . . . . . . . . . . . . . . . . . . . . . . . . Software and Drivers . . . . . . . . . . . . . . . . . . . . . . . . . . . . . . . . . . . . . 11 12 15 2 Installing and Replacing Hardware Parts in Your PC . . . . . . Removing and Replacing the Cover . . . . . . . . . . . . . . . . . . . . . . . . . Removing, Replacing and Upgrading Memory . . . . . . . . . . . . . . . . Installing or Replacing an Accessory Card . . . . . . . . . . . . . . . . . . . Installing Mass Storage Devices . . . . . . . . . . . . . . . . . . . . . . . . . . . . Replacing the Primary Hard Disk Drive. . . . . . . . . . . . . . . . . . . . . . Installing a Second Hard Disk Drive . . . . . . . . . . . . . . . . . . . . . . . . Installing Removable Media . . . . . . . . . . . . . . . . . . . . . . . . . . . . . . . Replacing the Floppy Drive . . . . . . . . . . . . . . . . . . . . . . . . . . . . . . . . Completing the Installation of a Mass Storage Device . . . . . . . . . Replacing the Main Chassis Fan . . . . . . . . . . . . . . . . . . . . . . . . . . . . Replacing the Power Supply Unit. . . . . . . . . . . . . . . . . . . . . . . . . . . Replacing the Processor . . . . . . . . . . . . . . . . . . . . . . . . . . . . . . . . . . Replacing the System Board . . . . . . . . . . . . . . . . . . . . . . . . . . . . . . System Board Switches . . . . . . . . . . . . . . . . . . . . . . . . . . . . . . . . . . . Replacing the Battery. . . . . . . . . . . . . . . . . . . . . . . . . . . . . . . . . . . . . System Board Connectors . . . . . . . . . . . . . . . . . . . . . . . . . . . . . . . . 23 25 27 30 31 35 38 41 43 45 46 47 49 52 55 56 58 17 18 19 21 22 22 22 iii User’s Guide Contents 3 Troubleshooting Your HP PC . . . . . . . . . . . . . . . . . . . . . . . . . If Your PC Does Not Start Properly. . . . . . . . . . . . . . . . . . . . . . . . . . If Your PC Has a Hardware Problem. . . . . . . . . . . . . . . . . . . . . . . . . Pre-Boot Diagnostics . . . . . . . . . . . . . . . . . . . . . . . . . . . . . . . . . . . . . . HP e-DiagTools Hardware Diagnostics Utility . . . . . . . . . . . . . . . . . Image Creation and Recovery CD-ROM . . . . . . . . . . . . . . . . . . . . . . Frequently Asked Questions. . . . . . . . . . . . . . . . . . . . . . . . . . . . . . . . Troubleshooting Tips. . . . . . . . . . . . . . . . . . . . . . . . . . . . . . . . . . . . . . If You Have a Problem. . . . . . . . . . . . . . . . . . . . . . . . . . . . . . . . . . . . . iv 59 60 60 62 63 65 68 69 70 Important Warnings Avoid Electrical Shocks WARNING To avoid electrical shock, do not open the power supply. There are no userserviceable parts inside. To avoid electrical shock and harm to your eyes by laser light, do not open the laser module. The laser module should only be serviced by service personnel. Do not attempt to make any adjustment to the laser unit. Refer to the label on the CD-ROM for power requirements and wavelength. This product is a class I laser product. Electrical Connection WARNING For your safety always connect equipment to a grounded wall outlet. Always use a power cord with a properly grounded plug, such as the one provided with the equipment, or one in compliance with your national safety standards. This equipment can be disconnected from the power by removing the power cord from the power outlet. This means the equipment must be located close to an easily accessible power outlet. Multimedia Models WARNING If your PC is a multimedia model, or if you have installed an audio card in your PC, always turn the volume down before connecting the headphones or speakers. This avoids discomfort from unexpected noise or static. Listening to loud sounds for prolonged periods of time may permanently damage your hearing. Before putting on headphones, place them around your neck and turn the volume down. When you put the headphones on, slowly increase the volume until you find a comfortable listening level. When you are able to hear comfortably and clearly, without distortion, leave the volume in that position. Removing and Replacing the Cover WARNING For your safety, never remove the PC's cover without first removing the power cord from the power outlet and any connection to a telecommunications network. Always replace the cover before switching the PC on again. v Safety Information WARNING There is a danger of explosion if the battery is incorrectly installed. For your safety, never attempt to recharge, disassemble, or burn an old battery. Only replace the battery with the same or equivalent type, as recommended by the manufacturer. The battery in this PC is a lithium battery which does not contain any heavy metals. Nevertheless, in order to protect the environment, do not dispose of batteries in household waste. Please return used batteries either to the shop from which you bought them, to the dealer from whom you purchased your PC, or to HP so that they can either be recycled or disposed of in the correct way . Returned batteries will be accepted free of charge. If you have a modem: Do not attempt to connect this product to the phone line during a lightning storm. Never install telephone jacks in wet locations unless the telephone line has been disconnected at the network interface. Never touch uninsulated telephone wires or terminals unless the telephone line has been disconnected at the network interface. Use caution when installing or modifying telephone lines. Avoid using a telephone (other than a cordless type) during an lightning storm. There may be a risk from lightning. Do not use the telephone to report a gas leak in the vicinity of the leak. Never touch or remove the communications board without first removing the connection to the telephone network. Unpacking Your PC WARNING If you are in any doubt that you can lift the equipment safely, do not try to move it without help. Static Electricity CAUTION Static electricity can damage electronic components. Turn OFF all equipment. Don’t let your clothes touch the accessory. To equalize the static electricity, rest the accessory bag on top of the PC while you are removing the accessory from the bag. Handle the accessory as little as possible and with care. vi Information and Help PC Documentation Roadmap If you want to ... Access Information Start ☞ Programs ☞ HP Info ☞ Finding Information Find Information Setup This guide Setting Up and Using Your PC Set up your computer www Reference Learn how to use your operating system Operating System Online Help Start ☞ Help ☞Contents Learn how to upgrade your computer by installing accessories This guide Installing and Replacing Hardware Parts in Your PC www Troubleshooting and Support HP Quick User’s Guide Find out about the different support options available, and how to troubleshoot your PC The paper manual that came with your PC Troubleshooting Guide www.hp.com/go/vectrasupport www vii On HP’s Web Site The HP web site contains a wide range of information, including downloadable documentation, service and support options, and the latest versions of drivers and utilities. Downloadable Documentation from HP’s Web Site HP’s web site lets you download additional documentation for your PC. This documentation is provided in Adobe Acrobat (PDF) format. The documentation for your PC is available free of charge on the HP web site www.hp.com/go/vectrasupport. This includes: • Troubleshooting Guide — provides troubleshooting information. • Technical Reference Manual — provides detailed information about your PC, including: System board switches, IRQs, DMAs, and I/O Addresses, power consumption and acoustic noise emission test configurations and Configuring Your Network Connection. • Service Handbook — provides information on replacement parts, including HP part numbers. NOTE To view and print the above guides, you need to have Adobe’s Acrobat Reader installed on your PC. You can download it free of charge from Adobe Systems Incorporated web site: www.adobe.com. Information on Ergonomic Aspects It is strongly recommended that you read the ergonomics information before using your PC. Basic ergonomics information is available in the Quick User’s Guide (provided with your PC). You can access more extensive ergonomics information from your PC by clicking the Start button, and then Programs ➪ HP Info ➪ Working in Comfort, or by connecting to HP’s web site www.hp.com/ergo. viii Technical Information Physical Characteristics (standard configuration as shipped) Characteristic Description Weight (configuration with 1 CD-ROM 14.0 kg (30.86 pounds) drive, excluding keyboard and display) Dimensions Width: 20.6 cm (8.1 inches) Height: 46.9 cm (18.5 inches) Depth: 45.5 cm (17.9 inches) Footprint 0.094 m2 (1.01 ft2) Acoustic noise emission (ISO 7779) Operating (idle): Sound power LwA < 38.5 dBA Sound pressure at operator position: LpA ≤ 32 dBA Power Supply Input voltage 100 - 127, (voltage selection switch) 200 -240 V 7A max or 7/4A Input frequency: 50/60Hz Power consumption - Windows 2000 115V / 60Hz and 230V / 50Hz • Typical <70W <5W • Suspend (*) NOTE Available min. output power: 250W Storage Humidity 8% to 85% (relative) When the computer is turned off with the power button on the front panel, the power consumption falls below 5 Watts, but is not zero. The special on/off method used by these computers considerably extends the lifetime of the power supply. To reach zero power consumption in “off” mode, either unplug the power outlet or use a power block with a switch. ix x 1 Setting Up and Using Your PC WARNING Installation Tools If you are in any doubt that you can lift the PC and monitor safely, do not try to move them without help. 1 When you receive your PC, unpack all of the components. 2 Place the PC on a sturdy desk with easily accessible power outlets and enough space for the keyboard, mouse, and any other accessories. 3 Position the PC so that its rear connectors are easily accessible. No tools are required to set up your PC. However, if you plan to install a disk drive or an accessory board inside your PC, you will need a flat-blade screwdriver. For more information on installing accessories, refer to "Installing and Replacing Hardware Parts in Your PC", on page 23. 1 Setting Up and Using Your PC Connecting Devices Connecting Devices For your own safety, it is recommended that you first read the warning notices on pages v and vi. Keyboard connector Mouse connector Serial port A Parallel port Serial port B Line Out (headphone or speaker) connector Use these audio connectors if your PC does not have a Sound Blaster card. For models with Sound Blaster card, refer to page 14. Line In connector Microphone connector Connecting the optical mouse (some models only) 12 Dual USB connectors 1 Setting Up and Using Your PC Connecting Devices NOTE Universal Serial Bus (USB) connectors can be used for USB accessories. (For information about HP accessories, connect to HP’s web site www.hp.com/go/pcaccessories.) Most USB accessories are automatically configured as soon as they are physically attached to the PC. USB is supported by Window 2000, Windows 98 and Windows 95 SR 2.1 only. Line Out Jack. The internal audio speaker is deactivated when you use the Line Out jack. External speakers should have a built-in power supply. Connecting the Monitor Connect the monitor according to the model of graphics card you have, as shown below. Matrox MGA 450 VGA Connector 1 VGA Connector 2 nVidia GeForce2 GTS S-Video VGA nVidia GeForce2 MX DVI-I (for digital LCD monitors) VGA 13 1 Setting Up and Using Your PC Connecting Devices Connecting the Sound Blaster Audio Card (Some Models Only) If your PC has a Sound Blaster audio card, connect your audio devices as shown. If your PC does not have a Sound Blaster audio card, refer to page 12. Digital I/O Line In Microphone Front Stereo Speakers or Headphones Rear Stereo Speakers MIDI/Joystick 14 1 Setting Up and Using Your PC Starting and Stopping Your PC Starting and Stopping Your PC Starting Your PC for the First Time If your PC has preinstalled software, it is initialized the first time you start the PC. The software initialization process takes a few minutes. This process sets up the software in your language and sets up your software to use the hardware installed in your computer (you can change the settings after the software has been initialized). Starting Your PC 1 Before you start your PC, first switch on the display. 2 Start your PC in one of these ways: • Press the power button on the front panel. • Press the keyboard space bar (multimedia models only). The keyboard power-on feature will work only if the appropriate system board switch is set (the default setting is enabled). When you switch on the computer, it carries out the Power-On-SelfTest (POST) while the PC’s logo is displayed. If you wish to view the details of this test, press the Esc key. If there is an error in the POST, the error will automatically be displayed. 3 If you have set a password in the PC’s Setup program, the password prompt displays after the POST has completed. If the Password prompt is displayed, type your password and press Enter to be able to use the PC. 15 1 Setting Up and Using Your PC Starting and Stopping Your PC Initializing Your Software NOTE Do NOT switch OFF the PC while the software is being initialized—this could cause unexpected results. To initialize your software: 1 Turn on the display first, then the PC. When the PC is switched on, the HP PC’s logo is displayed. The PC performs a Power-On-Self-Test (POST). 2 The software initialization process starts. It displays the software license agreement, gives you an opportunity to read Working in Comfort (ergonomics advice for computer users), then asks questions about the PC. 3 While the initialization process is running, you can complete the Warranty Registration card that came with this manual. 4 When the initialization process has finished, click OK and the PC will restart. Creating an Emergency Repair Disk During the initialization of your software, it is very important that you create an Emergency Repair Disk for the operating system, when prompted. HP recommends that you use new diskettes for this purpose. For more information on how to create these diskettes, refer to the documentation that came with your application software or operating system. Stopping Your PC To stop the PC, first make sure that you have exited all applications and then use the shutdown command in the Start menu. When prompted, press the power button on your PC. CAUTION Do not power off using the power button until prompted to do so otherwise you may lose any unsaved data from open applications. 16 1 Setting Up and Using Your PC Using Your HP Enhanced Multimedia Keyboard (some models only) Using Your HP Enhanced Multimedia Keyboard (some models only) The HP enhanced keyboard includes soft keys you can use to: • Display and configure the actions assigned to keys. • Perform one-touch shortcuts to start applications, open files, or open web sites on the Internet. • Launch the Internet browser supplied with your system. • Lock or suspend your PC. • Access HP TopTools and customer information. • Mute or adjust the volume of the audio system. • A headphone and microphone can be connected directly to the keyboard. For this option to work, the headphone and microphone connectors must be connected to their associated rear panel jacks. Keyboard connector Sockets for headphone and microphone (located on the top edge) Internet key Menu key HP TopTools Lock/Suspend key Headphone and microphone jacks (to be connected to the PC’s rear panel) Shortcut key HP Customer Information Mute key Volume control keys Space bar power on Menu Key Shortcut keys Pressing the “?” Menu soft key displays the soft key section of the HP enhanced keyboard control panel on your screen. Click any of the keys on the screen to display the action assigned to an individual key or to change or assign an action to a key. Shortcut keys are provided specifically for userdefined actions. 17 1 Setting Up and Using Your PC Viewing the Summary Screen Viewing the Summary Screen The Summary Screen gives you a summary of the current configuration of your PC (for example: BIOS version, CPU speed, memory module size, and installed mass storage devices). It is recommended that you check the configuration of your PC when you first use it and each time after you install, remove, or upgrade accessories. To check the configuration: 1 Turn on the display and then the PC. If the PC is already turned on, save your data and exit all programs, then restart the PC. Consult your operating system documentation for any special instructions concerning turning off and restarting your PC. 2 When the start-up logo appears on your display, press Esc. This takes you to the Summary Screen. (To go immediately into the Setup program, and bypass the Summary Screen, press F2 instead of Esc). The Summary Screen is displayed for only a short time. 18 1 Setting Up and Using Your PC Using the HP Setup Program Using the HP Setup Program Use the Setup program to configure your PC (for example: setting up system and user passwords, installing and upgrading mass storage devices), and to solve configuration problems. It is recommended that you take note of any changes to the system setup. Starting the HP Setup Program 1 Turn on the display and then the PC. If the PC is already turned on, save your data and exit all programs, then restart the PC. 2 Press F2 while F2 Setup is displayed at the bottom of the screen. If you fail to press F2 in time and the start-up process continues, you will need to restart your PC and go through the POST again so you can press F2. The opening screen of the PC’s Setup program is displayed. The Main Menu presents a list of fields, for example, the installed BIOS version or Date and Time. A band along the top of the screen offers a list of menus. A menu is selected by using either the left or right arrow keys. Main Menu The Main Menu presents a list of fields, for example, the installed BIOS version; “Reset Configuration Data”; “System Time”; “System Date”; “Key Click”; “Key Auto-Repeat Speed”; Delay Before Auto-Repeat” and “NumLock at Power-on”. By default the “Reset Configuration Data” item is set to No. Selecting Yes will clear the system configuration data and return to the default settings. Advanced Menu The Advanced Menu offers a list of sub-menus allowing you to: • Configure memory caching, USB ports, Integrated I/O Ports and Integrated Audio Devices • Enable floppy disk drives, IDE devices (Primary and Secondary) • PCI Devices. 19 1 Setting Up and Using Your PC Using the HP Setup Program Security Menu Sub-menus are presented for changing the characteristics and values of the System Administrator Password, User Password, Power-on Password, Fixed Disk Boot Sector and for preventing unauthorized start-up from the Floppy, CD-ROM and IDE-HDD drives (refer to “Setting Passwords in the HP Setup Program” on page 21). Boot Menu Select the order of the devices from which you want the BIOS to attempt to boot the operating system. The QuickBoot mode option allows the system to skip certain tests while booting. This decreases the time needed to boot the system. Power Menu The Network Interface option enables the system to return to normal speed when a specific command is received by the network interface. NOTE Setup changes system behavior by modifying the power-on initialization parameters. Setting incorrect values may cause system boot failure. Should this occur, press F9 to load the Setup default values to recover. 20 1 Setting Up and Using Your PC Setting Passwords in the HP Setup Program Setting Passwords in the HP Setup Program You can set passwords to provide different levels of protection for your PC, the Administrator password, the User password and the Power-on password. You set these passwords using the Security menu in the Setup program. The Administrator can access and change all settings in the Setup program, while the User can only access and modify certain items in the Main menu. When the Power-on Password option is enabled, you need to enter a password every time you boot the PC. Either the Administrator or User Password can be used. Setting a Password To set a password: 1 Start the Setup program 2 Select the Security menu. 3 Select the Administrator or User password submenu. 4 Choose the Set Administrator or User password setup item. You will be asked to enter your password twice. To enable the Power-on Password, select the Enabled setup item. 5 To save your changes and exit the Setup program press Esc or select Exit Menu, then Exit Saving Changes. To remove the password, follow the same procedure as to set a password. You will be asked to enter the existing password first. Then, for the new password, leave the password field blank and press Enter. To confirm your choice, press Enter a second time. 21 1 Setting Up and Using Your PC Using Power Management Using Power Management Power management enables you to reduce the PC’s overall power consumption by slowing down the PC’s activity when it is idle. For more information on power consumption data, refer to the PC’s data sheet on HP’s web site at: www.hp.com/desktops/vectra. Operating System Operating systems differ in their power management capabilities. Refer to your operating system documentation for more information. Manageability Your PC is highly manageable. HP TopTools is a device management tool that can help you in troubleshooting and makes remote administration easier. For more information about TopTools, connect to HP’s web site at: www.hp.com/toptools. Software and Drivers In the “Software and Drivers” section of the HP support site www.hp.com/go/vectrasupport, you can download the latest drivers and BIOS for your PC. You can also register to obtain information on new driver availability automatically. Contact your dealer for an up-to-date list of supported devices or check the HP web site: www.hp.com/go/vectrasupport. 22 2 Installing and Replacing Hardware Parts in Your PC This chapter provides information about installing accessories and replacing hardware parts in your PC. - 3.5-inch 1.44 MB floppy disk drive Power Supply Unit Front Access Bays, for - 5.25-inch drives Main Chassis Fan Secondary Hard Disk Drive Bay Primary Hard Disk Drive Bay Memory module sockets supporting four RDRAM modules Up to six accessory cards can be installed: - One AGP 4X slot (graphics) - Five 32-bit PCI slots Processor (heatsink not shown) Secondary IDE Connector Floppy Disk Drive Connector Primary IDE Connector 2 Installing and Replacing Hardware Parts in Your PC Contact your dealer for an up-to-date list of supported devices or connect to www.hp.com/go/pcaccessories then select vl800 in the menu. For the list of non-HP devices compatible with your PC, consult the Tested Product List at www.hp.com/desktops/vectra/vl800/tpl.html (when available). 24 2 Installing and Replacing Hardware Parts in Your PC Removing and Replacing the Cover Removing and Replacing the Cover Removing the Cover 1 Switch off the monitor and PC, disconnect all power cords and any telecommunication cables. 2 Unlock the cover (with the key) at the rear of the PC if a lock is installed. 3 Open the latch and remove the side panel. 4 Remove the front panel (required if you are adding a front-access device). 25 2 Installing and Replacing Hardware Parts in Your PC Removing and Replacing the Cover Replacing the Cover 1 Ensure that all internal cables are properly connected and safely routed (not trapped or snagging on anything.) 2 Replace the front panel. 3 Replace the side panel, making sure you align the hinges properly. 4 If required, lock the cover (with the key) at the rear of the PC. 26 2 Installing and Replacing Hardware Parts in Your PC Removing, Replacing and Upgrading Memory Removing, Replacing and Upgrading Memory NOTE Use only HP memory modules specifically designed for your PC model. To find out about available accessories for your PC, refer to the HP Accessories Web site at: www.hp.com/go/pcaccessories. Upgrading Memory Your PC has two pairs of memory sockets for installing either two or four PC800 RAMBUS Direct RAM (RDRAM) memory modules. Each pair of memory sockets must contain identical memory modules (identical in size, speed and type). That is, sockets A1 and B1 must contain identical modules, and sockets A2 and B2 must contain identical modules (or continuity modules). B2 B1 A2 A1 Power Supply Connector If only two RDRAM modules are installed, use the sockets marked A1 and B1. The other two sockets (A2 and B2) must contain continuity modules. Floppy Primary IDE Processor Secondary IDE NOTE 27 2 Installing and Replacing Hardware Parts in Your PC Removing, Replacing and Upgrading Memory Memory modules for your PC are available from HP or from your Authorized HP Reseller. To see which memory modules are available, connect to www.hp.com/go/pcaccessories, then select HP Memory and vl800 in the menus. Removing and Installing a Memory Module Installing or Replacing a Memory Module 1 Switch off the display and PC. Disconnect all power cables and any LAN or telecommunications cables. 2 Remove the PC’s cover (refer to page 25 for instructions). 3 Lay the minitower on its side. 4 If you are installing additional memory modules then you will need to remove the continuity modules. Open the two retaining clips and remove the continuity module from the socket. If you are replacing an existing memory module then open the two retaining clips and remove the existing memory module the socket. Always store any removed memory or continuity module in a safe place for future use. 5 Install your new memory modules, ensuring that the two notches on the bottom edge of each memory module is aligned with those of the socket. With the two retaining clips open, press the memory module fully into the socket until the retaining clips click into position. You can also close the retaining clips by hand to ensure that the module is correctly inserted. 28 2 Installing and Replacing Hardware Parts in Your PC Removing, Replacing and Upgrading Memory 6 Replace the PC’s cover (refer to page 25). Reconnect all the power and telecommunications cables. 7 Check the Summary Screen to verify the new configuration (refer to “Viewing the Summary Screen” on page 18). 29 2 Installing and Replacing Hardware Parts in Your PC Installing or Replacing an Accessory Card Installing or Replacing an Accessory Card Your PC has five 32-bit 33 MHz PCI (PCI 2.2) accessory card slots and one AGP slot on the system board. The AGP slot accepts standard 25W 1.5V AGP graphics cards. 1 Switch off the display and PC. Disconnect all power cables and any LAN or telecommunications cables. 2 Remove the PC’s cover (refer to page 25 for instructions). 3 Lay the minitower on its side. 4 Remove the accessory card retaining bracket. 5 If you are installing a new accessory card, remove the slot panel. Store it in a safe place. 6 If you are replacing an existing accessory card, remove any cables connected to the accessory card and carefully pull it out. If you are removing an AGP graphics card, release the plastic clip before removing the card. NOTE Some cards may have preferred locations and special installation instructions detailed in their manuals. 7 Aligning the new card carefully, slide it into position, then press it firmly into the slot. 8 Replace the retaining bracket. 9 If you are installing or replacing the AGP graphics card, remember to secure the card with the plastic latch on the AGP connector. 10 If you are installing or replacing a SCSI card, reconnect the disk activity LED connector to the system board (refer to page 55 for the location of the system board connectors). 11 If you are installing or replacing a Sound Blaster audio card, reconnect the CD drive’s audio cable to the Sound Blaster card. (If you do not have a Sound Blaster card, the CD drive’s audio cable connects to the system board – refer to page 55 for the location of the system board connectors.) 12 Install any other accessories before replacing the cover (refer to page 25). Reconnect all the power and telecommunications cables. 30 2 Installing and Replacing Hardware Parts in Your PC Installing Mass Storage Devices Installing Mass Storage Devices The PC has an integrated Ultra ATA-100 controller that supports up to four IDE devices. Removable media IDE devices, such as CD-ROM drives, DVD drives, tape drives and Zip drives, require front access. In addition to the floppy disk drive, your PC can support another 3.5-inch internal device plus three front-access 5.25-inch devices. Note that one front-access shelf may already have an optical drive installed in it. You can physically install up to two 7.2 or 10 Krpm hard disk drives in the minitower chassis. Refer to the drive’s manual to see if you must set jumpers or if there is a special installation procedure to follow. Cables and Connectors (all models) If you add an IDE Zip drive, hard disk drive, DVD drive, CD-ROM drive, CD RW drive, or tape drive, you need to connect it to power and data cables. The data cables and connectors provided are shown below: Two IDE data cables each with two connectors for IDE Drives Secondary IDE cable for access devices such as CD-ROM Drives or Zip Drives Primary IDE cable supports two Hard Disk Drives Cable with one 34-pin connector for 3.5-inch Floppy Disk Drive Floppy Disk Drive Connector Secondary IDE Connector Primary IDE Connector 31 2 Installing and Replacing Hardware Parts in Your PC Installing Mass Storage Devices Which IDE Data Connectors to Use There are three or four data cables inside your PC. Two of these are for IDE devices. • The ATA IDE cable supports two IDE devices. This cable is connected to the Primary IDE connector on the system board. The bootable hard disk drive is connected to this cable via the MASTER connector. A second hard disk drive could be installed by using the SLAVE connector. • A second IDE drive cable supports two IDE devices. If you install a CDROM drive, a DVD drive or a Zip drive, connect it to this cable. • The third cable has one connector for a floppy drive. • SCSI models have an additional cable and connectors. For more information, refer to “Cables and Connectors (SCSI Models)” on page 33. The following table explains which data connectors you should use when you install additional devices. Examples of multiple IDE drive combinations Configuration Before Installing an IDE Hard Disk Connections to data cables 1 Hard disk drive Bootable hard disk drive: Master connector, Primary IDE Cable 1 Hard disk drive 1 CD-ROM drive Bootable hard disk drive: CD-ROM drive: Master connector, Primary IDE Cable Master connector, Secondary IDE Cable 2 Hard disk drives 1 CD-ROM drive Bootable hard disk drive: Second hard disk drive: CD-ROM drive: Master connector, Primary IDE Cable Slave connector, Primary IDE Cable Master connector, Secondary IDE Cable 1 Hard disk drive 1 CD-ROM drive 1 Zip drive Bootable hard disk drive: CD-ROM drive: Zip drive: Master connector, Primary IDE Cable Master connector, Secondary Cable Slave connector, Secondary IDE Cable 2 Hard disk drives 1 CD-ROM drive 1 Zip drive Bootable hard disk drive: Second hard disk drive: CD-ROM drive: Zip drive: Master connector, Primary IDE Cable Slave connector, Primary IDE Cable Master connector, Secondary IDE Cable Slave connector, Secondary IDE Cable Refer to the drive’s installation guide to check jumper settings or if there is a special installation procedure to follow. 32 2 Installing and Replacing Hardware Parts in Your PC Installing Mass Storage Devices Cables and Connectors (SCSI Models) IDE data cable with two connectors for optical drives 16-bit SCSI Terminator fitted on cable 16-bit Internal U160 68-pin SCSI connector 16-bit SCSI cable with three 68-pin connectors External 68-pin SCSI connector (two screws) accessible from the rear of the PC. Cable with one 34-pin connector for 3.5-inch Floppy Disk Drive SCSI Card in PCI Slot Secondary IDE Connector Floppy Disk Drive Connector Primary IDE Connector Which SCSI Connectors to Use Models with a SCSI card can be connected to up to three internal SCSI devices. Additional devices can be added outside the PC by connecting directly to the rear panel SCSI connector. The SCSI card allows up to 15 devices to be connected, three internal and 12 external SCSI devices. NOTE The total length of the external SCSI cables should not exceed 3 meters (approximately 10 feet). Before Installing a SCSI Hard Disk (Selected Models Only) If you are installing an additional SCSI drive, you should configure an unused SCSI ID to this accessory. SCSI IDs range from 0 to 15 for Ultrawide 16-bit SCSI. SCSI ID 0 is used by the first SCSI hard disk drive and SCSI ID 7 is reserved for the integrated SCSI controller (the default for narrow and wide SCSI devices). You should assign an unused SCSI ID to the second SCSI hard disk drive (for example, SCSI ID 1). 33 2 Installing and Replacing Hardware Parts in Your PC Installing Mass Storage Devices The SCSI ID is usually configured with jumpers on the SCSI hard disk drive. Refer to the installation guide supplied with the drive for information on selecting a SCSI ID. Some SCSI disk drives may have termination resistors that must be removed or disabled before installation in your PC. Refer to the drive’s installation guide for more details and to see if there is a special installation procedure to follow. Power Connectors Power Cable for 3.5-inch Floppy Disk Drive Power Cables for Hard Disk Drives, Zip Drives, Tape Drives, CD-RW, CD-ROM Drives and DVD drives 34 2 Installing and Replacing Hardware Parts in Your PC Replacing the Primary Hard Disk Drive Replacing the Primary Hard Disk Drive CAUTION Handle the hard disk drive with care. Avoid shocks and violent movement as this can cause damage to the hard disk drive’s internal components. Make sure that you back up your files before you install a hard disk drive. Refer to your operating system documentation for information on how to do this. If you are replacing a SCSI hard disk, you need to set the hard disk’s SCSI ID correctly. Refer to “Before Installing a SCSI Hard Disk (Selected Models Only)” on page 33 for more information. You can replace your PC’s hard disk drive with a larger one. To do this: 1 Remove the computer’s cover (refer to page 25 for instructions). 2 Remove the drive’s connectors. IDE model shown 35 2 Installing and Replacing Hardware Parts in Your PC Replacing the Primary Hard Disk Drive 3 Press the retaining clip on the top of the drive tray and slide it forward to remove it. Hold the tray firmly while removing it. 4 Turn the drive tray over, remove all the screws from the base of the tray, then slide out the old hard drive. 5 Align the new drive in the tray and replace the screws to fix it in place. 6 Slide the drive tray back into the bay until it clicks into place. 7 Attach the data and power connectors. 36 2 Installing and Replacing Hardware Parts in Your PC Replacing the Primary Hard Disk Drive NOTE 8 Replace the cover (refer to page 25 for instructions). 9 Go to page 45 to complete the installation. Ensure that you have installed all the required operating system and HP drivers on the newly installed drive. To reinstall operating system and HP drivers, use the Image Creation & Recovery CD-ROM provided with the PC. In addition, you can find the most up-to-date versions of HP drivers on HP’s Web site at: www.hp.com/go/vectrasupport. 37 2 Installing and Replacing Hardware Parts in Your PC Installing a Second Hard Disk Drive Installing a Second Hard Disk Drive CAUTION Handle the hard disk drive with care. Avoid shocks and violent movement as this can cause damage to the hard disk drive’s internal components. Make sure that you back up your files before you install a hard disk drive. Refer to your operating system documentation for information on how to do this. If you are replacing a SCSI hard disk, you need to set the hard disk’s SCSI ID correctly. Refer to “Before Installing a SCSI Hard Disk (Selected Models Only)” on page 33 for more information. 1 Remove the computer’s cover (refer to page 25 for instructions). 2 Remove the connectors from the already installed hard drive. IDE model shown 38 2 Installing and Replacing Hardware Parts in Your PC Installing a Second Hard Disk Drive 3 Press the retaining clip on the top of the drive tray and slide it forward to remove it. Hold the tray firmly while removing it. 4 Slide in the new hard drive in the position shown and fasten the four screws to secure it in position in the drive tray. 5 Slide the drive tray back into the bay. 6 Attach an IDE or SCSI data connector and a power connector to each hard disk drive. NOTE For IDE drives, you must use the end connector (marked DRIVE 0) with the master hard drive. This is the drive you intend to boot your PC from. 39 2 Installing and Replacing Hardware Parts in Your PC Installing a Second Hard Disk Drive NOTE 7 Replace the cover (refer to page 25 for instructions). 8 Go to page 45 to complete the installation. If you intend to boot from the newly installed drive, ensure that you have configured Setup to do this. Also ensure that you have installed all the required operating system and HP drivers on the newly installed drive. To reinstall operating system and HP drivers, use the HP Image Creation & Recovery CD-ROM provided with the PC. In addition, you can find the most up-to-date versions of HP drivers on HP’s Web site at: www.hp.com/go/vectrasupport. 40 2 Installing and Replacing Hardware Parts in Your PC Installing Removable Media Installing Removable Media WARNING To avoid electric shock and harm to your eyes by laser light, do not open the laser module. The laser module should be serviced by service personnel only. Do not attempt to make any adjustment to the laser unit. Refer to the label on the CD-ROM drive for power requirements and wavelength. This product is a class 1 laser product. The PC has an integrated Enhanced IDE controller which supports up to four IDE devices. Removable media IDE devices, such as CD-ROM drives, DVD drives, tape drives and Zip drives require front access. You can install a removable media IDE drive in an empty front shelf. Refer to the drive’s manual to see if you must set jumpers or if there is a special installation procedure to follow. 1 Remove the computer’s cover and front panel (refer to page 25 for instructions). 2 Press the two latches inward and slide out the drive tray in which you want to install a new device. 3 Remove the tray’s metal RFI shield. 41 2 Installing and Replacing Hardware Parts in Your PC Installing Removable Media 4 Place the new device in the drive tray with the correct orientation and secure it in place with the four screws (two on each side). 5 Slide the device tray into the PC. 6 Attach the data and power connectors. If you are installing a CD-ROM, CD-RW or DVD drive, connect the audio cable too. Audio Connector (optional) 7 Replace the cover (refer to page 25 for instructions). 8 Go to page 45 to complete the installation. 42 2 Installing and Replacing Hardware Parts in Your PC Replacing the Floppy Drive Replacing the Floppy Drive 1 Remove the computer’s cover and front panel (refer to page 25 for instructions). 2 Remove the drive’s connectors. 3 Press the two latches inward and slide out the floppy drive. 4 Loosen the tray’s two side screws and remove the old floppy drive. 5 Insert the new floppy drive (pin side first) then replace the two side screws. 43 2 Installing and Replacing Hardware Parts in Your PC Replacing the Floppy Drive 6 Slide the floppy drive back into the PC. 7 Attach the data and power connectors. 8 Replace the cover (refer to page 25 for instructions). 9 Go to page 45 to complete the installation. 44 2 Installing and Replacing Hardware Parts in Your PC Completing the Installation of a Mass Storage Device Completing the Installation of a Mass Storage Device IDE Drive 1 Switch on the computer. 2 To verify the configuration of your hard disk drive, press F2 to enter Setup when the HP logo appears. Once in Setup, select the Advanced menu, then the IDE Devices submenu. In the Primary Master item, check that the details for the device have been correctly detected by the Setup program. 3 Press F3 to save and exit Setup. 4 Refer to the operating system documentation for information on partitioning and formatting a drive. 5 If an IDE drive is removed, switch on the computer. The system BIOS will detect that the device is missing. Press F4 to confirm that you want to remove the device. The system configuration will be updated automatically. SCSI Drive on SCSI Models 1 Switch on the computer. 2 To enter the SCSI Configuration Utility press Ctrl-C when prompted during the PC’s start-up routine. 3 Verify or modify the configuration of your new SCSI hard disk drive. For more information on configuring a SCSI hard disk drive, refer to the SCSI User’s Guide. 4 When configuration is complete, exit the SCSI Configuration Utility and reboot the computer to save any changes. CD-ROM, CD-RW or DVD-Drive Floppy Drive 1 Switch on the computer and press F2 when the HP logo appears. 2 In the Setup program, select the Advanced menu, then the IDE Devices submenu. Check that the CD-ROM drive has been detected on the IDE channel. 3 Press F3 to save and exit the program. 1 Switch on the computer and press F2 when the HP logo appears. 2 In the Setup program, select the Advanced menu, then the Floppy Disk Drives submenu, and check that the drive has been detected. 3 Press F3 to save and exit the program. 45 2 Installing and Replacing Hardware Parts in Your PC Replacing the Main Chassis Fan Replacing the Main Chassis Fan Removing the Fan 1 Switch off the display and PC. Disconnect all power cables and any LAN or telecommunications cables. 2 Remove the PC’s cover (refer to page 25 for instructions). 3 Lay the minitower on its side. 4 Disconnect the fan cable from the system board. 5 From inside the PC, use a screwdriver to gently push out the four plastic studs, then remove the fan. Replacing the Fan NOTE Ensure that all cables are clear of the fan and will not easily come into contact with the fan during normal use or following transportation. 1 Align the fixation holes in the fan with the holes in the chassis. 2 Insert the four plastic studs provided with the new fan. 3 Connect the fan cable to the main chassis fan connector on the system board (refer to page 58 for location). 4 Replace the PC’s cover (refer to page 25). Reconnect all the power and telecommunications cables. 46 2 Installing and Replacing Hardware Parts in Your PC Replacing the Power Supply Unit Replacing the Power Supply Unit WARNING Hewlett-Packard does not support power supply upgrades. This information is provided to help you replace a defective power supply unit. For your safety, only replace a power supply unit with a unit provided by HP support services. Removing the Power Supply Unit 1 Switch off the display and PC. Disconnect all power cables and any LAN or telecommunications cables. 2 Remove the PC’s cover (refer to page 25 for instructions). 3 Lay the minitower on its side. 4 Remove all internal power supply connectors. 5 Remove the four screws located on the rear of the chassis that secure the power supply unit in position. 6 Push the power supply from the rear to slide it forward, disengage the hinges and remove the power supply. 47 2 Installing and Replacing Hardware Parts in Your PC Replacing the Power Supply Unit Installing the Power Supply Unit 1 Insert the new power supply unit (lining up the metal catches). 2 Secure the power supply in position using the screws you removed previously. 3 Reconnect all internal power supply connectors (there are two connectors on the system board). 4 Replace the PC’s cover (refer to page 25). Reconnect all the power and telecommunications cables. 5 48 Select the correct voltage setting for your country. 2 Installing and Replacing Hardware Parts in Your PC Replacing the Processor Replacing the Processor CAUTION Before removing the heatsink or processor, ensure that you have a new piece of thermal interface material (provided with system board or processor replacement kit). When you re-attach the heatsink to the processor, use the new piece of thermal interface material. This will ensure the cooling properties of the heatsink are fully utilized. Removing the Existing Processor 1 Switch off the display and PC. Disconnect all power cables and any LAN or telecommunications cables. 2 Remove the PC’s cover (refer to page 25 for instructions). 3 Lay the minitower on its side. 4 Remove the heatsink fan cable from the system board. 5 Remove the four heatsink screws (and springs) then lift off the heatsink. You may need to twist the heatsink to detach the thermal interface material. Keep the screws and springs in a safe place; you will need them to install the new processor. ➎ ➍ 49 2 Installing and Replacing Hardware Parts in Your PC Replacing the Processor 6 Lift the Zero Insertion Force (ZIF) lever, located at the side of the processor socket, until it is in the vertical position, then carefully lift out the processor. To avoid bending the processor pins, keep the processor perfectly flat when removing it. 7 Store the processor in an anti-static bag (for example, the one provided with the replacement processor). Installing the New Processor 1 First ensure the processor is correctly oriented, then carefully lower the new processor into place. When the processor is fully inserted, close the ZIF lever. 2 Carefully remove all thermal bonding material from the underside of the heatsink. 3 Remove the two paper protectors from the thermal interface material then affix it to the top of the processor. 50 2 Installing and Replacing Hardware Parts in Your PC Replacing the Processor 4 Attach the heatsink to the processor then secure it in place using the four springs and four screws. 5 Connect the heatsink power connector to the system board. 6 Replace the PC’s cover (refer to page 25 for instructions). Reconnect all the power and telecommunications cables. When you start the PC, you should check that the processor has been correctly identified (refer to “Viewing the Summary Screen” on page 18). 51 2 Installing and Replacing Hardware Parts in Your PC Replacing the System Board Replacing the System Board Removing the System Board 1 Switch off the display and PC. Disconnect all power cables and any LAN or telecommunications cables. 2 Remove the PC’s cover (refer to page 25). 3 Lay the minitower on its side. 4 Disconnect all cables attached to the system board. 5 Remove the main memory, processor, heatsink and any accessory cards from the old system board (described in this chapter). 6 Remove the screws securing the system board in place. 7 Lift the system board out, being careful not to damage the PC’s rear connectors. 52 2 Installing and Replacing Hardware Parts in Your PC Replacing the System Board Installing the New System Board 1 Aligning the rear connectors with their corresponding sockets, insert the system board and lower it onto the guide pins. Ensure that all hooks are correctly positioned. Check that the rear connectors are correctly aligned in their sockets. CAUTION When inserting the system board, be careful not to damage or bend the metal fingers on the rear connector EMI shield. If the shield is damaged it can be very difficult to install the system board correctly. 2 Replace the screws to secure the system board in place. 3 Replace the main memory, processor, heatsink and any accessory cards in the new system board (described in this chapter). When reinstalling the heatsink, remember to replace the thermal interface (described on page 50). 4 Reconnect any cables you disconnected earlier from the system board. Note that there are two power connectors on the system board – you must connect both. To find out the positions of system board connectors, refer to page 58 or to the label located on the PC chassis. 5 Check the system board switches to ensure they are correctly set. Refer to page 55 for more information. 6 Replace the PC’s cover and front bezel (refer to page 25). Reconnect all the power and telecommunications cables. 53 2 Installing and Replacing Hardware Parts in Your PC Replacing the System Board 7 NOTE After installing the system board, you need to update your BIOS. The latest BIOS for your PC and instructions on updating the BIOS are available from: www.hp.com/go/vectrasupport. 54 2 Installing and Replacing Hardware Parts in Your PC System Board Switches System Board Switches There are ten system board switches used for configuration, numbered from 1 to 10. Of these a certain number are reserved and should not be modified, otherwise it could lead to a system failure. Switch Default Position To Configure: 1-5 OFF Reserved. Do Not change Default Settings 6 ON Enables keyboard power-on. OFF disables this option. 7 OFF Enables normal modes. ON enables the BIOS recovery mode at next boot. 8 OFF Retains CMOS memory. ON clears CMOS memory at next boot. 9 OFF Enables User and System Administrator passwords. ON clears the passwords at next boot. 10 OFF Location of system board switches 55 2 Installing and Replacing Hardware Parts in Your PC Replacing the Battery Replacing the Battery WARNING There is a danger of explosion if the battery is incorrectly installed. For your safety, never attempt to recharge, disassemble, or burn the old battery. Replace the battery only with the same or equivalent type recommended by the manufacturer. The battery is a lithium battery which does not contain heavy metals. Nevertheless, in order to protect the environment, do not dispose of batteries in household waste. Please return used batteries to the shop from which you bought them, or to the dealer from whom you purchased your PC, or to HP, so that they can be either recycled or disposed of in an environmentally sound way. Returned batteries will be accepted free of charge. If your PC repeatedly loses its configuration settings you should consider changing the battery. Replace it with a CR2032 coin type manganese/lithium battery, available from most PC stores. To change the battery: 1 Disconnect the PC’s power supply cord and any connection to a telecommunications network. 2 Remove the PC’s cover (refer to page 25). 3 Lay the minitower on its side. 4 Remove the old battery by sliding it from under the retaining clip. Location of battery 56 2 Installing and Replacing Hardware Parts in Your PC Replacing the Battery 5 Place the new battery in the battery holder and ensure that it is properly seated. Ensure that the clip holds the battery firmly in place. 6 Replace the cover (refer to page 25). Reconnect all cables and power cords. 7 Run the Setup program to reconfigure the PC. 57 2 Installing and Replacing Hardware Parts in Your PC System Board Connectors System Board Connectors A2 A1 MT chassis intrusion Main Power Supply Memory slots B2 B1 Main chassis fan i850 MCH CD-ROM audio in DT chassis intrusion AGP Slot Primary IDE Secondary IDE ATX12V power Floppy Processor fan Pentium 4 processor (socket 423) PCI slots i850 ICH2 Battery socket System board switches SCSI LED MT internal speaker DT Internal Speaker Wake On LAN DT status panel MT = Minitower DT = Desktop MT status panel 58 3 Troubleshooting Your HP PC This chapter provides summary information that can help you solve problems you may have when using your PC. • Dealing with common PC and hardware problems. • Using HP e-DiagTools hardware diagnostics program. • Using the HP Image Creation and Recovery CD-ROM. • Frequently Asked Questions. • What to do if you need more help. • What to do before contacting HP Support. For more detailed information, refer to the Troubleshooting Guide, available on HP’s web site at www.hp.com/go/vectrasupport, then select HP Vectra VL800 from the drop-down menu. HP Instant Support You can also use HP Instant Support, the web-based problem resolution service that automates and speeds up troubleshooting. This service is available free of charge. For more information about HP Instant Support, go to www.hp.com/go/vectrasupport, then click HP Instant Support in the left-hand menu. 3 Troubleshooting Your HP PC If Your PC Does Not Start Properly If Your PC Does Not Start Properly The PC Doesn’t Power On Check that... How The PC’s power cord is correctly connected. Connect the power cord to a working grounded power outlet and the PC. The Power Button LED Flashes Yellow Check that... How The internal hardware components are correctly installed. Refer to the Troubleshooting Guide available from HP’s web site at: www.hp.com/go/vectrasupport The Power-On Self Test Results In an Error, The Power Button LED Flashes Yellow, or The PC Doesn’t Start and Makes a Noise or Beeps An on-screen error message or a beep sequence when the PC starts up means there is a configuration problem with your PC. Check that... How The part of your configuration for which the Power-On Self Test has detected an error. Refer to "Pre-Boot Diagnostics", on page 62. Refer to the Troubleshooting Guide available from HP’s web site at: www.hp.com/go/vectrasupport If Your PC Has a Hardware Problem The Monitor Doesn’t Work... The PC’s power indicator light works but the monitor remains blank. Check that... How The monitor is switched ON (LED is on). Refer to the monitor manual for an explanation of the LED signals (green, orange, or blinking). The monitor’s power cord is correctly connected. Connect the power cord – ensure it is plugged into a working grounded power outlet and into the monitor. The monitor’s brightness and contrast settings are Check the settings using the monitor’s OSD (on-screen display) or using correctly set. controls on the front of the monitor. You see an image during boot but then the screen goes blank or unstable. Check that... The monitor settings in your PC are compatible with your monitor. 60 How • Windows NT: Enter VGA mode when prompted during start-up, then reset the resolution. • Windows 98: Restart the PC. When the HP screen is displayed, press F8 and then start the PC in safe mode. Double-click on the Display icon in your PC’s Control Panel, then click on the Settings button. Use the sliding control to reset the resolution. 3 Troubleshooting Your HP PC If Your PC Has a Hardware Problem The Keyboard Doesn’t Work... Check that... How The keyboard cable is correctly connected. The keyboard is clean and no keys are stuck down. The keyboard itself is not defective. Plug the cable into the correct connector on the back of the PC. Check all keys are at the same height, and none are stuck. Either replace the keyboard by a known working unit or try the keyboard with another PC. Run e-DiagTools. See page 63. If the PC starts but you still have a problem... The Mouse Doesn’t Work... How Check that... 1 2 The mouse cable is correctly connected. The mouse and keyboard connectors have not been switched. You are using the correct driver. If you are using HP’s mouse, ensure that the correct driver is installed. This driver is delivered with the HP scrolling mouse accessory. The mouse is clean. The mouse itself is not defective. If the PC starts but you still have a problem... Switch off the PC. Plug the cable into the correct connector on the back of the PC. Check the connectors at the rear of the PC. The connectors are color coded. Match the colors. Refer to page 12 for more information. Download the latest drivers from HP’s web at: www.hp.com/go/vectrasupport Clean the mouse ball. Replace the mouse by a known working unit or try the mouse with another PC. Run e-DiagTools. See page 63. The Power-On Self Test Displays an Error What to do Press the F2 key to enter Setup. 1 1. For more information on the Setup program, refer to the Troubleshooting Guide, available on the HP web at: www.hp.com/go/vectrasupport. 61 3 Troubleshooting Your HP PC Pre-Boot Diagnostics Pre-Boot Diagnostics When your PC starts up, the BIOS performs Pre-Boot Diagnostics and a Power-on Self Test (POST) to test your hardware configuration for any problems. If a problem is detected during the POST, an error is displayed on your PC’s monitor. If, however, your PC is unable to display an error message (for example, when you graphics controller has failed), the Pre-Boot Diagnostics will emit an audio signal. The Pre-Boot Diagnostics emits an audio sequence with two kinds of sounds. The first is an unusual series of tones that indicate an anomaly has been detected. This series of sounds also contains an electronic signal that can be sent through a telephone line to an authorized helpdesk or HP Support, if necessary. This signal cannot be interpreted by the human ear. However, it can be decoded by helpdesk equipment to extract the PC model and serial number. The second type of sound is a series of long beeps that indicate a particular error. If you hear a series of beeps, you should count them as this will help you detect the cause of the problem. Number of Beeps Meaning 1 2 Processor absent, not correctly connected or ZIP socket not closed Power supply is in protected mode 3 4 No memory, bad memory modules, incompatible memory module Graphics card problem 5 6 PnP/PCI initialization problem Corrupted BIOS. You need to activate crisis recovery procedure 7 Defective system board Please note that Memory (code 3), Video Card (code 4), and PnP/PCI (code 5) errors will only be detected after a 15-second timeout. If You Miss the Beep Code If you miss the beep code, turn off the PC by pressing the on/off power button for five seconds or more, then listen for the signal again. 62 3 Troubleshooting Your HP PC HP e-DiagTools Hardware Diagnostics Utility HP e-DiagTools Hardware Diagnostics Utility HP e-DiagTools is an accurate and reliable utility that helps you diagnose any potential hardware-related problems. With this utility you can: • Check the hardware configuration and verify that it is functioning correctly. • Test individual hardware components. • Diagnose hardware-related problems. • Obtain a complete hardware configuration. • Provide precise information to an HP support agent so they can solve any problems quickly and effectively. For more information about this utility, refer to the e-DiagTools Hardware Diagnostics User's Guide, available on the HP web site in PDF (Adobe Acrobat) format. Where Can I Get HP e-DiagTools? HP e-DiagTools is available from the following sources: • Installed on your hard disk drive in the special “Utility” partition. • Image Creation and Recovery CD-ROM delivered with your computer. • HP DiagTools CD-ROM obtained from the HP web site at www.hp.com/desktops/diagtools Before Using HP e-DiagTools Decide how you are going to run the diagnostics utility: using either the utility partition on the hard disk drive or one of the CD-ROM options. Both provide the same range of extensive test but the full range of e-DiagTools features are only available when you run e-DiagTools from the hard drive. If you are running the diagnostics from a CD-ROM, then the CD-ROM drive must be configured to boot before the hard disk drive. Starting HP e-DiagTools From the hard disk drive: 1 Close all applications if you have not already done so. 2 Shutdown the computer with the Restart option. 3 When the HP start-up logo appears, the following message will be displayed for a few seconds: “Press <F10> to start hardware diagnostics or any other key to proceed”. Press the F10 key to start HP e-DiagTools. 4 When e-DiagTools starts, it will display a welcome screen. Follow the on-screen instructions to perform the diagnostic tests. 63 3 Troubleshooting Your HP PC HP e-DiagTools Hardware Diagnostics Utility From either the Image Creation and Recovery CD-ROM or HP DiagTools CD-ROM: 1 Insert the CD-ROM into the CD-ROM drive and restart the computer. 2 Press the F8 key to select the boot order to CD-ROM first. 3 The PC will boot from the CD-ROM. If you are using the Image Creation and Recovery CD-ROM, a menu will be displayed. Select the option to run e-DiagTools. 4 When e-DiagTools starts, it will display a welcome screen. Follow the on-screen instructions to perform the diagnostic tests. The diagnostics utility will automatically detect the complete hardware configuration of your system before any tests are performed. Producing a Support Ticket To produce a complete record of your system’s configuration and test results, you will need to create a Support Ticket. This is a simple text file that contains essential information and is designed to assist your local or HP support agent. If you are using HP e-DiagTools from the hard disk drive and your PC is connected to a LAN using TCP/IP (Internet) protocols, you have the option of e-mailing your Support Ticket from within e-DiagTools. If you are using HP e-DiagTools from a CD-ROM, you can create the Support Ticket file on either the hard disk drive or floppy disk drive. You can also view the Support Ticket file using the “Support Ticket Viewer” program. The Support Ticket file can be easily be sent, via email or fax. 64 3 Troubleshooting Your HP PC Image Creation and Recovery CD-ROM Image Creation and Recovery CD-ROM The PC Image Engineer — Image Creation and Recovery CD-ROM enables you to restore your computer to its original factory configuration, change or reconfigure the operating system and reinstall drivers or other factory-supplied software components. The drivers and software utilities, including documentation and navigational aids, help you to recover either the full set of pre-loaded software or subset of it. What Functions Are Available? Some of the available functions on the Image Creation and Recovery CD-ROM are described below: • Full Recovery: Restores the operating system, drivers, utilities and Special Disk Partition as supplied by default. A full recovery also automatically erases any viruses that might be present on the Master Boot Record. It should be noted however, that this function reformats your hard disk drive. It is highly recommended, if possible, that you save all data files and software installations. • Minimal Recovery: Restores only the operating system and SCSI driver for access to a SCSI hard disk drive. • Partial Recovery: Restores individual drivers which are supplied in a “browseable area” of the CD-ROM. • Copy OS Master Files: For use when Windows prompts you to insert the operating system media when installing additional drivers. • HP e-DiagTools: Checks the system configuration and operation. Also described on page 63. NOTE Some of the operations that can be performed using the Image Creation and Recovery CD-ROM will permanently erase the current contents of your hard disk. You should always backup your data and personal files before using the CD-ROM. Requirements Before performing a recovery, upgrade or downgrade, it is advisable that you make a checklist for each type of function. You will require to have the Administrator password to make any changes to the Setup program and it is recommended that you make a note of any changes. 65 3 Troubleshooting Your HP PC Image Creation and Recovery CD-ROM Performing a Recovery or Downgrade (Windows 2000 to Windows NT4) ❒ The PC model must match the CD-ROM (the CD-ROM is locked to a specific PC model). ❒ Backup all data files and, if necessary, software applications. ❒ It is recommended upgrading to the latest BIOS version. ❒ Setup program settings: Clear any BIOS-level passwords. In the Security menu, set all Hardware Protection items to “Enabled” or “Unlocked” (if applicable). Check also that Booting from the CD-ROM is enabled; in the Boot menu, the CD-ROM drive is configured to boot before the hard disk drive in the Boot Device Priority List. ❒ Ensure that you have the Certificate of Authenticity from Microsoft available. (This may be a label on the side of your PC.) Running HP e-DiagTools ❒ The PC model must match the CD-ROM (the CD-ROM is locked to a specific PC model). ❒ CD-ROM drive has been configured to boot before the hard disk drive. Performing a Full Recovery Depending on the hardware configuration, a full system recovery should take from 30 minutes to 2 hours. NOTE Remember, this procedure will erase everything from the hard disk drive (primary partition if defined). Ensure that all data files and software applications have been saved. 1 Shutdown the Operating System and switch-off your PC. 2 Remove any non-standard components that were added after you received the PC to restore the PC to its original factory configuration. 3 Insert the recovery CD-ROM into the CD-ROM drive and start the PC. 4 Press the F8 key and select the CD-ROM to boot first. 5 The computer will boot from the CD-ROM and display a DOS-style menu. Select the option to recover the hard disk drive. In some cases, you might have to go through the menu item “Partitioning & Formatting”. In this case, there are two options: • • Automatic (recommended). Custom (for advanced users only). Unless you have a specific requirement, select Automatic. 66 3 Troubleshooting Your HP PC Image Creation and Recovery CD-ROM 6 Follow the on-screen instructions. 7 The hard disk drive will be formatted first. Several reboots will be carried out. This is normal: do not interrupt the process. Wait until a message indicates that the operation has been successfully completed. 8 Remove the recovery CD-ROM from the CD-ROM drive. 9 The operating system and drivers will be installed. In this phase, you will be required to enter the operating system settings. Completing a Full Recovery The full recovery function will restore the original disk image of your computer. However, it is recommended installing updated drivers which are available from the HP web site www.hp.com/go/vectrasupport. You will also be required to install drivers for any accessory boards that have been added to the original model. All data files and software applications that were saved before performing the full recovery will also need to be restored on the hard disk drive. Minimal Recovery To recover the operating system only, follow the instructions indicated above. In step 5, select the option to perform a minimal recovery. The minimal recovery will install the Service Pack originally delivered with your PC. However, it is possible to uninstall it later. To complete the recovery, you will need to install drivers recommended by Hewlett-Packard which are available from the HP web site, or other drivers. Performing a Partial Recovery Insert the recovery CD-ROM in the CD-ROM drive with the operating system running. A web browser can be used to navigate through the CD-ROM to obtain the required driver(s). You can also use Windows Explorer to browse through the driver directories. To install a driver, follow the driver’s instructions given in the Readme file. 67 3 Troubleshooting Your HP PC Frequently Asked Questions Frequently Asked Questions Q: How can I reinstall my PC’s operating system? A: Use the Image Creation and Recovery CD-ROM provided with your PC. Q: Why is my PC running slowly/producing strange messages? A: Your PC may have been infected by a virus. Run an antivirus utility on your PC. If the problem continues, update your PC’s BIOS. You can download the BIOS and updating instructions from www.hp.com/go/vectrasupport. Try reducing your demands on the PC by closing applications when you are not using them. Refer to your Operating System documentation (online or paper) for information on performance monitoring. Q: I’ve been experiencing problems with my PC ever since I installed some new software. What can I do? A: Uninstall the software to see whether this solves the problem. If the problem continues, contact the software manufacturer for help or information on known compatibility problems. Q: How do I disable the integrated sound features on my PC if I install an add-on sound card (on Windows NT, Windows 95 and Windows 98)? A: Use the HP Setup program to disable the Audio item in the Advanced menu. Refer to refer to “Using the HP Setup Program” on page 19. Q: Can I use USB hardware devices with all the operating systems preloaded on my PC? A: USB is supported by Windows 98 and Windows 2000 only. Q: An application says I need more free memory on my PC. How do I free memory? A: Quit any open applications that you are not using. Delete any unnecessary files on your hard disk. Q: Where can I get information about the latest HP drivers? A: www.hp.com/go/vectrasupport Need More Help? Refer to the Troubleshooting Guide for more detailed help. This manual is available from HP’s web site at: www.hp.com/go/vectrasupport 68 3 Troubleshooting Your HP PC Troubleshooting Tips Troubleshooting Tips • Restart your PC and see if the problem recurs. • Run HP e-DiagTools. You can create a hardware profile of your PC (Support Ticket) that can be faxed or mailed to support. Refer to page 63 for information on using e-DiagTools. • Visit the HP support web site www.hp.com/go/vectrasupport to see if you are experiencing a known problem. • Update your PC’s BIOS. The latest BIOS for your PC and instructions on updating the BIOS are available from HP’s support web site at: www.hp.com/go/vectrasupport • Record the details of the problem so that you can describe it accurately. Refer to page 70 for advice on what information is required. • Think of anything you may have done recently before you first experienced the problem. • If possible, have your system up and running and close by when you call. • We recommend you contact your HP dealer, or contact HP support outside of peak times (mid-morning and early evening). Refer to the HP Quick User’s Guide for more information. You can learn more about HP service and support from the support web site: www.hp.com/go/vectrasupport 69 3 Troubleshooting Your HP PC If You Have a Problem If You Have a Problem • Check you have your product receipt. • Run HP e-DiagTools (refer to page 63). • Check your warranty entitlement (refer to the Quick User’s Guide that came with your PC). • Contact your local Customer Care Center (for the phone numbers, refer to the Quick User’s Guide that came with your PC) or your HP Authorized Service Provider. It is recommended that before contacting HP Support you note down some of the information mentioned below. This will help HP support deal with your problem quickly and efficiently: PC Description Model number See label on the right side of your PC. Serial number Memory See label on the right side of your PC. • Number of megabytes installed • • Is it HP supplied memory or memory from another source? • The total amount of memory installed is displayed in the Setup program main menu, accessed by pressing F2 during start-up. There may be some compatibility problems with non-HP memory modules. HP supports and recommends only HP supplied memory modules. Question or Problem Write down a brief description of the problem Frequency Run OK? How often has the problem occurred? How long has the PC been running normally? Recent changes to the PC Have there been any recent changes made to the PC? Which BIOS version is used? The BIOS version is displayed in the Setup program main menu, accessed by pressing F2 during start-up. Any BIOS parameter changes? Did the problem occur after changes were made to the BIOS using the Setup program? Hardware Configuration Make a list of slots and interrupts used by additional cards (for example, LAN, sound and SCSI) This is to check for interrupt conflicts. You can find IRQs by running e-DiagTools (see page 63). Operating System... refer to next page � 70 3 Troubleshooting Your HP PC If You Have a Problem Operating System Are you using the original operating system software that came preloaded on your PC? If not, what is the operating system version? Select Settings ➪ Control Panel from the Start menu, then click on the System icon. The operating system version is displayed under System. Any operating system-generated error messages? Please note down exact text of error message. Any errors during boot (Power-On Self Test)? This test checks all installed components. Any POST errors will be displayed on your monitor screen or signalled by beep codes. 71 3 Troubleshooting Your HP PC If You Have a Problem 72 Index B battery replacing, 56 BIOS updating, 69 version, 70 BIOS recovery mode system board switch, 55 C CD-ROM drive installing, 41 Certificate of Authenticity from Microsoft, 66 CMOS memory system board switch, 55 completing the installation with a DVD-Drive, 45 with an IDE drive, 45 connecting graphics card, 13 keyboard, 12 monitor, 13 mouse, 12 optical mouse, 12 Sound Blaster card, 14 connectors system board, 58 cover removing, 25 replacing, 26 D diagnosing hardware problems, 63 disabling sound, 68 disk drives installing, 31 downloadable documentation, viii drivers downloading, 22 latest HP, 68 E e-DiagTools, 63 electrical important warnings, v enhanced keyboard, 17 purpose, 17 ergonomic information accessing, viii errors at startup, 62 F FastRaid, 33 floppy drive replacing, 43 G graphics card connecting, 13 H hard disk drive IDE, 32 SCSI, 33 hard disk drives installing 3.5-inch drive, 38 installing in top rear shelf, 38 hardware problems diagnosing, 63 troubleshooting, 60 HP e-DiagTools, 59, 63, 65 availability, 63 requirements before using, 63 starting, 63 HP Image Creation and Recovery CD-ROM, 59 HP TopTools, 22 I IDE hard disk, 32 IDE drives installing 3.5-inch drive, 38 installing in front shelf, 41 installing in top rear shelf, 38 Image Creation and Recovery CD-ROM available functions, 65 before using, 65 completing a full recovery, 67 partial recovery, 67 performing a full recovery, 66 recovery, 66 running HP DiagTools, 66 important warnings avoid electrical shocks, v electrical, v multimedia models, v removing and replacing the cover, v safety information, vi information and help, vii initializing software, 16 installing 3.5-inch hard disk drive, 38 disk drives, 31 IDE CD-ROM drive, 41 IDE drives in front shelf, 41 IDE drives in top rear shelf, 38 73 Index IDE tape drive, 41 IDE Zip drive, 41 mass storage devices, 31 memory module, 28 power supply unit, 48 Sound Blaster card, 30 system board, 53 installing and replacing hardware parts, 23 K keyboard, 17 connecting, 12 troubleshooting, 61 keyboard power-on system board switch, 55 M manageability, 22 mass storage device completing the installation, 45 memory installing, 28 replacing, 28 Microsoft Certificate of Authenticity, 66 monitor connecting, 13 troubleshooting, 60 mouse connecting, 12 troubleshooting, 61 multimedia models important warning, v N notice trademarks, ii O optical mouse connecting, 12 P password setting, 21 passwords system board switch, 55 PC overview, 23 starting, 15 starting and stopping, 15 starting first time, 15 stopping, 16 troubleshooting, 59 74 unpacking, 11 physical characteristics, ix POST errors, 62 power management using, 22 power supply unit installing, 48 replacing, 47 Power-On Self-Test (POST) screen, 16 problems Frequently Asked Questions, 68 PC doesn’t start, 60 POST error, 61 processor replacing, 49 R removing power supply unit, 47 system fan, 46 removing and replacing the cover important warning, v removing the cover, 25 replacing accessory board, 30 battery, 56 floppy drive, 43 memory module, 28 power supply unit, 47 processor, 49 system board, 52 system fan, 46 replacing the cover, 26 S safety information, vi SCSI hard disk, 33 setting password, 21 Setup program checking configuration, 18 menus, 19 setting passwords, 21 starting, 19 using, 19 viewing the summary screen, 18 software downloading, 22 initializing, 16 license agreement, 16 Sound Blaster card connecting, 14 Index installing, 30 starting and stopping PC, 15 HP e-DiagTools, 63 PC, 15 PC first time, 15 Setup program, 19 stopping PC, 16 summary screen viewing current configuration, 18 system board connectors, 58 installing, 53 removing, 52 replacing, 52 system board switches, 55 system fan replacing, 46 T tape drive installing, 41 technical information physical characteristics, ix power consumption, ix troubleshooting Frequently Asked Questions, 68 keyboard, 61 monitor, 60 mouse, 61 PC doesn’t start, 60 tips, 69 troubleshooting your PC, 59 U unpacking the PC, 11 updating BIOS, 69 URL for downloadable documentation, viii for downloading software and drivers, 22 for HP TopTools information, 22 for latest HP drivers, 68 for obtaining HP e-DiagTools, 63 for support, 59, 61 for updating the BIOS, 68 USB devices, 68 using power management, 22 Z Zip drive installing, 41 75 Index 76