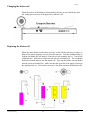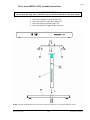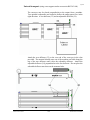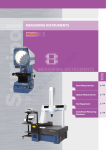
1
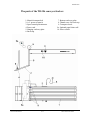
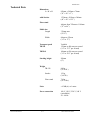
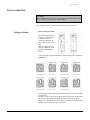
TB-356/356 S
Conveyor / Stacker
INSTRUCTION MANUAL
Rev. 3/17/04 Part#: M-3027
RENA Systems, Inc.
136 Green Tree Rd Ste 140
PO Box 1069
Oaks, PA 19456-1069
Telephone: 610/650-9170
Fax: 610/650-9171
Every effort has been made to assure the accuracy of this manual.
RENA Systems shall not be held liable for any errors contained herein
or for any consequential or incidental damages incurred as a result of
acting on information contained in this manual.
Technical specifications may change due to design advances.
The data stated are nominal values only.
CONTENTS
TB-356/356 S
INSTRUCTION MANUAL
Page
Chapter
Important notes on safety
1
Introduction
What does the TB356 conveyor/stacker do?
The parts of the TB356 conveyor/stacker
Technical data
2
Installing the conveyor
Assembling the conveyor
Stacker assembly
2.1
2.1
2.1
2.2
Positioning the conveyor
Connecting power
2.2
N.1
Changing the fuses
Operation (setting up the conveyor)
Connecting the power cable
Using the transport wheels
Operating the conveyor
Using the ink blotter roll
Changing the paper roll
Replacing the paper roll
4
1.1
1.2
1.3
Setting the form length
Selecting the voltage
3
1.1
Optional Accessories
Vertical paper stacker
Floor stand
Floor stand assembly instructions
Cross support stacker (lateral transport)
N.1
N.2
3.1
3.1
3.1
3.2
3.2
3.3
3.3
4.1
4.1
4.2
4.3
4.4
Important Notes on Safety
PLEASE READ THESE INSTRUCTIONS CAREFULLY
KEEP THEM WITHIN EASY REACH FOR LATER USE
All direction and warning labels on the conveyor must be observed.
Setting up the
conveyor
Electrical
safety
• When setting up the conveyor, be sure that it is positioned securely
and is level. If it is allowed to tilt, roll away or drop, injuries may
result.
• The conveyor must be protected from moisture.
• When connecting the conveyor to the power supply, observe the rated
•
•
•
•
•
•
Operational
safety
values for the power connection on the name plate.
Check the voltage setting on the conveyor’s power input module.
For reasons of electrical safety, the power connection socket must be
equipped with a grounded conductor contact.
The conveyor has double-pole fuse protection! In the event of fuse
failure, electrical parts in the conveyor may still be live.
Run the power supply cable so that no-one can trip over it. Also
make sure that nothing is placed on the cable.
If the conveyor remains unused over a long period of time,
disconnect it from the power supply. This ensures that no damage
will be caused by voltage surges.
Never open the conveyor. For reasons of electrical safety, it may be
opened only by authorized service personnel.
• Never touch the internal parts of the conveyor while it is running !
• To avoid damaging the coveyor, use only parts that have been
approved by the manufacturer.
Let your
RENA service
technician
check the
conveyor !
IN THE FOLLOWING CASES, DISCONNECT THE CONVEYOR
FROM THE POWER SUPPLY !
Parts
• If a repair is required, use only genuine RENA parts.
•
•
•
•
The power cable or power socket are damaged.
Liquid has penetrated the conveyor.
The conveyor was exposed to moisture.
If the conveyor does not function as described in the operating
instructions, or there is no improvement with the aid of these
instructions.
• The conveyor was dropped and/or the housing is damaged.
• If the conveyor shows clear signs of a defect.
Consult your RENA service provider with questions relating to service and repair. This will
ensure that your conveyor will operate properly at all times.
Introduction
Introduction
What does the TB-356 conveyor/stacker do?
The TB-356 conveyor is a variable speed conveyor that continuously
receives material output from another piece of equipment such as a printer
or labeler. The conveyor moves the material out of the way and neatly
stacks it in sequence in a drop-down stacking tray. Optionally, a roll of
blotter paper may be added to assist in the drying of ink on difficult to dry
material.
\text\tb356\introduction
1.1
TB356 Instruction Manual
Introduction
The parts of the TB-356 conveyor/stacker:
1. Material transport belt
2. A.C. power receptacle
3. Speed control potentiometer
4. Power cord
5. Hanging catch tray plate
6. Back stop
\text\tb356\introduction
1.2
7. Bottom catch tray plate
8. Thumb screw for back stop
9. Transport wheels
9a. Optional paper blotter roll
10. Power switch
TB356 Instruction Manual
Introduction
Technical Data
Dimensions
LxWxH
with Stacker
856mm x 262mm x 78mm
(34” x 10” x 3”)
1176mm x 262mm x 340mm
(46” x 10” x 13.5”)
Floor stand
Adjusts from 783mm to 1181mm
(31” to 46”)
Media size
Length
Width
90mm to 435mm
(3.5” to 17”)
Transport speed
TB-356
Variable
135mm to 448 mm per second
(5.5” to 17.5” per second)
TB356 S
100mm to 650 mm per second
(3.9” to 25.6” per second)
Stacking height
200mm
(8”)
Weight
TB-356
\text\tb356\introduction
312mm max.
(12.25”)
8.8 kg
(19.36 lb.)
Stacker
1.2 kg
(2.64 lb.)
Floor stand
7.6 kg
(16.72 lbs.)
Noise
<45 dB (A) at 1 meter
Power connection
100 V, 120 V, 220 V, 240 V
(switchable)
50 - 60 Hz
1.3
TB356 Instruction Manual
Introduction
Technical Data (cont’d)
Fuses
220V
110V
Certification
\text\tb356\introduction
1.4
3.15A (slow)
0.5A (slow)
GS for 3 years (European)
CE Conformity
TB356 Instruction Manual
Assembly
2.
Assembling the conveyor
Stacker
Parts
\text\dtb356\assembly
-Hanging catch tray plate (5)
-Back stop (6)
-Bottom catch tray plate (7)
-Knurled thumb screw for back stop (8)
-Nut for knurled thumb screw (11)
-Washer for knurled thumb screw (12) below
-Screws (2 ea.) for attaching bottom catch tray plate to hanging
catch tray plate (13)
-Washers (2 ea.)for screws (13)
2.1
TB356 Instruction Manual
Assembly
Adjusting for
the material
length
Loosen the knurled thumb screw (8). Take a piece of the
material being stacked and place it between the back stop plate
and the hanging plate. Move the back stop plate (6) in the
direction of the arrows until the material has about 1/4” of play.
Lock the knurled thumb screw (8).
Positioning the
conveyor in-line The conveyor should be positioned as close as possible to the
machine that it is in-line with. Be careful not to set the conveyor
so close that it actually touches the other machine. Make sure
that the belts are moving freely. The conveyor should be very
quiet.
\text\tb356\assembly
2.2
TB356 Instruction Manual
Power connection
Power connection
CAUTION !
Before plugging the power cable into the back of the printer check for the
correct voltage setting on the power input module.
If the setting is correct, go on to the sub-section on the “power cable”.
Voltage selection
-
Remove the power cable!
-
Open the (housing) lid (a)
at the slit (see arrow) with
a small screwdriver or
similar tool and place the
fuse mount carefully to one
side.
Pull the voltage selection
card (c) straight out of the
housing via the indicator
pin (b).
-
-
Turn the voltage selection card until the desired voltage can be read at the
bottom edge.
-
The indicator pin must be placed in the relevant space in the card and must
point upwards.
Insert the voltage selection card with the printed side toward the IEC plug
into the housing and align the indicator pin with the housing marking.
Replace the (housing) lid and check that the indicator pin is placed in the
opening with the desired voltage specification.
-
\text\da590\power
N.1
Power input module
Power connection
WARNING !
After changing the voltage, the fuses must also be changed ! (Fuse values can
be read off the letterplate.)
Changing fuses
-
Open the (housing) lid as described on the preceding page.
Screw the recessed head screw (e) out, by one turn.
First push the fuse mount (f) out horizontally and then lift it out.
European fuses [2 fuses (d)]
US fuse [1 fuse (d)]
-
\text\da590\power
For a US fuse turn the fuse mount (f) upside down.
Place the fuse mount (f) with the fuse(s) (d) onto the lid as shown in the
diagram.
Secure the recessed head screw (e) and replace the entire block in the
housing.
The fuse(s) is active.
N.2
Power input module
3.
Setting up to the conveyor
Connecting the power
Power cable
Caution !
The TB-356 is a class 1 safety device
Use grounded circuits only!
Plug the power cable into (2)
Setting up the transport wheels
The TB-356 comes with a holding bar that has a magnetic base. The bar is designed
to hold the three transport wheels (9) that are supplied. The wheels set up the printed
material to drop into the stacking tray in a neat stack. Each roller is held in place by
red securing clips (d) placed one on either side of the wheel. For proper operation the
wheels must be positioned on a transport belt (1) resting on the exit/drive roller (e).
\text\tb356\setup
3.1
TB356 Instruction Manual
printing
Operating the conveyor
The conveyor is turned on or off by pressing the power switch (10). The speed may
be adjusted faster or slower by turning the speed control potentiometer knob (3). The
minimum speed is (135 mm per sec.) about 51/2” per second and the maximum speed
is (448 mm per sec.) about 171/2” per second.
Optional blotter roll
The TB-356 may be used with an inkjet printer. With some material, ink drying time
may be so long that the ink smears when the piece is dropped into the stacker (high
gloss stock, varnished stock etc.). In these cases, the optional blotter roll and holder
will be helpful. The blotter roll must be placed over the exit/drive roller at the end of
the conveyor (see Note 1 below). The printed material passes under the revolving
roll and excess ink is blotted dry.
Note 1: If the blotter roll is placed anywhere other than directly over the exit/drive roller, it may cause the
transport belts to move out of position causing damage to the belts or the drive motor.
\text\da590\printing
3.2
DA590 Instruction Manual
printing
Changing the blotter roll
When the surface of the blotter roll stops blotting because it can’t absorb any more
ink, simply peel one layer of the paper away and tear it off.
Replacing the blotter roll
When the entire blotter roll has been used up, switch off the conveyor to replace it.
Remove the entire magnetic arm (9) from the conveyor. Pull the cardboard tube (a)
with the roll holder (b) still inside it, from the roll arm assembly bar (c). Tear off the
cardboard tube. Push a new blotter roll (d) onto the roll holder (b). The roll holder
should be inserted midway into the blotter roll. Then slip the blotter roll and holder
onto the roll arm assembly bar. Make sure that the open end of the paper is facing in
the right direction (e). Turn on the conveyor to check the operation of the blotter roll.
\text\da590\printing
3.3
DA590 Instruction Manual
Options
4.
Optional Accessories
Vertical paper stacker for 81/2” x 11” paper (R0353.2.007)
There may be occasions when you would like to stack material vertically.
The optional Vertical Paper Stacker allows this to be accomplished.
Insert the feeder baffle (24) into the 3 slits
of the back stop plate (6). (See arrow in the
following diagram.) The guide bars (a), keep
the printed media from slipping out on
either side.
\text\tb356\accessories
Shifting the back stop plate (6), changes the
position of the vertical paper stacker (see
broken outline in the figure below).
4.1
TB356 Instruction Manual
Options
Floor stand (R0356.3.003)
The floor stand supports the conveyor. The floor stand can adjust the height
of the conveyor from 783 mm (31”) minimum to 1181 mm (46”) maximum.
NOTE: The floor stand (R0356.3.003) shown above has been replaced by one with casters (R0356.3.005).
\text\tb356\accessories
4.2
TB356 Instruction Manual
Options
Floor stand (R0356.3.003) assembly instructions
SAFETY WARNING!
Do not open the wing nut (b) until the conveyor has been attached to the floor stand!
1.
2.
3.
4.
Screw the column (31) onto the base (33).
Screw the plate (32) onto the column (31).
Place the conveyor onto the plate (32).
Screw the plate (32) tightly to the conveyor.
NOTE: The floor stand (R0356.3.003) shown above has been replaced by one with casters (R0356.3.005).
\text\tb356\accessories
4.3
TB356 Instruction Manual
Options
Lateral transport (using cross support stacker accessories R0356.3.004)
The conveyor may be placed perpendicular to the output from a machine.
Two optional components are needed to deflect the output paper flow in the
right direction. A rear deflector (35) and an adjustable deflector (34).
Attach the rear deflector (35) to the rear end of the conveyor in the slots
provided. The material should come out of the machine and slide along the
top of the rear deflector until it hits the adjustable deflector. Attach the
adjustable deflector (34) perpendicular to the rear deflector. Do not place the
adjustable deflector anywhere on the transport belts.
\text\tb356\accessories
4.4
TB356 Instruction Manual