1
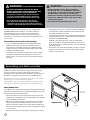
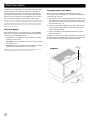
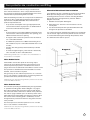
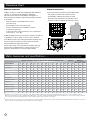
Wood Fire Installation & Owner’s Operation Manual
ECO Freestanding Models
• ECO Tiny Ped
• R1
• Wee Rad
• Xtreme Ped
• ECO Euro Rad
• ECO Tiny Rad
• R2
• ECO Wee Ped
• Xtreme Rad
• ECO Euro Ped
• ECO Wee Curve
• Xtreme Rad Base
Installation important information...........2
Optional wetbacks...................................9
Assembling your Metro.........................2-3
Getting to know your Metro...................10
Direct vent option.....................................4
Operating your Metro.............................10
Floor protector installation.......................5
Cleaning and maintenance .................11
Clearances and specifications...............6
Troubleshooting......................................12
Wetback and flue installation..................7
Metro warranty.......................................13
Operation important information............8
Pioneer wood fire accessories...............14
M1120 02/14
Where to install a Metro in your home.....9
PO Box 11, Inglewood 4347, New Zealand
Ph (06) 756 6520 • Fax (06) 756 6540
[email protected] • www.metrofires.co.nz
WARNING! Important Information
• WE HIGHLY RECOMMEND YOU READ THIS ENTIRE
MANUAL AS INCORRECT OPERATION AND/OR LACK
OF MAINTENANCE WILL VOID THE WARRANTY
• The appliance and flue-system shall be installed in
accordance with AS/NZS2918 and the appropriate
requirements of the relevant building code or codes
• Any modification of the appliance that has not
been approved in writing by the testing authority is
considered to be in breach of the approval granted for
compliance with AS/NZS 4013 and will void the warranty
This Metro wood fire has been tested to and complies with
AS/NZS2918:2001 when installed in accordance with this
manual. Please ensure you are fully conversant with this
relevant standard and the contents of this manual. Correct
installation is critical to the safe operation and performance of
this wood fire.
Please take particular note of the following:
• It is recommended that Metro’s be installed with a Metro
ECO flue system which has been developed to enhance
the performance of Metro wood fires. Any alternative flue
system must have a minimum flue pipe length of 4.2 metres
of 150mm diameter flue pipe.
• The 150mm active flue pipe must be fully encased from the
ceiling to the underside of the flashing cone at the top of
the flue system, (i.e. there must not be any 150mm flue pipe
exposed).
CAUTION! Important Information
•Mixing of appliance or flue-system components
from different sources or modifying the dimensional
specification or components may result in hazardous
conditions. Where such action is considered, the
manufacturer should be consulted in the first instance.
•Do not install a Metro fire if there is any sign of visible
damage to the product
• This manual must be left with the home owner
• All flue pipe joints must be sealed and riveted. The bottom
of the flue pipe in particular MUST be fully sealed into the
flue outlet of the Metro wood fire.
• In New Zealand, the Metro must be bolted through the floor
protector into the floor to comply with the seismic restraint
provisions of AS/NZS2918:2001
• All Metro’s are extremely heavy, varying in weight from
85kgs up to 150kgs. During the installation process do not
lift the appliance by yourself, and take care not to damage
the panel coating.
• Please take care when lifting the Metro into place onto the
hearth or floor protector as point loading may break tiles
and/or scratch surfaces.
Assembling your Metro wood fire
All Metro wood fires are packed in a single heavy-duty carton,
and tek screwed to a wooden pallet. Having removed the
packaging and located this manual, familiarise yourself with the
illustrations on pages 2 & 3, and proceed as detailed below.
Please note: you should only assemble this wood fire if you are suitably
experienced in wood fire assembly and installation.
Note: The Metro carton shows the model Metro you are about to install,
enabling you to select the appropriate model’s assembly instructions.
Metro Radiant Fires
These Metro’s are supplied virtually fully assembled. Packed inside
the firebox you will find bricks in a cardboard wrapper, a wire door
handle and the air control wire handle.
Air control
wire handle
• Remove the two tek screws located at the base of each rear
leg which secure the Metro to the wooden pallet, and carefully
“walk” the Metro off the pallet.
• Open the door fully and fit the side bricks to each side of the
firebox. Location lugs are fitted to the base and rear of the
firebox to retain the side bricks in position. Refer to Diagram 2.
• Attach the door handle to the door latch assembly by screwing
it on clockwise.
• Attach the air control wire handle by screwing it on clockwise.
2
Radiant Fires
Door
handle
Assembling your Metro wood fire
Metro Pedestal Fires
Diagram 1
Cook top grill
To minimise freight damage, the pedestal base has been
packaged inside the firebox. Please note: you should only
assemble this wood fire if you are suitably experienced in
wood fire assembly and installation.
To safely assemble your Metro, please proceed as follows: -
Safely remove straps by cutting straps with scissors.
-
Lift off carton, turn upside down (use to hold all discarded
packaging).
-
Lift off the top grill and place somewhere safe. Be careful
not to chip the enamel coating.
-
Open the door 90 degrees and lift the door off the hinge
and place somewhere safe. Be careful not to chip the
enamel coating.
-
Remove the pedestal packed in a cardboard wrap
-
Remove the pedestal mount plate
-
Remove pedestal heat shield (Xtreme & Euro models only)
Note: Xtreme is taped to rear heatshield and Euro is inside firebox.
-
Remove the side bricks, door handle and the bolt bag
-
Remove the 2 tek screws at the base of the inside of the
firebox that are fixing the wood fire to the pallet.
-
It is recommended that 2 people work together with this
step. Grab the underneath top of the firebox door opening
with one hand, holding the flue spigot with the other, slowly
lift the front of the wood fire all the way back and rest the
wood fire on it’s rear heat shield on the floor. Remove the
packaging pallet.
-
Xtreme & Euro models only – Fit the pedestal heat shield
over the 4 bolts as shown in Diagram 1, with the open edge
facing the front of the Metro (up)
-
Position the pedestal with its front facing over the 4 bolts
and fit the washers and nuts supplied, check to ensure the
pedestal is correctly aligned and securely tighten the nuts
-
It is recommended that 2 people work together with this
step. Grab the flue spigot with one hand and the other
hand underneath the top of the firebox door opening, lift
upwards standing the wood fire onto it’s pedestal.
-
Re-fit the door and top grill
-
Open the door fully and fit the side bricks to each side of
the fire box. Location lugs are fitted to the base and rear
of the firebox to retain the side bricks in position. Refer to
Diagram 2.
Door
Handle
Pedestal
heat shield
(For Euro Ped,
Xtreme Ped
and Xtreme
Base only)
Pedestal
Pedestal
mounting plate
(not available
on tiny ped)
Diagram 2
Top baffle
Note: The ECO Tiny Ped model utilises a slightly different pedestal to
that detailed in Diagram 1. The rear panel on the pedestal must be
turned around with the return fold facing back the opposite way. This
creates the mounting plate.
All Metro Models
Check to ensure the top baffle is in its correct position in the
top chamber of the firebox. It should be resting on four support
lugs (two on each side of the firebox). The baffle must be
hard back against the rear of the firebox with the “promet
extension” (white board) or return front steel edge of the baffle
facing forward as illustrated in Diagram 2.
Side brick
Note: The ECO Wee Ped has an additional “3rd brick” which fits to the
rear wall of the firebox, locating under/into a bracket provided in the
middle of the firebox’s rear wall, under the top baffle.
3
Direct vent option
The ECO Euro Ped, ECO Wee Curve and ECO Euro Rad models
have the option to be installed as “Direct Vent” appliances,
thereby drawing all primary and secondary combustion air
from outside the home. Once connected, this direct venting
option ensures the air that is heated within the home, stays in
the home improving efficiency and reducing fuel usage.
Note: Connection of the Metro’s direct vent inlet to outside the home
is optional. If not connected these Direct Vent models still offer greatly
improved performance and lower emissions due to the unique preheated air path for all primary and secondary combustion air that
these models consume.
Direct Vent Options
Three “Direct Vent kits” are available to connect the ECO DV
Metro to an air supply from outside the living environment of
the home. The kits available include;
• DV WALL KIT – For installations when the Metro is installed
against an outside wall.
Installing the Direct Vent Option
Remove the rear heatshield from the Metro wood fire by
unscrewing the four self tapping screws illustrated in Diagram
3 and proceed as follows;
1. Remove the section of panel illustrated with a “hatch”, from
the mid/bottom section of the rear heatshield. This section
to be removed has been pre-punched and only requires a
few small tabs to be cut.
2. Take the “inlet spigot” supplied in the “Direct Vent kit” and
slide it fully down into position into the brackets provided
on the rear of the firebox.
3. Replace the Metro’s rear heatshield with the four screws
previously removed.
The Metro wood fire is now ready for installation once you have
pre-fitted the Direct Vent kit into the wall or floor. Full instructions
for this procedure are supplied with the Direct Vent kits.
• DV FLOOR KIT– For installations onto a floor which has a free
air supply below it.
• DV CEILING KIT– For installations when the Metro is installed
against an internal wall and on a concrete floor
(DV Ceiling kit goes into the wall cavity, then up inside the wall into
the ceiling cavity, where the air supply is drawn from)
Diagram 3
Rear
heat shield
Inlet spigot
4
Floor protector size, construction and fitting
Pioneer manufacture an extensive range of what Pioneer
term “Ash Floor Protectors” which comply with the minimum
floor protector requirement of AS/NZS 2918:2001, and can be
installed with any freestanding Metro wood fire.
Metro freestanding wood fires do not require an insulated floor
protector as they comply with the minimum floor protector
requirements of AS/NZS 2918:2001. These minimum floor
protector requirements are;
• They must be of adequate size to give appropriate wall,
rear and front clearances/projections as detailed below
and in the chart illustrated on page 6.
Note;
- The floor protector must extend 200mm horizontally to the
rear and each side directly below the door opening, and
300mm forward of the door opening.
- The upper surface of the floor protector must be made of
non combustible material.
Alternative Metro Mount Plate Installation
For installations when it is desirable to position the assembled
Metro prior to bolting down, it is possible to “invert” the
mounting plate and use it as a means of bolting the Metro
directly to the floor, through the floor protector. Refer to
Diagram 4 and note;
1. Rotate the mount plate 180 degrees.
2. Remove the two “slide nuts” from the rear face of the
mount plate.
3. Secure the mount plate to the pedestal with 6mm bolts
through holes provided as illustrated.
You can then bolt down the Metro through the two rectangular
slots in the rear edge of the mount plate. These slots are more
accessible than bolting direct through the pedestal, and it
also eliminates the need for spacers.
• A suitable floor protector for a Metro freestanding wood
fire is therefore any non-combustible material which could
include;
- Ceramic tiles with grouted joints fixed directly to timber
flooring.
- A sheet of toughened glass, panel steel etc. laid directly
onto a wooden or other combustible floor.
Diagram 4
Note: If being installed onto a concrete or non-combustible floor a
floor protector is not required.
Metro Radiant Series
Lift the Metro onto the floor protector and using a tape
measure to ensure that the minimum wall clearances and
front floor protector projections as detailed in the chart on
page 6 are met or exceeded. Once the Metro’s location on the
floor protector is established and if the installation is in New
Zealand, seismic restraint is required.
Using masonry anchors if the floor protector is on a concrete
floor or coach bolts if a wooden floor, secure through the holes
provided at the base, behind both rear legs.
Note: The anchors must pass through the floor protector and securely
anchor the Metro to the floor.
Metro Pedestal Series
These models (excluding the ECO Tiny Ped) are supplied with
a “pedestal mounting plate”. Refer to Diagram 1 on page 3.
Place the mounting plate on the floor protector with the two
slots at the rear. A flue centre hole is marked on this plate and
the chart on page 6 enables you to locate the position of the
Metro without placing the Metro onto the floor protector. Once
the location of this mounting plate is established, secure it
through the floor protector into the floor using both of the two
holes provided.
Use masonry anchors if the floor protector is on a concrete
floor or coach bolts if a wooden floor.
Note: The anchors must pass through the floor protector and securely
anchor the Metro to the floor.
5
Clearance chart
Minimum clearances
Wetback connections
All Metro wood fires comply with AS/NZS 2918:2001. Minimum
clearances shown below are detailed in millimetres,
with a Pioneer double flue shield fitted to the appliance.
Measurements are taken from the following reference points
as illustrated:
Connections below are taken facing the Metro/wall.
• Tiny models are 92mm left of the flue centre.
• The Wee Rad is 226mm left of the flue centre.
• Xtreme models are 275mm left of the flue centre.
• All other models are 140mm left of the flue centre.
- From the nearest combustible wall or surface
(A, B, D, E, G, H)
- From the Metro’s flue centre (A, B, C, D)
- From the outermost point of the Metro’s cabinet
construction (E, F, G, H)
- To the edge of the ash floor protectors non-combustible
surface (C, F, I, J, K, L, M)
AS/NZS 2918:2001 allows for a reduction in minimum clearances
as detailed in Section 3, tables 3.1 and 3.2 of the standard.
N
O
Some Metro models have undergone additional testing which
allows for reduced clearances. Please see the footnotes
below the tables for applicable models.
Specifications were correct at the time of printing, but may
alter and those detailed within should be used only as a
guide. If in doubt, please consult your Metro retailer.
Metro clearances and specifications
(Minimum clearances shown are in mm, with a Pioneer double flue shield fitted)
Minimum installation clearances with a Pioneer double flueshield fitted (mm)
Clean Air Models
Wetback
Dimensions
A
B
C
D
E
F
G
H
I
J
K
L
M
N
O
Width
Depth
Height
ECO Tiny Ped
210
430
580
290
25
200
185
60
790
650
990
875
250
280
470
490
530
665
ECO Tiny Rad
225
552
580
420
150
200
300
75
805
650
1165
925
250
280
470
505
530
665
R1
243
774
586
554
280
244
530
100
829
825
1370
1118
425
N/A
N/A
488
485
668
R2
246
858
626
582
275
235
570
100
872
905
1449
1203
505
N/A
N/A
575
537
690
Wee Rad 1
243
568
580
455
150
230
260
100
823
825
1224
1015
425
295
485
615
498
688
ECO Wee Ped
260
595
580
385
85
200
300
110
840
825
1120
950
425
295
485
590
530
665
ECO Wee Curve DV
300
555
580
405
100
200
250
150
880
825
1150
975
425
280
470
607
537
665
Xtreme Ped
251
624
630
441
110
227
280
100
881
907
1254
1065
507
349
539
688
554
721
Xtreme Rad - Legs
251
650
630
458
100
227
280
100
881
907
1277
1077
507
349
539
740
554
743
Xtreme Rad - Base
251
650
630
458
100
227
280
100
881
907
1277
1077
507
349
539
740
554
743
ECO Euro Rad DV
250
625
625
435
80
200
250
100
875
905
1240
1065
505
338
528
750
575
745
ECO Euro Ped DV 2
230
585
625
495
170
200
250
80
855
905
1325
1120
505
325
515
670
575
715
1 Wee Rad corner clearance (E) can be reduced to 120mm with the Wee Rad corner wing shields fitted. This in turn also reduces clearances (D) to
425mm, (K) to 1180mm and (L) to 985mm. When fitting the corner wing shields the Wee Rad itself must be installed to a corner clearance (E) of 120mm.
The corner wing shields are then fitted which gives a wall to shield corner clearance of 100mm.
2 ECO Euro Ped corner clearance (E) can be reduced to 110mm if installed with a Pioneer double flue shield with the side extensions fitted. This in turn also
reduces clearances (D) to 435mm, (K) to 1240mm and (L) to 1060mm.
6
Wetbacks
WARNING! Important Information
•Do not connect to an unvented hot water system.
•Install in accordance with AS 3500.4.1 or NZS 4603
and the appropriate requirements of the relevant
building code or codes.
If the home is in a classified “clean air zone”, and dependent
on requirements/restrictions which may be imposed by your
local council, you may or may not be able to install a water
heating device. If in doubt consult your local Metro retailer.
Only Pioneer’s cast jacket wetback system should be fitted to
a Metro; alternative wetbacks will void the Metro’s emission
approvals and may seriously affect the performance of the
appliance and void the owner’s warranty.
• It is recommended the return pipe has a minimum rise of
1 in 12; performance will reduce as the distance to the
storage cylinder increases.
To fit the wetback proceed as follows: (For Wee Rad model
or any Xtreme Series model, then please follow instructions
included in the side wetback box)
1. Remove the rear panel of the Metro by removing the four
pozi drive screws. Remove the two pre-punched knockouts
from this panel.
2. Two further knockouts will be visible on the inner rear
heatshield; remove these also. Once these are removed
6mm nuts will be visible through the knockout holes.
3. Open the Metro’s door and locate two bolts securing the
pressed washers which are visible on the left hand side of
the firebox for both inlet and outlet connection points.
Note; Wetback systems are not suitable for use in locations where
the water supply has lime content, lime build up inside the coil will
eventually block the coil causing the wetback to fail.
4. A further three bolt heads will also be visible on the inside
rear wall of the firebox; these are threaded into the 6mm
thick firebox. Remove all three.
The wetback is fitted to the inside rear of the firebox, unless as
detailed in the points below. The connection pipe heights are
illustrated and detailed on the previous page 6. Please note:
5. Using the tube of sealant supplied with the wetback, apply
a liberal bead of sealant around both the two connection
• Wetback connections for the Tiny models are 92mm left
of the flue centre. The Wee Rad is 226mm, Xtreme Rad,
Xtreme Rad Base & Xtreme Ped are 275mm left of the flue
centre. All other Metro models are 140mm left of the flue
centre, facing the Metro/wall; the return pipe connection is
directly above the inlet connection.
• The Wee Rad, Xtreme Rad, Xtreme Rad Base & Xtreme Ped
wetback position is to the outside left hand firebox wall.
See specific instruction in the ‘Side Wetback’ box for these
appliances.
pipes and also the outer circumference of the wetback
which will face the inside rear wall of the firebox. This will
completely seal the wetback to the inside rear wall of the
fire on installation.
6. Fit the wetback into the firebox and carefully pass the
connection pipes through the holes in the rear of the
firebox. Securely attach the wetback using the three bolts
previously removed from the rear face of the firebox, fitting
them through the slots provided in the wetback’s jacket.
7. The wetback is now ready for connection to the storage
cylinder by a registered plumber.
• Reduced height pedestals are available for certain models
to reduce wetback connection heights.
Flue installation
It is recommended that all Metro freestanding wood fires be
installed with the energy efficient Metro ECO flue system which
comes complete with a detailed installation manual. This
installation manual must be presented with your application to
gain consent with your local council.
• The flue systems 150mm diameter flue pipe must terminate
a minimum of 4.6 metres above the top surface of the floor
protector.
Pioneer Flueshield
ECO Flue
A copy of the installation manual can be downloaded from
www.metrofires.co.nz, or a copy can be obtained from your
Metro retailer. Any alternative flue system must comply with
and be installed as detailed in AS/NZS 2918:2001, and a copy
of the installation manual must also be presented with your
application to gain consent with your local council.
All Metro’s require a 150mm diameter flue. Please note:
• All joints in the flue pipe must be sealed with Pioneer fire
cement (or similar) and riveted.
• The base of the flue pipe must be sealed into the outlet of
the Metro’s flue outlet. This is critical for optimum operation.
• Refer “Important Information” on page 2.
All Metro’s have been tested with
a Pioneer double flue mounted
shield. For the Metro to be installed
with minimal clearances as the
clearance chart states, only the
Pioneer double mounted flue
shield can be used. All other
flue shields will invalidate the
installation.
System Insta
llation Man
ual
ECO Flue
Systems
Freestandin
g Flue Syste
ms
ECO Flue
System Installa
tion Option
ECO Base
s ............
Flue System
2
& ECO Option
ECO Base
Flue System
Kits.... 3
Kit Installa
ECO Option
tion ........
Kit Installa
4-5
tion.............
................
5
Insert Flue
Systems
ECO Insert
Flue System
Kit Installa
ECO Flue
tion .......
System Minim
6-7
um Heigh
ts ..............
8
The Metro can be installed without a
flue shield, if this is the case it needs to be installed as AS/
NZS 2918:2001 stipulates.
7
WARNING! Important Information
• WE HIGHLY RECOMMEND YOU READ THIS ENTIRE
MANUAL AS INCORRECT OPERATION AND/OR LACK
OF MAINTENANCE WILL VOID THE WARRANTY
• Any modification of the appliance that has not been
approved in writing by the testing authority is considered
as breaching AS/NZS 4013 and will void the warranty
• Do not use flammable liquids or aerosols in the vicinity
of this appliance when it is operating
CAUTION! Important Information
•This appliance should be maintained & operated at
all times in accordance with this instruction manual
• This appliance should not be operated with cracked
door glass, over worn, faulty or missing door seals
• Do not use driftwood, treated or unseasoned (wet)
fuel, the use of most types of preservative treated
wood as fuel can be hazardous
• Do not empty ash into a combustible container
•Never operate your Metro with the top grill removed
• Do not dry clothes on or near this appliance
• Do not use flammable liquids or aerosols to start or
rekindle the fire OR store fuel within the Metro’s specified
installation clearances
• Never operate your Metro with the door ajar, except on
initial start up
• Open the air control before opening the Metro’s door
Congratulations on the purchase of your Metro wood fire
This low-emission, slow combustion appliance is designed to
give you many years of warmth and service, subject to the
following key factors. These key factors, if not adhered to are
the major causes of unsafe installation, poor performance
and flue blockages and product failure.
1. Your Metro wood fire must be installed correctly. Metro
recommend a competent and suitably qualified installer.
2. The only fuel to be used in this appliance shall be wood
that meets the following criteria.
– Less than 25% moisture
– Has not been treated with preservatives or
impregnated with chemicals or glue,
– Is not chipboard, particle board, or laminated board,
– Is not painted, stained or oiled
3. The appliance shall be operated at all times in
accordance with the “Installation and Operating
Instructions” supplied with each appliance.
4. It is preferable that Metro wood fires should be installed with
Metro ECO Flue Systems.
5. Coal must not be used as a fuel.
Please also note the following important points:
• In New Zealand a building consent is required from your
local building authority. The homeowner is responsible for
obtaining this consent.
• As correct installation is critical to the performance and
safe operation of your Metro, it is recommended your Metro
be installed by a registered installer or a person suitably
qualified in the installation of wood fires. Your Metro retailer
will be able to arrange professional installation for you.
• During the very first fire your Metro will give off an odour
and fumes as the firebox paint cures. Do not be alarmed;
open all windows and externally opening doors in that
room and close any internally opening doors. This curing
process will last for approximately one hour and is likely to
happen this one time.
8
• Properly seasoned (dry) timber is necessary for the Metro
to operate efficiently; firewood that contains a high
moisture content will result in flue pipe blockages, reduce
heat output and create other issues.
Note: Softwood usually takes 12 months to season - Hardwood can take
up to 24 months to season - Wood must be stored in a location that
enables air circulation. Unseasoned wood stored in a closed woodshed
without air circulation will still be unseasoned 12 months later.
•
It is critical that the fire not be operated with over worn,
faulty or missing door seals. Door seals will harden over
time and become over-worn (3-4 year’s) this will cause air
to leak into the fire, causing the appliance to ‘over fire’.
• It is critical that the fire not be operated with over worn,
faulty or missing bricks, baffle plate, baffle extension
(white board on the baffle plate)
• It is critical that the fire not be operated with cracked, or
broken door glass.
Please note, the above 3 points require regular inspection/
maintenance (every time the ash bed is cleaned out,
generally 3-5 times a season) and if not maintained will void
the firebox warranty. Please ensure you keep your proof of
purchase/receipt on any parts you purchase.
• For optimum performance fuel must be loaded so the logs
lay “front to rear” in preference to laying across the width
of the firebox. Spaces should be left between the logs to
enable oxygen to get to as much of the surface of the fuel
as possible.
• A small hot fire loaded frequently is more efficient than a
large fire burning on a low setting.
• Your Metro is covered by a full unconditional 12 month
warranty on replacement parts, and a 10 year firebox
warranty. See page 15 for warranty
conditions.
Where to install a Metro wood fire in your home
Wood fires are usually installed in the main living area, which is
the section of the home that is usually kept the warmest, being
the area in the home most frequently occupied. However,
before deciding on the best location for your Metro wood fire
you may wish to consider:
• Water heating. If you are intending to have a wetback it
is important that the wood fire is as close as practically
possible to the water storage cylinder.
• Split level homes are best heated when the wood fire is
installed on the lower level, as the heated air will rise to the
higher levels.
gutters etc are directly above your preferred site. If you
have a two storey dwelling you need to consider the
second storey to ensure you don’t have the flue directly
outside a second storey window.
Generally, you can install your Metro in your home anywhere
that suits you; Pioneer offer various fan systems to transfer heat
to other sections of the home that are not heated sufficiently.
It is necessary if using a fan system that the Metro you have
purchased has sufficient output to heat the total area you wish
to heat. Your Metro retailer or installer will be able to advise if
you are uncertain.
• Building construction is another consideration. Specified
clearances from walls, curtains etc must be maintained
and you need to ensure no structural beams or internal
Optional wetbacks
If your home is in a classified “clean air zone”, and dependent
on requirements/restrictions which may be imposed by your
local territorial authority (council) you may or may not be able
to install a water heating device. If in doubt consult your local
Metro retailer.
Water heating is another key feature of your Metro wood fire, and
on offer are a number of options depending on the model you
have purchased. Metro offer a 2kW wetback suitable for
the Tiny Rad and Tiny Ped. The ECO Wee Curve and Ambie One
cannot be fitted with a wetback in a clean air zone, but they can
both be fitted with a wetback if installed on a 2HA+ rural property.
All other ‘ECO’ Metro’s can be fitted with the ECO wetback.
The Side wetback is suitable for the Wee Rad, Xtreme Rad,
Xtreme Rad Base & Xtreme Ped. Both R1 and R2 models cannot
be fitted with a wetback at all.
Note: Wetbacks are not suitable for use in locations where the water
supply has lime content. Lime build up inside the coil will eventually
block the coil causing the wetback to fail.
Cost Savings
Wetbacks can enable substantial power savings, dependent
on the climate in the area in which you live. If you live in a cold
climate you are likely to use your Metro for many months of
the year, in which case a Pioneer wetback will reduce or even
eliminate your water heating costs over those months. If however
you live in a warmer climate and use your Metro for only a few
hours a day over the colder months, electricity savings will be
considerably less.
Water Pressure
A common misconception is that you must have a low-pressure
system to have a wetback; this is not true. You must have a
“vented” system and high-pressure cylinders are usually not
vented. However you can install an “indirect” cylinder which
contains a secondary coil inside the storage cylinder, enabling
you to have a wetback while retaining a high-pressure system.
Other considerations are:
• Distance from your Metro to the storage cylinder will affect
the amount of hot water produced.
• Your climate & the manner in which you will ‘fire’ your Metro
will determine the amount of hot water produced.
9
Getting to know your Metro wood fire
Operating your Metro wood fire is simple and you will quickly
learn how to get the best from it. First take a minute to
familiarise yourself with your new Metro.
• Raise the door handle anti-clockwise until the latch
releases, then slowly pull the door open. You will note that
if you let the door go before it is at 90° to the appliance, it
will fall closed. This is a safety feature that ensures the door
cannot fall open if it is not latched securely. For the door to
remain open, you must open it fully.
• There is a single air control making your Metro easy to adjust.
This control moves from left to right, which is “low to high”.
The Metro Radiant fires have a wire air control handle located
at the upper right hand side of the appliance. Simply pull out
to increase burn rate or push in to reduce burn rate.
Radiant fires air control
All other fires air control
All other model Metro’s have an air control knob located on
the upper front of the appliance.
Slide this control knob gently from right to left until you reach
a stop. This is a pre-set “low” position. Your Metro must not be
operated at a lower burn rate than this pre-set low allows.
Operating your Metro wood fire
If your Metro has only been installed within the past few
days, the fire cement seal at the base of the flue will not be
fully cured. To ensure the cement sets without blistering it
is recommended you burn 2-3 sheets of loosely crumpled
newspaper at a time, approximately once every hour over a
6-8 hour period.
During the very first fire your Metro will give off an odour and
fumes as the firebox paint cures. Do not be alarmed. Open all
windows and externally opening doors in that room and close
any internally opening doors. This curing process will last for
approximately one hour and is likely to happen this one time.
Please note:
• Always open the air control fully prior to opening the door,
then open the door slowly.
• When loading logs, place them end-on, “front to back”; air
spaces should be left between the logs to enable oxygen
to get to as much of the surface of the fuel as possible.
• Every time you refuel, leave the air control on “high” for a
minimum of 20-25 minutes.
• Never use the door to force wood into the firebox, as this is
likely to break the glass.
Start up
Cooking
Place a quantity of loosely crumpled newspaper on the base
of the firebox until it is approximately 50% full of paper, or
place firelighters on the base of the firebox. Add dry kindling
and move the air control knob fully to the right, being the “full
open” position.
All Metro’s are designed to enable cooking of soups, stews
and casseroles etc, and your Metro will easily boil a flat
bottom stainless steel kettle. The Radiant Series have a
dedicated cooking top enabling large pots to be placed on
the cook top, while all other models have a lift-off grill.
Light the paper at two or three locations across the front of
the door opening and leave the door slightly ajar resting
on the latch pin if necessary for a few minutes while the
fire establishes. Once the kindling is burning well, open the
door and add 2-3 small logs at a time until you have a wellestablished fire. Usually this will take approximately 30 minutes,
during which time the air control should be set on “high” and
the door should be closed, except for the initial few minutes
and when fuel is being added.
Normal operation
Once the fire is well established, regulate the air control to
achieve the desired burn rate and heat output. As you move
the air control to the right, burn rate, firebox temperature and
heat output will increase, if you move the control to the left
they will decrease.
10
Note: Metro’s supplied with a lift-off top grill have this feature to enable
the grill to be removed for cleaning if you have a spill. The lift-off top
grill must be left on when cooking, because if removed the wall
temperatures next to the appliance may become excessive and
the top of the firebox is generally too hot to cook on directly. Please
note: Although very durable, Metro’s in a satin stainless look are not
recommended to be used to cook on.
Cleaning and maintenance for your Metro wood fire
The Metro radiant fires are painted wood fires and coated
with “Pioneer Metallic Black” high temperature paint and will
require periodic repainting to keep them looking their best.
All other Metro’s are coated with either vitreous enamel or a
high temperature silver coating (HPC);
• Vitreous enamel is extremely durable and designed to last
the life of the appliance. As vitreous enamel is glass, a solid
or heavy object dropped or banged against a panel could
chip the enamel surface.
• HPC coated Metro’s are offered in a stainless steel look.
Although very durable it is not recommended that Metro’s
with this finish be used to cook on.
All model Metro’s can be cleaned with a cloth when the
appliance is not operating.
Door glass
Providing your fuel is properly seasoned, under normal
operating conditions the air-wash design of the Metro’s firebox
will keep the door glass clear. If the glass requires cleaning you
may use either a razor blade scraper or an oven cleaner.
If your door glass breaks it must be replaced with 5mm thick
ceramic glass which is available from your local Metro retailer.
Door seals
Over time, usually 3-4 years, the door and glass seals will
become hard and cause air to leak into the firebox, causing
the appliance to ‘over fire’. Your Metro retailer stocks
replacement woven fibreglass door and glass seals, which
need replacing when they become hard and over worn.
The door of your Metro is easily removed. Hold it in both hands
and lift the hinge end of the door up and over the top hinge
pin, then lower the door from the bottom hinge pin.
Side bricks
Hair-line cracks are not uncommon and are a result of
the intense heat within the Metro’s firebox, coupled with
mechanical damage caused by accidental impact when fuel
is being loaded. However if the side bricks become cracked to
the extent that they start to break up, they must be replaced.
Door adjustment
Provision is available on both sides of the door for adjustment.
To adjust the hinge end of the door, open the door fully, loosen
the top hinge nut and slightly lift the latch end of the door;
you will see the hinge assembly move back 1-2mm which will
usually be sufficient. Retighten, then repeat by loosening the
lower hinge nut, this time applying a slight downwards pressure
onto the door to move the lower hinge assembly back a similar
distance, then retighten.
The door latch is also adjustable, as the latch pin on the right
side of the firebox is fitted through a slot which enables the
latch pin to be loosened, moved back and re-tightened.
Ash removal
Over a period of time ash will build up in the base of the Metro’s
firebox and require removal. The time this build-up takes
depends on the density and cleanliness of your fuel.
To remove the excess ash your Metro should not be operating.
• Open the door, and using a hearth shovel or similar, empty
the excess ash directly into a steel or non-combustible
container.
• If the ash is not disposed of immediately, be careful where
you store it, as the ash can retain heat for many days and
become a fire hazard.
• You must leave a bed of ash in the base of the firebox
approximately 10mm deep; this insulates the base of the
firebox and improves combustion.
Top baffle
This is a ‘sacrificial’ part of the firebox and should be checked
monthly. Usually only the “Promet” (white board) front/
underneath section needs to be replaced when it starts to
disintegrate.
Note: Cracks in the promet are not uncommon and have no adverse
effect on the operation of your Metro. These cracks are the result of
intense heat coupled with expansion and contraction. Burning wood
which is not properly seasoned, i.e. 25% moisture content or more, will
over time cause the promet to disintegrate and require replacement.
Flue systems
Should be checked annually, particularly the bottom end of the
lower flue section at its rear lock formed joint. If deterioration is
noticed contact your Metro retailer or installer.
The flue pipe should also be swept a minimum of once a year,
or as required during the winter season. If smoke enters the
room when you open the Metro’s door this usually indicates
the flue pipe is becoming restricted and needs cleaning. The
frequency of flue pipe cleans depends on many factors, with
the main variables being:
• The seasoning of the wood. If not properly seasoned you will
require frequent flue pipe cleans.
• The density of the wood. Softwoods generally result in more
creosote build-up in the flue pipe.
To clean the flue pipe of your Metro, proceed as follows:• Open the Metro’s door fully, reach inside with the palm
of your hand face-up and extended, lift the top baffle
approximately 20mm, then lift it forward out through the
door opening, placing it on a sheet of newspaper you have
placed on the front of the floor protector.
Note: Some appliances have a two piece top baffle.
• Close the door and slide the air control to the left.
• Once on the roof, remove the cowl from the top of flue
system and sweep the flue pipe using a 150mm-diameter
flue pipe brush as detailed in the instructions provided with
the fluebrush.
• Once the flue pipe is clear, clean and refit the cowl.
Remove the excess soot which has fallen into the firebox,
leaving a layer of ash 10mm deep on the base of the
firebox, then refit the top baffle.
Note: The baffle must be fitted so its rear is touching the back of the
firebox; if uncertain refer to page 3 in the installation section at the front
of this manual, which shows illustrations of the baffle location.
11
Troubleshooting your Metro wood fire
If your Metro is installed correctly, your fuel is dry and you
operate your fire correctly, you will find it to be a pleasure to
use. Metro’s many years of experience within the wood heating
industry has shown that dissatisfaction is mainly due to:
• unseasoned fuel
• faulty installation
• operational error
• or a combination of the above 3 points.
The following may be of assistance if you are experiencing any
of these problems.
SMOKE ENTERS THE ROOM WHEN THE METRO’S
DOOR IS AJAR (Possible reasons and solutions)
Check flue pipe joins:
If the flue pipe joins are not sealed correctly, the flue pipe will
not draw as well as it should. The flue pipe join connecting into
the flue spigot on top of the Metro is most critical, if this is not
sealed correctly, smoke will enter the room when the door is
ajar. To check this join is sealed correctly, run a match or lighter
flame around the join. If the flame is sucked into the spigot then
it is not sealed correctly. This check needs to be done when
the fire is not going. Ensure you check the rear of the flue pipe/
spigot join, as due to the seam in the flue pipe, this is the most
common area for not being sealed correctly.
Ensure the fuel you are using is correctly seasoned:
If you are burning unseasoned fuel (wet), the fire will cause
nothing but problems. The Metro won’t deliver much heat, it will
be lazy, smoke will enter the room when the door is ajar, and
the door glass will run black.
Flue pipe length is too short:
Add more flue pipe as the longer the flue system, the better the
draw of the flue pipe. Please note, if you did not purchase the
Metro ECO Flue System, you will not have the ECO Cowl which
increases draw. We highly recommend the Metro ECO Cowl is
fitted as this will increase the draw. if you already have an ECO
Cowl and smoke is still entering the room, please add another
600mm length of flue pipe.
Downdraft:
If you have checked all of the above and the fire is still smoking
into the room, it’s possible there may be a down draft issue.
Down draft can be caused by many variables, and it is purely
trial and error to ascertain the cause. Solutions may be:
• ‘H’ Cowl, designed purely for downdraft issues, but if you
have an ECO Cowl fitted as standard, you will also need to
add another 600mm of flue pipe to compensate as the H
Cowl is shorter in length.
• Directional Cowl, designed for high wind areas.
Air control setting:
Ensure the air control setting is on high before opening the door
to reload, as this increases the draw up the flue pipe.
12
If your Metro did not smoke, but its starting too and
is getting worse:
The flue pipe is in need of a clean. It is recommended that the
flue pipe be cleaned every season, however if you are burning
the fire on low a lot, or are using unseasoned fuel, flue pipe
cleans will be required more frequently.
Correct operation:
Modern day wood fires need to be operated hard and fast,
more so than low and lazy to ensure the firebox and flue
pipe runs hot and efficiently. If the fire and flue pipe is up to
temperature it will perform extremely well, the smoke will draw
up the flue pipe with ease, and the fire will produce good
amounts of heat.
if the fire is operated on low a lot of the time, the door glass will
run black, the flue pipe will tend to block up more frequently
and the fire will end up smoking into the room when reloading.
It’s better to have a small fire running hard and fast, rather than
a big fire running low and lazy.
OTHER ISSUES YOU MAY EXPERIENCE
I can smell smoke in the room after a low burn cycle:
The smell is creosote that will be seeping through the flue
pipe join or out of the flue spigot onto an external surface,
thus creating the smell in your room. The cause will be either
unseasoned fuel or incorrect operation on low burn cycles.
Creosote is very corrosive and excessive buildups will result in the
flue pipe and potentially the flue spigot and upper burn chamber
failing. Failure of flue pipe or firebox due to creosote build up is
not covered under warranty as excessive creosote build up is only
possible from either unseasoned fuel or incorrect operation.
The Metro is noisy as it heats up and cools down:
There will always be some expansion and contraction noise
as the Metro heats and cools. This can usually be reduced by
loosening three nuts at the rear of the appliance. To remedy,
locate the 25mm deep cavity at the rear of your Metro between
the ‘rear panel’ and the ‘inner rear heat shield’. You will see a
6mm nut and two 6mm bolt heads in this cavity. Using a 10mm
ring or open ended spanner, loosen all three so they are finger
tight only.
On all non-DV model Metro’s the air channel that allows the
combustion air to enter the fire is fitted to the top underneath of
the door opening. It is fitted with two M6 bolts. Slightly loosen both
of these bolts. Note: This does not apply to the ECO DV models.
The Metro won’t turn down as much as it did
The door itself may need readjusting, the hinge and latch is
slotted and allows for movement. Loosening the hinge and
moving it back a few mm will make the door seal tighter and
stop air leaking into the fire. The door and glass seals may be in
need of replacing, which is generally required every 3-4 years.
Familiarise yourself with the instructions on page 11 before
proceeding with this maintenance.
Warranty details for your Metro wood fire
Metro wood fires are manufactured in New Zealand, using
the highest quality of materials, workmanship and the latest
manufacturing techniques, which is why we offer a full 10 year
firebox warranty and 1 year parts warranty for peace of mind.
METRO WARRANTY
(NZ Consumer laws apply to this warranty)
Pioneer Manufacturing Limited (Pioneer) warrants the steel
firebox against defective materials and workmanship which
would render it unfit for normal domestic use, from the date of
purchase by the original consumer, for a period of 10 years.
Components including panel coating, door retainers, door
seals, glass, trim, baffle & bricks are warranted for a period
of 1 year from the date of original purchase for domestic use
against defective materials and workmanship.
All associated accessories including, but not limited to, fans,
flue systems, flue shields, wetbacks, tool sets, ash pots etc, are
covered by a 1 year warranty against defective materials and
workmanship.
It is recommended, but not a condition of this warranty, that a
full service/inspection of the Metro wood fire be carried out at
the end of each winter season.
Warranty Conditions:
• The Metro wood fire must be installed, operated and
maintained strictly in accordance with the building code
and this installation and operation manual.
• The Metro wood fire must be installed and used in a
domestic application.
• This warranty covers appliance like for like replacement or
repair at the manufacturer’s discretion but excludes freight,
travel, installation, labour and/or any other associated costs.
• Pioneer or their agents are not liable for any loss or expense
direct or indirect arising from the failure of any part or
operation of the appliance.
• Operation of this appliance in violation of the warnings in this
operation and installation manual will void this warranty.
• Your Metro wood fire must be regularly maintained and we
recommended it is also serviced annually. Proof of servicing
may be required. If a wood fire is not regularly maintained
and serviced, the life span will be reduced. If your Metro
wood fire has been neglected, by not being regularly
maintained and serviced, warranty may be declined.
•
It is critical that the fire not be operated with over worn, faulty
or missing door seals. Door seals will harden over time and
become over-worn (3-4 year’s) this will cause air to leak into
the fire, causing the appliance to ‘over fire’.
• It is critical that the fire not be operated with over worn, faulty
or missing bricks, baffle plate, baffle extension (white board
on or under the baffle plate)
• It is critical that the fire not be operated with cracked, or
broken door glass.
IMPORTANT INFORMATION
Note: The above 3 points require regular inspection/
maintenance (every time the ash bed is cleaned out,
generally 3-5 times a season) and if not maintained will
void the firebox warranty. Please ensure you keep your
proof of purchase/receipt on any parts you buy.
• A claim under this warranty should be directed to the retailer
who supplied the Metro wood fire. If this is not possible write
directly to the manufacturer stating details of fault, model
and serial number of your Metro, date and proof of purchase
and name of retailer where the Metro was purchased.
Warranty Exclusions:
This manufacturer’s warranty does not cover:
• Service calls which are not related to any defect in the
product (i.e. operational, installation or fuel issues). The
cost of a service call will be charged if the problem is not
found to be a product fault.
• Defects caused by factors other than normal domestic use
or use in accordance with the product’s operation manual.
• Defects caused through the product being operated in
an “over-fired” manner resulting in sections of the firebox
operating excessively hot to the point that sections glow
red. (Note – This will result in distortion of the firebox)
• Defects to the product caused by accident, neglect, misuse
or act of God.
• The cost of repairs carried out by non-authorised repairers
or the cost of correcting such unauthorised repairs.
• Required maintenance as set out in this manual.
Service under this manufacturer’s warranty must be provided
by a repairer authorised by Pioneer Manufacturing Ltd. Such
service shall be provided during normal business hours.
WARNING! Complete and retain these details at time of purchase:
Purchase Date
Serial Number
Model
Colour
Retailer
13
Metro - Visit us online today www.metrofires.co.nz
Metro Wood Fire Specifications
Metro have a Specifications Brochure available which details
relevant compliance data for every model. This brochure is
updated annually and details the minimum clearances and
specifications for all models, which is generally required when
applying for a building consent. See your Metro retailer to
obtain a copy, or visit www.metrofires.co.nz
metrofires.co.nz
Visit the Metro website: www.metrofires.co.nz to view Metro’s
‘video demos’ showing the latest in wood fire technology energy
saving options. You can view the entire Metro product range,
find out where your nearest Metro retailer is located or simply
check out the latest specifications, installation requirements
and emission and efficiency data for the Metro of your choice.
Pioneer heating accessories
Metro Accessories
Metro offer a range of heating accessories designed to
compliment your Metro wood fire. See below for some of the
products within our heating accessory range.
This range of accessories includes floor protectors, heat transfer
systems, child guards, baffles, bricks and more. For further
details ask your Metro retailer for a copy of the Metro heating
accessories brochure, or visit www.metrofires.co.nz
ECO Flue Systems
Flashrites and Versatiles
Wetbacks
High Temperature Paint
Child Guards
Heat Transfer Systems
Universal Door Seal Kits
Fire Cement And Silicone
Corner and Wall Floor Protectors
Glass Tape
Door Seal Rope
Chubb Smoke Detectors
14
Parts guide for your Metro – Baffle, promet and wetback
Listed below are the parts and product codes for your Metro
wood fire. The promet/baffle should be regularly checked and
must always be in place during the operation of your fire.
Your Metro wood fire must be regularly maintained and we
recommended it is also serviced annually. If a wood fire is
not regularly maintained and serviced, the life span will be
reduced. If your Metro wood fire has been neglected, by not
being regularly maintained and serviced, with parts replaced
as required, your warranty may be declined.
Note: Cracks in the promet are not uncommon and have no adverse
effect on the operation of your Metro. These cracks are the result of
intense heat coupled with expansion and contraction and is normal
wear & tear.
Clean air models
Type of promet required / Type of steel baffle(s) required
ECO Tiny 500-1550
Water heating options
ECO Tiny Complete 500-2050
ECO 2kW Booster 450-0050
mm
5
12
• ECO Tiny Ped
• ECO Tiny Rad
32
0m
32
m
0m
Wee/R1 Set 500-2005
m
6m
24
m
Wee/R1 Complete 500-2505
0
50
• R1
10
70
No wetback can be fitted
42
42
0m
Xtreme/R2 Set 500-2010
0m
m
Xtreme/R2 Front 500-2510
m
m
0m
25
Xtreme/R2 Rear 500-2515
85
70
• R2
No wetback can be fitted
50
50
50
50
0m
0m
0m
m
m
m
mm
Wee/R1 Set 500-2005
m
0m
5
19
13
Wee/R1 Complete 500-2505
Side Wetback 450-0275
0
50
• Wee Rad
10
70
42
42
0m
0m
m
ECO Small 500-1650
m
m
0m
25
Wee Curve Complete 500-2150
No wetback if this fire is
installed in a clean air zone.
The LTD wetback can be
fitted in a non-clean air zone.
• ECO Wee Curve DV
42
0m
42
m
0m
m
mm
ECO Small 500-1650
LTD 3kW Wetback 450-0100 or
LTD 4kW Wetback 450-0150
m
2m
24
5
12
ECO Small Complete 500-2100
ECO Wetback 450-0450
• ECO Wee Ped
42
0m
m
42
0m
m
m
5m
12
Xtreme/R2 Set 500-2010
• Xtreme Rad [LEGS]
• Xtreme Rad [BASE]
• Xtreme Ped
Xtreme/R2 Front 500-2510
m
8m
24
Xtreme/R2 Rear 500-2515
Side Wetback 450-0275
mm
85
5
19
70
50
50
0m
50
50
0m
0m
m
m
m
m
0m
13
ECO DV 500-1750
ECO DV Complete 500-2200
m
5m
12
No wetback if this fire is
installed in a clean air zone.
The LTD wetback can be
fitted in a non-clean air zone.
• ECO Euro Rad DV
39
5m
m
ECO DV 500-1750
39
5m
m
m
0m
26
ECO DV Complete 500-2200
LTD 3kW Wetback 450-0100 or
LTD 4kW Wetback 450-0150
ECO Wetback 450-0450
m
5m
12
• ECO Euro Ped DV
39
5m
m
39
5m
m
m
0m
26
15