1
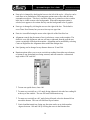
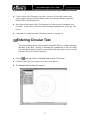
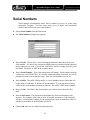
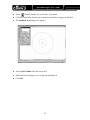
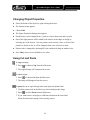
Spectrum2 Designer
User’s Guide
Spectrum2 Designer User’s Guide
Document Revision: 092903
Table of Contents
GETTING STARTED.................................................................................................................................... 3
INTRODUCTION.......................................................................................................................................... 3
INSTALLING THE APPLICATIONS .......................................................................................................... 3
SPECTRUM2 DESIGNER............................................................................................................................... 3
PRINTER DRIVER ........................................................................................................................................ 4
THE DISPLAY .............................................................................................................................................. 8
DESKTOP AND CD-R TEMPLATE .............................................................................................................. 8
TITLE BAR ............................................................................................................................................... 8
WINDOWS BORDER ................................................................................................................................. 9
MENU BAR .............................................................................................................................................. 9
TOOLBAR................................................................................................................................................. 9
SCROLL BARS .......................................................................................................................................... 9
STATUS BAR ............................................................................................................................................ 9
ADJUSTING THE DISPLAY...................................................................................................................... 10
ADJUSTING IMAGE SIZE............................................................................................................................ 10
HIDING THE DISPLAY ........................................................................................................................... 10
PRINTING ................................................................................................................................................... 11
PRINTING FROM A STANDARD PRINTER ................................................................................................ 11
PRINTING FROM THE SPECTRUM2 ......................................................................................................... 11
ADJUSTING THE PRINTOUT................................................................................................................... 12
FILE FUNCTIONS ...................................................................................................................................... 13
DESIGNING A LABEL............................................................................................................................... 14
ENTERING STANDARD TEXT ................................................................................................................ 15
ENTERING CIRCULAR TEXT......................................................................................................... 17
EDITING STANDARD AND CIRCULAR TEXT ..................................................................................... 19
MOVING STANDARD TEXT ....................................................................................................................... 19
MOVING CIRCULAR TEXT......................................................................................................................... 20
RETURNING TO THE TEXT DIALOGUE BOXES ............................................................................................ 20
CHANGING OR DELETING TEXT ................................................................................................................ 20
SERIAL NUMBERS ..................................................................................................................................... 21
WORKING WITH BASIC SHAPES........................................................................................................... 23
ENTERING BASIC SHAPES ......................................................................................................................... 23
RESHAPING AND RE-SIZING BASIC SHAPES .............................................................................................. 24
FILL PATTERNS......................................................................................................................................... 24
EDITING .................................................................................................................................................... 24
WORKING WITH FREEHAND ................................................................................................................. 25
1
Spectrum2 Designer User’s Guide
Document Revision: 092903
WORKING WITH IMPORTED GRAPHICS ............................................................................................. 25
IMPORT THE GRAPHIC............................................................................................................................... 26
IMAGES AND TEXT.................................................................................................................................... 26
EDITING LABEL GRAPHICS ................................................................................................................... 26
MOVING OBJECTS ..................................................................................................................................... 26
OVERLAYING OBJECTS ............................................................................................................................. 28
CHANGING OBJECT SIZE ........................................................................................................................... 28
CHANGING OBJECT PROPERTIES ............................................................................................................... 29
USING CUT AND PASTE ............................................................................................................................ 29
DELETING OBJECTS .................................................................................................................................. 31
INDEX ....................................................................................................................................................... 32
MF DIGITAL, INC. END USER LICENSE AGREEMENT ............................................................................... 33
2
Spectrum2 Designer User’s Guide
Document Revision: 092903
Introduction (Getting Started)
The Spectrum2™ Designer labeling software is the link between label designs
created by users and their CDs in the Spectrum2 printer. Designer enables users
to arrange graphics, text, and serial numbers into customized CD surfaces. The
image on the screen is transferred to the Spectrum2 printer, which prints the
image directly onto CD-R or DVD-R disks.
Installing the Applications
Spectrum2 Designer
Printer Driver
Spectrum2 Designer
Spectrum2 Designer is a Windows based application, so Windows must be
running in order for the program to operate. Spectrum2 Designer is compatible
with MS-Windows 95, MS-Windows 98 and MS-Windows NT 4.0. If one of
these operating systems is not already installed on your computer, you will need
to load one of them before installing Spectrum2 Designer.
If you have MS-Windows 95 or MS-Windows NT 4.0
b Exit Windows programs.
b Load the first Spectrum2 Designer disk.
b Select Start from the taskbar.
b Scroll to Settings and choose Control Panel from the Settings menu.
b Double-click on Add/Remove Programs icon in the Settings box.
b Directions appear on your screen.
b Press next to move through the installation process. To return to a previous
screen, click back.
b When the installation process is complete, a shortcut will appear on your desktop.
3
Spectrum2 Designer User’s Guide
Document Revision: 092903
If you have MS-Windows 98
b Exit all Windows Programs.
b Load the first Spectrum2 Designer installation disk.
b Select Start from the taskbar and scroll to Settings.
b Choose Control Panel from the Settings menu.
b Double-click on Add/Remove Programs.
b Choose Install.
b Follow the instructions that appear on your screen.
b You will be prompted to restart Windows before using the program.
b Before restarting your computer, remove the installation disk.
b A shortcut to Spectrum2 Designer will appear on your desktop after the program is
loaded.
Printer Driver
The MF Digital Spectrum2 printer requires that the printer driver is installed on
the PC to allow the PC to communicate with the Spectrum2 printer. The printer
driver file (pwrpro.inf) is supplied on the floppy diskette labeled Spectrum2
Driver.
Insert MF Digital Spectrum2 Software Driver disk into your PC’s floppy drive. The
following instructions assume the A:\ drive is utilized to load the printer driver.
Choose Start from the taskbar.
Select the Settings Menu.
Click the Printer option.
4
Spectrum2 Designer User’s Guide
Document Revision: 092903
The Printer Window will display.
Choose
from the window.
You will be prompted to install the MF Digital Spectrum2 printer driver.
bSelect Next
b Select Local Printer
bSelect Next
bSelect Have Disk
b Make sure the printer driver diskette is in the floppy drive.
b Select A:\ from List box.
5
Spectrum2 Designer User’s Guide
b If A:\ is not shown, select ‘Browse’, and select Drive A:\
bSelect OK.
bSelect Next.
Spectrum2
Select LPT Port. It is typically listed as: LPT1:Printer Port.
Click Next to move forward in the installation process.
6
Document Revision: 092903
Spectrum2 Designer User’s Guide
Document Revision: 092903
MF Digital Spectrum2 will appear in the Printer name window. If you wish to give
the Spectrum2 a different name on your computer, type the preferred name in the box.
You have the option to set the Spectrum2 printer as your default printer. Click Yes to
set it as the default, or leave the box checked No if you do not want the Spectrum2
printer to be the default printer on your PC.
Click Next to move forward in the installation process.
MF Digital Spectrum2
The next window will advise you to print a test page. If you do not want to print a
test page, click No.
If the system displays a message warning that an Older Version of a file is about to
be copied to the your computer, select the choice that keeps the Newer Version of the
file on your computer.
Select Finish. The system will copy printer driver files to the PC. The installation
process is finished and the Spectrum2 printer icon appears in the Printers Window.
7
Spectrum2 Designer User’s Guide
Document Revision: 092903
Basic Features
The template appears as soon as you open the program. Graphic and text tools are
contained vertically down the toolbar on the left side of the screen and
horizontally along the menu at the top of the design window.
The Display
Title Bar
Menu Bar
Toolbar
Status Bar
Scroll Bar
Windows Boarder
Desktop and CD-R template
The template represents the disk in the printer and remains on the desktop at all
times.
Title Bar
The name of the file you are working on is displayed in the title bar at the top of
the window. Options in the right corner allow you to reduce Spectrum2 Designer
to an icon, reduce or enlarge the window containing the program, or close it
altogether.
8
Spectrum2 Designer User’s Guide
Document Revision: 092903
Windows Border
You can shrink or enlarge the view box by clicking on the outer border of the
window. Reducing the size of the window allows you to work on several labels
simultaneously and operate other Windows applications at the same time.
Menu Bar
The complete menu bar appears across the top of the screen when you open a file.
When you click a menu option, commands appear on a vertical scroll. Printing
commands, file operations, and display changes can be made using the menu bar.
Options in the right corner of the menu bar allow you to reduce the size of the file
window, reduce or enlarge the size of the window, or close the file.
Toolbar
Common tools for designing your label are displayed in the toolbar. They are
arranged in two vertical columns down the left side of the screen, but can be
rearranged horizontally or vertically and placed anywhere on the screen. The
tools are usable as soon as you open a file.
Scroll Bars
A vertical scroll bar on the right side of the window allows you to move the label
template up and down on the screen. A scroll bar along the bottom of the window
allows you to move the label template left or right. The scroll bars are handy
when using the zoom feature.
Status Bar
The status bar provides reference to the scale you are working on. If the template
on the screen is full size, the status bar will read 1.00. The scale reading changes
when the template is made bigger or smaller with zoom controls and scale option
in the toolbar.
9
Spectrum2 Designer User’s Guide
Document Revision: 092903
Adjusting the Display
Adjusting Image Size
If you wish to make the template larger or smaller, you can adjust the display size
by selecting the scale icon from the tool bar. The display can be enhanced up to
500% of the actual label size and reduced to 10%. Only the display on the screen
is affected. The print size of the label will remain the same.
Zooming In and Out
You can zoom in or out on the entire label by choosing the zoom icons in the
toolbar. While items will grow larger or smaller on the display, they will remain
their original size on the printed label.
Hiding the Display
The Status Bar in the lower right hand corner indicates the scale of the display. It
can be hidden by clicking on the Status Bar in the View menu. The Status Bar
will reappear when you click on it again. The left column of the toolbar can also
be hidden and retrieved by clicking the toolbar in the View menu. The tools in
the right column will remain on the screen so you can continue to enter graphics
and text on the label.
Print Preview
To view what will show up on your label when printed on the Spectrum2 printer,
select
or Print Preview from the File menu. Any part of a graphic or text
item outside the CD-R template will disappear. If you chose Print Preview from
the File menu, the menu bar and toolbar disappear, but you retain the zoom and
print options. Selecting Close in the top right corner will return you to the main
screen.
10
Spectrum2 Designer User’s Guide
Document Revision: 092903
Printing
Printing from a Standard Printer
Before you are ready to print your label onto disks in the Spectrum2 printer, you
may want to print a copy of the image on paper. This can be done on a standard
printer. To print a copy of your label on a standard printer, simply follow the
commands you would to print any other windows document on your standard
printer.
Printing from the Spectrum2
b Select Print from the File menu.
b The Print dialogue box appears.
b Select the Spectrum2 printer by using the arrow to the right of Name.
b Choose the number of copies you wish to print by using the arrows in the bottom
right corner of the dialogue box.
b Click OK.
11
Spectrum2 Designer User’s Guide
Document Revision: 092903
Adjusting the Printout
Label printouts are made lighter or darker by changing the setting within the
Spectrum2 properties dialogue box. You can lighten the printout by selecting a
lower number than the one currently displayed, and you can darken the printout
by selecting a number higher than the one displayed.
Click Start on the taskbar.
Select Settings.
Choose Printer in the menu that appears by placing the pointer on the arrow next to
Settings by clicking once.
The Printer Window appears with all printers installed on your PC.
Choose the Spectrum2 printer by clicking once.
Select Properties from the Printer menu.
Select Paper from the Spectrum2 Properties dialogue box.
Use the arrows to the left of media choice to find the tone value you wish to use.
Select the value by clicking on it once with the mouse.
After making your change, click OK to save properties changes.
CD Disk 100
CD Disk 150
CD Disk 200
CD Disk 250
CD Disk 300
CD Disk 350
Lighter
Darker
To Make the Printout Lighter
Select a number smaller than the one displayed in the Media Choice box.
To Make the Printout Darker
Select a number greater than the one displayed in the Media Choice box.
12
Spectrum2 Designer User’s Guide
Document Revision: 092903
Creating and Operating a Label File
File Functions
Opening New Files
bSelect New from the file menu or
from the toolbar.
bYou can begin working with text, graphics, and serial numbers instantly.
Opening Existing Files
b Choose Open from the File menu, or click
b Select the drive and directory the label was saved in.
b Highlight the file name.
b Click OK.
Saving Label Files
bChose Save from the file menu or click
.
b Enter a file name and directory at the prompt.
b Click Okay.
Closing Label Files
b Save changes if you wish to keep them.
b Select Close from the file menu or
from the Menu bar.
Exiting Spectrum2 Designer
b Select Exit from the file menu or click
13
from the Title bar.
Spectrum2 Designer User’s Guide
Document Revision: 092903
Designing a Label
When you open a label, the template appears in the center of the display window.
Only objects entered on the template will appear on printed versions of the label,
but text and graphics can be entered anywhere in the display window. This gives
you extra workspace.
Defining Label Size
b Select the appropriate type of media from the Settings / CD Template menu.
b Enter a new radius if your CDs are not standard size.
The printer will print CDs of minimum size 7.5 mm inner radius and 50 mm outer
radius. If you select a radius smaller than that, you will be prompted to select one
within the printable region. You can change the default setting to a customized
size by clicking the default box. The modified size will automatically be saved
for the label you are working on when you save. New labels will go back to
standard size for the next file if the default box is not checked.
Inner border of printable
region
Center of printable region
Outer border of printable
region
14
Spectrum2 Designer User’s Guide
Document Revision: 092903
Text
Standard Text
Circular Text
Entering Standard Text
Standard text is best for creating straight lines of text, and must be used for serial
numbers. The standard text option allows the user to write left to right, top to
bottom, or bottom to top. Additionally, standard text can be pivoted vertically at
a 90° angle or flipped 180° and read from the “outside” of the disk. Font style,
size, and color are adjustable, as is line spacing.
Choose
from the toolbar or Text from the Tools menu.
Click the mouse in the exact place you wish to enter the text.
The Text Setting dialogue box appears.
Enter text in the box entitled Text at the top of the dialogue box. The text will
appear on the screen as it is entered. You must press Enter on your keyboard to
move to the next line.
15
Spectrum2 Designer User’s Guide
Document Revision: 092903
Font style is changed by checking the boxes to the left of the styles. All styles can be
used alone or in combination. The transparent option removes the white box that
surrounds text objects. This box is invisible when text is printed on a clear or white
label, but is visible on most color backgrounds. When the transparent option is
selected, text appears to be written directly onto the background color or graphic.
Font type is changed by clicking the arrow to the right of the box. The default is
set at Times New Roman, but you can select any true-type font.
Font size is modified using the arrow at the right side of the Font Size box.
Alignment controls the placement of text in relation to cursor on the template. The
default is set to left alignment, and text will move rightward from the spot the text
cursor was initially clicked on the template. Alignment can be modified by selecting
Center or Right from the Alignment menu within the dialogue box.
Line Spacing can be changed to any distance between .30 and 5.00.
Rotation options allow you to create vertical text reading from either top to bottom,
or bottom to top; horizontal text facing outward; and text rotated to a customized
angle within -180° and 180°.
b To turn text upside down, chose 180.
b To rotate text vertically at a -90° angle facing rightward, select the box reading 90
at the top of the window. The text will read from bottom to top.
b To rotate text vertically at a 90° angle facing leftward, select the bottom 90 box
toward the bottom. The text will read from top to bottom.
b Vertical and horizontal text facing any direction can be set at whole number
degrees between –180 and 180 by clicking the arrow in the Rotation box.
16
Spectrum2 Designer User’s Guide
Document Revision: 092903
Color is selected by clicking the color box. An array of basic and custom color
options appear, and you may also define a color by selecting Custom Color at the
bottom of the Color dialogue box.
Press Okay at the bottom of the Text dialogue box when you have completed your
text entry. If you do not press Okay before closing the dialogue box, your entry will
be lost.
Commands for editing text after it has been entered are on page 19.
Entering Circular Text
Text entered using the arc feature rotates around the label in a fashion mirroring
the shape of the disk. Spacing is automatically standardized as the user enters
text, and options make it simple to create labels with many lines of text in a wide
selection of sizes, directions, and styles.
Choose
from the toolbar or Circular Text from the Tools menu.
Click the cursor in the exact place you wish to enter the text.
The Circular Text dialogue box appears.
17
Spectrum2 Designer User’s Guide
Document Revision: 092903
Enter text in the box entitled Text at the top of the dialogue box. The text will appear
on the screen as it is entered.
Font type is chosen by clicking the arrow to the right of the Font box and selecting
and clicking a choice. The font selection is composed of all fonts installed on your
system.
Font size can be modified using the arrow at the right side of the Font Size box.
Radius controls the number of millimeters from the center of the disk that text is
placed. Text moves in an even arc around the disk according to the selected distance
of the radius. Keep in mind that the printable region of the disk is between 58 and
22mm from the inner edge of the disk. If a radius greater than 58 mm or less than 22
mm is selected, the text entered will not appear on the printed label.
Font style is changed by clicking the box to the left of the choice.
b The bold and italics options may be used singly or in combination.
b The transparent option is valuable when using a background color or design
because it removes the white box that otherwise surrounds text objects.
b You also have a clockwise option that modifies the direction of the text. Regular
text moves counterclockwise and faces the outside of the disk template. When the
clockwise option is activated, text is entered leftward from the origin, and faces
the inside of the disk.
Reference Angle gauges the exact angle on the template you are working on. You
can change the reference angle by clicking on the arrow to the right of the reference
angle reading, and selecting an angle. The program will allow you to chose any
whole number degree between –180° and 180°. Additional choices to the right of the
reading allow you to reset the reference angle to 0°, -90°, 180°, or 90° instantly.
The reference angle is helpful for making objects on the label symmetrical.
Center refers to the alignment of entered text in relation to the reference angle. The
default is set on left alignment and text will move leftward from the reference angle
unless the C or R is clicked under the Center box. When C is chosen, the text is
centered on the reference angle. When R is chosen, text is aligned on the right, and
the text moves rightward from the reference angle as it is entered.
Color is added the same way as it is with standard text. Click on Color at the
bottom of the Circular Text dialogue box. An array of basic and color options
appear, and you may also define a custom color by selecting Custom Color.
18
Spectrum2 Designer User’s Guide
Document Revision: 092903
Editing Standard and Circular Text
Tools for editing text on your label design are the same for standard and circular
text except for the Move command. Editing tools are found in the toolbar and
menu bar, and you can return to the Text dialogue boxes at any time by double
clicking on the block of text, or by using the right click on your mouse. The
shortcut menu contains several commonly used editing tools including quick
access to the text dialogue box as well as the ability to cut, paste, delete, and
move text objects.
Moving Standard Text
Select the text object you wish to move by right clicking the mouse.
Choose Move from the shortcut menu.
You can now move the text freely around the label.
When you are finished moving the text, press the left mouse key and the text will
become stationary again.
Another Option: You can move text using just the mouse, but the mouse button
must be depressed during the operation.
b Place the mouse pointer on the piece of text until the four-directional arrow
appears.
b Click the mouse. The text object is mobile as long as the button is depressed.
b Release the mouse button when you are done moving the object.
19
Spectrum2 Designer User’s Guide
Document Revision: 092903
Moving Circular Text
Right click the mouse on the piece of text you wish to edit.
Chose Edit from the shortcut menu.
The Circular Text dialogue Box appears.
Change the Radius to move text closer or farther from the center of the label.
Change the Reference Angle to move the text to another angle on the label.
Center commands are also useful for movement operations.
Returning to the Text dialogue boxes
Double click on the block of text.
Another Option: You can also return to the dialogue box by right-clicking the
mouse on the block of text and choosing Edit from the shortcut menu.
Changing or Deleting Text
Return to the dialogue box.
The cursor is already in the Text box, and the block of text you have entered is
highlighted.
Left-click the mouse, and you can change the text.
When you have finished your changes, press OK so your changes are not lost.
You can also delete text by putting the cursor on it, right-clicking, and selecting Cut
from the shortcut menu.
20
Spectrum2 Designer User’s Guide
Document Revision: 092903
Serial Numbers
Serial numbers incorporating letters and or numbers are easy to create using
Spectrum2 Designer. You can create series up to 10 digits, and incorporate
prefixes and suffixes into your serial numbers.
Select Serial Number from the Data menu.
The Serial Number dialogue box appears.
Enter a Prefix. The prefix is a set of unchanging characters that will precede your
serial number. It is not set for a particular length, and you can enter as many numbers
and or letters as you wish. If you do not wish to have a prefix, simply leave the prefix
line blank. The prefix is ABC in the example above.
Enter a Serial Number. This is the number that will change. Serial numbers must be
set between 1 and 4294967292. If a number outside this range is selected, you will be
prompted to choose one within the range. Here, the serial number is set at 10.
Enter a Suffix. The suffix, like the prefix, is a set of numbers and or letters that will
be the same on each label. It follows the Serial number. You do not have to enter a
suffix for the serial number operation to function. The suffix is DEF in the example.
Enter a Value. The value is the Serial number you wish to start with on the first
label.
Enter an Increment. The increment is the number by which serial numbers will
increase. For example, if the value is set at 10 and the increment is 5, the first label
will have a serial number reading 10, the serial number on the second label will be 15,
and the serial number on the third label will be 20.
Choose OK when you are finished entering the data.
21
Spectrum2 Designer User’s Guide
Select
Document Revision: 092903
from the toolbar or Text from the Tools menu.
Click the cursor in the location you want the serial number to appear on the label.
The Standard Text dialogue box appears.
Select Serial Number from the Source box.
Make any format changes as you would with standard text.
Click OK.
22
Spectrum2 Designer User’s Guide
Document Revision: 092903
Graphics
You can create your own graphics or import images on your label with the design
tools located in the right column of the toolbar and in the Tools menu. Ellipses,
circles, ovals, rectangles, squares and lines can be created instantly with the
options. The shapes can then be customized easily using the mouse pointer to
define the dimensions of the shape. The freehand option gives you full reign of
your design, and you can draw your own graphic on the screen. Graphics
imported onto the label from other files can be left as is, or their size and quality
can be altered using the Spectrum2 Designer graphics tools. Text objects are
completely compatible with the graphics both created and imported onto the label,
and the two can overlap to create label designs with text written on a background
image.
Types of graphics
Basic Shapes
Freehand
File Art
Working With Basic Shapes
Entering Basic Shapes
Choose the line, rectangle, or ellipse from the toolbar or the Tools menu and then
click the point on the disk you wish to place the shape.
Keeping the left mouse button depressed, move the cursor in the direction you want
to extend the shape.
The rectangle makes squares and rectangles.
The ellipse makes circles, ellipses, and ovals.
The rounded rectangle makes rounded rectangles.
The line is used to create straight lines in any direction.
The shape will remain hinged in the spot on the template chosen with the mouse
pointer, but the image can be extended in any direction to customize size and shape.
23
Spectrum2 Designer User’s Guide
Document Revision: 092903
Release the cursor when you are satisfied with the shape.
Reshaping and Re-sizing Basic Shapes
To turn a square into a rounded rectangle or circle
b Put the mouse pointer on the corner of a square, or rounded rectangle until the
pointer changes into a two-sided arrow.
b Hold down the Shift key and the left mouse button simultaneously.
b Re-figure the square into a rounded rectangle or circle by maneuvering the mouse.
To turn a rounded rectangle into a circle
b Put the pointer tool on the corner of the rounded rectangle.
b Hold down the Shift key and the left mouse button simultaneously.
b The rounded rectangle is transformed into a circle by maneuvering the mouse.
Fill Patterns
Fill patterns including stripes and checkerboards can be added to the shape in black and
white or color.
Place the mouse pointer on any part of the shape’s border and right click.
The Fill Properties dialogue box appears, and you can select a pattern by clicking
on your choice.
You can select a color for the fill pattern by choosing Color. The color dialogue box
appears and you can select a basic or custom color.
Editing
Shape properties and placement on the template can be edited at any point. See page 26.
24
Spectrum2 Designer User’s Guide
Document Revision: 092903
Working With Freehand
The freehand options allows you to use the mouse pointer as a pen or paint brush to
design images and alter basic shapes or imported images. Freehand images can be made
in color or black and white.
Choose
or Freehand from the tools menu.
Click the mouse pointer at the location on the template you want to start drawing. This can be on
a blank spot or one where an image already exists.
Holding down the mouse pointer, draw your graphic.
Release the mouse only when you are finished drawing the image.
Working With Imported Graphics
Graphics stored on a disk or on your hard-drive can be imported to the label
easily. The imported graphics can then be altered using Spectrum2 Designer tools
for the purpose of your label while maintaining the integrity of your file art.
25
Spectrum2 Designer User’s Guide
Document Revision: 092903
Import the Graphic
Select the
or Picture from the Tools menu.
The Open Picture File dialogue box appears.
Select the drive and directory in which your picture file is located. Only graphics files
will appear in the window. Select the correct file.
The file graphic will appear in the Window on the right side of the dialogue box if the
Preview option in the bottom corner of the dialogue box is checked.
Press Open.
The image will appear at the center of the disk and you can move it to any spot on the
template.
Move the image to the preferred spot by clicking anywhere on the template. The foursided arrow appears, and you can move the image by dragging it with the mouse.
Imported graphics are moved and edited with the same commands as other objects.
Images and Text
Text and other images can be added over the graphic. Simply use the commands
for creating text and graphics on any other surfaces. Make sure that the color font
you are using is visible over the graphics behind it.
Editing Label Graphics
You can continue to work on graphics and text objects after they are entered using
the editing commands. Editing options range from basic Windows tools like cut
and paste to specialized functions allowing objects to be layered or “hidden” one
behind the other.
Moving objects
One at a time:
Place the mouse pointer on the object until the four-sided arrow appears.
Click the mouse and keep the cursor depressed.
26
Spectrum2 Designer User’s Guide
Document Revision: 092903
The object is mobile as long as you hold down the left mouse button. Or,
Right-click on the border of the object.
Select Move from the shortcut menu.
You can now move the object freely with the mouse.
Press the left mouse button when you are done moving the object.
Simultaneously:
Press the Shift button and keep it depressed.
Select each item you wish to move by clicking on it once with the mouse.
Each object selected is surrounded by a perforated border.
Release the Shift key.
Right click on the border of one of the selected objects.
The shortcut menu appears.
Choose Move.
The objects become mobile. Move the mouse to position them.
When they are positioned, click the mouse to make them stationary again.
27
Spectrum2 Designer User’s Guide
Document Revision: 092903
Overlaying Objects
If objects are entered where others already exist, the new object will be placed on top, or
in front, of the other objects.
You can change object positioning by right-clicking on one of the objects and using the
following commands:
Send to Back moves the selected object to the very back of the stack of objects.
Send to Front moves the selected object to the very front of the stack.
Move Backward moves the selected object one place back in the stack.
Move Forward moves the selected object one place forward in the stack.
Changing Object Size
Move the cursor along the border of the object until the two-sided arrow appears. It
appears in all four corners of rectangles and rounded rectangles, sides of ellipses, and
at either end of lines.
When the arrow appears, click the cursor and the object will stretch or retract.
Objects remain hinged at an angle unique to each of the shapes.
b Lines remain hinged at the opposite end of the one selected with the two-sided
arrow.
b Rectangles and squares are hinged at the corner diagonal to the one selected.
b Ellipses, circles, and ovals are hinged at the center point.
When you are finished changing the object shape, left-click and the object will
become stationary again.
28
Spectrum2 Designer User’s Guide
Document Revision: 092903
Changing Object Properties
Select the border of the object by right-clicking the mouse.
The shortcut menu appears.
Choose Edit.
The Figure Properties dialogue box appears.
Pen thickness can be changed from .1 pixel to a choice between 0 and 10 pixels.
One of the eight patterns will be added to the interior of the shape or design by
selecting one of the choices. Just one pattern can be used at a time, so if one of the
patterns is already in use, it will be changed when a new selection is made.
Pattern color is changed by choosing fill color and then clicking on another color.
Press Okay when you are finished to save edits.
Using Cut and Paste
To copy an image
b Press
or choose Copy from the Edit menu.
b The original image will remain on the screen.
To cut an image
b Press
or choose Cut from the Edit menu.
b The image will disappear from the screen.
To paste the cut or copied image in the same place on another label
b Click the pointer tool on the label you wish to duplicate the image.
b Press
or select Paste from the Edit menu.
b If you want to move an image to a different location on the same label,
follow the directions on page 26 for moving objects.
29
Spectrum2 Designer User’s Guide
Document Revision: 092903
Deleting Objects
If you are not sure whether or not you want to delete the object, it is better to use Cut
and Paste which allows you to return the object to your screen if you are unsatisfied
with the removal.
bSelect the object with the left-click.
bChoose Cut from the Edit menu.
bIf you wish the graphic to return to the screen, simply chose Paste from the Edit
menu before cutting another object.
If you are certain you wish to delete the object, right-click.
Choose Delete from the shortcut menu.
The object will be deleted instantly from your screen.
30
Spectrum2 Designer User’s Guide
Document Revision: 092903
Index
Importing graphics...................................... 27
Layering...................................................... 29
Label................................................................ 16
Close ........................................................... 15
Exit.............................................................. 15
Open existing .............................................. 15
Open new .................................................... 15
Save ............................................................ 15
Size ............................................................. 16
Printing ............................................................ 13
From a standard printer............................... 13
Serial numbers ................................................. 23
Entering....................................................... 23
Increment .................................................... 23
Prefix .......................................................... 23
Suffix .......................................................... 23
Value........................................................... 23
Text.................................................................. 17
Aligning standard text................................. 18
Editing ................................... See Editing text
Enter Standard Text .................................... 17
Entering Circular Text ................................ 19
Rotating circular text .................................. 20
Rotating standard text ................................. 18
Selecting circular text fonts ........................ 20
Selecting standard text fonts ....................... 18
Spacing standard text .................................. 18
Display .............................................................10
Adjusting image size....................................12
Adjusting the display ...................................12
Hiding the display........................................12
Print preview................................................12
Zoom............................................................12
Editing graphics
Basic shapes.................................................26
Changing properties.....................................30
Cutting and pasting ......................................30
Deleting .......................................................31
Layering.......................................................29
Moving objects ............................................28
Resizing .......................................................29
Editing text
Changing text...............................................22
Deleting text ................................................22
From dialogue boxes....................................22
Moving circular text ....................................22
Moving standard text ...................................21
Graphics ...........................................................25
Cut and paste ...............................................30
Editing .......................................... See Editing
Editing basic shapes.....................................25
Entering basic shapes...................................25
Entering freehand ........................................27
Fill patterns ..................................................26
31
Spectrum2 Designer User’s Guide
Document Revision: 092903
MF Digital - End User License Agreement
MF Digital Spectrum2 Designer for Windows 95 and Windows 98
Copyright © 1998 MF Digital and its
Affiliated Companies. All Rights Reserved
NOTICE TO ALL USERS: CAREFULLY READ THE FOLLOWING LEGAL
AGREEMENT, WHICH SETS FORTH LICENSE TERMS FOR THE SOFTWARE
IDENTIFIED IN THE HEADING ABOVE. BY INSTALLING THE SOFTWARE,
YOU (EITHER AN INDIVIDUAL OR A SINGLE ENTITY) CONSENT TO BE
BOUND BY AND BECOME A PARTY TO THIS AGREEMENT WITH MF
DIGITAL, INC.
IF YOU DO NOT AGREE TO ALL OF IT’S TERMS, DO NOT INSTALL THE
SOFTWARE, OR DESTROY ALL COPIES OF THE SOFTWARE THAT YOU HAVE
INSTALLED. IF APPLICABLE, YOU MAY RETURN THE PRODUCT TO THE
PLACE OF PURCHASE FOR A FULL REFUND.
1. License Grant. Subject to the payment of the applicable license fees, and subject to
the termsand conditions of this Agreement, MF DIGITAL hereby grants to you a nonexclusive, non-transferable right to use one copy of the specified version of the
Software and the accompanying documentation (the “Documentation”). You may
install one copy of the Software on one computer, workstation, personal digital
assistant, pager, “smart phone” or other electronic device for which the Software was
designed (each, a “Client Device”). If the Software is licensed as a suite or bundle
with more than one specified Software products, this license applies to all such
specified Software products, subject to any restrictions or usage terms specified
individually for any of such Software products on the applicable product invoicing or
packaging.
a. Use. The Software is licensed as a single product; it may not be used on more
than one Client Device or by more than one user at a time, except as set forth in
this Section 1. The Software is “in use” on a computer when it is loaded into the
temporary memory (i.e., random-access memory or RAM) or installed into the
permanent memory (e.g., hard disk, CD-ROM disc, or other storage device) of
that Client Device. This license authorizes you to make one copy of the Software
solely for backup or archival purposes, provided that the copy you make contains
all of the proprietary notices for the Software.
b. Server Use. To the extent that the applicable product invoicing or packaging sets
forth, you may use the Software on a Client Device or as a server (“Server”)
within a multi-user or networked environment (“Server Use”) for either
(i) connecting, directly or indirectly, to not more than the maximum number of specified Client
Devices, or (ii) deploying not more than the maximum number of agents (pollers) specified
for deployment. If the applicable product invoicing or packaging does not specify a maximum
number of Client Devices or pollers, this is a single product use license subject to subsection
(a) above. A separate license is required for each Client Device or “seat” that may connect to
the Software at any time, regardless of whether such licensed Client Devices or seats are
connected to the Software concurrently, or are actually using the Software at any particular
time. Your use of software or hardware that reduces the number of Client Devices or seats
32
Spectrum2 Designer User’s Guide
Document Revision: 092903
that connect to and use the Software directly or simultaneously (e.g., “multiplexing” or
“pooling” software or hardware) does not reduce the number of licenses required.
Specifically, you must have that number of licenses that would equal the number of distinct
inputs to the multiplexing or pooling software or hardware “front end”). If the number of
Client Devices or seats that can connect to the Software can exceed the number of licenses
you have obtained, then you must have a reasonable mechanism in place to ensure that your
use of the Software does not exceed the use limits specified for the license you have obtained.
This license authorizes you to make or download one copy of the Documentation for each
Client Device or seat that is licensed, provided that each such copy contains all of the
proprietary notices for the Documentation.
c. Volume Use. If the Software is licensed with volume use terms specified in the
applicable product invoicing or packaging, you may make, use and install as
many additional copies of the Software on the number of Client Devices as the
volume use terms authorize. You must have a reasonable mechanism in place to
ensure that the number of Client Devices on which the Software has been
installed does not exceed the number of licenses you have obtained. This license
authorizes you to make or download one copy of the Documentation for each
additional copy authorized by the volume license, provided that each such copy
contains all of the proprietary notices for the Documentation.
2. Term. This Agreement is effective unless and until you or MF DIGITAL terminates
the Agreement earlier, in accordance with the terms set forth herein. This Agreement
will terminate automatically if you fail to comply with any of the limitations or other
requirements described herein. When this agreement terminates, you must destroy all
copies of the Software and the Documentation. You may terminate this Agreement at
any point by destroying all copies of the Software and the Documentation.
3. Updates. You may download updates to the Software when and as MF DIGITAL
publishes them via its website or other online services.
http://www.mfdigital.com
For the purposes of this license, “upgrade” means a release of all or a substantial
portion of the computer program or components of the Software.
4. Ownership Rights. The Software is protected by United States copyright laws and
international treaty provisions. MF Digital and its suppliers own and retain all right,
title and interest in and to the Software, including all copyrights, patents, trade secret
rights, trademarks and other intellectual property rights therein. You acknowledge
that your possession, installation, or use of the Software does not transfer to you any
title to the intellectual property in the Software, and that you will not acquire any
rights to the Software except as expressly set forth in this Agreement. You agree that
any copies of the Software and Documentation will contain the same proprietary
notices that appear on and in the Software and Documentation.
5. Restrictions. You may not rent, lease, loan or resell the Software. You may not permit
third parties to benefit from the use or functionality of the Software via a timesharing,
service bureau or other arrangement, except to the extent that the applicable product
invoicing or packaging permits such use. You may not transfer any of the rights
33
Spectrum2 Designer User’s Guide
Document Revision: 092903
granted to you under this Agreement. You may not reverse engineer, decompile, or
disassemble the Software, except to the extent that the foregoing restriction is
expressly prohibited by applicable law. You may not modify, or create derivative
works based upon, the Software in whole or in part. You may not copy the Software
or Documentation except as expressly permitted in Section 1 above. You may not
remove any proprietary notices or labels on the Software. All rights not expressly set
forth hereunder are reserved by MF Digital. MF DIGITAL reserves the right to
periodically conduct audits upon advance written notice to verify compliance with the
terms of this Agreement.
6. Warranty and Disclaimer
a. Limited Warranty. MF DIGITAL warrants that for sixty (60) days from the date
of original purchase the media (for example, the diskettes) on which the Software
is contained will be free from defects in materials and workmanship.
b. Customer Remedies. MF DIGITAL’s and its suppliers’ entire liability, and your
exclusive remedy, shall be, at MF DIGITAL’s option, either (i) to return the
purchase price paid for the license, if any, or (ii) to replace the defective media on
which the Software is contained with a copy on nondefective media. You must
return the defective media to MF DIGITAL at your expense with a copy of your
receipt. This limited warranty is void if the defect has resulted from accident,
abuse, or misapplication. Any replacement media will be warranted for the
remainder of the original warranty period. Outside the United States, this remedy
is not available to the extent that MF DIGITAL is subject to restrictions under
United States export control laws and regulations.
c. Warranty Disclaimer. To the maximum extent permitted by applicable law, and
except for the limited warranty set forth herein, THE SOFTWARE IS
PROVIDED ON AN “AS IS” BASIS WITHOUT WARRANTY OF ANY KIND,
EXPRESS OR IMPLIED. WITHOUT LIMITING THE FOREGOING
PROVISIONS, YOU ASSUME RESPONSIBILITY FOR SELECTING THE
SOFTWARE TO ACHIEVE YOUR INTENDED RESULTS, AND FOR THE
INSTALLATION OF, USE OF, AND RESULTS OBTAINED FROM THE
SOFTWARE. WITHOUT LIMITING THE FOREGOING PROVISIONS, MF
DIGITAL MAKES NO WARRANTY THAT THE SOFTWARE WILL BE
ERROR-FREE OR FREE FROM INTERRUPTIONS OR OTHER FAILURES,
OR THAT THE SOFTWARE WILL MEET YOUR REQUIREMENTS. TO THE
MAXIMUM EXTENT PERMITTED BY APPLICABLE LAW, MF DIGITAL
DISCLAIMS ALL WARRANTIES, EITHER EXPRESS OR IMPLIED,
INCLUDING BUT NOT LIMITED TO IMPLIED WARRANTIES OF
MERCHANTABILITY, FITNESS FOR A PARTICULAR PURPOSE, AND
NONINFRINGEMENT WITH RESPECT TO THE SOFTWARE AND THE
ACCOMPANYING DOCUMENTATION. SOME STATES AND
JURISDICTIONS DO NOT ALLOW LIMITATIONS ON IMPLIED
WARRANTIES, SO THE ABOVE LIMITATION MAY NOT APPLY TO YOU.
The foregoing provisions shall be enforceable to the maximum extent permitted
by applicable law.
34
Spectrum2 Designer User’s Guide
Document Revision: 092903
7. Limitation of Liability. UNDER NO CIRCUMSTANCES AND UNDER NO
LEGAL THEORY, WHETHER IN TORT, CONTRACT, OR OTHERWISE,
SHALL MF DIGITAL OR ITS SUPPLIERS BE LIABLE TO YOU OR TO ANY
OTHER PERSON FOR ANY INDIRECT, SPECIAL, INCIDENTAL, OR
CONSEQUENTIAL DAMAGES OF ANY CHARACTER INCLUDING,
WITHOUT LIMITATION, DAMAGES FOR LOSS OF GOODWILL, WORK
STOPPAGE, COMPUTER FAILURE OR MALFUNCTION, OR FOR ANY AND
ALL OTHER DAMAGES OR LOSSES. IN NO EVENT WILL MF DIGITAL BE
LIABLE FOR ANY DAMAGES IN EXCESS OF THE LIST PRICE MF DIGITAL
CHARGES FOR A LICENSE TO THE SOFTWARE, EVEN IF MF DIGITAL
SHALL HAVE BEEN ADVISED OF THE POSSIBILITY OF SUCH DAMAGES.
THIS LIMITATION OF LIABILITY SHALL NOT APPLY TO LIABILITY FOR
DEATH OR PERSONAL INJURY TO THE EXTENT THAT APPLICABLE LAW
PROHIBITS SUCH LIMITATION. FURTHERMORE, SOME STATES AND
JURISDICTIONS DO NOT ALLOW THE EXCLUSION OR LIMITATION OF
INCIDENTAL OR CONSEQUENTIAL DAMAGES, SO THIS LIMITATION AND
EXCLUSION MIGHT NOT APPLY TO YOU. The foregoing provisions shall be
enforceable to the maximum extent permitted by applicable law.
8. United States Government. The Software and accompanying Documentation are
deemed to be “commercial computer software” and “commercial computer software
documentation,” respectively, pursuant to DFAR Section 227.7202 and FAR Section
12.212, as applicable. Any use, modification, reproduction, release, performance,
display or disclosure of the Software and accompanying Documentation by the
United States Government shall be governed solely by the terms of this Agreement
and shall be prohibited except to the extent expressly permitted by the terms of this
Agreement.
9. Export Controls. Neither the Software nor the Documentation or any underlying
information or technology may be downloaded or otherwise exported or re-exported
(i) into (or to a national or resident of) Cuba, Iran, Iraq, Libya, North Korea, Sudan,
Syria or any other country to which the United States has embargoed goods; or (ii) to
anyone on the United States Treasury Department’s list of Specially Designated
Nations or the United States Commerce Department’s Table of Denial Orders. By
downloading or using the Software you are agreeing to the foregoing provisions and
you are certifying that you are not located in, under the control of, or a national or
resident of any such country or on any such list.
IN ADDITION, YOU SHOULD BE AWARE THAT EXPORT OF THE SOFTWARE
MAY BE SUBJECT TO COMPLIANCE WITH THE RULES AND REGULATIONS
PROMULGATED FROM TIME TO TIME BY THE BUREAU OF EXPORT
ADMINISTRATION, UNITED STATES DEPARTMENT OF COMMERCE, WHICH
RESTRICT THE EXPORT AND RE-EXPORT OF CERTAIN PRODUCTS AND
TECHNICAL DATA. IF THE EXPORT OF THE SOFTWARE IS CONTROLLED
UNDER SUCH RULES AND REGULATIONS, THEN THE SOFTWARE SHALL
NOT BE EXPORTED OR RE-EXPORTED, DIRECTLY OR INDIRECTLY,
(A) WITHOUT ALL EXPORT OR RE-EXPORT LICENSES AND UNITED
STATES OR OTHER GOVERNMENTAL APPROVALS REQUIRED BY ANY
35
Spectrum2 Designer User’s Guide
Document Revision: 092903
APPLICABLE LAWS, OR (B) IN VIOLATION OF ANY APPLICABLE
PROHIBITION AGAINST THE EXPORT OR RE-EXPORT OF ANY PART
OF THE SOFTWARE. SOME COUNTRIES HAVE RESTRICTIONS ON THE
USE OF ENCRYPTION WITHIN THEIR BORDERS, OR THE IMPORT OR
EXPORT OF ENCRYPTION EVEN IF FOR ONLY TEMPORARY
PERSONAL OR BUSINESS USE. YOU ACKNOWLEDGE THAT THE
IMPLEMENTATION AND ENFORCEMENT OF THESE LAWS IS NOT
ALWAYS CONSISTENT AS TO SPECIFIC COUNTRIES. ALTHOUGH THE
FOLLOWING COUNTRIES ARE NOT AN EXHAUSTIVE LIST, THERE
MAY EXIST RESTRICTIONS ON THE EXPORTATION TO, OR
IMPORTATION OF, ENCRYPTION BY: BELGIUM, CHINA (INCLUDING
HONG KONG), FRANCE, INDIA, INDONESIA, ISRAEL, RUSSIA, SAUDI
ARABIA, SINGAPORE, AND SOUTH KOREA. YOU ACKNOWLEDGE IT IS
YOUR ULTIMATE RESPONSIBILITY TO COMPLY WITH ANY AND ALL
GOVERNMENT EXPORT AND OTHER APPLICABLE LAWS AND THAT
MF DIGITAL HAS NO FURTHER RESPONSIBILITY AFTER THE INITIAL
SALE TO YOU WITHIN THE ORIGINAL COUNTRY OF SALE.
10. High Risk Activities. The Software is not fault-tolerant and is not designed or
intended for use in hazardous environments requiring fail-safe performance, including
without limitation, in the operation of nuclear facilities, aircraft navigation or
communication systems, air traffic control, weapons systems, direct life-support
machines, or any other application in which the failure of the Software could lead
directly to death, personal injury, or severe physical or property damage (collectively,
“High Risk Activities”). MF DIGITAL expressly disclaims any express or implied
warranty of fitness for High Risk Activities.
11. Miscellaneous. This Agreement is governed by the laws of the United States and the
State of California, without reference to conflict of laws principles. The application of
the United Nations Convention of Contracts for the International Sale of Goods is
expressly excluded. This Agreement sets forth all rights for the user of the Software
and is the entire agreement between the parties. This agreement supersedes any other
communications with respect to the Software and Documentation. This Agreement
may not be modified except by a written addendum issued by a duly authorized
representative of MF DIGITAL. No provision hereof shall be deemed waived unless
such waiver shall be in writing and signed by MF DIGITAL or a duly authorized
representative of MF DIGITAL. If any provision of this Agreement is held invalid,
the remainder of this Agreement shall continue in full force and effect. The parties
confirm that it is their wish that this Agreement has been written in the English
language only.
12. MF DIGITAL CUSTOMER CONTACT. If you have any questions concerning these
terms and conditions, or if you would like to contact MF DIGITAL for any other
reason, please call (631) 249-9393 or e-mail at [email protected].
36