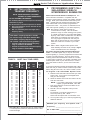
1
® Advanced Features/ Applications Manual • USING SECOND SWITCH INPUT TERMINALS FOR MESSAGES • WIDE BAND OR NARROW BAND OPERATION (JUMPER SELECTABLE) • ANALOG VOLTAGE INPUTS, (OR 4 - 20 mA LOOP INPUTS) • MULTIPLE LOCATION IDENTIFICATION MESSAGES • TERMINATED ALARM LOOP INPUTS • MODULATION SELECT FOR NARROW BAND CHANNELS • CONNECTING & USING AN EXTERNAL 12 VDC POWER SUPPLY • USING SOLAR POWER PANELS TO OPERATE & CHARGE INTERNAL NI-CD BATTERIES • ENABLING & DISABLING THE LOW BATTERY OR EXTERNAL POWER FAILURE MESSAGES • BATTERY SAVER OPTIONS Ritron RQT-UM2 Rev. J 00-05 Copyright© 1999 RITRON, INC. — ALL RIGHTS RESERVED RITRON®, PATRIOT®, JOBCOM® & Quiet Call® are registered trademarks of RITRON, INC. Quick TalkTM is a trademark of RITRON, INC. P.O. Box 1998, Carmel, IN 46082-1998 • 505 W. Carmel Dr., Carmel, IN 46032 • USA PH: 317-846-1201; 1-800-USA-1-USA (1-800-872-1872) • FAX: 317-846-4978 Web: www.ritron.com • E-mail: [email protected] qtc9322c.pm5 Quick Talk Advanced Features/ Applications Manual WHAT THIS MANUAL COVERS This manual, Ritron Item RQT-UM2, covers advanced operation of the Quick Talk Voice Notification Radio Transmitter, including the more complex features not covered in the Basic Owner's Manual, Ritron Item RQT-UM1 (14500006). For further information on the Quick Talk, visit Ritron's website at http://www.ritron.com, or call Ritron at 317-846-1201. TABLE OF CONTENTS DESCRIPTION PAGE WHAT THIS MANUAL COVERS ............................................... ii WARNING: IMPORTANT SAFETY INFORMATION .................. ii ACCESSORIES FOR QUICK TALK .......................................... ii GENERAL INFORMATION ........................................................ 1 QUICK TALK FEATURES ......................................................... 1 IDENTIFICATION OF CONTROLS & CONNECTIONS ............. 2 COVER GASKET INSTALLATION/ REPLACEMENT ............... 3 PROGRAMMING YOUR QUICK TALK ..................................... 4 PULSE TELEPHONE CONFIGURATION ................................. 4 TO PROGRAM QUICK TALK BY TELEPHONE ....................... 4 1. Configure Switch Terminals (1 or 2 switches) ................ 5 2. Adding a Second Switch to Disable ................................ the Quick Talk Transmitter ........................................... 5 3. Programming Quick Talk Transmitter Frequency .......... 6 4. Setting a Special Transmit Frequency ........................... 7 5. Programming Quiet Call Sub-Audible ............................. Squelch Interference Eliminator .................................. 7 6. Programming Digital Quiet Call Sub-Audible ................... Squelch Interference Eliminator .................................. 8 7. Test Quick Talk Radio Transmitter ................................. 8 8. Testing Switch Open & Closed Conditions .................... 9 9. Recording Location & Switch Condition .......................... Voice Phrases ........................................................... 10 10. Number of Recorded Voice Phrase Repeats ................. for Each Message Transmission ............................... 11 11. Programming the Switch Status ...................................... Broadcast Schedule .................................................. 11 12. Programming a Message Repeat Limit ....................... 12 13. Restart Quick Talk when Finished Programming ............ Message Parameters ................................................ 12 14. To Reprogram Quick Talk to Original ............................... Factory Settings ........................................................ 12 15. Setting Debounce Options Normal Debounce ..................................................... 13 Holdoff Debounce ...................................................... 13 16. Monitoring 4-20 mA Sensor Current Loops ..................... w/ Analog Modes ....................................................... 14 17. Solar Panels for Operating & Charging ........................... Ni-Cd Batteries .......................................................... 14 18. Using Latching Option ................................................. 14 19. J103 Settings for Battery Type Alkaline Batteries ....................................................... 15 Ni-Cd Batteries .......................................................... 15 20. Setting Analog Modes ................................................. 15 Analog Input Mode .................................................... 16 Terminated Alarm Input Mode ................................... 16 21. Recording Unique Low Battery Messages .................. 17 22. Recording Unique Power Failure Messages ............... 17 23. Enabling/ Disabling Status Messages ......................... 17 24. Setting Battery Saver Options ..................................... 17 25. Setting Narrow-Band (2.5 kHZ) Channels ................... 18 26. Connecting an External 12 VDC Power Supply ........... 18 27. Configuring Transmit Delay ......................................... 18 28. Pre-installation Checklist ............................................. 18 29. Quick Talk Installation .................................................. 19 CARE & MAINTENANCE ........................................................ 19 QUICK REFERENCE GUIDE ............................................ 20, 21 Page ii — — — WARNING — — — IMPORTANT SAFETY INFORMATION NOTICE: DO NOT use the Quick Talk unit to report conditions relating to safety of life or property. To reduce the risk of fire, electric shock or personal injury, follow these basic safety instructions when using this unit. 1. Read and follow all instructions. 2. Disconnect the unit before cleaning. Do not use liquid or aerosol cleaners. 3. Use only approved power sources for the unit. 4. During thunderstorms, avoid contact with this unit and any external antenna system or wiring. 5. The Quick Talk switch and external power terminals are connected internally through ground to the antenna connector. If the Quick Talk switch or power supply terminals contact high voltage, a hazardous condition may exist in that contacting the antenna could prove injurious or even fatal. 6. In general, the switches you connect to the Quick Talk are to be independent dry contact switches, and not part of any other "live" electrical circuit 7. If you are unsure whether your installation will be safe, contact an experienced electrician or electronics technician. ACCESSORIES FOR QUICK TALK These replacement and optional items are available from Ritron and its authorized dealers. ITEM DESCRIPTION AFB-1545 RAM-1545 Standard 16 in. Flexible Whip Antenna Magnetic-Mount Antenna w/ 20 ft. Cable & BNC Connector TABLE OF FIGURES DESCRIPTION FIG—1: FIG—2: FIG—3: FIG—4: FIG—5: PAGE CONTROL & CONNECTION LOCATIONS ................ 2 COVER ASSEMBLY ................................................... 3 CONNECTIONS FOR TESTING SWITCHES ............ 9 TYPICAL MESSAGE CONFIGURATION ................. 10 CURRENT LOOP ......................................................... (EXAMPLE CONNECTION DIAGRAM) ................... 14 FIG—6: J103 POSITION FOR USE WITH ................................. ALKALINE BATTERIES .......................................... 15 FIG—7: J103 POSITION FOR USE WITH ................................. NI-CD BATTERIES ................................................. 15 FIG—8: ANALOG INPUT MODE (EXAMPLE) ....................... 16 FIG—9: TERMINATED ALARM INPUT MODE (EXAMPLE) . 16 FIG—10: J102 SETTING FOR NARROW BAND ...................... OPERATION .......................................................... 18 FIG—11: EXTERNAL POWER SUPPLY CONNECTIONS .... 18 FIG—12: QUICK TALK INSTALLATION ................................ 19 ® Quick Talk Features/ Applications Manual Page 1 Page 1 GENERAL INFORMATION ON THE QUICK TALKTM VOICE NOTIFICATION TRANSMITTER The Quick TalkTM is a radio transmitter that reports changes in the status of switches by transmitting userrecorded voice messages to two-way mobile, portable or base station radios. Quick Talk transmits your voice message when switch changes occur, and at also intervals you select. Because you provide and connect the switches, your Quick Talk units can report on the status of intrusion, tampering, equipment malfunction, liquid levels, machinery, pressure, temperature, power, smoke or leakage. The Quick Talk is easily programmed to transmit on either an existing or a new radio frequency, with the most popular sub-audible coded squelch formats, such as Quiet Call® or Digital Quiet CallTM. This enables all your personnel with JOBCOM®, PATRIOT®, or equivalent two-way radios to hear the voice messages instantly, and to be advised of current conditions for each monitored location or device. Quick Talk is housed in a weather-resistant enclosure, so it can be installed in a wide variety of indoor and outdoor locations. Because its six internal AA Alkaline batteries will power the unit for about a year, Quick Talk does not require AC line power. QUICK TALK MODELS AND FREQUENCIES There are two Quick Talk models, one for each of the most popular professional radio communications bands. Each unit is labeled for model number on the Quick Talk cover, and again inside the case. MODEL RQT-150 RQT-450 BAND VHF-FM UHF-FM FREQUENCY RANGE 150 to 165 MHz 450 to 470 MHz Ritron manufactures mobile, portable and base station twoway radios and repeaters which can be used with Quick Talk. Ritron pioneered the use of Color Dots on radios to identify frequencies. Factory-programmed, default Quick Talk frequencies are: Blue Dot = 154.570 MHz for VHF units; Blue Star = 467.925 MHz for UHF units. For instructions on changing Quick Talk transmit frequency to match an existing radio system, see page 7. QUICK TALKTM FEATURES DESCRIBED IN THIS MANUAL: • Internal radio transmitter (separate VHF and UHF models) • User-recorded voice messages (total recording time of 16 seconds) • Terminals for connection to user-supplied switches • Included external antenna • Typical range of 1/ 2 mile—longer range possible with use of optional antenna • Weather-resistant enclosure—not waterproof nor immersible • Internal battery holder for six (6) AA alkaline cells • Typical operating battery life of 1 year • Automatic low battery message • The following programmable features: - Transmit frequency - Tone Coded Squelch Encoder (Quiet Call® Interference Eliminator) - Digital Coded Squelch Encoder (Digital Quiet CallTM Interference Eliminator) - Message transmission schedules and limits • Use of the second switch input terminals for messages • Analog voltage (or 4-20 mA loop) inputs • Multiple location identification messages • Terminated alarm loop inputs • Modulation Select for narrow band channels • Connection and use of an external 12 Volt DC power supply • Use of solar power to operate the unit • Use of solar power to charge internal Ni-Cd batteries • Enabling and disabling low battery or external power failure messages • Battery saver options • Limited One-year Factory Warranty For assistance, call RITRON at 800-872-1872, or go to http://www.ritron.com Page 1 ® Page 2 Quick Talk Features/ Applications Manual IDENTIFICATION OF CONTROLS & CONNECTIONS 1 ANTENNA CONNECTOR The antenna radiates radio signals. Before using Quick Talk, make sure the antenna is fastened securely to this connector. See page 19. 2 TELEPHONE JACK The modular telephone jack provides temporary connection to a standard pulse or rotary mode telephone unit, which is used by the owner to program Quick Talk voice messages and other settings. 6 EXTERNAL POWER TERMINALS Refer to page 18 for information about connecting an external 12 Volt DC power supply to these terminals. 7 WATERTIGHT STRAIN RELIEF CABLE FITTING The cable to your external switches passes through this fitting. When the strain relief fitting is used with recommended cable sizes, it provides a waterresistant enclosure. Do not overtighten this fitting. NOTES: Use Radio Shack Telephone Station Wire, 6-conductor, solid 24-AWG In-wall Type CM, Cat. No. 278-874, or equivalent size round cable (0.114 – 0.250” diameter). If you cannot find suitable wire, call Ritron at 800-872-1872. WARNING: DO NOT connect the Quick Talk to a line from the telephone company; doing so will damage the unit, and void the manufacturer's warranty. 3 BATTERY HOLDER The battery holder accommodates the six (6) standard "AA" alkaline cells required to power the Quick Talk. NOTE: ALWAYS INSTALL A FRESH SET of alkaline batteries before programming the Quick Talk. 4 SWITCH #1 TERMINALS These terminals are for connection to a switch the user supplies. Quick Talk transmits voice messages determined by the state of this switch. 5 SWITCH #2 TERMINALS These terminals are for connection to an optional user-supplied switch. This manual describes how to use Switch #2 as an On/Off switch to enable or disable the Quick Talk transmitter, as well as programming normal debounced and contact closure settings, and latching mode. Page 2 8 TRANSMITTER BANDWIDTH SELECT JUMPER DO NOT remove this jumper. As described on page 18, this jumper controls selection of wide or narrow bandwidth. 9 BATTERY TYPE SELECT JUMPER DO NOT remove this jumper. As described on page 15, this jumper controls charging of optional Ni-Cd batteries. NOTE: DO NOT remove any other fasteners, nor further disassemble the Quick Talk unit; doing so risks damaging the unit and voiding manufacturer's warranty. FIG—1: CONTROL & CONNECTION LOCATIONS OWNER-SUPPLIED STANDARD DESK TELEPHONE SET, SWITCHED TO PULSE DIALING MODE 1 Antenna Connection (Antenna shown on page 19.) (Back of Quick Talk Cover Assem.) 3 TO QUICK TALK TELEPHONE JACK. FACTORY S HORTING JUMPER Standard Modular Telephone Jack OWNER-SUPPLIED MODULAR TELEPHONE CORD: DO NOT CONNECT TO A TELEPHONE LINE, BUT TO A TELEPHONE SET ONLY. + + 2 + — + — 5 Switch #2 Wiring Terminals 4 Switch #1 Wiring Terminals 6 External Power Input Terminals SWITCH 2 + + SWITCH 1 + 8 + — EXT. PWR. + 7 Page 2 Battery Holder Strain Relief Fitting (For wire to External Switch) ® Quick Talk Features/ Applications Manual Page 3 Page 3 COVER GASKET INSTALLATION/ REPLACEMENT To seal against environmental hazards of outdoor operation, the Cover Gasket (Pt. No. 25605600) must be in good condition and installed correctly. + + CAUTION: If the Cover Gasket is crimped, damaged or incorrectly installed, rain will leak into the unit, causing severe damage, and voiding the warranty. REPLACE ANY DAMAGED GASKET. COVER GASKET (IN THE RECESS) + a. Remove the unit from the wall or other mounting surface. + + + b. Place the Cover Assembly on a flat horizontal surface with the recessed side up. Carefully seat the Gasket in the recess of the Cover; refer to FIG–2. c. Reconnect connectors as necessary. With the Gasket side of the Cover Assembly up, insert the case into the recess. d. Replace the four (4) Cover screws. Snug down, but do not overtighten the screws; excessive force can break the plastic enclosure material. FIG–2: COVER ASSEMBLY For assistance, call RITRON at 800-872-1872, or go to http://www.ritron.com Page 3 ® Quick Talk Features/ Applications Manual Page 4 PROGRAMMING YOUR QUICK TALK FREQUENTLY ASKED QUESTIONS ABOUT QUICK TALK: Do I have to program my Quick Talk? If you purchased a Quick Talk factory-programmed to your radio system frequency, you may not need to program your unit. To check the frequency, compare the Color Dots on your radios and the Quick Talk. If these match, and in addition, if you use no form of Quiet Call coded squelch, you can start using Quick Talk. Just connect your switch to the terminals marked "Switch #1" and install the batteries. The factory default messages are "Switch Open" and "Switch Closed." Do I need to program every feature? In many cases, no. The factory pre-programmed settings, explained in the instructions, may meet many of your needs. How do I program Quick Talk? Use a standard style, widely-available telephone unit, capable of, and switched to "Pulse” operation. Enter programming information on the keypad, and use the telephone handset to record custom voice messages. The telephone unit is used only for programming, and is to be disconnected from the unit when Quick Talk is operating normally. What if I don't find what I need in this manual? Call Ritron; we will be glad to help you make Quick Talk do just about anything. For most applications, this manual should cover everything you will need to know. The Application Notes posted on the Ritron website may also help you. Page 4 Will it harm the Quick Talk if I program it improperly? No; however, you may be required to erase all programming and start over; see page 12 to do this. Feel free to try the various features and experiment with possible configurations. Can my settings or messages get lost or erased if the battery runs down, or if my Quick Talk is disconnected? No. The settings and voice messages you enter are stored in special electronic memory devices in the Quick Talk that do not require power to hold the information. This means that if the batteries run down or if you remove them, you will not need to reprogram the unit. All your settings and messages will be there for you when you install fresh batteries. What if I need more range? To increase the range of your Quick Talk transmissions, move the unit. Depending on the type of switch and wiring, several hundred feet of wiring may be used to connect the switch. This promotes setup of Quick Talk and its attached antenna at the best range for installation: an unobstructed and elevated position. You may also wish to consider optional "high gain" antennas; call Ritron at 800-872-1872. Ritron also can provide a radio repeater to increase the range of your entire radio system, not just Quick Talk. PULSE TELEPHONE CONFIGURATION: BEFORE PROGRAMMING THE QUICK TALK— 1. Remove the (4) large screws at the corners of the gray enclosure. 2. Lift the cover from the unit. Use care to not damage or disturb any exposed internal components. 3. For programming the Quick Talk, use a telephone unit that passes the following test: CAUTION: • The telephone must be capable of, and also set to, "Pulse" mode dialing. Speaker telephones and those with lighted dials—most office and specialized telephone units—and those that generate only Touch Tones CANNOT BE USED TO PROGRAM THE QUICK TALK. • • The telephone must have a cord with a standard modular plug. • Test the telephone for suitability by plugging it into the telephone jack of the Quick Talk, then dialing "O" (Operator). A repeating busy signal in the telephone earpiece indicates the telephone unit is acceptable for programming. If the telephone has a mode selection switch, IT MUST BE SET TO "P" (Pulse), rather than "T" (Tone), to program the Quick Talk. 4. Remove batteries from the unit. Install a fresh set of six AA alkaline batteries, matching polarity marks on the batteries with the marks in the battery holder. TO PROGRAM QUICK TALK BY TELEPHONE: • Dial numbers which represent settings, on a telephone keypad as instructed in this manual. If you make an error while dialing, hang up the handset, then pick it up and dial again. - When you pick up the telephone handset, Quick Talk sounds a brief acknowledgment tone. Wait to hear this tone before you dial. - If you mis-dial or use an invalid command, Quick Talk emits a series of repeating tones until you hang up the handset. You may pick it up and try the command again. - After you dial (enter on the keypad) command and setting numbers, Quick Talk responds with a confirmation tone. You may either hang up, or dial another command. - A series of three short tones cues you to begin speaking when you dial a command to record a voice message. • Program the Quick Talk as follows: Page 4 ® Quick Talk Features/ Applications Manual Page 5 1. CONFIGURE SWITCH TERMINALS Page 5 ONE SWITCH INPUT TERMINAL: a. Pick up the telephone receiver and listen for the acknowledge tone. b. Dial "911". Quick Talk responds with a confirmation tone. TWO SWITCH INPUT TERMINALS: a. Pick up the telephone receiver and listen for the acknowledge tone. b. Dial "912". Quick Talk responds with a confirmation tone. NOTE: If you change from one input terminal to two, or from two input terminals to one, record all new messages. The way messages are stored and the time available for each message differs between the two modes. 2. ADDING A SECOND SWITCH TO DISABLE THE QUICK TALK TRANSMITTER What is the purpose adding a second switch to disable the Quick Talk? There may be times you want the Quick Talk to not transmit messages. For example, if Quick Talk reports the status of an entry door for the night shift, you may wish to not hear status messages all day. Use the second switch to enable the Quick Talk at night, and disable it during the day. Add a second switch to disable Quick Talk Messaging: a. Remove the shorting jumper from the Switch #2 terminals. b. Connect an external switch to the terminals marked Switch #2. NOTES: Switch #2 in On/ OFF mode, as described here, is a feature of Switch #1 operation. Dial “911” to put Quick Talk into this mode. When Switch #2 is closed, Quick Talk functions normally. When Switch #2 is open, Quick Talk is disabled and will not transmit messages. When Switch #2 has been open (Quick Talk disabled), and it is then closed, Quick Talk transmits the prerecorded message describing the current condition of Switch #1. If you do not need to add a second switch, see the next section. For assistance, call RITRON at 800-872-1872, or go to http://www.ritron.com Page 5 ® Quick Talk Features/ Applications Manual Page 6 3. PROGRAMMING QUICK TALK TRANSMITTER FREQUENCY What is my Radio System Frequency? Ritron pioneered the Color Dot system to simplify the identification of radio system frequencies for Ritron Jobcom radios. Color Dots are placed on the bottoms of and inside the enclosures of all Jobcom radios. Other manufacturers have also adopted this idea. Do I need to program the Quick Talk transmitter frequency? The original factory-programmed transmitter frequency of your Quick Talk is marked on the outside of the shipping box, and is also indicated by a color dot on the inside the unit case. If the Quick Talk frequency matches your radio system frequency, and if the Quick Talk has not been reprogrammed since it left the factory, skip this section and proceed to the next. If the radios do not have a color dot, identify your frequency on the radio label that identifies receiver frequency in megahertz (MHz). Your assigned frequency is also shown on your F.C.C. Station License. If you cannot determine radio receiver frequency, call Ritron or your radio dealer for help. TO PROGRAM THE QUICK TALK TRANSMITTER FREQUENCY: a. Determine your radio system frequency (above). b. Find this frequency in the appropriate table at right, then determine its corresponding two-digit code. If your radio system frequency is not in the chart, your Quick Talk must be programmed by a radio dealer or by Ritron. c. Pick up the telephone receiver, and listen for the acknowledge tone. Dial "11", then the digits of the frequency code selected from the table. EXAMPLES: If the Quick Talk is a VHF RQT-150 model, and the radios operate on 154.570 MHz (Blue Dot frequency), dial "1102". If the Quick Talk is a UHF RQT-450 model, and the radios operate on 467.9250 MHz (Blue Star frequency), dial "1108". d. Quick Talk responds with a single beep to indicate it has programmed the transmitter frequency. e. You may either hang up or continue programming. NOTES: If you make a dialing mistake while programming, hang up the telephone handset, then pick it up and dial again. If the Quick Talk frequency has been reprogrammed, to alleviate later mistakes, remove the Color Dot from inside the case. What the Tones (Beeps) in Your Earpiece Mean: • A series of three short tones cues you to begin recording a message. • A single brief tone means your command is accepted and stored. • A series of long repeating tones means your command was not understood; hang up and dial again. NOTE: see page 7 to set FREQUENCIES NOT SHOWN in the above charts. Page 6 Page 6 TABLE 1: TRANSMIT FREQUENCY CODES (VHF Business Band) QUICK TALK FREQ. CODE VHF Business Band Model RQT-150 MHz 01 02 03 04 154.600 ..... 154.570 ..... 151.625 ..... 151.955 ..... 05 06 07 08 151.925 154.540 154.515 154.655 09 10 11 12 151.685 151.715 151.775 151.805 13 14 15 16 151.835 151.895 154.490 151.655 17 18 151.745 151.865 Frequency Color Green Dot Blue Dot Red Dot Purple Dot (UHF Business Band) QUICK TALK FREQ. CODE UHF Business Band Model RQT-450 MHz Frequency Color 01 02 03 04 467.7625 ..... J 467.8125 ..... K 464.5500 ..... Yellow Dot 464.5000 ..... Brown Dot 05 06 07 08 467.8500 ...... Silver Star 467.8750 ...... Gold Star 467.9000 ...... Red Star 467.9250 ...... Blue Star 09 10 11 12 469.2625 462.5750 ...... White Dot 462.6250 ...... Black Dot 462.6750 ...... Orange Dot 13 14 15 16 464.3250 464.8250 469.5000 469.5500 17 18 19 20 463.2625 464.9125 464.6000 464.7000 ® Quick Talk Features/ Applications Manual Page 7 4. SETTING A SPECIAL TRANSMIT FREQUENCY NOTE: ENTER SIX DIGITS TO PROGRAM EITHER 6- OR 7-DIGIT FREQUENCIES. TO SET TRANSMIT FREQUENCIES: Set standard (tabled) transmit frequencies following the instructions on page 6. See the box below. Set other frequencies as follows: a. Pick up the telephone receiver and listen for the acknowledge tone. b. Dial "12", followed by the first six digits of the frequency setting. UHF UNITS: Frequency step size is 12.5 kHz; the selection range is 450.000 to 469.9875 MHz. VHF UNITS: Frequency step size is 5 kHz OR 12.5 kHz. Refer to the following guidelines: • For VHF 5 kHz step size, transmit frequency range is 150.000 to 164.995 MHz. • For VHF 12.5 kHz step size, transmit frequency range is 150.000 to 164.9875 MHz. TABLE 2: QUICK TALK QC CODE 01 02 03 04 05 06 07 08 09 10 11 12 13 14 15 16 17 18 19 20 21 22 23 24 25 26 QUIET CALL TONE CODES Freq. ( Hz ) 67.0 71.9 74.4 77.0 79.7 82.5 85.4 88.5 91.5 94.8 97.4 100.0 103.5 107.2 110.9 114.8 118.8 123.0 127.3 131.8 136.5 141.3 146.2 151.4 156.7 162.2 Other Radio Brands Tone Code QUICK TALK QC CODE XZ XA WA XB SP YZ YA YB ZZ ZA ZB 1Z 1A 1B 2Z 2A 2B 3Z 3A 3B 4Z 4A 4B 5Z 5A 5B 27 28 29 30 31 32 33 34 35 36 37 38 39 40 41 42 43 *44 45 46 47 48 49 50 51 Freq. ( Hz ) 167.9 173.8 179.9 186.2 192.8 203.5 210.7 218.1 225.7 233.6 241.8 250.3 69.4 159.8 165.5 171.3 177.3 No Tone 183.5 189.9 196.6 199.5 206.5 229.1 254.1 Other Radio Brands Tone Code 6Z 6A 6B 7Z 7A M1 -------------------- * Use Code "44" to program No Tone for systems without a Coded Squelch Interference Eliminator feature. Refer to the text at right. 5. Page 7 PROGRAMMING QUIET CALL SUB-AUDIBLE SQUELCH INTERFERENCE ELIMINATOR What is Quiet Call Sub Audible Coded Squelch? The Quick Talk radio transmitter is compatible with two standard communications industry sub-audible signaling formats: QC® (Quiet Call Interference Eliminator), and DQCTM (Digital Quiet Call Interference Eliminator). Both Quiet Call formats unlock receivers programmed to require these codes -- they screen out interference from other radio systems operating on your same frequency. QC® QC is Ritron’s trade name for what the communications industry calls sub-audible (below the range of human hearing) tone squelch, or CTCSS (Continuous Tone Coded Sub-audible Squelch). Other radio manufacturers use different trade-names for essentially the same system. You may program a specific QC code into your Quick Talk to transmit with the voice messages, which will "unlock" the receivers in your radio system. DQCTM DQC is Ritron’s digital coded squelch which works basically the same as QC, except a digital code is transmitted with voice messages. Do I need to program my Quick Talk with a Quiet Call Code? Your radio system may or may not use coded squelch signaling. If you have programmed the Quick Talk to match your radio frequency, and your radios are not receiving Quick Talk transmissions unless the "monitor" or "test" button is pressed, your system is probably using Coded Squelch. Refer to your radio manual, or contact your radio dealer or Ritron if you are unsure about this issue. If your Quick Talk was previously programmed with a QC or DCC code and you need to remove it, follow the procedure below, using No Tone code, "44", shown in Table 2, at left. To Program a QC Sub-audible Squelch Code: a. Determine the Quiet Call code tone that your radio system uses. If your system uses Digital Quiet Call, go to the next page. b. Select the desired Tone Code from Table 2 at left; enter the code below. NOTE: If your radio system does not use coded squelch, program No Tone, code "44". c. Pick up the telephone receiver and listen for the acknowledge tone. d. Dial "21", then the 2-digit QC Code you have selected. For example, if your Quiet Call frequency is 103.5 Hz (Code 13), dial: "2113". Quick Talk will respond with a confirmation tone. e. You may either hang up or continue programming additional features. RECORD your frequency and squelch code— Frequency: ______________________________ ; QC or DQC Code: __________________________ For assistance, call RITRON at 800-872-1872, or go to http://www.ritron.com Page 7 ® Page 8 6. Quick Talk Features/ Applications Manual PROGRAMMING DIGITAL QUIET CALL SUB-AUDIBLE SQUELCH INTERFERENCE ELIMINATOR What is Digital Quiet Call? DQC is a digital sub-audible coded squelch system. Refer to page 7. Do I need to program my Quick Talk with a Digital Quiet Call code? If your radio system does not use Digital Quiet Call, or any other trade name equivalent, skip this section and go to the next programming feature. TO PROGRAM A DIGITAL QUIET CALL CODE: a. Determine the specific Digital Quiet Call (DQC) code used for your system, then make sure this code is listed in Table 3, which shows all of the possible DQC codes for Quick Talk. If your system code is not listed, call your radio service provider or Ritron. b. Write down your code. c. Pick up the telephone receiver, and listen for the acknowledge tone. d. Dial "22" followed by the selected 3-digit DQC code. EXAMPLE: If your DQC code is "131", dial "22131". Wait for the confirmation tone. e. You may either hang up or continue programming. NOTE: Record your frequency and QC or DQC code in the space provided on page 7. TABLE 3: DIGITAL QUIET CALL CODES Normal Normal Invert Normal Invert 023 047 025 ........ 244 026 ........ 464 031 ........ 627 174 205 223 226 ........ ........ ........ ........ 074 263 134 411 445 464 465 466 ........ ........ ........ ........ 043 026 331 662 032 043 047 051 ........ 051 ........ 445 ........ 023 ........ 032 243 244 245 251 ........ ........ ........ ........ 351 025 072 165 503 506 516 532 ........ ........ ........ ........ 162 073 432 343 054 065 071 072 ........ 413 ........ 271 ........ 306 ........ 245 261 263 265 271 ........ ........ ........ ........ 732 205 156 065 546 565 606 612 ........ ........ ........ ........ 132 103 631 346 073 074 114 115 ........ 506 ........ 174 ........ 712 ........ 152 306 311 315 331 ........ 071 ........ 664 ........ 423 ........ 465 624 627 631 632 ........ ........ ........ ........ 632 031 606 624 116 125 131 132 ........ 754 ........ 365 ........ 364 ........ 546 343 346 351 364 ........ ........ ........ ........ 532 612 243 131 654 662 664 703 ........ ........ ........ ........ 743 466 311 565 134 143 152 155 ........ 223 ........ 412 ........ 115 ........ 731 365 371 411 412 ........ 125 ........ 734 ........ 226 ........ 143 712 723 731 732 ........ ........ ........ ........ 114 431 155 261 156 162 165 172 ........ 265 ........ 503 ........ 251 ........ 036 413 423 431 432 ........ ........ ........ ........ 734 ........ 371 743 ........ 654 754 ........ 116 Page 8 Invert 054 315 723 516 7. TEST THE QUICK TALK RADIO TRANSMITTER Page 8 What is the purpose of testing the Quick Talk radio transmitter? After following the previous instructions, your Quick Talk will be programmed to transmit on the same frequency as your radio receivers, and you also will have programmed your Quick Talk to transmit any coded squelch signals required for your radio system. Do I need to test my Quick Talk Transmitter? Yes; if you perform this test when you have finished programing frequency (and if used, QC or DQC code), you will save yourself time and confusion later. TO TEST THE QUICK TALK RADIO TRANSMITTER: a. Attach the Quick Talk flexible antenna. b. Turn on your radio receiver. c. Momentarily place a screwdriver, paper clip or other electrically conductive item across the Switch #1 terminals. d. Quick Talk transmits the Closed and Open Switch messages, which you should hear on your radio. If this is the case, remove the conductive item and proceed with your setup. If you do not hear the messages, you have not properly programmed Quick Talk transmitter frequency or Quiet Call Coded Squelch. Repeat the programming, then perform this test again. ® Quick Talk Features/ Applications Manual Page 9 8. Page 9 TESTING SWITCH OPEN & CLOSED CONDITIONS 5. From performing Step 4, you will understand how your switch works and the meaning of its open and closed states—essential information to program a descriptive message for each switch condition. EXAMPLE: A magnetic reed switch on a door closes when the door is opened. You can record "Door three open" for switch closed condition, and "Door three closed" for switch open condition. NOTE: Magnetic reed switches are available which work in the opposite way. After you have programmed the Quick Talk with your radio system frequency and, if required, Quiet Call Interference Eliminator squelch code, test your switch to determine how it works, and the meaning of its open and closed states. This procedure also reconfirms proper programming of the transmitter frequency. Use the following procedure: Test Your Switch and Confirm Message Reception: 1. Remove the batteries from the holder. 2. Review the safety precautions on page 19 before connecting your switches. When you are sure your connections will be safe, connect your switch to Quick Talk Switch #1 terminals. See Figure 3 below. 3. Reinstall fresh AA Alkaline batteries in the Quick Talk according to polarity marks on the holder. 4. Activate your switch; listen to your two-way radio as the factory default messages are transmitted: the message will be either "Switch One Open" or "Switch One Closed." Write down how the switch condition corresponds to the transmitted message. Then deactivate the switch and listen to the other message; again, write down the results. NOTE: If you do not hear messages, the Quick Talk transmitter frequency and/ or the Quiet Call Squelch Code is not programmed properly. Repeat the procedures on pages 6–8. 6. With the Quick Talk in basic operating mode, you may then record a voice message to report each of two (2) switch conditions. One voice message is to transmit when the switch is open, and the other when the switch is closed. Refer to page 10 for message length limits. NOTES: The above instructions (Steps 1–6) are written for Switch #1. Before connecting Switch #2 to an external device, test it in the same way. We suggest you not record over factory prerecorded messages until you are sure how your switch works. If factory-programmed messages have been erased (see page 13), use an electrician's continuity tester or similar instrument to determine how your switch works. FIGURE 3: CONNECTIONS FOR TESTING YOUR SWITCH 1 Owner Supplied Standard Desk Telephone, switched (Back of Quick Talk Cover Assem.) to Pulse Dialing Mode TO QUICK TALK TELEPHONE JACK + NOT CONNECT IT TO A TELEPHONE LINE. Battery Holder + — + — SWITCH 2 + + DO 3 + CONNECT THE STANDARD MODULAR PLUG ONLY TO A TELEPHONE SET. Antenna Connection (Antenna shown on page 19.) SWITCH 1 + + — EXT. PWR. CONNECT TO SWITCH #1 TERMINALS. + For assistance, call RITRON at 800-872-1872, or go to http://www.ritron.com Page 9 ® Quick Talk Features/ Applications Manual Page 10 9. Page 10 RECORDING LOCATION & SWITCH CONDITION VOICE PHRASES What is the purpose of Recording Voice Phrases? Recording customized voice phrases gives Quick Talk messages unmistakable meaning and significance. The standard factory prerecorded messages—"Switch Open" and "Switch Closed"—require the listener to know how the switch works and what it does. However, when a user hears a custom message such as "Pump three running hot," the meaning is clear. Do I need to program Voice Phrases? If the factoryrecorded messages "Switch Open" and "Switch Closed" suit your application, you may skip this section. Your recorded voice message will sound only as good as the telephone you use. If the message audio is too low, record again, speaking louder. If the message is distorted, record again, speaking softer. If you are not satisfied with audio quality, try a different telephone set. NOTE: RERECORD ALL MESSAGES if you change from one input terminal to two, or from two input terminals to one. The way messages are stored and the time available for each message is different in each mode. USE THE FOLLOWING INSTRUCTIONS TO PROGRAM ONE-SWITCH MODE: NOTES: The message is to be as brief as possible; recording time for one-switch mode is eight seconds. Hang up as soon as you finish speaking. If you keep the phone off-hook, when Quick Talk sends a message, the transmitter stays on for all eight seconds—drawing maximum battery power— rather than staying on for actual message length. To Record Switch Open Condition Phrase a. Pick up the telephone receiver, wait for the beep and dial "311". Quick Talk sounds three short tones to prompt you to begin speaking. b. Record a phrase no longer than eight seconds, describing the open condition of your switch. EXAMPLE: "Pump motor temperature OK." c. Dial "411" (Review Code for Switch 1 OPEN Phrase). d. Repeat all steps "a" through "c" as necessary, until you are pleased with the results. To Record Switch CLOSED Condition Phrase a. Pick up the telephone receiver, wait for the beep and dial "312". Quick Talk sounds three short tones to prompt you to begin speaking. b. Record a phrase no longer than eight seconds, describing the closed condition of your switch. EXAMPLE: "Pump motor over temperature." c. Dial "412" (Review Code for Switch 1 CLOSED Phrase). d. Repeat all steps "a" through "c" as necessary, until you are pleased with the results. USE THE FOLLOWING INSTRUCTIONS TO PROGRAM TWO-SWITCH MODE: NOTES:The message is to be as brief as possible; recording time for two-switch mode is 3.5 seconds. For two-switch mode, record a location phrase to identify a unit at a location having more than one Quick Talk on a single frequency. As shown in FIG–4, the location phrase precedes the Switch Condition Phrase in the transmitted message. Page 10 To record Location Phrase: a. Pick up the telephone receiver, wait for the beep and dial "33". Quick Talk sounds three short tones to prompt you to begin speaking. b. Record a phrase no longer than 3.5 seconds, describing the location of your switch. EXAMPLE: Record "Utility Room 5." c. Dial "43" (Review Code for the Location Phrase). d. Repeat all steps "a" through "c" as necessary, until you are pleased with the results. TRANSMITTED MESSAGE One (1) Location Phrase One of Four (4) Switch Condition Phrases Switch 1 Open Phrase Location Phrase Switch 1 Switch 2 Open Phrase Switch 2 FIG—4. Closed Phrase Closed Phrase TYPICAL MESSAGE CONFIGURATION NOTE: The following examples are for Switch #1. To program this feature on Switch #2, refer to Quick Reference Guide dial codes on page 20. To record Switch 1 OPEN Condition Phrase: a. Pick up the telephone receiver, wait for the beep and dial "311". Quick Talk sounds three short tones to prompt you to begin speaking. b. Record a phrase no longer than 3.5 seconds, describing the open condition of your switch. EXAMPLE: Record "Air conditioner OK." c. Dial "411" (Review Code for Switch 1 OPEN Phrase). d. Repeat all steps "a" through "c" as necessary, until you are pleased with the results. To record Switch 1 CLOSED Condition Phrase: a. Pick up the telephone receiver, wait for the beep and dial "312". Quick Talk sounds three short tones to prompt you to begin speaking. b. Record a phrase no longer than 3.5 seconds, describing the open condition of your switch. EXAMPLE: Record "Air conditioner fail." c. Dial "412" (Review Code for Switch 1 CLOSED Phrase). d. Repeat all steps "a" through "c" as necessary, until you are pleased with the results. NOTE: Simulate the message Quick Talk will transmit by using Review Codes to play Location and Switch Condition phrases consecutively, as follows. EXAMPLE for Two-Switch Mode: To review Switch 1 Open message, press "43" then "411": "Utility Room 5." "Air conditioner OK." To review Switch 2 Closed message, press "43" then "422": "Utility Room 5." "Door secure." SEE ALL CODES ON PAGE 20. ® Quick Talk Features/ Applications Manual Page 11 10. NUMBER OF RECORDED VOICE PHRASE REPEATS FOR EACH MESSAGE TRANSMISSION What is the purpose of setting the number of times the Voice Phrase is repeated in each Transmission? Your previously recorded voice phrase can be programmed to repeat from one time to nine times in each Quick Talk transmission. You may wish to use more phrase repeats for more urgent messages. EXAMPLE: The recorded location phrase (“Well 3”), and switch condition phrase ("Pump motor hot"), when programmed to repeat two times in each message transmission, plays back: "...beep. Well 3. Pump motor hot. Pump motor hot. beep..." The beginning and ending beeps are added automatically to attract attention to Quick Talk message transmissions. Do I need to program this feature? The Quick Talk is set at the factory to play each recorded voice phrase one time in each transmission. If this is sufficient for your application, you can skip to the next section, in which we explain how to program the transmission itself to be repeated at different intervals. NOTE: The following examples are for Switch #1. To program this feature on Switch #2, refer to Quick Reference Guide dial codes on pages 20 and 21. To Program the Number of Times the Switch Open Phrase is Repeated in Each Transmission: 1. Pick up the telephone receiver; listen for the tone. 2. Dial "711" then a single digit indicating how many times you want the voice phrase repeated in each transmission, as shown in Table 4. EXAMPLE: To repeat the phrase three times, dial "7113." Wait for the confirmation tone after dialing. 3. Hang up the telephone or continue programming. To Program the Number of Times the Switch Closed Phrase is Repeated in Each Transmission: 4. Pick up the telephone receiver, listen for the tone. 5. Dial "712", then a single digit indicating how many times you want the voice phrase repeated in each transmission, as shown in Table 4. EXAMPLE: To repeat the phrase five times, dial "7125." Wait for the confirmation tone after dialing. 6. Hang up the telephone or continue programming. 1 2 3 4 5 6 7 8 9 Page 11 PROGRAMMING SWITCH STATUS BROADCAST SCHEDULE What is the purpose of programming a Broadcast Schedule for Switch Status Transmissions? You can program different switch status transmission schedules for the open and closeds condition of your switch. EXAMPLE: The switch status message for switch open is "Pump motor temperature OK." To know Quick Talk is operating properly, schedule this message to transmit once every two hours. The corresponding switch status message for switch closed is "Pump motor over temperature." So this situation receives prompt attention, schedule this message to transmit once every two minutes. Do I need to program this feature? Quick Talk is factoryset to transmit a switch status message one time with each switch change. Skip to the next section if the default is sufficient for your application. NOTE: The following examples are for Switch #1. To program this feature on Switch #2, see the Quick Reference Guide on page 20. To Program a Broadcast Schedule of Switch Status Transmissions for the Switch Open Condition: 1. Pick up the telephone receiver; listen for the tone. 2. Dial "511", then the one-digit code from Table 5, below. Wait for the confirmation beep after dialing. EXAMPLE: To schedule switch open message for every two hours, dial "5119." NOTE: The factory default is "5111": transmit message on switch change only. 3. Hang up the telephone or continue programming. To Program a Broadcast Schedule of Switch Status Transmissions for the Switch Closed Condition: 4. Pick up the telephone receiver; listen for the tone. 5. Dial "512", then the one-digit code from Table 5, below. Wait for the confirmation beep after dialing. EXAMPLE: To schedule switch closed message for every two minutes, dial "5124." NOTE: The factory default is "5121": transmit message on switch change only. 6. Hang up the telephone or continue programming. — TABLE 5 — MESSAGE SCHEDULE — TABLE 4 — VOICE PHRASE REPEATS IN EACH TRANSMISSION 11. CODE NUMBER time ............................. times ............................ times ............................ times ............................ times ............................ times ............................ times ............................ times ............................ times ............................ 1— 2 3 4 5 6 7 8 9 DEFAULT CODE NUMBER Never send messages for this condition .. On switch condition change only ....... Every 30 seconds ..................... Every 1 minute ....................... Every 2 minutes ...................... Every 5 minutes ...................... Every 10 minutes ..................... Every 30 minutes ..................... Every 1 hour ......................... Every 2 hours ........................ For assistance, call RITRON at 800-872-1872, or go to http://www.ritron.com 0 1— 2 3 4 5 6 7 8 9 DEFAULT Page 11 ® Quick Talk Features/ Applications Manual Page 12 12. PROGRAMMING A MESSAGE REPEAT LIMIT What is the purpose of limiting the number of times a scheduled voice message is transmitted? In the previous section, you programmed the Quick Talk to transmit a switch status message at regular intervals. In this section, you can limit to the number of times the message will transmit at the scheduled intervals. EXAMPLE: A switch closes when it detects a vehicle at your delivery door. The recorded message is "Vehicle at delivery door." This transmits every two minutes for about 15 minutes after a vehicle is detected, then stops until the vehicle is moved. To achieve this, set the message schedule (Section 11 of this manual), for two minutes, and set the message limit (as described below), to "8." When a vehicle arrives, the switch closes and the message transmits every 2 minutes until it has been sent 8 times over a span of 16 minutes. If the vehicle leaves before 16 minutes elapses, the switch opens and messaging ceases. The process repeats for every vehicle detected. Do I need to program this feature? The Quick Talk is factory-set to transmit switch status messages without limit. Example: If you program Quick Talk to transmit a status message every hour, it will continually do this until the battery runs down. If this programming is sufficient for your application, you can skip to the next section. NOTE: The following example is for Switch #1. To program this feature on Switch #2, refer to Quick Reference Guide dial codes on page 20. Set Scheduled Message Repeat Limit for Switch Closed a. From Table 6 below, select the code number for the desired number of messages. b. Lift the telephone receiver and dial "612", then dial the selected Code Number. Quick Talk responds with a single confirmation tone. EXAMPLE: To schedule message limit “8”, program "6128." c. You may either hang up or continue programming. — TABLE 6 — MESSAGE SCHEDULED REPEAT LIMIT CODE NUMBER 1 time ............................. 2 times ............................ 3 times ............................ 4 times ............................ 5 times ............................ 6 times ............................ 7 times ............................ 8 times ............................ Repeat Forever, No Limit ............ 1 2 3 4 5 6 7 8 9 — DEFAULT 13. Page 12 RESTART QUICK TALK WHEN FINISHED PROGRAMMING MESSAGE PARAMETERS What is the purpose of restarting the Quick Talk? If you have changed message schedules or limits, restarting the Quick Talk ensures all internal clocks and counters are set properly. Do I need to restart the Quick Talk? It is best if you do. To Leave Telephone Programming Mode and Restart the Quick Talk: • Pick up the telephone receiver, wait for the beep and dial "999." Quick Talk responds with a single short tone. NOTE: Be sure to hang up, and to disconnect the telephone from Quick Talk. 14. TO REPROGRAM QUICK TALK TO ORIGINAL FACTORY SETTINGS What is the purpose of erasing and reprogramming the Quick Talk to its original factory settings? If you are unsure how Quick Talk features are programmed and want to start over again, use this feature. Do I need to use this feature? You can erase all your programming to return Quick Talk to its Factory Default Settings with this command. To erase programming and start over with Factory Default Settings: a. Pick up the telephone receiver, wait for the acknowledgment tone. b. If your Quick Talk is a VHF-FM RQT-150 model, dial "978” to return it to the default frequency of 154.570 MHz. OR ...if your Quick Talk is a UHF-FM RQT-450 model, dial "979” to return it to the default frequency of 467.925 MHz. c. After you hear the confirmation tone, hang up the telephone. d. Play back your voice phrases and re-record them as necessary. See pages 9 and 10. NOTE: This command does not restore the Factory Default recorded voice messages. Any and all recorded messages may be lost by use of this command; you will have to record them again, using the instructions in this manual. Page 12 ® Quick Talk Features/ Applications Manual Page 13 15. Page 13 SETTING DEBOUNCE OPTIONS There are two modes of contact debounce; 1. Normal Debounce, and 2. Holdoff Debounce: 1. NORMAL DEBOUNCE is an option specifying that the switch must remain in its changed condition for a userspecified time period ("debounce"), before generating a message for the changed condition. EXAMPLE: A sensor is used to detect a car in a "No Parking" zone. Since it is undesirable for a message to be generated by normal traffic through the "No Parking" zone, a five-minute Normal Debounce is used. Only if the sensor is activated for a full five minutes will the "car illegally parked" message be transmitted. TO USE SWITCH 1 AS A NORMAL DEBOUNCED CONTACT CLOSURE: a. Pick up the telephone receiver and listen for the acknowledge tone. b. Select the code for the desired Debounce time from Table 7 below. c. Dial "812x", "x" being the selected code from Table 7, below. A beep indicates the command is accepted. NOTE: For the "No Parking" zone example above, dial "8126" for 5-minute debounce. d. To complete the programming, dial "999", wait for the beep, then hang up the telephone. TO USE SWITCH 2 AS A NORMAL DEBOUNCED CONTACT CLOSURE: a. Pick up the telephone receiver and listen for the acknowledge tone. b. Select the code for the desired Debounce time from Table 2, below. c. Dial "822x", "x" being the selected code from Table 7, below. A beep indicates the command is accepted. d. To complete the programming, dial "999”, wait for the beep, then hang up the telephone. — TABLE 7 — DEBOUNCE TIME CODE NUMBER No Debounce ...................... 1 10 seconds ........................ 2 30 seconds ........................ 3 1 minute ........................... 4 3 minutes .......................... 5 5 minutes .......................... 6 — DEFAULT 2. HOLDOFF DEBOUNCE option transmits messages immediately upon change of switch condition, and will also hold off a message of further change for the time period of the selected debounce. EXAMPLE: A Quick Talk is used as a gate doorbell. It is practical for the message to be transmitted immediately, and also desirable to have a one-minute debounce before the same message is re-sent, even if the button is pushed repeatedly. TO USE SWITCH 1 AS A NORMAL HOLDOFF CONTACT CLOSURE: a. Pick up the telephone receiver and listen for the acknowledge tone. b. Dial "5110" to suppress the phrase for Switch 1 OPEN, and to prevent message transmission for the button being pressed. b. Select the code for the desired Holdoff time from Table 8 below. c. Dial "813x", "x" being the selected code from Table 8, below. A beep indicates the command is accepted. NOTE: For the gate doorbell example above, dial "8134" for 1-minute holdoff. d. To complete the programming, dial "999", wait for the beep, then hang up the telephone. TO USE SWITCH 2 AS A NORMAL HOLDOFF CONTACT CLOSURE: a. Pick up the telephone receiver and listen for the acknowledge tone. b. Dial "5210" to suppress the phrase for Switch 2 OPEN, and to prevent message transmission for the button being pressed. b. Select the code for the desired Holdoff time from Table 8 below. c. Dial "823x", "x" being the selected code from Table 8, below. A beep indicates the command is accepted. d. To complete the programming, dial "999”, wait for the beep, then hang up the telephone. — TABLE 8 — HOLDOFF TIME CODE NUMBER No Holdoff ......................... 1 10 seconds ........................ 2 30 seconds ........................ 3 1 minute ........................... 4 3 minutes .......................... 5 5 minutes .......................... 6 — DEFAULT For assistance, call RITRON at 800-872-1872, or go to http://www.ritron.com Page 13 ® Quick Talk Features/ Applications Manual Page 14 16. MONITORING 4 - 20 mA SENSOR CURRENT LOOPS W/ ANALOG MODES 17. Page 14 SOLAR PANELS FOR OPERATING & CHARGING NICD BATTERIES TO USE QUICK TALK TO MONITOR 4-20 mA SENSOR CURRENT LOOPS WITH ANALOG INPUT MODES TO USE SOLAR POWER PANELS FOR OPERATION AND FOR CHARGING INTERNAL NI-CD BATTERIES: Quick Talk can act as a current sink after a resistor is connected between the Switch 1 positive and negative terminals. The resistance value is selected to scale the current to the permitted 0 - 5 Voltage range for the Switch 1 input to Quick Talk. See the following formula, and Fig–5. Follow the instructions in Section 19 for using Ni-Cd batteries, including Step c. to enable the Battery Saver, and d. to minimize the charging current needed. DO NOT EXCEED 15 Volts at the external battery terminals. 5 Volts (max. permitted Voltage) --------------------------------------------------------- = 250 Ohms of resistance 20 mA (max. current from sensor loop) NOTES: Using a lower resistance value with the 4-20 mA current loop produces less than 5 V at the Switch 1 input; since the full 5 Volt range is not used, measurement resolution is reduced. Using a higher resistance value at 20 mA produces greater than 5V at the Switch 1 input, which risks damaging the Quick Talk unit. i EXT. PWR. SWITCH 1 (1/60 hour) (150mA) (24 hours/ day) = 60 mA hours/ day SWITCH 2 FIG–5. CURRENT LOOP (EXAMPLE CONNECTION DIAGRAM) 18. USING LATCHING OPTION TO USE LATCHING MODE: Use the Quick Talk latching mode application if repeated transmissions are desired with a momentary switch (i.e.: a push-button). The latching effect maintains message repeats after the momentary switch change has ended. EXAMPLE: To use a Quick Talk in a paint department, set it to repeat phrase transmissions after the "Press for Help" push-button is activated. In this example, the recorded phrase transmits every 2 minutes until the Quick Talk latch mode resets (an employee resets Switch 2). TO PROGRAM LATCHING MODE: NOTE: This example uses a Normally Open switch. a. Pick up the telephone receiver and listen for the acknowledge tone. NOTE: To remove possible interference from prior programming, in this application it is best to use a Quick Talk unit set to factory defaults. To restore factory defaults: Dial "978" for VHF units; dial "979" for UHF units. To program a different frequency than the default, refer to page 7. b. If you have a Normally Open switch, dial "814" to latch the CLOSED condition on Switch 1. A beep indicates the command is accepted. Page 14 EXAMPLE: Assume the Quick Talk transmits for one minute of every hour, on average (1/60 hour). Further assume the Quick Talk draws 150 mA of current while transmitting (150 mA). NOTE: 150 mA is a bit higher than real consumption; the panel will be slightly oversized. The formula to calculate required mA hours: (1/60 hr.) x (150 mA) x ( No. of hours ) = Req'd. mA hr./ day operation/ day Plug the Example into the Formula: 250 Ω 4-20mA Current Loop Input CALCULATING THE SOLAR PANEL SIZE: Quick Talk uses little power when it is not transmitting. The estimated time the unit does transmit can accurately determine solar panel size requirements to charge Ni-Cd batteries. The following formula sizes the panel properly: RESULTS: In this Example, the Quick Talk solar panel supplies 60 mA-hours in a 24-hour period. NOTE: Study solar panel manufacturers' information. c. Dial "312". Quick Talk sounds three short tones to prompt you to begin speaking, then record the Switch 1 phrase, to be no longer than eight seconds. EXAMPLE: Record "Help needed Paint Department." d. Dial "5110" to suppress the Switch 1 OPEN message (preventing transmitted messages when the sales person resets the unit). NOTE: Skip Step d. if it is desirable to send a message when the unit is reset. e. Dial "5124" to select 2 minutes as the message repeat schedule for Switch 1 latched condition; refer to Table 9. f. Dial "999", wait for the beep, then hang up the telephone to complete the programming. — TABLE 9 — TIME BETWEEN MESSAGES CODE NUMBER None/ Never ........................ 0 On Changes Only ................... 1 — DEFAULT 30 seconds ........................ 2 1 minute ........................... 3 2 minutes .......................... 4 5 minutes .......................... 5 10 minutes ......................... 6 30 minutes ......................... 7 1 hour ............................. 8 2 hours ............................ 9 ® Page 15 19. Quick Talk Features/ Applications Manual Page 15 J103 JUMPER SETTINGS FOR BATTERY TYPE NOTE: When programming, use either fresh Alkaline batteries (or an external power supply), to power the Quick Talk. When programming is finished, you may either insert Ni-Cd batteries or leave Alkaline batteries in place. WARNING: DO NOT attempt to charge Alkaline batteries from an external +12VDC power supply. When powering Quick Talk with ALKALINE BATTERIES, set J103 as follows to disconnect the charging current paths: a. To set the Quick Talk for use with alkaline batteries, move Jumper J103 to cover only one pin of the jumper base, as shown in FIG—6 below; this setting prevents the flow of charging current. b. Dial "943" to program the Quick Talk for use with alkaline batteries. + + + + J103 FIG—6. J103 POSITION FOR USE WITH ALKALINE BATTERIES When powering Quick Talk with NI-CD BATTERIES, set J103 as follows to connect the charging current paths: c. Cover both pins with Jumper J103, as shown in FIG—7 below, to charge the Ni-Cd batteries from the External Power connection. d. Dial "944" to adjust the Quick Talk voltage; the unit then transmits a "Low Battery" phrase. NOTE: Because Ni-Cd batteries self-discharge rapidly, constantly charge them with external +12VDC power. + + + + J103 FIG—7. J103 POSITION FOR USE WITH NI-CD BATTERIES 20. SETTING ANALOG MODES CAUTION: Protective circuits limit voltage measured by the microprocessor at Switch 1; however, voltage at the positive terminal of Switch 1 must not exceed +5 VDC; higher voltages can damage the protective circuit. NOTES: To facilitate using analog sensors, Quick Talk detects changes to analog signals on Switch 1. Analog Mode threshold voltage equivalents: 0V is measured as (number) 0; +5V as (number) 255. THE FORMULA for threshold setpoint of a user-selected voltage: Threshold Setpoint = (User selected voltage) x 255 ------------------------------------------5 (volts) EXAMPLE: For +3 volt setting: 3 x 255 Threshold Setpoint = ------------------ = 153 5 Quick Talk provides two analog modes: 1.) Analog Input Mode, and 2.) Terminated Alarm Input Mode, described on the following page. (Continued on page 16) For assistance, call RITRON at 800-872-1872, or go to http://www.ritron.com Page 15 ® Quick Talk Features/ Applications Manual Page 16 SETTING ANALOG MODES (continued from page 15) 1. ANALOG INPUT MODE: Voltages above High Threshold Setpoint cause Switch 1 OPEN message to transmit. Voltages below Low Threshold Setpoint cause Switch 1 CLOSED message to transmit. The dead zone—an area of hysteresis provided by the difference between High and Low Threshold Setpoints—prevents unwanted messages, caused by noise or minor signal changes. See Fig–8. When the input is in CLOSED condition, a change to OPEN condition occurs only when the signal exceeds the High Threshold Setpoint. Similarly, when the input is in OPEN condition, the change to CLOSED condition occurs only when the signal is less than the Low Threshold Setpoint. To Set Analog Input Mode: a. Pick up the telephone receiver and listen for the acknowledge tone. b. Dial "8162" to set Quick Talk to Analog Input Mode— a beep indicates the command is accepted. c. Dial "999", wait for the beep, then hang up the telephone to complete programming. HIGH THRESHOLD SETPOINT NOTE: No messages is sent until a threshold is crossed. LOW THRESHOLD SETPOINT 0 MIN. 1 MIN. 2 MIN. Q.T. "SWITCH 1 OPEN" MESSAGE FIG–8. Q.T. "SWITCH 1 CLOSED" MESSAGE ANALOG INPUT MODE (EXAMPLE) 2. TERMINATED ALARM INPUT MODE: This mode is useful in security alarm applications, where the "Secure" (Good) condition is a range of voltages. Voltages above or below this range represent "Alarm" (Bad) conditions. See Fig–9. The "Secure" condition is the range of voltage between the High and Low Threshold Setpoints. Switch 1 OPEN message is activated in this range. Voltage above High Threshold Setpoint, or below Low Threshold Setpoint activates the Switch 1 CLOSED message. "MALFUNCTION" HIGH THRESHOLD SETPOINT "SECURE" LOW THRESHOLD SETPOINT "ALARM" FIG–9. Page 16 TERMINATED ALARM INPUT MODE (EXAMPLE) Page 16 To Set Terminated Alarm input Mode: a. Pick up the telephone receiver and listen for the acknowledge tone. b. Dial "8163" to set Quick Talk to Terminated Alarm Input Mode—a beep indicates the command is accepted. c. Dial "999", wait for the beep and then hang up the telephone to complete the programming. Setting the High Threshold Setpoint in either Analog Input, or in Terminated alarm Input Mode: a. Pick up the telephone receiver and listen for the acknowledge tone. b. Dial "818xxx", "xxx" being the selected code from Table 1, below. A beep indicates the command is accepted. EXAMPLE: 185 represents a threshold of approximately 3.6 Volts. Dial "818185" to set 3.6 Volts as the High Threshold Setpoint. c. Dial "999", wait for the beep, then hang up the telephone to complete the programming. Setting the Low Threshold Setpoint in either Analog Input, or in Terminated alarm Input Mode: a. Pick up the telephone receiver and listen for the acknowledge tone. b. Dial "817xxx", "xxx" being the selected code from Table 1, below. A beep indicates the command is accepted. EXAMPLE: 85 represents a threshold of approximately 1.6 Volts. Dial "817085" * to set 1.6 Volts as the Low Threshold Setpoint. *NOTE: Inserting a zero before a 2-digit number (Example: "85"), completes the command. Insert two zeros in front of a one-digit number. c. Dial "999", wait for the beep, then hang up the telephone to complete the programming. To revert to Contact Closure Mode, using Switch 1 as a Contact Closure Input: a. Pick up the telephone receiver and listen for the acknowledge tone. b. Dial "8161"—a beep indicates the command is accepted. c. Dial "999", wait for the beep, then hang up the t elephone to complete the programming. — TABLE 10 — THRESHOLD VOLTAGE CODE SETTING NUMBER 0 volts ............................ 000 1 volt ............................. 051 2 volts ............................ 102 3 volts ............................ 153 4 volts ............................ 204 5 volts ............................ 255 ® Quick Talk Features/ Applications Manual Page 17 21. RECORDING UNIQUE LOW BATTERY MESSAGES Why record a unique Voice Phrase for the Low Battery Message? When it senses installed batteries are nearly run down, Quick Talk transmits a factory-programmed "Low Battery" message no more often than once an hour. If you have several units grouped within radio range of one another, we recommend you customize messages to easily identify the specific unit. NOTE: Also physically mark the Quick Talk case with the same unique identifier (number) you record for Quick Talk location phrasing (see page 10). Do I need to program this feature? If you use only one Quick Talk in an area, or if you regularly change Quick Talk batteries, the factory-programmed message may be sufficient: you can skip to the next section. TO RECORD LOW BATTERY PHRASE: a. Pick up the telephone receiver and listen for the acknowledge tone. b. Dial "35"—Quick Talk prompts you with three short tones to begin speaking. NOTE: Your recorded LOW BATTERY phrase is to be no longer than 1.5 seconds. EXAMPLE: "Low batt five." c. Hang up the telephone when you are done speaking. d. To review the recorded phrase, dial "45". e. Repeat steps "a" through "d" until you are pleased with the results. 22. RECORDING UNIQUE POWER FAILURE MESSAGES What is the purpose of recording a unique Voice Phrase for the Power Failure Message? When it senses power failure, Quick Talk transmits a factory-programmed "Power Failure" message no more often than once an hour. If you have several units grouped within radio range of one another, we recommend you customize messages to easily identify the specific unit. NOTE: Also physically mark the Quick Talk case with the same unique identifier (number) you record for Quick Talk location phrasing (see page 10). Do I need to program this feature? If you use only one Quick Talk in an area, or if you regularly change Quick Talk batteries, the factory-programmed message may be sufficient: you can skip to the next section. TO RECORD POWER FAILURE PHRASE: a. Pick up the telephone receiver and listen for the acknowledge tone. b. Dial "34"—Quick Talk prompts you with three short tones to begin speaking. NOTE: Your recorded POWER FAIL phrase is to be no longer than 1.5 seconds. EXAMPLE: "Power fail fivec. Hang up the telephone when you are done speaking. d. To review the POWER FAIL phrase, dial "44". e. Repeat steps "a" through "d" until you are pleased with the results. 23. UNABLING/ DISABLING STATUS MESSAGES Page 17 TO DISABLE LOW BATTERY MESSAGE: a. Pick up the telephone receiver and listen for the acknowledge tone. b. Dial "941". TO ENABLE LOW BATTERY MESSAGE: a. Pick up the telephone receiver and listen for the acknowledge tone. b. Dial "942". NOTE: The default is Low Battery Message “On.” TO DISABLE EXTERNAL POWER FAILURE MESSAGE: a. Pick up the telephone receiver and listen for the acknowledge tone. b. Dial "951". TO ENABLE EXTERNAL POWER FAILURE MESSAGE: a. Pick up the telephone receiver and listen for the acknowledge tone. b. Dial "952". NOTE: The default is Power Failure Message “Off.” 24. SETTING BATTERY SAVER OPTIONS TO SET BATTERY SAVER OPTIONS: The Battery Saver factory default is "Battery Saver enabled." In this setting, which greatly extends battery life, Quick Talk checks switch inputs for changes 4 times a second. a. Dial "932" to enable Battery Saver. NOTE: DO NOT disable the Battery Saver unless you need to detect very fast changes in the switch inputs. To detect very fast changes, set Quick Talk to check switch inputs rapidly: b. Dial "931" to disable Battery Saver. NOTE: Powering the Quick Talk with an external Power Supply is very practical with the Battery Saver Option disabled, because Quick Talk draws approximately 7 mA continuously with this setting. For assistance, call RITRON at 800-872-1872, or go to http://www.ritron.com Page 17 ® Quick Talk Features/ Applications Manual Page 18 25. SETTING NARROW-BAND (2.5 kHz) CHANNELS 27. Page 18 CONFIGURING TRANSMIT DELAY MODULATION SELECT FOR NARROW BAND CHANNELS: TRANSMIT DELAY: To change Quick Talk from wide band to narrow (2.5 kHz deviation) band operation, move Jumper J102 to cover only one pin of the jumper base, as shown in Figure 10: For either Quick Talk applications using a repeater system, or for handheld receivers with longer turn-on delays, Quick Talk provides for an adjustment of the delay before sending transmit audio. + + + J102 TO PROGRAM THE TRANSMIT DELAY: a. Pick up the telephone receiver and listen for the acknowledge tone. + FIG—10. If the default delay is sufficient, you can skip this programming step. However, if the attention-getting beep is being missed because the repeater has not started transmitting, or because a handheld radio takes too long to break squelch, you will need to program a longer delay. J102 SETTING FOR NARROW BAND OPERATION b. Dial "96xxx", "xxx" being the selected code between 000 and 255. Refer to Table 11, below. EXAMPLE: Dialing "96032"* sets a one-second delay. *NOTE: Inserting a zero in front of a two-digit number (Example: "32"), completes the command. Insert two zeros in front of a one-digit number. — TABLE 11 — APPX. DELAY TIME 26. CONNECTING AN EXTERNAL 12 VDC POWER SUPPLY TO CONNECT AN EXTERNAL 12 VDC POWER SUPPLY: Quick Talk can be powered by an External Power Supply. Battery backup is recommended for this configuration. Connect the External Power Supply to Quick Talk positive and negative terminals, as shown in FIG—11, below. CODE NUMBER No Delay ......................... 3/4 second ........................ 1 second ......................... 2 seconds ........................ 3 seconds ........................ 4 seconds ........................ 5 seconds ........................ 6 seconds ........................ 7 seconds ........................ 7-7/8 seconds ..................... 000 024 — 032 064 096 128 160 192 224 255 DEFAULT + + - SWITCH 1 + +12V +12V External EXTERNAL Power POWER SUPPLY G ND Supply + - EXT. PWR. GND 28. PRE-INSTALLATION CHECKLIST Quick Talk Pre-Installation Checklist: FIG—11. EXTERNAL POWER SUPPLY CONNECTIONS Page 18 a. Make sure your radios hear the Quick Talk message transmissions. b. Review your recorded voice phrases. c. Review your message schedules and limits. Quick Talk Features/ Applications Manual Page 19 29. Page 19 QUICK TALK INSTALLATION WHEN YOU ARE FINISHED PROGRAMMING: 1. Hang up and disconnect the telephone from the internal jack on the Quick Talk. * WARNING: The antenna connection MUST BE SEALED if the Quick Talk is to be used outdoors. See FIG–12 below, and Step 4 at left. 2. Test the operation of the Quick Talk before putting it into service by activating the switch and listening to message(s) received on your radio. 3. Replace the cover and (4) cover screws; snug down, but do not overtighten the screws. Excessive force can break plastic enclosure material. 4. Attach the antenna and seal the connection. Refer to Figure 12 at right. a. Insert, rotate and lock the antenna into Quick Talk antenna jack. b. Orient antenna in vertical position. c. Seal antenna connection to hold antenna in vertical position, to protect antenna fittings, and to maintain water-resistance of the Quick Talk in wet or outdoor environments. Use Archer Connector Sealant, Radio Shack Catalog Number 278-1645 or an equivalent. Wrap the connection with sealant tape and press it securely in place. See Figure 12, at right, and instructions with the sealant. Antenna Connection — See Warning * 5. Test for sufficient broadcast range when choosing the location. For maximum range and coverage, install the unit as high as possible off the ground. Choose a well-shaded location. Be aware that metal and wires near the antenna can block or absorb radio transmissions. NOTE: An optional high gain antenna is available from Ritron; call 1-800-872-1872 for information. 6. Position the unit as shown in FIG–12, and secure it in place with screws through the enclosure flanges. Do not overtighten these screws, as the plastic flanges may break from excessive pressure. IMPORTANT: Call a qualified electrician or technician if you are not certain your installation will work properly and safely. FIG–12. QUICK TALK INSTALLATION CARE & MAINTENANCE Batteries: Use only fresh, new alkaline batteries when programming Quick Talk. Acceptable brands and types are: Duracell MX1500B, Eveready E91, RayOvac 815 and equivalents. NOTE: For information on using rechargeable Ni-Cd AA batteries charged by an optional external 12 Volt DC power supply, refer to page 18 of this manual. Estimated Battery Life: Starting with a fresh set of AA alkaline batteries, Quick Talk can transmit about 7,000 voice messages before batteries will need replacement. Automatic Low Battery Alert Message: If battery voltage drops below approximately 6 Volts, Quick Talk transmits the factory prerecorded message "Low Battery" no more often than every 60 minutes. When this occurs, replace batteries promptly—within a day or so. Temperature: Quick Talk is designed to operate between -22 and +140 F. Within this range, good radio performance also depends on specifications of batteries in the unit. Alkaline battery power decreases in extreme cold—e.g.: a power loss of 20% at 14 F. As for all electronic equipment, do not subject Quick Talk to extreme heat or direct sun. The ideal outdoor location is shaded. Moisture: When cover gasket (page 3) and antenna sealant (above) recommendations are followed, Quick Talk is highly weather-resistant to outdoor environments. Do not immerse the unit in water. Vibrations/ Shocks: Although it is of rugged design, Quick Talk cannot be expected to survive extreme abuse. Chemicals: Use only a cloth moistened with water to clean the Quick Talk case. Do not attempt to clean the printed circuit board, located inside the housing. For assistance, call RITRON at 800-872-1872, or go to O O http://www.ritron.com Page 19 Quick Talk Advanced Features/ Applications Manual — QUICK REFERENCE GUIDE — DIAL CODE DESCRIPTION FREQUENCY PROGRAMMING 1-1 1-2 TX Freq. 2 digit code: Table 1 (See page 6.) TX Freq., 6 digit: Dealer programming ONLY; enter 1st 6 digits of frequency. SUB-AUDIBLE CODED SQUELCH PROGRAMMING 2-1 2-2 CTCSS/ QC® 2-digit code: Table 2 (See page 7.) DCS/ DQCTM 3 digit code: Table 3 (See page 8.) RECORDING VOICE PHRASES 3-1-1 3-1-2 3-2-1 3-2-2 3-3 3-4 3-5 Record “Switch 1 Open” Phrase Record “Switch 1 Closed” Phrase Record “Switch 2 Open” Phrase Record “Switch 2 Closed” Phrase Record Location Phrase Record Power Failure Phrase Record Low Battery Phrase PLAY BACK PHRASES 4-1-1 4-1-2 4-2-1 4-2-2 4-3 4-4 4-5 Play Switch 1 OPEN Condition Phrase Play Switch 1 CLOSED Condition Phrase Play Switch 2 OPEN Condition Phrase Play Switch 2 CLOSED Condition Phrase Play Location Phrase Play Power Fail Phrase Play Low Battery Phrase TIME BETWEEN MESSAGES: SWITCH 1 OPEN 5-1-1-0 5-1-1-1 5-1-1-2 5-1-1-3 5-1-1-4 5-1-1-5 5-1-1-6 5-1-1-7 5-1-1-8 5-1-1-9 Suppressed messages On changes only — DEFAULT 30 seconds 1 minute 2 minutes 5 minutes 10 minutes 30 minutes 1 hour 2 hours SWITCH 1 CLOSED 5-1-2-0 5-1-2-1 5-1-2-2 5-1-2-3 5-1-2-4 5-1-2-5 5-1-2-6 5-1-2-7 5-1-2-8 5-1-2-9 Suppressed messages On changes only — DEFAULT 30 seconds 1 minute 2 minutes 5 minutes 10 minutes 30 minutes 1 hour 2 hours SWITCH 2 OPEN 5-2-1-0 5-2-1-1 5-2-1-2 5-2-1-3 5-2-1-4 5-2-1-5 5-2-1-6 5-2-1-7 5-2-1-8 5-2-1-9 Page 20 Suppressed messages On changes only — DEFAULT 30 seconds 1 minute 2 minutes 5 minutes 10 minutes 30 minutes 1 hour 2 hours DIAL CODE DESCRIPTION TIME BETWEEN MESSAGES: (continued) SWITCH 2 CLOSED 5-2-2-0 5-2-2-1 5-2-2-2 5-2-2-3 5-2-2-4 5-2-2-5 5-2-2-6 5-2-2-7 5-2-2-8 5-2-2-9 Suppressed messages On changes only — DEFAULT 30 seconds 1 minute 2 minutes 5 minutes 10 minutes 30 minutes 1 hour 2 hours SCHEDULED MESSAGE REPEAT LIMIT: SWITCH 1 OPEN 6-1-1-1 6-1-1-2 6-1-1-3 6-1-1-4 6-1-1-5 6-1-1-6 6-1-1-7 6-1-1-8 6-1-1-9 SWITCH 1 CLOSED 6-1-2-1 6-1-2-2 6-1-2-3 6-1-2-4 6-1-2-5 6-1-2-6 6-1-2-7 6-1-2-8 6-1-2-9 One time Two times Three times Four times Five times Six times Seven times Eight times Repeat forever — DEFAULT SWITCH 2 OPEN 6-2-1-1 6-2-1-2 6-2-1-3 6-2-1-4 6-2-1-5 6-2-1-6 6-2-1-7 6-2-1-8 6-2-1-9 One time Two times Three times Four times Five times Six times Seven times Eight times Repeat forever — DEFAULT SWITCH 2 CLOSED 6-2-2-1 6-2-2-2 6-2-2-3 6-2-2-4 6-2-2-5 6-2-2-6 6-2-2-7 6-2-2-8 6-2-2-9 One time Two times Three times Four times Five times Six times Seven times Eight times Repeat forever — DEFAULT PHRASE REPEATS IN EACH MESSAGE: SWITCH 1 OPEN 7-1-1-1 7-1-1-2 7-1-1-3 7-1-1-4 7-1-1-5 7-1-1-6 7-1-1-7 7-1-1-8 7-1-1-9 { NOTE: If Time One time Between Messages Two times (above), is changed Three times from default On Four times Changes Only, message is Five times repeated by active Six times Repeat Schedule. Seven times Eight times Repeat forever — DEFAULT One time — DEFAULT Two times Three times Four times Five times Six times Seven times Eight times Nine times / Quick Talk Advanced Features/ Applications Manual (Quick Reference Guide, continued from page 20 ) DIAL CODE DESCRIPTION PHRASE REPEATS IN EACH MESSAGE: SWITCH 1 CLOSED 7-1-2-1 7-1-2-2 7-1-2-3 7-1-2-4 7-1-2-5 7-1-2-6 7-1-2-7 7-1-2-8 7-1-2-9 DIAL CODE (continued) One time — DEFAULT Two times Three times Four times Five times Six times Seven times Eight times Nine times One time — DEFAULT Two times Three times Four times Five times Six times Seven times Eight times Nine times 8-1-4 8-1-5 One time — DEFAULT Two times Three times Four times Five times Six times Seven times Eight times Nine times DEBOUNCE OPTIONS SWITCH 1 MODE—NORMAL 8-1-1 Normal On/ Off SWITCH 1 MODE—DEBOUNCED CONTACT 8-1-2-1 8-1-2-2 8-1-2-3 8-1-2-4 8-1-2-5 8-1-2-6 No contact debounce 10 seconds of debounce 30 seconds of debounce 1 minute of debounce 3 minutes of debounce 5 minutes of debounce SWITCH 1 MODE—HOLDOFF CONTACT 8-1-3-1 8-1-3-2 8-1-3-3 8-1-3-4 8-1-3-5 8-1-3-6 No contact holdoff 10 seconds of holdoff 30 seconds of holdoff 1 minute of holdoff 3 minutes of holdoff 5 minutes of holdoff 8-1-6-1 8-1-6-2 8-1-6-3 8-1-7-x-x-x 8-1-8-x-x-x SWITCH 2 MODE—HOLDOFF CONTACT 8-2-3-1 8-2-3-2 8-2-3-3 8-2-3-4 8-2-3-5 8-2-3-6 No contact holdoff 10 seconds of holdoff 30 seconds of holdoff 1 minute of holdoff 3 minutes of holdoff 5 minutes of holdoff 0-0-0 0-5-1 0-8-4 1-0-2 1-5-3 2-0-4 2-5-5 = = = = = = = 0 volt 1 volt 1.68 volts — DEFAULT 2 volts 3 volts 4 volts 5 volts 0-0-0 0-5-1 1-0-2 1-5-3 1-7-1 2-0-4 2-5-5 = = = = = = = NOTE: For Switch 1 ONLY 0 volt 1 volt 2 volts 3 volts 3.42 volts — DEFAULT 4 volts 5 volts / SPECIAL FEATURES: CONFIGURATION 9-1-1 9-1-2 Configure to One Contact Input — DEFAULT Configure to Two Contact Inputs ALERT BEEPS 9-2-1 9-2-2 9-2-3 9-2-4 One beep — DEFAULT Two beeps Three beeps No beeps BATTERY SAVER 9-3-1 9-3-2 Off On — DEFAULT LOW BATTERY MESSAGE 9-4-1 9-4-2 9-4-3 9-4-4 Off On — DEFAULT Alkaline batteries — DEFAULT Ni-Cd batteries . . . . . . . . . . . . . { EXTERNAL POWER MESSAGE 9-5-1 9-5-2 Off — DEFAULT On IMPORTANT: See J103 settings, page 15. TRANSMIT DELAY IN 1/32 SECOND INCREMENTS 9-6-x-x-x Normal On/ Off No contact debounce 10 seconds of debounce 30 seconds of debounce 1 minute of debounce 3 minutes of debounce 5 minutes of debounce Contact closure — DEFAULT Analog Input Terminated Alarm Input SWITCH 1 MODE—HIGH THRESHOLD SETPOINT SWITCH 2 MODE—DEBOUNCED CONTACT 8-2-2-1 8-2-2-2 8-2-2-3 8-2-2-4 8-2-2-5 8-2-2-6 Latch off — DEFAULT Latch on SWITCH 1 MODE—LOW THRESHOLD SETPOINT SWITCH 2 MODE—NORMAL 8-2-1 / SWITCH 1 MODE—INPUT TYPE SWITCH 2 CLOSED 7-2-2-1 7-2-2-2 7-2-2-3 7-2-2-4 7-2-2-5 7-2-2-6 7-2-2-7 7-2-2-8 7-2-2-9 { LATCHING OPTIONS SWITCH 1 MODE—ON/ OFF SWITCH 2 OPEN 7-2.1-1 7-2-1-2 7-2-1-3 7-2-1-4 7-2-1-5 7-2-1-6 7-2-1-7 7-2-1-8 7-2-1-9 DESCRIPTION 0-0-0 0-2-4 0-3-2 0-6-4 0-9-6 1-2-8 1-6-0 1-9-2 2-2-4 2-5-5 = = = = = = = = = = No Delay 3/4 second — DEFAULT 1 second 2 seconds 3 seconds 4 seconds 5 seconds 6 seconds 7 seconds 7- 31/32 seconds RESTORE FACTORY DEFAULTS 9-7-8 9-7-9 VHF (Frequency = 154.570 MHz) UHF (Frequency = 467.925 MHz) END TELEPHONE PROGRAMMING 9-9-9 End telephone programming & RESTART For assistance, call RITRON at 800-872-1872, or go to http://www.ritron.com Page 21