1
machine number
I VRB211
VRB411
VRB412
VRB421
Y STAR
® Partm
has determined
NERGYSTAR
®
operating
guide
/
warranty
RECORD
YOUR
MODEL
NUMBER
(Now,whiteyoucanseeit)
|
/
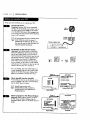
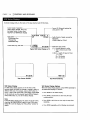
The model and serial numberof your new VCRare Located
on the backof the VCRcabinet. Foryourfuture convenience,
we suggestthat you recordthese numbershere:
MODEL NO.
SERIALNO.
WARNING:
TO REDUCE
THERISKOF ELECTRIC
SHOCKDONOTREMOVE
COVER(ORBACK).NOUSERSERVICEABLE
PARTS
INSIDE. REFER
SERVICINGTO QUALIFIEDSERVICEPERSONNEL
The Lightning
flashwitharrowhead
symbol withinan equilateral,
triangle,
isintended
toa[ert
theusertothepresence
of uninsulated
"dangerous
voltage"
withintheproduct's
enclosure
thatmay be ofsufficient
magnitude
toconstitute
a
risk
ofelectric
shockto persons.
The exclamationpoint within an equiLateraLtriangle is intended to alert the user to the presence of important
operatingand maintenance(servicing) instructions in the Uterature accompanyingthe appliance.
WARNING:
TO REDUCETHERISKOF FIREOR ELECTRIC
SHOCK,DO NOTEXPOSETHISAPPLIANCE
TO RAINOR MOISTURE,
CAUTION:To Prevent ELectricShock, matchwide blade of plug to wide slot, fu[[yinsert.
ATTENTION:Pour_viter
Leschocs_tectriques,
intrudui_e
taLametaplusLa_je
de tafiche
dens_ bornecorrespondante
I POWER CORD POLARIZATION:
de laprise
etpousser
jusqu'au
fond.
NOTE TO CABLE/_/INSTALLER:
Thisreminder
isprovided
tocart
thecable
IV systeminstatter's
attention
toArticLe
820-40oftheNational
Etecb'ic
Code
(U.S.A.).
Thecode provides
guide[ines
forpropergrounding
and,inparticular,
specifies
thatthecabLegroundshaLL
be
connected
to thegrounding
systemofthebuilding,
asclosetothepointofthecableentryaspractical
REGULATORY INFORMATION:
This equipment has been tested and found to comply with the limits for a CLassB digital device, pursuant to Part 15
of the FCCRuLes. These Emits are designed to provide reasonable protection against harmfot interference
equipment is operated in a residential, installation.
when the
This equipment generates, uses and can radiate radio frequency
energy and, if not installed and used in accordance with the instruction
manual
radio communications.
wii[ not occur in a particular instaLLation. If this
However, there is no guarantee that interference
may cause harmful interference
te
equipment does cause harmfo[ interference to radio or te[evision reception, which can be determined by turning
the equipment off and on, the user is encouraged to try to correct the interference by one or more of the following
measures:
• Reorient or relocate the receiving antenna.
• Increase the separation between the equipment and receiver.
• Connect the equipment into an outlet on a circuit different from that to which the receiver is
connected.
• ConsuLtthe dealer or an experienced radio/TV technician for help.
_J,U110N:
Do not attempt to modify this product in any way without written authorization
from Zenith ELectronics
Corporation.Unauthorizedmodificationcould void the user'sauthori_ to operatethisproduct.
This class B digital,
apparatus meets a[[requirements of the Canadian Interference-CausingEquipment
Regul`ations.
"Ce apparei[num_rique de [a classb respecte toutes [esexigences du R_gu[ement sur [e materielbroui[[ier
du
Canada."
Zenith isa trademark of ZEC © CopyrightZenith Eiectronlcs
Cornoratlon1999
SAFETY
TIPS
{
Thesesimple precautionswiLLt_lp ensure that you get many yearsof safe enjoyment from your new product.
1,
20
Read Instructions
Read all of the safety and operatinginstructions before
operating
the product.
Retain |n$'croctlons
Keep all safety and operating instructions
reference.
3.
for future
Heed Warnings
Followwarningson the product and in the operating
guide.
11. Power Sources
Operateproduct only from type of powersource
indicated
on markinglabeL.
Ifyou atenotsureofthe
typeofpowersupplytoyourhome, consult
your
productdealer or Local power company.For products
intended to operate from battery poweror other
sources,refer to manual.
12. Line-Cord Polarization
Product is equippedwith a polarized aLternaUngcurrent fine plug (a plug having one blade wider than
theother).
As a safetyfeature,
this_ug willfitinto
poweroutlet
onlyone way.Ifyou'reunableto insert
plugfully
intooutlet,
tryreversing
theplug.Ifplug
still
fails
to fit,
contactan electrician
to replace
your
obsolete
out[el.
Do notdefeatsafetypurposeof
polarized
plug.
4.
Follow Instructions
Followaft operaUngand use instructions.
5°
CLeaning
Unplugthisproductfromthe waltoutletbefore
cleaning.
Do notuse Liquid
cleaners
or aerosol
cleaners.
Usea damp clothforcleaning.
13. Power-Cord Protection
6.
Attachments
Do not use attachments not recommendedby product
manufactureras they may cause hazards.
7.
Water and Moisture
Do not use this productnear water--for example, near
a bathtub,
wash bowl,sink,
orlaundry
tub,ina wet
basement,or neara swimming pool
8,
Accessories
Do not place producton an unstable caR, stand,
tripod, bracket, or table. Productmay fal!., causing
seriousinjury to a child or adult, and seriousdamage
to the product. Use only with a cart, stand, tripod,
bracket, or table recommendedby the manufacturer or
soldwiththe product.
Any mountingof productshould
fo[towmanufacturer's
instructions
and shouldusea
mountiDgaccessory recommended by manufacturer.
9.
Transporting Product
Move product and cart combinations
with care. Quick steps, excessive
force, and uneven surfacesmay cause
product and cart combinaUonto
Route power-supplycords so
they are not likely to be
walked on or pinchedby items
placeduponor against them,
paying particularattention to
cordsat plugs,convenience
receptacles, and the point
where they exit from product.
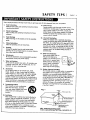
14. Outdoor Antenna Grounding
If an outside antenna or cable system is connectedto
this product,be sure antenna or cable systemis
groundedso as to provide someprotection against
voltage surgesand built-up static charges.A_cle 810
oftheNational
Electrical
Code(USA),ANSI/NFPA70
provides
information
on groundingofmastand
supporting
structure,
groundingoflead-in
wireto an
antennadischarge
unitconnection
to grounding
electrodes,
and requirements
forgroundingelectrode.
(See Fig.I below.)
Fig. 1
overturn.
10. Ventilation
Slotsand openingsin cabinet must not be blocked or
covered.They are providedfor ventilation,
to ensure
reliable operation, and to protect from overheating.
Never block openingsby placing producton a bed,
sofa, rug, or other similar surface. Do not place product
in bui[t-in installation suchas a bookcase or rack
unlessproperventilation is providedor manufacturer's
instructions have been adhered to.
NEC Section 8_10-20
Conductors
round Clamps
Power Se_ice
GTounding
NEC: National ELectricalCode
Antenna grounding per NECCode, ANSI/NFPA 70
+ I SAFETY
TZPS
These simple precautionswill help ensurethat you get manyyears of safe enjoyment from your new product.
15. Lightning
For addedprotection for
this productduring a
[ightning storm, or when
productis Left unattended
and unused for tong
periods of time, unplug it
from the wall outlet and
disconnectantenna or
cable system.This wilt
prevent damageto product
due to Lightningand
powerLinesurges.
16. Power Lines
An outside antenna systemshould not be Locatedin
the vicinity of overheadpower lines or other electric
tight or powercircuits, or where it can fall into such
powerLinesor circuits,
When installing
an outside
antennasystem,takeextremecareto keepfrom
touchingsuchpower lines
orcircuits,
as contact
with
them mightbe fatal.
17. Over!oading
Do not overloadwall outlets, extension cordsor
integral conveniencereceptacles, as this can result in
risk of fire or electric shock.
18. Object and Uquid Entry
Neverpush objects of any kind into this product
through openings,as they may touch dangerous
voltage points or short-out partsthat couldresult in
fire or electric shock.Never spill Liquidof any kind on
product.
19. Servidng
Do not attempt to service this productyourself,as
opening or removing covers may expose you to
dangerousvoltage or other hazards.Refer all servicing
to qualified servicepersonnel.
20. WaU or CeiUng Mounting
Mount productto watt or ceiling only as recommendea
by manufacturer.
21. RepLacement Parts
When replacement
technician
part(s) ate required, be sure service
has used replacement part(s) specified by
manufacturer
or have same characteristics as original
part(s), Unauthorized substitutions
electric shock, or other hazards.
may result in fire,
22. Damage Requiring Service
Unplug this product from the walt outlet andrefer
servicingto qualified servicepersonnelunderthese
conditions:
a. If power-supply cord or plug is damaged.
b. If Liquid has been spilled or objects have fallen into
product.
CoIf producthas been exposedto rain or water.
d. If productdoesn't operate normallyby following
handbook instructions.Adjust only those controls
coveredby handbookinstructions; improper
adjustmentof other controlsmay resultin damage
and often requiresextensivework by a qualified
technician to restore productto normal operation.
e.
If producthas been dropped or cabinet has been
damaged.
f. Ifproduct
exhibits
a distinct
changein performance.
23. Heat
Keep product away
from heat sources
such as radiators,
heat registers, stoves,
or other products
(includingamplifiers)
that produceheat.
24. Safety Check
Upon completionof any service or repairsto this
product, askservicetechnicianto performsafety
checksto determinethat productis in properoperating
condition.
INSTALLATIONI
CONTENTS
PAGE
S
INDEX
SAFETYTIPS.............................
2-4
INSTALLATION ..........................
6-12
VCRFeaturesChart ........................
Connections for YourVCR..................
Before you operate your VCR...............
CONTROLSAND DISPLAYS..................
6
7-8
g-12
13-14
AudioMenu ..............................
19
Auto ChannetSearch ......................
Connections...........................
11, 18
7-8, 21
Charmer Add/Det ........................
11, 18
Crock Set .............................
11, 16
FeaturesChart .............................
6
Front Panel Diagram ......................
13
FrontPanel Oiagram ........................
VCRStatus Oisptays......................
14
Instant Recording ........................
24-26
Language Menu ............................
18
OPERAT[ON .................
..
..
..
..
..
15-27
13
The Buttonson YourRemote ................
15
MainMenus ...............................
Crock Menu ............................
16
P_aying
Tapes...........................
Timer Menu............................
17
Remote Contret............................
15
Setup Menu ...........................
18
SafetyInformation
.........................
2-4
AudioMenu ...........................
19
SetupMenu ..............................
1B
Watching_ Throughthe VCR................
20
SpeakEZFunction..........................
10
CamcorderConnected to VER ................
21
TimerMenu ..............................
17
27
g
22-23
PrayingTapes ........................
22-23
Timer-Controlled
Recording....................
Instant Recording .....................
24-26
Treubteshooting
.........................
RecordingWhileYou'reAway ................
TROUBLESHOOTING
......................
SPECIfiCATIONS...........................
27
28-30
31
28-30
VCR StatusDisplays.........................
14
Warranty ................................
36
WatchingTV through the VCR ..................
20
PAGE
6
I
INSTALLATION
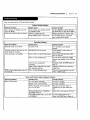
This page showsthe features of your VCRand the differencesbetween the models.
FEATURES
VRB211
SpeakEZFunction
VRB411
VRB412
VRB421
EngLish
EngLish
X
N/A
N/A
N/A
N/A
X
X
X
FuLLLoad/QuickStaFf
X
X
X
X
Auto Head CLeaner
X
X
X
X
Audio System
Monaural
Monaural
MonauraL
Audio/Video (A/V) 3acks
Monaural
_onaura[
Monaural
Stereo
Remote Control SC411Z
X
X
X
X
Auto/ManuaLBand SeLect
X
X
X
X
Auto/ManuaLChannelSearch
X
X
X
X
181
181
181
181
RecordSpeeds SP/EP
X
X
X
X
PLayback Speeds SP/LP/EP
X
X
X
X
Auto PLaybackSystem
X
X
X
X
AutolManua[Digita[
Tracking
X
X
X
X
InstantRecording
X
X
X
X
Timer-ControLled
Recording
X
X
X
X
Auto PLaybackTape Speed Adjust
X
X
X
X
N/A
X
VariabLe
1/10 to 1/32
X
VariabLe
1/10 to 1/32
X
VariabLe
1/10 to 1/32
2-Heads
4-Heads(Special.
VideoEffects)
Channe[ CapabiLity (CATV& TV)
Forward/Reverse
SLow-Motion
Video (4-headVCR)
Pause/StiLL
Video
Noise
C[ear
EngtLsh/Spanish
EngLish
MTS Hi-Fi
Stereo
CLear
CLear
ReaL-TimeTape Counter
X
X
X
X
Speed Search
X
X
X
X
_X
X
X
X
English/Spanish/French
Menus
X
X
X
X
1-Year,
8-EventTimer
X
X
X
X
LED CLockFrontPanelIndicator
X
X
X
X
Auto CLockSetSystem
X
X
X
X
Hook-up CabLe(VCR to TV)
X
X
X
X
EnergySaving
X
X
X
X
CM Skip
1. Mode{ VRB421 is used for the description, operation, and details provided in this operating guide.
2. VCRdesign and specifications are subject to change without prior notice.
X = Feature is provided
N/A = Feature is Not AvaiLabLe
INSTALLATXON
I
PAGE
Required
connectionsfor yourVCR.
Connections Without a Cable Box
Antenna
FlatWire
(300ohm)
Back Panel of Stereo VCR
ss
300/75ohm
i,
Adaptor
.
OUT
T_)_
""
OR
OR
(Notpro_
__
\
Wall3ack
CabLe
W
%
Back Panel of TypicalTV
Thiscableis provided ._p/
with yourVCR.
Tum
before
offmalting
power any
or unplug
connections.
VCR
Connections With a CaMe Box
BackPane[of StereoVCR
BackPane[of TypicalIV
VHF_JHF/CATV
Back Pane[ of
Typical Cable Box
CABLE
______
CableTV
Walt 3ack
.L_
This cable is provided
with your VCR.
Turn off power or unplug VCR
before making any connections.
7
PAGE
8
J INSTALLATION
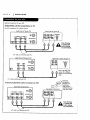
Optional connectionsfor your VCR.
Audio/Video
(A/V) Connections to TV
UseA/V connectionsfor a better picture.
Back Panel of Stereo VCR
-. AUO,_L-
Back Panel of TypicalTV
VHflUHF_AT_
;N"T
@
ANT
IN
VHF/UHF/CATV
or unptug
VCR
Tum
off power
before ma_ng
any connections.
A_/ cableis not providedwith VCR.
BackPanelof MonauralVCR
BackPanelof TypicalMonaura[_/
AUD
AUDIO
VIDEO
VIDEO
VHF_iF/CA TM
ANNT(_
VHF/UHF/CATV
c_
/
c_
[]
IN
ANT
Note:If the backpanel
onyourTVis different,
refer to the 1N'soperating
guide.
A/V cableis not providedwith VCR.
_
Accessory Audlo/Video
(A/V)
Connections
to VCR
Back Panel of StereoVCR
3ack panetof Accessory
Accessory
Component:
Another VCR,
Camcorder,
Video Camera,
SateLLiteReceiver,
Laser Disc PLayer
_N_
VHF/UHF/CA'I%"
or unptug VCR
Turn off power
before making
any connections.
A/V cable is not provided with VCR.
INSTALLATION
I
PAGE
Thingsyou must do beforeyou can operateyourVCR.
CLOCKMENU
AUTOCLOCKSET(ON):i'll
MANUALCLOCKSET :N
Pressnumberkeys
QUIT= exit
• PROGRAM E1
MONTH :
DAY
START
STOP
CHANNEL :
SPEED
:
REPEAT:
(1-8) to select p¢ogmm
_. ENTER to adjust program
CLOCK
s_Ez: ORUO_ _OFF
OH. ADD/DEL:
SOURCE:
AUTO PROGRAM:
ON-SCREEN
DISPLAY:
LANGUAGE SELECT:
Press number keys
QUIT = exit
TIMER
f
AUDIOMENU
SETUP MENU
SETUP
Press NUMBER (1, 2, 3, 4) button
SpukEZ
CL !I
pLAYBACK:HkFI
RECORD:STEREO
Press number keys
• then ENTER
QUIT = exit.
AUDIO
f
Notes
Audio menu's PLAYBACK
and
RECORDoptions are avaiLableonly
with stereo VCRs.
"flMEN
SETUP
AUDIO
Pressnumberkeels
QUIT= exit
MAIN MENU
Mow to Access
Menus
Menu operation is easy--just
at the bottom of the menu.
fot[ow the instrudons
shown
1. Press MENU to see main menu.
2. Press NUMBER (1, 2, 3, or 4) to see desired sub menu to
be used.
3. Press NUMBER to choose desired option to be changed .
4. Press QUIT to exit menu, or wait a few minutes and the
VCR returnsto normal operation.
Note:
Perform menu operations w_th the VCR and TV on, and tune
the TV to ehanne[ 3 or 4. The VCR must also be in the VCR
mode of operation. Press the W/VCR button repeatedly
unit VCR indicatorlightappearsin the frontpanel
Point remote towardVCR
g
PAGE
10
I INSTALLATION
Things you must do before you can operate your VCR.
L
-
F
Connect the Power
(Required) PLugyour VCRinto an unswitched
120 Vac, 60 Hz householdpower outlet. Turn on
the VCRby pressingthe POWERon the remote
or on the VCR'sfront pane[.WhiLepluggedinto
an ACoutlet, the VCRconsumes3W of eLectricaL
power in OFFcondition.
[]Do
not plug
the VCRinto a switched
outlet.
Othemdse,whenthe
poweris power
switchedo_, the VCRturns o_. Youmay
then haveto reset the time and dote, and
reprogram operationalfeatures.
SWITCH'
WALL
I
I
I
I
I
OUTLET
POWER_
TYPICALZENITHVCR
_
_
Set Position of the CH3/CH4 Switch
(Required) The CH3/CH4 switch on the VCR's
hackpanel determineswhich channelthe VCR
usesto sendvideo signalsto your TY.The TY
must be tuned to the samechannelyou set with
the CH3/CH4switch to seetape playbackand
status displaysfrom the VCR.To determine
which video channelprovidesthe best picture
foryoursystem,trytheswitchinCH3 position
andtuneyourTY tochannel3;thentrytheCH4
position
and tuneyourTV to channel4.
For a test dispby, pressthe TY/VCRbutton on
remote repeatedlyuntil the VCRindicator light
appearsin the VCR'sfront panel display. Press
MENUon the remote to seethe main menu.
Press 4.
AUDIOMENU
Y
Select SpeakEZ Function (0n/Off)
A voicetells
you how to usethefeatures
inthe
menus ifSpeakEZisON. (ON isrecommended.).
SeetheAUDIO Menu fordetaffs.
[_
SpeakEZonly
functions
with
ENGLISH(VRB421/VRB41
I/VRB21I).
SpeakEZJ:unctionswith ENGLISHand
SPANISH(VRB412).
Select Language for VCR Menus/Displays
(OptionaL) SeLectEngUsh,Spanish,or French
for VCRmenusand status displays.Seethe
LANGUAGE
SELECTopUon on the SETUPmenufor
details,
SpeakEZ:ON noel mOFF
PLAYBACK:
HkFI
SpeakEZ
RECORD:
STEREO
TIMER
SETUP
AUDIO
Press number keys
• then ENTER
QUIT = exit .
Press number keys
QUIT = exit
Press NUMBER (1 or 2) to
choose ON or OFF
MAIN MENU
Press 5,
SETUp MENU
I
SETUP MENU
CH. ADO/DEL:
SOURCE:
ON-SCREEN
DISPLAY:
AUTO PROGRAM:
LANGUAGE SELECT:
Pressnumberkeys
QUIT = exit
SETUPMENU
LANGUAGE SELECT : ENGLISF
IENGUSH
m ESPAI_IOL
FRAI_A_
Pressnumberkeys
• thenENTER QUIT= exN
Press NUMBER(1, 2, or 3)
to select the desired
language
INSTALLATION
I
PAGE
11
Some things you must do and othersyou may want to do before you can operate your VCR.
Set Date and Time for Clock
Set the c(ockin the VCRto the currentdate and
time. See CLOCKMenu on page 16 for details.
Press 2.
CLOCK
MENU
I
MONTH
DAY
YEAR
11ME
CLOCK
MENLI
YourVCRalso has an Auto-ClockSet [eature. See
CLOCK
Menu for details.
AUTO CLOCK SET(ON): []
MANUAL CLOCK SET :
[]
[] JANUARY
1 FRI
1999
12:00 AM
Pressnumber
keys
then ENTER
[_The the Clock
Timerhas
feature
beenwiff
set.not function unless
Pressnumber
QUIT i exit
PressNUMBER (0-9) then
ENTERto set date and time
OUIT= exit
CLOCKMENU
U
Select Source for VCR
(OptionaL) Set the sourceof the VCRfor the
type of programsignaI.you haveconnected to
the ANTIN jack on the back of the VCR.Choose
TV if you have an antenna connected to the VCR,
Choose CAW if you have a cable system(with or
without a cable box) connectedto the VCR,
ChooseAUXif you have an accessory
Audio/video (A/V) connected to the VCR.See
SOURCE
opUon on SETUPmenu(page 18) for
details.
Use Auto Program to Find Channels
(Required) Use AUTOPROGRAM
to find active
channels in your broadcastarea. AUTOPROGRAM
storesthe ac_ve channelsthat you can access
by usingthe CH (V/A). See AUTOPROGRAM
on
the SETUPMenu (page 18) for details.
Press 3.
SETUp
MENU
I
SETUP MENU
SOURCE:
TUNER
IA_?
CH. ADD/DEL:
SOURCE:
ON-SCREEN
DISPLAY:
AUTO
PROGRAM:
LANGUAGE
RCATV
Pressnumberkeys
then ENTER
SELECT:
QUIT = exit ,_
Press NUMBER(1, 2, or 3)
to select the desired
source
press number keys
QUIT= exit
SETUPMENU
Press 1.
SETUP MENU
r
!
AUTO PROGRAM: SEARCHIEK
SETUP MENU
CH. ADD/DEL:
SOURCE:
AUTO pROGRAM:
OIl-SCREEN
DtSPLE¥:
LANGUAGE SELECT:
QUIT=exit
press number keys
QUIT : exit
SETUPMENU
Use CH. ADD/DEL to Create Favorite
Channels
(OptionaD Use CH. ADD/DELto change the List
of active channelsfound when usingAUTO
PROGRAM, so you can List
yourfavorites.
See
CH.ADD/DEL on theSETUP Menu (page18)for
details.
Press 2.
SETUP MENU
CH. AOD/DEL:
SOURCE:
ON-SCREEN
thSPLAY:
AUTO PROGRAM:
LANGUAGE SELECT:
preem number keys
QUIT : ey_it
SETUPMENU
SETUp MENU
CH. ADD/DEL: CH. IN
Pr-_
ADD
number keys
_,thenENTER
QUiT=exit .
Press NUMBER (O-g)
then ENTER
PAGE
12
I INSTALLATION
Thingsyou may want to do beforeyou operateyour VCR.
Select Other Menu OpUons
Show or hide the VCRstatus on your screenby
usingthe ON-SCREEN
DISPLAYoption on the
SETUPmenu. We recommendkeepingthis option
ON. See the SETUPmenufor details.
Press 4.
SETUP MENU
I
SETUP MENU
ON-SCREEN DISPLAY: ON
DON mOFF
CH, ADDIDEL:
SOURCE:
ON-SCREEN
DISPLAY:
AUTO PROGRAM:
LANGUAGE SELECT:
Pressnumberkeys
thenENTER QUiT= exit
PressNUMBER (1 or 2) to
choose ON or OFF
Press number keys
QUiT : exit
SETUP MENU
Press 4.
If you havea stereoVCR, pressENTERto select
the audio format (HI-Fi or NORMAL)to use
when you play a tape. We recommendsetting
this option to HI-FI. Seethe PLAYBACK
MODE
option on the AUDIO Menu for details.
_._
v
AUDIO MENU
SpeakEZ: ON
PLAYBACK:
HI-FI
SpukEZ
mHI-FI
[] NORMAL
RECORD: STEREO
TIMER
SETUp
CLOCK
AUDIO
Press number
then ENTER
keys
QUiT : exH
PressNUMBER (1 or 2) to
choose HI-FI or NORMAL
Press number keys
QUIT : exit
MAIN MENU
Press 4.
If you havea stereo VCR,pressENTERto se|ect
the audioformat (STEREO,MONOor SAP) to use
when recording. We recommendusingSTEREO.
Seethe RECORD
MODEoption on the AUDIO
Menu for detaiLs.
AUDIO MENU
r
SpeakEZ: ON
PLAYBACK: HI-FI
SpeakEZ
TIMER
SETUP
CLOCK
AUDIO
Press number keys
OU_ : exit
MAIN MENU
RECORD: STEREO _sM_pIIoSTEREO
Press number keys
then ENTER
QUIT = exit
Press NUMBER(1, 2 or 3
to choose STEREO,MONO
or SAP
CONTROLS AND DISPLAYS
I
PAGE
13
Descriptions
ofitemsyou needto know tooperateyourVCR.
Front Panel Contro[s
Thesecontrols perform basic VCRoperations--some of them tight up as you usethem. The Remoteperforms basicas welt.as
advanced VCRoperations.
Cassette
Compartment
POWER On/Off
Button
Stop/Eject
Selector
Recording
Speed SeLector
ChannelUp/Down
SeLector
/
LED ClockFrontPane£
Display
PLAY,REW (Rewind),
F FWD (FastForward),
PAUSESelector
RE£/ITR
(Instant
Timer
Record)Selector
LED Clock Front Panel Indicators
CLockTime
A Cassette
isintheVCR
VCR functions
areavailable
and
channels
areselected
at VCR
#_
lIvER
VCR isRecording
Front Panel.Disp[ay shows which VCRfunction you are
using. For example,when you pressSP/EP,SP or EPappears
to indicate the tape speed. As you change channels,the
channel numbers appear.The currenttime showseven while.
the VCRis off.
I_
Time iS PM
isin timer recording
Other messagesinclude:
AU
Auxiliary channe[is selected Forviewing equipment
connectedto the Audio/Videojack on the front or rear
of the VCR.
EP
Extended Playspeed is selected.
SP
StandardPlay speed is selected.
-:--Clockisnotset.
Err Error:
TurnVCR On and OFF toerase"Err"message.
Ifitisnoterased,
takeVCR toan authorized
repair
center.
PAGE
14
I CONTROLS AND DISPLAYS
On-Screendisplaystell you the status of the tape inserted and VCRfunctions.
Currentmodeof operation
(STOP,PAUSE,RECORD,PLAY,etc.)
and audio format of tape, where
Play-HI-F1 or NORMAL(Nodisplay)
CurrentCH (ChanneL)selected by
usingtuner in VCR
PLAY HI-FI
-SP
TapeSpeed
EP-ExtendedPLay
LP-LongPlay
SP-StandardPlay
VCR CH 11
ST/SAP - --
Audio format of signal received by
VCR tuner:
STEREO,MONO or ST/SAP
15 MON
7:17 AM
Current date, day, and time__
M-1:35:45- --
Typical VCR Status IHsptay on W
ReaL-timetape counter
M = Counter Hemonjis active
- - Tapeis rewoundpastindex
mark.
1:35:45 1=
35 =
45 =
M-1:35:45
Tape Counter Position
VCR Status Display
The VCRStatus Displayappearson the TV when a VCR
function starts, Like when you change a channelor select ao
different VCRmode. Forexample, pressingSTOPwhite the
VCRis in PLAYmodeshowsSTOPin the display. PressENTER
on the remote at any time (except Special.Effects PLayback
mode;SLOW,STILLetc.) to seethe Status DispLay.
Lengthof tape (in time)
I hour
35 minutes
45 seconds
REM 1:35
Tape Time Remaining
VCR Status DispLay Options
Whenthe Status Displayappears, pressENTERrepeatedly to
see abbreviateddisplays,as foLLows:
1. PressENTERto see Status Display.
2. PressENTERa secondtime to showonly the tape
counter position.
Note:
Zf the VCRStatus Displaydoes not appearon the TV screen,
checkthe ON-SCREEN
DISPLAYoption on the SETUPmenu.
SeLectON to seethe display.See "Setup Menu" section for
details.
3. PressENTERa third time to showonly the tape time
remaining.
4. PressENTERrepeatedly until all displaysare removed.
OPERATION
I
PAGE
15
A quick List of at[ the buttons on your remotecontrol and what they do.
CH (V/A) -- ChanneLSelectors. ALsoselectsAUX
A/V input channel
CM SKIP -- Fast forwards picture searchthrough 30
secondsof recording.
E3ECT-- Ejectsthe tape from the VCR.
Turns VCR
a tape
Exits An
ChoosesTape
RecordingSpeed
ENTER-- Programsmenuoptions and showsVCR
display.
F FWD (Fast Forward)--Advances tape rapidly.
MEMORY-- Returnsreal-time tape counterto zero
(M o:oo:00).
MENU -- Showsmain menu.
AccessesTape Counter
Tape Play/Record
Options
Direct Channel and
Programming EntPJ
Numbers -- ChooseschanneLsand enters
programminginformation.
PAUSE-- Pausestape temporarily duringplayback
or record.
SwitchesTV_cture/
between TVand VCR
ChannelSe_cto_
(Tuner)
PLAY-- Begins tape playback.
POWER-- TurnsVCROn and Off. ALsoturns VCR
Timer Off and On, if programmed.
QUIT -- Exits menu'system.
REC/TrR-- Beginstape recording.
REW --
Rewinds tape to the beginning.
Installing Batteries
SP]EP -STOP -TRK (Y/A)
Chooses tape recording speed.
CanceLs playback or record modes.
--
Adjusts tape playback tracking.
TV/VCR -- Switches source of TV picture between TV
channel and VCR channel selection. VCR
functions
are available in VCR mode.
_Shows main menu
Be sure to install the batteries
providedwith this remote. Match
positive (+) and negative (-) with
markingsshownin battery
compartment.
Note: At! VCRoperations and menu
options con be accessedby using
the remotecontrol
t Selectors
Fastforwards picture
30 secondsof
recording
_Adjusts tape
playbacktracking.
PAGE
16
I OPERATION
The CLock Menu sets the cLock in the VCR to the current time. There are two options AUTO and MANUAL.
Auto Clock Sot
AUTOautomaticaLLy
sets the cLockin the VCRto the current time
and date. AUTOworks onl.yin areaswhere DataService (DS)
signalsare provided aLongwith normaLTV signals.
1. PressMENUto see Main Menu.
2.
Press 1 to see Clock Menu.
3.
Press1 to set the current time automaticaLlyon the CLock
Menu.
CLOCK MENU
AUTO CLOCK SET{ON): []
MANUAL CLOCK SET :1_1
Press number keys
QUIT = exit
Notes:
We recommendthat you set the clockusingthe MANUALmethod
the first time you use your VCR.See MANUALoption for details.
The cLock must be set before you can record by using the TIMER.
Manual CLock Set
The CLOCKMenu aLLows
you to set the cLockin the VCRto the
current date and time.
Notes:
The cLock must be set before you can record, using the TIMER
menu.
You may have to reset the clockand other features if a power
outage Lastsfor more than 3 seconds.
If you use the Manual option. The AUTOCLOCK
SETmode wilLbe
turned to OFF
CLOCK MENU
How to Set CLock
1. PressMENUto see Main Menu.
2. Press1 to seeclock options.
3. Press2 to adjust your options.
4. Firstinsert the month number(5=MAY,6=3UNEetc).
5. PressENTERto moveto next option.
6. PressQUIT to exit the menu system.
MONTH
DAY
YEAR
TIME
: n JANUARY
: 1 FRI
: 1999
: 12:00 AM
Press number keys
then ENTER
QUiT = exit
Typical CLOCKMenu with
date and time settings
OPERATION
I
PAGE
TheTIMER Menu tel.ls
theVCR when to recorda programon a dayand ata Ume you speci_.
You can specifyeightdifferent
eventsto be recordedin a one-yearperiod.
Press 2
"rIMER
SETUp
CLOCK m
AUDIO
SpeakEZ
pressnumberkeys
Qun'=_lt
1
PROGRAM []
MONTH
DAY
START
STOP
CHANNEL :
SPEEO
:
REPEAT:
(1-8) to select program
ENTER to adjust program
PROGRAM []
MONTH
DAY
START
STOP
CHANNEL :
SPEED
:
REPEAT:
11-8) to select program
ENTER to adjust program
nun
Month ofRecordin,
Number
When highlighted, press NUMBER (E-8) to
choose program Number.
DayofRecording
StartTime ofRecording
REPEATOPTIONS
ONCE-- Recordsonce.
WEEKLY
-- Recordsonce each week.
DAILY-- Recordsone time each day,
Monday - Friday.
StopTime ofRecordin,
ChannelofRecordin,
SpeedofRecordin
Frequency
ofRecording
PressQUIT
CHANNEL OPTIONS
To select an AUX channeL,select the next
highestor LowestchanneLprogrammed in
the VCRwith the CH (V/A).
Timer will be on
when VCR Is off
(SP or EP)
SPEED OPTIONS
The SP mode determines
Left and switches
how much tape is
speed from SP to EP, if
necessary, to complete recording the
How to Use Timer
E. ChooseTIMERmenu as describedin "Howto Access Menus"
on page g.
2. Whenthe TIMER menuis displayed on screen, press the
ENTERbutton to select the correct month, then pressthe
ENTERbutton again to move the next option or setting.
program. There wilt be some picture and
sound distortion
at the point of the speed
change.
AM/PM OPTIONS
PressI forAM
Press2 forPM
3. Whenyou have entered all of the settings to your
satisfaction, pressQUIT to exit the menusystem.
Note:
SettheVCR inTIMER mode by pressing
POWER toturnofftheVCR.
TheTIMERindicator
tight
appears
inthefTont
panel,
oftheVER,.
]
YoucannotoperatetheVCRmanuallywhileitis
recording.
Pressing
POWER stopstherecording.
To Erase a Program
E. ChooseTIMERmenu as describedin "Howto Access Menus"
on page 9.
2. PressNUMBER(I-8) to select desiredPROGRAM
to be erased.
3. Press0 to erase the program.
4. PressQUIT to exit the menusystem.
• PROGRAM
I_
:
DAY
:
START
:
STOP
:
CHANNEL
SPEED
REPEAT:
[]
7 JULY
20 TUE
11:16 AM
11:46 AM
: 20"rv
: EP
ONCE
(1-8) to selectprogram
Toerae_press(0)
Press0 to erase program
FoLLow
_these
steps
17
PAGE
18
I OPERATION
The SETUP Menu customizes
theVCR'soperation
foryourparticular
needs.
SETUPMENU
ChooseSETUP Menu as described
in
"How to AccessMenus"on page9.
CH. ADD/DEL:
SOURCE:
ON-SCREEN
DISPLAY:
AUTO
PROGRAM:
LANGUAGE SELECT:
Press number keys
QUIT = exit
AUTO PROGRAM
FindsaLLactivechannelsandstoresthem intheVCR'smemory Foraccessby CH (V/A). Press
I to beginsearch.
CH. ADD/DEL
Edits
thechannelsfoundby AUTO PROGRAM. Use numberkeysfoil.owed
by ENTER to select
thechannelto be edited(e.g.,
toADD channel3,press3 thenENTER).PressENTER toADD
or DEL (DeLete)
channeLsto create
yourown List
offavorite
channels.
SOURCE
SeLects
TV,CAIV,orAUX as thesourceofthe programto watch orrecord.
ChooseIV ifyou
havean antennaconnectedto theVCR.ChooseCAIVifyou havea cablesystem(withor
withouta cablebox)connectedtotheVCR.ChooseAUX ifyou wantto seetheprogramfrom
accessory
equipment,
suchas a camcorder,
connected
to theAudio/Video
(A/V)IN jackson
theVCR.
ON-SCREEN DISPLAY
SeLects
whetheror notyou seeVCR StatusDispLays
on theIV.
LANGUAGE SELECT
SeLects
EngLish,
Spanishor FrenchforVCR menus and displays
on theIV.
OPERATION
I
PAGE
19
The AUDIOMenu specifiesthe audio format to be used when recording or prayinga tape.
(Audiomenu'sPLAYBACK
and RECORD
options are avaiLabLeonty with stereo VCRs.)
TheAUDIO Menu indicatesthe audio
format usedwhen recordingor playing
a tape. ChooseAUDIO Menu as
describedin "How to AccessMenus" on
page 9.
Press ENTER(and repeat) to choose
items tn the menu (some models).
SpeakEZ
AUD_ MENU
SpeakEZ:ON BON BOFF
PLAYBACK:HkR
RECORD:STEREO
Press number keys
then ENTER
QUIT = exit
TurnsSpeakEZON or OFF.
A voicetetts you how to usethe features you setect in the menusif SpeakEZis ON.(ON is
recommended.)
PLAYBACK
Selects HI-F1 or NORMALfor tape p|ayback.
HI-FI (High Fidetity) providesstereo sound,if presenton the tape, to the teft and right VCR
AUDIOoutput jacks on the backof the VCR.
NORMALprovidesmonaural sound,regardless of the audioformat present on the tape.
RECORD
Select the STEREO,MONO,or SAPfor recordinga program.
STEREOrecordssoundfrom the left and right audiotracks in stereophonicformat.
MONO(Monaural) records soundin rnonauratformat even if the programis in stereo.
SAPrecordsthe SecondAudio Program(SAP) track, if present, in addition to the stereo audio
tracks. SAPusuaL|ycontainsaudio in another tanguage.
PAGE
20
I OPERATION
This page showsa typical video system and explains how to select channels.
ALL-ChanneL,
Antenna
Zenith W
_bLe W
W_ck--
DirectCabLe
Or
Zenith Steteo VCR
VHF-UHF
CHANNEL
3_4
Typical
Ca_ Box
From
System ,
Or
_
_
VHFAJH_CATV
Czo_tleprtx
to VCR
AUDIO
VIDEO
OUT
OUT
r_
VCROutputto 13/
(fhJnneL 3 or 4 when
'_R is on and W/VCR
?TI
C_
IN
VIDEO
IN
AUDIO
IN
Ip
>
Audio/Video Output to W
Selecting Channels when the VCRis OFF
1, Turn1Von.
Selecting Channels at the VCR when VCR is ON
1. TurnTVandVCRon.
2. Select channel_you'd Uke to watch at the TV.If you have
a cable box, select channel 3 or 4 at the TV. Select cable
box channels at the cable box.
Z. PLaceVCR inVCR mode by pressing
theTV/VCRbuttonon
the remotecontrol,
repeatedly
until,
theVCR indicator
appearsinthefrontpanel,
oftheVCR.
Selecting Channels at the TV when VCR is ON
1, TurnTVandVCRon,
3. Select channels3 or 4 at the TV. If yourTV is equipped
with A/V input jacks, check your TVoperating manual,to
select the A/V sourcefor a better picture.
2. PLaceVCR inTVmode by pressing
the TV/VCR buttonon
the remote control repeatedly until the VCRindicator
disappearsfrom the front pane[ of the VCR.
3. Select channeI.you'd I.iketo watch at the TV.If you have
a cable box, select channel.3 or 4 at the W. SeLect cable
box channeLsat the cab[e box.
4. Select
thechanneI.
you'dl.lke
to watchat theVCR.Ifyou
havea cablebox,sel.ect
channel.
3 or4 attheVCR.
Selectcabl.e
boxchannelsatthecablebox.
OPERATION
I
PAGE
This page describeshow to connecta camcorderto your VCR.
Back Panel of Stereo VCR
LIT
VHF/UHF/CATV
VIDE_)_
W
Turn
offmaking
power any
or unplug
VCR
before
connections.
V
A/V cable is not provided with VCR.
Select AUX for Viewing an Audio/Vldeo source like a
Camcorder
1. With TV and VCRon, pLaceVCRin VCRmode by pressingthe
1V/VCRbutton on the remote (and repeat) until the VCR
indicator Lightappears in the VCR'sfront paneL.
2. SeLectchanneL3 (or 4) on the TV.Note: If your TV has A/V
jacks, you may get a better picture if you connect your VCR
there. (Then, select the A/V source on the TV.)
3. At the VCR,ChanneLdown Lowerthan the lowest channel (or
ChanneLup above the highest) to select "AUX" You can also
choose the SETUPmenu as described in "How to Access
Menus" on page 9.
Press3 for the SETUPmenu's SOURCE
item.
Press3 for AUX,then ENTER.(Press QUIT to exit.)
SETUPMENU
SOURCE:TUNER(TV)
.CA V
Press number keys
then ENTER
QUIT = exit
Press 3 to select AUX
Items in the Menu
SOURCE
Shows the programsource--W, CATV,or AUX--setected for the VCRto receive.
TUNER
TheVCRis using its Tunerto receive programsfrom an antenna or cabLe.
TV
SeLectsprogramsfor the VCRfrom a rooftop-type antenna.
CATV
SeLectsprograms for the VCRfrom CabLeTV.
AUX
Selects programsfor the VCRfrom the R-AUDIO-L--VIDEOIN jacks (where you may have connected your
camcorder).
21
PAGE
22
I OPERATION
Thispage explains the basicsof playing tapes in your VCR.
Automatic Playback (No Safety Tab)
1. Tape playbackbeginsautomaUcaliy,if the safety tab has
been removedfrom the cassette case. For example,most
rental movies have no safety tab. SimpLyinsert the
prerecordedVHScassette into the VCR. Powerwi[[ turn on
a_toma'dcaiLyandplaybackwill begin.
power
stop/eject
©
play
@
VCR'sControLs
2. Selectthe channel3 or 4 at the TV or select the TV'sAUX
(Auxitla_J)sourceto see the plctum, if you are using the A/N
jacks. Referto page 7 and8.
Manual Playback (Has Safety Tab)
1. PressPOWERto turn VCRon.
Safety Tab
Cassette
Shownin
PLace
2. Znserta prerecordedVHScassette into the VCR.
3. PressPLAYto begin playback.
4. SeLectthe channel 3 or 4 at the TV or select the TV'sAUX
(AuxiLiary)sourceto seethe picture, if you are usingthe A/V
jacks. Referto your TV operating manual..
Unloading the Cassette from the VCR
]. PressSTOPif the tape is playing.
2. PressSTOP/EJECT
at the VCRunU[ the cassette is ejected.
Note;
ThisVCRrecordsonly in SP and EPspeeds.YourVCRsets the
playbackspeed automaticaLLy
to the speed usedto recordthe
tape.
(ConUnuedon next page)
VHS Cassette Playback/Record Times
Cassette
Length
T-30
SP
LP
EP
(Standard Play) (Long Play) (Extended Play)
30 Minutes
1 Hour
I Hour,
30 Minutes
1"-60
1 Hour
2 Hours
3 Hours
T-120
2 Hours
4 Hours
6 Hours
T-160
2 Hours,
40 Minutes
5 Hours,
20 Minutes
8 Hours
I
I
OPERATION
I
PAGE
23
This page explains how to use the remote to play tapes on your VCR.
Auto/Manuat Tracking Adjustment
YourVCRadjuststracking automaticaLLy
when you play a tape. If
the tape was recordedon a different VCR,streaks (video noise)
may appear.WhiLethe tape is pLaying,pressTRK(V/&) to
adjust the tracking manuaLLy.
Real-Time Tape Counter
PressENTERtwice to keep the tape counteron the TVscreen.
PressENTERrepeatedly to removeall displays.The counter
resetsto 0:00:00 when you insert a cassette or when a tape is
rewoundto its beginning.
Pause/Forward/Reverse
Stow-Motlon
Video
(WhiLe in play mode) Press PAUSE fur stiLLvideo. Press PAUSE
POWER_
jF
pAOSE2
slow moUon.
. STOP
REW
(Re nd)J
again, and follow on-screen instructions for Forward or Reverse
stow motion. Press F FWD or REW to control stow speed during
FWD
(Fast Forward)
/ON
PLAY
(_
SKIP
_
Press PLAYto resume normal tape playing.
Note: Whenthe reverseslow mode continues for morethan 30
seconds,the VCRwill automatically changeto play mode.
_TRK(Tracking)
Tape Rewind and Fast Forward
(WhiLein Stop mode) Pressand release REWor F FWO(East
Forward),as desired. PressSTOPwhen tape reachesdesired
Location.
Reverse/Forward Search
(WhiLein PLaymode) Pressand releaseREWor F FWD,as
desired.PressPLAYto resumenormaltape playing.
CM Skip (Commercial Skip)
(While in play mode) PressingCMSKIP on the remote skips
commercialsor other programmateriaL. Pressing1, 2, 3, or 4
Umes skips30, 60, 90, or 120 seconds,respectively.C/4SKIP
skipsa full 120 secondsof commerciaLsin a few seconds,then
resumesnormalplayback.
(V/A)
PAGE
24
[ OPERATION
Recording
what you arewatchingon IV.
Options You Can Use White Recording
Instant recording Letsyou record untiLyou reachthe end of
tape or you pressSTOPto stop recording.
Turn TVand VCR on.
PLaceVCRin VCRmode by pressingthe TV/VCR
button on the remote repeatedLy until the VCR
indicator light appearsin the V_Rfront paneL.
SeLectchannel.3 or 4 at the TV.If you have
connected your VCRto the W's A/V input jacks,
seLectthe A/V sourceat the TV for a better
picture.
SeLectthe channel,to be watched and recorded
at the VCR.Zf you have a cabLebox, seLectthe
cabl.ebox output channeL(usuaLLy
3 or 4) at the
VCR.Select cable box channelsat the cable box.
Insert a VHScassettetape into the VCR.
PressSP/EP to select recordingspeed, if
desired. Recording speedis always SP, unless
you select EP.
PressREC/ITRuntil recording begins. REC
indicator Lightappears in the VCRfront paneL.
Recordingcontinuesuntil you reach the end of
the tape, or until, you pressSTOPto stop
recording.
power
©
sp/ep
tWvcr
©
Remote's Controls
power
0
Sp/ep
O0
rec/ur
stop/elect
@
VCR'sControls
Instant Recording
unlit endof tape)
Instant Timer Recording
(Presetrecordinglimes)
PAUSEIMomentariLypauses
STOPor STOP/E1ECT
Stopsand exits recording
recording.
Press
PAUSE
again to resumerecording.
STOPor STOP/_ECTStops and exitsrecording
mode.
mode.
OPERATION
I
PAGE
Recordingusing preset time periods.
Preset Time Periods for ITR Recording.
Note:
Presetrecording Ume counts down unULthe recording time
iS over.
Instant
(attended)
power
©
Timer Recording (ITR) Lets you record for
a specific preset time period, instead
of recording
Remote's Controls
until the
end of tape is reached. For example, you can record a
30-mlnute show using the preset time period.
TurnTVand VCRon.
power
000@
Place VCRin VCRmode by pressingthe TV/VCR
button on the remote repeatedly until the VCR
indicator Light appearsin the VCRfront panel.
Select channel3 or 4 at the lV. If you have
connectedyour VCRto the TV'sA/V input jacks,
select the A/V sourceat the TVfor a better
picture.
sp/ep
recAtr
stop/eject
VCR'sControls
Pressesof
REC/ITR
Display
I (Press)
2
3
4
Current Time
0:30
1:00
1:30
Insert a VHScassettetape into the VCR.
5
2:00
Until end of tape
30 minutes
1 hours
I hour and
30 minutes
2 hours
PressSP/EPto select recording speed,if desired.
Recordingspeed is alwaysSP, unlessyou select
EP.
9
4:00
4 hours
Selectthe channelto be watched and recorded
at the VCR.If you have a cable box, select the
cable box output channel (usually3 or 4) at the
VCR.Select cable box channelsat the cable box.
Note: The SP mode determineshow much tape is
Left and switchesspeed from SP to EP,if
necessaTy,
to complete recording the program.
There will be some picture and sound distortion
at the point of the speed change.
PressREC/ITRuntil recordingbegins. The REC
indicator Lightappearsin the VCRfront panel.
Recordingcontinuesuntil you reachthe end of
the tape, or until you press STOPto stop
recording.
PressREC/ITRrepeatedly
toselecta preset
recording
time period.
Eachsubsequent
pressof
REC/ITRincreases
therecording
timeby 30
minutesuntil
you reacha maximum of4 hours.
10
No display
Preset Time For
Recordin9
normal recording
25
PAGE
26
I OPERATION
Recording one show white watching another.
Note:
If you havea cable boxconnectedto your VCR,you cannot
record one showand watch another.
power
Choosethe showyou wish to recordusingthe VCR'schannel
selector.Choosethe showyou wish to watch usingthe W's
channelselector.
Remote's ControLs
Turn TVand V[R on.
pow_
sp/ep
000@
Place VCRin VCRmode by pressingthe TV/VCR
button on the remote repeatedly until the VCR
indicator tight appearsin the VCRfront paneL.
rec/itr
stop/eject
VCR'sControls
SeLectchannel 3 or 4 at the TV.If you have
connected your VCRto the TV's A/V input jacks,
select the A/V sourceat the TVfor a better
picture.
B
D
SeLectthe channelto be watched and recorded
at the VCR.tf you have a cable box, select the
cable boxoutput channel (usuaLLy
3 or 4) at the
VCR.Select cable box channelsat the cable box.
Insert a VHScassette tape into the VCR.
PressSP/EPto select recordingspeed,if desired.
Recordingspeedis alwaysSP, unlessyou select
EP.
m
PressREC/[TRuntil recordingbegins. REC
indicator tight appearsin the VCRfront panel..
Recordingcontinuesuntil you reach the end of
the tape, or until you pressSTOPto stop
recording.
PLaceVCR inW mode by pressing
theW/n_CR
buttonon remoteto turnoffVCR indicator
tight
inthe VCR frontpanel..
Setecttheshow you wishtowatch usingthe
W's channelselector.
Note=
To return to the showyou're recording, select channel 3 or 4
at the TV. PLacethe VCRin the VCRmodeby pressingthe
W/VCR button on theremote to show theVCRindicator
tight
intheVCR'sfrontpanel.
Options You Can Use White Recording
Xnstant Recording
until,end of tape)
PAUSEiMomentariLy pausesrecording.PressPAUSEagain to
resumerecording.
I
!STOPor STOP/F..3ECr
Stopsand exits recordingmode.
OPERATION
I
PAGE
27
This page explains how to use the Timer sothat you can record white you are away.
r
SpeakEZ
Press 2
TIMER
SETUP
CLOCK
AUDIO
Pressnumber
keys
QUIT=exit
PROGRAM []
MONTH :
DAY
START
STOP
CHANNEL :
SPEED
:
REPEAT:
(1-8) to select program
ENTER to adjust program
MAIN MENU
TIMER MENU
for Program 1
Timer-controlledrecordingLetsyou recordshows
unattended.Picka day and time up to oneyear in advance.
The showmay be recordedonce or on multiple days.You
can scheduleup to eight different eventsinto the PROGRAM
TIMERfor recording,as Longas no eventsoverlapin the
sametime period.
PlaceVCRin VCRmodeby pressingthe TV/VCR
button on the remote repeatedly until the VCR
indicator Lightappearsin the VCRfront panel.
Select channel3 or 4 at the TV.
Insert a VHScassette tape into the VCR.
Program eventsto be recordedwith the Timer
by following the procedurein the TIMER MENU
section. If you have a cabla box, select channel
3 or 4 (ar the VCR)as the channelto be
recorded.Keepyour cable boxon when using
the Timer to record.
Enablethe Timer by pressing POWERto turn off
the VCR.The TIMERindicator Light appears in
the VCRfront panel to indicate the VCRis in the
TIMER recording mode.
TIMER MENU
for Program 8
VCR Operation with Timer Off or On
VCR
POWER
TIMER
STATUS
VCR OPERATION
On
Off
Off
On (or set) EnablesTimer-controlled
recordingif an event is scheduled
in the Timer. You cannot operate
the VCRmanually while it is in
TimerSet mode. If you have
scheduledthe Timer, you'LLbe
recordingat a Later time.
Turn TVand VCRon.
Ih
mmm
PROGRAM []
MONTH
DAY
START
STOP
CHANNEL :
SPEED
:
REPEAT:
(1-8) to select program
ENTER to adjust program
DisabLesTimer-controlled
recording if an event is scheduled
in the Timer. ALLother VCR
operationscan be usedas
desired.
PAGE
28
I TROUBLESHOOTING
Some quick and easytips to fixing problemsyourself.
Before Calling for Service
PLeaserefer to this chart before calling for service.First, turn on the IV andVCR.Select appropriate input for the IV to
receivethe video signal from the VCR.You will probablyuse the Antenna In connectionto the TV. Selectchannel 3 or 4 at
the TV.Place the VCRin the VCRmodeby pressingthe TV/VCRbutton on the remote repeatedly until VCRindicator tight
appearsintheVCR frontpanel.
If you havea cablebox,turniton and select
channel3 or4 attheVCR.
Operating Problems
Observed Condition
Possibla Cause
Probable Solution
No powerto the VCR.
Powercordis not connected.
Connect powercord.
Remotedoes not function.
Batteriesare weak.
Replacewith newbatteries.
You are too far away from the VCR.
Movecloserto the VCR.
Remote may be at an awkwardangle.
Avoidholdingtheremoteatsharp
angle.
Sourcefor IV is not selected properly.
SetINPUT sourceon IV to Audio/Video
In,ortuneIV to Channel3 or4,as
appropriate.
IV/VCR mode for VCRis set to IV.
Press
theIV/VCRbuttonon remote
repeated[y
tochooseVCR mode.VCR
indicator
Light
appearsinVCR front
panel..
No picture
appearson IV screenfrom
anyVCR function.
VCRfeatures do not function. VCRdoes VCRis locked up.
not respondto remote functionsor VCR
keys.
Disconnect
VER power cordforthree(3)'
minutes.
Resetdock and otherfeatures
as necessary.
Playing Tapes (Playback) Problems
ObservedCondition
Possible Cause
Probable Solution
Tape will not rewindor fast forward.
Tapeis fully rewound or is at its end.
No action necessepj.
Mechanical sound is audib[eduring
playback.
Note: Thisis normal operatingsound
from internal mechanisms.
No action necessary.
Tapeplayback
does notappearon IV
screen.
Sourcefor IV is not selected properly.
SetInputsourceon IV to Audio/Video
In,ortuneIV to Channel3 or4,as
appropriate.
TV/VCRmode forVCR issettoIV.
PresstheIV/VCRbuttonrepeatedly
to
chooseVCR mode.VCR indicator
tight
appearsinVCR frontpanel.
Tape is a rental or x/as recordedon
anotherVCR.
Use TRK(v/&) for manual tracking
adjustmentwhile tape is playing.
Tape heads are dirty.
Cleanvideoheads.
Video "noise" (horizontal streaks)
appear during normaltape playing.
VCR StatusDisplay
flickers
when using Tape tracking needsto be adjusted
STILLvideoduringtapeplayback.
while in slow-motion playback.
FromSTILLvideomode,enable
stow-motlon
playback.
UseTRK (v/A)
to adjusttracking
forbestpicture.
Returnto PLAYmode,thenpress
PAUSE forSTILLvideo.
TROUBLESHOOTING
I
PAGE
29
Some quick and easy tips to fixing problems yourself.
Channel Tuning ProbLems
ObservedCondition
PossibLeCause
Some channelsare skippedover when
Thosechannelswere deleted with the
usingCH (V/A).
CH. ADD/DELoption.
Picture
and sound areweak ormissing. Antenna or cables are Loose.
WrongSOURCEoption is being used.
ProbabLeSoLution
UseCH. ADD/DELto restore channels.
SeeSETUPMenu on page 18 for details.
Tighten connectionsor replace cable.
Try aLLSOURCEoptions. See SETUP
menuon page 18 for detaiLs.
Recording ProbLems
Observed Condition
PossibLeCause
ProbabLeSoLution
Camcorderimage is not shown.
Camcorderis off.
Turncamcorderon and operate
properly.
Camcorder image via A/V inputto VCR
is not shown on TV screen.
VCRSOURCEis not set to AUX.
Timer recordingisnot possible.
CLockin VCRis not set to correct time.
UseCH (V/A) to select
AUX A/V
inputchannel.
Setclockto correct
time.See CLOCK
menu on page16.
TIMERindicator
Lightappearsafter
VCR
isturnedoff.
VCRis on which disablestimer.
TurnVCR offto enabletimer.
TIMER
indicator
Light
appearsintheVCR front
_aneL,
Timer has been programmed
incorrectly.
ReprogramTimer. SeeTIMER menu on
page 17.
TIMER indicator
Light
doesnotappear
after
programmingtimer.
ReprogramTimerand turnVCR offto
enabletimer.
VCR isinTimerRecording
mode.
Thisisthe normalindication
thatthe
VCR isinTIMER mode.
Stereo Audio Record and]or Ptayback ProbLems
Observed Condition
PossibLeCause
ProbabLeSoLution
Stereois not present.
TVis not Stereo-compatible,
No action is possible.
Program is not in stereo format.
No action is possibLe.
VCRA/V Out jacks are not connected
to TV A/V In jacks.
MakeA/V connections.Stereo is
available only via A/V output from
VCR.
VCRAudlo/Video "Out is not selected
for viewing at the TV.
SeLectAUXor A/V sourceas TVinput.
VCRAUDIO RECORDmodeis set to SAP
or MONAURAL.
SetVCR AUDIO RECORD mode to
Stereo.
SeeAUDIO Menu on pagelg.
PAGE
30
I TROUBLESHOOTING
Some quick and easy Ups to fixing probtemsyourse|f.
MoistureCondensation
Moisture condensation can occur:
n locationswhere moisturecondensationmay occur:
When the video recorder is moved from a cold place to a
warm place.
Under extre_e[y
humid conditions.
POWEROn. Thiswit[ help prevent condensation.
When condensation has occurred,wait a few hoursfor the
VCRto dry before usingit.
Magnetic
FieLd from
Other
Keep the VCR and videotapes
air conditioner.
Equipment
away from strong magnetic
fie[ds, such as those produced by a vacuum c|eaner, refrigerator, or
Video Head Cleaning
YourVCRautomatica[tycleansthe heads as it is used. However,after long periodsof use,your video heads may become
cJ.ogged
with accumulateddirt, causingdistortion. When this occurs,use a do-it-yourself wet-type head cleaningcassette
avaiLabl.efrom your Zenith dealer.
Caution:
Do not use a dry-_pe head-cleaningsystem. It may seriouslydamagethe VCRand cassettesused in the VCR.Snow,strealdng
in picture, and horizonta[ pu[ting indicate the need for professfona[video head deanfog. Seeyour Zenith approvedse_ce
center for c[eanfog.
Cabinet Cleaning
Cleanthe outsidesurfaces
of the V(_R
with a softlint-flee clothas required,tJsecarenot to scratchthe VCRduringcleaning.
SPECIFICATIONS
I PAGE 31
GENERAL
Head System
Power Source
Power Consumption
Dimensions
Operating Temperature
Operating Humidity
Timer
Weight
Tape Speed
(WxHxD)
(sP)
(LP)
(EP)
TapeWidth
MaximumRecordingTime
(SP)
(EP)
Rewind Time
TUNER
Antenna
VHF Output Signal
ChannelCoverage
(UHF)
(VHF)
(VHF)
(UHF)
(CAW)
VIDEO
Video Stgna|System
SuppLied Accessory
75 ohms
75 ohms
Channel 3 or 4
2-13
14-69
1-125 (4A, A-W, W+l~W+84, A-5_A-1)
EIA Standard (525 Lines, 60 fields)
NTSCtype color signal
1.0 Vp-p 75 ohms unbalanced
1.0 Vp-p 75 ohms unbalanced
More than 43 dg (SP mode)
Input
Output
Signal to Noise Ratio
AUDIO
FM audio(VRB421 only)
Frequency Range
Dynamic Range
Channel Separation
Conventional audio
Input
Output
S/N Ratio
Frequency Range
Two head (VRB211),Fourhead (VRB411,VRB412, VRB421)
AC 120V,60Nz
Approx.17 Watts(VRB421),15 Watts (VRB411,VRB412, VRB211)
360 x 94 x 270 mm (14.2"x 3.7"x 10.6")
5 °C~35 °C (41 °F_95 °F)
Less than 80% RH
12-hour display type with AM, PM
Approx. 3.4 kg (7.5 Lbs)
33.35 mm/sec
16.67 mm/sec
11.12 mm/sec
12.7mm
2 HOURS(T-120)
6 HOURS (T-120)
8 HOURS (T-160)
Lessthan 210 seconds(T-120)
20Hz to 20kHz
Morethan 83 dB
Morethan 55 dB
(LINE)
(LINE)
-6.0dBm more than 47 kohms
-6.0dBm Lessthan 1.5kohms
Mor_ than 43 dB (SPmode)
200 Hz to 10kHz (SPmode)
Hook-up CabLe
(VCRto TV) (1)
Batteries (2)
RemoteControl (1)
* Designsand specifications are subject to change without notice.
* Weight and dimensions shown are approximate.
VHS TAPE REWINDER
Most repair work on VCRsand Camcorders is due to excessive
rewindinq. Prolong the Ufe of your video equipment with our
rewinder,r
Z_N,O,
ONLY$14.99 "_'"
SNI_NG
_ HA#I_G
WIRELESSINTERCOMSET
Kids watching movies in another room?Baby in another
room as you watch TV? Keeptabs on them with our
inexpensive intercom set.
• FM wirelesstwo stations,3 channels,plug into
standardAC outlets
• Relativelynoiselesstransmiss!onfor excellentsound
• ,u,
pgraaes,,to
four stationswith ,additiona{
set
umts waL, mourn: or set on taoLe
A,_.
1.8 ONLY $4g.gg
"_'"
SHZ_f,
L _H_,ItIG
ZENITH 5 FUNCTION REMOTE
'Broken or lost remote? Need a second remote or more functions?
I Order direct from Zenith!!
• Operates TV, VCR, CD, DVD, DIVX, DSS 8, Cab{e Box
• Operates PIP and Most Screen Menus
• Extended Range & MORE!!!
Orders 1 year or more after product purchase may recelve upgraded models.
Other Remotes with 3,4, 5 & 7 FunctionsAvailabLe
Upon Request
ZEN52S
ONLY.._..€to.0o
"_""
S_IIPP1NG L EIANOLING
zenith
Use Your Visa or MasterCard to Order
PLEASEALLOW3 -4 WEEKS
FORDELIVERY
VISA
m
NOTES
I
PAGE
33
PAGE 34
I NOTES
NOTESI
PAGE 35
VIDEOCASSEITERECORDER
OR PLAYER
Welaomeinto the Zenith family! We beLievethat you WIUhe pleased with your new Zenith Entertainment Machine. PLeaseread
this warrantycarefoUV,it is a "UMITED WARRAN_ as defined under FederalLaw. This warranty givesyou spadfic legal rights,
and you may also have other rights that van/fiom state to state within the U.S.A.
ZENITH'S RESPONSIBILITY
ServiceLaber
During a period of 90 days from effective warmoty date, Zenith wiLLprovidese_ice Laborby a Zenith authorized servicecenter
when needed as detarmfaed by Zenith, as a resu_of manufacturing defects.
Parts
Not Covered
New or remanufacteredreplacementsfor fact_nj-defecUve parts will he suppLiedby a Zenith a_horlaed servicecenter for one
year from effective warranty date. Suchreplacement parts are warrantedfor the remainingportion of the origfaalwarranty
pa_od.
This warranty coversmanufacturingdefects and does not cover instaUation, adjustmentof customer controlsin the home,
instaUatlonor repair of home antenna systems,cable converters or cable company-suppded equipment; it aLsodoes not cover
damagedue to misuse,abuse, negUgence,acts of God or other causes beyondthe contro_of Zenith. Any aLterationof the
productafter manufacture voids this warranty in its entirety.
OWNER'S RESPONSIBILITY
Effective Warranty Date
Warrantybeginson the date of originaLconsumer purchase.For your convenience, keep the dealer's dated bill of sala or a
deliveryticket as evidence of the purchasedate.
Operating Gzdde
Readyour Operating GuidecarefuLLysothat you will understandthe operation of your set and how to adjust the customer
controls.
Carry-ln Service
Thevideoproductmusthe takento a U.S.orCanadianZenithauthorized
service
centerfor warranty
serviceandmusthepicked
upbytheowne_
11/Set Perfamance
It is the owner'srespanslbiUtyto maintainthe TV receiverwith which the video productis used,and the associatedantenna
system,in proper operating condition..
[mp_tant
ProductRegistraUon--PteasefiLLout and maLL
your ProductRegistraUonCard.It is imperative that Zenith know hew to reach
you promptly if we shodd discovera safety problemthat coutd affect you.
WarrantySentfoe
Forwarranty serviceinformation, contact any Zenith authorized se_ice center. Partsand se_ce labor that are Zenlth's
responsibility(see above) will be provided without charge. Otherserviceis at the owner'se_panse.If you have any problem in
obtaining satisfactorywarrantyse_ce, caLLor write the Zenith ResponseCenter.You must provide the modelnumber, serial
numberand date of purchase or date of o_9tha| installation. Beforeyou askfor warranty se_ce, read _Mafatenance And
TroubLeshooting" in your opamting guide.You might avoid a se_ce caLL
THIS WARRANTY ISIN lIEUOF ANY OTHER WARRANTY,EXPRESSOR IMPLIED,INCLUDINGWITHOUT LIMITATION,
ANY
WARRANTY OF MERCHANTABILITY
OR FITNESSFORA PARTICULARPURPOSE,AND ZENITHSHALL NOT BE LIABLEFOR ANY
CONSEQUENTIAL,
INDIRECT,
OR INCIDENTAL
DAMAGES OF ANY KIND,INCLUDINGLOSTREVENUESOR PROFITSIN
CONNECTIONWITH THE PRODUCT.
Zenith Electronics Corporation
Customer Service Department
1000 Milwaukee Avenue
Glenview, nlinois 60025-2493
Telephon_: (847) 391-8752
Mon-Fri, 8:00 a.m. - 4:30 p.m. Central Time
ZENITH ELECTRONICS CORPORATION
1000 MILWAUKEE AVENUE
GLENVIEW, ILLINOIS 60025-2493
Zenith Part No. 206-3515
GS# 3835RM0031R
Printed in China
|r_IIe
0