1
,acMne numbers I VRB210 I VRB410 I VRB420
_IERGY
STAR® q
operating
guide
/
warranty
RECORD
YOUR
MODEL
NUMBER
(Now,whileyoucanseeit)
l
/
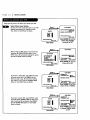
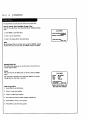
The model and serial numberof yournew VCRare Located
on the backof the VCRcabinet.Foryour future convenience,
we suggestthat yourecord these numbershere:
MODELNO.
SERIALNO.
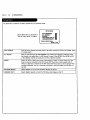
WARNING:
TO REDUCETHE RISKOF ELECTRIC
SHOCK DO NOT REMOVE COVER (OR BACK).NO USERSERVICEABLEPARTSINSIDE.
REFERSERVICINGTO QUALIFIEDSERVICEPERSONNEL
The Lightningflash with arrowheadsymbol within an equilateraltriangle, is intended to alert the user to the presence
of uninsulated"dangerousvoltage" within the product'senclosurethat may be of sufficientmagnitudeto constittrtea
riskof electricshockto persons.
The e_clamationpoint within an equilateraltriangle is intendedto alert the userto the presenceof important
operatingand maintenance(servicing)instructions in the literatureaccompanying
the appliance.
WARNING:
TO REDUCETHERISKOF FIREOR ELECTRIC
SHOCK,DO NOTEXPOSETHISAPPLIANCE
TO RAINOR MOISTURE.
POWER
CAUTION:To Prevent ELectricShock,match wide bladeof plug to wide slot, fuLLyinsert.
ATTENTION:Pour _viter les chocs_lectriques, introduireia lame la pluslarge de le fiche dansla bornecorrespondante
CORD
POLARIZATION:
J
de la priseet
pousserjusqu'aufond.
NOTETO CABLE/IV INSTALLER:
This reminder is providedto caLLthe cableTVsystem installers attention to ArticLe820-40 of the National ElectricCode
(U.S.A.). Thecodeprovidesguidelinesfor propergroundingand, in particular,specifiesthat the cablegroundshallbe
connectedto the groundingsystemof the building,as dose to the point of the cableentry as practical
REGULATORYINFORMATION:
This equipmenthasbeen tested and found to comp[ywith the limits for a ClassB digital device, pursuant to Part 15
of the FCCRules.TheseEmitsare designedto providereasonableprotectionagainst harmful,interferencewhenthe
equipmentis operatedin a residentialinstaUation.This equipmentgenerates,usesand can radiateradio frequency
energyand, if not installedand usedin accordancewith the instructionmanual may causeharmfulinterference to
radio communications.However,there js no guaranteethat interference wiLLnot occurin a particularinstaLLation.If
this equipmentdoescauseharmful interference to radioor television reception,whichcan be determinedbyturning
the equipmentoff and on, the useris encouragedto try to correctthe interference by oneor moreof the following
measures: • Reorientor relocate the receivingahterma.
• Increase the separationbetween the equipmentand receiver.
• Connect the equipmentinto an outlet on a circuit differentfrom that to whichthe receiveris
connected.
CAUTION:
• ConsuLtthe dealeror an experiencedradio/TVtechnicianfor help.
Do not attempt to modify this productin any way without written authorization fTomZenith ELectronics
Corporation. Unauthorized modification could void the user'sauthority to operate this product.
This class B digital apparatus meets aLLrequirements of the Canadian Interference-Causing
ReguLations.
Equipment
"Ce appareiLnum6rique de la class h respecte routes [es exigences du R6gutement sur [e materiel brouiLlier du
Canada."
Zenithisa trademark
ofZEC© Copyright
ZenithELectronics
Corporation
1999
SAFETY TIPS I
PAGE
Thesesimple precauUonswiLLhelp ensurethat you get many years of safe enjoyment from your new product.
1o
Read Instructions
11. Power Sources
Read all of the safety and operating instructionsbefore
operating the product.
2.
3*
4*
5.
6.
Operate product only from type of power source
indicated on marking
Retain Instructions
Keepall safety and operaUnginstructionsfor future
reference.
Heed Warnings
Followwarnings on the productand in the operating
guide.
product dealar or Local power company. For products
intended to operate from battery power or other
sources, refer to manual.
12. Une-Cord PotadzaUon
Productis equipped with a polarized aLternaUngcurrent Line plug (a plug having one blade wider than
the other). Asa safety feature, this plug will fit into
power outlet only one way. If you'reunable to insert
plug folly into outlet, try reversingthe plug. If plug
still fails to fit, contact an electrician to replace your
obsolete outlet. Do not defeat safety purposeof
polarized plug.
FollowInstructions
Followall operatinganduseinstructions.
CLeaning
Unplugthis productfrom the wall outlet before
cleaning. Do not use Liquidcleanersor aerosolcleaners.
Usea damp cloth for cleaning.
13. Power-CordProtection
Attachments
Route power-supplycords so
they are not UkeLyto be
walked on or pinchedby items
placed uponor against them,
paying particular attenUon to
cordsat plugs, convenience
receptacles,and the point
where they exit from product.
Do not use attachments not recommended by product
manufactureras they may causehazards.
7°
Water and Moisture
Oo not use this productnear water--for example,near
a bathtub, wash bowL,sink, or Laundrytub, in a wet
basement,or near a swimmingpooL.
8.
Accessories
14.
Do not place producton an unstable cart, stand,
tripod, bracket, or table. Product may fall, causing
seriousinjury to a child or adult, and seriousdamage
to the product. Use only with a cart, stand, tripod,
bracket,or table recommendedby the manufacturer or
sold with the product. Any mounting of productshould
follow manufacturer'sinstructions and shoulduse a
mountingaccessoryrecommendedby manufacturer;
Outdoor Antenna
Transporting Product
Hove productand cart combinations
with care. Quickstops, excessive
force, and uneven surfacesmay cause
productand cart combinaUon to
overturn.
®
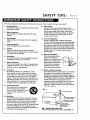
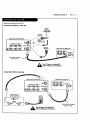
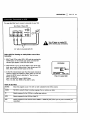
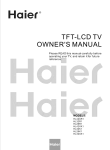
Grounding
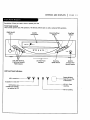
If an outside antenna or cable system is connected to
this product, be sure antenna or cable system is
grounded so as to provide some protection against
voltage surges and built-up static charges. Article 810
of the National ELectrical Code (USA), ANSI/NFPA 70
provides information
on grounding of mast and
supporting structure, grounding of Lead-in wire to an
antenna discharge unit connection to grounding
electrodes,
9.
label. If you are not sure of the
type of power supply to your home, consult your
and requirements for grounding electrode.
( See Fig. 1 below. )
Fig. 1
_
Antenna
Lead-in Wire
Ground
Clamp
10. Ventilation
SLotsand openingsin cabinet must not be blockedor
covered. Theyare providedfor ventilation, to ensure
reliable operation, and to protect from overheating.
Neverblock openingsby placing product on a bed,
sofa, rug, or other similar surface.Do not place product
in built-in installation suchas a bookcaseor rack
unlessproperventilation is providedor manufacturer's
instructionshave been adhered to.
--
__
NECSecUon810.20
GroundingConductors
NECSection810-21
mtenna Discharge Unit
ElactdcSewice
Equipment
GroundCLamps
- _
Etectroae_ysGrm
°unding
NECArt 250, Part H
NEC: National Electrical Code
Antenna groundingper NECCode, ANSI/NFPA70
3
I SAFETY TIPS
Thesesimpl,eprecautionsv_ll,help ensurethat you get manyyears of safe enjoyment from your new product.
15. Ughtn|ng
For added protection for
this productduring a
Lightningstorm, or when
productis l,effunattended
and unused for Long
periodsof time, unplugit
from the watt outlet and
disconnectantenna or
cable system. Thiswil,l,
prevent damageto product
due to lightning and
power l,foesurges.
2t. Repl,acementParts
Whenreplacement part(s) are required,be sure service
technician has usedreplacement part(s) specifiedby
manufactureror havesame characteristicsas original.
part(s). Unauthorized substitutionsmay resul,tin fire,
el,ectric shock,or other hazards.
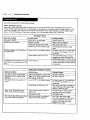
22. Damage Requiring Service
UnpLugthis productfrom the wal,[outlet and refer
servicingto qual,ified se_ce personnel,underthese
conditions:
a. If power-suppLy
cord or plug is damaged.
b. If liquid has been spil,l,edor objects havefal,l,eninto
product.
16. Power Unes
An outside antenna system shouLd not be l,ocated in
the vicinity of overhead power lines or other electric
l,ight or power circuits, or where it can fal,l, into such
power Lines or circuits.
When instal,ling
an outside
antenna system, take extreme care to keep from
touching such power lines or circuits, as contact w_th
them might be fatal..
17. OverLoading
Do not overl,oadwal,[outl,ets,extensioncords or
integral, conveniencereceptacl,es,as this can resul,tin
risk of fire or eLectricshock.
18. Object and Uquid Entry
Neverpush objects of any kind into this product
through openings, as they may touch dangerous
vol,tagepoints or short-out parts that could result in
fire or electric shock. Never spill,liquid of any kind on
product.
19. Senddng
Do not attempt to servicethis productyourself, as
opening or removingcoversmay exposeyou to
dangerousvoltage or other hazards.Refer al,l,servicing
to qualified servicepersonnel..
20. Wal,l,or Ceiling Mounting
Mount productto wal,Lor ceiling onl,yas recommended
by manufacturer.
c. If producthas been exposedto rain or water.
d. If product:doesn't operate normal,l,yby fol,Lewing
handbookinstructions. Adjust only those controls
coveredby handbookinstructions; improper
adjustment of other controLsmay resul.tin damage
and often requiresextensivework by a qualified
technician to restore productto normaloperation.
e. If producthas been droppedor cabinet has been
damaged.
f. If productexhibits a distinct change in performance.
23. Heat
Keepproductaway
from heat sources
suchas radiators,
heat registers,stoves,
or other products
(incl,udingamplifiers)
that produceheat.
24. Safety Check
Upon compteUonof any serviceor repairsto this
product, askservicetechnicianto performsafety
checksto determinethat productis in properoperating
condition.
INSTALLATION
CONTENTS
I
PAGE
5
INDEX
SAFETYTIPS.............................
2-4
INSTALLATION ..........................
6-12
VCRFeaturesChart ........................
6
Connections for YourVCR ..................
Beforeyou operate your VCR...............
CONTROLSAND DISPLAYS..................
7-8
9-12
13-14
AudioMenu ..............................
19
Auto Channe[Search......................
Connections ......................
11, 18
.....
7-8, 21
Channel.Add/De{ ........................
11, 18
Clock Set .............................
tl, 16
Features Chart .............................
6
Front Panel Diagram......................
13
Front PanelDiagram ........................
VCRStatus Displays ......................
14
Instant Recording........................
24-26
LanguageMenu ............................
18
OPERATION...........................
15-27
13
The Buttonson YourRemote ................
15
Main Menus ...............................
Clock Menu............................
16
PlayingTapes ...........................
Timer Menu............................
17
RemoteControl ............................
Setup Menu ...........................
18
Safety Information .........................
Audio Menu ...........................
19
Setup Menu ..............................
18
WatchingTVThroughthe VCR................
20
SpeakF.ZFunction ..........................
10
CamcorderConnected to VCR ................
21
Timer Menu ..............................
17
27
PlayingTapes ........................
22-23
Timer-Controt[edRecording ....................
Instant Recording .....................
24-26
Troubleshooting .........................
RecordingWhile You'reAway ................
TROUBLESHOOTING
.................-.SPECIFICATEONS
...........................
.,
27
28-30
31
9
22-23
15
2-4
28-30
VCRStatus Disptays.........................
14
Warranty ................................
36
Watching TVthroughthe VCR ..................
20
PAGE
6
I
INSTALLATION
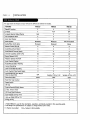
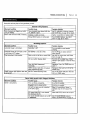
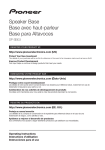
This pageshowsthe features of your VCRand the differencesbetween the models.
FEATURES
VRB210
VRB410
VRB420
SpeakEZFunction
X
X
X
g-Heads
X
N/A
N/A
N/A
X
X
Fu!,!,
Load/QuickStart
X
X
X
Auto Head C!,eaner
X
X
X
Audio System
Monaurat
Monaurat
MTS Hi-Fi Stereo
Audio/Video (A/V) ,lacks
Monaural.
Monaura!,
Stereo
Remote Contro!, SC411Z
X
X
X
Auto/Manua!. Band Se[[ect
X
X
X
Auto/ManuaL Channel. Search
X
X
X
181
181
181
Record SpeedsSP/EP
X
X
X
Playback Speeds SP/LP/EP
X
X
X
Auto Playback System
X
X
X
Auto/Manua!. Digita!.Tracking
X
X
X
Instant Recording
X
X
X
Timer-Control.!,edRecording
X
X
X
Auto PtaybackTape Speed Adjust
X
X
X
Forward/ReverseS!,ow-Motion
Video (4-head VCR)
N/A
X
Variab!,e1/10 to 1/32
X
Vadable 1/10 to 1/32
Pause/Stir!,Video
Noise
4-Heads (Special.
Video Effects)
Channe!.Capabil.ity (CAW & TV)
C!,ear
CLear
Rea!,-TimeTape Counter
X
X
X
Speed Search
X
X
X
CM Skip
X
X
X
English/Spanish/French
Menus
X
X
X
l-Year,
8-EventTimer
X
X
X
LED FrontPane!.
Indicator
X
X
X
Auto Day!,ight
SavingsTime
X
X
X
Hook-up Cab!,e
(VCR to TV)
X
X
X
EnergySaving
X
X
X
1. Mode!.VRB4EOis used for the description, operation, and details provided in this operating guide.
2. VCRdesign and specifications are subject to change without prior notice.
X = Feature is provided
N/A = Feature is Not AvaiLab!,e
INSTALLATION
]
PAGE
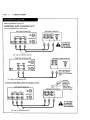
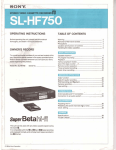
Required
connections
for yourVCR.
Connections Without a Cable Box
Antenna
Rat Wire
(300 ohm)
Back Pane[ of Stereo VCR
S
S
.....
300/75 ohm
Adaptor
S
OR
.,
(Notprovi_
OR
CableTV
Watt3ack
Back Pane[of Typical "IV
%%
VHF/UHF_TV
This came is provided
with your VCR.
_k
Turn
offmalting
power any
or unplug
VCR
before
connections.
Connections With a Cable Box
BackPane[of TypicaI.1_/
Back Pane[ of
TypicaI, CabLeBox
CabLe
W
WaU ,lack
This cable is provided
with your VCR.
A
Tum offmaking
power any
or unplug
VCR
before
connections.
7
PAGE
8
I INSTALLATION
OpUonaLconnectionsfor your VCR.
Audio/Video
(A/V)
ConnecUons
to TV
Use A/V connectionsfor a better picture.
Back PaneLof Stereo VCR
Back Panetof TypicalTV
(1 11÷VHF/UHFICA'r7
orumoffpower
unplug VCR
before making
any connections.
A
A/_/ cableis not providedwith VCR.
Back Panel of Monaural VCR
BackPanetof TypicatMonauraL
AUDIO VI
IN
Note:If the backpanel
on yourTVis different,
referto the 7_s operating
guide.
A/V cable is not provided with VCR.
_
AccessoryAudio/Video (A/V) Connections to'VCR
Back Panetof Stereo VCR
3ack paneLof Accessory
R-AUDIO-L
Accessory
Component:
Another VCR,
Camcorder,
Video Camera,
SateLliteReceiver,
LaserDisc Prayer
VIDEO
•
A/V cabLe
is not providedwith VCR.
A
or
unplug
VCR
Tum
off power
before maMng
any connections
INSTALLATION
Things
you must do beforeyou
CLOCK MENU
AUTO DAYUGHT SAVING:ON
BON I_OFF
MANUAL CLOCK SET:IJ]
Pressnumberkeys
QUff = exit
I
PA G E 9
can operate your VCR.
• PROGRAM[]
MONTH
DAY
START
STOP
CHANNEL :
SPEED
:
REPEAT:
(1-8) to select program
ENTERto adjust program
CLOCK
AUD_MENU
AUTOPROGRAM:
CH. ADD/DEL:
SOURCE:
ON-SCREEN
SETUPMENU
DISPLAY:_
LANGUAGESELECT:
SpmkEZ:ON DON BOFF
PLAYBACK:Hkn
/
Press numberkeys
|
QUIT -- exit
Press number keys
then ENTER
QUIT = exit
SETUP
AUDI0
)
TIMER
_mmm_
_[_
Press NUMBER (1,
2,
RECORD:STEREO
3,
Note:
4) button
f
Audio menu's PLAYBACKand
RECORDoptions are avail.abl.eonJy
with stereo VCRs.,
-]
"tiMER
gETUp
CLOCK _
AUI_
Press numberkeys
•
QUIT= exit
MAIN HENU
How to Access t4enus
Menu operation is easy--just
at the bottom of the menu.
follow the instructions
shown
1. Press MENU to see main menu.
2. Press NUMBER (1, 2, 3, or 4) to see desired sub menu to
be used.
3. Press NUMBER to choose desired option to be changed.
4. Press QUIT to exit menu, or wait a few minutes and the
VCR returns to normal operation.
Note:
Perform menu operations with the VCR and _/on,
and tune
the TV to channe(( 3 or 4. The VCR must also be in the VCR
mode of operation. Press the TV/VCR button repeated((y
until. VCR indicator [ight appears _n the front pane((.
Point remotetoward VCR
PAGE
I INSTALLATION
10
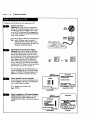
Thingsyou must do beforeyou can operate your VCR.
Connect
(Required)
the
Power
Plug your VCR into an unswitched
SW]TCH
WALL
120 Vac, 60 Hz household power outtet. Turn on
the VCR by pressing the POWER on the remote
I
D
!
|
|
or on the VCR'sfront paneL. White ptugged into
an AC outtet, the VCR consumes 3W of e|ectrical
power in OFF condition.
]Do
not plug
the VCRinto a switchedpower
outlet.
Otherwise,whenthe
power is
switchedoff, the VCRturns off. Youmay
then hoveto reset the time and dote, and
reprogromoperotionolfeatures.
Set PosJUon
of the
CH3/CH4
OUTLET
POWER_
WPICALZENITHVCR
I\
,_
_
;I
Switch
(Required) The CH3/CH4 switch on the VCR's
back panet determines which charmer the VCR
uses to send video signals to your W. The TV
must be tuned to the same channel you set with
the CH3/CH4 switch to see tape ptayback and
status displays from the VCR. To determine
which video channet provides the best picture
[]
o. []
for your system, try the switch in CH3 position
and tune your TV to channe{ 3; then try the CH4
position and tune your TV to channel 4.
Fora test dispLay,pressthe W/VCR button on
remoterepeatedly unU[ the VCRindicator tight
appearsin the VCR'sfront panel display. Press
MENUon the remote to see the main menu.
Press 4.
AUDIOUENU
Sp_k_:ON nON InOR;
PLAYBACK:
HI-R
Se|ect SpeakEZ Function (On/Off)
A voice Letlsyou how to use the features in the
menusif SpeakEZis ON. (ON is recommended.).
See the AUDIO Menu for details.
[]
SpeakEZ
onlyfunctions with
ENGLISH.
RECORD:STEREO
11UEFI
SEIUF
CLOCK
AUDIO
Press number keys
k theft ENTER
QUIT : exit ,
Press NUMBER (1 or 2) to
choose ON or OFF
P_e=num_=kws
QUIT = exit
MAIN MENU
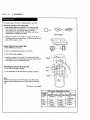
SeLect Language for VCR Menus/Disptays
(Optional) Select EngLish,Spanish,or French
for VCRmenusand status displays.Seethe
LANGUAGE
SELECToption on the SETUPmenu for
details.
Press5.
I
SEeP
MENU
r
SETUP MENU
LANGUAGE
SELECT
: ENGLISH
IF_U_aS BESEA_x
Preu numb_keys
thenENTER QUieT=exit
ON--BEN
DISPLAy:
AUTOPROGRAM:
LANGUAGE
SELECT:
Prea_nmnber
key=
OUiT= exit
Press NUMBER (1, 2, or 3)
to seLectthe desired
SETUPMENU
language
INSTALLATION
I
PAGE
11
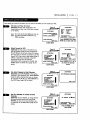
Somethings you must do and others you may want to do beforeyou can operate your VCR.
Set Date and Time for Clock
(Required) Set the clockin the VCRto the
currentdate and time. SeeCLOCKMenu on page
16 for details.
[]
Youmust
set the clockbeforeyou
any
Timer-controUed
VCRfeotures,conuse
e.g.
TIMERrecordings.
Press 3.
II
CLOCKMENU
r
CLOCK MENU
AUTO DAYUGHT SAVING:ON
nON BOFF
MANUAL CLOCK SET:ig
Pressnurnlwkeys
QUIT=exit
MONIH
DAY
YEAR
TIME
: [] JANUARY
: I FEll
: 199Q
: 12:00 AM
Pressnumbm"
keys
thenEmER
OUIT=exit
Press NUMBER (0-9) then
ENTERto set date and time
CLOCKMENU
SeLectSourcefor VCR
(Optional) Set the sourceof the VCRfor the
type of programsignal you haveconnectedto
the ANTIN jack on the backof the VCR.Choose
"iVif you have an antenna connectedto the VCR.
ChooseCAW if you have a cable system(with or
without a cable box) connectedto the VCR.
ChooseAUXif you havean accessory
Audio/Video (A/V) connectedto the VCR.See
SOURCEoption on SETUPmenu (page 18) for
details.
Use Auto Program to Find ChanneLs
(Required) Use AUTOPROGRAM
to find active
channelsin your broadcastarea. AUTOPROGRAM
storesthe active channelsthat you can access
by usingthe CH (V/&). SeeAUTOPROGRAMon
the SETUPMenu (page 18) for details.
Press 3.
SETUP MENU
I
SETUpMENU
SOURCE: TUNER
CH.ADO/DEL:
SOURCE:
ON-SCREEN
DISPLAy:
AUTOPROGRAM:
LANGUAGE
SELECT:
Press number keys
then ENTER
QUIT=exlt
Pressnumberkeys
QUIT= exlt
PressNUMBER (1, 2, or 3)
to select the desired
SETUPMENU
source
Press 1.
I
SETUP MENU
AUTO PROGRAM: SEARCHINC
SETUP MENU
CH. ADO/IDEL:
SOURCE:
ON-SCREEN
DISPLAy:
AUTO PROGRAM:
LANGUAGE SELECT:
QUIT: exit
number keys
QUIT: exit
SETUPMENU
Use CH. ADD/DEL to Create Favorite
Channels
(Optional) UseCH. ADO/DELto changethe List
of active channelsfound when using AUTO
PROGRAM,soyou can |ist your favorites. See
CH. ADD/DELon the SETUPMenu (page 18) for
details.
Press 2.
SETUP MENU
I
SE'IUp MENU
CH. ADD/DEL:
SOURCE:
ON-SCREER
DISPLAY:
AUTO PROGRAM:
LANGUAGE SELECT:
Press number keys
QUIT : exU
SETUP MENU
CH, ADD/DEL: CH, Bl_ ADD
number
thenENTER QUIT: exR
Press NUMBER (0-9)
then ENTER
PAGE
12
I
INSTALLATION
Thingsyou may want to do before you operate your VCR.
SeLect Other Menu OpUons
You may not want to havethe clock in your VCR
adjusted automatically for DayLightSavings
Time. Refer to CLOCKMenu for details.
Press 1.
CLOCK MENU
AUTODAYUGHT
SAVING:ON
BONBOFF
Sp_keZ
MANUAL CLOCK SET.'El
Pre. numbwke_
Gun":exit
PressNUMBER(1 or 2) to
choose Auto Dayt|ght
Saving ON or OFF
Promhumorkeys
MAIN MENU
Press4.
I
Showor hide the VCRstatus on your screen by
using the ON-SCREEN
DISPLAYoption on the
SETUPmenu. We recommendkeeping this option
ON. See the SETUPmenu for details.
SETUP MENU
y
SETUp
MENU
ON-SCREEN DI_PI.AY: ON
BONmOFF
Pressnumberkeys
CH. AJDD/DEL:
SOURCE:
OH-SCREEN
DISPLAY:
AUTOpROGRAM:
LANGUAGESELECT:
•
then ENTER
Press number keys
QUIT = exit ,
QUIT : exN
Press NUMBER(1 or 2) to
choose ON or OFF
SETUP MENU
Press4.
AUDtOMENU
Y
If you have a stereo VCR, press ENTER to select
spwez
the audio format (HI-F[ or NORMAL) to use
when you play a tape. We recommend
setting
this option to HI-F[. See the PLAYBACKMODE
option on the AUDIO Menu for details.
TIMER
SETUP
CLOCK
AUDIO
I
PrmmnumborI_
Q4JIT= exit
xmkEZ:ON
PLAYBACK:
HI-FI NN_RMA
RECORD:
STEREO
Press number keys
• then ENTER
QUiT = exN ,
Press NUMBER (1 or 2) to
choose HI-F[ or NORMAL
MAIN MENU
Press 4.
AUDIO MENU
SpeakEZ:
OH
If you have a stereo VCR, press ENTERto select
the audio format (STEREO, MONO or SAP) to use
when recording. We recommend using STEREO.
See the RECORDMODE option on the AUDIO
Menu for details.
$peakEZ
I_YBACK:
HI-FI
TIMER
RECORD: S'I_REO NSAP_I_REO
SETUP
AUDIO
Prmmnumberkeys
Pr_mnumbwkeys
QUIT.exit
MAIN MENU
theft ENTER
QUIT = exit
Press NUMBER(1, 2 or 3)
to choose STEREO,NONO,
or SAP
CONTROLS AND DISPLAYS
I
PAGE
13
Descriptionsof items you need to knowto operate your VCR.
Front PaneLControLs
Thesecontrolsperformbasic VCRoperations.The Remoteperformsbasicas weU.as advancedVCRoperations.
POWEROn/Off
Button
Cassette
Compartment
Channel Up/Down
SeLector
\
Stop/Eject
Selector
zenith
ooooo:
/
PLAY,REW(Rewind),
F FWD(Fast Forward),
PAUSESetector
LEOFront _net
LED FrontPanel
Zndicators
Recording
Speed Setector
RECiITR
(Instant Timer
Record)Se[ector
Indicators
power
VCRis turned on
A Cassetteis in the VCR
VCRfunctions are
avaitabLeand channels
are selected at VCR
cl3t.in
vcr
-T l
rec
timer
,"
•_
RemoteWindow:
_,
of obstruction.
v
.
T
_
_L___
Keepthis area flee
VCRis in Timer
recording
VCRis recording
PAGE
14
J CONTROLS AND DISPLAYS
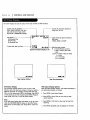
)n-Screen dispLaysteLLyou the status of the tape inserted and VCRfunctions.
1[
Currentmodeof operation
(STOP,PAUSE,RECORD,PLAY,etc.)
and audio format of tape, where
PLay=HT-FE
or NORMAL(Nodisplay)
PLAY HI-FI
SP
TapeSpeed
EP-ExtendedPLay
LP-LongPLay
SP-Standard PLay
15 MON
7:17 AM
Current date, day, andtime
VCR CH 11
ST/SAP - --
M-1:35:45 - --
Typical VCRStatus Display on 1!/
M-1:35:45
TapeCounter Position
VCR Status Display
TheVCRStatus DispLayappearson the TV when a VCR
function starts, like whenyou change a channelor select a o
different VCRmode.For example, pressingSTOPwhile the
VCRis in PLAYmodeshowsSTOPin the display. PressENTER
on the remote at any time (except Special EffectsPLayback
mode; SLOW,STILLetc.) to see the Status DispLay.
Note:
If the VCRStatus DispLaydoes not appearon the TV screen,
checkthe ON-SCREENDISPLAYoption on the SETUPmenu.
SeLectON to see the display. See"Setup Menu" section for
details.
Current CH (ChanneL)selectedby
using tuner in VCR
Audio format of signal receivedby
VCRtuner:
STEREO,MONOor ST/SAP
ReaL-timetape counter
H - Counter MemopJis active
- ,, Tapeis rewound past index
mark.
1:35:45 - Length of tape (in time)
1 - 1 hour
35 - 35 minutes
45 - 45 seconds
REM 1:35
Tape Time Remaining
VCR Status Display Options
When the Status DispLayappears,pressENTERrepeatedly to
seeabbreviated displays,as foLLows:
1. PressENTERto see Status DispLay.
2. PressENTERa secondtime to show only the tape
counterposition.
3. PressENTERa third time to showonLythe tape time
remaining.
4. PressENTERrepeatedly until alLdisplaysare removed.
OPERATION
I
PAGE
15
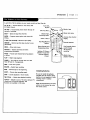
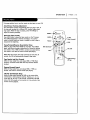
A quick Est of all.the buttons on your remote control and what they do.
CH (V/A) -- ChannelSeLectors.ALsoselects AUX
A/V input channel
CM SKIP -- Fastforwardspicture searchthrough 30
secondsof recording.
E3ECT-- Ejectsthe tape from the VCR.
ENTER-- Programsmenu options and showsVCR
display.
TurnsVCR
Exits An
ChoesesTa
Recording
Speed
_Shows main menu
AccessesTape Counter
Enters
F FWD (Fast Eonvard)--Advancestape rapidly.
MEMORY-- Returnsrea|-time tape counterto zero
(M 0:00:00).
MENU -- Showsmain menu.
Numbers -- Chooseschannelsandenters
programminginformation.
PAUSE-- Pausestape temporarily during playback
or record.
TapeP_y/Record
Options
Direct Channel and
ProgrammingEntry
30 secondsof
SwitchesW_cturaJ
between TVand VCR
ChanneLSeLectors
(Tuner)
PLAY-- Beginstape playback.
POWER-- TurnsVCROn and Off. Alsoturns VCR
Timer Off and On, if programmed.
QUN"-- Exits menusystem.
REC/]TR-- Beginstape recording.
REW-- Rewindstape to the beginning.
InstaLLingBatteries
SP/EP -- Choosestape recordingspeed.
STOP-- CanceLsptaybackor record modes.
TRK (V]&)
-- Adjuststape ptaybacktracking.
TV]VCR -- Switchessourceof W picture between TV
channeland VCRchannel selection. VCR
functionsare avaitablein VCRmode.
Fastforwardspicture
Be sureto insta[t the batteries
providedwith this remote. Match
positive (+) and negative (-) with
markings shownin battery
compartment.
Note: All VCRoperationsand menu
optionscan be accused by using
the remotecontrol
recording
_ Adjuststape
playbacktracking.
PAGE
16
I OPERATION
The Clock Menu sets the clockin VCRto the current time.
HOW to Access Auto Daylight Savings Time
This VCRcan adjust the clock automaticaUyfor Daylight Savings
Time.
CLOCKMENU
1. PressMENUto see Main Menu.
2. Press1 to see CLockMenu.
3. Press1 to chooseON on the Clock Menu.
AUTODAYLIGHTSAVING.'ON
lION EIOFF
MANUALCLOCKSET:B
Prw numuwby_
QUIT=exit
Note:
We recommendthat you set the clock usingthe MANUALmethod
the first Ume you use yourVCR. See MANUALoption for details.
Manual Clock Set
TheCLOCK
Menuallowsyouto setthe clockin the VCRto the
currentdateandUme.
Notes:
The clock must be set beforeyou can record, usingthe TIMER
menu.
You may have to reset the clock and other features if a power
outage Lastsfor more than 3 seconds.
CLOCK U_kiU
MONItl
DAY
YEAR
TIME
: IJANUARY
: 1 Fill
: 1gin
: 12._0 AM
Primnum_ ko_
thane
QUITuexit
How to Set Clock
1. PressMENUto see Main Menu.
2. Press 1 to see clock options.
3. Press3 to adjust your options.
4. Firstinsert the month number (5-MAY, 6-,]UNE etc).
5. PressENTERto moveto next option.
6. PressQUIT to exit the menusystem.
Typical CLOCKMenu with
date and time settings
OPERATION
J
PAGE
17
The TIMERMenuteLLsthe VCRwhen to recorda programon a day and at a time you specify.
You can specify eight different events to be recordedin a one-year period.
Speak=-/
Press2
OLd*i|
TIMER
SEllJp
AUDIO
Prims nuraberlur/s
_yiT =,_tt
Month of Recording--.________
Day of Recording
Start Time of Recording
Stop Time of Recording---_-'-_'_''-_
Channelof RecordingS/
PROGRAM B
MONTH
DAY
START
STOP
CHANNEL :
SPEED
:
REPEAT:
(1-8) to select program
ENTER to adimlt program
p_OQRAM
B _____----=
b'MONTII
:
_- DAY
:
--START
:
w.STOP
:
i.- CHANNEL
r SPEED
REPEAT:
7 JULY
20 "rUE
11:16 AM
11-,46 AM
: 20 TV
: El=
ONCE
Y(_ -s) to se',ect
• TO erue
press 10)
PressQUIT t
Timer vdll b4 on
when VCR is off
How to Use Timer
1. ChooseTIMER menuas describedin "How to AccessMenus"
on page g.
g. When the TIMER menu is displayedon screen,press the
ENTERbutton to select the correct month, then pressthe
ENTERbutton again to move the next option or setting.
El====
r PROGRAM []
MONTH
DAY
START
STOP
CHANNEL :
SPEED
:
REPEAT:
(1.8) to select prosram
ENll_R to adlust program
ProgramNumber
When highfighted, pressNUMBER(1-8) to
chooseprogramNumber.
REPEATOPllONS
ONCE-- Recordsonce.
WEEKLY
-- Recordsonce each week.
DAILY-- Recordsone time each day,
Monday- Friday.
CHANNEL OPTIONS
Toselect an AUX channel select the next
highestor Lowestchannet programmedin
the VCRwith the CH (V/A).
SPEED OPTIONS (SP or EP)
The SP modedetermineshow much tape is
[eft and switchesspeed from SP to EP,if
necessary,to complete recordingthe
program.There wilt be somepicture and
sounddistortion at the point of the speed
change.
AM/PN OPTIONS
Press 1 for AM
Press E for PM
3. Whenyou haveentered aU.of the settings to your
saUsfact_on,pressQUIT to exit the menusystem.
Note:
Set the VCRin TIMERmode by pressingPOWERto turn off the VCR.
TheTIMERindicator Ughtappearsin the front panel of the V_R.
YoucannotoperatePOWER
the VCRmonuaUywhile
it is
recording.Pressing
stopsthe recording.
To Erase a Program
1. ChooseTIMERmenu as describedin "How to AccessMenus"
on page g.
2. PressNUMBER(I-8)to se[ect
desiredPROGRAM to be erased.
PROGRAM I
MONTH
7 JULY
DAY
20 TUE
START
11:16 AM
STOP
11"46 AM
CHANNEL : 20 TV
SPEED
: El=
REPEAT:
ONCE
(1-8) to setect program
TO m
I_
(0)
3. Press0 to erasetheprogram.
Press 0 to erase program
4. PressQUIT to exitthe menu system.
I
i
FoLLow
i -_hese
-_ steps
PAGE
!8
I OPERATION
The SETUPMenu customizesthe VCR'soperaUonfor your particularneeds.
r
SETUPMENU
ChooseSETUPMenu as describedin
_How to AccessMenus"on page 9.
CH. ADDIDEL:
SOURCE:
ON-SCREENDISPLAY:
AUTOPROGRAM:
LANGUAGESELECT:
Press number keys
QUIT : exN
AUTOPROGRAM
Findsall active channels and storesthem in the VCR'smemoryfor accessby CH (V/A).
1 to begin search.
Press
CH. ADD/DEL
Editsthe channelsfound by AUTOPROGRAM,Usenumberkeys followed by ENTERto setect
the channe[to be edited (e.g, to ADDchannel 3, press3 then ENTER).PressENTERto ADD
or DEL(DeLete) channelsto create your own List of favorite channels.
SOURCE
SetectsTV, CATV,or AUXas the sourceof the programto watch or record. ChooseTVif you
have an antenna connectedto the VCR.ChooseCATVif you have a cable system(with or
without a cab[e box) connectedto the VCR. ChooseAUXif you want to seethe programfrom
accessoryequipment, such as a camcorder,connectedto the Audlo/Video (A/V) IN jacks on
the VCR.
ON-SCREEN
OISPLAY
Setectswhether or not you seeVCRStatus Disp[ayson the TV.
LANGUAGE
SELECT
Selects English,Spanish or Frenchfor VCRmenusand displayson the TV.
OPERATION
I
PAGE
19
TheAUDIO Menu specifiesthe audio format to be usedwhen recordingor playing a tape.
(Audio menu's PLAYBACK
and RECORD
options are avaltabie only with stereo VCRs.)
TheAUDIO Menu indicates the audio
format used when recordingor playing
a tape. ChooseAUDIOMenu as
describedin "How to AccessMenus" on
AUDIOMENU
SpeakEZ:ON iliON FJOFF
PLAYBACK:HI-FI
RECORD:STEREO
page 9.
PressENTER(and repeat) to choose
items in the menu (somemodeLs).
Press number keys
then ENTER
QUIT = exit
SpeakEZ
TurnsSpeakEZON or OFF.
A voice telLsyou how to use the features you select in the menus if SpeakEZis ON. (ONis
recommended.)
PLAYBACK
SeLectsHI-FI or NORMALfor tape playback.
HI-FI (High FideLity)providesstereo sound,if presenton the tape, to the left and right VCR
AUDIOoutput jacks on the back of the VCR.
NORMAl_providesmonauraI. sound, regardless of the audioformat presenton the tape.
RECORD
Selectthe STEREO,
NONO,or SAPfor recordinga program.
STEREOrecords sound from the [eft and right audio tracks in stereophonicformat.
MONO(Monaural) records soundin monaure{ format evenif the programis in stereo.
SAPrecords the SecondAudio Program(SAP) track, if present, in addition to the stereo audio
tracks. SAPusuallycontainsaudio in another Language.
PAGE
20
I OPERATION
This page showsa typical video systemand explains how to seLectchanneLs.
AIL-Chamne|,
Antenna
ZenithW
7
CableW
Zenith StereoVCR
w_
•
Or
CHANNEL
VHF-UHF
sin34
TypicaL
CableBox
AUDIO
VIDEC
OUT
OUT
VHFJU HFF-AW
_tem
I
_
_Ou_u_tx
to VCR
IN
VCROut_t to W
(Channel3 or 4 when
VCRis on ind TV/V_R
in Y_Epo=_don)
..
kedio/_deo
VIDEO
_
AUDIO
i_l
Output to IV
Selecting ChanneLs when the VCR is OFF
1. TurnTVon.
SeLectingChanneLs at the VCR when VCR is ON
!. TurnTVandVCRon.
2. SeLectchannelyou'd Liketo watch at the TV.If you have
a cable box, select channel 3 or 4 at the TV,SeLectcable
box channelsat the cable box.
2. Place VCRin VCRmode by pressingthe W/VCR button on
the remote control repeatedly until the VCRindicator
appearsin the fiont paneLof the VCR.
SeLecting Channets at the TVwhen VCR is ON
1. TurnTVandVCRon.
3. SeLectchannels3 or 4 at the TV. If your TVis equipped
with A/V input jacks, checkyour TV operating manual to
select the A/V sourcefor a better picture.
2. Place VCRin TV modeby pressingthe W/VCR button on
the remotecontroL repeatedly until the VCRindicator
disappearsfTomthe fxont panel of the VCR.
3. SeLectchannelyou'd Liketo watch at the TV. If you have
a cabLebox, select channeL3 or 4 at the TV.SeLectcable
box channeLsat the cable box.
4. SeLectthe channeLyou'd Liketo watch at the VCR.If you
havea cable box, select channel3 or 4 at the VCR.
SeLectcable box channeLsat the cable box.
OPERATION
I
PAGE
This page describeshow to connect a camcorderto your VCR.
BackPaneLof StereoVCR
A
Tum
beforemakingany
off poweror unplugVCR
connections.
A/V cable is not providedwith VCR.
SeLectAUX for Viewing an Audio/Video source Like a
CamcoMer
1. With TV and VCRon, place VCRin VCRmode by pressingthe
TV/VCRbutton on the remote (and repeat) until the VCR
indicator Lightappearsin the VCR'sfront paneL.
2. SeLectchannel3 (or 4) on the TV. Note: If your TV hasA/V
jacks, you may get a better picture if you connect yourVCR
there. (Then, selectthe A/V sourceon the TV.)
3. At the VCR,Channel down Lowerthan the LowestchanneL(or
Channelup above the highest) to select "AUX".You can also
choosethe SETUPmenuas describedin "How to Access
Menus"on page g.
Press3 for the SETUPmenu'sSOURCE
item.
Press3 for AUX, then ENTER.(PressQUIT to exit.)
SETUPMENU
SOURCE:TUNER(TV)
NTVx
.CA.
Press number keys
then ENTER
QUIT : exit
Press 3 to select AUX
Ztems tn the Menu
SOURCE
Showsthe programsource--W, CATV,or AUX--seLectedfor the VCRto receive.
TUNER
TheVCRis usingits Tunerto receiveprogramsfrom an antenna or cable.
TV
SeLectsprogramsfor the VCRfrom a rooftop-type antenna.
CATV
SeLectsprogramsfor the VCRfrom CabLe"IV.
AUX
SeLectsprogramsfor the VCRfrom the R-AUDIO-L--VIDEOIN lacks (where you may have connectedyour
camcorder).
21
PAGE
22
J OPERATZON
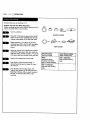
This pageexplains the basicsof playing tapes in your VCR.
Automatic Playback (No Safety Tab)
1. Tape playbackbegins automaticaLLy,
if the safety tab has
been removed from the cassettecase. For example,most
rental movies have no safety tab. Simply insert the
prerecordedVHScassetteinto the VCR.Power wilt turn on
automaticaLLy
and playbackwilt begin.
VCR'sControLs
2. SeLectthe channel3 or 4 at the TVor select the TV'sAUX
(AuxiLiary)sourceto seethe picture, if you are usingthe AiV
jacks. Refer to page7 and 8.
Manua[ Ptayback (Has Safety Tab)
1. PressPOWERto turn VCRon.
I )
Safety Tab _
Sh_tWnein
2. Insert a prerecordedVHScassette into the VCR.
3. PressPLAYto begin playback.
4. SeLectthe channel 3 or 4 at the W or select the TV'sAUX
(AuxiLiary)sourceto seethe picture, if you are usingthe A/V
jacks. Referto your TV operating manual
Unloading the Cassette from the VCR
1. PressSTOPif the tapeis pLaying.
2. PressSTOP/E3ECT
at the VCRuntil the cassetteis ejected.
_//VCR
Note:
This VCRrecords only in SP and EPspeeds.YourVCRsets the
playbackspeed automaticaLLy
to the speed usedto recordthe
tape.
(Continuedon next page)
CasseU VHS Cassette
Playback/Record
Times EP
SP
LP
Lengtl
(Standard Pray) (Long Pray) (Extended Play)
1 Hour
30
Minutes
1 Hour,
1 Hour
2 Hours
3 Hours
2 Hours
4 Hours
6 Hours
40
Minutes
2 Hours,
20
Minutes
5 Hours,
8 Hours
T-30
30 Minutes
T-60
T-120
T-160
OPERATION
I
PAGE
23
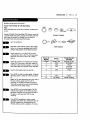
This page explainshow to usethe remote to pLaytapes on your VCR.
Auto/ManuaL Tracking Adjustment
YourVCRadjusts tracking automaticatLywhen you play a tape. If
the tape was recordedon a different VCR,streaks(video noise)
may appear.WhiLethe tape is pLaying,pressTRK(V/A) to
adjustthe tracking manually.
Real-Time Tape Counter
PressENTERtwice to keepthe tape counter on the TV screen.
PressENTERrepeatedlyto removeat[ displays.Thecounter
resets to 0:00:00 when you insert a cassette or when a tape is
rewoundto its beginning.
Pause/Forward/Reverse
Slow-Motion Video
(White in play mode) PressPAUSEfor still video. PressPAUSE
again, and follow on-screeninstructionsfor Forwardor Reverse
stowmotion. PressF FWDor REWto control stowspeed during
stowmotion. PressPLAYto resumenormaltape playing.
POWER-ENTER-_
F FWD
(Fast Forward)
PAUSE-STOP
REW(Rewind)/
PLAY/
(2_QQ
Q (3)
(3_
/CM
SKIP
Note: Whenthe reverseslow modecontinues_r morethan 30
seconds,the VCRwill automaticaLLy
change to play mode.
_TRK(Tracking)
Tape Rewind and Fast Forward
(WhiLein Stop mode) Pressand release REWor F FWD(Fast
Forward),as desired. PressSTOPwhen tape reachesdesired
[ocaUon.
Reverse/Forward Search
(While in Play mode) Pressand releaseREWor F FWD,as
desired,PressPLAYto resume normal tape playing.
CM Skip (Commercial Sldp)
(White in play mode) PressingCMSKTPon the remoteskips
commercialsor other programmaterial. Pressing1, ?, 3, or 4
times skips30, 60, 90, or 120 seconds,respectively. CMSKIP
skipsa fur[ 120 secondsof commercialsin a few seconds,then
resumes normalplayback.
(V/A )
PAGE
24
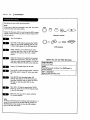
I OPERATION
Recordingwhat you are watching on W.
Options You Can Use While Recording
Instant recording lets you recorduntil you reachthe end of
tape or you pressSTOPto stop recording.
_i_
power
Turn TVand VCRon.
Remote's Controls
PlaceVCRin VCRmode by pressingthe TV/VCR
button on the remote repeatedly until the VCR
indicator tight appearsin the VCRfront panel.
SeLectchannel3 or 4 at the TV.If you have
connectedyour VCRto the W's A/V input jacks,
sel.ectthe A!V sourceat the W for a better
picture.
Selectthe channelto be watched and recorded
at the VCR.If you have a cable box, selectthe
cabte box output channet (usuatty3 or 4) at the
VCR.Setect cabte box channelsat the cabte box.
Inserta VHS cassette
tapeintotheVCR.
PressSP/EPto select recordingspeed,if
desired. Recordingspeed is al.waysSP, unless
you select ER
PressREC/TrRuntil recordingbegins. REC
indicator tight appearsin the VCRfront panel
Recordingcontinues until you reach the end of
the tape, or until you pressSTOPto stop
recording.
VCR'sControLs
InstantRecom'in9
'until.endof tape)
Instant
TimerReco_n9
(Preset
recording
times)
PAUSEMomentarily pauses
recording. PressPAUSE
again to resumerecording.
STOPor STOP/FJECT
Stopsand exitsrecording
mode.
STOPor STOWFJEQ"
Stopsandexitsrecording
mode,
OPERATION
]
PAGE
Recordingusing preset time periods.
Preset Time Periods for [TR Recording.
Note:
Preset recordingtime countsdown until the recording time
is over.
powsr
Q
Instant (attended) Timer Recording(ITR) Letsyou recordfor
a specificpreset time period, instead of recordinguntil the
end of tape is reached. For example, you can recorda
30-minute showusingthe preset time period.
B
TurnTV and VCRon.
B
PLaceVCRin VCRmodeby pressingthe TV/VCR
button on the remote repeatedly until the VCR
indicator Lightappearsin the VCRfront pane[.
Select channel3 or 4 at the TV. If you have
connectedyour VCRto the TV'sA/V input jacks,
select the A/V sourceat the TVfor a better
picture.
Remote's Controls
VCR'sControls
Pressesof
REC/ITR
Dfsptay
1 (Press)
2
3
4
Current Time
0:30
1:00
1:30
2:00
l
Select the channelto be watched and recorded
at the VCR.If you have a cable box, select the
cable box output channel (usually3 or 4) at the
VCR.Select cable box channelsat the cable box.
m
Insert a VHScassettetape into the VCR.
5
PressSP/EPto select recordingspeed,if desired.
Recordingspeed is alwaysSP, unlessyou select
EP.
10
Note: The SP mode determines how much tape is
[eft and switches speed from SP to EP, if
necessary, to complete recording the program.
There will be some picture and sound distortion
at the point of the speed change.
B
B
PressREC/ITRuntil recordingbegins. The REC
indicator tight appearsin the VCRfront panel.
Recordingcontinuesuntil you reach the end of
the tape, or until you pressSTOPto stop
recording.
PressREC/ITRrepeatedly to select a preset
recordingtime period. Each subsequentpressof
REC/]TRincreasesthe recording time by 30
minutes until you reacha maximumof 4 hours.
9
4:00
No display
Preset Time For
Recording
Until end of tape
30 minutes
1 hours
1 hour and
30 minutes
2 hours
4 hours
normal recording
25
PAGE
26
I OPERATZON
Recordingoneshow white watching another.
Note:
If you have a cable box connectedto your VCR,you cannot
recordone showand watch another.
powt_r
Choose the show you wish to record using the VCR's channel
selector. Choose the show you wish to watch using the TV's
channel selector.
Remote's ControLs
TurnTVand VCRon.
PLaceVCRin VCRmode by pressingthe TV/VCR
button on the remote repeatedly until the VCR
indicator tight appearsin the VCRfront paneL.
VCR'sControLs
SeLectchannel3 or 4 at the TV.If you have
connectedyour VCRto the TV'sA/V input Jacks,
select the A,/V sourceat the TVfor a better
picture.
SeLectthe channelto be watched and recorded
at the VCR. If you have a cable box, select the
cable boxoutput channel (usually 3 or 4) at the
VCR. SeLectcablebox channels at the cable box.
Insert a VHScassette tape into the VCR.
Options You Can Use White Recording
Instant Recording
(untiLend of tape)
PAUSEMomentariLypausesrecording,PressPAUSEagain to
resumerecording.
PressSP/EPto select recordingspeed, if desired.
Recordingspeed is alwaysSP, unlessyou select
EP.
PressREC/ITRuntil recordingbegins. REC
indicator tight appearsin the VCRfront pane[.
Recordingcontinuesuntil you reachthe end of
the tape, or until you pressSTOPto stop
recording.
PLaceVCRin TV modeby pressingthe W/VCR
button on remote to turn off VCRindicator tight
in the VCRfront paneL.
Setect the showyou wish to watch usingthe
TV'schannelse[ecton
Note:
To return to the showyou'rerecording, select channeI 3 or 4
at the W. PLacethe VCRin the V£R mode by pressingthe
W/VCR button on the remoteto showthe VCRindicator
light in the VCR'sfront panel.
STOPor STOP]E3ECTStopsand exits recordingmode.
OPERATZON
J
PAGE
27
Thispage explains how to use the Timer sothat you can recordwhile you are away.
$peakEZ
Press 2
11UER
SETUP
CLOCK
AUDIO
!
Press number keys
QUIT = exit
MAIN MENU
• PROGRAU[]
MONTH:
MONTH
DAY
START
STOP
CHAHNEL:
SPEED :
REPEAT:
(14)
toselectprogram
ENTERto adjust program
TIMER MENU
DAY
m u
for Program 1
Timer-controLLed
recordingLets you record shows
unattended. Pick a day and time up to one year in advance.
The showmay be recorded once or on muLtipLedays.You
can scheduleup to eight different eventsinto the PROGRAM
TIMERfor recording,as Longas no events overbp in the
sametime period.
VCROperation with Timer Off or On
VCR
POWER
On
Turn TVand VCRon.
PlaceVCRin VCRmode by pressingthe TV/VCR
button on the remote _'epeatedLyuntil the VCR
indicator light appearsin the VCRfront paneL.
Select channel 3 or 4 at the _/.
Insert a VHScassette tape into the VCR.
Program eventsto be recordedwith the Timer
by foLLowingthe procedurein the TIMERMENU
section.If you have a cable box, select channel
3 or 4 (ar the VCR)as the channelto be
recorded. Keepyour cable box on when using
the Timer to record.
D
EnabLethe Timer by pressingPOWERto turn off
the VCR.The TIMERindicator tight appearsin
the VCRfront pane[to indicate the VCRis in the
TIMERrecordingmode.
m
START
STOP
CHANNEL:
SPEED :
REPEAT:
(1-8) toselectprogram
_, ENTERto adjust program
TIMER MENU
for Program 8
TIMER
STATUS
Off
VCR OPERATZON
DisabLesTimer-controLLed
recordingif an event is scheduled
in the Timer. ALLother VCR
operationscan he usedas
desired.
Off
Timer-controlLed
On (or set) EnabLes
recordingif an event is scheduled
in the Timer. You cannotoperate
the VCRmanually while it is in
Timer Set mode.If you have
scheduledthe Timer,you'Llbe
recordingat a tater time.
PAGE
?8
I TROUBLESHOOT]NG
Some quickand easytips to fixing problemsyourself.
Before Catting for Service
PLeaserefer to this chart before caLUngfor service. First, turn on the IV and VCR.SeLectappropriate input for the IV to
receivethe video signal from the VCR.You wiU probablyuse the Antenna In connectionto the TV. SeLectchannel3 or 4 at
the TV. Placethe VCRin the VCRmode by pressingthe TV/VCRbutton on the remote repeatedlyunU[ VCRindicator Light
appearsin the VCRfront paneL.If you have a cable box, turn it on and select channel3 or 4 at the VCR.
Operating Problems
Observed Condition
PossibLeCause
ProbabLeSoLution
No powerto the VCR.
Powercordis not connected.
Connect powercord.
Remotedoes not function.
Batteriesare weak.
RepLacewith new batteries.
You are too far away from the VCR.
Movecloserto the VCR.
Remotemay be at an awkwardangle.
Avoidholding the remote at sharp
angle.
Sourcefor IV is not selectedproperty.
Set INPUT sourceon IV to Audio/Video
In, or tune TVto Channel3 or 4, as
appropriate.
TV/VCRmode for VCRis set to TV.
Pressthe TV/VCRbutton on remote
repeatedly to choose VCRmode. VCR
indicator tightappearsin VCRfront paneL.
No picture appearson IV screenfrom
any VCRfunction.
VCRfeatures do not function. VCRdoes VCRis Lockedup.
not respondto remote functions or VCR
keys.
DisconnectVCRpowercord for three (3)
minutes. Resetclock and other features
as necessary.
PLaying Tapes (PLayback) Problems
Observed Condition
Possible Cause
ProbabLeSoLution
Tape wiff not rewind or fast forward.
Tape is fuLLyrewound or is at its end.
No action necessary.
Mechanical soundis audible during
playback.
Note: This is normal operaUng sound
from internal mechanisms.
No action necessary.
Tape playbackdoesnot appear on IV
Source for IV is not selected property.
Set Input sourceon IV to Audio/Video
In, or tune IV to Channel 3 or 4, as
appropriate.
IV/VCR modefor VCRis set to TV.
Pressthe IV/VCR button repeatedlyto
choose VCRmode.VCRindicator Light
appearsin VCRfront panel.
Tapeis a rental o_was recordedon
another VCR.
UseTRK(v/A) for manua[tracking
adjustment
whiletapeis playing.
Tapeheads are dirty.
C_an video heads.
Tapetracking needs to be adjusted
white in stow-motion playback,
FromSTILLvideo mode, enable
sLow-motionplayback.UseTRK(v/A)
to adjust tracking for best picture.
Return to PLAYmode, then press
PAUSEfor STILLvideo.
screen.
Video _noise" (horizontal streaks)
appear during normaltape playing.
VCRStatus Displayflickers when using
STILLvideo during tape playback.
TROUBLESHOOTING
I
PAGE
Some quick and easy tips to fixing problemsyourself.
Channel.Tuning Probl.ems
ObservedCondition
Possible Cause
Probable Sol.ution
Somechannelsare skippedover when
usingCH (V/A).
Thosechannels were deleted with the
CH. ADD/DELoption.
Use CH. ADD/DELto restore channels.
SeeSETUPMenu on page 18 for details.
Picture and soundare weak or missing. Antenna or cablesare loose.
WrongSOURCEoption is being used.
Tighten connectionsor replace cable.
Try all SOURCEopUons.See SETUP
menu on page 18 for details.
Recording Problems
Observed Condition
Possible Cause
Probabla Sol.ution
Camcorderimage is not shown.
Camcorderis off.
Turn camcorder on and operate
properly.
Camcorderimage via A/V input to VCR
is not shownon TVscreen.
VCRSOURCEis not set to AUX.
Timer recordingis not possible.
Clockin VCRis not set to correct time.
Use CH (V/A) to select AUXA/V
input channeL.
Set clockto correcttime. SeeCLOCK
menu on page 16.
VCRis on which disablesUmer.
Turn VCRoff to enable timer. TIMER
indicator light appearsin the VCRfront
)aneL
Timer has been programmed
incorrecUy.
ReprogramTimer. See TIMERmenuon
page 17.
TIMERindicator tight does not appear
after programmingUmer.
ReprogramTimer and turn VCRoff to
enabletimer.
TIMERindicator Ughtappearsafter VCR VCRis in Timer Recordingmode.
is turned off.
Thisis the normalindication that the
VCRis in TIMER mode.
Stereo Audio Record and/or Playback ProbLems
Observed Condition
Possible Cause
Probable Solution
Stereo is not present.
TV is not Stereo-compatibLe.
No action is possible.
Program is not in stereo format.
No action is possible.
VCRA/V Out jacks are not connected
to TVA/V In jacks.
Make A/V connections.Stereo is
avaffabLeonly via A/V output from
VCR.
VCRAudio/Video Out is not selected
for viewing at the TV.
SeLectAUXor A/V sourceas TV input.
VCRAUDIO RECORDmodeis set to SAP
or MONAURAL.
Set VCRAUDIO RECORDmode to
Stereo. See AUDIOMenu on page 19.
29
PAGE
30
I TROUBLESHOOTING
Somequick and easy Lipsto fixing problemsyourself.
MoistureCondensation
Moisture condensation can occur:
In Locationswhere moisturecondensationmay occur:
• When the video recorder is moved from a cold place to a
• Keepthe powercord pluggedinto an ACoutlet and
POWEROn. This wilLheLpprevent condensation.
warm place.
• Under extremely
• When condensationhas occurred,wait a few hoursfor the
VCRto dry beforeusing it.
humid conditions.
Magnetic field from Other Equipment
Keepthe VCRandvideotapes away from strong magneticfields, such as those producedby a vacuumcleaner,refrigerator,or
air conditioner.
Video Head CLeaning
YourVCRautomatically
cleansthe headsas it is used.However,
aftertong periodsof use,yourvideoheadsmaybecome
cLogged
with accumulated
dirt, causingdistortion.Whenthis occurs,usea do-it-yourseLf
wet-typeheadcleaningcassette
availablefrom yourZenithdealer.
Caution:
Do not use a dry-type head-cleaning
system. It may
seriously
damage
the VCR and cassettes used in the VCR. Snow, streaking
in picture, and horizontal pulling indicate the need for professional video head cleaning. See your Zenith approved service
center for cleaning.
Cabinet Cleaning
Cleanthe outsidesurfaces
of the VCRwith a soft lint-free clothas required.Usecarenot to scratchthe VCRduringcleaning.
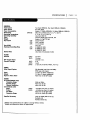
SPECIFICATIONS
I PAGE 31
GENERAL
HeadSystem
Power
Source
PowerConsumption
Dimensions
OperatingTemperature
OperatingHum|d_y
Timer
Weight
Tape Speed
(WxHxD)
(sP)
(LP)
(EP)
Tape width
Maximum RecordingTime
(SP)
(EP)
RewindTime
TUNER
Antenna
VHF Output Signal
ChannelCoverage
(UHF)
(VHF)
75 ohms
75 ohms
Channe| 3 or 4
(VHF)
(UHF)
(CAW)
2-13
14-69
1-125 (4A,A-W,W+1~W+84, A-5~A-1)
VIDEO
Video S_JnalSystem
EIA Standard (525 Unes, 60 fields)
NTSCtype color signal
1.0 Vp-p 75 ohms unbalanced
1.0 Vp-p 75 ohms unbalanced
More than 43 dB (SP mode)
Input
Output
Signal to Noise Ratio
AUDIO
FM audio(VRB420 only)
FrequencyRange
DynamicRange
ChannelSeparation
Conventionalaudio
Input
Output
S/N Ratio
FrequencyRange
Supp|ied Accessory
Twohead (VRB210),Fourhead(VRB410,VRB420)
AC120V,6OHz
Approx.17 Watts(VRB420),15 Watts(VRB410,VRB210)
360 x 94 x 270ram(14.2" x 3.7" x 10.6_)
s oc~35oc (41 or_5 °F)
Lessthan 80% RH
12-hourdisplaytype _th AM, PM
Approx.3.4 kg (7.5 tbs)
33.35 mm/sec
16.67 mm/sec
11.12 mm/sec
12.7 mm
2 HOURS(T-120)
6 HOURS(T-_2O)
8 HOURS(T-160)
Lessthan 210 seconds(T-120)
2OHzto 2OkHz
Morethan 83 dB
Morethan 55 dB
(liNE)
(lINE)
-6.0 dBm more than 47 kohms
-6.0 dBm tess than 1.5 kohms
More than 43 dB (SP mode)
200 Hz to 1OkHz (SP mode)
Hook-up Cable(VCRto W) (1)
Batteries(2)
RemoteControl (1)
* Designsand specificationsare subjectto changewithout notice.
* Weightand dimensionsshownare approximate.
VHS TAPE REWINDER
Most repair work on VCRs and Camcorders is due to excessive
rewindinq. ProLong the Life of your video equipment with our
rewinder r
ZEN 901
ONLY $14.• 99 "_'"
S.wm_ & .*.DLmi
WIRELESSINTERCOMSET
Kids watching movies in another room? Baby in another
room as you watch TV? Keep tabs on them with our
inexpenswe intercom set.
• FM wireLess two stations, 3 channels, pLug into
standard AC outlets
four stations
with ,additional
set sound
i Upgrades,to
eLativeLy noiseLess
transmission
for exceLLent
Unl-ts watt mount or set on taDLe
ALG1188
ONLY$49.99 "'""
SHIPPING& KANDUIt6
ZENITH 5 FUNCTION REMOTE
Broken or Lost remote? Need a second remote or more functions?
Order direct from Zenith!!
• Operates TV, VCR, CD, OVD, DIVX, DSS & CabLe Box
• Operates PIP and Most Screen Menus
• Extended Range & MORE!!!
Orders 1 year or more after product purchase may receive upgraded models.
Other Remotes with 3, 4, 5 & 7 Functions AvailabLe Upon Request
ZEN 525
ONLY $19 • 99 Smm.;
"_""& .*.m._
zenith
Use Your Visa or MasterCard to Order
PLEASEALLOW 3 - 4 WEEKS FOR DELIVERY
VISA
NOTES
I
PAGE
33
PAGE
34
I NOTES
NOTESt
PAGE
35
V]OEOCASSETTE
RECORDER
O_PLAYER
WeLcome
into theZenithfamily! Webe_ that youwill be pleased
w_h_r newZenithEntevrtainrnent
Machine._easeread
thiswamntycarefoL_,
it is a "LIMITEDWARRANIY"
asdefinedunderFederalLaw.Thiswarranty_
youspecificlegalrights,
andyoumayaLsohaw otherdghtsthat vaq/fromstatetostatewithinthe U.S.A.
ZENITH'S RESPONSIBILITY
Dufin9a periodof 90 daysfloraeffectivewarranty
date,ZenithwiLL
provideservice
laborbya Zenithauthorized
sendcecenter
whenneeded
as_ined
byZenith,asa result of manufactodng
defects.
Newor mmanufactured
replacements
for fastory_fectiveper(swill be supplLnd
by a Zenithauthorized
se_'k:ecenterfor one
)ear fromeff_
warrantydate. Suchreplacement
partsarewarranted
for theremainingportionof theo_ginatwarranty
period.
Not Co_
Thiswarranty
coversmanufacturingdefects
anddoesnotcoverinsta_tion,adjustment
of customer
cont_isin thehome,
instaLlatfonor repairof homeantennasystems,
cameconverters
or cablecompany-supptled
equipment;
it aLsodoesnotcover
damagedueto mLsuse,
abut negLigence_
actsof Godorothercauses
beyondthe controlof Zenith.Any alteration
of the
productaftermanufacture
voidsthiswarranty
in its entirety.
OWNER'S RESPONSIBILITY
Eff_
Wammty O_to
Warnmtybegins on the date of originaLconsumerpurdlaSe. For)(our coiiveirience_keep the deatei_$dated bLL[of sateor a
da{'wlmyticket as evidenceof the pint.basedat_
01_q;
GQdde
Camj-l. se_ke
1Vset Performam
;mpo_umt
Warranty
Sew_
Readyour Operating G_ddecarefuLLy
so thnt _
controls.
will understandthe opembon of your set and how to adjust the customer
Thevideoproductmustbe takento a U.S._ Canadian
Zenithauthorizedsendcecenterfor warrantyse_ce andmustbepicked
up bytho owner.
It isthe owner's
responsibilLty
to maintainthe_/receiver withwhichthevideoproductis used,andtheassociated
antenna
system,in properoperatln9
condit_n..
ProductRe(3istmtion--P[ea_e
fiLL
out andmailyourProductRegistrat_ Card.It is imperativethat Zenithknowhewto reach
youpromptty
if weshoulddiscover
a safetyproblem
that couldaffectyou.
Forwarrantysemiteir_)rmation,contactanyZenithauthorized
se_ cefiter.Fartsandse(vicelaborthatam Zeniths
resyonsibiSty
(seeabme)wiLL
be provided
withoutcharge.Otherser_ is at theowner'sexpense.
If youhaveanyI_omemin
obtelningsatisfactory
wanantysen_ callor writethe ZenithResponse
CentenYoumustprovidethemodelnumber,
serial
numberanddataof purchase
or dateof originalinstallation.Beforeyou askfor warrantyservice,read"MLdntenance
And
Troui_eshooUng"
in yourope_n9 guide.Youmight avolda se_ice(atL
THISWARRAfflYIS IN LIEUOFANYOTHERWARRANTY,
EXPRESS
ORIIvIPLIED,INCLUDINGWITHOUTLIMITATION,ANY
WARRAfflYOFMERCHANTABILITY
OR FITNESSFORA PARTICULAR
PURPOSE,
ANDZENITHSHALLNOTBE LIABLEFORANY
CONSEQUENTIAL,
INDIRECT,ORINCIDENTALDAMAGES
OFANYKIND, INCLUDINGLOSTREVENUES
OR PROFTI5IN
CONNECTION
WITHTHE PRODUCT.
i
Zenith Electronics Corporation
Customer Service Department
1000 Milwaukee Avenue
Glenview, Illinois 60025-2493
Telephon_: (847) 391-8752
Mon-Fri, 8:00 a.m. - 4:30 p.m. Central Time
ZENITH ELECTRONICS CORPORATION
1000 MILWAUKEE AVENUE
GLENVIEW, ILLINOIS 60025-2493
Zenith PartNo. 206-3514
GS#3835RM0031J
Printed inKorea
Issuc O