1
Adapt-a-Valve Installation
Caution: Water supply line to the system must be from the cold water supply line. Hot water will severely damage your system.
(A)Turn off the main supply water to the house.
(B) Turn off the cold water supply to the faucet by turning the angle stop valve clockwise
until it is completely off. Drain any water in the line by opening the faucet cold side.
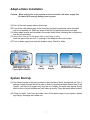
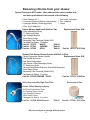
(C) Attach adapt-a-valve as illustrated in the center photo below, choosing the configuration
that fits your plumbing.
(D) Attach the loose end of the green tube to the Adapt-a-Valve.
Insert the green tube into the ¼” opening on the adapt-a-valve until it stops.
(E) Turn on water supply and open the Adapt-a-valve. Check for leaks.
Configuration:
* Washer
Configuration for 3/8”
(With Brass Fittings)
* Insert White Washer
Hot
Supply
Cold
Supply
Configuration for 1/2” (Without Brass Fittings)
System Start Up
(A)Turn faucet handle to the open position to start the flow of water through the unit. Run 7
gallons of water through the unit in order to flush out the normal black carbon fines (it will
“sputter” until the air is purged out) from the unit. Initially, the water may appear cloudy
which is due to tiny air bubbles and it will clear up shortly. Close the faucet when finished.
(B) Check for leaks. If you have any leaks, shut off the water supply to your system, tighten
any fittings / housings and restart unit.
7