1
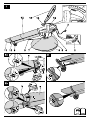
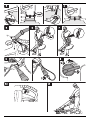
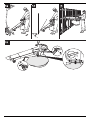
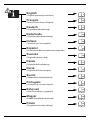
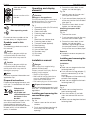
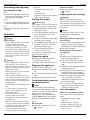
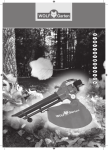
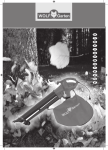
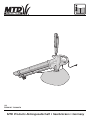
I 12 FORM NO. 769-08370 jqa=mêçÇìÅíë=^âíáÉåÖÉëÉääëÅÜ~Ñí=√=p~~êÄêΩÅâÉå=√=dÉêã~åó 0041.book Seite 6 Montag, 17. März 2003 3:06 15 English (Original operating instructions) Français 4 10 (Notice d'instructions d'origine) Deutsch 17 (Originalbetriebsanleitung) Nederlands 23 (Originele gebruiksaanwijzing) Italiano 29 (Istruzioni per l'uso originali) Español 35 (Instrucciones de funcionamiento originales) Svenska 42 (Originalbruksanvisning) Dansk (Originale driftsvejledning) Norsk 47 53 (Originale driftsanvisningen) Suomi 59 (Alkuperäinen käyttöohjekirja) Português (Instruções de serviço originais) Ελληνικά (Αυθεντικές οδηγίες χειρισμού) Magyar (Eredeti üzemeltetési útmutató) Polski (Oryginalna instrukcja obsługi) 65 72 80 86 English Operating manual Contents Safe operating practices . . . . . . . Operating and display elements . Installation manual . . . . . . . . . . . Operation . . . . . . . . . . . . . . . . . . Maintenance and cleaning . . . . . Transportation . . . . . . . . . . . . . . . Warranty . . . . . . . . . . . . . . . . . . . Troubleshooting . . . . . . . . . . . . . 4 6 6 7 8 8 8 9 Details on the ratings plate Enter all information on the rating plate of your unit in the following field. You can find the rating plate near the engine. These specifications are very important for subsequent identification when ordering spare parts and for customer service. Improper use is not covered by the warranty and the manufacturer will reject any liability. The user is liable for all injuries to third parties and damage to their property. Operate the unit only in the technical condition as stipulated and delivered by the manufacturer. Arbitrary changes to the unit will exclude the manufacturer from any liability for resulting injury and/or damage. Read all instructions before operating These and other details for your appliance can be found on the separate CE declaration of conformity that forms an integral part of these operating instructions. Illustrations Fold out the illustrated pages at the start of the operating manual. Graphical representations may deviate in detail from the purchased unit. Safe operating practices Using the unit correctly This unit is designed exclusively for use – as a leaf vacuum/leaf blower around the outside of the house and in the garden, – according to the descriptions and safety instructions indicated in this operating manual. Any other use is not as intended. 4 Please read these instructions carefully. Familiarize yourself with the operation and handling of the unit. Never allow children or other persons to use the appliance who do not know the operating instructions. Do not use this unit if you are tired or ill or under the influence of alcohol, drugs or medication. Children and young people under 16 years of age must not operate the unit. This unit is not designed to be used by persons (including children) who have limited physical, sensory or mental abilities or who have no experience and/or knowledge of the unit, unless they are supervised by a person responsible for their safety or they have been instructed by the person how to use the unit. Children should be supervised to ensure that they do not play with the appliance. Check the unit before using it. Replace damaged parts. Ensure that all connections are attached and tight. If these instructions are not followed, the user and bystanders may be injured or the unit damaged. Always be aware of the risk of injury to head, hands and feet. Keep children, onlookers and animals out of the area in which you want to work. Keep children, bystanders and animals at a minimum distance of 15 m; there is always a risk of bystanders being hit by ejected objects. Bystanders should wear eye protection. If you are approached, switch off the engine immediately . Operating the unit Use outdoors with the permitted and appropriately identified connection cable only, e.g. H07RN – F 3 x 1,5 mm² (max. 25 m). Connecting parts of connection cables must be splash-proof and made of rubber or covered with rubber. Before using the unit, always check whether the connection cable is damaged, brittle or tangled. Before using the unit, always check whether the power cord and mains plug are damaged. Immediately have a damaged cable replaced by a specialist company. To do this, switch off the unit and pull out the mains plug. Use only a connection cable which is in perfect condition. Never start the unit and never leave it running in a closed room or building. Use the unit outdoors only. Wear eye and ear protection when using the unit. If working in a dusty environment, wear a face or dust mask. A long-sleeved shirt is recommended. Wear thick, long trousers, boots and gloves. Keep hair, clothing and gloves away from moving parts. Loose clothing, jewellery or long hair may become caught by moving parts. If required, wear a hair net. Use this unit for its designated purpose only. Do not stretch too far over the unit. Always have a secure footing and keep your balance. Do not use this unit unless it is fully assembled. Do not use the unit without attached vacuum/blow pipe and vacuum bag. Check that the vacuum bag is closed. Never carry the unit by the power cord. Operating manual Always guide the unit power cord away from the unit to the rear. Before carrying out any care and maintenance work or installing and removing the blow/vacuum pipe and vacuum bag, switch off the motor and pull the mains plug out of the socket. Operate the unit in daylight or adequate artificial lighting only. Avoid starting the unit unintentionally. Be ready to operate the unit as soon as you switch it on. User and unit must be in a stable position when the unit is started. Follow the instructions for starting and stopping the engine. If the unit hits or becomes ensnared by a foreign object, immediately switch off the engine and check for damage. Before checking the unit, pull the mains plug out of the socket. Never use the unit with loose or damaged parts. While the engine is running, never place the unit on dusty or dirty surfaces. Dirt, grass, foliage, etc. may be drawn in and cause injuries and/or damage the unit. If there are any unusual vibrations, immediately switch the motor off and pull the mains plug out of the socket. Check the unit for damage. If the unit is damaged, contact a specialist company. Switch the motor off and pull the mains plug out of the socket before removing obstructions/ blockages, emptying the vacuum bag or before carrying out any work on the unit, e.g. checking, cleaning, transporting, making adjustments. Keep hands, face and feet away from all rotating parts. Do not touch the rotor while it is rotating and do not try to stop it either. Never use this unit to spread chemical products, fertilisers or other substances which contain toxic substances. Do not put anything into the intake opening by hand. English Do not use the unit in adverse weather conditions, e.g. if there is a probability of rain or a storm. Keep away from naked flames, avoid creating sparks and do not smoke. Using the unit as a blower Never point the unit at persons, pets or windows. Always blow in a direction in which there are no persons, animals or fragile, solid surfaces (e.g. windows, walls, cars). Using the unit as a vacuum This unit is used for collecting dry materials, such as leaves, grass, twigs and scraps of paper. Do not attempt to draw in damp objects or water, as the unit may be damaged. Do not vacuum up metal, pieces of glass, etc., as the rotor could be severely damaged as a result. Do not draw in hot objects, such as ash, embers, cigarettes, etc. The vacuum bag could catch fire. Other safety instructions Before starting work, clear the working area of all foreign objects which may damage the unit or which may cause injuries or damage if blown away or ejected. Before storing or transporting the unit, leave the engine to cool down. Protect your unit while it is being transported. Store the unit in a dry, closed room to prevent unauthorised use or damage. Keep the unit away from children. Never douse or splash the unit with water or other liquids. Keep the unit dry, clean and free of dust. Clean the unit after each use and follow the instructions for cleaning and storage. Never use parts, accessories or attachments which are not authorised for this unit. Otherwise, the user may be seriously injured and the unit damaged. In addition, your warranty may be deemed null and void. Therefore use original spare parts and original accessories only or spare parts and accessories authorised by the manufacturer. Never operate the unit with a defective operating switch. Have all repairs carried out by a repair shop only. Keep this manual. Read it frequently and use it to instruct other users. If you lend this unit to somebody else, also include this manual. Operating times Observe the national/municipal regulations concerning times of use (if required, ask your local authority). Symbols on the appliance This operating manual describes safety and international symbols and pictograms which may be displayed on this unit. Read this user handbook in order to familiarise yourself with all safety, installation, operating and repair instructions. Attention! Before starting up the unit, read the operating instructions! ! Keep third parties away from the danger area! Before carrying out any work on the unit, e.g. making adjustments, cleaning, checking, etc., switch the unit off and pull out the mains plug! Risk of injury from rotating parts! Keep hands and feet away from rotating parts. 5 English Operating manual Wear eye and ear protection. Operating and display elements Do not use the unit in the rain. `~ìíáçåK= a~ã~ÖÉ=íç=íÜÉ=~ééäá~åÅÉ qÜáë=Ñáêëí=ÇÉëÅêáÄÉë=íÜÉ=Åçåíêçä=~åÇ= Çáëéä~ó=ÑìåÅíáçåëK=aç=åçí=ÉñÉÅìíÉ= ~åó=çÑ=íÜÉëÉ=ÑìåÅíáçåë=óÉí> Vacuum operating mode Blow operating mode Ensure that these symbols on the unit are always in a legible state. Symbols used in this manual The following symbols are used in this manual: a~åÖÉê qÜÉó=êÉÑÉê=íç=Ç~åÖÉêë=ïÜáÅÜ=~êÉ= ÅçååÉÅíÉÇ=ïáíÜ=íÜÉ=ÇÉëÅêáÄÉÇ= ~Åíáîáíó=~åÇ=ïÜáÅÜ=ã~ó=êÉëìäí=áå= áåàìêóK `~ìíáçå qÜÉó=êÉÑÉê=íç=Ç~åÖÉêë=ïÜáÅÜ=~êÉ= ÅçååÉÅíÉÇ=ïáíÜ=íÜÉ=ÇÉëÅêáÄÉÇ= ~Åíáîáíó=~åÇ=ïÜáÅÜ=ã~ó=êÉëìäí=áå= Ç~ã~ÖÉ=íç=éêçéÉêíóK Note Indicates important information and application tips. Disposal instructions Dispose of packaging remnants, old units, etc., in accordance with local regulations. Old electrical equipment is recyclable and should therefore not be thrown in the dustbin! We request that you support us with your active contribution in the conservation of resources and protection of the environment and to dispose of this unit at collection points, if available. 6 Fig. 1 1 Operating switch (On/Off switch) 2 Connector plug 3 Cable strain relief 4 Fastening hook at back 5 Vacuum bag 6 Zip 7 Blow/vacuum selector lever 8 Fastening hook at front 9 Transport wheel (optional) 10 Blow opening 11 Intake opening 12 Vacuum/blow pipe 13 Shoulder strap 14 Grip knob 15 Handle 3. Screw the screw back in and tighten, but not too tightly. Fig. 2b 1. Loosen screw on the vacuum/ blow pipe and remove. 2. Push vacuum/blow pipe (part b) all the way into the vacuum/blow pipe (part a). 3. Screw the screw back in and tighten, but not too tightly. Attaching transport wheel (optional) Fig. 2c 1. Remove the screw. 2. Push transport wheel all the way onto the vacuum/blow pipe. 3. Screw the screw back in and tighten, but not too tightly. However, tight enough so that the transport wheel is situated firmly on the vacuum/blow pipe! Removal Proceed in reverse sequence to installation. Installation manual Installing and removing the vacuum bag a~åÖÉê oáëâ=çÑ=áåàìêó=Ñêçã=ÉåÖáåÉ=ÄÉáåÖ= ëí~êíÉÇ=ìåáåíÉåíáçå~ääóK mêçíÉÅí=óçìêëÉäÑ=Ñêçã=áåàìêóK=_ÉÑçêÉ= ïçêâáåÖ=çå=íÜÉ=ÉåÖáåÉW Ó pïáíÅÜ=çÑÑ=íÜÉ=ÉåÖáåÉI Ó t~áí=ìåíáä=~ää=ãçîáåÖ=é~êíë=Ü~îÉ= ÅçãÉ=íç=ëí~åÇëíáääX=íÜÉ=ÉåÖáåÉ= ãìëí=Ü~îÉ=ÅççäÉÇ=ÇçïåK Ó mìää=ã~áåë=éäìÖ=çìí=çÑ=íÜÉ=ëçÅâÉíK Installation Fig. 3 Hook vacuum bag onto the front fastening hook (4). Push the vacuum bag adapter (1) onto the connection (2) on the housing. Press adapter until the catches (3) on both sides engage. Hook vacuum bag onto the back fastening hook (5). Disposal instructions Dispose of packaging remnants, old units, etc., in accordance with local regulations. Installing and removing the vacuum/blow pipe Installation Fig. 2a 1. Loosen screw on the unit and remove. 2. Push vacuum/blow pipe (part a) all the way into the housing opening. Removal Fig. 4 Detach vacuum bag from the back fastening hook. Press the catches (1) on both sides and remove the vacuum bag. Detach vacuum bag from the front fastening hook. Operating manual Assembling and adjusting the shoulder strap Fig. 5 Open retaining hook (1) and hook onto the fastening eye (2) on the housing and close again. Fig. 6 Pull the shoulder strap over your head and adopt the work position. Fig. 7 Adjust the shoulder strap to your height. Operation a~åÖÉê bäÉÅíêáÅ=ëÜçÅâ Ó rëÉ=~ ë~ÑÉíó=ëïáíÅÜ=çå=óçìê=ã~áåë= ëçÅâÉí=EZ=êÉëáÇì~ä=ÅìêêÉåí= çéÉê~íÉÇ=ÇÉîáÅÉ=ïáíÜ=~ êÉäÉ~ëÉ= ÅìêêÉåí=åçí=ÉñÅÉÉÇáåÖ=PM=ã^FK Ó fÑ=íÜÉ=éçïÉê=ÅçêÇ=áë=Ç~ã~ÖÉÇI=óçì= ~êÉ=~í=êáëâ=çÑ=ÄÉáåÖ=âáääÉÇ=çê=áåàìêÉÇK= päçïäó=ãçîÉ=~ï~ó=áå=ëÜçêí=ëíÉéë= Ñêçã=íÜÉ=ìåáíK=mìää=íÜÉ=éäìÖ=çìí=çÑ= íÜÉ=ëçÅâÉíK Ó Ó Ó Ó Ó Ó Ó Ó Ó `~ìíáçå tÜÉå=ëí~êíáåÖ=íÜÉ=ÉåÖáåÉI=ÉåëìêÉ= íÜ~í=íÜÉ=ìåáí=áë=åçí=éçáåíáåÖ=~í= éÉêëçåëI=~åáã~äëI=çÄàÉÅíë=çê=äáííÉêK tÜáäÉ=ìëáåÖ=íÜÉ=ìåáíI=ïÉ~ê=ÉóÉ=~åÇ= ÜÉ~êáåÖ=éêçíÉÅíáçåK tÜáäÉ=ìëáåÖ=íÜÉ=ìåáíI=ÜçäÇ=çå=ïáíÜ= ÄçíÜ=Ü~åÇë=EcáÖK=NPFK tÜÉå=ïçêâáåÖ=ïáíÜ=íÜÉ=ìåáíI=óçì= ã~ó=íêáé=çîÉê=íÜÉ=éçïÉê=ÅçêÇ=~åÇ= áåàìêÉ=óçìêëÉäÑK=^äï~óë=âÉÉé=íÜÉ= éçïÉê=ÅçêÇ=çìí=çÑ=íÜÉ=ï~äâáåÖ=~åÇ= ïçêâáåÖ=~êÉ~K tçêâ=ïáíÜ=íÜÉ=ìåáí=~í=ï~äâáåÖ=é~ÅÉ= çåäóK aç=åçí=ìëÉ=íÜÉ=ìåáí=ìåäÉëë=íÜÉ= éçïÉê=ÅçêÇ=áë=~íí~ÅÜÉÇ=íç=íÜÉ= Å~ÄäÉ=ëíê~áå=êÉäáÉÑK `ÜÉÅâ=íÜ~í=íÜÉ=ìåáí=áë=áå=ÖççÇ= ïçêâáåÖ=çêÇÉê=~åÇ=íÜ~í=íÜÉ= î~ÅììãLÄäçï=éáéÉ=~åÇ=ÜçìëáåÖ= ~êÉ=~íí~ÅÜÉÇK tÜÉå=óçì=Ü~îÉ=ÑáåáëÜÉÇ=ïçêâáåÖ= çê=áÑ=óçì=éìí=íÜÉ=ìåáí=Ççïå=çê=äÉ~îÉ= áíI=~äï~óë=éìää=íÜÉ=ã~áåë=éäìÖ=çìí= çÑ=íÜÉ=ëçÅâÉí=~åÇ=íÜÉ=ìåáíK `ÜÉÅâ=íÜ~í=íÜÉ=òáé=ESF=çå=íÜÉ= î~Åììã=Ä~Ö=ERF=áë=ÅäçëÉÇ=EcáÖK=NFK English Ó ^ÑíÉê=ìëÉW Ó mìää=ã~áåë=éäìÖ=çìí=çÑ=íÜÉ= ëçÅâÉíK Ó `äÉ~å=íÜÉ=ìåáíK Ó aáëéçëÉ=çÑ=êÉÑìëÉ=áå=~ÅÅçêÇ~åÅÉ= ïáíÜ=äçÅ~ä=êÉÖìä~íáçåëK Starting the engine oáëâ=çÑ=áåàìêó hÉÉé=Ü~åÇëI=ÑÉÉí=~åÇ=çíÜÉê=é~êíë=çÑ= íÜÉ=ÄçÇó=~ï~ó=Ñêçã=êçí~íáåÖ=é~êíëK 1. Attach connection cable to the cable grip (Fig. 8). 2. First connect power cord to the unit plug and then insert into a 230 V socket. 3. Put on the shoulder strap already adjusted to your height. 4. Set to operating position (Fig. 6). 5. Preselect “Blow” or “Vacuum” operating mode (Fig. 9). 6. Press the operating switch / On/Off switch (Fig. 10). The motor is running and you can now start work (Fig. 11). Stopp the engine Release the operating switch / On/Off switch (Fig. 10). The motor stops after a short time. Stopping the appliance When you are using the unit: Attach the shoulder strap to the unit. Pull the shoulder strap over your head. Adopt the work position (Fig. 6). Switching between vacuum and blow function Note It is possible to switch between vacuum and blow function while the engine is running. Turn the selector lever, always ensuring that it engages with the corresponding symbol. Never move the selector lever to an intermediate position. Fig. 9 Blow function Move the selector lever to the symbol. Vacuum function Move the selector lever to the symbol. Emptying the vacuum bag a~åÖÉê _ÉÑçêÉ=êÉãçîáåÖLÉãéíóáåÖ=íÜÉ= î~Åììã=Ä~ÖI=ëíçé=íÜÉ=ÉåÖáåÉ=~åÇ= ï~áí=ìåíáä=~ää=ãçîáåÖ=é~êíë=Ü~îÉ=ÅçãÉ= íç=~ ëí~åÇëíáääK=mìää=ã~áåë=éäìÖ=çìí=çÑ= íÜÉ=ëçÅâÉíK Note If the vacuum bag is very full, the suction power will decrease significantly. Emptying without removing the vacuum bag Open the zip and dispose of the contents of the vacuum bag in accordance with local regulations. Close the zip again. Emptying with removing the vacuum bag Fig. 15 Detach vacuum bag from the back fastening hook (2). Press the catches (1) on both sides and remove the vacuum bag. Detach vacuum bag from the front fastening hook (3). Open the zip and dispose of the contents of the vacuum bag in accordance with local regulations. After emptying the vacuum bag, turn it inside out and shake thoroughly to remove dust and dirt from the fabric. Turn the vacuum bag back the right way, close the zip and reattach the vacuum bag. User information When to use the blow function Use in areas which are difficult to clean: – Flowerbeds, bushes, trees (Fig. 12) – House corners (Fig. 13) – Grilles, fences, etc. (Fig. 14). Hold the unit as illustrated in Figs. 12–14. 7 English Hold the vacuum/blow pipe several centimetres above the ground and make sweeping movements from side to side. Walk slowly forwards. Keep the collected pile of refuse in front of you. When to use the vacuum function For areas which are difficult to clean, such as flowerbeds, bushes, house corners, etc. Hold the unit with the vacuum/ blow pipe slightly inclined, as illustrated in Fig. 11, or move on the transport wheel (optional). Collect light-weight material by making sweeping movements to the side. Leaves and twigs are vacuumed up and crushed. The vacuum bag can then hold more material. Empty the vacuum bag when full. After finishing work Operating manual Cleaning the unit `~ìíáçå ^äï~óë=âÉÉé=íÜÉ=ìåáí=~åÇ=îÉåíáä~íáçå= ëäçíë=ÅäÉ~å=~åÇ=ÑêÉÉ=çÑ=ÇáêíK Use a small brush for cleaning the outside of the unit. Do not use abrasive detergents. Household cleaners which contain aromatic oils such as pine oil or lemon as well as solvents such as kerosene may damage the plastic housing and handle. Regularly clean connection (2, Fig. 3) for holding the vacuum bag. Wipe housing with a damp cloth only. Cleaning the vacuum bag Switch off the engine. Pull the mains plug out of the socket and the unit. Leave the motor to cool down (approx. 30 minutes) before cleaning, servicing, storing or shutting down the unit. Wear safety glasses and a dust mask. After using the unit, always empty and shake out the vacuum bag. Once a year (or more often if required) wash the vacuum bag: – Empty the vacuum bag thoroughly. – Turn the vacuum bag inside out. – Shake out vacuum bag. – Clean vacuum bag with a soap solution. – Leave the vacuum bag to dry. Maintenance and cleaning Storage ! a~åÖÉê qç=éêçíÉÅí=~Ö~áåëí=áåàìêó=ÄÉÑçêÉ=~ää= ïçêâ=çå=íÜÉ=~ééäá~åÅÉ Ó ëïáíÅÜ=çÑÑ=íÜÉ=ÉåÖáåÉK Ó ï~áí=ìåíáä=~ää=êçí~íáåÖ=é~êíë=Ü~îÉ= ÅçãÉ=íç=~ ëí~åÇëíáääI Ó éìää=çìí=íÜÉ=ã~áåë=éäìÖI Ó äÉ~îÉ=ãçíçê=íç=Åççä=Ççïå=E~ééêçñK= PM=ãáåìíÉëFK e~îÉ=~ää=êÉé~áêë=Å~êêáÉÇ=çìí=Äó= ~ êÉé~áê=ëÜçé=çåäóK ^í=íÜÉ=ÉåÇ=çÑ=íÜÉ=ëÉ~ëçå=Ü~îÉ=íÜÉ= ìåáí=áåëéÉÅíÉÇ=~åÇ=ëÉêîáÅÉÇ=Äó= ~ ëéÉÅá~äáëí=Åçãé~åóK aç=åçí=ëéä~ëÜ=íÜÉ=ìåáí=ïáíÜ=ï~íÉêI= çíÜÉêïáëÉ=ÉäÉÅíêáÅ=ÅçãéçåÉåíë=ã~ó= ÄÉ=Ç~ã~ÖÉÇK `äÉ~å=íÜÉ=~ééäá~åÅÉ=~ÑíÉê=ÉîÉêó=ìëÉK= c~áäìêÉ=íç=ÅäÉ~å=íÜÉ=~ééäá~åÅÉ=Å~å= Ç~ã~ÖÉ=íÜÉ=ã~íÉêá~äë=~åÇ=Å~ìëÉ= ã~äÑìåÅíáçåëK 8 Before storing the unit, leave the engine to cool down. Store the unit in a dry, closed room to prevent unauthorised use or damage. Keep the unit away from children. Long-term storage If the unit is to be stored for a prolonged period, proceed as follows: Thoroughly clean the unit and check for loose and damaged parts. Repair or replace damaged parts and tighten loose screws, nuts and bolts. The unit can now be stored. Store the unit in a dry, closed room to prevent unauthorised use or damage. Keep the unit away from children. Transportation Stopp the engine. Pull mains plug out of the socket. Remove power cord from the connector plug on the unit. Before transporting the unit, leave it to cool down. Secure the unit to prevent it from shifting during transportation. Warranty The warranty regulations issued by our company or the importer are valid in all countries. We shall repair any faults on your unit free of charge in accordance with the warranty, provided the fault was due to defective materials or manufacturing. If claiming under the warranty, please contact your seller or your nearest branch Operating manual English Troubleshooting Error Cause Remedial action Engine does not start. Connection cable not connected or defective. Check and plug in cable; if required replace or have it repaired by a specialist. Household fuse overloaded. Switch on fuse; if required increase the fused house connection or have one installed by a specialist. Operating switch defective. Have it repaired by a specialist company Motor suddenly stops. Plug has become loose. Check cable, ensure that it is attached to the cord grip, insert plug again. The engine has no power or the unit is not vacuuming/blowing. Vacuum bag full. Empty the vacuum bag. Damaged vacuum/blow turbine. Have defective parts replaced by a specialist company. Blocked vacuum/blow pipe. Remove and clean vacuum/blow pipe. Damaged vacuum/blow turbine or other parts. Switch off the unit immediately. Have defective parts replaced by a specialist company. Strong vibrations. If you have any further questions, please contact your authorised dealer on site. 9