1
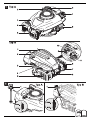
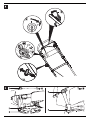
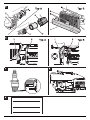
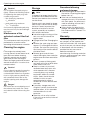
MTD OHV Series I13 FORM NO. 769-08890A jqa=mêçÇìÅíë=^âíáÉåÖÉëÉääëÅÜ~Ñí=√=p~~êÄêΩÅâÉå=√=dÉêã~åó 4 11 19 27 35 43 51 58 65 72 79 87 96 104 112 119 126 134 141 148 155 162 171 179 188 197 206 213 221 English Contents Handling the document . . . . . . . . 4 Safe operating practices . . . . . . . 4 About the engine . . . . . . . . . . . . . 5 Operating instructions . . . . . . . . . 5 Maintenance . . . . . . . . . . . . . . . . 7 Cleaning the engine . . . . . . . . . . 9 Storage . . . . . . . . . . . . . . . . . . . . 9 Warranty . . . . . . . . . . . . . . . . . . . 9 Troubleshooting . . . . . . . . . . . . 10 Handling the document As the user of this unit, read this operating manual carefully before using the unit for the first time. Then comply with the operating manual and keep it for subsequent use. Never allow children or other people who are not familiar with this operating manual to use the unit. This manual includes safety instructions which – point out dangers in connection with the engine, – indicate risks of injury, – show how the risk of injury can be avoided or reduced. The safety instructions in this manual are identified as follows: ! a~åÖÉê> aÉåçíÉë=áãéÉåÇáåÖ=Ç~åÖÉêK=kçåJ çÄëÉêî~åÅÉ=çÑ=íÜáë=ï~êåáåÖ=ã~ó= êÉëìäí=áå=ÇÉ~íÜ=çê=ÉñíêÉãÉäó=ëÉîÉêÉ= áåàìêáÉëK `~ìíáçå> aÉåçíÉë=~=Ç~åÖÉêçìë=ëáíì~íáçåK= kçåJçÄëÉêî~åÅÉ=çÑ=íÜáë=ï~êåáåÖ= ã~ó=êÉëìäí=áå=ëäáÖÜí=áåàìêó=çê=Ç~ã~ÖÉ= íç=éêçéÉêíóK Important Denotes application tips and important information. Specifications on the engine housing Fig. 8 These specifications are very important for subsequent identification when ordering spare parts and for customer service. Enter all engine specifications in the box (Fig. 9). 4 Operating manual for engine Safe operating practices Important In general the term “unit” is used in the following. The engine can be installed in different units. ! oáëâ=çÑ=Éñéäçëáçå=~åÇ=ÑáêÉ> mÉíêçä=~åÇ=éÉíêçä=î~éçìêë=~êÉ= ÉñíêÉãÉäó=Ñä~ãã~ÄäÉ=~åÇ=ÉñéäçëáîÉK= ^=ÑáêÉ=çê=~å=Éñéäçëáçå=ã~ó=êÉëìäí=áå= ëÉêáçìë=Äìêåë=çê=Ñ~í~äáíáÉëK=fÑ=éÉíêçä= ÖÉíë=çåíç=óçìê=ÄçÇó=çê=ÅäçíÜáåÖI= ï~ëÜ=ëâáå=áããÉÇá~íÉäó=~åÇ=ÅÜ~åÖÉ= ÅäçíÜáåÖK Ó _ÉÑçêÉ=êÉÑìÉääáåÖI=ëïáíÅÜ=çÑÑ=íÜÉ= ÉåÖáåÉ=~åÇ=äÉ~îÉ=íç=Åççä=Ççïå=Ñçê= ~í=äÉ~ëí=íïç=ãáåìíÉë=ÄÉÑçêÉ= çéÉåáåÖ=íÜÉ=ÑìÉä=Å~éK Ó cáää=ìé=íÜÉ=í~åâ=çìíÇççêë=çê=áå= ~ ïÉää=îÉåíáä~íÉÇ=~êÉ~=çåäóK Ó rëÉ=~ìíÜçêáëÉÇ=ÑìÉä=Åçåí~áåÉêë= çåäóK Ó kÉîÉê=Ñáää=ìé=~=éÉíêçä=Å~å=áå= ~ îÉÜáÅäÉI=íê~Åíçê=çê=çå=~=íê~áäÉê= ïáíÜ=éä~ëíáÅ=é~åÉääáåÖK=^äï~óë=Ñáää= ~ éÉíêçä=Å~å=çå=íÜÉ=ÖêçìåÇ=~åÇ=~í= ëçãÉ=Çáëí~åÅÉ=Ñêçã=íÜÉ=îÉÜáÅäÉK Ó fÑ=éçëëáÄäÉI=í~âÉ=ãçíçêáëÉÇ=ìåáíë= çìí=çÑ=íÜÉ=ÜÉ~îó=ÖççÇë=îÉÜáÅäÉ=çê= íÜÉ=íê~áäÉê=~åÇ=êÉÑìÉä=çå=íÜÉ= ÖêçìåÇK=fÑ=íÜáë=áë=åçí=éçëëáÄäÉI=Ñáää= ìé=íÜÉëÉ=ìåáíë=ïáíÜ=~=éÉíêçä=Å~å= áåëíÉ~Ç=çÑ=ÇáêÉÅíäó=ïáíÜ=íÜÉ=éÉíêçä= éìãé=ÜçëÉK Ó ^äï~óë=éä~ÅÉ=íÜÉ=í~åâ=éáéÉ=çå=íÜÉ= ÉÇÖÉ=çÑ=íÜÉ=ÑáääÉê=åÉÅâ=çå=íÜÉ=í~åâ= çê=éÉíêçä=Å~å=ìåíáä=íÜÉ=êÉÑìÉääáåÖ=áë= ÅçãéäÉíÉK=aç=åçí=ìëÉ=íÜÉ=äçÅâáåÖ= äÉîÉê=Ñçê=Åçåíáåìçìë=ÑáääáåÖK Ó aç=åçí=çîÉêÑáää=íÜÉ=í~åâK=cáää=íÜÉ=í~åâ= ìåíáä=~ééêçñK=íïç=ÅÉåíáãÉíêÉë= ÄÉäçï=íÜÉ=êáã=çÑ=íÜÉ=ÑáääÉê=åÉÅâ=íç= ~ääçï=íÜÉ=ÑìÉä=íç=Éñé~åÇK Ó hÉÉé=íÜÉ=ÑìÉä=~ï~ó=Ñêçã=ëé~êâëI= å~âÉÇ=Ñä~ãÉëI=ï~êåáåÖ=äáÖÜíëI=ÜÉ~í= ~åÇ=áÖåáíáçå=ëçìêÅÉëK Ó kÉîÉê=êÉÑìÉä=ìåáíë=áå=ÅäçëÉÇ=êççãëI= ~ë=Ñä~ãã~ÄäÉ=î~éçìêë=ïáää=ÑçêãK Ó aç=åçí=ëãçâÉK Ó cêÉèìÉåíäó=ÅÜÉÅâ=ÑìÉä=äáåÉëI=í~åâI= ÑìÉä=Å~é=~åÇ=ÅçååÉÅíáçå=é~êíë=Ñçê= Åê~Åâë=~åÇ=äÉ~âëK=fÑ=êÉèìáêÉÇI= êÉéä~ÅÉK Ó _ÉÑçêÉ=ëí~êíáåÖ=íÜÉ=ÉåÖáåÉI=ÉåëìêÉ= íÜ~í=íÜÉ=ëé~êâ=éäìÖI=ÉñÜ~ìëíI=ÑìÉä= Å~é=~åÇ=~áê=ÑáäíÉê=Ü~îÉ=ÄÉÉå= ~íí~ÅÜÉÇK Ó aç=åçí=ëí~êí=íÜÉ=ÉåÖáåÉ=ïáíÜçìí= áåëí~ääÉÇ=ëé~êâ=éäìÖK Ó cìÉä=Ü~ë=ÄÉÉå=ëéáääÉÇI=ï~áí=ìåíáä= íÜÉ=ÑìÉä=Ü~ë=Éî~éçê~íÉÇ=ÄÉÑçêÉ= ëí~êíáåÖ=íÜÉ=ÉåÖáåÉK Ó tÜÉå=çéÉê~íáåÖ=ìåáíëI=Çç=åçí=íáäí= íÜÉ=ÉåÖáåÉ=çê=íÜÉ=ìåáí=íç=ëìÅÜ=~å= ÉñíÉåí=íÜ~í=ÑìÉä=Å~å=êìå=çìíK Ó aç=åçí=ìëÉ=íÜÉ=ÅÜçâÉ=íç=ëíçé=íÜÉ= ÉåÖáåÉK Ó qê~åëéçêí=ìåáíë=ïáíÜ=Éãéíó=í~åâ= çåäóK Ó hÉÉé=éÉíêçä=çê=ìåáíë=ïáíÜ=Ñìää=í~åâ= ~ï~ó=Ñêçã=ÜÉ~íÉêëI=çîÉåëI=Üçí= ï~íÉê=ÄçáäÉêë=çê=çíÜÉê=ÉèìáéãÉåí= ïÜáÅÜ=ÑÉ~íìêÉ=ï~êåáåÖ=äáÖÜíë=çê= çíÜÉê=áÖåáíáçå=ëçìêÅÉëI=~ë=íÜÉëÉ= ã~ó=áÖåáíÉ=éÉíêçä=î~éçìêëK ! oáëâ=çÑ=Éñéäçëáçå=~åÇ=ÑáêÉ> pé~êâë=~êÉ=ÖÉåÉê~íÉÇ=ïÜÉå=íÜÉ= ÉåÖáåÉ=áë=ëí~êíÉÇK=qÜÉëÉ=ëé~êâë= ã~ó áÖåáíÉ=Ñä~ãã~ÄäÉ=î~éçìêë=áå= íÜÉ îáÅáåáíóK=qÜáë=ã~ó=êÉëìäí=áå=~å= Éñéäçëáçå=çê=ÑáêÉK Ó aç=åçí=ëí~êí=íÜÉ=ÉåÖáåÉ=åÉ~ê= Ç~ã~ÖÉÇI=Ö~ëJçéÉê~íÉÇ= ÉèìáéãÉåíK Ó aç=åçí=ìëÉ=~åó=éêÉëëìêáëÉÇ= ëí~êíáåÖ=~áÇëI=~ë=íÜÉáê=î~éçìêë=~êÉ= Ñä~ãã~ÄäÉK ! oáëâ=çÑ=~ëéÜóñá~íáçå> båÖáåÉë=êÉäÉ~ëÉ=Å~êÄçå=ãçåçñáÇÉI= ~å=çÇçìêäÉëë=~åÇ=ÅçäçìêäÉëë=íçñáÅ= Ö~ëK=fåÜ~ä~íáçå=çÑ=Å~êÄçå=ãçåçñáÇÉ= ã~ó=êÉëìäí=áå=ÇáòòáåÉëëI=Ñ~áåíáåÖ=çê= ÇÉ~íÜK Ó pí~êí=~åÇ=êìå=íÜÉ=ÉåÖáåÉ=çìíÇççêë= çåäóK Ó aç=åçí=ëí~êí=çê=êìå=íÜÉ=ÉåÖáåÉ=áå= ÅäçëÉÇ=êççãëI=ÉîÉå=áÑ=Çççêë=~åÇ= ïáåÇçïë=~êÉ=çéÉåK ! oáëâ=çÑ=áåàìêó> fÑ=íÜÉ=ÉåÖáåÉ=áë=ëí~êíÉÇ=ìåáåíÉåJ íáçå~ääóI=íÜáë=ã~ó=êÉëìäí=áå=ëÉêáçìë= áåàìêáÉëI=~=ÑáêÉ=çê=~å=ÉäÉÅíêáÅ=ëÜçÅâK Ó _ÉÑçêÉ=Å~êêóáåÖ=çìí=~åó=ïçêâI=ÉKÖK= ëÉííáåÖë=çê=êÉé~áêëI=~äï~óë=êÉãçîÉ= íÜÉ=ëé~êâ=éäìÖ=íÉêãáå~ä=~åÇ=âÉÉé=áí= ~ï~ó=Ñêçã=íÜÉ=ëé~êâ=éäìÖK Operating manual for engine Ó cçê=áÖåáíáçå=íÉëíëI=ìëÉ=~å= ~ìíÜçêáëÉÇ=áÖåáíáçå=íÉëíÉê=çåäóK Ó `çåÇìÅí=~å=áÖåáíáçå=íÉëí=çå= ~ ëé~êâ=éäìÖ=ïÜáÅÜ=Ü~ë=ÄÉÉå= êÉãçîÉÇK ! oáëâ=çÑ=Äìêåë>= oáëâ=çÑ=ÑáêÉ> ^=êìååáåÖ=ÉåÖáåÉ=ÖÉåÉê~íÉë=ÜÉ~íK= båÖáåÉ=é~êíëI=ÉëéÉÅá~ääó=íÜÉ=ÉñÜ~ìëíI= ~êÉ=ÉñíêÉãÉäó=ÜçíK=aç=åçí=íçìÅÜI= çíÜÉêïáëÉ=óçì=ÅçìäÇ=êÉÅÉáîÉ=ëÉîÉêÉ= ÄìêåëK= cä~ãã~ÄäÉ=çÄàÉÅíë=ëìÅÜ=~ë=äÉ~îÉëI= Öê~ëëI=ÄìëÜÉëI=ÉíÅK=ã~ó=Å~íÅÜ=ÑáêÉK Ó aç=åçí=íçìÅÜ=íÜÉ=ÉñÜ~ìëíI=ÅóäáåÇÉê= ÄäçÅâ=çê=ÅççäáåÖ=Ñáåë=ìåíáä=íÜÉó= Ü~îÉ=ÅççäÉÇ=ÇçïåK Ó hÉÉé=ÅÜáäÇêÉå=~ï~ó=Ñêçã=~=Üçí=çê= êìååáåÖ=ÉåÖáåÉK Ó oÉãçîÉ=Ñä~ãã~ÄäÉ=çÄàÉÅíë=Ñêçã= íÜÉ=îáÅáåáíó=çÑ=íÜÉ=ÉñÜ~ìëí=~åÇ= ÅóäáåÇÉêK ! oáëâ=çÑ=ÉäÉÅíêáÅ=ëÜçÅâ>= oáëâ çÑ=ÑáêÉ> fÖåáíáçå=ëé~êâë=ã~ó=Å~ìëÉ=~=ÑáêÉ=çê= ÉäÉÅíêáÅ=ëÜçÅâK ! oáëâ=çÑ=áåàìêó> oçí~íáåÖ=é~êíë=ã~ó=íçìÅÜ=çê=Å~íÅÜ= Ü~åÇëI=ÑÉÉíI=Ü~áêI=ÅäçíÜáåÖ=çê=ÅäçíÜáåÖ= é~êíëK=qÜáë=ã~ó=êÉëìäí=áå=ëÉêáçìë= áåàìêáÉëK Ó léÉê~íÉ=íÜÉ=ìåáí=ïáíÜ=áåëí~ääÉÇ= Öì~êÇë=çåäóK Ó hÉÉé=Ü~åÇ=~åÇ=ÑÉÉí=~ï~ó=Ñêçã= êçí~íáåÖ=é~êíëK Ó _ÉÑçêÉ=ëí~êíáåÖ=ïçêâI=íáÉ=Ä~Åâ=äçåÖ= Ü~áê=~åÇ=êÉãçîÉ=àÉïÉääÉêóK Ó aç=åçí=ïÉ~ê=äççëÉJÑáííáåÖ=ÅäçíÜáåÖI= Ü~åÖáåÖ=ëíêáåÖë=çê=é~êíë=ïÜáÅÜ= ÅçìäÇ=ÄÉÅçãÉ=Å~ìÖÜíK ! oáëâ=çÑ=áåàìêó> qÜÉ=èìáÅâ=êÉíê~Åíáçå=çÑ=íÜÉ=ëí~êíÉê= Å~ÄäÉ=EêÉÅçáäI=ÉKÖK=Å~ìëÉÇ=Äó=~= ãáëÑáêÉF=ïáää=éìää=óçìê=Ü~åÇ=~åÇ=~êã= íçï~êÇë=íÜÉ=ÉåÖáåÉ=ãçêÉ=èìáÅâäó= íÜ~å=óçì=Å~å=êÉäÉ~ëÉ=íÜÉ=ëí~êíÉê= Ü~åÇäÉK=qÜáë=ã~ó=êÉëìäí=áå=áåàìêáÉëK Ó qç=ëí~êí=íÜÉ=ÉåÖáåÉI=ëäçïäó=éìää=íÜÉ= ëí~êíÉê=Ü~åÇäÉ=ìåíáä=áí=ÄÉÖáåë=íç= êÉëáëíI=íÜÉå=éìää=áå=çåÉ=ÖçK Ó _ÉÑçêÉ=ëí~êíáåÖ=íÜÉ=ÉåÖáåÉI= êÉãçîÉ=~ää=çÄàÉÅíë=ëáíì~íÉÇ=çå=íÜÉ= ÉåÖáåÉK English Ó aáêÉÅíäó=ÅçååÉÅíÉÇ=ÅçãéçåÉåíëI= ëìÅÜ=~ë=ÅìííÉêëI=Ñ~å=áãéÉääÉêI=ÇêáîÉ= é~êíëI=ÉíÅKI=ãìëí=ÄÉ=~íí~ÅÜÉÇ= ëÉÅìêÉäóK ! oáëâ=çÑ=áåàìêó>=a~ã~ÖÉ=íç=íÜÉ= ìåáí> aç=åçí=ÅÜ~åÖÉ=íÜÉ=ÉåÖáåÉ=ëÉííáåÖë= ïÜáÅÜ=ïÉêÉ=éêÉëÉí=~í=íÜÉ=Ñ~ÅíçêóK Symbols on the unit Safety instructions and warning instructions, illustrated with symbols or pictograms, can be found on the engine. The symbols have the following meanings: ! Caution! Warning – danger source. Read operating instructions before starting the unit! Warning – hot surface! Warning – toxic vapours! Do not use the unit in the rain! Petrol is flammable! Use unleaded fuel! Fig. 1 1 Fuel cap 2 Starter handle 3 Oil filler cap/dip stick 4 Engine cover 5 Exhaust 6 a) Spark plug b) Spark plug terminal 7 Primer (depending on model) 8 Air filter 9 On/Off switch (depending on model) 10 Choke lever (depending on model) 11 Fuel tap (depending on model) Operating instructions Checks to be carried out before operating the unit Recommended oil grades `~ìíáçå> qÜÉ=ìåáí=áë=ëìééäáÉÇ=ïáíÜçìí=ÑìÉä=~åÇ= çáä=áå=íÜÉ=ÉåÖáåÉK=fÑ=íÜÉ=ÉåÖáåÉ=áë= çéÉê~íÉÇ=ïáíÜçìí=~ÇÉèì~íÉ=çáäI=íÜÉ= ÉåÖáåÉ=ã~ó=ÄÉ=ëÉêáçìëäó=Ç~ã~ÖÉÇK= qÜáë=Ç~ã~ÖÉ=áë=ÉñÅäìÇÉÇ=Ñêçã=íÜÉ= ï~êê~åíóK Before starting the engine, fill with oil. Do not pour in too much oil. The oil tank has a capacity of approx. 0.6 litres. Use only 4-stroke oil of classification SF/SG/SH/SJ or higher. Select the viscosity of the oil from the following table depending on the outside temperature: 10w Always ensure that these symbols on the unit are legible. a About the engine b 20w40, 20w50 These operating instructions describe different models. The graphical representations may differ in detail from the unit which you purchased. Compare Fig. 1 with your unit and make sure you know where the different controls and regulators are located. 20w 20 30 40 15w40, 15w50 10w40 10w30 (ºC) -30º -20º -10º 0º 10º 20º 30º40º a) Single viscosity b) Multiple viscosity SAE30 for Type A and SAE 10W-30 for Type B are recommended for general use within the normal temperature range. 5 English If oil with an individual viscosity is used, a viscosity should be selected from the table for the average tempe-rature in the application area. `~ìíáçå> fÑ=~å=áåÑÉêáçê=çáä=çê=~å=çáä=Ñçê=OJëíêçâÉ= ÉåÖáåÉë=áë=ìëÉÇI=íÜÉ=ëÉêîáÅÉ=äáÑÉ=çÑ= íÜÉ=ÉåÖáåÉ=ã~ó=ÄÉ=Ç~ã~ÖÉÇK Checking the oil level `~ìíáçå> tÜÉå=ÅÜÉÅâáåÖ=íÜÉ=çáäI=ÉåëìêÉ=íÜ~í= íÜÉ=ìåáí=áë=çå=~=äÉîÉä=ëìêÑ~ÅÉ=~åÇ=íÜ~í= íÜÉ=ÉåÖáåÉ=áë=ëïáíÅÜÉÇ=çÑÑK Fig. 2 Unscrew the oil filler cap (1) and wipe the dip stick. Insert the dip stick into the filler neck. Screw in one quarter turn. Unscrew dipstick. Pull out the dipstick and check the oil level. If the level is too low, slowly pour in a little oil up to the upper “max” mark on the dip stick. Before starting the engine, firmly screw in the dip stick. `~ìíáçå> aç=åçí=éçìê=áå=íçç=ãìÅÜ=çáäK= qçç ãìÅÜ=çáä=ã~ó=êÉëìäí=áå=ÉåÖáåÉ= Ç~ã~ÖÉI=ëãçâÉ=ÖÉåÉê~íáçåI=ëí~êíáåÖ= éêçÄäÉãëI=ëççíÉÇ=ëé~êâ=éäìÖ=çê= çáäÉÇJìé=~áê=ÑáäíÉêK Recommended fuels ! a~åÖÉê> Ó råÇÉê=ÅÉêí~áå=ÅçåÇáíáçåë=éÉíêçä=áë= ÉñíêÉãÉäó=Ñä~ãã~ÄäÉ=~åÇ= ÉñéäçëáîÉK Ó oÉÑìÉä=çåäó=áå=ïÉää=îÉåíáä~íÉÇ= ëìêêçìåÇáåÖë=~åÇ=ïáíÜ=íÜÉ=ÉåÖáåÉ= ëïáíÅÜÉÇ=çÑÑK=aç=åçí=ëãçâÉ=åÉ~ê= íÜÉ=ÑìÉä=í~åâ=çê=áå=íÜÉ=ÑìÉä=ëíçê~ÖÉ= äçÅ~íáçå=~åÇ=ÉñíáåÖìáëÜ=~ää=áÖåáíáçå= ëçìêÅÉëK Ó aç=åçí=çîÉêÑáää=íÜÉ=éÉíêçä=í~åâ= EíÜÉêÉ=ãìëí=ÄÉ=åç=ÑìÉä=áå=íÜÉ=ÑáääÉê= åÉÅâFK=^ÑíÉê=êÉÑìÉääáåÖI=ÉåëìêÉ=íÜ~í= íÜÉ=ÑìÉä=Å~é=áë=ÅäçëÉÇ=~åÇ= ëÉÅìêÉÇK 6 Operating manual for engine Ó tÜÉå=êÉÑìÉääáåÖI=Çç=åçí=ëéáää=~åó= ÑìÉäK=péáääÉÇ=ÑìÉä=çê=éÉíêçä=î~éçìêë= ã~ó=áÖåáíÉK=fÑ=ÑìÉä=ï~ë=ëéáääÉÇI= ÉåëìêÉ=íÜ~í=íÜÉ=~êÉ~=áë=ÇêáÉÇ= ÄÉÑçêÉ=êÉëí~êíáåÖ=íÜÉ=ÉåÖáåÉK Ó ^îçáÇ=êÉéÉ~íÉÇ=çê=éêçäçåÖÉÇ=ëâáå= Åçåí~Åí=~åÇ=áåÜ~ä~íáçå=çÑ=íÜÉ= î~éçìêëK ! oáëâ=çÑ=ÉåÖáåÉ=Ç~ã~ÖÉ> Ó aç=åçí=ãáñ=ÑìÉä=~åÇ=çáäK Ó rëÉ=ÅäÉ~åI=ÑêÉëÜ=~åÇ=ìåäÉ~ÇÉÇ= ÑìÉä=çåäóK Ó rëÉ=ÑìÉä=ïáíÜ=~å=çÅí~åÉ=åìãÄÉê=çÑ= UT=çê=ÜáÖÜÉê=çåäóK Ó aç=åçí=ìëÉ=ÑìÉä=çÑ=ëéÉÅáÑáÅ~íáçå= b=URLbNR> Ó píçêÉ=ÑìÉä=áå=èì~åíáíáÉë=ïÜáÅÜ=Å~å= ÄÉ=ìëÉÇ=ïáíÜ=áå=PM=Ç~óëK Ó båëìêÉ=íÜ~í=åç=ÇáêíI=Çìëí=çê=ï~íÉê= ÖÉíë=áåíç=íÜÉ=í~åâK Checking the petrol level `~ìíáçå> _ÉÑçêÉ=êÉÑìÉääáåÖI=äÉ~îÉ=íÜÉ=ÉåÖáåÉ=íç= Åççä=Ççïå=Ñçê=~í=äÉ~ëí=íïç=ãáåìíÉëK Before removing the fuel cap and refuelling, clean the area around the filler neck. Fill the tank until approx. 2 cm below the rim of the filler neck to allow the fuel to expand. Starting the engine ! a~åÖÉê> hÉÉé=Ü~åÇë=~åÇ=ÑÉÉí=~ï~ó=Ñêçã= ãçîáåÖ=é~êíëK=aç=åçí=ìëÉ=~åó= éêÉëëìêáëÉÇ=ëí~êíáåÖ=~áÇëK= qÜÉ î~éçìêë=~êÉ=Ñä~ãã~ÄäÉK ! a~åÖÉê>= cçääçï=~ää=çéÉê~íáåÖ=áåëíêìÅíáçåë=áå= íÜÉ=çéÉê~íáåÖ=ã~åì~ä=Ñçê=íÜÉ=ìåáí=çå= ïÜáÅÜ=íÜáë=ÉåÖáåÉ=áë=ãçìåíÉÇK Note: Some models have – no choke and no primer: The engine is automatically set to the particular starting process. – no throttle: The speed is automatically set. The engine always runs at optimum speed. Fig. 3 Preparing to start the engine If the engine is cold: Set throttle (1; if fitted) to position . or Actuate the choke, i.e. pull out the choke lever (10, Fig. 1; if fitted). or Press the primer (7, Fig. 1; if fitted): – at temperatures above 10 °C: Press 1–3x – at temperatures below 10 °C: Press 3–5x Note: – When pressing the primer, cover the vent hole on the primer button with your finger. – If the engine does not start, actuate the primer again. If the engine is warm: Set throttle (1; if fitted) to MAX/ . Important Even if the engine is warm, it may be necessary – to actuate the choke (if fitted) or – to actuate the primer (if fitted) 1x. Starting with the hand starter Open fuel tap (11, Fig. 1; if fitted). Set On/Off switch on the engine (9, Fig. 1; if available) to position “On/I”. Stand behind the unit, depress the safety lever (2; if fitted) and hold down against the handle. Pull gently on the starter handle (3) until it begins to resist. Then pull quickly and forcefully to overcome the compression and prevent a backlash. If required, repeat. `~ìíáçå> aç=åçí=äÉí=íÜÉ=ëí~êíÉê=Ü~åÇäÉ=ëéêáåÖ= Ä~Åâ=~Ö~áåëí=íÜÉ=ÉåÖáåÉK=päçïäó= ÖìáÇÉ=áí=Ä~Åâ=íç=éêÉîÉåí=Ç~ã~ÖáåÖ= íÜÉ=ëí~êíÉêK Operating manual for engine English Starting with the electric starter (depending on model) Set the throttle (if fitted) to Disconnect charger from power or supply and unit. Open fuel tap (11, Fig. 1; if fitted). Set On/Off switch on the engine (9, Fig. 1; if available) to position “On/I”. Stand behind the unit, depress the safety lever (2; if fitted) and hold down against the handle. Turn the key on the steering handle (4) to the right and hold until the engine starts. – Start attempt maximum 5 seconds. – Wait 20 seconds before trying again. Set On/Off switch on the engine When the engine has started Set throttle (if fitted) to the required position: = fast engine speed = slow engine speed Press in choke lever (10, Fig. 1; if fitted) as soon as the engine has warmed up. Stopping the engine Fig. 3 Release the safety lever (if fitted). or STOP/ . (9, Fig. 1; if available) to position “Off/0”. Close fuel tap (11, Fig. 1; if fitted). Important If you switch off or leave the unit, remove ignition key (if fitted). Maintenance ! a~åÖÉê> _ÉÑçêÉ=Å~êêóáåÖ=çìí=~åó=ïçêâI=ÉKÖK= ã~áåíÉå~åÅÉ=~åÇ=ÅäÉ~åáåÖ=ïçêâI= äÉ~îÉ=íÜÉ=ÉåÖáåÉ=íç=Åççä=ÇçïåK= qç éêÉîÉåí=íÜÉ=ÉåÖáåÉ=Ñêçã=ëí~êíáåÖ= ìåáåíÉåíáçå~ääóI=~äï~óë=êÉãçîÉ=íÜÉ= ëé~êâ=éäìÖ=íÉêãáå~äK `~ìíáçå> Ó qÜÉ=ÉåÖáåÉ=Ü~ë=ÄÉÉå=ëÉí=çéíáã~ääó= Äó=íÜÉ=ã~åìÑ~ÅíìêÉê=ïáíÜ=êÉëéÉÅí= íç=éçïÉê=~åÇ=ÅçåëìãéíáçåK=^åó= ÅÜ~åÖÉ=íç=íÜÉëÉ=ëÉííáåÖë=ã~ó=ÄÉ= ã~ÇÉ=Äó=íÜÉ=ã~åìÑ~ÅíìêÉê=çê= ~ìíÜçêáëÉÇ=íÉÅÜåáÅá~åë=çåäóK Ó fÑ=íÜÉ=ÉåÖáåÉ=Ü~ë=íç=ÄÉ=íáäíÉÇ=Ñçê= íê~åëéçêí~íáçå=çÑ=íÜÉ=ìåáíI=Ñçê= áåëéÉÅíáçå=çê=êÉãçî~ä=çÑ=Öê~ëëI= ÉåëìêÉ=íÜ~í=íÜÉ=ëé~êâ=éäìÖ=áë=Ñ~ÅÉ= ìé=íç=éêÉîÉåí=ÑìÉä=~åÇ=çáä=Ñêçã= Ç~ã~ÖáåÖ=íÜÉ=ÉåÖáåÉK Ó pé~êÉ=é~êíë=ãìëí=Åçãéäó=ïáíÜ=íÜÉ= êÉèìáêÉãÉåíë=ëéÉÅáÑáÉÇ=Äó=íÜÉ= ã~åìÑ~ÅíìêÉêK Ó qÜÉêÉÑçêÉI=ìëÉ=çåäó=çêáÖáå~ä=ëé~êÉ= é~êíë=çê=íÜçëÉ=ëé~êÉ=é~êíë= ~ìíÜçêáëÉÇ=Äó=íÜÉ=ã~åìÑ~ÅíìêÉêK= oÉé~áêë=ã~ó=ÄÉ=Å~êêáÉÇ=çìí=Äó=~= ëéÉÅá~äáëí=Åçãé~åó=çåäóK To maintain a constantly high power, it is essential to inspect and re-adjust the engine on a regular basis. Regular maintenance ensures a long service life. The required maintenance intervals and the type of maintenance work to be carried out are indicated in the following table. The intervals according to operating hours or other times/dates should be observed according to which occurs first. If the engine is operated under difficult conditions, more frequent maintenance is required. At the end of the season have the unit inspected and serviced by a specialist company. Maintenance schedule Maintenance work After the first 5 operating hours Before each use or every 5 hours Clean engine cover Check engine oil Change engine oil Check air filter Once a season or every 25 hours 1) Once a season or every 50 hours Once a season or every 100 hours 2) Service air filter Check spark plugs Service spark plugs Change fuel filter Clean/change activatedcarbon filter 2) Clean exhaust area 1) 2) If a heavy load or at high ambient temperatures. If operating the unit in a dusty environment, clean more frequently. 7 English Operating manual for engine Checking the oil Servicing the air filter Attach cover: Before starting the engine, always A dirty air filter restricts the air flow to the carburettor. To prevent the carburettor from malfunctioning, the air filter should be cleaned/replaced regularly. In an extremely dusty environment more frequent maintenance may be required. A paper filter cannot be cleaned and must be changed according to the maintenance interval. – Press lower retaining plates of the air filter cover into the lower retaining slots of the air filter housing (4). – Press air filter cover upwards until the upper retaining plates (2) engage in the upper retaining slots (5). Ensure that the air filter cover is positioned correctly! check the oil level. Ensure that the correct oil level is always maintained. See “Checking the oil level”. Changing the oil ! a~åÖÉê> t~ëíÉ=ÉåÖáåÉ=çáä=ã~ó=Å~ìëÉ=ëâáå= Å~åÅÉê=áÑ=áí=ÅçãÉë=áåíç=Åçåí~Åí=ïáíÜ= íÜÉ=ëâáå=ÑêÉèìÉåíäó=~åÇ=Ñçê= ~ éêçäçåÖÉÇ=éÉêáçÇK=bîÉå=íÜçìÖÜ= íÜáë=áë=ìåäáâÉäóI=éêçîáÇÉÇ=ï~ëíÉ=çáä=áë= åçí=Ü~åÇäÉÇ=Ç~áäóI=áí=áë=~Çîáë~ÄäÉ=íç= ï~ëÜ=Ü~åÇë=~ë=ëççå=~ë=éçëëáÄäÉ= ïáíÜ=ëç~é=~åÇ=ï~íÉê=~ÑíÉê=ïçêâáåÖ= ïáíÜ=ï~ëíÉ=çáäK `~ìíáçå> aê~áå=íÜÉ=çáä=ïÜáäÉ=íÜÉ=ÉåÖáåÉ=áë=ëíáää= ï~êã=Äìí=åç=äçåÖÉê=Üçí=EíÜÉ=çáä= Çê~áåë=èìáÅâäó=~åÇ=ÅçãéäÉíÉäóFK Fig. 4 Remove the oil filler cap (1). Drain the oil into a suitable container by: – Open the oil drain plug (2) or (3) – depending on model or – tilting the unit on its side (air filter side face up). ! a~åÖÉê> _ÉÑçêÉ=íáäíáåÖ=íÜÉ=ìåáí=íç=Çê~áå=íÜÉ=çáäI= êìå=íÜÉ=ÉåÖáåÉ=ìåíáä=íÜÉ=éÉíêçä=í~åâ=áë= ÉãéíóK Screw in the oil drain plug (if removed) and tighten. Fill the oil tank with the recommended oil and check the oil level. Re-attach the oil filler cap. Important Dispose of waste oil according to the currently valid regulations for the protection of the environment. It is recommended to take the waste oil in a leakproof container to a waste oil collection centre. Do not dispose of with residual waste or pour onto the ground and leave to seep away. 8 ! a~åÖÉê> kÉîÉê=ÅäÉ~å=íÜÉ=~áê=ÑáäíÉê=ïáíÜ=éÉíêçä= çê=ëçäîÉåíë=ïáíÜ=~=äçï=Ñä~ëÜ=éçáåíK= qÜÉêÉ=áë=~=êáëâ=çÑ=ÑáêÉ=çê=ÉñéäçëáçåK `~ìíáçå> kÉîÉê=êìå=íÜÉ=ÉåÖáåÉ=ïáíÜçìí=~å=~áê= ÑáäíÉêK=líÜÉêïáëÉ=íÜÉ=ÉåÖáåÉ=ã~ó=ÄÉ= Ç~ã~ÖÉÇ=çê=ëìÄàÉÅí=íç=áåÅêÉ~ëÉÇ= ïÉ~êK Fig. 5 Type A: Turn air filter cover (1) anticlockwise (to the left) and pull out backwards. Remove paper filter element (3). Clean air filter cover (1) and mounting flange (4). Fit new paper filter element in the air filter cover. Press retaining plates (2) of the air filter cover into the retaining slots (5) of the mounting flange and turn all the way clockwise (to the right). Ensure that the air filter cover is positioned correctly! Type B: Press on the retaining plates (2) of the air filter cover (1) and remove cover. Remove paper filter element (3). Gently tap the paper element several times on a hard surface to remove dirt or blow out dirt with compressed air from inside through the filter. Never attempt to brush out dirt; the dirt would only be rubbed permanently into the fibres. Replace the paper element if it is excessively dirty. Re-insert paper filter element. Servicing the spark plug ! a~åÖÉê> iÉ~îÉ=íÜÉ=ÉåÖáåÉ=íçç=Åççä=ÇçïåK `çåÇìÅí=~å=áÖåáíáçå=íÉëí=çå=~=ëé~êâ= éäìÖ=ïÜáÅÜ=Ü~ë=ÄÉÉå=êÉãçîÉÇK= aç åçí=ëí~êí=íÜÉ=ÉåÖáåÉ=ïáíÜçìí= áåëí~ääÉÇ=ëé~êâ=éäìÖK To ensure that the engine runs correctly, the gap between the electrodes on the spark plug must be set correctly and free of contaminants. Fig. 6 Remove the spark plug terminal (1) and unscrew the spark plug (2) with a spark-plug wrench. Visually check the spark plug. Replace the spark plug if it is clearly worn or the insulator is damaged. Clean the spark plug with a wire brush if it is to be used again. Measure the gap between the electrodes with a feeler gauge. If required, re-adjust the gap by slightly bending the side electrode. The gap between the electrodes should be 0.70–0.80 mm (Fig. 7). Check that the sealing ring on the spark plug is in good condition, then screw in the spark plug by hand to prevent damage to the thread. When the spark plug is hand-tight, tighten with the spark-plug wrench. Operating manual for engine `~ìíáçå> aç=åçí=íáÖÜíÉå=íÜÉ=ëé~êâ=éäìÖ=íçç= íáÖÜíäóK=lÄëÉêîÉ=íÜÉ=ÑçääçïáåÖ=î~äìÉë= Ñçê=íáÖÜíÉåáåÖ=íÜÉ=ëé~êâ=éäìÖ=ïáíÜ= ~ ëé~êâJéäìÖ=ïêÉåÅÜW Ó åÉï=ëé~êâ=éäìÖ=ã~ñáãìã= N LO=êÉîçäìíáçå Ó ìëÉÇ=ëé~êâ=éäìÖ=ã~ñáãìã= NL Ó=NL =êÉîçäìíáçåK U= Q ^å=áåÅçêêÉÅíäó=íáÖÜíÉåÉÇ=ëé~êâ=éäìÖ= ã~ó=ÄÉÅçãÉ=îÉêó=Üçí=~åÇ=Ç~ã~ÖÉ= íÜÉ=ÉåÖáåÉK Maintenance of the activated-carbon filter/fuel filter This maintenance work may only be performed by a service centre according to maintenance schedule. Cleaning the engine If the engine has already been running, leave it to cool down for at least one hour before cleaning. Regularly remove accumulated grass and dirt from the engine. Clean the finger guard and the area around the exhaust. Use a brush or compressed air. `~ìíáçå> aç=åçí=ÅäÉ~å=íÜÉ=ÉåÖáåÉ=Äó=ëéê~óáåÖ= áí=ïáíÜ=ï~íÉêI=~ë=íÜÉ=ÑìÉä=ã~ó=ÄÉ= Åçåí~ãáå~íÉÇK=t~íÉê=Ñêçã=~=Ö~êÇÉå= ÜçëÉ=çê=ÜáÖÜJéêÉëëìêÉ=ÅäÉ~åÉê=ã~ó= ~äëç=éÉåÉíê~íÉ=íÜÉ=~áê=ÑáäíÉê=çê=íÜÉ= ÉñÜ~ìëí=çéÉåáåÖ=~åÇ=Ç~ã~ÖÉ=íÜÉ= ÉåÖáåÉK ! a~åÖÉê> aáêí=ïÜáÅÜ=Ü~ë=~ÅÅìãìä~íÉÇ=~êçìåÇ= íÜÉ=ÉñÜ~ìëí=ã~ó=Å~íÅÜ=ÑáêÉK=`ÜÉÅâ= ~åÇ=ÅäÉ~å=íÜÉ=~êÉ~=ÄÉÑçêÉ=ìëáåÖ=íÜÉ= ìåáíK English Storage Note: If storage is for longer than 30 days, a stabiliser can be added to the fuel. Contact your dealer or the customer service centre. Engines which are stored for longer than 30 days should have an empty fuel tank in order to prevent the formation of residue in the fuel system, especially on important parts of the carburettor. Leave the engine running until the tank runs out of fuel and the engine stops. Change the oil. See “Changing the oil”. Remove the spark plug and pour approx. 15 ml of engine oil into the cylinder. Re-install the spark plug and slowly pull the starter cable to distribute the oil. Remove grass and dirt from around the engine, from under the engine cover and from around the exhaust. Touch up areas of flaking paint and apply a thin film of oil to other areas which could rust. Store in a clean, dry and well ventilated area away from units which operate with a flame or a warning lamp, e.g. heating equipment, boilers or tumbledryers. Areas should also be avoided in which a sparkgenerating electric motor is situated or in which electric tools are used. If possible, storage areas with a high air humidity should not be selected either, as this promotes the formation of rust and corrosion. Store the unit on a flat surface. If the unit is on an incline, fuel or oil may run out. Procedure following prolonged storage Check the engine as described in the section “Checking the engine before start-up”. If the fuel was drained prior to storage of the unit, fill up the tank with fresh petrol. If a petrol can is used for refuelling, ensure that it contains fresh petrol. If the cylinder was oiled during storage, the engine generates a little smoke when it is started. This is normal. Warranty The warranty regulations issued by our company or the importer are valid in all countries. We shall repair any faults on your unit free of charge in accordance with the warranty, provided the fault was due to defective materials or manufacturing. If claiming under the warranty, please contact your seller or your nearest branch. 9 English Operating manual for engine Troubleshooting Fault Engine does not start. Possible cause Safety lever not actuated. No fuel in the tank. Stale fuel. Engine in a cold state, choke/primer (if fitted) not actuated. Throttle not set to “START” or maximum speed. Spark plug terminal not connected. Spark plug dirty or defective. Engine runs irregularly (splutters). Engine overheats. Blocked petrol line. Choke (if fitted) actuated. Spark plug terminal connected loosely. Stale fuel. Water or dirt in fuel system. Air filter dirty. Spark plug scorched, defective or gap between electrodes too wide. Inadequate engine oil. Air flow restricted. Engine cuts out at high Gap between electrodes too narrow. speed. *) This work may be carried out by a specialist company only Remedial action Actuate safety lever (if fitted). Fill tank with clean, fresh and lead-free fuel. Drain stale fuel into a suitable container outdoors. Fill tank with clean, fresh and leadfree fuel. Actuate choke/primer. Set throttle to “START” – maximum speed. Connect spark plug terminal to the spark plug. Clean spark plug. Re-adjust gap between electrodes or change spark plug. Clean petrol line *). Put back choke lever. Firmly connect spark plug terminal. Drain stale fuel into a suitable container outdoors. Fill tank with clean, fresh and leadfree fuel. Clean air filter. Re-adjust gap between electrodes or change spark plug. Fill crank case with appropriate amount of oil. Remove grass clippings and dirt from the area around the cooling fins on the engine and from the blower housing. Remove spark plug and re-adjust gap between electrodes. Important If repairs exceed the work mentioned above, please contact your local dealer with customer service facilities. 10