1
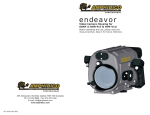
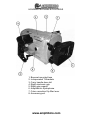
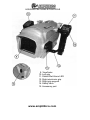
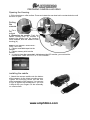
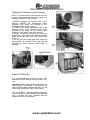
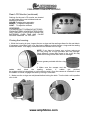
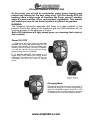
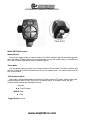
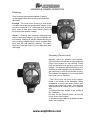
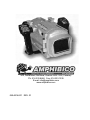
Instruction Manual
Video Camera Housing for
SONY® HDR-HC5/HC7
Before operating the unit, please read this manual carefully. Keep it for
future reference.
www.amphibico.com
NOTES
www.amphibico.com
TABLE OF CONTENTS
Features............................................................................................. 2
Specifications.................................................................................... 3
Housing Features and Controls.................................................... 4-5
Unpacking Your Housing ................................................................... 6
Preparing the Camera & Housing ................................................ 7-11
Opening the housing................................................................ 7
Setting the camera................................................................... 7
Installing the saddle................................................................. 7
Placing the camera .................................................................. 8
Rear LCD Monitor................................................................. 8-9
Closing the housing.................................................................. 9
Replacing the bayonet lens.................................................... 10
Installing accessories ......................................................... 10
Water Entry ........................................................................... 11
Housing Camera & Operations................................................... 12-15
Power ON /OFF .................................................................... 12
Changing MODE................................................................... 12
Mode settings........................................................................ 13
Zooming ............................................................................... 14
Focusing............................................................................... 14
Maintenance.................................................................................... 16
Servicing of O-rings ........................................................................ 17
Optional Accessories...................................................................... 18
General Shooting Tips..................................................................... 19
Warranty.......................................................................................... 20
www.amphibico.com
FEATURES
Our new Dive Buddy EVO HD for the Sony
HDR-HC5/HC7 camcorder has arrived!
Now equipped with a 3.5" rear LCD monitor, everyone can shoot High Definition images and
take superior digital stills underwater!!
Good ergonomics and electronic controls with superb optics is what the Dive Buddy EVO HD
offers you in a small compact housing.
Electronic controls:
The housing provides electronic controls on a newly designed marine grip.
- Record / Standby (Camera mode)
- Shutter (Photo mode)
- Zoom T & W with variable zoom speed
- Mode (Camera / Photo / VTR)
- Focus
- Power ON /OFF
Five Electronic Push Button Controls on
Right grip:
- The trigger button will access the Record /
Standby function while in camera mode, the
Shutter function while in Photo mode and the
Pause function while in VTR (Playback) mode.
- Variable speed ZOOM-W & ZOOM-T
engages the zoom function of the camera.
- The MODE button will switch the camera from
the CAMERA to the PHOTO mode and from the
PHOTO mode to the VTR mode.
- By pressing the FOCUS mode you will
engage the Focus Lock, pushing it again will
bring the setting back to auto focus.
- Power ON / OFF: Press on the trigger button
to turn ON the unit and press again while
holding down the MODE button to turn it OFF
74° Optics
Marine bayonet mounted lens system 0.55X
rectilinear fully coated amphibious conversion
lens, vacuum-sealed for maximum anti-fog
protection. Includes a square lens hood
complete w/3" x 4" filter slot 74° degree angle of
coverage top side, 67° coverage underwater &
full zoom through capability
www.amphibico.com
SPECIFICATIONS
Dive Buddy EVO HD
Marine Housing for the Sony® HDR-HC5/HC7
-
Marine Grade Aluminum Construction
Fully anodized with a hard coat of polyurethane paint
Ail hardware is marine grade brass and stainless steel
Optics: Marine bayonet mounted lens system.
74° angle of coverage underwater amphibious conversion lens
Internal Flip filter with a UR Pro Blue Water Filter installed
External Hydrophone to pick up high frequency sounds, such as whales and dolphins
Rear Viewfinder
Auxiliary port
Weight of unit (W/O lead bars):
- On land: 10.6 lbs. (4.80kg) fully loaded w/camera battery and lens.
- In seawater: 14.1-oz (400g) negative buoyancy
Dimensions :
- Length 12" (305mm)
- Width 10.5" (267mm)
- Height 6.5" (165mm)
Measurements includes lens and grips
Operating depth :
Each unit is pressure tested to 330ft (100m)
Accessories included :
-
Camera Saddle
Internal Filter Ring with a 52mm UR Pro Blue Water Filter
O-ring kit
Instruction manual
LCD Monitor:
-
Display size: 3.5"
DOT format: 480 x 234
Contrast ratio: 150:1
Input signal: Composite, NTSC/PAL (auto switch)
Operating temperature: 0° ~ 60°C
www.amphibico.com
HOUSING FEATURES & CONTROLS
1. Bayonet mounted lens
2. Incorporated T-Brackets
3. Carry handle dove tail
4. Right electronic grip
5. Right grip support
6. Amphibico's hydrophone
7. Color correction flip filter lever
8. Accessory port
www.amphibico.com
HOUSING FEATURES & CONTROLS
9. Viewfinder
10. Left grip
11. Status/Wet Alarm LED
12. Right electronic grip
13. Right grip support
14. Safety latch
15. Accessory port
www.amphibico.com
UNPACKING YOUR HOUSING
Before unpacking your housing kit, inspect the shipping box as well as all contents for
damage during shipping. If damage has occurred, please contact the shipping company
immediately.
Every Amphibico Housing is pressure tested prior to shipping. However, damage may have
occurred during shipping. It is strongly recommended to test dive the housing once without
camcorder installed to insure the housing is water tight.
This instruction manual assumes that the user is already familiar with the SONY® HDRHC5/HC7 camcorder. If not, please read instruction manuals thoroughly before beginning to
use the housing.
Your Dive Buddy EVO HD housing comes to you as follows:
A) Marine Housing
B) 0.55x, 74° wide angle bayonet mounted lens (Installed on housing)
C) Removable / lockable camera saddle (shipped mounted into
position in the housing
D) Protective cover for the lens
E) O-ring kit with container of silicone grease
F) Instruction manual and warranty card
www.amphibico.com
PREPARING CAMERA & HOUSING
Opening the Housing
1. Sit the housing on a flat surface. Press and rotate the rear door latch counterclockwise until
the door is open.
Setting
the
camera
1. Put a
fully
charged
2. Removing the saddle: Push the
saddle locking latch (a) inwards to
release the saddle from the housing.
Once released, slide the saddle out the
housing (b).
battery in the camera. (SONY® NPFH50, 70 or 100)
2. Place a recordable tape into the
camera.
3. Place a memory stick into the
camera.
4. In order to show the camcorder's indicators on the LCD monitor, you must set the
camcorder's "DISP OUTPUT" to "V-OUT/PANEL".
installing the saddle
1. Attach the camera saddle onto the bottom
of the camera via the tripod mounting screw.
Tighten the mounting screw into the rear
tripod receptacle of the camera. You can use
a coin to tighten the thumbscrew if you find
it difficult with your fingers. Sit the assembly
on a flat surface.
www.amphibico.com
PREPARING CAMERA & HOUSING
Placing the Camera in the housing
NOTE: The hand strap of the camera must be
tucked in tight against the camera in order for it
to properly slide into the housing.
1. Before engaging the camera into to the
housing, connect the hydrophone cable
(biggest) from inside the housing to the
microphone jack of the camera .
2. Position the camera with saddle into to the
housing into its track. Grab the LANC cable
(smallest) from inside of the housing and
connect it to the LANC jack of the camera.
3. Before completely inserting the camera,
connect the video cable from the rear monitor
inside the housing to the A/V OUT jack of the
camera.
4. Lift up the hand strap tong and insert the
camera fully into housing. The camera will be
secured into place once the locking latch is
engaged.
Rear LCD Monitor
It is recommended to place four fresh "AA"
batteries into the battery holder before every
dive.
Operating limit: Typical alkaline batteries will
produce up to 30 minutes of continuous use.
Nickel metal hydride batteries (Ni-MH), on the
other hand, will produce up to 150 minutes.
The "LOW BATT" indicator starts to flash red
once the batteries have reached their operating
limit. A steady red color indicates that the
batteries need to be replaced.
wvwv.amphibico.com
PREPARING CAMERA & HOUSING
Rear LCD Monitor (continued)
Settings for the rear LCD monitor are located
on the inside of the rear bulkhead and are
described as follows.
COLOR To adjust color saturation
BRIGHT. To adjust the brightness
CONT. To adjust the contrast
WARNING:
IT IS IMPORTANT TO REMOVE BATTERIES
FROM BATTERY HOLDER AFTER EVERY
USE. FAILURE TO DO SO MAY DRAIN THE
BATTERIES OVER TIME AND CAUSE
SEVERE DAMAGE TO THE UNIT.
Closing the housing
1. While the housing is open, inspect the two o-rings and the sealing surface for dirt and debris.
If necessary, clean them with a lint free tissue. Make sure that the two o-rings and the sealing
surface are clean. Then apply a small amount of lubricant to the o-rings.
NOTE: If you have to change your o-rings, make sure
you are using the o-rings provided with the package.
Using different o-rings than those in the o-ring kit may
cause the housing to leak and result in damage.
Silicone grease provided with the o-ring
kit.
2. Make sure the camera and the
cables
don't
block
the
sealing
surface.
If
cables
get
pinched,
the system might be intermittent or not functioning at all. Once the camera is completely in and
the saddle is locked, engage the latch by turning it clockwise.
3. Make sure the o-rings are well placed before locking the latch. Turn the latch until a positive
click is felt.
www.amphibico.com
PREPARING CAMERA & HOUSING
Replacing the bayonet lens
1. To remove the lens, push and hold the
button on the lower right of the front bulkhead
and then turn counter clockwise until the lugs
are free from the bayonet ring. Pull gently on
the lens to release it.
2. Remove the rear cover from the new
bayonet mounted lens and place it on the
previously installed lens for safe keeping. Make
sure the seals on the bottom part of the lens are
clean and free from dust and debris.
3. Put a small amount of lubricant on the o-ring
seals and the sealing surface of the housing.
4. Line up the bayonet lug marked by a hole
with the printed dot on the front bulkhead of the
housing. Push the lens all the way until it sits
on the bayonet ring and turn clockwise. You will
hear a positive click and the lens will lock into
place.
Installing Accessories
All Amphibico housings are provided with
brackets where optional accessories can be
mounted. On the Dive Buddy EVO HD housing,
these brackets have been machined directly on
the body. In fact, two T-brackets are
incorporated to it. A third one, which is basically
done to accommodate the carry handle, is
located on top of the body.
Accessories are provided with either thumb
screws, adjustable handles or setscrews.
Some
of
these
accessories
require
communication with the camera's electronics.
Waterproof connectors need to be installed on
the housing to allow information to travel
through the electronics. For example, the
monitor needs to be hooked up to the AA/
connector on the camera.
www.amphibico.com
PREPARING CAMERA & HOUSING
Water Entry
1. Always make sure that the electronics of the housing is ON before entering the water. To turn
it ON, use the trigger button. This is confirmed by the CAM indicator light turning on steady
green. The camera viewfinder will also turn ON.
Doing step 1 will activate the built-in moisture alarm sensor located in the bottom of the housing.
IMPORTANT
Both indicator lights will start flashing RED
if water leakage occurs into the housing unit.
Remove from water as soon as possible,
take the camera out of the housing and inspect all
seals and the inside of the housing. ALWAYS
REMEMBER DIVER SAFETY FIRST.
2. Lower the housing just below the water
surface in level position and hold for one minute
to confirm there is no leakage in the housing.
Never leap into the water while holding the
housing. Always have the housing handed to
you or lowered down once you are in the water.
3. Point the lens of the housing upwards and
shake off any air bubbles. It may also be
necessary to gently wipe the lens with your
finger to remove bubbles.
www.amphibico.com
HOUSING CAMERA & OPERATIONS
At this point, you should be underwater going down chasing your
subject and looking for the best video shot. The Dive Buddy EVO HD
housing offers a large range of functions like Zoom, record / standby,
photo & camera modes, focus, and playback capabilities. This chapter
will explain you how to use these functions as efficient as possible.
WARNING:
The following instruction assumes that there is a tape installed in the
camera. Due to the nature of the electronic grip, the LED indicators will not
function properly in the absence of a tape.
Both LED indicators will light steady green as a warning that a tape is
not installed.
Power ON / OFF
1. Pressing on the trigger button will turn the
unit ON. The camera will automatically turn ON
and the CAM indicator will light up steady green
meaning that the system is ready to operate.
You can also confirm this by seeing the image
appear through the rear viewfinder.
2. To turn the unit OFF, simply press on the
trigger button while holding the MODE button
depressed. The opportunity to turn OFF the unit
underwater will allow you save on battery
power.
Changing Mode
Depressing the Mode button for longer than 2
seconds will allow you to switch the camera to
either the CAMERA (default), PHOTO or VTR
(Playback) mode. You will find on the next page
an explanation of these three different modes.
www.amphibico.com
HOUSING & CAMERA OPERATION
MODE SETTINGS Camera
Mode (Default)
Press on the trigger button to start recording. The CAM. indicator light will start flashing green
when recording. Pressing again on the trigger button will put the camera back on standby and
the CAM. indicator light will go back to a steady green.
Photo Mode
Use the Mode button to switch from Camera mode to Photo mode. The CAM. indicator light
will turn off and the PHOTO indicator light will turn on steady green. The trigger button acts as
the shutter button.
VTR (Playback) Mode
Once again, use the Mode button to switch from Photo mode to VTR mode. At this mode, both
indicator lights (CAM. & PHOTO) will turn on steady green. In Playback mode, the grip
buttons will be used for the following functions:
^ : Rewind
►►: Fast-Forward
MODE :Stop
► :Play
Trigger Button: Pause
www.amphibico.com
HOUSING & CAMERA OPERATION
Zooming
Zoom functions have variable speeds. Pressing
on the trigger button while zooming will accelerate
the zoom.
Zoom-W - For most users, shooting in wide Angle
is a safer way to achieve good quality images. As we
provide the unit with a 74° wide angle lens, shooting
while zoom is wide open means better control on
the subject and steadier images.
Zoom-T - Zooming while shooting underwater may
result in bouncing images if you are not steady with
the housing. Zooming in with the camera housing will
give you sharp images until you reach a certain focal
point past the half zooming distance. For macro
shoot you must get closer to your subject and shoot
wide angle.
Focusing (Focus Lock)
Normally focus is adjusted automatically.
FOCUS button will activate or deactivate the
Focus Lock function on the camera. Focus
Lock can be used to fix the focus on the main
subject*. This features prevents the focus from
switching to other subjects such as particles or
fish swimming in front of the camera housing.
The indicator will appear on the screen when
the Focus Lock is activated.
* The Focus Lock will focus on the subject
found in the middle of the viewfinder. When
composing a picture, the main subject may
need to be located off center. The following
steps describes a method on how to achieve
this.
a) Position the main subject in the middle of
the viewfinder.
b) Press on the FOCUS button to lock the
focus on the main subject.
c) Move the main subject to a desired location
within the viewfinder.
www.amphibico.com
This page is purposely left blank
www.amphibico.com
MAINTENANCE
WARNING: DO NOT leave the housing exposed to direct sunshine, as extreme heat
condition can be detrimental to certain of its components.
1. Keep housing and o-rings away from direct sunlight. Always store unit when possible away
from direct sunlight as this can dry out and crack o-rings in the housing. Ultraviolet rays can
damage plastics, paint and o-rings.
2. Always rinse or soak closed housing in fresh water for 10 to 15 minutes after every use.
Reach into freshwater and operate all controls to clear salt water. Do not use solvents to clean
unit. If preferred, use mild detergent and clean fresh water.
3. Fasteners that are removable should occasionally have the threads lubricated with silicon
grease.
4. Rinse clean and remove water spots from external filters and lens surface after every dive or
water spots may build up and become impossible to remove. Dry gently with a soft, lint-free
cloth.
5. Inspect housing's rear door main o-ring seals (double seals) before every dive. Make sure
that there are no cracks or misalignment in the o-ring channel and that no debris is caught on
the o-rings.
www.amphibico.com
SERVICING OF O-RINGS
1. O-rings and sealing surface should be lightly lubricated with silicon lubricant on a regular
basis. This is not necessary after every dive; every tenth dive during regular heavy use is
sufficient. This should always be done before storing the housing and before a first dive after
taking the housing out of storage.
2. It is important never to use a sharp instrument when removing an o-ring as this may cause
damage to the o-ring or the o-ring groove. A hairpin or a credit card works well.
3. The removed o-ring should be examined for damage. Check to make sure that the o-ring is
free from nicks and cuts and that it retains its original round profile. O-rings that appear to be
damaged should be discarded immediately and replaced with new o-rings.
4. Rinse the o-ring with freshwater and dry it with a clean lint free cloth.
5. Clean the o-ring grooves (where the o-rings sit) with a Q-tip. Be sure to remove any lint the
Q-tip may leave behind. Inspect the groove for damage.
6. Wipe the part of the housing that the o-ring seals against with a clean lint free cloth.
7. Re-grease the o-rings with a thin layer of silicon grease until it appears to be smooth and
shiny. Do not over grease it - use just enough grease so that the o-ring will pull smoothly through
your fingers. Excessive amounts will only attract dirt to the o-ring.
8.
Replace o-rings in their proper position on the lens assembly and on the main door seal.
www.amphibico.com
OPTIONAL ACCESSORIES
Optional Accessories
Extra large carry case
Aluminum carry handle
Optics
- Bayonet mounted Flat Port
- Bayonet mounted .55x lens (as supplied)
- +1, +2, +4 Diopters
Light
- 10 Watt Arc Light "HID Technology" with mounting arm
Filters
- UR PRO Blue Water 3"X 4" plastic Filter (fits on Flat Port & .55X lens)
- UR PRO Blue Water 52mm
- UR PRO Green Water 52mm
Specialty Items
-
Umbilical Coaxial Video Cable (Custom lengths available)
3-Pin Male and Female video connectors
Charger with 4x NiMH battery kit
4x NiMH battery kit
GENERAL SHOOTING TIPS
1. Best results will be obtained with natural light if the sun is directly overhead during
calm water periods.
2. Placing the sun behind your shoulder during shooting will produce the best colors.
3. Wide angle is the preferred focus setting for best results with subject, as close as
possible to the housing. This will reduce the water column and the amount of particles
between subject and lens.
4. In PHOTO mode, images are going to be larger than those taken in CAMERA
mode. This is due to the fact that the camera uses more recordable surface of the
CCD size and results in vignetting. For good digital pictures, zoom in a bit to clear
lens shade edges.
5. Zooming during shooting is not recommended unless absolutely necessary as
telephoto will magnify particles. Swimming toward subject is a much more visually
pleasing filming method.
6. Use image stabilizer if available on your camera when filming macro to minimize
camera movement during high magnification. Image stabilizer is not as critical while
using wide angle and will use battery power unnecessarily.
7. Buoyancy control is one of the most important aspects of underwater videography
and diving in general. Avoid disturbing bottom silt and contacting delicate reef
structures. Work on controlling your breathing and your buoyancy. Your video will be
much more visually appealing. You are trying to make yourself a steady shooting
platform. The less movement you make , the better your video will be. Work on
attaining a comfort zone underwater. The more comfortable you are underwater, the
more controlled your breathing will be and the steadier your video will be.
8. In low light situations, add light with optional Amphibico video lights for brighter and
more vibrant colors. As light level falls so does color saturation. Lights will also
provide necessary fill during daylight shooting. If this technique is used, filtration of
light using a color correction filter will be necessary for accurate color rendition.
www.amphibico.com
WARRANTY
All Amphibico products are guaranteed against defects in material or workmanship for one full
year from the date of purchase for consumer use. These same products when used
commercially will carry a 90-day warranty. No statutory warranty applies. Cameras housed in
Amphibico housings are not covered under this warranty and ANY WATER DAMAGE
SUSTAINED DUE TO INSTALLATION ERROR OR FOR ANY OTHER REASON IS NOT THE
RESPONSIBILITY OF AMPHIBICO INC. Therefore the appropriate insurance should be
maintained by the user.
Subject to the terms and conditions specified hereunder, Amphibico Inc. agrees to correct, either
by repair or by replacement, any defect in material or workmanship which develops within one
year after delivery of the product to the original purchaser.
Repair or replacement is provided in the event that investigation and factory inspection by
Amphibico Inc. discloses that such a defect has developed under normal and proper use. No
warranty is granted concerning components, accessories, or devices not manufactured by
Amphibico Inc.
AMPHIBICO INC. SHALL BE RELEASED FROM ALL OBLIGATIONS UNDER ITS WARRANTY
IN THE EVENT REPAIRS OR MODIFICATIONS ARE MADE BY PERSONNEL OTHER THAN
ITS OWN OR AUTHORIZED (IN WRITING) SERVICE PERSONNEL.
Amphibico Inc., in its continued commitment to provide excellence in the field of underwater
imaging, reserves the right to change specifications at any time, without notice and without
incurring any obligations to incorporate new features in equipment previously sold.
CONDITIONS
Registration condition: The attached (warranty) card must be mailed to Amphibico Inc. within
fourteen (14) days after retail purchase.
Repairs: The unit must be returned freight prepaid to Amphibico Inc. The returned documents
must show Serial NO. and be marked " CANADIAN GOODS RETURNED." No returns will be
accepted without Amphibico Inc return authorization number.
www.amphibico.com
NOTES
www.amphibico.com
459, Deslauriers, Montreal, Quebec H4N 1W2 (Canada)
Ph: 514.333.8666 Fax: 514.333.1339
E-mail: [email protected]
www.amphibico.com
049-6214-001 REV. 01


![hank yo_fo buyil_gaSamsung (}a_Te_a ]hs](http://vs1.manualzilla.com/store/data/005691502_1-2e8e29ffb67d0c8f7d0d701e3cb644b7-150x150.png)