1
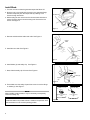
Install Blade
1. Turn the unit over so that the gearcase output shaft faces UP.
2. Align the hole in the holder with the notch in the gearcase flange,
and then temporarily lock the output shaft by inserting a hex
wrench through both holes.
Hex Wrench
3. While holding the hex wrench turn the trimmer head clockwise to
remove. Remove trimmer head mounting bolt. Remove the hex
wrench. See figure 4.
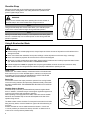
Figure 4
26107
4. Remove and discard the holder and collar. See Figure 5.
Output
Shaft
Holder
5. Install the new collar. See Figure 5.
Collar
Figure 5
Assembly: Blade T261X
Assembly: Blade T261X
6. Install
Holder Blade.
(A) and safety clip. See Figure 6.
Mount
the Cutting
Mount the Cutting Blade.
Shaft Bolt
Shaft Bolt
Slide the safety clip off-center
Slide the safety clip off-center
Turn the T61X upside down so the
Turn the
T61X
upside
downUP
soand
the
gearcase
output
shaft
is facing
Bolt Guard
gearcase
output
shaft
is
facing
UP
remove the shaft bolt, bolt guard and and
Bolt Guard
7. Next,
slide
the
safety
clip off-center.
See Figure 6.
remove
the
shaft
bolt,
bolt
guard
and
holder B from the gearcase shaft.
Output
Holder B
holder B from the gearcase shaft.
Output
Shaft
Holder B
1. Align the hole in blade holder A with
Shaft
1.
Align
the
hole
in
blade
holder
A
with
the matching hole in the gearcase
Gear Shaft
Holder (A)
the
matching
hole
in
the
gearcase
Gear Shaft
flange and then temporarily lock the
Safety
flange
andby
then
temporarily
the
Safety Clip
output
shaft
inserting
a hex lock
wrench
Safety
Clip
Safety Clip
output
shaft
by
inserting
a
hex
wrench
through both holes. See Figure 1.
Clip
Holder A
through both holes. See Figure 1.
6 13
23110
Figure
Holder A Figure
. Slide the safety clip off-center. See
23110
Figure 13
.
Slide13.
the safety clip off-center. See
Figure
8.Figure
Fit the13.
blade over the safety clip and then center it over the flange
3. Fit the
over
safety
clip and
on blade
Holder
(A).the
See
Figure
7.
3.
Fitcenter
the blade
over
the
safetyonclip
and
then
it over
the
flange
holder
then
center
it
over
the
flange
on
holder
A. See Figure 14.
26109
A. See Figure 14.
NOTE:
26109
CAUTION!
When installing certain blades, it may be necessary to temporarily
Center the Safety
Slip the Saw Blade In
CAUTION!
Center
Slip the
Saw Blade In
Clipthe Safety
Place
remove
safety
Install
the the
blade
so itsclip.
printed surHex Wrench
Clip
Place
Install
the blade
its printed
surHex Wrench
face
is visible
to thesooperator
when
face
is
visible
to
the
operator
when
the brushcutter
is in the normal
Figure 14
Figure 12
theCAUTION!
brushcutter
14
Figure 12
FigureFigure
7
operating
position.is in the normal
operating
Install theposition.
blade so its printed surface is visible to the operator when
the brushcutter is in the normal operating position.
WARNING!
WARNING!
The blade must fit flat
The blade
must flange.
fit flat
against
the holder
Output
against the
holder
The blade mounting
hole
must flange.
be
Output
Shaft
Blade
The
blade
mounting
hole
must
be
Shaft
centered over the raised boss on
Blade
centered
blade
holderover
A. the raised boss on
6
blade holder A.
26111
26111
26112
26112
NOTE:
NOTE: