1
COPYRIGHT
Copyright 1988-1994 – Octagon Systems and Remote Processing Corp. All rights reserved.
Modifications by Remote Processing Corporation, Copyright 1999
The software described in this manual is furnished under a license agreement and may be used only in accordance with the
terms of the agreement.
The contents of this manual and the specifications herein may change without notice.
TRADEMARKS
CAMBASIC™, Micro PC™, PC SmartLINK™ and Event Multitasking™ are trademarks of Octagon Systems.
IBM PC® is a registered trademark of IBM Corporation.
QBASIC® is a registered trademark of Microsoft Corporation.
Remote Processing Corp.
7975 E. Harvard Ave.
Denver, CO 80231
Phone:303–690–1588
FAX: 303-690-1875
www.rp3.com
Document Order #1042
Rev 1.1
HOW TO USE THIS MANUAL
This manual contains information on CAMBASIC and its commands. You will find that some information is duplicated in
this manual. This is done on purpose, as you will probably want to skip over some sections to read those of immediate
interest. We have included caution and warning notes that are designed to steer you away from potential trouble areas.
Symbols And Terminology
Throughout this manual, the following symbols and terminology are used:
&
A prefix “&” denotes a hexadecimal number. A decimal number has no prefix.
For example, &1000 and 4096 are equivalent.
@
A prefix “@” denotes a binary number. Only numbers from 0–255 or @00000000
to @11111111 can be represented. @10101010=170.
< >
Characters within “< >” indicate a single keystroke.
NOTE:
Information under this heading presents helpful tips for using CAMBASIC.
CAUTION:
Information under this heading shows you how to avoid potential problems.
WARNING:
Information under this heading warns you of situations which might cause
catastrophic or irreversible program damage.
>_
This symbol indicates the prompt (>) and the cursor position (_).
.
.
.
A column of periods is used in program examples
to indicate that a portion of the program is omitted.
%
This symbol indicates special variables.
address
Indicates any address from &0000 to &FFFF or 0 to 65535.
n, m
Lower–case letters, a thru z, are used to represent quantities or expressions. They
are not CAMBASIC variables.
segment
Refers to a 64K block of memory.
string
When used as part of a function or command, string may be a variable or text
enclosed in quotes.
[]
Brackets indicate that the item enclosed is optional.
()
Means that parentheses are required.
bit
Indicates the bit number from (0 to 7) of an I/O address.
Preface - 1
PRODUCT SUPPORT
If you have a question about CAMBASIC and you cannot find the answer in this manual, call Technical Support at the
number listed below during normal business hours. They will be ready to give you the support you need to successfully use
CAMBASIC with your Systems card.
When you call, please have the following at hand:
* Your CAMBASIC Programming Guide
* A description of your problem
TEL: 303–690–1588
FAX: 303–690–1875
Preface - 2
ABOUT CAMBASIC
CAMBASIC is the logical result of 13 years of industrial language development at Octagon. Its major strengths are
ease–of–use, unequaled performance and the rich vocabulary of industrial BASIC commands. This version was written for
Remote Processing Corporation.
CAMBASIC is a real time, multitasking, language for control and data acquisition applications. It programs easily and has
most of the BASIC language commands found on personal computers. However, the performance and the industrial
extensions set CAMBASIC apart from any other BASIC dialect.
While all the commands and structures in this manual have examples of their use, this manual is not intended to teach you
how to program in BASIC. We assume that you have at least some familiarity with BASIC or some other high level
language. If you have not had any programming experience, there are literally dozens of books that can teach you to
program in BASIC. Knowledge of electronics and/or digital circuitry is not required to write successful programs.
Major Features
In addition to the commands and features in BASICs like those found in personal computers, CAMBASIC has some
important extensions for industrial control, data acquisition, and ease–of–use.
1.
Labels Supported
You can call a subroutine by name in addition to the line number. This makes programs
self–documenting. The example below shows a fragment of an over–temperature program.
10
IF TEMP>150 THEN 500
.
.
500 OUT HEAT,0
With labels the same code would be:
10
IF TEMP>150 THEN ..HEAT_OFF
.
.
500 ..HEAT_OFF
510 OUT HEAT,0
The labels may be any length up to 40 characters. Since they are precompiled, long labels do not
slow program execution.
Line labels may be used only with GOTO and GOSUB statements. They may not be used with ON
GOTO or ON GOSUB type commands. Labels may be used as a part of conditional IF–THEN
statements, provided the GOTO command precede the labels.
2.
Full Screen Editor
When using PC SmartLINK with CAMBASIC, you can do full screen editing. You also have a line
editor, which is used with terminals.
3.
Nonvolatile Variables
CAMBASIC has a special set of 26 process variables (A% through Z%) that are not zeroed on
power–up or reset. These variables are used in exactly the same manner as the normal variables.
With a battery–backed RAM module, these variables will automatically retain their values if the
power goes off. They also are precompiled, so they execute faster than standard variables.
Introduction - 1
4.
Event Multitasking
CAMBASIC provides several types of multitasking. All defined tasks operate in the background and
are checked 200 times per second on 18 Mhz systems and 100 times per second on 9 Mhz systems.
This includes periodic interrupts, counting, timed outputs, checking the keypad input, checking input
combinations, and checking inputs for a change of state.
5.
Individual Bit Manipulation
Most industrial control is done on a line or bit basis, rather than an 8–line port basis. CAMBASIC
can set and reset individual bits without affecting other bits on the port. It can also cause individual
bits to be timed outputs that time out, independently of program execution.
6.
Automatic Serial Data Capture
In many applications, your microcomputer card may be connected to a host computer, either through
a modem or radio link, or directly. The computer can transmit a message to the microcomputer card
while the card is executing a program. An automatic interrupt can be generated when the message is
completed, or CAMBASIC can interrogate the message at its convenience. Input and output
characters are always buffered automatically.
7.
Multidimension Numeric and String Arrays
Both numeric and string arrays may have up to 255 dimensions.
8.
Error Handling
In most applications, it is important that program execution not be broken when a run time error
occurs. CAMBASIC can trap these errors and corrective action can be taken without stopping the
program.
9.
Keypad and Display Support
The DISPLAY and KEYPAD$ commands fully support RPC keypads and displays.
10.
Large Programs Supported
You can run programs as large as 32K in all cards.
11.
Automatic Type Conversion
In CAMBASIC you never need to declare integer or floating point variables. CAMBASIC converts
automatically, as needed by the program. Data is always stored as floating point, so that no precision
is lost.
12.
EEPROM Programming Supported
CAMBASIC programs are developed in the on–card RAM. Once you are satisfied with its operation,
you type SAVE and an autorun EEPROM is programmed automatically. Your program then runs
from the EEPROM on power–up.
13.
Process Functions Simplify Programming
Most functions return the result of a numeric or string calculation. A process function manipulates
and acquires data from a hardware device. For example, the AIN function causes the A/D converter
to begin its conversion. When the converter has finished, the data is read and converted to the
appropriate format .
14.
Trace and Debug Capability
The TRON and TROFF statements can be invoked to print out line numbers as the lines are executed.
15.
Assembly Code and Compiled “C” Programs From BASIC
Assembly code and compiled “C” programs may be combined with CAMBASIC programs. The
Introduction - 2
machine code segments are executed with the CALL statement. You can pass up to 20 parameters to
the machine code program. Small programs can be stored in DATA statements and POKEd into
memory.
16.
Other features include:
a.
Line renumbering
b.
48 error messages to pinpoint problem areas
c.
Access to system information
d.
Bit, BCD, byte, word, and floating point data supported
e.
Hex input and hex and binary output supported
Introduction - 3
Getting Started
To program in CAMBASIC you will need a terminal to interface with your CPU card. This may be a CRT terminal or a
PC configured as a terminal. If you use the PC, you will need additional software for your PC to communicate.
SmartLINK turns your PC into a program development workstation. See your hardware manual for setup instructions.
You should review the CAMBASIC commands in Chapter 4 of this manual. Don’t be overwhelmed by the number of
commands available. Most programs use only a limited number of commands. You will find that most commands in
CAMBASIC are familiar to you if you have ever programmed in any basic before.
On power–up a message is printed like that below. If a nonsense message appears, your terminal is not set at 19,200 baud,
one start bit, 8 data bits, one stop bit and no parity. The amount of free memory is product dependent.
CAMBASIC (tm) Version 1.00
(c) 1985–93 Octagon Systems Corp
(c) 1994 Remote Processing Corp.
All rights reserved
Free 30482
> _
The underline ( _ ) shown to the right of the “>” prompt represents the cursor position. Your cursor may be a block or
other character depending upon your system.
This mode is useful for debugging and for using CAMBASIC as a calculator for quick computations. Virtually all
statements and commands may be used in this mode. Memory may be read and modified. Data may be sent to or read
from ports.
The Program Mode is used for entering programs. Program lines are always preceded by line numbers. Execution begins
after RUN is entered. The program may be run as many times as desired. You can enter a program in either upper or
lower case.
Line Format
Every program begins with a line number. Line numbers may range from 1 to 65529.
Programs are stored and run in RAM, in line number order, regardless of the entry sequence. Programs are compiled into
an intermediate code to speed execution. The average compiled program will use about 10% more memory than the
keystrokes you typed or disk memory used. This number can vary 20% either way, depending upon the type of program
you are writing.
A compiler limits a program line to 159 characters. More than one statement may reside on a line as long as the statements
are separated by colons (:). Putting more than one statement on a line will cause somewhat faster program execution and
use less memory.
Line Renumbering
CAMBASIC can renumber your program. Typing in RENUM will automatically renumber your program in line steps of
10 beginning with line 10. You can optionally specify the starting line number and step value. Refer to the RENUM
command.
Concepts - 1
Line Labels
You can write a program to GOTO or gosub to a label instead of a line number. This makes for more readable code.
90 A3 = AIN(0)
100 GOSUB ..FILTER
110 IF FL > 138 THEN GOTO ..OVER_LIMIT
.
.
.
5460 ..FILTER
5470 FL=.875 *FL+.125*A3
5480 RETURN
.
.
.
8950 ..OVER_LIMIT
8960 OUT 49,3 :’shut down
.
.
.
Using line labels makes it easier to review code. You would probably know what “FILTER” does before remembering the
line number it is on.
Line labels must be the first and only information on a line.
NOTE:
Labels may not be used with ON GOTO, ON GOSUB, RESTORE, or RESUME.
When labels are used with GOTO, etc., no other statements may follow the label on the same line.
Debugging
CAMBASIC provides you with several methods to help debug your program. As with all debugging, technique is usually
more important than tools. See the Debugging Programs Chapter for more information.
Bit Manipulation
CAMBASIC has commands for manipulating and reading bits. The BIT statement and BIT function can modify and read
individual bits. In order to modify a bit at an I/O port, the port must first be read, the appropriate bit set and the byte
written back to the port. The BIT statement does this automatically. The BIT function reads back individual bits. It returns
a “1” or “0” to reflects the state of the bit.
Communications Ports
CAMBASIC supports two serial ports, COM1 (console) and COM2. Once the serial ports are configured, they can
simultaneously capture data in the background while the program executes. If the ON COM$ statement is used,
CAMBASIC will branch to the user’s routine to handle the incoming data when the message is complete.
Both ports also have output buffering. When the PRINT statement is executed, the characters to be printed are sent to the
multitasker and program execution continues at the next statement. The program does not wait until all the characters are
printed. This is especially useful when data is being transmitted at a low baud rate over a modem or radio link. The output
buffers are 255 characters long.
Concepts - 2
Real time Multitasking
CAMBASIC can perform several kinds of tasks at assembly language speed while the program is running. See the
Multitasking Chapter for more information.
Reserved Words
CAMBASIC comprises a set of statements, commands and function names which are treated as reserved words and cannot
be used at the beginning of variable names. These are sometimes referred to as keywords.
Character Set
The CAMBASIC character set includes all characters which are legal in CAMBASIC commands, statements, functions and
variables. The set comprises alphabetic, numeric and special characters.
Alphabetic characters are automatically converted to upper case unless they are part of a string and enclosed in quotation
marks, or are part of a remark. Numeric digits are 0 through 9.
Any character, whether printable or not, may be used in a string. The following characters have special significance in
CAMBASIC:
=
+
–
*
/
ˆ
(
)
[
]
%
#
$
,
.
;
:
<
>
&
@
<BKSP>
<ESC>
\
<ˆC>
<ˆS>
<ˆQ>
..
<ENTER>
<SPC>
'
Space or Blank
Equals sign or assignment symbol
Plus sign for addition or string concatenation
Minus sign for subtraction
Asterisk or multiplication symbol
Slash or division symbol
Caret, Control Key, or exponentiation
Left parenthesis
Right parenthesis
Left bracket
Right bracket
Percent or PRINT USING overflow indicator
Binary number prefix or logical unit declaration
Dollar sign or string declaration
Comma and print separation symbol
Period or decimal point
Semicolon or carriage return suppressor
Colon or program line statement delimiter
Less than
Greater than and system prompt
Ampersand or hexadecimal number prefix
Binary number prefix
Backspace and erase the previous character
Escape input mode or halt execution
Back slash and integer divider
Control C to break an INPUT statement
Control S is XON code
Control Q is XOFF code
Two periods or label prefix
Carriage return
Space
Apostrophe or remark
Concepts - 3
Below is a list of CAMBASIC commands. Some CPU Cards do not use all of the commands. Refer to your hardware
manual for exceptions, if any.
ABS
AIN
AND
AOT
ASC
ATN
AUTO
BCD
BIN
BIN$
BIT
CALL
CHR$
CLEAR
CLS
COM$
CONFIG
CONT
COS
COUNT
DATA
DATE$
DEC
DECF
DEL
DELAY
DIM
DISPLAY
DO
DPEEK
DPOKE
EDIT
ELSE
END
ERL
ERR
ERROR
EXIT
EXP
FIND
FOR
FPEEK
FPOKE
FRE
GOSUB
GOTO
HEX$
IF
INC
INCF
INKEY$
INP
INPUT
INSTR
INT
KEYPAD$
LEFT$
LEN
LINE
LIST
LOAD
LOCK
LOG
MID$
MOD
MON
NEW
NEXT
NOT
OFF
ON
OPTO
OR
OUT
PEEK
PEEK$
POKE
POKE$
PR
PRINT
PRINT USING
PRINT$
PULSE
READ
REM
RENUM
RESTORE
RESUME
RETURN
RIGHT$
RND
RUN
SAVE
SGN
SIN
SOUND
SQR
START
STEP
STOP
STR$
Concepts - 4
SYS
TAB
TAN
THEN
TICK
TIME$
TO
TROFF
TRON
UNLOCK
UNNEW
UNTIL
USING
VAL
VARPTR
WATCHDOG
XOR
+
–
*
/
\
=
<
>
<=
>=
ˆ
@
&
#
..
^
'
Software and Hardware Interrupts
CAMBASIC supports multiple hardware and software interrupts. These interrupts causes the program to branch to an
interrupt service routine which acts exactly like a GOSUB. The syntax of a typical routine is:
10 ON KEYPAD$ GOSUB 50
NOTE:
Not all products support all the interrupts. See your hardware manual for more information.
Hardware Interrupts
CAMBASIC supports up to three hardware interrupts. Not all hardware products implement these hardware interrupts. See
your CPU card user’s manual for more information. When a hardware interrupt occurs, a flag is set. If the corresponding
ON ITR statement has been previously executed, CAMBASIC will sense the flag and cause program execution to branch.
Branching occurs after the completion of the current statement. Thus, the hardware interrupt is converted to a software
interrupt.
At the hardware level, the interrupts are prioritized. However, the software response to the interrupts have equal priority.
Any interrupt can preempt any other interrupt.
Software Interrupts
CAMBASIC has other interrupts which are purely software interrupts. For example, you can cause program execution to
branch on a periodic basis using the ON TICK statement.
All software interrupts have equal priority. Any software interrupt can interrupt another software interrupt, but not a
hardware interrupt.
In the case of several nearly simultaneous interrupts, the following sequence will occur. Suppose the first interrupt service
routine starts to execute only to be interrupted by a second interrupt. If another interrupt occurs before the second routine
finishes, then the third interrupt routine will execute to completion. Then the second interrupt service routine will finish,
followed by the first.
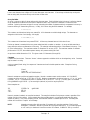
The software interrupts include:
8
8
2
8
1
3
Port status interrupts
– ON INP
Input line interrupts
– ON BIT
Serial input interrupts
– ON COM$
Counter interrupts
– ON COUNT
Keypad interrupt – ON KEYPAD$
Periodic interrupts
– ON TICK
Assembly Language Interface
You may call an assembly or a compiled language using the CAMBASIC CALL statement. The compiled “C” or assembly
language is object code which executes directly. This code is generated by your linker on your PC. The resultant Intel hex
format data is downloaded by PC SmartLINK into the system RAM.
You may save your assembly code program to EEPROM along with your BASIC program. We suggest that you save your
BASIC program first, then load your assembly code in the free area on the EEPROM, above BASIC.
Concepts - 5
SAVING AND LOADING PROGRAMS
Saving and loading programs to and from nonvolatile memory is as easy as typing “SAVE” and “LOAD”. You can
download programs through a modem hundreds of miles from the computer.
AUTORUN OPERATION
Once a program has been stored in nonvolatile memory, it can autorun on power–up.
PROTECTING YOUR PROGRAMS
You can cause your program to be completely hidden so that it cannot be viewed by unauthorized people. Once hidden, the
program cannot be modified or listed.
The procedure is very simple. Just make the following line the first in your program.
10 . . .
The three periods tell the runtime executor that the contents are to be hidden.
WARNING:
Once hidden, the process cannot be reversed. We made it that way so that programs would truly be
protected. Before hiding a program, save a copy on disk.
VARIABLES
More than 25,000 unique variables may be defined for use in CAMBASIC programs. Variable names may be up to 40
characters long. In order to maximize speed, the first and last characters and the length are significant. Variables must
begin with an alpha character. They may contain numbers, the underline character and the period.
TIME_OUT
MOTOR_ON
START_PRE_HEAT
RELAY_1
The length of an array variable name is not used. PUMP(n) and PP(n) are seen as the same variable and will return the
same value.
The variables A% through Z% are “pre–compiled”. This gives them two special advantages not shared with the rest of the
variables. They are not cleared to zero on power–up, reset or when chaining programs. They also execute about 50%
faster in an average program.
NOTE:
Variables with “%” as the second character may only be used for simple variables, and not array or
string variables.
There are simple, array and string variables. The “$” is used when defining a string variable. Different type variables may
have the same name. For example:
A
A%
A$
A(0)
Concepts - 6
Variables may contain keywords, as long as the keyword is not first. Keywords may be imbedded in variable names. For
example,
GOTOE
is not ok
EGOTO
is ok
String variables are limited to 255 characters. Arrays may be any length, may be multidimensional, and include strings.
String and array space is limited only by available memory.
Numeric variables take seven bytes of memory. Two bytes for the name, one byte for the length and four bytes for the
value. String variables are stored with a 7–byte header and byte–for–byte as the string was assigned. The header and string
are stored in different locations.
String Variables
CAMBASIC reserves 100 bytes for strings on power–up. Using the CLEAR statement, more or less memory may be
reserved. The reserved memory is shared by all the strings. String constants do not use any of the reserved space. For
example,
10 A$="This is a string constant"
does not use any of the reserved space as the string is a constant.
In the example below, A$ and B$ do not use reserved string space, but C$ does.
10 A$ = "Hello"
20 B$ = "there"
30 C$ = A$+B$
In this example, only B$ uses reserved space.
10
20
A$ = "Hello"
B$ = A$
Strings may be compared using the same relational operators that are used with numbers. The string operators are:
+
=
<>
>
<
>=
<=
Adding or concatenating
equal
not equal
greater than
less than
greater than or equal
less than or equal
Consider the following program:
10 A$ = "ABC"
20 B$ = "ABD"
30 IF A$ > B$ THEN PRINT "YES" : ELSE PRINT "NO"
RUN
NO
Strings are compared on a character–by–character basis. In the example above B$ is greater than A$, as the ASCII value of
D is greater than that of C.
Concepts - 7
Lower–case characters have a higher ASCII value than upper–case characters. If two strings are identical up to the point
that one string ends, the shorter string is said to have a lower value.
Array Variables
An array is a group or table of values referenced by the same name. Each individual value in the array is called an element.
Array elements are variables and can be used in expressions and in any CAMBASIC statement or function that uses
variables. Declaring the name and type of an array and setting the number of elements and their arrangement in the array is
known as defining or dimensioning the array. Usually, this is done using the DIM statement. For example,
10 DIM G$(100)
This creates a one–dimensional string array named G$. All its elements are variable length strings. The elements are
assigned an initial value of null (empty; zero length).
10 DIM TEMP(20,20)
This creates a two–dimensional array named TEMP. All the array elements have an initial value of zero.
Each array element is named with the array name subscripted with a number or numbers. An array variable name has as
many subscripts as there are dimensions in the array. The subscript indicates the position of the element in the array. Zero
(0) is the lowest position. The maximum number of dimensions for an array is 255. The maximum number of elements
per dimension is 32,767, but available system memory will prevent reaching this limit.
Arrays have a default dimension of 10. This gives a total of 11 elements (0 through 10).
Constants
Constants are literal values. These are “known” values as opposed to variables which can be assigned any value. Constants
may be numeric or string.
A string constant (literal string) is a sequence of characters enclosed in double quotation marks. Examples of string
constants are:
"Power"
"Valve 34"
"INPUT PH METER READING"
Numeric constants are positive and negative numbers. Numeric constants cannot contain commas. All CAMBASIC
constants are in the range from –1.7E+38 to 1.7E+38. Numbers are assumed to be decimal unless an “&” or “@” prefix
is present. The “&” is a hexadecimal prefix for numbers from &0 to &FFFF. The “@” is a binary prefix for numbers
from @00000000 to @11111111. Up to seven digits (decimal) of precision may be specified.
Some examples are:
123
.567
–34.9
1.5678E+34
15E–10
&8200
@00110101
Numeric constants (numbers) are compiled as entered. The compiled code takes five bytes per constant, regardless of the
number of digits in the constant. Using constants other than variable names in your program speeds execution at the
expense of memory. Due to the compiling process, the maximum number of constants per line is 24. Exceeding that
number will invoke the “Compile” error message.
NOTE:
Attempting to enter a line with more than 24 constants will cause the remainder of the line to be
terminated. CAMBASIC does this to prevent serious program malfunction. If you create a program
on a PC and try to download a line with more than 24 constants, CAMBASIC will try to send an
Concepts - 8
error message. Subsequent lines will become garbled as the synchronous nature of data transmission
is lost.
When numeric constants are printed in a program listing, they are always followed by a space. The space is added by the
LIST statement and is not stored in your program.
OPERATORS
Arithmetic Operators:
CAMBASIC is capable of manipulating single bits within an 8–bit field, packed BCD data, 8–bit bytes, 16–bit words, and
real (floating point) numbers.
CAMBASIC assumes that all numbers contained in a program and those input by the operator are decimal. It can also
accept hexadecimal numbers. The prefix of the number determines its modulus. For example,
Decimal
33797
(no prefix needed)
Hexadecimal
&8405 (& means hexadecimal)
Binary
@11001001
(@ means binary)
The output can be in decimal, hexadecimal or binary format:
Decimal
242
Hexadecimal
E2
Additional math operators are:
Operator
Operation
Example
+
–
*
/
\
mod
addition
subtraction
multiplication
division
integer division
modulo
X+Y
X–Y
X*Y
X/Y
X\Y
X mod Y
Expression analysis of multiplication and division is carried out first from left to right. Then addition and subtraction are
evaluated from left to right.
NOTE:
Values for X and Y cannot exceed 32767 or be less than –32768 when performing integer division.
If these values are exceeded, overflow will occur, data will be erroneous and no error message will be
generated.
Relational Operators
Operator
=
<>
Relation
Tested
equal
not equal
Example
X=Y
X<>Y
Concepts - 9
>
<
>=
greater than
less than
greater than
or equal to
less than
or equal to
<=
X>Y
X<Y
X>=Y
X<=Y
Relational operations return a value of “0” if false, – “1” if true.
Logical Operators
Logical operators perform logical, or Boolean operations on numeric values. Just as relational operators usually make
decisions regarding program flow, logical operators usually connect two or more relations and return a true or false value to
be used in a decision (see “IF statement” in CAMBASIC COMMANDS).
A logical operator takes a combination of true–false values and returns a true or false result. An operand of a logical
operator is considered “true” if it is not equal to zero (like the –1 returned by a relational operator), or “false” if it is equal
to zero. The result of the logical operation is a number which is, again, “true” if it is not equal to zero, or “false” if it is
equal to zero. The number is calculated by performing the operation, bit by bit.
The logical operators are NOT, AND, XOR and OR. In the following table. (“T” indicates a true, or nonzero value. “F”
indicates a false, or zero value.). The operators are listed in order of precedence.
A
T
F
F
F
NOT A
F
T
T
F
A
T
T
F
F
B
T
F
T
F
A
T
T
F
F
B
T
F
T
F
A AND B
T
F
F
F
A OR B A
T
T
T
F
B
T
T
F
F
A XOR B
T
F
T
F
F
T
T
F
Logical operations are carried out on 16–bit operands with 16–bit results. The examples use 8–bit operands for simplicity.
The OR operator essentially detects the presence of a binary “1” in either operand. For example:
Operand 1
Operand 2
Operand 1
OR Operand 2
0001 0111
0100 1010
0101 1111
=
=
=
23
74
95
The AND operator detects the coincidence of two binary “1”s.
Operand 1
0001 0111
Operand 2
0100 1010
Operand 1
0000 0010
AND Operand 2
=
=
=
23
74
2
Concepts - 10
The NOT operator performs a logical negative of a value.
Operand 1
0001 0111
NOT Operand 1 1110 1000
Value of expression
1
2
–2
–1
NOTE:
=
=
23
232
Value of NOT expression
–2
–3
1
0
The NOT expression is false only if the expression evaluates to a value of –1. If you define Boolean
constants or variables for use in your programs, use –1 for true.
The XOR operator essentially detects the presence of a binary “1” in either operand. For example:
Operand 1
0001 0111
Operand 2
0100 1010
Operand 1
0101 1101
XOR Operand 2
=
=
=
23
74
93
Expression Evaluation
Parenthesis
The usual rules for order are followed in evaluating expressions. The order of evaluation is controlled by parentheses.
Their liberal use is recommended both for error–free code and for clarity. They are required when mixing functional,
mathematical, logical or relational operators.
Spaces
CAMBASIC has a very forgiving attitude towards the use of spaces. They may be used almost anywhere. They must be
used after keywords. If the keyword is followed by a variable, for example, PRINTF, will give a syntax error. All spaces
are removed in the compiling process. They are added back when you type LIST.
Order
The set of arithmetic and logical operators available in CAMBASIC in the order in which they are evaluated is as follows:
1.
expressions in parentheses “( )”
2.
ˆ (exponentiation)
3.
– (unary minus)
4.
* and / (multiplication and division)
5.
+ and – (addition and subtraction)
6.
relational operators
=
(equal)
<>
(not equal)
<
(less than)
>
(greater than)
<=
(less than or equal to)
Concepts - 11
>=
(greater than or equal to)
7.
NOT (logical bitwise complement)
8.
AND (logical bitwise and)
9.
OR (logical bitwise or)
10.
XOR (logical bitwise exclusive OR).
11.
MOD (remainder from integer divide)
All operators listed at the same level are evaluated left to right in an expression.
All logical operations convert their operands to 16–bit integer values prior to the operation. These operands must be in the
range 0 to 65,535 or –32,768 to 32,767. If they exceed these values, the result will be meaningless and no error message
will be given.
Concepts - 12
CAMBASIC EDITOR
Using the Line Editor
When using a CRT terminal to write programs, the resources of the PC are not available. CAMBASIC has a line editor that
may be used with any “smart” or “dumb” terminal. You can also use these commands when using your PC with terminal
software other than PC SmartLINK. There are 12 editing commands.
Your program can be edited a line at a time. Since you are talking through a serial port to your PC or terminal, full screen
editing like that on your PC is not possible.
To insert a new line, you just type the line and the CAMBASIC editor will place it in the proper numeric sequence with the
rest of the program. If there was previously a line with the same line number, the previous line is deleted before the new
line is added. To delete a whole line, type the line number and then <ENTER>.
Some commands are prefixed with n. This is an optional numeric parameter. For example, 5D means delete the next 5
characters.
A
Abort all changes and reenter Edit Mode on same line.
I
Insert Mode active.
L
Lists the entire line
X
Extend the line by moving cursor to end and enter Insert Mode.
H
Hack off the remainder of the line and enter Insert Mode.
nD
Delete n characters.
nM
Delete n characters and enter Insert Mode.
nR
Replace n characters.
n<SPC>
Space n characters.
<ESC>
Escapes the Insert Mode.
<ENTER>
Save the edited line.
<BKsp>
Nondestructive cursor backspacing.
All commands may be used within a single line. Use of an illegal command causes the bell on the terminal to sound. If an
attempt is made to space beyond the actual line length, the cursor will simply stop.
WARNING:
When using the screen editor in PC SmartLINK, do not use the EDIT command. Use LIST to put the
lines you want to edit on the screen.
ENTERING THE EDIT MODE – LINE EDITOR
To start this tutorial on editing, power–up your system and enter the following line.
10 PRINT "This is" ; : PRINT" a sample edit"
Now type:
EDIT 10
10 PRINT "This is" ; : PRINT" a sample edit"
10 _
Executing the EDIT statement will cause the target line to be displayed. Below this line the line number will be displayed
again and the cursor will be positioned at the start of the line. In the following text, the notation <ENTER> means press
the key enclosed by the < >. The underline shows the cursor position.
Program Editing - 1
CURSOR MOVEMENT
The display will appear as above. Press <SPC> twice. You will notice that the first two characters appear as the cursor
moves to the right. Now press <4> and then <SPC>. The cursor now moves 4 spaces to the right.
Press <SPC> twice. The characters seem to be erased but are not. You can confirm this by pressing <SPC> twice
again.
You cannot move the cursor with the <SPC> beyond the end of the line or with the <SPC> to the left of the text.
Editing the line number is not allowed.
Now press <ENTER>. The line is reprinted and then saved. In this case no editing took place. This line will be used
throughout this section.
Now type a period “ . ”.
You will notice that line 10 once again appears for editing. This is the quick form of editing. The “.” command causes the
“current” line to be edited.
LINE EDITING COMMANDS
A
Abort All Changes And Reenter The Edit Mode
If you change your mind in the middle of an edit, you can use the “A” command to cancel all the
editing work done on the line so far and redisplay the command for further editing.
If you are in the Insert Mode when the decision to abandon the edit occurs, you must exit the Insert
Mode. To get out of the Insert Mode, press the <ESC> key then press <A>.
D
Delete
To delete a character move the cursor to the character to be deleted. Note that the character is not
printed at the cursor. Now press the <D> on a terminal (do not press <ENTER> yet). If several
characters are to be deleted, press the number first and then the <D> key.
The cursor will move leaving blanks where the deleted characters are. Now press <ENTER>. The
line is reprinted with the blanks indicating the edit. The blanks are not stored in the text. You can
confirm this by executing:
>LIST [line]
CAMBASIC will not let you delete more characters than exist on a line. There is no way to undo a
delete except by performing an Abort <A>. To view the changes to the line, type <L>. The
entire line will be displayed.
ESC
Escape From Insert And Replace Modes
This command turns off the Insert Mode. If you wish to use other editing commands while in Insert
Mode, you must press <ESC>.
H
Hack Remainder Of The Line And Enter Insert
The Hack command deletes from the cursor position to the end of the line and enters the Insert Mode.
EDIT 10
10 PRINT "This is";:PRINT" a simple edit"
10 _
Program Editing - 2
Move the cursor to the “e” in edit.
10 PRINT "This is";:PRINT" a simple edit"
10 PRINT "This is";:PRINT" a simple _
Now type <H> and then the phrase ("hack") and, finally, <ENTER>.
10
I
PRINT " This is"; : PRINT " a simple hack"
Insert
The <I> key is used for insert.
The cursor is normally a blinking underline character. When in the Insert Mode, this changes to a
blinking block character.
When using a CRT terminal, <I> turns on the Insert Mode and <ESC> turns it off. After the
Insert Mode is turned off, you can continue editing the remainder of the line. Typing an <ENTER>
when in the Insert Mode will cause the edited line to be saved.
L
List The Entire Line
Use the L command to finish listing the line and remain in the Edit Mode. This command is useful
when you have made several inserts and deletions in a line.
M
Modify By Deleting And Inserting
The Modify command deletes n characters and enters the Insert Mode. It is a combination of the
Delete and Insert Modes.
EDIT 10
10 PRINT "This is";:PRINT" a simple edit"
10 _
Space the cursor out to the “i” in “is”.
10 PRINT "This is";:PRINT" a simple edit"
10 PRINT "This _
Now type <2M> and the word (was) followed with <ENTER>.
The word “is” was deleted and the word “was” was inserted.
10 PRINT "This was";:PRINT" a simple edit"
R
Replace
The Replace command does a delete and insert on a character basis. For example:
EDIT 10
10 PRINT "This is";:PRINT" a sample edit"
10 _
Now press the <SPC> until the cursor is under the “a” in sample.
10 PRINT "This is";:PRINT" a sample edit"
Program Editing - 3
10 PRINT "This is";:PRINT" a s_
Type <R> and then <i>. You have replaced the “a” with an “i”. Finally, type <ENTER>.
10 PRINT "This is";:PRINT" a sample edit"
10 PRINT "This is";:PRINT" a si
10 PRINT "This is";:PRINT" a simple edit"
If you change your mind in the middle of a Replace, you can exit by pressing <ESC>
X
Extend The Line
To add more to the end of an existing line type <X>. This command moves the cursor to the next
character past the end of the line and enters the Insert Mode.
The cursor will change from the underline to the block. You may now insert test.
Program Editing - 4
How to Maximize Execution Speed
1.
Use the precompiled variable A% to Z%. In an average program these will run 50% faster. Use as many as
possible, especially in FOR/NEXT loops and software counters.
For other variables there is a lookup time. To minimize lookup time declare the variables at the beginning of
the program to force them to be at the beginning of the variable table. Put the variables which need to execute
fastest at the beginning.
10 A=0:B=0:C=0:A$=""
2.
Use constants rather than variables whenever possible in all functions and statements. Except for the
precompiled variables above, a “lookup” time is required.
POKE &9000,4
fastest
POKE A%,B%
fast
POKE A,B
slowest
3.
The speed of execution is independent of the length of the variable name.
4.
Place several statements on the same line. This will yield a slight increase in speed at the expense of clarity.
5.
Use INC and DEC whenever possible. They are much faster than the standard syntax to increment variables.
INC A% fastest
6.
INC A
fast
A=A+1
slowest
All string operations are slow. This is especially true when concatenating strings. When printing, avoid string
concatenation.
PRINT A$;B$
fast
PRINT A$+B$
slow
7.
Certain mathematical operations have long execution times: multiply, divide, SIN, COS, ATN, SQR, LOG,
EXP and ˆ.
8.
Replace a list of conditionals with the ON GOTO statement:
10 ON X GOTO 200,300,400,500 fast
10
20
30
40
9.
IF
IF
IF
IF
X=1
X=2
X=3
X+4
GOTO
GOTO
GOTO
GOTO
200
300
400
500
very slow
Even though remarks are not executed, there is a slight amount of overhead to skip over the list number. You
can use PC SmartLINK to strip out the remarks in the final program. However, this may have a significant
impact on clarity. Do this only if all other methods fail.
Programing Tips - 1
10.
Spaces have no affect on speed since they are eliminated in the compiling process.
11.
Data statements execute slowly. If you need large data tables, load them into RAM at the start of the program,
and access them with the PEEK function. While this is less convenient, it is faster.
12.
The PRINT USING statement takes longer to execute than PRINT, as it must format before sending the
characters.
13.
FPOKE and FPEEK are the fastest memory accesses. They move four bytes at a time. If you have enough
memory to store multiple bytes, then use these constructs rather than PEEK, POKE, DPEEK and DPOKE.
FPOKE A%,B%
is more than twice as fast as
in an average program
POKE A,B
14.
Array handling is, by its nature, slow in any language. Avoid multi-dimension arrays when possible.
15.
When possible, use the DO/ENDDO loop instead of the FOR/NEXT. It is much faster.
16.
The most effective way to speed up a program is through good programming. Highly modular programs with
lots of subroutines and GOSUBs are easy to develop, read and maintain. However, they are slower than
optimizing program flow for speed.
17.
When using a FOR/NEXT loop, avoid placing the variable after NEXT. This forces CAMBASIC to verify the
variable name and slow down execution of the loop.
fast
10 NEXT
10 NEXT D
18.
slow
Do not use exponentiation to square or cube a number. It is a very slow operation.
10 A=Xˆ2
very slow
10 A=X*X
fast
10 A=X*X*X
better than xˆ3
Other Tips
1.
Sometimes a system will crash without any obvious cause. The crashing can occur because part of the memory
used by CAMBASIC has been modified by a POKE statement that is out of bounds. For example,
10
POKE A,B
The variable A is the address at which the POKE occurs. If the value of A inadvertently falls into the wrong
area, unpredictable results may occur. Some of these are:
a.
b.
c.
d.
e.
2.
Error message for a nonexistent line number.
Erroneous error message for a good line.
A <System corruption> error message.
The system will not respond to the keyboard.
The program stops or locks up.
Software interrupts occur as a result of ON COUNT, ON KEYPAD$, ON BIT and similar statements. If a
Programing Tips - 2
second software interrupt occurs while the system is in a subroutine for another interrupt, nesting occurs. This
means that the second interrupt will interrupt the first subroutine. After the second subroutine finishes
executing, the first subroutine can finish executing. Use LOCK and UNLOCK if this will cause a problem in
your program.
Nesting can occur at any level, limited only by the amount of memory. Keep in mind that the last interrupt
ultimately has the highest priority, while the first interrupt has the lowest priority.
There is one situation where nesting can cause serious problems. Suppose an ON COM$ statement were
issued, the conditions were met and you have entered a subroutine. If a second interrupt occurs from the same
ON COM$ statement, it will interrupt itself.
The effect of this is that the second interrupt may change variables that the first interrupt has yet to use. You
can avoid this situation by either disabling the ON COM$ statement while you are in an interrupt routine or
preventing the sender from sending more data until you have processed the first data.
A good rule of the thumb is that all interrupt service routines should be as short as possible.
3.
Before downloading a program from the PC, always type NEW if a program already exists. This will speed
up the download.
4.
When doing a comparison on the result of multiple calculations, rounding errors can cause a comparison to be
missed. In the example below A is the result of multiple calculations, the variable A (below) could increase
from 1.22999 to 1.23001 and the equality would not be met.
10 IF A=1.23 THEN 100
A better method is
10 IF A=>1.23 THEN 100
Programing Tips - 3
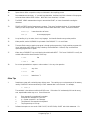
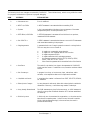
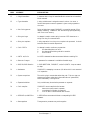
Command
Syntax
Purpose
ABS
n=ABS(m)
Returns absolute value of a number
AIN
n=AIN(channel)
Returns result of A/D conversion
AND
n = a AND b
Performs logical AND
AOT
AOT channel,value
Sends data to a D/A converter
ASC
n=ASC(m$)
Returns ASCII code for first character
ATN
n = ATN(m)
Returns the arctangent
BCD
n = BCD(m)
Converts binary to BCD
BIN
n=BIN(m)
Converts packed BCD to binary
BIN$
a$ = BIN$(m)
Converts 8–bit number to string
BIT
n=BIT(I/O address,bit)
Reads specific bit at address
BIT
BIT addr,bit,value
Writes bit at address
CALL
CALL addr [,m1][,m2]
Call assembly program and pass data
CHR$
n$=CHR$(m)
Converts number to character equivalent
n$=CHR$(m,n)
Returns a string m characters with length n
CLEAR
CLEAR[string]
Clears variables, sets string space
CLEAR COM$
CLEAR COM$ n
Resets serial input buffer
CLEAR COUNT
CLEAR COUNT n
Clears count in software counter
CLEAR TICK
CLEAR TICK n
CLS
CLS[#n]
Clears screen
COM$
n$=COM$(n)
Returns string from serial input buffer
CONFIG
CONFIG n
Initializes system parameters
CONT
CONT
Resumes program execution
COS
n=COS(m)
Returns cosign of m to n
COUNT
n=COUNT(m)
Returns the count in software counters
DATA
DATA constant
Stores numeric and string data
DATE$
a$=DATE$(n)
Returns date from calendar/clock
DATE$=string
Writes to calendar/clock
DEC
DEC variable
Decrements variable by 1
DECF
DECF variable
Decrements variable by 4
DELETE
DELETE–]line[–line][–]
Deletes CAMBASIC program lines
DELAY
DELAY n
Delays program by n seconds
DIM
DIM variable (value)
Specifies max size for array variables
DISPLAY
DISPLAY a$
Writes data to display
Resets internal system clock to 0
Command Summary - 1
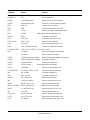
Command
Syntax
Purpose
DO/UNTIL
DO list UNTIL expr.
Executes until expression is true
DO/ENDDO
DO n
Fast loop structure
DPEEK
n=DPEEK(address)
Returns 16–bit value from memory
DPOKE
DPOKE address,data
Writes 16–bit value to memory address
EDIT
EDIT line
Displays a line for editing
END
END
Causes program execution to cease
ERL
n=ERL
Returns line number associated with error
ERR
n=ERR
ERROR
ERR n
Simulates run–time error
EXIT
EXIT [line]
Allows branching out of a loop
EXIT CLEAR
EXIT CLEAR
Resets all loops and stacks
EXP
n=EXP(m)
Returns exponential function of “e”
FIND
FIND [variable][command]
Searches for parameter in program
FOR/NEXT/STEP
FOR x=m TO n [STEP] Do a loop for n times
FRE
n=FRE(0)
Returns free program and data bytes
n=FRE(c$)
Returns unused string space
FPEEK
a=FPEEK(address[,segment])
Returns floating point number from memory
FPOKE
FPOKE address,data[,segment]
Stores data in memory
GOSUB
GOSUB line/label
Branches to a subroutine
GOTO
GOTO line/label
HEX$
n=HEX$(m)
Returns hex representation of m
IF/THEN/ELSE
IF condition THEN .. ELSE ..
Performs conditional operations
INC
INC variable
Increments variable by 1
INCF
INCF variable
Increments variable by 4
INKEY$
a$ = INKEY$(n)
Returns serial characters
INP
n=INP(I/O address)
Returns a byte from an I/O port
INPUT
INPUT["string";] var
Returns data from serial port
INPUT KEYPAD$
INPUT KEYPAD$ a$
Returns string from keypad
INSTR
a = INSTR(n,a$,b$)
Returns the position of b$ in a$
INT
n=INT(b)
Returns integer portion of b
KEYPAD$
a$=KEYPAD$(n)
Returns last key from keypad port
LEFT$
n$=LEFT$(m$,p)
Returns left–most characters of m$
LEN
n=LEN(m$)
Returns number of characters in m$
Returns error code associated with error
Branches to specified line number
Command Summary - 2
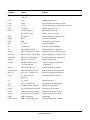
Command
Syntax
Purpose
LINE
a = LINE(n)
Read and write single bit
LINE n, m
LIST
LIST
Outputs program listing
LOAD
LOAD
Moves program from memory to RAM
LOCK
LOCK
Lock out interrupts at a critical time in a program
LOG
n=LOG(m)
Returns natural log of m
MID$
n$=MID$(m$,p,q)
Returns part of string m$
MID$(m$,p,q)=n$
Inserts a string into a string
MOD
n=a MOD b
Returns remainder of integer division
MON
MON
Invokes the minimonitor
NEW
NEW
Initializes for a new program
NOT
n = NOT a
Performs a negation
OFF
Command OFF
Used with various statements
ON
ON expression GOSUB
Calculated branch to a subroutine
ON BIT
ON BIT tsk#,addr,bit GOSUB
Declares I/O line to monitor logic level
ON COM$
ON COM$ chan GOSUB [line]
Branches program on CONFIG COM$
ON COUNT
ON COUNT n GOSUB line
Executes subroutine on a preset count
ON ERR
ON ERR GOTO [line]
Enables error trapping
ON INP
ON INP n, address, mask
Causes a break on an input pattern
GOSUB line/label
to subroutine
ON ITR
ON ITR GOSUB [line]
Branches program on interrupt
ON KEYPAD$
ON KEYPAD$ GOSUB line
Branches program with keypad input
ON TICK
ON TICK n, t GOSUB line
Causes periodic program branching
OPTO
n = OPTO (channel)
Read and write to OPTO racks
OPTO n,m
OR
n = a OR b
Performs logical OR
OUT
OUT I/O address, data
Sends a byte to an output address
PEEK
n=PEEK(address[,segment])
Returns byte from memory
PEEK$
X$=PEEK$(address[,segment])
Returns string from memory
POKE
POKE address,data[,segment]
Writes byte into memory location
POKE$
POKE$ address,a$[,segment]
Sends string to memory address
PRINT
PRINT [expression]
Outputs data
PRINT USING
PRINT USING"format";exp.
Prints formatted strings or number
Command Summary - 3
Command
Syntax
Purpose
PRINT$
PRINT$ char [,char]
Prints string of characters
PULSE
n=PULSE(m)
Returns time from pulsed output
PULSE n,m
Pulses an output bit
READ
READ variable
Reads DATA statement values
REMARK
'
Allows program comments
RENUM
RENUM [newline] . .
Renumbers program lines
RESTORE
RESTORE [line]
RESUME
RESUME
Continues program execution
RESUME line
RESUME line
Continues program execution
RESUME NEXT
RESUME NEXT
Continues program execution
RESUME COUNT
RESUME COUNT m
Reenables software counter
RETURN
RETURN
Resumes execution after GOSUB
RETURN ITR
RETURN ITR
Resumes execution after interrupt
RIGHT$
n$=RIGHT$(m$,p)
Returns right–most p char of m$
RND
n=RND(m)
Returns pseudo–random number
RUN
RUN [line]
Begins program execution
SAVE
SAVE n
Saves programor data to memory device
SGN
n=SGN(m)
Returns the sign of m
SIN
n=SIN(m)
Calculates sine function
SQR
x=SQR(m)
Returns square root
START BIT
START BIT task number Enables a BIT task
START COUNT
START COUNT n
Activates software counter(s)
START INP
START INP n
Activates port checking task
STOP
STOP
Terminates program execution
STOP BIT
STOP BIT task number
Disables BIT task
STOP COUNT
STOP COUNT n
Deactivates software counter(s)
STOP INP
STOP INP n
Deactivates port checking task
STR$
n$=STR$(m)
Converts m to a string n$
SYS
a=SYS(n)
Accesses system data
TAB
PRINT TAB(m)
Tabs to position m
TAN
n=TAN(n)
Returns the tangent indirectly
TICK
a=TICK(n)
Return time from 12 hour clock
Resets read pointer
Command Summary - 4
Command
Syntax
Purpose
TIME$
n$=TIME$(n)
Reads calendar/clock
TIME$=n$
Writes to calendar/clock
TROFF
TROFF
Stops the trace
TRON
TRON
Starts the trace
UNLOCK
UNLOCK
Unlocks interrupt lock out
UNNEW
UNNEW
Restores a program
USING
USING
Formats a printed output
VAL
n=VAL(m$)
Converts m$ to a number
VARPTR
VARPTR(variable)
Returns address of variable
XOR
n = a XOR b
Performs a logical exclusive OR
/
/
Lists entire program to screen
Command Summary - 5
ABS
Numeric Function
Syntax:
n = ABS(m)
Purpose:
To return the absolute value of the expression m.
Remarks:
The absolute value of a number is always positive or zero.
Related:
none
Example:
PRINT ABS(7)
7
PRINT ABS(–7)
7
Error:
none
Commands - 1
AIN
Process Function
SYNTAX:
a = AIN(channel)
PURPOSE:
To return the analog input value.
REMARKS:
The channel is the channel number of the A/D converter. The maximum channel number varies from
card to card. See your hardware manual for more information.
EXAMPLE:
See your hardware manual.
ERROR:
<Data negative> – for all parameters
<Illegal function> – if channel too large
<Command not available> – if function not supported in your card
Commands - 2
AOT
Process Statement
SYNTAX:
AOT channel,value
PURPOSE:
To write data to a analog output port.
REMARKS:
AOT causes the analog output voltage to move to a level specified by the value. The voltage will
remain constant until another AOT statement is executed. The analog output ICs change voltage as
fast as the CPU can write to them. See your hardware manual for more information.
RELATED:
CONFIG AOT
EXAMPLE:
See your hardware manual.
ERROR:
<Data negative> – for channel and value
<Data out of range> – if channel too large
<Command not available> – if card does not have hardware support
Commands - 3
ASC
Numeric Function
SYNTAX:
n = ASC(m$)
PURPOSE:
To return the ASCII code for the first character of the string m$.
REMARKS:
The result of the ASC function is a numerical value that is the ASCII code of the first character of the
string.
The CHR$ function is the inverse of the ASC function, and is used to convert from the ASCII code to
a character.
RELATED:
CHR$, STR$, VAL
EXAMPLE:
10 F$ = "Alert"
20 PRINT ASC(F$)
RUN
65
ERROR:
<Illegal argument> – if m$ is a null
Commands - 4
ATN
Numeric Function
SYNTAX:
n = ATN(m)
PURPOSE:
To return the arctangent of m.
REMARKS:
The result, n, of the ATN function is a value in radians in the range of –PI/2 to PI/2, where PI =
3.141593. The expression may be integer, but the evaluation is always performed in floating point.
To obtain the tangent of m when m is in degrees, use TAN (m* 180).
Trigonometric functions are computed as a power series in CAMBASIC. Calculations are done in
single precision floating point to seven digits of precision. Since the power series is an
approximation, the result will be accurate to four to six digits, depending upon the value of m.
RELATED:
COS, SIN, TAN
EXAMPLE:
10 PI = 3.141593
20 RADIANS = ATN(1)
30 DEGREES = RADIANS * 180 / PI
40 PRINT RADIANS,DEGREES
RUN
.785398
45
ERROR:
none
Commands - 5
BCD
Numeric Function
SYNTAX:
n = BCD(m)
PURPOSE:
To return four digits in packed BCD format from a number.
REMARKS:
The four BCD digits are stored in the variable n. Each BCD digit is 4–bits and the four BCD digits
are stored in 16–bit form. These are known as packed BCD numbers. One common use is to
convert a count to BCD to send to displays that have BCD inputs.
RELATED:
BIN
EXAMPLE:
A = 456
PRINT BCD(A)
1110
At first, the answer above appears to be wrong. This is due to the fact that the 4–digit BCD number
has been packed into 16–bits and the print command is treating it as a binary number.
The following converts a 4–digit number and outputs it to two ports:
10
20
30
40
50
ERROR:
N =
M =
OUT
N =
OUT
BCD(6789)
N AND 255
1,M
N \ 256
2,N
<Illegal argument> – if m > 9999
<Data negative > – for m
Commands - 6
BIN
Numeric Function
SYNTAX:
n = BIN(m)
PURPOSE:
To return a number from a packed BCD number.
REMARKS:
This function assumes that the BCD digits are packed. That is, there are four BCD digits per 16–bits.
EXAMPLE:
A = BIN(B)
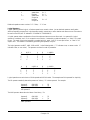
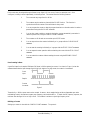
Normally, the only way BCD data can enter the system is through an I/O port like those on the 82C55
(e.g. reading a two digit BCD thumbwheel switch).
Each of the two switches has four outputs. Together, the eight lines are connected to an I/O port
input. Assuming the thumbwheel switches are set to 98 and connected to I/O port &18, the port input
would look as follows (where D0 through D7 are the eight data bits):
D7
1
D6
0
D5
0
D4
1
D3
1
D2
0
D1
0
D0
0
The example below appears wrong at first. However, CAMBASIC assumed that this was a binary
number and gave you the decimal equivalent.
PRINT INP(&18)
152
To get the correct result:
PRINT BIN(INP(&18))
98
ERROR:
<Illegal argument> – if any BCD digit > 9
<Data negative > – for m
Commands - 7
BIN$
String Function
SYNTAX:
n$ = BIN$(m)
PURPOSE:
Returns an 8–bit binary representation of a number.
REMARKS:
The most significant bit (bit 7) is on the left and the least significant is on the right. If a string
argument is inadvertently used, the result will be zero.
This function is primarily used with the INP function to display the status of each input line.
RELATED:
The HEX$ function and the “@” binary prefix.
EXAMPLE:
PRINT BIN$(199)
11000111
This example illustrates the usefulness of BIN$ to determine the status of an I/O port. Suppose that
the port is connected to switches. Reading the value with the INP function yields 199. Without doing
calculations, it is difficult to tell which switches are on. Using BIN$ you can see immediately that
switches 0, 1, 2, 6 and 7 are on.
ERROR:
<Type mismatch> – if m is a string or n is not a string.
<Data > 255> – for m.
<Data negative > – for m.
Commands - 8
BIT
Process Function
SYNTAX:
n = BIT(I/O address,bit)
PURPOSE:
To read a specified bit at a specified I/O address.
REMARKS:
This function returns a “1” if the bit is high and a “0” if it is low.
This function will operate only with I/O addresses, not memory addresses.
RELATED:
BIT statement, INP, ON BIT, OUT
EXAMPLE:
10 OUT &10,209
15 FOR X = 0 TO 7
20 PRINT BIT(&10,X) ;
30 NEXT : PRINT
RUN
1
ERROR:
1
0
1
0
0
0
1
<Data negative > – for I/O address, bit
<Data out of range > – if bit > 7
<Data > 65,535> – for I/O address
Commands - 9
BIT
Process Statement
SYNTAX:
BIT
BIT
BIT
BIT
PURPOSE:
To set or turn on an individual bit at the specified I/O address without affecting the other bits.
REMARKS:
This statement will operate only with I/O addresses, not memory addresses. This program works by
reading the last byte written to this port, performing the bit operation and writing it back to the same
I/O address. Ports like those on the 82C55 can be read back. The BIT statement cannot be used with
ports that lack read back capability.
I/O address,bit,value
I/O address,bit,ON
I/O address,bit,OFF
I/O address,bit,NOT
Four syntaxes are allowed. The first syntax is the most flexible, as the value parameter can be a
variable. The next three are more descriptive, where ON sets the bit high, OFF sets the bit low, and
NOT writes the complement of the bit. These execute faster than the first variation and are
self–documenting.
RELATED:
BIT function, INP, ON BIT, OUT
EXAMPLE:
10 BIT &10,2,1
Set bit 2 of address &10 to a high state
10 BIT &10,5,A
Set bit 5 of address &10 to the value of A
ERROR:
10 BIT &10,1,OFF
Set bit 1 of address &10 to a low state.
10 BIT &10,0,NOT
This reverses the value of bit 0 at address &10
<Data negative > – if I/O address, bit or value
<Data out of range > – if value is not 0, 1, ON, NOT or OFF, or if bit > 8
<Data > 65,535> – for I/O address
Commands - 10
CALL
Statement
SYNTAX:
CALL address [,m1] [,m2]. . .
PURPOSE:
To execute an assembly language program at the specified address and, optionally, to pass data.
REMARKS:
The specified address may be an expression and is the absolute address of the assembly language
program.
The optional data may be expressions. After conversion to 16–bit integers, the data is pushed on the
CPU stack for use by the CALLed routine.
The data could be the memory address (obtained by the VAR function) of either numeric or string
variables, if the routine is to access floating point data.
The amount of data that can be saved on the stack is limited only by available memory. When the
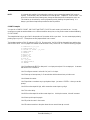
assembly language routine is entered, the information passed and created is structured as follows:
SP –>
mn
m n–1
.
.
.
m1
return address
HL –> stack location of return address
BC –> number of data
The data may then be popped off the stack in reverse order. Note the HL register pair point to the
location of the return address in the stack, allowing a clean return to CAMBASIC. The BC register
pair contains the number of data passed to the routine.
Data may be returned to CAMBASIC from the assembly language routine by storing them in memory
locations before returning to CAMBASIC, and then reading the memory locations from within
CAMBASIC with the PEEK function. Or they may be stored directly in CAMBASIC variables, if
the VAR function was used to pass the variable addresses to the assembly language program.
NOTE1: Once you have called an assembly language routine, you are in complete control.
CAMBASIC has no influence (unless the interrupts are left enabled). If you do not return to
CAMBASIC, you probably have not restored the CPU stack or registers, destroyed RAM reserved
for CAMBASIC, or have not executed a RET (C9H). However, if interrupts have been enabled by
CAMBASIC, you must consider the consequences or turn off the interrupts.
NOTE2: CAMBASIC internal routines are not accessible by the object code programmer except
those listed in the SYS function (if any).
Commands - 11
NOTE3: The CALL statement saves all the registers needed by CAMBASIC except IY. If this
register is used, it must be restored before returning.
EXAMPLE:
CALL 0
This causes the system to reinitialize. If an autorun EEPROM is present, its program will execute.
ERROR:
<Data negative> – for any parameter
<Data > 65,535> – for any parameter
Commands - 12
CHR$
String Function
SYNTAX:
n$ = CHR$(m)
n$ = CHR$(m,n)
PURPOSE:
To convert an ASCII code to its character equivalent. Also, to return a string of like characters.
REMARKS:
The CHR$ function returns the one–character string with ASCII code m. CHR$ is commonly used to
send a special character to the screen or printer.
The second syntax will generate a string of n characters all with the character m. This is useful for
printing graphics. It can be used to simulate SPACE$ and STRING$ in other BASICS.
CHR$(65,10) is equal to STRING$(10,65)
CHR$(32,14) is equal to SPACE$(14)
RELATED:
ASC, STR$, VAL
EXAMPLE:
PRINT CHR$(65)
A
PRINT CHR$(36,10)
$$$$$$$$$$
ERROR:
<Data negative>– for m,n
<Data> 255> – for m,n
<Out of string space> if n>available string space
Commands - 13
CLEAR
Statement
SYNTAX:
CLEAR [string]
PURPOSE:
To set all numeric variables to zero, set all string variables to null, restore the data pointer, and negate
all DIM statements. You can optionally set the string space size.
REMARKS:
If the optional parameter string is specified, variables are cleared and the string space is made equal to
the number of bytes specified. 100 bytes is the default value on power–up.
NOTE: You do not need to clear string space for string arrays. The DIM statement does this
automatically.
RELATED:
none
EXAMPLE:
The following clears all variables and sets the string space to 100 bytes:
10 CLEAR
The following clears all variables and reserves 500 bytes of RAM for strings:
10 CLEAR 500
ERROR:
<Data negative> – for string
<Out of memory> – if an attempt is made to clear more memory than is available
Commands - 14
CLEAR COM$
Process Statement
SYNTAX:
CLEAR COM$ n
PURPOSE:
To reset a serial port input buffer to the power–up condition.
REMARKS:
Executing this statement will clear the serial input buffer specified by n.
n = legal serial port number.
The input buffer parameters are reset. Any previous CONFIG COM$ and ON COM$ commands will
be cancelled.
This statement does not clear serial output buffers.
See the Multitasking Chapter for more information.
RELATED:
COM$, CONFIG COM$, ON COM$
EXAMPLE:
The following clears the primary serial port input buffer:
10 CLEAR COM$ 1
ERROR:
<Data negative> – for n
<Data out of range> – if n is not a legal serial port number
Commands - 15
CLEAR COUNT
Tasking Statement
SYNTAX:
CLEAR COUNT n [,n1] . . . [,nm]
PURPOSE:
To clear the accumulated count in a software event counter.
REMARKS:
CLEAR COUNT is functional both during timed operation and when the counter is stopped. The
counter number n ranges from 0 to 7.
See the Multitasking Chapter for more information.
NOTE: This statement has no effect on 82C54 hardware counters.
RELATED:
CONFIG COUNT, ON COUNT, RESUME COUNT, START COUNT, STOP COUNT
EXAMPLE:
10 CLEAR COUNT 0
10 CLEAR COUNT 5,6,3
ERROR:
<Data negative> – for n
<Data out of range> – if n > 7
Commands - 16
CLEAR TICK
Tasking Statement
SYNTAX:
CLEAR TICK n
PURPOSE:
To reset the internal TICK clock to zero. This does not affect a calendar/clock or the counter for the
ON TICK statement.
REMARKS:
There are three TICK timers in CAMBASIC. The parameter n is the timer number and the range is 0
to 2. All TICK timers are independent. This statement can be used as an electronic stop watch. It
can be used in conjunction with the ON BIT statement to measure how long an input is active.
See the Multitasking Chapter for more information.
RELATED:
ON TICK, TICK
EXAMPLE:
10 CLEAR TICK 0
20 IF BIT(&18,0) = 1 THEN 20
30 PRINT TICK (0)
RUN
37.20
This example measured the elapsed time for bit 0 of address &18 to go high.
ERROR:
<Data out of range> - if n>2
<Data negative> - for n
Commands - 17
CLEAR PULSE
Tasking Statement
SYNTAX:
CLEAR PULSE n [,n1] . . . [,nm]
PURPOSE:
To clear the remaining time in a software timer and clear the parameters specified by CONFIG
TIMER.
REMARKS:
Once a timer has been defined with the CONFIG PULSE statement, the CLEAR PULSE statement
can be used to abort the timing sequence. A CONFIG PULSE statement must be executed after
CLEAR PULSE in order for the PULSE commands to work again.
CLEAR PULSE is functional both during timed operation and when the timer is stopped. The
parameter n is the timer number and ranges from 0 to 7.
See the Multitasking Chapter for more information.
RELATED:
PULSE statement and function
EXAMPLE:
10 CLEAR PULSE 1
10 CLEAR PULSE 0,1,2,3,4
ERROR:
<Data negative> – for n
<Data out of range> – if n > 7
Commands - 18
CLS
Statement
SYNTAX:
CLS [#n]
PURPOSE:
To clear the screen of a terminal connected to a serial port using PC SmartLINK.
REMARKS:
This statement sends a string of control characters out the serial port.
n = legal serial port number.
When #n is not present, the COM1 port is cleared.
EXAMPLE:
200 CLS
ERROR:
<Data negative> – for n
<Data out of range> – if n is not a legal port number
Commands - 19
COM$
Process Function
SYNTAX:
n$ =COM$(n)
PURPOSE:
To return a string from the serial input buffer. This function is usually used in conjunction with ON
COM$.
REMARKS:
n = legal serial port number.
COM$ returns the characters in the buffer up to the terminating character (if specified) or the total
number of characters in the buffer.
When COM$ is executed, the characters in the buffer are removed. Immediately executing COM$
again will produce a null string.
RELATED:
CLEAR COM$, ON COM$, CONFIG COM$
EXAMPLE:
See the ON COM$ statement.
ERROR:
<Data negative> – for n
<Illegal argument> – if n is not a legal serial port number
Commands - 20
CONFIG
Statement
SYNTAX:
CONFIG command [list]
PURPOSE:
The CONFIG statement is used to set parameters for a number of industrial commands
REMARKS:
Each subcommand has a list of parameters. See the CONFIG Chapter for details. The configuration
variations are:
CONFIG BAUD
CONFIG BREAK
CONFIG CLOCK
CONFIG COM$
CONFIG COUNT
CONFIG DISPLAY
CONFIG PIO
sets the serial port parameters
enables/disables break characters
set up calendar/clock
defines the serial port interrupt
sets the event counter parameters
defines display type
initializes parallel I/O ICs
RELATED:
See CONFIG Chapter for more information.
EXAMPLE:
See CONFIG Chapter
ERROR:
See CONFIG Chapter
Commands - 21
CONT
Command
SYNTAX:
CONT
PURPOSE:
To resume program execution after a break.
REMARKS:
The CONT command may be used to resume program execution after a break from the serial port, or
an END or STOP statement has been executed. Execution continues at the point where the break
happened.
CONT is invalid if the program has been edited during the break or if any statements have been
executed in the immediate mode.
WARNING: All tasks are cancelled when a program stops. CONTinuing when using multitasking
is not recommended.
EXAMPLE:
In the following example, we create a long loop.
10 A = 1
20 PRINT A ;
30 INC A:GOTO 20
RUN
1 2 3 4 5 6 7 8
(At this point we interrupt the loop by pressing ESC)
<Stop>
CONT
9 10
ERROR:
<Ln 20>
11
12
13
14
15
16
17
18
19
CONT– if executed after a program edit
Commands - 22
20
COS
Numeric Function
SYNTAX:
n = COS(m)
PURPOSE:
To return the trigonometric cosine function.
REMARKS:
m must be in radians. To convert from degrees to radians, multiply by PI/180 where PI = 3.141593.
Trigonometric functions are computed as a power series in CAMBASIC. Calculations are done in
single precision floating point to seven digits of precision. Since the power series is an
approximation, the result will be accurate to four to six digits, depending upon the value of m.
RELATED:
ATN, SIN, TAN
EXAMPLE:
10 PI = 3.141593
20 PRINT COS(PI)
30 DEGREES = 180
40 RADIANS = DEGREES * PI/180
50 PRINT COS(RADIANS)
RUN
–1
–1
ERROR:
none
Commands - 23
COUNT
Process Function
Syntax:
n =count(channel)
Purpose:
To return the count in the software event counters and return the count of the hardware counters.
Remarks:
The COUNT function returns the accumulated high to low transitions at a specified input, independent
of program execution.
The software counters are set up using the ON COUNT statement. channel is the counter number,
and ranges from 0 to 7.
See the Multitasking Chapter for more information.
RELATED:
CLEAR COUNT, CONFIG COUNT, ON COUNT, RESUME COUNT, START COUNT, STOP
COUNT
EXAMPLE:
10 FOR X = 0 TO 7
20 A(X) = COUNT(X)
30 NEXT
This example transfers the data from all the counters to array A.
ERROR:
<Illegal argument> – if counter> 7
<Data negative> – for counter
Commands - 24
DATA
Statement
SYNTAX:
DATA constant [,constant] . . . .
PURPOSE:
To provide a means to store numeric and string constants and object code programs. The data may be
accessed by the READ statement.
REMARKS:
DATA statements are skipped over during execution and may be placed anywhere in the program.
A DATA statement may contain as many constants as will fit on a line, and any number of DATA
statements may be used in a program. The information contained in the DATA statements may be
thought of as one continuous list of items, regardless of how many items are on a line or where the
lines are placed in the program. The READ statements access DATA statements in line number
order.
Each constant may be a numeric or string constant. No expressions are allowed in the list. The
numeric constants may be decimal or hex. String constants in DATA statements need to be
surrounded by quotation marks.
You can use the RESTORE statement to reread information from the beginning of the list of DATA
statements. See the RESTORE statement.
RELATED:
READ, RESTORE
EXAMPLE:
See the READ statement.
ERROR:
none
Commands - 25
DATE$
System Statement
SYNTAX:
DATE$ = date string
PURPOSE:
DATE$ is used to set the date on the system calendar clock. The system clock keeps time on a 24
hour basis, with a resolution of one second.
REMARKS:
The date string may be a variable or a constant. In either case the format is the same.
The string must be in one of the forms below:
"mm-dd-yy"
"mm-dd-yy,dw"
where mm is the month and ranges from 01 to 12, dd is the day (01-31), yy is the year (00-99) and
dw is the day of the week (0-6).
RELATED:
DATE$ function and TIME$
EXAMPLE:
10 DATE$ = "11-01-91"
10 A$ = "01-15-91"
20 DATE$ = A$
10 A$ = "04-02-99,4"
20 DATE$ = A$
ERROR:
<Syntax> – if two digits are not used mm,dd,yy, or if digits not 0-9 are entered.
<Data out of range> - when month, day and year are out of range or not numbers. Extensive range
checking is not performed. You can enter "02-39-99" as a valid date. Range checking on RPC-2350
series only.
Commands - 26
DATE$
System Function
SYNTAX:
a$ = DATE$(n)
PURPOSE:
The DATE$ function is used read the date of the system calendar clock. The system clock keeps time
on a 24 hour basis with a resolution of one second.
REMARKS:
The date is returned in two forms depending upon the value of the argument n. When n=0, the
months, days and years are returned. When n=1, the day of the week is returned.
The clock is set by the DATE$ statement.
RELATED:
DATE$ statement and TIME$
EXAMPLE:
10 DATE$ = "02-11-91,4"
20 PRINT DATE$(0)
30 PRINT DATE$(1)
02-11-91
04
ERROR:
<Data negative> - for n
<Illegal argument> – if n > 1
Commands - 27
DEC & DECF
Statements
SYNTAX:
DEC variable
DECF variable
PURPOSE:
To decrement a variable by one (DEC) or four (DECF).
REMARKS:
This is a fast way to decrement a simple or array variable.
A = A–1
slow
DEC A
fast
A = A–4
slow
DECF A
fast
DEC executes more than twice as fast as the statement it replaces. Valid for simple and array
variables.
RELATED:
INC, INCF
EXAMPLE:
10 A = 4
20 DEC A
30 PRINT A
40 DECF A
50 PRINT A
RUN
3
–1
ERROR:
<Expected variable> – if parameter is not a variable
Commands - 28
DELETE
Command
SYNTAX:
DEL [–] line [–line] [–]
PURPOSE:
To delete CAMBASIC program lines.
REMARKS:
The DEL command erases the specified range of lines from the program. CAMBASIC always
returns to the Immediate Mode after a DELETE is executed.
RELATED:
None
EXAMPLE:
DEL 10
Deletes line 10
DEL 30–78
Deletes lines 30 through 78.
DEL –40
DEL 100–
Deletes all lines from the beginning of the program up to and including line
40.
Delete all lines from 100 to the end of the program.
To delete the whole program, type NEW. If you accidently type NEW, you can recover the program
by typing “UNNEW”. You cannot recover individually deleted lines.
WARNING:
ERROR:
If you specify a deletion range and the second line number does not exist, the next
higher line number will be deleted.
<Line/label not found> – If the first line does not exist
Commands - 29
DELAY
Statement
SYNTAX:
DELAY n
PURPOSE:
To create a precision delay. The resolution is 5 mS (10 ms on 9 Mhz systems).
REMARKS:
Program execution is suspended during the delay period. Interrupt service will be delayed until the
end of the delay period. For breakable delays, use a FOR/NEXT loop.
For applications which require high accuracy, the execution of the DELAY statement itself and the
number of interrupts occurring must be considered.
If a delay of 0 is specified, the delay will be less than 0.5 mS.
NOTE: This command uses a 5 mS system clock (10 ms in 9 Mhz systems). The actual delay can
vary by 0.005 (0.010) seconds. Background tasks are latched but not serviced during the delay
period. Pressing <ESC> will abort the delay and stop the program.
RELATED:
None
EXAMPLE:
10 DELAY .5
delays 1/2 second
10 DELAY 3.25 delays 3.25 seconds
ERROR:
<Data negative> – for n
<Time > 327.67> - for n
Commands - 30
DIM
Statement
SYNTAX:
DIM variable (value) [,variable (value)] . . .
PURPOSE:
To specify the maximum size for array variables and reserve memory accordingly.
REMARKS:
The DIM statement sets all elements of the specified numerical arrays to an initial value of zero.
String array elements are of variable length, with an initial value of zero (null).
The default value is 11 for numerical values and 253 for strings. This means that the numerical array
subscripts for 0 to 10 are allowed. The number of subscripts is always one more than the dimension.
The maximum number of dimensions for an array is 255.
NOTE:
When CLEAR is executed, all dimensioned arrays are redimensioned to 11 (0–10).
NOTE:
String arrays are single dimension only.
Unlike scalar variables, dimensioned array names use only the first and last letters. A variable name
PUMP(n) is seen as the same as PP(n) and returns the same number.
EXAMPLE:
The following dimensions a single dimension numeric and string array:
10 DIM A(25), A$(30)
The following dimensions a numeric array with three dimensions:
20 DIM B(10,10,10)
ERROR:
<Out of memory> – if dimensioned space exceeds memory
<Data negative> – if value is negative
<Array already dimensioned> – if an attempt is made to redimension an array or dimension an
array that has already been referenced in the execution path
Commands - 31
DISPLAY
Process Statement
SYNTAX:
DISPLAY data [,][;][data] . . .
DISPLAY$ data [,data] . . .
DISPLAY! "format";data [,][;]
DISPLAY (row,column) data [,][;][data] . . .
DISPLAY (row,column)$ data [,data] . . .
DISPLAY (row,column)USING "format";data [,][;]
PURPOSE:
To write information to Vacuum fluorescent and LCD displays.
REMARKS:
The three basic syntaxes above can be used to write to the DP series and LCD series displays. Before
using the DISPLAY command, you must first execute the CONFIG DISPLAY statement to install the
driver for your display.
There are two ways to access the display: sequential and random access. In the sequential mode,
characters are displayed beginning in the upper left hand corner and continue to the right. The
random access mode lets you place the cursor anywhere on the display and commence writing at that
point.
The first syntax is sequential. On power–up, the cursor position is at row 0 and column 0. Printing
will continue to the right. At the end of the line, the DP series displays wrap to the next line. The
LCD displays generally do not wrap. The cursor must be moved to the next line.
The second and third syntaxes are random access. These are most commonly used when presenting
data or during operator feedback. You specify a row and column where you want the first character
to be printed. The third syntax formats the data, like the PRINT USING command in other BASICs.
LCD Series Notes:
The integrated electronics within the LCD displays treat the unit as either
one or two 1x80 displays. Each display has one “logical” and one to four “physical” lines.
If the lines are 40 characters long, then there are two physical lines (rows). The first has a column
range from 0 to 39, and the second line has a column range from 40 to 79. When more than 80
characters are written to the display in the sequential mode, the display will wrap around back to the
beginning.
If the display lines are 20 characters long, a different mode is used. The first row has a column range
from 0 to 19. Columns 20 through 39 are not used. Writing to these columns will not affect the
display. Columns 40 through 59 form the second display line, and columns 60 through 79 are not
used.
No display wrapping will occur from row 1 to row 2. This is true in both the sequential and random
access modes.
DISPLAY functions like the PRINT statement. A carriage return/line feed will be appended to the
DISPLAY statement unless there is a trailing semicolon.
LCD Graphics notes
The LCD graphics display has several unique commands:
Commands - 32
CLEAR DISPLAY
Clears graphics and characters from display
CLEAR DISPLAY LINE
Clears characters at current line
CLEAR DISPLAY LINE (x1,y1),(x2,y2) Clears graphics line
CLEAR DISPLAY P(x,y)
Clears a point on a graphics screen
CLEAR DISPLAY C
Clears all characters, graphics not affected
CLEAR DISPLAY G
Clears all graphics, characters not affected
DISPLAY P(x,y)
Prints a point at x,y
DISPLAY LINE(x1,y1),(x2,y2)
Draws a line
DISPLAY OFF [type]
Turns display off. type is C or G.
DISPLAY ON [type]
Turns display on. type is C or G.
LINE draws l line on a graphics display. Its syntax is:
DISPLAY LINE (x1,y1),(x2,y2)
Where: x1,x2 = 0 to 159 (LCD 5003 only)
y1,y2 = 0 to 127 (LCD 5003 only)
The P parameter puts a single point to a graphics display.
A point is erased using the CLEAR DISPLAY P(x,y) command. Graphics dots in a line are cleared
using the CLEAR DISPLAY LINE command.
ON enables character, graphics, or both displays. Power on default is both graphics and character
display ON. Turning on or off the character or graphics does not affect the other. In other words,
you could turn characters on without affecting the graphics display. It is possible to update goth
graphics and character screen even if they are off.
RELATED:
CONFIG DISPLAY
EXAMPLE:
The example below is for the LCD–4x40 display.
Notice that all DISPLAY statements end with a semicolon so that a carriage return/line feed will not
be sent.
10 CONFIG DISPLAY &40,7,0
20 A$ = "--PRESENTING--"
30 B$ = "--------"
40 C$ = "160 Character LCD display"
50 D$ = "with LED backlighting"
60 DISPLAY (0,5) A$;
70 DISPLAY (1,14) B$;
80 DISPLAY (2,6) C$;
90 DISPLAY (3,8) D$;
100 DELAY 2
110 DISPLAY (0,0) CHR$(32,80);
120 DISPLAY (2,0) CHR$(32,80);
130 DELAY .5
140 GOTO 60
Line 10 installs the driver for the LCD–4x40 at address &40 with no visible cursor.
Lines 20 to 50 define the four strings to be printed
Lines 60 to 90 display the strings in the random access mode
Line 100 has a 2 second delay
Lines 110 and 120 erase all four lines, two at a time, by writing a strings of 80 spaces to each line.
Commands - 33
Line 130 is a 0.5 second delay and the program repeats.
ERROR:
<Data negative> – for row and column
<Data out of range> – if row or column exceed that for the specified display
Commands - 34
DO/UNTIL
Statements
SYNTAX:
DO
.
.
.
UNTIL expression is true
PURPOSE:
To execute a conditional loop structure.
REMARKS:
The DO/UNTIL statements cause a list of statements to be executed until a condition is met. You
may exit a DO/UNTIL with the EXIT statement
EXAMPLE:
10
20
30
50
A= - 45
DO
INC A:PRINT A
UNTIL A=0
Nesting DO/UNTIL loops is permitted. Care must be taken in the construct. The following example
illustrates one of the possible pitfalls:
10
20
30
40
50
60
DO
DO
INC X
UNTIL X=5
INC Y
UNTIL Y=5
In the “inside” loop beginning at line 20, variable X is incremented until X = 5. Line 50 is then
executed. Since Y is now 1, execution branches to line 20. The previous value of X was 5, and it is
now incremented to 6. Since this is greater than 5, the inside loop continues until X overflows (a
very long time).
One solution is to add line 45 to reset X each time so the program will run properly:
45 X=0
ERROR:
<UNTIL> – if UNTIL encountered without corresponding DO.
Commands - 35
DPEEK and DPOKE
Memory Function and Statement
SYNTAX:
n = DPEEK(address)
n = DPEEK (address, segment)
DPOKE address, data
DPOKE address, data, segment
PURPOSE:
DPEEK returns a 16–bit value from memory.
DPOKE writes a 16–bit value to memory.
REMARKS:
A 16–bit word is formed with the lower 8 bits as the value located at memory address “address” and
the upper 8 bits as the value located at memory location “address + 1”.
The first syntax applies to the first 64K of memory (segment 0). For addresses above segment 0, use
the second syntax. Not all cards support segmented memory.
DPEEK is an extension of PEEK and executes twice as fast as two PEEK functions. DPOKE is an
extension of POKE and executes twice as fast as two pokes.
RELATED:
DPOKE, PEEK, FPEEK, PEEK$, POKE, FPOKE, POKE$
EXAMPLE:
The following routine POKEs or writes two numbers into memory. The DPEEK statement allows
both to be retrieved and printed ( 256 x 3 + 45 = 813). You could also say DPOKE 2000, 813.
10 POKE &A000,45 : POKE &A001,3
20 PRINT DPEEK(&A000)
RUN
813
10 A=DPEEK(1000,2)
This retrieves data from address 1000 at segment 2.
ERROR:
<Data negative> – for address and segment
<Data > 65,535> – for address
<Data out of range> – if segment > 15
Commands - 36
EDIT
Command
SYNTAX:
EDIT line
“.”
PURPOSE:
To display a line for editing.
REMARKS:
The EDIT statement simply displays the line specified, and positions the cursor under the first
character of the line. The line may then be modified, as described under the Editing Programs
Chapter. Typing a period “.” will edit the current line.
EXAMPLE:
EDIT 10
10 A =15
10 _
The syntax below displays the current line for editing. The current line is the last line entered, OR
the last line edited, OR the last line executed, OR the last line in a download, OR the line in which an
error occurred, whichever was the last condition.
.
<ENTER>
10 A=15
10 _
See the Editing Programs Chapter for more information.
NOTE: Labels cannot be used in place of line number with EDIT.
NOTE: PC SmartLINK has a screen editor which may also be used.
WARNING:
You cannot use EDIT when using the full screen editor in PC SmartLINK at the
same time.
RELATED:
none
ERROR:
<Line/label not found> – if line does not exist
Commands - 37
END
Statement
SYNTAX:
END
PURPOSE:
To halt execution of a program at a given point.
REMARKS:
END causes execution to cease without any message.
RELATED:
STOP
EXAMPLE:
10
20
30
50
60
GOSUB 50
PRINT "STATEMENT"
END
PRINT "END";
RETURN
Without the END statement at line 30, execution would continue through lines 50 and 60 with a
second “end” printed. A “GOSUB” error would also occur.
ERROR:
none
Commands - 38
ERL
System Variable
SYNTAX:
n = ERL
PURPOSE:
To return the line number associated with an error.
REMARKS:
The function returns the line number of the last error encountered by CAMBASIC.
RELATED:
ERR, ON ERR, RESUME
EXAMPLE:
10
20
30
40
50
60
70
ERROR:
none
ON ERR GOTO 50 : 'enable error trapping
INPUT"Enter a number to divide by. (0 will cause error):”,A
B=10 / A
GOTO 20
PRINT"Error#" ; ERR” ; occurred on line#” ; ERL
ON ERR GOTO 50 : ‘re-enable error trapping
RESUME NEXT : ‘resume at next statement after error
Commands - 39
ERR
System Variable
SYNTAX:
n = ERR
PURPOSE:
To return the error code associated with an error.
REMARKS:
The function returns the error code for the last error. It is usually used in conjunction with the ERL
function.
Error trapping is essential in control applications, where a halt in execution is not tolerable.
See the Error Messages Chapter for a list of error codes and messages.
RELATED:
ERL, ON ERR, RESUME, ERR statement
EXAMPLE:
10
20
30
40
50
60
70
ERROR:
none
ON ERR GOTO 50 : ’enable error trapping
INPUT"Enter a number to divide by. (0 will cause error) : ",A
B=10 / A
GOTO 20
PRINT"Error#" ; ERR ; "occurred on line#";ERL
ON ERR GOTO 50 : ’re-enable error trapping
RESUME NEXT : ‘resume at next statement after error
Commands - 40
ERROR
System Statement
SYNTAX:
ERR n
ERROR n
PURPOSE:
To simulate the occurrence of a run time error.
REMARKS:
This statement is usually used to test error trapping systems using the ERR and/or ERL functions.
If n is not an assigned error number, an unknown error message will result.
See the Error Messages Chapter for a list of error codes and messages.
RELATED:
ERL, ERR function, ON ERR, RESUME
EXAMPLE:
ERR 2
<ERROR 2>
ERROR:
<Syntax>
<Data negative> – for n
<Data > 255> – for n
Commands - 41
EXIT and EXIT CLEAR
Statement
SYNTAX:
EXIT [line/label]
EXIT CLEAR
PURPOSE:
To allow legal branching out of a loop structure.
REMARKS:
Within FOR/NEXT, GOSUB/RETURN and DO/UNTIL structures, it is sometimes necessary to exit
the loop before the loop conditions are met.
EXIT CLEAR resets all stacks. It can be used in emergency stop (etc.) situations where the nesting
of loop structures cannot be known.
EXIT is always used with a line/label unless two or more levels are to be exited. When multiple
EXITs are used, the last one must have a line/label.
EXAMPLE:
10 GOSUB 50
50 EXIT:GOTO 10
60 RETURN
Without the EXIT statement, the system would eventually crash, as the RETURN statement would
never be reached.
10
20
30
40
50
GOSUB 20
GOSUB 30
EXIT : EXIT 50
RETURN
GOTO 10
In this case there is a nested GOSUB structure. EXIT must be executed one time for each level of
nesting. Failure to include two EXITs would have caused a stack imbalance on each pass.
Eventually, you would get a “Nesting” error message.
ERROR:
<Can’t compile> – if line/label does not exist
<Syntax> – Trying to exit a nonexistent loop
Commands - 42
EXP
Numeric Function
SYNTAX:
n = EXP(m)
PURPOSE:
To return the exponential function of “e.”
REMARKS:
This function returns the result of the number “e” (2.718282) raised to the power given by m.
EXAMPLE:
10 PRINT EXP(1),EXP(2)
RUN
2.71828
7.38906
ERROR:
<Overflow> – if m> 88.0296
Commands - 43
FIND
Command
SYNTAX:
FIND argument
PURPOSE:
Used to locate variables, keywords, and labels.
REMARKS:
This is a useful tool especially in long programs. The variations described below:
FIND keyword - This will list all the lines that contain the specified keyword. For example, FIND
POKE
EXAMPLE:
FIND . .
This will list all lines that start with labels. It will not list lines where the
labels is part of a GOSUB, etc.
FIND . . label
This will list the entire subroutine that begins with a specific label name.
You must mark the end of the subroutine with a line that only has . . on the
line. Otherwise, FIND will continue to list every line until it encounters
the label symbol.
FIND variable
This is probably the most valuable feature of FIND. It will list the line of
every instance of the variable name. It will help locate conflicting
variables. For example, PIT and PAT have the first letter, last letter and
the length the same. If you execute FIND PIT, then lines with PAT, PET,
PIT, POT and PUT will also be listed.
10
20
30
40
50
60
70
80
90
200
210
220
230
240
300
310
320
330
MOTOR = 1
GOSUB . . confirm
PRINT “Motor OK”
DO
GOSUB .. current_test
UNTIL RUNAMPS > 5
OUT 35,43
COR = INP(35)
IF COR <= 176 THEN PRINT “Status OK”
. . confirm
CUR = INP(12)
IF CUR < 2 THEN F = 0 ELSE F = 1
RETURN
. .
. . current _test
RUNAMPS = 1.5*AIN(2)
RETURN
. .
>FIND RUNAMPS
60 UNTIL RUNAMPS >5
310 RUNAMPS = 1.5*AIN(2)
>FIND GOSUB
Commands - 44
20 GOSUB . . confirm
50 GOSUB . . current_test
>FIND . .
200 . . confirm
300 . . current_test
>FIND . . confirm
200 . . confirm
210 CUR = INP(12)
220 IF CUR < 2 THEN F = 0 ELSE F = 1
>FIND CUR
80 COR = INP(35)
90 IF COR <= 176 THEN PRINT “Status OK”
210 CUR = INP(12)
220 IF CUR < 2 THEN F = 0 ELSE F = 1
In this case you would be able to detect the conflict between the COR and CUR variables.
ERROR:
<Syntax> – for other argument variations
Commands - 45
FOR / NEXT / STEP
Statements
SYNTAX:
FOR variable = n TO m [STEP z]
.
.
.
NEXT
PURPOSE:
To perform a loop operation a given number of times.
REMARKS:
n and m are positive (including zero ) numbers and the optional z may be negative or positive, but not
0.
n is the initial value of the counter. m is the final value of the counter. The program lines following
the FOR statement are executed until the NEXT statement is encountered. Then the counter is
incremented by the amount specified by the STEP value z. If z is not specified, the increment is
assumed to be 1 (one). A check is performed to see if the value of the counter is now greater than the
final value m. If it is not greater, CAMBASIC branches back to the statement after the FOR
statement and the process is repeated. If it is greater, execution continues with the statement
following the NEXT statement. This is a FOR/NEXT loop.
If z is negative, the test is reversed. The counter is decremented each time through the loop, and the
loop is executed until the counter is less than the final value.
The body of the loop is executed once if n is already greater than m when the STEP value is positive,
or if n is less than m when the STEP value is negative. If z is zero, an error will be displayed.
Nested Loops
FOR/NEXT loops may be nested, that is, one FOR/NEXT loop may be placed inside another
FOR/NEXT loop. When loops are nested, each loop must have a unique variable name as its
counter. The NEXT statement for the inside loop must appear before the NEXT for the outside loop.
EXAMPLE:
10
20
30
40
50
60
1
3
5
7
9
ERROR:
J=10 : K=30
FOR I=1 TO J STEP 2
PRINT I ;
K = K + 10
PRINT K
NEXT
40
50
60
70
80
<NEXT w/o FOR> – if a NEXT is encountered without a corresponding FOR
<Data out of range> – if z = 0
Commands - 46
FPEEK and FPOKE
Memory Function and Statement
SYNTAX:
a = FPEEK(address)
a = FPEEK(address,segment)
FPOKE address, data
FPOKE address, data, segment
PURPOSE:
FPEEK returns a floating point number previously stored in memory.
FPOKE writes a floating point number to memory.
REMARKS:
This function can be used to write and retrieve data stored in memory. This is very useful in data
logging and process data storage and retrieval.
The first syntax applies to the first 64K of memory (segment 0). For addresses above segment 0, use
the second syntax. Not all cards support segmented memory.
FPEEK and FPOKE are the fastest way to write and retrieve data from memory.
RELATED:
DPEEK, DPOKE, PEEK, PEEK$, POKE, POKE$
EXAMPLE:
10 FPOKE &A000,1.25
20 A=FPEEK(&A000)
10 D=FPEEK(200,1)
ERROR:
<Data > 65,535> – address, data and segment
<Data negative> – for address
<Data out of range> – if segment > 15
Commands - 47
FRE
Function
SYNTAX:
a = FRE(0)
a = FRE(c$)
PURPOSE:
Returns the number of bytes of unused but allocated string space, or the number of bytes left for
program and variables.
REMARKS:
The argument 0 returns the number of bytes which are currently unused and available for program
and variables.
When the argument is any string variable (variable name unimportant), the number of bytes of unused
string space is returned.
RELATED:
none
EXAMPLE:
On power–up, you type:
PRINT FRE(0) ; FRE(A$)
35210
100
The first number is the bytes for programs and all variables. The second is the default string. The
line below increases the string space to 1000 bytes.
CLEAR 1000
PRINT FRE(0) ; FRE(A$)
34310
1000
Notice that the unused string space is now 1000, which reduced the total program and variable space
by 900 bytes.
ERROR:
none
Commands - 48
GOSUB
Statement
SYNTAX:
GOSUB line/label
.
.
.
RETURN
PURPOSE:
To branch to and return from a subroutine.
REMARKS:
line/label is the beginning of the subroutine.
A subroutine may be called any number of times in a program, and a subroutine may be called from
within another subroutine.
The RETURN statement causes CAMBASIC to branch back to the statement following the most
recent GOSUB statement. A subroutine may contain more than one RETURN statement, should logic
dictate a return at different points in the subroutine. Subroutines may appear anywhere in the
program.
To prevent inadvertent entry into the subroutine, you may put an END or GOTO statement in front of
it to direct program control around the subroutine.
NOTE: The execution of the GOSUB statement is independent of the location of the target line in the
program. No run–time search occurs.
When a label is used with GOSUB, a statement cannot follow GOSUB on the same line.
EXAMPLE:
10 GOSUB 40
20 PRINT "Back from subroutine"
30 END
40 PRINT "subroutine";
50 PRINT "in";
60 PRINT "progress"
70 RETURN
RUN
subroutine in progress
Back from subroutine
The following shows the use of labels:
90 A3 = AIN(0)
100 GOSUB ..FILTER
110 PR FL
.
.
.
3000
..FILTER
3010
FL = .875 * FL + .125 * A3
3020
RETURN
ERROR:
<Can’t compile> – if line/label does not exist
Commands - 49
GOTO
Statement
SYNTAX:
GOTO line/label
PURPOSE:
To branch unconditionally out of the normal program sequence to a specified line number or label.
REMARKS:
If line is the line number of an executable statement, that statement and those following are executed.
If it is a nonexecutable statement (such as a remark), execution continues at the first executable
statement encountered after line.
The GOTO statement can be used in Immediate Mode to reenter a program at a desired point. This
can be useful in debugging.
NOTE: The execution time of the GOTO statement is independent of the location of the target line in the program. There
is no runtime search.
EXAMPLE:
10 PRINT"line 10"
20 PRINT"line 20"
RUN
line 10
line 20
GOTO 20
line 20
The following is an example using line/labels:
10 ..start
20 PRINT "at start"
30 GOTO ..here
40 ..there
50 PRINT "over there"
60 END
70 ..here
80 PRINT "over here"
90 GOTO ..there
RUN
at start
over here
over there
NOTE: When a label is used with GOTO, a statement cannot follow GOTO on the same line.
ERROR:
<Can’t compile> – if the line/label does not exist
Commands - 50
HEX$
String Function
SYNTAX:
n$ = HEX$(m)
PURPOSE:
To return a hex representation of a number.
REMARKS:
The value of m may range from 0 to 65,535.
If the number is 255 or less, HEX$ returns a two hex digit result. Larger numbers result in four hex
digits being returned.
RELATED:
none
EXAMPLE:
PRINT HEX$(127)
7F
PRINT HEX$(1280)
0500
ERROR:
<Data negative> – for m
<Data > 65,535> – for m
Commands - 51
IF / THEN / ELSE
Statement
SYNTAX:
IF m THEN statement(s) [ELSE statement(s)]
IF m GOTO line/label
IF m THEN line/label
PURPOSE:
To make decisions regarding program flow based on the results returned by an expression.
REMARKS:
If the expression m is true (not zero), the THEN clause is executed. THEN may be followed by
either a line number for branching or one or more statements to be executed.
If the result of m is false (zero), the THEN line is ignored and the ELSE line, if present, is executed.
Otherwise execution continues with the next executable statement.
THEN or ELSE may be followed by either a line number for branching, or one or more statements to
be executed. IF/THEN/ELSE statements may be nested.
10 IF A=B THEN C=2 ELSE IF A=J THEN PRINT J
If an IF. .THEN statement is followed by a line number in the Immediate Mode, a <Line not
found> error results, unless a statement with the specified line number had been previously entered
in the Program Mode.
NOTE: If a label is used, it must be the last statement on the line. If a label follows GOTO or
THEN, there cannot be an ELSE.
EXAMPLE:
10 IF PEEK(5000)=27 THEN B=34 ELSE B=12
ERROR:
<Expected THEN> – if THEN missing
<Can’t compile> – if line/label does not exist
Commands - 52
INC and INCF
Statements
SYNTAX:
INC variable
INCF variable
PURPOSE:
To increment a variable by one (INC) or four (INCF).
REMARKS:
This is a fast increment of a simple or array variable.
A=A+1
INC A
A=A+4
INCF A fast
slow
fast
slow
INC executes more than double the speed of the statement it replaces. Valid for simple and array
variables.
RELATED:
DEC, DECF
EXAMPLE:
10 PRINT H
20 INC H
30 PRINT H
40 INCF H
50 PRINT H
RUN
0
1
5
Line 10 increments element 8 of the array A.
10 INC A(8)
ERROR:
<Expected variable> – if parameter is not a variable
Commands - 53
INKEY$
Function
SYNTAX:
a$ = INKEY$(n)
PURPOSE:
To return a single character from a serial input buffer.
REMARKS:
The returned value is a null or one–character–length string.
n = legal serial port number.
As long as there are characters in the input serial buffer, you may bring them out one at a time. Each
time INKEY$ is executed, a character is erased from the buffer.
RELATED:
COM$, INPUT
EXAMPLE:
10
20
30
40
50
ERROR:
<Illegal argument> – if n is not a legal port number
<Data negative> – for n
A$ = INKEY$(1)
IF A$ = "" THEN 10
IF A$ = "Y" THEN PRINT "YES"
IF A$ = "N" THEN PRINT "NO"
GOTO 10
Commands - 54
INP and OUT
I/O Function and Statement
SYNTAX:
n = INP(I/O address)
OUT I/O Address, Data
PURPOSE:
INP returns a byte from an I/O address.
OUT writes a byte to an I/O address.
REMARKS:
INP is the complementary function to the OUT statement.
WARNING:
Some I/O address are used internally and should not be written to with the OUT
statement. See your hardware manual for these reserved addresses.
RELATED:
BIT
EXAMPLE:
100 A = INP(255)
120 OUT &40,12
ERROR:
<Data negative> – for I/O address and data
<Illegal argument> – if I/O address > 65,535
<Data >255> – if data > 255
Commands - 55
INPUT
Statement
SYNTAX:
INPUT [,#n][;] var [,var] .....
INPUT [,#n][;] "prompt message"; var [,var] .....
INPUT [,#n][;] "prompt message", var [,var] ....
PURPOSE:
The INPUT statement causes the program to pause and prompt an operator for input data.
REMARKS:
The prompt message is a question mark in the first syntax. The other two syntaxes specify a message
string to be printed before the question mark. No question mark will be printed if a comma is used in
place of a semicolon after the prompt message.
If the INPUT statement is followed immediately by a semicolon, the carriage return that you type at
the end of the variable list will be ignored and the cursor will remain on the same line.
The variables may be both numeric and string. The data you enter at the prompt must match the
variable type. Strings do not require the use of quotation marks. If a string is entered when a
numeric variable is required, a <Redo> error is given and all the variables must be reentered.
When multiple variables are used, separate the input data with commas. If fewer variables are entered
than specified with the INPUT statement, a '??' prompt will be given for the remainder.
The only editing you can do on an input line is the backspace. You can abort the INPUT statement
by executing <CTL-C>, which will also stop the program.
Even though the serial ports accept any character from 0 to 255, the INPUT statement filters these to
the 32 to 127 ASCII set.
When the # is specified, n is the source number. For example #2 is COM2. If the # is omitted, the
default is COM1.
RELATED:
none
EXAMPLE:
10 INPUT "Input pH, volume";PH,VO
RUN
Input pH, volume? _
ERROR:
none
Commands - 56
INPUT KEYPAD$
Statement
SYNTAX:
INPUT KEYPAD$ echo port,variable
INPUT KEYPAD$ echo port,"text",variable
INPUT KEYPAD$ echo port,"text";variable
PURPOSE:
To input data from a keypad. Optionally print text to echo port
REMARKS:
The INPUT KEYPAD$ statement is similar to the INPUT statement in that the program pauses to
accept data from a matrix keypad.
The echo port parameter tells the system where to echo the keys pressed on the keypad. The display
must be previously initialized for an echo.
0
1
2
3-8
9
10
11
12-255
no echo
COM1
COM2
no echo
DP display
LCD display
speaker
no echo
The INPUT KEYPAD$ statement terminates when a carriage return (<CR>) is received. One of
the keypad keys must be configured to return a <CR>(13 or&D) when pressed using the SYS(8)
command. By default, key position 15 returns a <CR>. A <CR><LF> sequence is sent to the
echo port when a <CR> is sent. On all echo ports, except the LCD display, the line advances. The
cursor returns back to the beginning of the line on LCD's.
"text" is optionally printed to the echo port. This is usefull as part of a prompt. The character
following the last quotation (") determines if a question mark (?) is printed or not. A comma (,)
supresses printing a ? while a semi-colon (;) will print one.
This command must be initialized by ON KEYPAD$. When INPUT KEYPAD$ is executed, the
subroutine specified in ON KEYPAD$ is not executed. Even if you use INPUT KEYPAD$ as your
only keypad input, you must have a valid line number specified as part of the ON KEYPAD$ routine.
variable is a string (for example, NAME$) or numeric (for example, WEIGHT). As with the regular
INPUT statement, any string characters entered into a numeric variable prompts for a redo. LCD
displays do not promt for a redo, but the cursor returns back to the point where it is requesting data.
RELATED:
KEYPAD$, ON KEYPAD$
Commands - 57
EXAMPLE:
10 ON KEYPAD$ 24 GOSUB 500
20 DISPLAY (1,0);
30 INPUT KEYPAD$ 10,"Enter weight",WEIGHT
40 PRINT WEIGHT
50 INPUT KEYPAD$ 10,"Enter name ";NAME$
.
.
.
500 C$ = KEYPAD$(1)
510 RETURN
The ON KEYPAD$ syntax above may be different for your card.
ERROR:
<Data negative> - echo port
<Data > 255> - echo port
Commands - 58
INSTR
Function
SYNTAX:
a = INSTR(n,string,substring)
PURPOSE:
Returns the position of the first occurrence on a substring within a string.
REMARKS:
The parameter n specifies where the search is to start in the string. A “1” signifies the leftmost
position in the string. This parameter is not optional.
string is a string constant or string variable that is to be searched.
substring is the string variable or constant to be searched for.
If n is greater than the length of string or if string is null or if substring cannot be found, INSTR
returns zero. If substring is null, INSTR returns n or one.
RELATED:
LEFT$, RIGHT$, LEN and MID$
EXAMPLE:
10 A$="BOOHOO"
20 B$="HOO"
30 PRINT INSTR(1,A$,B$)
RUN
4
ERROR:
<Illegal argument> – if n < 1
Commands - 59
INT
Numeric Function
SYNTAX:
a = INT(b)
PURPOSE:
To return the largest integer that is equal to, or less than the argument.
REMARKS:
The integer portion is stored in variable “a” as a floating point number.
RELATED:
MOD, "\" integer divide
EXAMPLE:
PRINT INT(45.67)
45
PRINT INT(–15.02)
–16
To produce true rounding to the closest whole number, use the following syntax:
A=INT(B+0.5)
Adding 0.5 provides the true rounding and emulates the CINT function found in other BASICs.
ERROR:
none
Commands - 60
KEYPAD$
Process Function
SYNTAX:
a$=KEYPAD$(0)
a=KEYPAD$(1)
PURPOSE:
To return a one–character string in response to a keypad input or return the position of the key.
REMARKS:
KEYPAD$(0) returns a single–character string that has been assigned to a key. It is most useful on
16–key devices. If no key was pressed ,or if you read the keypad again before another key is pressed,
a null string is returned.
KEYPAD$(1) returns the key position. Keypads often have legends that are not single letters. Thus,
the first syntax may not make sense. If no key was pressed, or if you read the keypad again before
another key is pressed, a zero is returned.
A table in RAM can be programmed to return any ASCII value. The table is set up so that the first
character is in the upper–left–hand corner and the last character is in the lower–right–hand corner.
See SYS(8).
You can assign a single–character string to the keys in the following manner.
10
20
30
40
50
FOR X=0 TO 15
READ A$
POKE SYS(8)+X,ASC(A$)
NEXT
DATA 1,2,3,A,4,5,6,B,7,8,9,C,*,0,#,D
This example matches many 16 position keypads.
RELATED:
ON KEYPAD$, INPUT KEYPAD$
EXAMPLES:
The first example uses a 16–key keypad.
40
50
60
70
80
ERROR:
ON KEYPAD$ GOSUB..Key_interrupt
GOTO 50
..Key_interrupt
PRINT KEYPAD$(0)
RETURN
none
Commands - 61
LEFT$
String Function
SYNTAX:
n$ = LEFT$(m$,p)
PURPOSE:
To return the leftmost p characters of m$.
REMARKS:
If p is greater than the length of m$, the entire string (m$) will be returned. If p = 0, a null string is
returned.
RELATED:
LEN, MID$, RIGHT$, INSTR
EXAMPLE:
10 A$ = "Hopeless"
20 B$ = LEFT$(A$,4)
30 PRINT B$
RUN
Hope
ERROR:
<Data negative> – for p
<Data > 255> – for p
Commands - 62
LEN
Numeric Function
SYNTAX:
n = LEN(m$)
PURPOSE:
To return the number of characters in m$.
REMARKS:
Unprintable and blank characters are counted.
RELATED:
LEFT$, MID$, RIGHT$, INSTR
EXAMPLE:
10 A$ = "Short string"
20 PRINT LEN(A$)
RUN
12
ERROR:
none
Commands - 63
LINE
Process Function
SYNTAX:
a = LINE(terminal #)
PURPOSE:
To return the status of an input on a STB-26 terminal board.
REMARKS:
The terminal # has a one-to-one correspondence with the terminals on the STB-26 terminal board.
This feature eases documentation and troubleshooting. Refer to Card Manual for terminal number
range.
The LINE function is similar to the BIT function in that individual I/O bits or channels can be read.
It differs in that it is used specifically with the STB-26 terminal boards and it executes much faster.
RELATED:
LINE statement
EXAMPLE:
10 OUT 0,1
20 PRINT LINE(119)
RUN
0
In this example the bit 0 of the port at address 0 was set high. Since the LINE function inverts the
result, a “0” was returned. This would mean that there was not input signal at an opto module in this
location.
ERROR:
<Data negative> - terminal #
Commands - 64
LINE
Process Statement
SYNTAX:
LINE terminal #, value
PURPOSE:
To write directly to the STB-26 terminal board.
REMARKS:
The terminal # has a one-to-one correspondence with the terminals on the STB-26. This feature eases
documentation and troubleshooting. Refer to card manual for terminal number range.
The LINE statement is similar to the BIT statement in that individual I/O bits or channels can be
controlled. It differs in that it is used specifically with the STB-26 terminal board and it executes
much faster.
The value is the state of the output. To turn an output on, enter a 1 or ON. To turn the output off,
enter a 0 or OFF. The ON and OFF execute faster than 1 or 0.
RELATED:
LINE function
EXAMPLE:
10 LINE 113,ON
20 PRINT LINE(113)
RUN
1
In this example line 3 was turned on. Thus, a 1 is returned.
ERROR:
<Data negative> - terminal #l and value
<Data out of range> - if value > 1 or not ON/OFF
Commands - 65
LIST
Command
SYNTAX:
LIST [line [–[line]]]
LIST #n, [line [–[line]]]
LIST!
PURPOSE:
To list a part or all of the program currently in memory.
REMARKS:
You can stop the listing by pressing <ESC>. The program is listed through the COM1 serial port
unless you specify otherwise.
The basic variations are:
LIST
list the entire program to COM1
/
quick version of above
LIST #1
list the entire program to COM1
LIST #2
list the entire program to COM2
LIST.
list 16 lines at a time
LIST!
list program with no line numbers
For simplicity the next group of variations shown for COM1:
LIST 50
list only line 50
LIST 100–500
list from the line 100 to line 500
LIST 220–
list from line 220 to the end of the program
LIST –50
list from the beginning of the program to line 50
To combine the two groups of variations:
LIST #2,10–200
LIST.
list through COM2 from line 10 to line 200.
lists 16 lines at a time. Pressing the space bar will list the next 16 lines. Pressing any other
key will abort the listing. The command is valid only on the COM 1 port.
You can use the optional line numbers to define a range.
RELATED:
none
ERROR:
<Line not found> – if line does not exist
Commands - 66
LOAD
Command
SYNTAX:
LOAD
LOAD segment
LOAD DATA to RAM segment, RAM address, from Flash segment, Flash address, length
PURPOSE:
LOAD with no parameters reads a program from Flash and puts it into RAM. LOAD segment
retrieves a program from 0 or 1 in a 128K Flash EPROM and puts it into RAM. LOAD DATA
transfers data from Flash to RAM.
REMARKS:
The program and serial EEPROMs are two different devices. Saving to a serial EEPROM requires
about 200 mS. Loading takes about 20 mS.
Since data is saved and loaded 128 bytes at a time, any combination of strings and numbers can be
saved. Use PEEK and POKE commands to get and save from memory.
EXAMPLE:
LOAD
LOAD segment
LOAD DATA 1,weight,1,&9000,4500
ERROR:
<Command not available> – if card does not support user serial EEPROM
<Data negative> – for address
<Data > 65.535> – for address
Loads a program from Flash segment 0, address 0.
Loads a program from Flash segment 0 or 1, address 0
Loads 4500 bytes of data to RAM segment 1, address “weight”
from Flash segment 1, address &9000.
Commands - 67
LOCK and UNLOCK
Tasking Statements
SYNTAX:
LOCK
UNLOCK [RETURN]
PURPOSE:
To lock out interrupts from time critical portions of a program.
REMARKS:
When an interrupt occurs from a ON TICK, ON COM$, etc., the current program is interrupted and
the interrupt subroutine is called.
In some cases, especially where time is critical, it is desirable that the current program not be
interrupted until it is completed. When the command LOCK is executed, any interrupts will be
latched, but not executed until the UNLOCK command is executed.
The UNLOCK RETURN is only used at the end of a GOSUB routine. In this case a previous LOCK
must occur in the subroutine. For these commands to prevent any part of a subroutine from being
interrupted, LOCK must be the first line of the subroutine. Therefore, the GOSUB must use a line
number, not a label.
EXAMPLE:
10 GOSUB 500
20 IF PRESSURE > 234 THEN ALARM = 1.
.
500 LOCK
510 PRESSURE = AIN(6) - AIN(0)
520 UNLOCK RETURN
If this construct were not used, an interrupt could occur between lines 500 and 510 and/or between
lines 510 and 520 and delay the alarm flag being set in line 20.
ERROR:
none
Commands - 68
LOG
Numeric Function
SYNTAX:
n = LOG(m)
PURPOSE:
To return the natural logarithm of m.
REMARKS:
The natural logarithm is the logarithm to the base e (2.718282).
EXAMPLE:
PRINT LOG(45/7)
1.86075
ERROR:
<Illegal argument>– if m is zero or negative.
Commands - 69
MID$
String Function
SYNTAX:
n$ = MID$(m$,p[,q])
PURPOSE:
To return the requested part of a given string.
REMARKS:
The function returns a string of length q characters from m$ beginning with the pth character. If q is
equal to zero, or p is greater than the length of m$, then MID$ returns a null string.
If q is omitted, then a string from position p to the end of m$ is returned.
RELATED:
LEFT$, LEN, RIGHT$, INSTR, MID$ Statement
EXAMPLE:
10 A$ = "ABCDEFG"
20 PRINT MID$(A$,5,2)
RUN
EF
ERROR:
<Illegal argument> – if p or q is out of range
<Illegal argument> – if p = 0
<Data negative> – for p or q
Commands - 70
MID$
String Statement
SYNTAX:
MID$(a$,s [,n]) = b$
PURPOSE:
To replace a portion of one string with another.
REMARKS:
A common usage for the MID$ statement is in networking protocols. The network commands are
standard strings defined by string variables.
Using the MID$ statement to modify these strings is much faster than other string methods.
The string a$ is the target string, while b$ is the replacement string.
The parameter s is the starting point within a$ where b$ will be inserted. The optional parameter n
indicates how many characters of b$ are to be used. When n is omitted, all of b$ is used.
If b$ is longer than a$, replacement will not exceed the length of a$. No error message will be
given.
RELATED:
LEFT$, LEN, RIGHT$, INSTR, MID$ Function
EXAMPLE:
10
20
30
40
F$ = "Hopeless"
R$ = "Help"
MID$(F$,1) = R$
PRINT F$
Helpless
The example below is for a communications protocol. Note that the escape character is not a
printable character.
10 CV$=CHR(27) + "A" + "12"
20 MID$(CV$,3) = "23"
30 PRINT CV$
ESC A23
ERROR:
<Data negative>– for s and n
<Data out of range> – if s = 0
<Data > 255> – for s and n
Commands - 71
MOD
Operator
SYNTAX:
n = a MOD b
PURPOSE:
To return the remainder of an integer division.
REMARKS:
a is divided by b and the remainder is placed in n.
The arguments a and b are first rounded to integers. These must be in the range from –32,768 to
32,767 (no error messages are given). The division is then done and the quotient is truncated to an
integer.
The sign of the result is always the sign of a.
RELATED:
“\” for integer division.
EXAMPLE:
PRINT 8 MOD 4
8/4=2 with 0 remainder 0
PRINT 5 MOD 3
5/3=1 with 2 remainder 2
7/3=2 with 1 remainder 1
PRINT 7.5 MOD 3
PRINT –7.5 MOD 3
ERROR:
8/3=2 with 2 remainder –2
<Division by zero> – if b is zero
Commands - 72
MON
Command
SYNTAX:
MON
PURPOSE:
To invoke the Mini–Monitor
REMARKS:
The Mini–Monitor is used primarily for debugging object code programs. Its use assumes that the
programmer is familiar with assembly code and debugging techniques.
Unlike CAMBASIC all data is entered in hexadecimal. The Mini–Monitor subcommands are:
D – Display memory
E – Edit memory
F – Fill a block of memory
M – Math, add, subtract, multiply in Hex
Q – Quit Mini–Monitor
See the Mini–Monitor Chapter for more information.
EXAMPLE:
MON>D 4A90
The number to the left of the colon is the segment number. This is displayed only on cards that can
have 128K or more RAM.
MON>D 4A90
0:4A90
0:4AA0
0:4AB0
0:4AC0
0:4AD0
0:4AE0
0:4AF0
0:4B00
00
20
D1
A7
28
D2
87
64
00
AE
28
AE
AE
28
99
89
60
00
AE
00
00
22
20
29
83
00
00
00
00
41
E9
A8
9E
0C
00
0C
60
53
00
A6
28
86
0C
00
00
44
1A
20
9D
99
00
98
29
46
00
AE
AE
20
29
AE
3A
22
78
00
00
E9
00
00
82
29
00
C0
00
00
21
00
00
A8
8B
0A
20
0F
00
60
1B
A6
20
8B
Commands - 73
83
00
5A
83
00
20
C7
99
29
50
00
3A
64
AE
28
20
29
00
81
41
00
00
AE
E9
A8
94
20
A7
8B
00
00
00
..`..(.... .))..
...... ....P..
.(.....).!.Z.. X
..........`.:A..
(...`.):....d..
.("ASDF").. ....
.. ....x.. .(...
d.).. ...... ...
NEW and UNNEW
Commands
SYNTAX:
NEW
UNNEW
PURPOSE:
NEW initializes CAMBASIC for a new program.
UNNEW restores a program erased by NEW or a hardware reset.
REMARKS:
NEW is used to free memory before entering a new program.
NEW does not change the memory reserved by the last CLEAR statement.
EXAMPLE:
The following erases the program pointers for entry of a new program.
NEW
ERROR:
none
Commands - 74
ON
Statement
SYNTAX:
ON expression GOSUB line [,line] ...
ON expression GOTO line [,line] ...
PURPOSE:
In the ON...GOTO statement, the value of the expression determines which line number in the list
will be used for branching. For example, if the value is 3, the third line number in the list will be the
destination of the branch.
NOTE: You may not use labels with this statement.
REMARKS:
In the ON...GOSUB statement, each line number in the list must be the first number of a subroutine.
If the value of the expression is zero, the statement is ignored.
RELATED:
RETURN
EXAMPLE:
200 ON R GOTO 150,300,320,390
If R=1, the program goes to line 150
If R=2, the program branches to line 300 and continues from there. If R=3, the branch will be to
line 320 and so on.
ERROR:
<Can’t compile> – if line does not exist
<Data negative> – for expression
<Data > 255> – for expression
Commands - 75
ON BIT
Tasking Statement
SYNTAX:
ON BIT task number,address,bit GOSUB line/label
PURPOSE:
To declare an I/O line to be monitored for changes in logic level.
REMARKS:
Any eight I/O lines may be monitored so that a change in state causes a program branch to the
specified subroutine.
The I/O lines may be located on any parallel port. A change of state is either a low to high or a high
to low transition.
The specified line is sampled at each tick of the system clock. When the ON BIT statement is
executed, the specified line is sampled for the current state.
The task does not become active until the START BIT statement is executed. The STOP BIT
statement will disable the event.
The BIT task number ranges from 0 to 7. address ranges from 0 to 65,535. bit ranges from 0 to 7.
line/label may be any valid program line number or label.
See the Multitasking Chapter for more information.
RELATED:
START BIT, STOP BIT
EXAMPLE:
10
20
30
40
50
60
70
ERROR:
<Data negative> – for task, address, bit
<Data out of range> – if bit,task or bit > 7
<Data>65,535> – for address
<Can’t compile> – if line/label does not exist
ON BIT 0,0,0 GOSUB 60
START BIT 0
PRINT "waiting..."
DELAY .5
GOTO 30
IF BIT(0,0) = 1 THEN PRINT "closed" ELSE PRINT"open"
RETURN
Commands - 76
ON COM$
Tasking Statement
SYNTAX:
ON COM$ n GOSUB line/label
ON COM$ n GOSUB
PURPOSE:
To define a program branch when a task defined by the CONFIG COM$ statement becomes valid.
REMARKS:
After defining all the parameters with CONFIG COM$ the ON COM$ activates the task. You can
deactivate the task by executing the same statement but without a line number after GOSUB.
n = legal serial port number.
See the Multitasking Chapter for more information.
RELATED:
CLEAR COM$, COM$, CONFIG COM$
EXAMPLE:
10 CONFIG COM$ 2,0,8,0,1
20 ON COM$ 1 GOSUB 80
30 'your program goes here
.
80 PRINT COM$(2)
90 RETURN
In this example the program will branch when 8 characters have been received. The XON and
protocol functions are disabled. All characters will be echoed.
ERROR:
<Data negative> – n
<Data out of range> – if n is not a legal serial port number
<Can’t compile> – if line/label does not exist
Commands - 77
ON COUNT
Tasking Statement
SYNTAX:
ON COUNT n GOSUB line/label
ON COUNT n GOSUB
PURPOSE:
To execute a subroutine when a preset count is reached.
REMARKS:
To use this statement you must first set up a counter with CONFIG COUNT and specify a preset
count.
Every time the preset count is reached, the counter is reset to zero and program flow branches to the
routine specified by line. When the subroutine is finished, the program will resume execution.
If the line is not specified after the GOSUB, the function is disabled.
The parameter n is the counter number which ranges from 0 to 7.
See the Multitasking Chapter for more information.
RELATED:
CLEAR COUNT, COUNT, START COUNT, STOP COUNT, RESUME COUNT
EXAMPLE:
10
20
30
35
40
50
60
70
ERROR:
<Data negative> – for n
<Data out of range> – n > 7
<Can’t compile> – if line/label does not exist
CONFIG PI0 0,1,1,1,1 : 'SET FOR INPUTS
CONFIG COUNT 0,0,0,500,AUTO
ON COUNT 0 GOSUB 60
START COUNT 0
'
GOTO 40
PRINT "limit reached"
RETURN
Commands - 78
ON ERR GOTO
Statement
SYNTAX:
ON ERR GOTO line/label
PURPOSE:
To enable error trapping and specify the first line of the error handling subroutine.
REMARKS:
Once error trapping has been enabled, all errors detected by CAMBASIC during run time cause
CAMBASIC to branch to the specified line.
To disable error trapping, execute an ON ERR without the line number. If the routine beginning at
line has an error, an infinite loop will be set up. In this case, do a hardware reset and execute the
UNNEW! command. The error trapping subroutine should be tested before executing an ON ERR
statement.
The ON ERR GOTO line statement must be performed every time an error occurs if you wish to
continue to trap on errors. The best place to do this is in the error handling routine.
RELATED:
RESUME, RESUME NEXT
EXAMPLE:
10 ON ERR GOTO 100
20 A=5/0
30 END
100 PRINT "DIV BY ZERO"
110 ON ERR GOTO 100
120 RESUME NEXT
In this case just using RESUME without the NEXT would cause line 20 to be executed again,
producing another error.
10 ON ERR GOTO
ERROR:
: 'disable error trapping
<Can’t compile> – if line/label does not exist
Commands - 79
ON INP
Tasking Statement
SYNTAX:
ON INP n, address, mask, compare GOSUB line/label
PURPOSE:
To cause an interrupt when a preset input bit pattern is detected in an input port.
REMARKS:
The task is similar to ON BIT. However, you can look at any or all of the 8 bits on a port. An
interrupt occurs when the bit pattern is recognized.
The interrupt will occur on the first instance of the pattern match. It will not interrupt again until the
inputs change and then change back to match the pattern. This is sometimes called an “edge
triggered” mode.
The parameter n is the task number. It ranges from 0 to 7.
The address is the I/O address of the port to be read.
The mask parameter determines which bits are of interest. Each bit in the mask that is a “1” is a bit
of interest.
When the data at the port matches the compare parameter, an interrupt occurs and the program
branches to the line/label. Up to 8 conditions may be tested on the same port or different ports
See the Multitasking Chapter for more information.
RELATED:
START INP, STOP INP
EXAMPLE:
10
20
30
40
50
60
70
ERROR:
<Data negative> – all parameters
<Data out of range> – if n>7
<Data > 255> – for mask and compare
<Data > 65,535> – for address
<Can’t compile> – if line/label not found
ON INP 0,3,7,5 GOSUB 60
START INP 0
PRINT BIN$(INP(0))
DELAY .25
GOTO 30
PRINT "match"
RETURN
Commands - 80
ON ITR
Tasking Statement
SYNTAX:
ON ITR n GOSUB line/label
ON ITR n GOSUB
PURPOSE:
To enable or disable a program branch due to an hardware interrupt.
REMARKS:
Check your hardware manual to determine if this statement is active for your card. It is not active for
the RPC-2300 or RPC-150.
n = 0 or 1. These correspond to ITR 0 and ITR 1 as described in the hardware manual.
The ON ITR statement traps a hardware interrupt so software can service it. When a hardware
interrupt occurs, it sets an internal flag and that. interrupt is disabled. If an appropriate ON ITR has
been declared, a program branch will occur.
Hardware interrupts will remain disabled until a corresponding RETURN ITR statement has been
executed. If the subroutine ends with just a RETURN, the interrupt remains disabled. You can
cancel an ON ITR at any time by executing the statement without a line number.
NOTE: Not all hardware products implement a hardware interrupt. See your CPU card user’s
manual.
RELATED:
RETURN ITR
EXAMPLE:
10
20
30
40
50
60
70
ERRORS:
ON ITR 0 GOSUB..clock
.
.
.
..clock
BIT 1,1,OFF
RETURN ITR 0
'turn whatever off
<Can’t compile> – if line/label does not exist
<Command not available> – if not implemented on your card
<Data out of range> - when n is not 0 or 1
Commands - 81
ON KEYPAD$
Tasking Statement
SYNTAX:
ON KEYPAD$ GOSUB line/label
ON KEYPAD$ GOSUB
PURPOSE:
To cause a program branch when any key is pressed on the keypad. Using this command without a
line/label disables keypad tasking.
REMARKS:
The program branch will respond to any key being pressed. The interrupt service routine can then
filter the characters.
See the Multitasking Chapter for more information.
RELATED:
KEYPAD$, SYS(8)
EXAMPLE:
10
20
30
.
.
70
80
ERROR:
ON KEYPAD$ GOSUB 70
'
GOTO 20
PRINT KEYPAD$(0)
RETURN
<Can’t compile> – if line/label does not exist
Commands - 82
ON TICK
Tasking Statement
SYNTAX:
ON TICK n,t GOSUB line/label
ON TICK n,t GOSUB
PURPOSE:
To cause periodic program branching.
REMARKS:
This statement is used when periodic tasks must be executed. The GOSUB is executed every t
seconds.
There are three TICK timers in CAMBASIC. The parameter n ranges from 0-2. The TICK timers
are independent of each other.
The range of t is 0.005 to 327.68 seconds. The GOSUB branch occurs every t seconds unless the
second syntax is executed. Not specifying a line number or label after GOSUB disables the ON tick
subroutine.
Every t seconds an interval flag is set. At the conclusion of the current CAMBASIC command, a
GOSUB branch occurs.
See Multitasking Chapter for more information.
RELATED:
CLEAR TICK, TICK
EXAMPLE:
10
20
30
40
50
60
ERROR:
<Data negative> – for t and n
<Data out of range> - if n > 2
<Time> 327.67 sec> - for t
<Can’t compile> – if line/label does not exist
ON TICK 1, 1 GOSUB 50
PRINT "*"
FOR X=0 TO 600:NEXT
GOTO 20
PRINT TICK(1)
RETURN
Commands - 83
OPTO
Process Function
SYNTAX:
a = OPTO (channel)
PURPOSE:
To return the status of an input on an on board opto isolator rack.
REMARKS:
Inputs and outputs are active low when interfacing with opto-isolator racks. Thus, writing a “1” to
an opto output module will turn it off. This confusion is eliminated with the OPTO function. It
automatically inverts the logic so that a “1” represents on and a “0” represents off.
The OPTO function is similar to the BIT function in that individual I/O bits or channels can be read.
It differs in that it is used specifically with opto-isolator racks and it executes much faster.
The channel parameter ranges from 0 to 3 or 100 to 123 and the channel number corresponds to the
position numbers on the opto module racks.
EXAMPLE:
20 PRINT OPTO(0)
RUN
0
In this example the bit 0 of the port at address 0 was set high. Since the OPTO function inverts the
result, a “0” was returned. This would mean that there was not input signal at an opto module in this
location.
ERROR:
<Data negative> – channel
<Illegal argument> - if channel > 23
Commands - 84
OPTO
Process Statement
SYNTAX:
OPTO channel, value
PURPOSE:
To turn output modules on and off on 24 position opto-isolator racks that are external to the card.
REMARKS:
Inputs and outputs are active low when interfacing with opto-isolator racks. Thus, writing a “1” to
an opto output module will turn it off. This confusion is eliminated with the OPTO statement. It
automatically inverts the logic so that a “1” represents on and a “0” represents off.
The OPTO statement is similar to the BIT statement in that individual I/O bits or channels can be
controlled. It differs in that it is used specifically with opto-isolator racks and it executes much faster.
The channel parameter ranges from 0 to 3 OR 100 to 123 and corresponds to the position numbers on
the opto-module racks.
The value is the state of the output. To turn an output on, enter a 1 or ON. To turn the output off,
enter a 0 or OFF. The ON and OFF execute faster than 1 or 0.
RELATED:
OPTO function
EXAMPLE:
10 OPTO 3,ON
20 PRINT OPTO(103)
RUN
1
In this example channel 3 was turned on. Thus, a 1 is returned.
ERROR:
<Data negative> – channel and value
<Data out of range> - if channel > 23 or value >1 or ON/OFF
Commands - 85
PEEK and POKE
Memory Function and Statement
SYNTAX:
n = PEEK(address)
n = PEEK(address,segment)
POKE address, data
POKE address, data, segment
PURPOSE:
PEEK returns a byte from memory.
POKE writes a byte to memory.
REMARKS:
The returned value from PEEK will be an integer in the range 0 to 255. address is the address in
memory. PEEK is the complement to the POKE statement.
The first syntax applies to the first 64K of memory (segment 0). For addresses above segment 0, use
the second syntax. Not all products support segmented memory.
RELATED:
DPEEK, DPOKE, PEEK$, POKE$, FPEEK, FPOKE
EXAMPLE:
10 A=PEEK(&7000)
10 A=PEEK (&2000,1)
20 POKE &A000, 12, 1
ERROR:
<Data negative> – for address, data and segment
<Data > 65,535> – for address
<Data out of range> – if segment > 15
Commands - 86
PEEK$ and POKE$
Memory Function and Statement
SYNTAX:
x$ = PEEK$(address)
x$ = PEEK$(address, segment)
POKE $ address, X$
POKE$ address, X$, segment
PURPOSE:
PEEK$ returns a string from successive memory addresses.
POKE$ writes a string to memory.
REMARKS:
The first syntax applies to the first 64K of memory (segment 0). For addresses above segment 0, use
the second syntax. Not all products support segmented memory.
RELATED:
DPEEK, DPOKE, PEEK, FPEEK, POKE, FPOKE
EXAMPLE:
10 A$ = "string"
20 B$ = " stuffer"
30 POKE$ 0,A$,1
40 POKE$ 10,B$,1
50 PRINT PEEK$(0,1);PEEK$(10,1)
RUN
string stuffer
ERROR:
<Data negative> – for address, data and segment
<Data > 65,535> – for address
<String too long> – if string > 254 characters
<Data range> – if segment > 15
Commands - 87
PRINT
Statement
PR [#n,] [expression] [; or ,] [expression]..
PRINT [#n,] [expression] [; or ,] [expression]..
PURPOSE:
To output data through the specified serial or display port.
REMARKS:
If all of the expressions are omitted, a carriage return is performed. If the list of expressions is
included, the values of the expressions are displayed on the screen. The expressions in the list may
be numeric and/or string expressions. String constants must be enclosed in quotation marks.
The position of each printed item is determined by the punctuation used to separate the items in the
list. In the list of expressions, a comma causes a tab to the next print zone (print zones are 14
characters wide). A semicolon does not place any spaces between the printed items. If the list of
expressions terminates without a semicolon or a comma, a carriage return is printed at the end of the
line.
Printed numbers are always followed by a space. Positive numbers are preceded by a space.
Negative numbers are preceded by a minus sign.
n = valid port number. Port numbers are 1 and 2 for serial; 9 for VF display; 10 for LCD display.
LCD and VF displays must be configured using the CONFIG DISPLAY command before use.
RELATED:
PRINT$, PRINT USING
EXAMPLE:
In the example below, the semicolons in the PRINT statement cause each value to be printed in the
same line.
10 X=5
20 PRINT X + 5; X – 5; X * (–5)
RUN
10
0 –25
The following is an example of string concatenation. The output is through the COM2 serial port.
30 A$ = "Hi"
40 B$ = " there"
50 PRINT #2,A$+B$
RUN
Hi there
Commands - 88
In the example below, the semicolon at the end of line 20 causes both PRINT statements to be printed
on the same line.
10 INPUT X
20 PRINT X; "Squared is";Xˆ2;" and;"
30 PRINT X; "Cubed is";Xˆ3
RUN
? 9.
9 Squared is 81 and 9 Cubed is 729.OO1
RUN
? 21
21 Squared is 441 and 21 Cubed is 9260.99
This example prints a message to the COM2 port.
100 PRINT #2,"Pressure:";A
In this example, the comma in the PRINT statement causes each value to be printed in successive print
zones.
10 FOR X = 1 TO 5
20 PRINT X,
30 NEXT
RUN
1
2
3
4
5
This does a carriage return.
10 PR
NOTE: The use of PR instead of PRINT does not save memory space. It eliminates the number of
keystrokes.
ERROR:
<Data out of range> – if n is not a legal serial port number
<Data negative> – for n
Commands - 89
PRINT USING
Statement
SYNTAX:
PRINT USING[#n,]!"format string"; expression
PURPOSE:
To print strings or numbers using a specified format.
REMARKS:
n = valid port number. Port numbers are 1 and 2 for serial; 9 for VF display; 10 for LCD display.
LCD and VF displays must be configured using the CONFIG DISPLAY command before use.
The format declaration(s) is one or two strings that specify the print format. The three possibilities
are:
#
Used to specify the number of digits to be printed on each side of the decimal point.
ˆˆˆˆ
Used to print numbers in scientific or engineering notation. This format string must contain
4 carets and be used in conjunction with the # format string. Failure to do the latter will
produce unpredictable results.
.
Used to specify the location of the decimal point in a field determined by the use of #.
NOTE: You cannot print a string expression in the same line containing a format declaration. The
string will be taken as numerical.
RELATED:
PRINT, PRINT$
EXAMPLE:
A = 1.2345
PRINT USING "##.##";A
1.23
PRINT USING ".##";A
%1.23
The % sign indicates that the number contained digits outside the specified field.
Commands - 90
A = 1234.67
PRINT USING "#.##ˆˆˆˆ";A
0.12E+4
In this case the first # specifies the leading zero to the left of the decimal point.
PRINT USING "##.##ˆˆˆˆ;A
1.23E+3
Leading zeros to the left of the first digit to the left of the decimal point are suppressed.
A = 25.5555
PRINT USING #2, "##.##";A
25.56
Note that true rounding to the second decimal place took place. Output is to the COM2 port.
ERROR:
<Illegal argument> – if the field specifier, “#”, is longer than 8 characters
<Data out of range> – if n is not a legal serial port number
NOTE: Illegal combinations of field declaration characters may cause erratic printing.
Commands - 91
PRINT$
Statement
SYNTAX:
PRINT [#n,] $ character [,character]...
PR [#n,] $ character [,character]...
PURPOSE:
Used to send any character from 0 to 255 out a serial port.
REMARKS:
The statement is often used to send escape sequences to printers, displays, etc. It is the same as
PRINT CHR$(n);CHR$(n);CHR$(n);...
n = valid port number. Port numbers are 1 and 2 for serial; 9 for VF display; 10 for LCD display.
LCD and VF displays must be configured using the CONFIG DISPLAY command before use.
The valid character values are:
number
"string"
prints numbers as a character
print the string constant within the quotes. You cannot use string
variables.
NOTE: Due to compiler limitations, the number of numeric parameters following the PRINT$ may
not exceed 24.
RELATED:
PRINT,PRINT USING
EXAMPLE:
10 PRINT$ 27,71,33,"END" replaces
10 PRINT CHR$(27) ; CHR$(71) ; CHR$(33) ; "END"
ERROR:
<Data negative> – for character
<Data > 255> – for character
<Data out of range> – if n is not a valid serial port number
Commands - 92
PULSE
Process Function
SYNTAX:
n=PULSE(m)
PURPOSE:
To return the remaining time of a pulsed output.
REMARKS:
The resolution of the software pulse timers is 0.005 seconds (0.01 sec in 9 Mhz systems). The
remaining time is returned in seconds. If the timer is still in the wait period, the number returned will
be negative.
The argument range for m is 0 to 7, which is the timer number.
See the Multitasking Chapter for more information.
RELATED:
CLEAR PULSE, CONFIG PULSE, RESUME PULSE, START PULSE, STOP PULSE
EXAMPLE:
10 A=PULSE(2)
ERROR:
<Data negative> – for m
<Illegal argument> – if m > 7
Commands - 93
PULSE
Tasking Statement
SYNTAX:
PULSE n,address,bit,time,polarity
PURPOSE:
To configure a digital output line as a timed or pulsed output.
REMARKS:
You may configure up to eight digital I/O lines as independent pulse output. The lines may be on any
I/O port.
The parameter n is the pulse number and has a range from 0 to 7.
The address is the I/O address of an 8–bit port. The range is 0 to 255.
The bit parameter is the particular bit of the port. The value ranges from 0 to 7.
The time parameter is the time in seconds that the specified bit is active. You may specify a time
from 0.0 to 327.67 seconds.
The polarity parameter determines whether the specified bit will be active high or low. When polarity
is “1”, the bit will go high during the active time. It will go low during the active time if the polarity
is “0”.
For more information see the Multitasking Chapter.
RELATED:
CLEAR PULSE, PULSE function
EXAMPLE:
PULSE 5,48,2,2.55,1
Pulse number 5 is configured to output bit 2 at address 48 so the bit will go high for 2.55 seconds and
then return low. This sequence will execute only once.
ERROR:
<Data > 255> - for address
<Data negative> – for n,address,bit,wait,active
<Time > 327.67 sec> - for t
<Data > 65,535> – for address
<Data out of range> – if bit or bit > 7
Commands - 94
READ
Statement
SYNTAX:
READ variable [,variable] . . .
PURPOSE:
To read values from a DATA statement and assign them to variables. See the DATA statement.
REMARKS:
A READ statement must always be used in conjunction with a DATA statement. READ statements
assign DATA statement values to variables in the READ statement on a one–to–one basis. READ
statement variables may be numeric or string.
A single READ statement may access one or more data statements (they will be accessed in order), or
several READ statements may access the same DATA statement. If the number of variables is fewer
than the number of elements in the DATA statement(s), subsequent READ statements will begin
reading data at the first unread element. If there are no subsequent READ statements, the extra data
is ignored.
To reread the DATA statements from the start, use the RESTORE statement. CLEAR also restores
the data pointer.
RELATED:
DATA, RESTORE
EXAMPLE:
10
20
30
40
50
FOR X = 1 TO 9
READ A(X)
NEXT
DATA 153,124,5432,10,7,812,11
DATA 201,332,762,902,0,–34,69875
This program segment READs the values from the DATA statements into array A. After execution
the value of A(1) will be 153, and so on.
ERROR:
<Syntax>– if data type does not match variable type
<Out of DATA>– if the number of READs exceed the number of data
Commands - 95
REMARK
Statement
SYNTAX:
'any characters
PURPOSE:
To allow explanatory remarks to be inserted in a program or designate a line/label.
REMARKS:
This syntax is different from the REM used in other Basics. The ' format provides a more readable
remark. The old REMARK syntax,
10 REM test comments
10 'test comments
is not allowed.
is required.
Remark statements are not executed but are output exactly as entered when the program is listed.
Remarks are skipped over during execution. Thus, if memory allows, you may leave all your
remarks in your final application software with no sacrifice in speed. The extra memory required is
usually insignificant compared to the additional clarity achieved with the addition of remarks.
If you put a remark on a line with other CAMBASIC statements, the remark must be the last
statement on the line and be preceded with a colon. Any statements following the remark are
ignored.
This format may be used to designate line/labels. The maximum length is 159 characters.
EXAMPLE:
120
130
140
150
ERROR:
none
'calculate average velocity
FOR I = 1 TO 20
S = S + V(I)
A = 0 : 'initialize A
Commands - 96
RENUM
Command
SYNTAX:
RENUM [newline] [,increment] [,oldline]
PURPOSE:
To renumber program lines.
REMARKS:
newline is the first line number to be used in the new sequence. The default is 10.
increment is the increment to be used in the new sequence. The default is 10.
oldline is the line in the current program where renumbering is to begin. The default is the first line
of the program.
RENUM also changes all line number references to reflect the new line numbers. RENUM may not
be used to change the order of program lines. Nor can it be used to create line numbers greater than
65,529.
RELATED:
AUTO
EXAMPLE:
RENUM
Renumbers the entire program. The first new line number will be 10. Lines will increment by 10.
RENUM 300,50
Renumbers the entire program. The first new line number will be 300. Lines will increment by 50.
RENUM 1000,1,20
Renumbers the lines from 20 up so they start with line number 1000 and increment by 1.
ERROR:
<Line not found> – newline or oldline does not exist
<Subscript out of range> – if attempt is made to RENUM past line 65,529
Commands - 97
RESTORE
Statement
SYNTAX:
RESTORE [line]
PURPOSE:
To reset the READ pointer to the beginning of the DATA list.
REMARKS:
After a RESTORE statement is executed, the next READ statement accesses the first item in the first
data statement in the program.
If the optional line number is specified, the next READ statement accesses the first item beginning at
the line number specified.
NOTE: Labels may not be used with RESTORE.
RELATED:
DATA, READ
EXAMPLE:
10 READ A,B,C
20 RESTORE
30 READ D,E,F
40 DATA 12,34,56
50 PRINT A ; B ; C ; D ; E ; F
RUN
12 34 56 12 34 56
ERROR:
<Can’t compile> – if optional line does not exist
Commands - 98
RESUME
Statement
SYNTAX:
RESUME
RESUME NEXT
RESUME line
PURPOSE:
To continue program execution after an error recovery procedure has been performed.
REMARKS:
If NEXT is not declared, the main program will resume operation by reexecuting the statement that
originally caused the error. Every error–handling routine must eventually end either by executing a
RESUME statement or by terminating the program.
If NEXT is specified, execution resumes at the statement immediately following the one which caused
the error.
When an error trap occurs, it has the effect of disabling the ON ERROR GOTO statement that
enabled the trap. Any further error occurring prior to the execution of another ON ERROR GOTO
statement will cause the termination of the program. An ON ERROR GOTO statement may be
included at the end of the error–handling routine to maintain the error trap enabled.
Error traps may be nested in the same manner as GOSUBs and function calls, and the error routine
may begin with an ON ERROR GOTO statement, with its own error–handling routine. Each
error–handling routine must be terminated with a RESUME statement.
NOTE: You cannot use labels with RESUME.
RELATED:
ON ERR
ERROR:
<RESUME w/o ON/ERR> – if no corresponding error condition
<Can’t compile> – if line does not exist
Commands - 99
RESUME COUNT
Tasking Statement
SYNTAX:
RESUME COUNT m [,m1] [,m2] . . . [,mn]
PURPOSE:
To reenable a software event counter.
REMARKS:
The statement reenables a counter after a STOP COUNT statement has been executed. The counter
contents remain unchanged.
The m parameter is the count number which ranges from 0 to 7.
See the Multitasking Chapter for more information.
RELATED:
CLEAR COUNT, CONFIG COUNT, ON COUNT, START COUNT, STOP COUNT
EXAMPLE:
10 START COUNT 2
20 STOP COUNT 2
30 RESUME COUNT 2
ERROR:
<Data negative> – for m
<Data out of range> – if m > 7
Commands - 100
RETURN
Statement
SYNTAX:
RETURN [line/label]
RETURN ITR number
PURPOSE:
To resume execution after a GOSUB, interrupt, multitasking or communications call. The RETURN
ITR reenables the interrupt.
REMARKS:
RETURN is used as a return from a GOSUB call. Program execution continues at the statement
following the GOSUB.
number is 0 or 1, or as limited by your hardware. It is the interrupt number that the subroutine
declared by ON ITR n declared.
If the optional line/label is specified, the program will branch to the specified line/label.
RETURN ITR is used as a return from an ON ITR GOSUB declaration. In this case the return is to
the next statement where the interrupt occurred. The hardware interrupt is reenabled. If ITR number
is left off, the return is still to the next statement where the interrupt occurred. However, interrupt
number is disabled until a RETURN ITR number is executed or ON ITR GOSUB is declared again.
This is useful when you want to recognize an interrupt once and enable it again at some later time.
RELATED:
GOSUB, ON ITR
EXAMPLE:
10
20
30
40
50
ERROR:
<RETURN w/o GOSUB> – if no corresponding GOSUB
<Can’t compile> – if line/label does not exist
<Data out of range> - if number is not 0 or 1 when used with ITR
<Expected (> - if number is missing when used with an ITR
ON ITR 0 GOSUB 40
A=23 : 'This is a dummy loop
GOTO 20
PRINT "Interrupt"
RETURN ITR 0
Commands - 101
RIGHT$
String Function
SYNTAX:
n$ = RIGHT$(m$,p)
PURPOSE:
To return the right–most p characters of m$ as a string.
REMARKS:
If p is greater than or equal to LEN(m$), then m$ is returned. If p is zero, a null string is returned.
RELATED:
LEFT$, MID$, LEN, INSTR
EXAMPLE:
10 A$ = "ABCDEFG"
20 PRINT RIGHT$(A$,3)
RUN
EFG
ERROR:
<Data negative> – for p
<Data > 255> – for p
Commands - 102
RND
Numeric Function
SYNTAX:
n = RND(m)
PURPOSE:
To return a pseudo–random number between 0 and 1.
REMARKS:
The RND function returns a pseudo–random number between 0 and 1.
An m of less than zero will initialize the pseudo–random number sequence. Each time the
pseudo–random number generator is initialized with the same m number, it will produce the same
sequence of pseudo–random numbers.
An m of zero will cause RND to return the previous random number.
An m of greater than zero will cause RND to return the next random number in the sequence.
EXAMPLE:
10 R = RND(–1)
20 S = RND(0)
30 T = RND(1)
40 PRINT R,S,T
RUN
7.65943E–06 7.65943E–06 .163989
ERROR:
none
Commands - 103
RUN
Command
SYNTAX:
RUN [line]
PURPOSE:
To begin the execution of a program.
REMARKS:
RUN resets the numeric variables to zero, string variables to null, resets the interrupt pending flag
and runs the current program.
RUN changes the memory reserved by the last CLEAR statement.
RUN causes parts of the program to be compiled at speed execution. A typical program will compile
at about 800 lines per second.
RUN may also be used at run time with the optional line number. The effect will be to clear all
variables and reserved space. Great care should be taken when using RUN with the optional line
number.
NOTE: The program must be compiled by executing RUN before performing a RUN [line].
RELATED:
none
EXAMPLE:
10 PRINT 7/1
20 PRINT "HELLO"
RUN 20
HELLO
ERROR:
<Syntax> – if line not found when using RUN [line]. (Nonsense line number will be displayed.)
Commands - 104
SAVE
Commands
SYNTAX:
SAVE
SAVE segment
SAVE DATA,to Flash segment, to Flash address, from RAM segment, from RAM address, length
PURPOSE:
SAVE saves programs and data to flash EPROM.
REMARKS:
Some cards, such as the RPC-150 and RPC-2300, only allow the first syntax, SAVE. Cards with
128K or more of flash EPROM allow saving more than 1 program. These same cards also allow
saving binary data. Refer to your hardware manual to see if it supports 128K of flash. The RPC-150
and RPC-2300 do not. The RPC-2350 does.
segment is 0 or 1, when using a 128K Flash.
address is in the range of 0 to &FFFF (65535).
A simple SAVE transferrs the program from RAM to Flash. It begins saving at Flash address 0.
SAVE segment allows you to save programs in segment 0 or 1. Programs are saved at either address
&00000 or &10000.
SAVE DATA allows you to store information POKE’d into RAM. Data should be saved above
where the program is stored to prevent clobbering.
EXAMPLE:
SAVE
SAVE 1
SAVE DATA 1,SA,1,RA,5500
ERROR:
<Command not available> – if card does not support user serial EEPROM
<Data negative> – for address
<Data > 65.535> – for address
<21> <Hardware> - If Flash EPROM or jumper missing or bad Flash
Saves a program to Flash segment 1
Saves data to Flash segment 1
Commands - 105
SIN
Numeric Function
SYNTAX:
n = SIN(m)
PURPOSE:
To calculate the trigonometric sine function.
REMARKS:
m is an angle in radians. To convert degrees to radians, multiply by PI/180 where PI = 3.141593.
RELATED:
ATN, COS, TAN
EXAMPLE:
PRINT SIN(1.5)
.997495
ERROR:
none
Commands - 106
START BIT
Tasking Statement
SYNTAX:
START BIT task number [,task number]. . .
PURPOSE:
To enable a BIT task that has previously been defined with an ON BIT statement.
REMARKS:
You can disable the task using the STOP BIT statement. The START BIT statement will start the last
task that was declared by the ON BIT statement.
If you use START BIT without first defining the task with the ON BIT statement, CAMBASIC
cannot know whether a valid task exists. Attempting to start a nonexistent task will usually produce
nonsense errors.
See the Multitasking Chapter for more information.
RELATED:
BIT function and statement, ON BIT, STOP BIT
EXAMPLE:
10
20
30
40
50
60
70
ERROR:
ON BIT 0,0,0 GOSUB 60
START BIT 0
PRINT "waiting..."
DELAY .5
GOTO 30
IF BIT(0,0)=0 THEN PRINT "closed" ELSE
RETURN
<Data out of range> – If task number > 7
<Data negative> – for task number
Commands - 107
PRINT" open"
START COUNT
Tasking Statement
SYNTAX:
START COUNT n [,n1] [,nm]
PURPOSE:
To activate a software counter task that was previously defined.
REMARKS:
Once one or more counters have been defined by the CONFIG COUNT statement, the counter is
activated by the START COUNT statement. Until that time no counts will be accumulated.
The range of n is 0 to 7, which is the counter number.
See the Multitasking Chapter for more information.
RELATED:
CLEAR COUNT, ON COUNT, CONFIG COUNT, STOP COUNT, RESUME COUNT
EXAMPLE:
10 CONFIG COUNT 0,1,0
20 START COUNT 0
ERROR:
<Data negative> – for n
<Data out of range> – if n > 7
Commands - 108
START INP
Tasking Statement
SYNTAX:
START INP n [,n1] [,n2]
PURPOSE:
To enable one or more INP tasks declared by the ON INP statement.
REMARKS:
The task parameters are defined by the ON INP statement. START INP activates the task.
NOTE: You must execute an ON INP statement first for each corresponding START INP.
You may start more than one task at a time.
RELATED:
STOP INP, ON INP
See the Multitasking Chapter for more information.
EXAMPLE:
This demonstration program can be expanded to do more complex tasks. The state of the input lines
are printed by line 30.
10
20
30
40
50
60
70
ERROR:
ON INP 0,3,7,5 GOSUB 60
START INP 0
PRINT BIN$(INP(0))
DELAY .25
GOTO 30
PRINT "match"
RETURN
<Data negative> – for n
<Data out of range> – if n > 7
Commands - 109
STOP
Statement
SYNTAX:
STOP
PURPOSE:
To terminate program execution and return to command level.
REMARKS:
STOP statements may be used anywhere in a program to terminate execution. When a STOP is
encountered, the following message is displayed:
<STOP> <Ln nnn>
where nnn is the line number where the STOP occurred.
CAMBASIC always returns to command level after a STOP is executed. Execution is resumed by
issuing a CONT command (see “CONT Command”).
RELATED:
CONT
EXAMPLE:
10 INPUT A,B,C
20 K = 5 : L = 3/2
30 STOP
40 M = CSK + 100 : PRINT M
RUN
? 1,2,3
<STOP> <Ln 30>
ERROR:
none
Commands - 110
STOP BIT
Tasking Statement
SYNTAX:
STOP BIT task [,task] . . .
PURPOSE:
To disable a bit that has previously been defined with an ON BIT statement and enabled with a
START BIT statement.
REMARKS:
You can reenable the task by using the START BIT statement. You do not need to reexecute the ON
BIT statement.
See the Multitasking Chapter for more information.
RELATED:
BIT function and statement, ON BIT, START BIT
EXAMPLE:
10
20
30
40
50
60
70
80
ERROR:
<Data out of range> – If task number > 7
<Data negative> – for task number
ON BIT 0,2,0 GOSUB 60
START BIT 0
PRINT "waiting..."
DELAY .5
GOTO 30
IF BIT(0,0) = 0 THEN PRINT"closed" ELSE PRINT "open"
STOP BIT 0
RETURN
Commands - 111
STOP COUNT
Tasking Statement
SYNTAX:
STOP COUNT n [,n1] [,nn]
PURPOSE:
To deactivate a software counter task that was previously active.
REMARKS:
This statement is used to suspend a counter that has previously been started. The accumulated count
is not changed.
You can restart the counter at the same point by executing START COUNT.
The range of n is 0 to 7.
See the Multitasking Chapter for more information.
RELATED:
CLEAR COUNT, CONFIG COUNT, ON COUNT, RESUME COUNT, START COUNT
EXAMPLE:
10 STOP COUNT 0,1
ERROR:
<Data negative> – for n
<Data out of range> – if n > 7
Commands - 112
STOP INP
Tasking Statement
SYNTAX:
STOP INP n [,n1] [,n2]
PURPOSE:
To disable one or more INP tasks declared by the ON INP statement.
REMARKS:
The task parameters are defined by the ON INP statement. STOP INP deactivates the task. You may
specify more than one task parameter so that several tasks may be stopped simultaneously.
NOTE: STOP INP is only executed after a START INP has been executed.
RELATED:
START INP, ON INP
See the Multitasking Chapter for more information.
EXAMPLE:
This demonstration program can be expanded to do more complex tasks. The state of the input lines
are printed by line 40. After 10 seconds, the task is disabled. After 30 seconds it is enabled again.
10
20
30
40
50
60
70
80
90
ERROR:
CLEAR TICK
ON INP 0,3,7,5 GOSUB 80
START INP 0
PRINT BIN$(INP(0))
DELAY .25
IF (TICK(0) > 10) AND (TICK(0) < 30) THEN STOP INP 0 ELSE START INP 0
GOTO 40
PRINT "match"
RETURN
<Data negative> – for n
<Data out of range> – if
nKEYBOARD() > 7
Commands - 113
STR$
String Function
SYNTAX:
n$ = STR$(m)
PURPOSE:
To convert a number to a string.
REMARKS:
For positive numbers, the string generated by STR$ has a leading blank. See the VAL function for
its complement.
RELATED:
ASC, CHR$, VAL
EXAMPLE:
10 A$=STR$(3.14159)
20 PRINT "PI=";A$
RUN
PI=3.14159
10 A=8
20 IF STR$(A) <> " 8" THEN END
30 PRINT "OK"
NOTE: In this case a space is required in " 8" since all positive numbers are printed with a leading
space.
ERROR:
none
Commands - 114
SYS
System Function
SYNTAX:
a = SYS(n)
PURPOSE:
To access system data and addresses.
REMARKS:
n is the system number.
The following is a list of system information returned using this function:
n
Function
0
1
2
3
4
5
6
7
8
9
10
11
12
13
14
Program size
End of program of variables
Bottom of stack
Interrupt table address
COM1 spooler status
COM2 spooler status
COM1 error flag
COM2 error flag
Keypad string table address
COM1 input character count
COM2 input character count
Buffer full flag for COM1 port
Buffer full flag for COM2 port
Display row
Display column
The SYS function lets you access internal variables within the operating system. In most cases, you
will not need to use this function.
If you need to find memory that is not used by CAMBASIC, you can use all the addresses from the
address returned from SYS(1) up to the address returned by SYS(2). Since the stack moves
downward, it is recommended that you stay at least 300 bytes below the address given by SYS(2).
If you execute:
PRINT SYS(2)–SYS(1)
in the Immediate Mode, the result will be the amount of remaining RAM.
SYS(4) and SYS (5) return the status of the console output buffer, the primary output buffer and the
secondary output buffer respectively. When zero is returned, the buffer is empty. A nonzero value
means the buffer has some characters to send. The actual nonzero value does not indicate the number
of characters left.
SYS(6) and SYS(7) provide an important data security function when executing the ON COM$
statement. When a parity, overrun, or framing error occurs on the serial port, CAMBASIC branches
to your ON COM$ interrupt service routine. By testing SYS(6) for the COM1 Port or SYS(7) for the
COM2 Port, you can determine if the serial data was truncated at the error.
Commands - 115
The SYS(6) and SYS(7) will return 0 if no error has occurred. Any nonzero value means an error
has occurred and you can request the host to retransmit the data.
The advanced user may want to know which of the three errors has occurred. The SYS function will
return 64 for an overrun error, 32 for a parity error, and 16 for a framing error. Keep in mind that
an incorrect baud rate could cause any one of these errors, since the incoming bits would be out of
time synchronization with the UART clock.
Errors are most likely to occur from noise when using modems or radio links.
SYS(8) returns the start of the keypad string table. Keys may be redefined by POKEing into the
address corresponding to the key's new value. The following routine prints the address of the keypad
string and the “key” values.
10
20
30
40
FOR N = SYS(8) TO SYS(8)+15
A = PEEK(N)
PRINT N,A,CHR$(A)
NEXT
SYS(9) and SYS(10) return the number of characters in the COM1 port input buffer and the COM2
port input buffer.
SYS(11) and SYS(12) return the COM1 port buffer full flag and the COM2 port buffer full flag.
“0” means the buffer is not full; “1” means the buffer is full.
SYS(13) and SYS(14) display the cursor position of the LCD display.
ERROR:
<Data negative> – for n
<Illegal argument> – if n > number of functions
Commands - 116
TAB
Print Function
SYNTAX:
PRINT TAB(m)
PURPOSE:
To tab to position m.
REMARKS:
m ranges from 0 to 255
If the current print position is at or beyond space m, TAB is ignored.
RELATED:
PRINT
EXAMPLE:
PRINT "S"; TAB(10); "E"
S
E
ERROR:
<Data negative> – for m
<Data > 255> – for m
Commands - 117
TAN
Numeric Function
SYNTAX:
n = TAN(m)
PURPOSE:
To return the trigonometric tangent of m.
REMARKS:
The angle m must be in radians. To convert degrees to radians, multiply by PI/180 where PI =
3.141593.
RELATED:
ATN, COS, SIN
EXAMPLE:
10 PRINT TAN(1.5)
14.1014
ERROR:
none
Commands - 118
TICK
Process Function
SYNTAX:
a=TICK(n)
PURPOSE:
To return the time from the TICK timers.
REMARKS:
There are three TICK timers in CAMBASIC that accumulate on a 12 hour basis. These are separate
from the calendar/clock and are not battery-backed.
n is from 0 to 2, corresponding to the tick timer.
The functions return the time in 0.005 (0.010 in 9 Mhz systems) second increments up to 12 hours.
Using the process clock has an advantage over the calendar/clock in that you deal only with seconds,
and not hours and minutes.
On power–up all TICK timers start at 0.0 and begin counting. You can reset the process at any time
by using the CLEAR TICK statement. The process clock cannot be preset to a value other than 0
(using CLEAR TICK).
RELATED:
CLEAR TICK, ON TICK
EXAMPLE:
10 CLEAR TICK 2
20 FOR X=0 TO 5000 : NEXT
30 PRINT TICK (2)
RUN
.6
ERROR:
<Data negative> - for n
<Data out of range> - if n > 2
Commands - 119
TIME$
Function
SYNTAX:
a$ = TIME$(n)
PURPOSE:
The TIME$ function is used to read the system calendar/clock. The system clock keeps time on a 24
hour basis with a resolution of one second.
REMARKS:
The time is returned in two forms, depending upon the value of the argument n. When n=0, the
hours, minutes and seconds are returned. When n=1, the minutes and seconds are returned.
The clock is set by the TIME$ statement.
RELATED:
TIME$ statement and DATE$
EXAMPLE:
10 TIME$ = "11:23:45"
20 PRINT TIME$(0)
30 PRINT TIME$(1)
11:23:45
23:45
ERROR:
<Data negative> – for n
<Illegal argument> – if n > 1
Commands - 120
TIME$
Statement
SYNTAX:
TIME$ = time string
PURPOSE:
TIME$ is used to set the time on the system calendar/clock. The clock keeps time on a 24 hour basis
with a resolution of one second.
REMARKS:
The time string may be a variable or a constant. In either case the format is the same.
The string must be in the form:
hh:mm:ss
where hh is the hour and ranges from 01 to 23, mm is the minute (00 to 59) and ss the second (00 to
59).
NOTE: No error checking is done on the entries. If you enter 99 for the minutes, no error message
will be given.
RELATED:
TIME$ function and DATE$
EXAMPLE:
10 TIME$ = "11:23:45"
10 A$ = “01:45:12"
20 TIME$ = A$
ERROR:
<Syntax> – if two digits are not used hh,mm,ss or, if digits not 0–9 are entered.
Commands - 121
TRON/TROFF
Statement
SYNTAX:
TRON
TROFF
PURPOSE:
To trace program execution and/or display variable values.
REMARKS:
You execute TRON to turn on the trace and TROFF to turn the trace off. It may be executed in the
immediate mode to trace a whole program or be placed within a program to trace only a section.
WARNING:
RELATED:
none
EXAMPLE:
10
20
30
40
50
TRON and TROFF must be the only command or last command on a line.
TRON
FOR X = 0 TO 3
A = X
NEXT
TROFF
RUN
.20..30..40..30..40..30..40..30..40..50.
ERROR:
none
Commands - 122
VAL
Numeric Function
SYNTAX:
n = VAL(m$)
PURPOSE:
To convert a string to a number.
REMARKS:
The VAL function strips leading spaces from m$ before calculating the result.
A leading alphanumeric character will always cause zero to be returned, regardless of the characters
that follow the alphanumeric character.
Trailing alphanumeric characters are ignored.
RELATED:
STR$, ASC, CHR$
EXAMPLE:
PRINT VAL(" 98")
98
PRINT VAL("A56")
0
PRINT VAL("12BB")
12
PRINT VAL("LAST")
0
ERROR:
none
Commands - 123
VARPTR
Numeric Function
SYNTAX:
VARPTR(variable)
PURPOSE:
To return the address in RAM of the variable. This command is similar to VARPTR found in other
BASICs. Unlike VARPTR, the address of a string variable is returned directly.
REMARKS:
variable is any CAMBASIC variable.
This function may be used to pass data other than single bytes to external machine or assembly
language routines. It is also used to find uncommitted RAM for temporary data storage.
This function returns an integer value that is the address in memory at which the value of a specified
numeric variable or numeric array resides. In the case of strings, the value returned is the address of
a vector (or address) that points to the string. This function may be used directly in the PEEK or
POKE functions and in the CALL statement for memory address references.
The format of the stored CAMBASIC variable values is as follows:
Numbers are first normalized to a standard fractional binary form, with the binary point to the right of
the sign bit of the mantissa, and stored in four bytes.
The least significant byte appears at the lowest address. The first three bytes are the mantissa, with
the sign in the most significant bit of the third byte. A sign bit of “1” designates a negative value.
The fourth byte contains the exponent, in “excess 128” notation (i.e., the value is always positive and
equals the actual binary exponent plus 128). As an example, the hexadecimal string:
LSB
MMMMMMMM
Mem
Mantissa
MSB
MMMMMMMM
S.MMMMMMM
Mem+1
Mem+2
Exponent
1EEEEEEE
Mem+3
The normalized binary notation yields decimal equivalents which may not be obvious. The floating
point numbers are shown with the LSB on the left. For more information see “An Introduction to
Microcomputers,” Volume 1, by Osborne/McGraw–Hill.
Scalar (simple) and numeric array variables reside above a program in RAM and are relocated upward
as new program lines are entered.
Strings are stored one character per byte, with the left–hand character first. The address returned is
the left–hand character.
Strings are stored in two ways. A literal string (e.g., A$ = "string") is stored in the program line in
which it appears. Other strings that are formed as a result of string operations (like concatenation) are
stored starting at the top of RAM and build down towards the numeric variables.
Commands - 124
On power–up, you have 100 bytes of string space. You can change this with the CLEAR statement.
(Beneath the string area is the stack).
Thus, unused RAM extends from the top of the array space to the bottom of the stack.
EXAMPLE 1:
10 A = 1.1
20 B = VARPTR(A)
30 PRINT B ;
40 FOR X = 0 TO 3
50 PRINT PEEK(B+X) ;
60 NEXT : PRINT
RUN
17487 205 204 12 129
This example is for a simple numeric variable. The first number printed is the address of the first
byte of the floating point representation of the number, or “1.1”. This is the same as shown on the
previous page.
EXAMPLE 2:
10 H(0) = 1.1
20 Z = VARPTR(H(0))
30 PRINT Z
40 PRINT PEEK(Z) ; PEEK(Z+1) ; PEEK(Z+2) ; PEEK(Z+3)
RUN
17512
205 204 12 129
This routine returns the address of the first element of array H. The next element, if present, would
be at address 17004, the next at 17008, and so forth.
EXAMPLE 3:
Addresses of array variables change each time a simple variable is assigned. For example:
10 T(0) = 0
20 PRINT VARPTR(T(0))
30 W = 0
40 PRINT VARPTR(T(0))
RUN
17484
17490
In this example, the variable W is first used after the array address was printed. Thus the array
address is shifted by the six bytes required for a simple variable.
EXAMPLE 4:
10 A$ = "Tuesday"
20 R = VARPTR(A$)
30 PRINT CHR$(PEEK(R))
T
In this case, new variables are declared after VARPTR returned the address. Unlike the array case,
the value returned will not change.
Commands - 125
CONFIG BAUD
Statement
SYNTAX:
CONFIG BAUD n,baud rate, mode, parity [,com]
PURPOSE:
To change the serial port parameters.
REMARKS:
The power–up default for COM1 is:
19,200 baud
8 data bits and 2 stop bits
no parity
The power–up default for COM2 is:
19,200 baud
8 data bits and 1 stop bit
no parity
RS-232
All these parameters are programmable. Once programmed, the serial parameters will remain in
place even when the program stops. A reset or another power–up will cause the default values to be
reinstalled.
The parameter n is the COM port number. Legal value is 1.
The baud rate parameter is a number from 0 to 7 which correspond to the baud rates below:
0
1
2
3
150
300
600
1200
4
5
6
7
2400
4800
9600
19,200
The mode parameter determines the data word length, whether parity is checked, and the number of
stop bits.
0
1
2
3
7 data, no parity, 1 stop
7 data, no parity, 2 stop
7 data, parity, 1 stop
7 data, parity, 2 stop
4
5
8 data, no parity, 1 stop
8 data, no parity, 2 stop
6
8 data, parity, 1 stop
7
8 data, parity, 2 stop
The parity parameter determines the type of parity. Specifying a “0” is even parity and specifying
“1” is odd parity. If the mode parameter is set for no parity, then enter a “0”.
com is an optional parameter and is valid only for COM2. It determines if this port is RS-232, RS422, or RS-485. When in RS-485 mode, the output is automatically turn on when printing and turn
off when it is finished. The transmitter is turned off within one character time after the last character
is sent.
CONFIG Commands - 1
0 = RS-232 (default)
1 = RS-422 (transmitter always on)
2 = RS-485
RELATED:
none
EXAMPLE:
10 CONFIG BAUD 1,6,5,0
This sets COM1 for the default values.
ERROR:
<Data negative> – all parameters
<Data out of range> – if illegal baud, mode or parity parameter.
CONFIG Commands - 2
CONFIG BREAK
Statement
SYNTAX:
CONFIG BREAK com port,mode
PURPOSE:
To enable or disable response to a break character on a communications port.
REMARKS:
In normal operation an <ESC> to COM1 while the program is running will stop program
execution. The same is true for ˆC in an INPUT statement.
This response is disabled with CONFIG BREAK.
The com port parameter is 1 or 2.
The mode parameter tells the system whether or not to suppress break. A “0” will allow normal
break operation. A “1” will suppress the break characters.
RELATED:
none
EXAMPLE:
10 CONFIG BREAK 1,1
Suppress break on both serial channels.
ERROR:
<Data negative> – for com port and mode
CONFIG Commands - 3
CONFIG CLOCK
Statement
SYNTAX:
CONFIG CLOCK mode,run
CONFIG CLOCK run (RPC-2350 series only)
PURPOSE:
Configures real time clock for 12 or 24 hour modes and starts or stops the clock.
REMARKS:
The TIME$ function returns the time in 12 or 24 hour formats. Set mode = 0 for 12 hour time and 1
for 24 hour time format.
run turns the clock on and off. 0 = off or stopped, 1 = on or run.
RELATED:
TIME$, DATE$
EXAMPLE:
CONFIG CLOCK 1,1
Sets to clock to 24 hour mode and starts it running.
CONFIG CLOCK 1
ERROR:
Starts clock (2350 series only)
<Data out of range> - if data other than 0 or 1 are used.
CONFIG Commands - 4
CONFIG COM$
Tasking Statement
SYNTAX:
CONFIG COM$ n,terminator,length,XON,echo
PURPOSE:
To configure a communication port to interrupt when the programmed conditions are met.
REMARKS:
The CONFIG COM$ statement is used in conjunction with the ON COM$ statement so that the
foreground program is interrupted when either a specific message length has been received or a
specified termination character has been received.
n = legal serial port number.
The terminator is equal to the termination character of the incoming string. This is normally a
carriage return (13) but it may be any character from 1 to 127. If you specify 0, CAMBASIC will
not test for a terminator.
In some cases there is no termination character. The length of the message is always the same. In
this case the length parameter should be set to the message length. The range is 1 to 127 characters.
If you specify “0”, CAMBASIC will not check for length.
The XON parameter enables or disables XON/XOFF protocol checking by the serial port. Setting this
parameter to ”1” enables the protocol, and setting it to “0” disables the protocol.
The echo parameter determines when the incoming characters are to be echoed. When a “1” is
specified, the characters are echoed. Characters are not echoed when the parameter is “0”.
See the Multitasking Chapters for more information.
RELATED:
ON COM$, COM$
EXAMPLE:
10 CONFIG COM$ 2,13,0,0,0
This example configures COM2 so that the terminator is a carriage return. There is no length
checking, XON/XOFF protocol and no character echo.
ERROR:
<Data negative> – for n,terminator,length,XON,echo
<Data out of range> –if n is not 1, 2 or 3; terminator or length > 127;
XON or echo > 1
CONFIG Commands - 5
CONFIG COUNT
Tasking Statement
SYNTAX:
CONFIG COUNT number,address,bit [,preset] [,AUTO]
PURPOSE:
To define the characteristics of a software counter.
REMARKS:
The CONFIG COUNT statement is the initial step in setting up a software counter. Up to eight
counters can be defined. A counter input may be any digital input.
The counter number has a range of 0 to 7. The address is the address of a parallel I/O port. The bit
parameter specifies bit 0 through 7 of that port.
The optional preset parameter is only used when you want an interrupt at a specified number of
counts. When the optional AUTO parameter is specified, the counter will automatically reset to zero
when the preset is reached.
For additional information see the Multitasking Chapters.
RELATED:
ON COUNT, START COUNT, STOP COUNT, RESUME COUNT
EXAMPLE:
10 CONFIG COUNT 4,32,2,5000
This configures counter 4 at address 32, and bit 2 with a preset count of 5000.
ERROR:
<Data negative> – for number, address, bit, preset
<Data > 65,535> – for preset and address
<Data out of range> – if number or bit > 7
CONFIG Commands - 6
CONFIG DISPLAY
Statement
SYNTAX:
CONFIG DISPLAY address,type,cursor
PURPOSE:
To install a driver for a display
REMARKS:
CAMBASIC supports eight vacuum fluorescent (DP series) and liquid crystal (LCD) displays. When
the CONFIG DISPLAY statement is executed, a driver is installed that tells CAMBASIC the I/O
address, type and cursor.
The address is the address of the output port at which the display is located. See your hardware
manual for more information.
The type parameter is determined by the display type, as shown in the table below:
0
1
2
3
DP-1x16
DP-2x20
DP-2x40
DP-4x20
VF, 1 line, 16 char/line
VF, 2 line, 20 char/line
VF, 2 line, 40 char/line
VF, 4 line, 20 char/line
4
5
6
7
8
LCD-2x20
LCD-2x40
LCD-4x20
LCD-4x40
LCD
LCD, 2 line, 20 char/line
LCD, 2 line, 40 char/line
LCD, 4 line, 20 char/line
LCD, 4 line, 40 char/line
LCD, Graphic
The cursor parameter sets the cursor type. This may not be valid, depending upon the display type.
For DP series displays:
0
2
cursor not displayed (all models)
cursor displayed, 2x40, 4x20
For LCD character displays:
0
1
2
cursor not displayed
blinking cursor
steady cursor
RELATED:
DISPLAY
EXAMPLE:
The example below is for a vacuum florescent 2x20 display. It illustrates both continuous updating
and periodic updating of the display.
500 ON TICK .1 GOSUB 590
CONFIG Commands - 7
510
520
530
540
550
560
570
580
590
600
610
620
ERROR:
CONFIG DISPLAY & 40,3,0
DISPLAY “REMOTE PROCESSING”;
DISPLAY (3,1) “Tick = “;
DISPLAY (3,8);
PRINT#9,!”###.##”;TICK(0);
IF TICK(0)>110 THEN CLEAR TICK
GOTO 540
‘
INC S:IF S=20 THEN S=0:DISPLAY (2,19)” “;:DISPLAY(2,S)”>“;:RETURN
DISPLAY (2,S-1)”>“;
DISPLAY (3,8);
RETURN
<Data negative> - for all parameters
<Data range> - if type > 7 or cursor > 2
<Data > 65,535> - for address
CONFIG Commands - 8
CONFIG PIO
Statement
SYNTAX:
CONFIG PIO init,port A,port B, port LC, port UC [,address]
PURPOSE:
To initialize an 82C55 parallel I/O IC.
REMARKS:
The 82C55 parallel I/O IC has four I/O ports. Each port can be programmed as input or output.
They are defined as follows:
Port A
Port B
Port LC 4 bits
Port UC
8 bits
8 bits
4 bits
0 to 3
0 to 7
0 to 7
4 to 7
The init parameter is the value you want output ports to be after the command is executed.
The 82C55 initializes itself to all inputs on power–up. When an input port is changed to an output
port, the 82C55 forces all the bits to a low state. When it drives devices such as opto–isolator
modules, this would be undesirable as all the modules would turn on. Specifying “1” will make the
ports go high; specifying “0” will make the outputs go low. The inputs will be unaffected.
Port A - UC are direction parameters and are specified as “1” for an input port and “0” as an output
port.
The address parameter is the base address of the chip. You normally do not specify an address since
CAMBASIC will use the default of 0.
RELATED:
none
EXAMPLE:
10 CONFIG PIO 1,0,0,1,1
This configures an 82C55 at the address default to have ports A and B as outputs. Ports UC and LC
are inputs. Ports A and B will have high outputs.
ERROR:
<Data negative> – for address, init, port directions
<Data > 65,535> – for address
CONFIG Commands - 9
PROGRAM DEBUGGING
CAMBASIC has several constructs which can be used to debug a program. This section will outline the methods and give
examples.
Using the STOP statement
When a STOP statement is encountered, program execution halts and the line number containing the stop statement is
displayed.
By inserting the STOP statement in different sections of the program, you can determine whether these sections are being
executed. For example, you can test a conditional branch:
10
20
30
40
50
55
60
70
75
80
INPUT A
IF A=2 THEN 50 ELSE 80
'
'
B=23
STOP
'
B=25
STOP
'
In this example, a line number followed by a remark ( ' ) statement means that this line would be a part of your program.
In the example above, STOP statements are inserted at lines 55 and 75 to determine if the branch at line 20 is operating
correctly. When you input 2, the program should stop at line 55. Otherwise, it should always stop at line 75.
USING THE PRINT AND INPUT STATEMENTS
The example above shows how the INPUT statement can be inserted so that you can manually change the value of X to test
this program fragment.
The PRINT statement can also be used to print out the value of any variable or memory location after the program has
halted.
TRON/TROFF TRACES EXECUTION PATHS
TRON turns on the line number tracing function. Line numbers are printed as they are executed. No other information is
printed. However, all PRINT statements execute properly. Because the line numbers are printed, execution is slowed. The
slowdown is less noticeable at higher baud rates. To turn the trace off, execute TROFF.
Use TROFF to turn off the trace function. These two statements are most useful when tracing portions, rather than entire
programs. Below is a test program:
10
20
30
40
50
60
70
80
A$ = "Down"
TRON
FOR X = 0 TO 2
GOSUB 90
NEXT
TROFF
END
S = 0
Program debugging - 1
90 INC H
100 RETURN
RUN
.30..40..90..100..50..40..90..100..50..40..90..100..50..60.
USING MON TO EXAMINE MEMORY
When storing data into memory, it is sometimes necessary to verify that a block is correct. You can display 128 bytes at a
time with the MON "D" command.
The syntax is:
MON>D address [segment]
where address is the starting address in hexadecimal. The command will display 8 lines of 16 bytes. The optional segment
parameter can be used to view memory segments above segment 0. The segment is entered in hexadecimal.
The program will pause at the end of each display. Pressing the space bar will cause another block to be displayed.
Pressing <ENTER> returns you to the Immediate Mode. Pressing <ESC> during the listing will abort the display.
Program debugging - 2
The following list of error messages are returned by CAMBASIC. These indicate clearly, what is wrong, within the context
of a program, and should be of great use in program debugging.
NUM
MESSAGE
EXPLANATION
0
<Unknown error>
Error is undefined
1
<NEXT w/o FOR>
A NEXT statement is encountered without a matching FOR.
2
<Syntax>
A line is encountered that includes an incorrect sequence of characters
(misspelled keyword, incorrect punctuation, etc.).
3
<RETURN w/o GOSUB>
A RETURN statement is encountered for which there is no previous,
unmatched GOSUB statement.
4
<Out of DATA>
A READ statement is executed when there are no more DATA statements
with unread data remaining in the program.
5
<Illegal argument>
A parameter that is out of range is passed to a numeric or string function.
This error may also occur as a result of:
a.
b.
c.
d.
e.
f.
A negative or unreasonably large subscript.
A negative or zero argument with the LOG function.
A negative argument to SQR.
A negative mantissa with a noninteger exponent.
An improper argument to MID$, LEFT$, RIGHT$, PEEK,
POKE, TAB, SPC or ON...GOTO.
Other function arguments which exceed the limits of the function.
6
<Overflow>
The result of a calculation is too large to be represented in CAMBASIC
single–precision format. If underflow occurs, execution continues without
an error.
7
<Out of memory>
A program is too large, or has too many loops, subroutines, and/or
variables; or has expressions that are too complicated to evaluate.
8
<Line/label not found>
A nonexistent line number is referenced in an EDIT, DELETE, RENUM,
etc. statement.
9
<Subscript out of range>
An array element is referenced, either with a subscript that is outside the
dimensions of the array, or with the wrong number of subscripts.
10
<Array already dimensioned> Two DIM statements are given for the same array; or a DIM statement is
given for an array after the default dimension of 11 has been established
for that array.
11
<Division by zero>
A division by zero is encountered in an expression; or, the value zero has
been raised to a negative power. In the first case, the result is machine
infinity (with the appropriate sign); in the second case, the result is
positive machine infinity.
Error Messages - 1
NUM
MESSAGE
EXPLANATION
12
<Illegal immediate>
A statement that is illegal in Immediate Mode is entered as an Immediate
Mode command.
13
<Type mismatch>
A string variable name is assigned a numeric value or vice–versa; a
function that expects a numeric argument is given a string argument or
vice versa.
14
<Out of string space>
String variables have caused CAMBASIC to exceed the amount of free
memory remaining. CAMBASIC will allocate string space dynamically,
until it runs out of memory.
15
<String too long>
An attempt is made to create a string in excess of 255 characters or a
string is too long for command limits.
16
<String too complex>
A string expression is too long or too complex to be processed. It should
be broken down into smaller expressions.
17
<Can’t CONT>
An attempt is made to continue a program that:
a.
Has been halted due to an error.
b.
Has been modified during a break in execution.
c.
Does not exist.
18
<UNTIL w/o DO>
An UNTIL statement has been encountered without a matching DO.
19
<Data out of range>
A parameter for a statement is outside the allowable range.
20
<DO/FOR/GOSUB stack>
A GOSUB/RETURN, FOR/NEXT, and/or DO/UNTIL loops are nested
too deep.
21
<Hardware>
CAMBASIC is attempting to access an I/O device which is not connected
or is inoperative.
22
<System corruption>
The card is trying to execute data rather than code. This error trap can
prevent some system crashes due to the modification of system RAM,
either inadvertently or through noise.
23
<Expected variable>
Only a variable may be used as the parameter or argument.
24
<Can’t compile>
CAMBASIC cannot compile the line because:
a.
there are too many numeric constants,
b.
a nonexistent line number is referenced,
c.
a line or label is referenced that does not exist.
25
<RESUME w/o ON ERR>
A RESUME was encountered without a corresponding ON ERR
statement.
26
<Data negative>
The argument or parameter may not be negative.
Error Messages - 2
NUM
MESSAGE
EXPLANATION
27
<Data > 255>
The argument or parameter may not exceed 255.
28
<Data > 65,535>
The argument or parameter may not exceed 65,535.
29
<Can’t LOAD program>
Program does not exist in EEPROM.
30
<Expected (>
CAMBASIC is expecting a left parenthesis or an expression.
31
<Expected )>
CAMBASIC is expecting a right parenthesis.
32
<Expected ]>
CAMBASIC is expecting a right bracket.
33
<Need more>
Another parameter or argument is expected.
34
<Expected –>
CAMBASIC is expecting a “–”.
35
<TO missing>
A TO was missing in a FOR/NEXT structure.
36
<Expected GOTO>
A GOTO is expected after a conditional.
37
<Expected GOSUB>
A GOSUB is expected after a conditional.
38
<Expected THEN>
A THEN is expected after a conditional.
39
<Expected =>
An “=” sign is expected.
40
<Expected ;>
A semicolon is missing in a PRINT statement with a prompt string.
41
<Variable name length>
The variable name is longer than 40 characters.
42
<No Autorun program>
CAMBASIC cannot find the autorun program.
43
<Task construction>
A mismatch of task numbers or task construction has occurred.
44
<CONFIG mismatch>
A config statement was improperly constructed.
45
<Command not available>
You have used a command which is not implemented on your card. For
example, the AIN is useless on cards without analog input.
46
<DO loop counter empty>
Encountered an ENDDO without a previous DO/n statement.
47
<Time >327.67 sec>
Self explanatory
Error Messages - 3
Event Multitasking
Event Multitasking was developed to give faster response to real time events. It is different than the multitasking that was
originally designed for business applications and later used in some industrial control languages.
Time Slice Multitasking – The Old Way
This older form of multitasking usually takes two forms. The most popular is called “time slice.” Each task is written as if
it were a separate program. The first task starts and, on a clock tick (usually 60 times per second), that task is suspended
and the next task starts. After another clock tick, the second task is suspended and the third task begins. This continues
until all tasks have had their slice of time and the process starts over.
To get some idea of the performance level of this type of multitasking, assume that there are 10 equal tasks. Tasks are
switched 60 times per second. With 10 tasks, each task is serviced only 60/10 or 6 times per second.
The second form is really a version of the first. Tasks are switched after each command in each task. This increases the
task switching to several hundred times per second, but the switching overhead seriously slows the throughput.
The problem with time slice is that all the tasks are written in BASIC. Since there is only one microprocessor chip, and task
switching takes processor time away from program execution, the system will actually run slower than with a
non–multitasking program.
Event Multitasking – For Real Time Control
Event Multitasking in CAMBASIC solves the speed problem by compiling all tasks into machine code, which executes
much faster than BASIC. CAMBASIC executes about 3600 commands per second, which is very fast by BASIC standards.
It also can execute 5000 tasks per second in the background while maintaining the foreground rate!
NOTE: These numbers are half for 9 Mhz systems.
There are some limitations to this method. You can only use the tasks defined by the language. These are:
Output Timing (PULSE)
Input Counting (COUNT)
Keypad (KEYPAD$)
Communications (COM$)
Hardware Interrupts (ITR)
Change of state on inputs (INP)
Periodic Interrupts (TICK)
A series of special commands are used for the tasks. You do not use CAMBASIC commands like POKE, GOTO, etc. for
the tasks.
Hardware vs Software Interrupts
It is important to understand the difference between hardware and software interrupts when dealing with a high level
language. CAMBASIC can respond to hardware interrupts, but only indirectly.
When a hardware interrupt occurs, an internal flag is set within a few microseconds. In the same manner, any task that can
cause an interrupt set an internal flag.
Between each program statement CAMBASIC checks to see if any interrupt flags are set. If so, it branches to the line
number that was specified for that interrupt. The maximum time to service an interrupt is the length of the command
previous to the interrupt. This is called maximum latency time. It ranges from about 0.2 milliseconds to 2 milliseconds.
Event Multitasking - 1
There are a few exceptions. The INPUT and INPUT KEYPAD$ statements will ignore interrupts until the input is
received. The DELAY statement will prevent a response to an interrupt until the delay period. If the serial output buffer
becomes full, and there are still more characters to put in the buffer, interrupts will not be serviced until all the characters
are in the buffer.
Interrupt Priorities
CAMBASIC does not have an interrupt priority scheme. However, you can lock out a response to an interrupt for critical
program segments with the ITROFF command.
CAMBASIC allows nesting of interrupts. That means an interrupt service routine can interrupt another interrupt service
routine. If there are two interrupt routines, A and B, and A has partly executed when B interrupts, B will execute to
conclusion and then A will finish. Thus, the routine that occurred last, in effect, has the highest priority.
Since the sequence of the incoming data must be preserved, ON COM$ interrupts are internally stacked in CAMBASIC,
such that each ON COM$ interrupt will be handled in its entirety before the next one occurs. Other types of interrupts,
such as ON TICK, can be nested inside an ON COM$ interrupt.
Event Multitasking does not have a priority system.
COM$ TASKING
ON COM$ defines a program branch when a task defined by the CONFIG COM$ statement becomes valid. The syntax is:
ON COM$ channel GOSUB line or label
ON COM$ channel GOSUB
After defining all the parameters with CONFIG COM$ the ON COM$ activates the task. You can deactivate the task by
executing the same statement but without a line number after GOSUB.
Channel 1 is COM1 and Channel 2 is COM2.
COM$ Example:
In the following example, the program will branch when 8 characters have been received. The XON and protocol functions
are disabled. All characters will be echoed.
10
20
30
.
.
80
90
NOTE:
CONFIG COM$ 1,0,8,0,1
ON COM$ 1 GOSUB 80
..your program goes here
PRINT COM$(1)
RETURN
If a serial reception error occurs, the program will branch to line 80 regardless of the number of
characters received. You can use the SYS(6) or SYS(7) function to determine the cause of the error.
COUNT MULTITASKING
Introduction
CAMBASIC supports eight event counters. These are generated in software and are intended for low–speed counting.
Event Multitasking - 2
Each counter may be assigned through software to any digital I/O line on any Control or expansion card. Once
configured, counting is done independently in the background. The counters have the following features:
1.
The count rate may range from 0 to 80 Hz.
2.
The counters may be read at any time with the COUNT function. This function is
synchronized with the counter so that valid data is always read.
3.
You can program the counter so that the program branches to a subroutine when it reaches a
preset amount using the ON COUNT statement.
4.
You can also create a module n counter by having the counter automatically reset when it
reaches a preset count, using the CONFIG COUNT statement.
5.
The counters are 16–bit and can accumulate up to 65,535 counts.
6.
You can stop and zero the counters individually or in groups with the CLEAR COUNT
statement.
7.
You can start the counting individually or in groups with the START COUNT statement.
8.
You can suspend counter operation while maintaining the count with the STOP COUNT
statement.
9.
You can restart the counters without resetting the count using the RESUME COUNT
statement.
How Counting is Done
A specified input line is sampled 200 times (100 times in 9 Mhz systems) per second. As shown in Figure 1, when the
software detects that the input changes from a high logic state to a low logic state, the counter is incremented.
Count
input
Sample
Counter
Increment
Figure 1
Theoretically, a 100 Hz square wave can be counted. However, due to sample timing variations (dependent upon other
multitasking events), the maximum square wave frequency rate should be 80 Hz. To obtain the full frequency response, the
minimum time the signal is low or high is 8 mS. The software is written to reject high frequency noise.
Defining a Counter
Setting up a counter is done with the CONFIG COUNT statement. The syntax is:
Event Multitasking - 3
CONFIG COUNT counter, address, bit [,preset] [,AUTO]
Where:
counter is the counter number which may be 0 through 7.
address is the I/O address of the port (of 8 bits) that you want to use for the input. This will typically
be an 82C55 port.
bit is the particular bit or line of the port addressed. The range is 0 through 7.
preset is an optional parameter that tells the counter to notify the system when a preset count has been
reached. The program will branch if an ON COUNT statement has been executed. The value may
range from 1 to 65,656.
AUTO is an optional parameter. Without AUTO, the counter will continue to increment after the
preset count is reached. When AUTO is specified, the counter will reset to zero after reacting the
preset count. This way no counts are missed while the subroutine branch is executing.
Background Tasking is Much Faster
The data that you enter with the CONFIG COUNT and ON COUNT statements is compiled into object code. Thus, the
execution time on the 200 Hz (100 times in 9 Mhz systems) clock tick is only microseconds, rather than the milliseconds
that it would take in BASIC.
Modes of Operation
At there are two modes of operation. The first is the polled mode in which counts are accumulated and read from time to
time by the program. When the counter reaches 65,535, the next count will roll the counter over to zero. This mode
requires only that CONFIG COUNT and START COUNT be executed in that order. A short example would be:
10 CONFIG COUNT 5,0,1,2000,AUTO
20 START COUNT 5
.
.
Line 10 configures counter 5 to read bit 1 of address 0 as an input. When the count reaches 2000,
the counter will automatically reset.
Line 20 starts counter operation. These two lines do not need to be adjacent in the program.
However, line 20 must be executed after line 10.
The second is the interrupt mode. When the preset count is reached, a software interrupt is generated and the program
branches to a subroutine which acts on the preset count. This mode requires that CONFIG COUNT, ON COUNT and
START COUNT be executed in that order. Below is a short example of a prescaler:
10 CONFIG COUNT 5,0,1,2000,AUTO
20 ON COUNT 5 GOSUB 200
30 START COUNT 5
.
.
200 INC A
210 RETURN
Event Multitasking - 4
Line 10 configures counter 5 to read bit 1 of address 0 as an input. When the count reaches 2000,
the counter will automatically reset.
Line 20 directs CAMBASIC to branch to a subroutine when the preset count is reached.
Line 30 starts counter operation. These three lines do not need to be adjacent in the program.
However, they must be executed in this order.
Line 200 increments variable A. Thus, the value of A is the number of times the counter has counted
to 2000.
Line 210 returns program execution to the place that it was interrupted.
It is imperative that the counter numbers in CONFIG COUNT and START count match. Otherwise, operation will be
unpredictable.
Event Multitasking - 5
NOTE:
It is theoretically possible for the subroutine to take so long to execute that another 2000 counts is
reached. In this unlikely case, the subroutine will interrupt itself. CAMBASIC is not recursive. The
effect of this is that the second interrupt may change variables that the first interrupt has yet to use.
This situation can be avoided by careful programming and by detailing the system timing. It is
always a good idea to keep interrupt routines as short as possible.
COUNT Examples
You must do a CONFIG COUNT, ON COUNT and START COUNT for each counter you intend to use. You may
reconfigure a counter to another address or to a different condition at any time, as long as the counter has been disabled by
CLEAR COUNT.
The example below lets you get a feel for the operation of the counter while at your desk. You can create output pulses by
pressing keys on your PC. These pulses are then jumpered back into a counter.
The hardware requires a CMA–26 cable and a STB–26. Plug one end of the CMA–26 into the parallel port and the other
end into the STB–26. Place a jumper wire between screw terminals x and y on the STB–26. Enter the following program:
10 CONFIG PIO 0,0,1,0,1,1
20 CONFIG COUNT 4,0,1
30 ON TICK 0,1 GOSUB .. pr_count
40 START COUNT 4
50 INPUT A$
60 BIT 0,1,ON
70 DELAY .05
80 BIT 0,1,OFF
90 GOTO 50
100 ..pr_count
110 PRINT COUNT(4)
120 RETURN
Line 10 configures the 82C55 so that port A is an input port and port B is an output port. It assumes
that the 82C55 is at address 0.
Line 20 configures counter 4 so that bit 1 of port 0 is its input.
Line 30 sets up an interrupt every 1.00 seconds that calls the subroutine to print the count.
Line 40 starts the counter.
Line 50 provides a convenient way to get keyboard input. Just enter <ENTER> when you see the
prompt.
Line 60 forces the output bit high, which causes the counter input to go high.
Line 70 is a short delay.
Line 80 forces the output bit and the counter input low. At this point counter, 4 should increment.
Line 90 sets up the input loop again.
Line 110 prints the count in the counter.
Line 120 returns execution to the place where the one–second interrupt occurred.
Event Multitasking - 6
You can try this by holding down the <ENTER> on your terminal so that it auto–repeats and enters count faster.
INP TASKING
INP tasking lets you react to a combination of on/off conditions at a digital I/O port. That is, you may want to detect when
inputs 0, 1 and 7 are high, and inputs 2 and 3 are low, while ignoring the other input lines (4, 5, 6).
There are a total of 8 tasks that can be configured. The ON INP statement sets the interrupt conditions. The START INP is
used to activate the task. STOP INP will deactivate the task. Another START INP will reactivate the task. You do not
need to execute ON INP to start the task again.
Declaring a Task
This is done with the ON INP statement. The syntax is :
ON INP n, address, mask, compare GOSUB line/label
Where:
n is the task number. The range of n is 0 to 7.
address is the I/O address of the port in interest. The port can be an actual input port like that on an
82C55, a readable latch or an internal CPU register.
mask determines which of the input bits or lines are of interest. For example, if we want to look at
lines 0, 1, 2, 3 and 7, then the mask would be:
10001111
in binary or 8F in hex or 143 in decimal. The “1” bits of the mask are the bits of interest. During
execution the mask is ANDed with the port value.
If the result is equal to the compare parameter, then a interrupt occurs. The program then branches to
the GOSUB line/label.
The inputs are checked 200 (100 in 9 Mhz systems) times per second. In most applications, the inputs will be changing
much more slowly. Thus, if a match occurred and remained the same for one second, then 200 (100 in 9 Mhz systems)
interrupts would occur.
To prevent this from happening, the ON INP operates in the “edge triggered” mode. The program branch occurs only on
the first instance of the match. All subsequent matches are ignored until at least one input changes, so that a match is not
present.
The example below will let you demonstrate the INP task, using a parallel port, a UTB terminal board and clip leads.
10
20
30
40
50
60
70
ON INP 0, 2, 7, 5 GOSUB 60
START INP 0
PRINT BIN$ (INP (2) )
DELAY .25
GOTO 30
PRINT "match"
RETURN
Line 10 defines the INP task 0 to look at address 2. The bits of interest are set by the seven
Event Multitasking - 7
parameters and are bits 0, 1 and 2. When the data at the port is ANDed with 7, and the value is 5
(bits 0 and 2 are high and bit 1 is low), the program branches to line 50.
Line 20 prints the binary representation of the port of interest so that you can see the bits pattern
while you experiment.
Line 30 actually starts the tasking process.
Line 40 creates a small delay so that the binary string printing is easily readable.
Line 50 repeats the printing.
Line 60 lets you know that an interrupt has occurred.
Using START INP and STOP INP
As shown in the example above, START INP enables the task defined by the ON INP statement. Generally, the ON INP
statements are declared at the beginning of the program for document clarity. This also makes the program run faster by
not executing these statements in the body of the program. The START INP executes about three times faster than ON
INP.
The STOP INP halts the task checking, temporarily. It does not change any of the parameters specified by ON INP.
Executing another START INP will reactivate the task.
Tasks can be started and stopped in banks. For example:
10 START INP 0, 1, 4, 5, 7
10 STOP INP 2, 3, 4
KEYPAD MULTITASKING
CAMBASIC has built–in keypad scanner and debounce software. When activated, a keypad is scanned in the background.
When a key press is detected, the system waits 80 mS and tests again. If the key is still pressed, the system is notified that a
valid input exists. The program then jumps to a subroutine, which acts on the key press.
1.
ON KEYPAD$ GOSUB tells the program where to branch when a key is pressed. The syntax is:
ON KEYPAD$ GOSUB line/label
The line/label is the beginning of the subroutine to react to the key press. The routine must end with
a RETURN statement. If the line/label are omitted, this task is disabled.
2.
KEYPAD$ function returns either a one–character string that has been assigned to each key or the
numerical position of the key. The two variations are:
A$=KEYPAD$(0)
returns a string character to a string variable. The assignment is shown below. A null string is
returned if no key was pressed. This variation is most useful where a single character can be assigned
to match the keypad marking.
Event Multitasking - 8
A=KEYPAD$(1)
returns the key position number to a numeric variable. A zero is returned if no key was pressed. For
large keypads, the legends often contain some words and symbols in addition to letters. The variation
is most suited for these cases.
Assigning Character String to Keys
A table in RAM can be programmed to return any ASCII value. The table is set up so that the first character is the
upper–left–hand corner and the last character is the lower–right–hand corner.
You can assign a single character string to the keys in the following manner.
10
20
30
40
50
FOR X=0 TO 15
READ A$
POKE SYS(8)+X,ASC(A$)
NEXT
DATA 1,2,3,A,4,5,6,B,7,8,9,C,*,0,#,D
This example matches the KP–1 Keypad except that the "#" sign is replaced by a carriage return (value=13).
Applications Examples
Basic 16–Key Example
The first example is written for the KP–1 Keypad. No characters were entered into RAM. The CAMBASIC system
defaults to the KP–1 character set.
10
40
50
60
70
80
'Basic 16 Key Demo Program
ON KEYPAD$ GOSUB ..Key_interrupt
GOTO 50
..Key_interrupt
PRINT KEYPAD$(0)
RETURN
Line 40 tells CAMBASIC to call a subroutine by the name of “Keypad_interrupt” every time a key is
pressed.
Line 50 is used only as part of this demo program so that the system will wait. You could insert the
rest of your control program.
Line 70 prints the keypad character.
Line 80 returns program execution to the place that it was executing before the key was pressed.
Inputting Multi–digit Numbers
The basic examples print out the key that was pressed. The following example is a variation of the basic 16–key demo that
inputs a multi–digit number.
10
30
35
40
45
50
'Input a multi–digit number
ON KEYPAD$ GOSUB ..Key_interrupt
PRINT R
DELAY .25
GOTO 35
..Key_interrupt
Event Multitasking - 9
55
60
65
70
75
80
85
90
95
B$=KEYPAD$(0)
IF B$=CHR$(13) THEN ..Get_value
IF B$="*" THEN B$="."
A$=A$+B$
RETURN
..Get_value
R=VAL(A$)
A$=""
RETURN
Line 30 tells CAMBASIC to call a subroutine by the name of “Keypad_interrupt” every time a key is
pressed.
Line 35 prints the number that the input string will be converted to. Initially, it will be zero.
Line 40 is a 0.25 second delay for demonstration purposes.
Line 45 is used only as part of this demo program so that the system will wait. You could insert the
rest of your control program.
Line 55 assigns the input to B$.
Line 60 tests to see if this is the terminator key for the input.
Line 65 tests to see if the input is an asterisk. If so, it converts it to a decimal point.
Line 70 adds the new value to the string.
Line 75 returns program execution to the place that it was executing before the key was pressed.
Line 85 converts the assembled string into a number.
Line 90 clear the assembled string to a null string.
Line 95 returns program execution to the place that it was executing before the key was pressed.
Fast Branching on Keys
Sometimes the input data is in the form of symbols. That is, rather than numbers and letters, the keypads legends might be
direction arrows or words like “Load” and “Stop”.
Intercepting these keys in the form of strings provides a slower response than using the key positions. The following
program does an instant branch to one of 16 routines, based on the position number.
10 'Branch on the Key Position
40 ON KEYPAD$ GOSUB ..Key_interrupt
50 GOTO 50
60 ..Key_interrupt
70 K=KEYPAD$(1)
80 ON K GOTO 100,200,300,400 ......,1600
90 RETURN
.
.
100 ..service key position 1
.
150 RETURN
.
200 'service key position 2
.
Event Multitasking - 10
250 RETURN
and so forth.
Line 40 tells CAMBASIC to call a subroutine by the name of “Keypad_interrupt” every time a key is
pressed.
Line 50 is used only as part of this demo program so that the system will wait. You could insert the
rest of your control program.
Line 70 assigns the input position to variable K.
Line 90 returns program execution to the place that was executing before the key was pressed.
However, the program should never get to this point if 16 line numbers are specified.
Line 100 would be the routine to handle the operation desired by pressing key 1.
Line 150 returns program execution to the place that it was executing before the key was pressed.
Line 200 would be the routine to handle the operation desired by pressing key 1.
Line 250 returns program execution to the place that it was executing before the key was pressed.
Using INPUT KEYPAD$
The previous examples have shown how to use a keypad on an interrupt basis. In some applications it is acceptable for the
program to wait for operator input. INPUT KEYPAD$ will accept data in the same manner as the INPUT statement does
from a serial port.
The following example is for the KP–1 keypad. It uses the default assignment of a carriage return (13) for the "#" key.
This is necessary, as a string input must be terminated with the carriage return.
30 INPUT KEYPAD$ 1,A$
40 PRINT A$
Line 30 is the input statement. The parameter “1” tells the system to echo the keypad characters to
the COM1 serial port. In an actual application, the characters would probably be echoed to a
multiline display. Enter the data and then press the "#" key.
Line 40 will print out the string.
Event Multitasking - 11
MULTITASKING ON A CLOCK TICK
The three 200 Hz (100 Hz in 9 Mhz systems) tick timers are used for a number of multitasking functions in CAMBASIC.
In multitasking, it is used as a periodic interrupt. The ON TICK statement can call a subroutine as often as 200 (100 in 9
Mhz systems) times per second, or once every 327.67 seconds. The syntax is:
ON TICK number, time GOSUB line/label
On every multiple of the specified time, program execution branches to the subroutine at the line/label. Program execution
resumes when the RETURN statement is reached in the subroutine.
A simple example would be as follows:
10
20
30
40
50
60
70
ON TICK 0,1 GOSUB 50
PRINT "foreground"
FOR C=0 TO 1000:NEXT
GOTO 20
INC A%
PRINT A
RETURN
Line 10 tells CAMBASIC to interrupt every 1.00 seconds and branch to line 50.
Lines 20 through 40 represent a foreground program. It prints, does a short delay and prints again.
Line 50 increments a variable and represents the number of seconds.
In some applications multiple interrupts are required. This can be done with the TICK statement. The only limitation is that
the interrupt times must be multiples of each other. For example, 1.0 and 3.0 seconds would be acceptable, but 1.0 and 2.7
seconds would not.
Below is a program that demonstrates clock interrupts every 1 and 5 seconds.
10
20
30
40
50
60
70
80
ON TICK 0,1 GOSUB 50
PRINT "foreground"
DELAY .25
GOTO 20
PRINT TAB(20);"tick";
INC A%:IF A%=5 THEN A%=0:GOSUB 70 ELSE PRINT:RETURN
PRINT " tock"
RETURN
Line 10 sets up an interrupt every 1.00 seconds
Lines 20 through 40 simulate your foreground program, as in the first example.
Line 50 prints “tick” every second
Line 60 increments a second counter. When it reaches 5, the counter is reset and "tock" is printed at
line 70.
Event Multitasking - 12
PULSE MULTITASKING
Introduction
CAMBASIC supports eight timed (or pulsed) outputs. These are generated in software and have a resolution of 10 mS.
Each timer may be assigned through software to any digital I/O line on any CPU or expansion card. Once configured,
timing is done independently in the background. The timers have the following features:
1.
The time resolution is 5 mS (10 ms in 9 Mhz systems)
2.
The timers may be read at any time with the PULSE function.
3.
The timers are 16–bit with a range from 0.005 (0.010 in 9 Mhz systems) to 327.67 (655.35
in 9 Mhz systems) seconds.
Defining a Pulsed Output
Setting up a timer is done with the PULSE statement. The syntax is:
PULSE n,address,bit,wait,time, polarity
Where
n is the timer number and has a range from 0 to 7.
address is the I/O address of an any 8–bit port either on or off the card.
bit is the particular bit of the port. The value ranges from 0 to 7.
time is the time in seconds that the specified bit is active. You may specify a time from 0.0 to 327.67
seconds.
polarity determines whether the specified bit will be active high or low. When polarity is 1, the bit
will go high during the active time. It will go low during the active time if the polarity is 0. The “0”
polarity is always used when driving opto module racks.
In the simplest mode, operation with the polarity active “high” would be as follows:
ON
OFF
0
1
2
3
4
5
6
Figure 2
Faster Code Execution
The data that you enter with the CONFIG PULSE statement is compiled into object code. Thus, the execution time on the
200 Hz (100 Hz in 9 Mhz systems) clock tick is only microseconds, rather than the milliseconds that it would take in
BASIC.
Operation of a Single Pulsed Output
Event Multitasking - 13
Timer 0 is configured at address 0 and bit 1. The wait time is 0.05 seconds. The output will go high for 0.06 seconds at
the end of the wait period, and then go low.
The PULSE function returns the remaining time of each stage. If the return is negative, the number is the time left in the
wait stage. If the return is positive, the number is the remaining part of the active time. The example below demonstrates
this.
10
30
40
50
PULSE 0,0,1,.05,1
A = PULSE(0):IF A=0 THEN STOP
PRINT A
GOTO 30
RUN
–.05
–.05
–.045
–.045
–.045
.
.
.
.03
.02
.02
.02
.01
.01
.01
5E-03
5E-03
5E-03
STOP
Operation of a Multiple Pulsed Outputs
The real power of the PULSE operation comes when multiple timed outputs are required and the time relationship between
outputs must be maintained. The application could involve pneumatic valves, injection molding steps or other
sequence–oriented operations.
10
20
30
40
50
60
PULSE
PULSE
PULSE
PULSE
.
.
0,0,0,4,1
1,0,1,6.5,1
2,0,2,1.5,1
3,0,3,7.5,1
The rest of your program, starting at line 60, executes independently of the timed outputs. Each output will time without
further intervention by the program. Thus, the program can do other tasks, like handle communications, check safety limits
and acquire process data such as temperatures, pressures, etc.
If the program should terminate before a timer times out, the bit will be left in the “active” state. When program execution
stops, all timers are cancelled. If the program is restarted with the CONT statement, the timers will not restart.
Event Multitasking - 14
DIFFERENCES—CAMBASIC vs QBASIC
1.
CAMBASIC is a multitasking language while the others are not. This adds features to the language
and also some limitations.
2.
CAMBASIC does not support disk or direct video commands on 64180 systems.
3.
CAMBASIC has an automatic floating point math system. which automatically converts from floating
point to integer and back as needed. Values are always stored in floating point. The floating point is
single precision, with seven digits of precision that are rounded to six digits when printed.
4.
While variable names may be as long as 40 characters, only the first and last characters and the length
are significant. This allows for more than 25,000 variable names.
5.
CAMBASIC does not support the following BASICA and GW–BASIC non–disk commands:
BEEP, CINT, CIRCLE, COLOR, KEY, LINE INPUT, LOC, LOCATE, LOCK, LPOS
LSET, RSET, OCT$, ON PEN, ON PLAY, ON STRIG, PAINT, PALETTE, PEN, PLAY
PMAP, POINT, POS, PUT, RANDOMIZE, SCREEN, SOUND, SPC, STICK, SYSTEM
UNLOCK, USR, VIEW, WAIT, WHILE, WEND and WRITE
QBASIC does not support the following CAMBASIC commands:
AIN, BCD, BIN, CONFIG, COUNT, DEC, DECF, DISPLAY, DO, DPEEK, DPOKE
EXIT, FPEEK, FPOKE, INC, INCF, ITR, KEYPAD$, ON BIT, ON COUNT, ON INP
ON ITR, ON KEYPAD$, ON TICK, PEEK$, POKE$, PRINT$, RESUME COUNT
RESUME TIMER, START BIT, START COUNT, START INP, START TIMER
STOP BIT, STOP COUNT, STOP INP, STOP TIMER, SYS, and TICK
6.
CAMBASIC supports hardware interrupts while the others do not.
Differences - 1
THE CAMBASIC MINI–MONITOR
The Mini–Monitor is included in CAMBASIC primarily for those who will be combining object code (either from assembly
or “C”) programs with CAMBASIC. The command set will let you examine and edit memory, and single step using the
breakpoint feature. You enter the Mini–Monitor by typing:
>MON
While in the monitor, the prompt will change from the normal “>” to:
MON>
You can exit the monitor by typing <Q> <RET> at the monitor prompt.
MINI–MONITOR COMMAND SET
The Mini–Monitor has eleven commands. All data must be entered in hexadecimal. If too little data or an illegal command
letter is entered, the terminal will beep and you will be prompted to start again. Entering more than four hex digits for a
number produces a system error, causing you to exit the Mini–Monitor.
The parameters for the various commands require a space after the command letter and between parameters. The
Mini–Monitor cannot be used with a program line number. The command summary is below:
D – Display memory
E – Edit memory
F – Fill a block of memory
M – Math, add, subtract, multiply in Hex
Q – Quit Mini–Monitor
Display
This command is used to examine memory. When executed, it displays 8 lines of 16 bytes at a time. To display the next
128 bytes, press the space bar. To exit this command, press <RET>.
A typical display would be as follows:
0:4A90
0:4AA0
0:4AB0
0:4AC0
0:4AD0
0:4AE0
0:4AF0
0:4B00
00
20
D1
A7
28
D2
87
64
00
AE
28
AE
AE
28
99
89
60
00
AE
00
00
22
20
29
83
00
00
00
00
41
E9
A8
9E
0C
00
0C
60
53
00
A6
28
86
0C
00
00
44
1A
20
9D
99
00
98
29
46
00
AE
AE
20
29
AE
3A
22
78
00
00
E9
00
00
82
29
00
C0
00
00
21
00
00
A8
8B
0A
20
0F
00
60
1B
A6
20
8B
83
00
5A
83
00
20
C7
99
29
50
00
3A
64
AE
28
20
29
00
81
41
00
00
AE
E9
A8
94
20
A7
8B
00
00
00
..'..(.... .))..
...... ....P..
(.....).!.Z.. X
..........'.:A..
...'.):....d..
.("ASDF").. ....
.. ....x.. .(...
d.).. ...... ...
To display memory in segment one or higher, see the following example which will display RAM memory in segment 1,
starting at address 0.
MON>D 0 1
Mini-Monitor - 1
Edit Memory
This routine lets you poke hex values into memory. For example, to edit at A000, you enter the command below. The “*”
prompt is for the data. Enter the data and type <RET>. The data and addresses will then be displayed for easy
verification.
MON>E A000
*01 22 4D C3 20 00 7A 23 C9
A000
A001
A002
A003
A004
A005
A006
A007
A008
01
22
4D
C3
20
00
7A
23
C9
This command can only be used in segment 0, since this is the only segment where code may be executed.
Fill Memory
This command may be used to fill a block of memory. It is often used to zero a section of memory where data will be
stored to make the detection of the data easier when debugging. The syntax is:
F start address end address data [segment]
All the memory locations, from the start through the end address, will be filled with the data (00–FF). An optional segment
may be entered.
MATH
This feature is a hexadecimal calculator. You enter two 8–bit numbers and the Mini–Monitor displays the sum, difference
and product of the two.
MON>M 65 44
+ A9
21
* 1AD4
QUIT
This command is used to exit the Mini–Monitor and return to CAMBASIC.
Mini-Monitor - 2