1
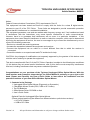
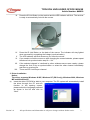
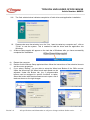
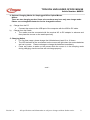
Instruction Manual
TYPHOON UNPLUGGED
OFFICE MOUSE
Art: 40800
07/2003
HOTLINE:
GERMANY TEL: 0180-5897466 (Mo.- Fr. 10:00 - 19.00Uhr 0,12ct/min.)
INTERNATIONAL TEL: 00800-22558974
http://www.typhoonline.com
E-Mail: [email protected]
TYPHOON UNPLUGGED OFFICE MOUSE
Article Number: #40800
GB
Notice:
Federal Communications Commission (FCC) requirements, Part 15
This equipment has been tested and found to comply with the limits for a class B digital device,
pursuant to part 15 of the FCC Rules. These limits are designed to provide reasonable protection
against harmful interference in a residential installation.
This equipment generates, uses and can radiate radio frequency energy and, if not installed and used
in accordance with the instructions, may cause harmful interference to radio communications.
However, there is no guarantee that interference will not occur in a particular installation. If this
equipment does cause harmful interference to radio or television reception, which can be determined
by turning the equipment off and on, the user is encouraged to try to correct the interference by one or
more of the following measures:
--Reorient or relocate the receiving antenna.
--Increase the separation between the equipment and receiver.
--Connect the equipment into an outlet on a circuit different from that to which the receiver is
connected.
--Consult the dealer or an experienced radio/TV technician for help.
CAUTION: Any changes of modifications not expressly approved by the grantee of this device could
void the user’s authority to operate the equipment.
This device complies with Part 15 of the FCC Rules. Operation is subject to the following two conditions:
(1) this device may not cause harmful interference, and (2) this device must accept any interference
received, including interference that may cause undesired operation.
Congratulations on your purchase of the Typhoon Unplugged Office Optical Mouse. With the
latest modern and symmetric shape design, the Office Mouse fit perfectly on your right or left
hand. Please read carefully the User’s Quick Guide to learn about the installation and the
powerful functions of your new Office Wireless Optical Mouse.
1. Contents in the Package
Unplugged Office Optical Mouse (Ergonomic or Symmetric)
Chargeable Mouse Cradle (PS/2, USB or UP Combo)
Two AA Batteries
Office Mouse Driver CD-ROM or disk
User’s Quick Guide
Optional Parts for Unplugged Office Optical Mouse
(These optional parts may be different on different wireless optical mice versions)
• AC to DC Adaptor
• USB to DC Cable
Version 2.0
All specifications and information are subject to changes without further notice.
1
TYPHOON UNPLUGGED OFFICE MOUSE
Article Number: #40800
2. Hardware Installation
a)
Connect the Receiver to Your Computer
I. Please turn off your computer.
II. Plug the connector of the receiver into the PS/2 or USB port of the computer. As
indicator on the image below, use the included USB–to-PS/2 converter for connection
directly to the PS/2 mouse port.
b)
Select the Channel
I. The two-channel switch is located under the belly of the mouse, right inside the
battery compartment. Select either Channel “1” or “2” as long during operation there
are no adverse Radio interferences to the mouse. Else please choose the next
number or re-synchronize with the Receiver to change the ID.
II. Insert the batteries into the battery compartment. Please pre-charge the batteries first
for 10 – 12 hours before initial use.
c)
Link the Mouse with the Receiver (Synchronization)
I. Connect the included power adapter to the Receiver/Charger back and to a 230V AC
power source.
II. Turn on the Computer and the LED indicator on the receiver will light up in green.
Version 2.0
All specifications and information are subject to changes without further notice.
2
TYPHOON UNPLUGGED OFFICE MOUSE
Article Number: #40800
III.
Press the ID Link Button on the receiver and the LED indicator will blink. The receiver
is ready to automatically link with the mouse.
IV.
Press the ID Link Button on the back of the mouse. The indicator will stay lighted
when successfully completing the linkage (synchronization).
The LED indicator will blink whenever you move the mouse.
If you need to re-link the mouse or after changing the mouse batteries, please repeat
the above link synchronization step 2b ~ 2IV.
If the selected channel is interfered by other wireless-mouse users nearby, please
change the Link ID by re-synchronization or select the other channel immediately
and then re-synchronize.
There are 256 Link IDs per channel.
V.
VI.
VII.
VIII.
3. Driver Installation
Notice:
The driver supports Windows 98 SE, Windows NT (PS/2 only), Windows 2000, Windows
ME and Windows XP.
a) Insert the driver CD-ROM or disk to your computer. The PC system will automatically install
the driver through the PC auto-run
function. In the opening screen,
please select the Language preferred
as shown in the list and click on
“Next”.
Version 2.0
All specifications and information are subject to changes without further notice.
3
TYPHOON UNPLUGGED OFFICE MOUSE
Article Number: #40800
b)
If the PC system does not have the auto-run function enabled, please double click the file
“Setup.exe” in the CD-ROM and follow the setup instructions to complete the driver
installation.
I. Welcome to the Office mouse 1.1 installation program, please click on “Next” to begin.
II.
Read the Information screen first, then click on “Next” to continue.
III.
Input the preferred target directory or click on “Browse” to find the folder of choice. Else
click on “Next” to use the default assigned directory.
Version 2.0
All specifications and information are subject to changes without further notice.
4
TYPHOON UNPLUGGED OFFICE MOUSE
Article Number: #40800
IV.
Select the Program folder to add to, or simply click on “Next” to use the default by adding
to the main folder area.
V.
Click on “Next” to begin the files transfer process.
VI.
Driver and Application
installation in progress.
VII.
For Windows XP users, when prompted with
the screen on the right, please click on
“Continue Anyway” to carry on the installation
process.
Version 2.0
files
copying
and
All specifications and information are subject to changes without further notice.
5
TYPHOON UNPLUGGED OFFICE MOUSE
Article Number: #40800
VIII.
IX.
c)
d)
e)
f)
The final window below indicates completion of both driver and application installation.
Please make sure the selection is on the “Yes, I want to restart my computer now”, click on
“Finish” to rest the system. This is needed to load the driver and the application into
Windows.
A Mouse Setup applet will appear on the task bar of Windows after you have successfully
completed the installation.
Restart the computer.
Double click the Mouse Setup applet and then follow the instructions of the selection items to
set the mouse properties.
If you select “Setting”, you are able to setup the Wheel and Button of the Office mouse.
Under the Wheel tap, the Wheel mode and speed can be
adjusted. Under the Button tab, the 3 programmable
buttons can be assigned to specific functions or tasks.
Select the button with the downward arrow to open a list of
tasks as shown on the right images.
Version 2.0
All specifications and information are subject to changes without further notice.
6
TYPHOON UNPLUGGED OFFICE MOUSE
Article Number: #40800
g)
If you select “Active Mouse Properties”, you are able to make many preferred adjustment to
the mouse capabilities.
Office Application Software introduction:
h) You can simply apply the Office application functions through the one-touch hot key on the
top of the Office mouse.
Intro d uctio n of the O ffice ap p licatio n softw are:
Yo u can sim p ly ap p ly the O ffice ap p licatio n functions through
the o ne-touch hot key on th e to p o f the O fficeM o use .
TM
O p en
S ave
R e-d o
U n-d o
P
P rint
Find
C lose A p p licatio n
Version 2.0
W o rd
N ew
O u tlo ok
B old
A cce ss
Excel
P o w erP o int
M y C o m p ute r
M y D o cum en t
IE
C lose A p p licatio n
All specifications and information are subject to changes without further notice.
7
TYPHOON UNPLUGGED OFFICE MOUSE
Article Number: #40800
4. Optional Charging Modes for Unplugged Office Optical Mouse
Notice:
There are two charging modes. Some mice versions may have only one charge mode.
Please use rechargeable batteries for the chargeable mouse.
a)
b)
Charge from the PC
•
Connect the mouse to the USB port of the computer with the USB to DC cable.
Charge from the Cradle
•
The cradle must be connected with the required AC to DC adaptor in advance and
then place the mouse on the cradle precisely.
5. Charging Notice
•
For first time usage, please charge the AA batteries at least 10 to 12 hours.
•
The LED indicator or the scroll wheel on the mouse will light when the mouse batteries
are low in power. Please recharge or change the batteries immediately.
•
Press any button to wake up the mouse while the mouse is in the sleeping mode
during charging, else the mouse will not charge properly.
- end -
Version 2.0
All specifications and information are subject to changes without further notice.
8