1
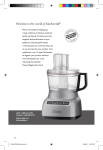
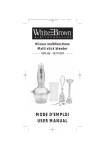
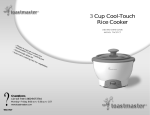
Owner’s Manual
Do Not Operate The
Shred EmulsifierTM Before
Reading This Entire Manual
FOR HOUSEHOLD USE ONLY.
Model: SE1-PRO
120VAC 60Hz 1500W
SEE WARRANTY INFORMATION
IN THIS MANUAL
Contents
• Important Safeguards
• Specifications
3-4
• Avoiding Serious Injury and Burns
While Processing Hot Liquids
4
• Parts & Accessories
5
• Assembling the Shred Emulsifier™
6–7
• Using The Control Panel
8
• Using the Tamper
9
• Making Hot Soups & Sauces
• Making Frozen Blends & Treats
10
• Making Dough
• Chopping with the Shred Emulsifier™
11
• Cleaning and Maintenance
• Troubleshooting
12
• Frequently Asked Questions
• Warranty Information
13-14
2
Important Safeguards
IMPORTANT: Read this manual carefully and completely before attempting to operate
the Shred EmulsifierTM. Failure to do so could result in serious personal injury. When
using electrical appliances, basic safety precautions should always be followed
including the following:
• Read all instructions.
• Blades are sharp. Handle carefully.
• This appliance is not intended for use by persons with reduced physical, sensory or mental
capabilities, or lack of experience and knowledge, unless they are under the supervision of a
responsible person or have been given proper instruction in using the appliance. This appliance
is not intended for use by children.
• Do not attempt any home repairs to this unit. Should the unit require repair, such repair should
only be performed by a qualified professional.
• Unit For Indoor Home Use Only. To reduce the risk of electric shock, never expose any part of
this appliance including the power cord, plug or motorized Base to rain, moisture or immersion
in liquids of any kind.
• The unit has a polarized plug. One prong is narrower than the other and it will fit only one way
into an electrical outlet. Never force the plug into the outlet. If it doesn’t fit after trying it one way
and then reversing it … contact an electrician. Do not modify the plug in any way.
• Never use an adaptor or an extension cord.
• Unplug from outlet when not in use, before putting on or taking off parts, and before cleaning.
• The Shred EmulsifierTM comes equipped with a “Tamper” utensil. This is the only utensil you
should ever use while operating this unit. Using other utensils may damage the unit, cause
possible personal injury and void the warranty.
• To prevent overheating, do not block any ventilation intake openings (underside of base).
• Use on a dry, stable surface.
• When preparing fresh baby food always consult with your physician (pediatrician) before
making any dietary changes. Certain fruits and vegetables are not recommended for infants or
young children due to immature digestive systems, allergies, or other developmental reasons.
• When preparing fresh baby food, to prevent choking, always make sure all fruits and vegetables
are completely liquefied before feeding them to a baby.
• To avoid personal injury: Never remove the Lid while the motor is running. If something is stuck
press the power STOP button, wait for motor to stop running, unplug the unit then remove the
Cap only, insert the Tamper to dislodge stuck food. If food remains stuck, disassemble and
remove the blocked food.
• Make sure the Lid is secured properly before pressing the POWER button.
• Avoid contact with moving parts.
• Do not operate any appliance that has a damaged cord or plug, or after the appliance malfunctions,
or has been dropped or damaged in any manner. Return appliance to an authorized service
facility for examination, repair or electrical or mechanical adjustment.
• The use of attachments, including canning jars, not recommended by the manufacturer may
cause a risk of injury to persons.
3
Important Safeguards (continued)
• Never use hands, fingers, or other utensils to insert food into the Pitcher. Use the Tamper only.
• Never leave the Shred EmulsifierTM unattended while motor is running.
• Never add ingredients to the Shred EmulsifierTM while unit is running at a speed greater
than #1.
• We do not recommend RUNNING the unit when the Pitcher is empty.
• Always hold the Pitcher handle when operating this unit at high speeds.
• Never put fruits with pits in the Shred EmulsifierTM. Remove pits prior to placing these items
into the Pitcher.
• The maximum Pitcher capacity is 70 ounces. Use significantly less with thicker ingredients.
• When processing foods with a dense consistency such as peanut butter, grains, or doughs, do
not process for more than 30 seconds at a time. Doing so can cause the motor to overheat.
• Always make sure the Lid and E-Z Lock Cap are positioned and secured properly before use.
• Do not let cord come in contact with a stove, other hot surfaces or hang over edge of a table
or counter.
• Close supervision is necessary when any appliance is used by or near children.
• Keep hands and utensils out of container while blending to reduce the risk of severe injury
to persons or damage to the Shred EmulsifierTM. A scraper may be used but must be used
only when the blender is not running (does not apply to an acceptable scraper integral with
the appliance).
• Always operate blender with cover in place.
•D
o not immerse in water.
•N
ever place blade assembly on base unless assembled to container.
WARNING: Failure to follow these instructions can result in death,
fire, or electric shock.
SPECIFICATIONS: Model: SE1-PRO - 120VAC 60Hz 1500W
Caution: Avoiding Serious Injury and Burns While Processing Hot Liquids
•M
ake sure the Lid and E-Z Lock Cap are properly positioned and secured when processing
hot liquids.
•W
hen processing hot liquids always start on lowest speed (“STIR” on LED Display). Then
increase rapidly to the required speed for that recipe. Use caution when working with hot
liquids as steam may escape from the safety vents on the sides of the E-Z Lock Cap.
• Always hold the Pitcher securely by the handle while processing hot liquids.
SAVE THESE INSTRUCTIONS
4
Parts & Accessories
IMPORTANT: Your Shred EmulsifierTM has been shipped with the following components.
Check everything carefully before use. If any part is missing or has been damaged in shipping
do not use this product and contact shipper using the customer service number located in the
back of this owner’s manual.
EZ-Lock Cap
Lid
Lock Tabs
Press down and snap in
place on Pitcher before
operating unit
Two Liter Pitcher
Sits on base in 4 positions
Tamper
Control Panel
10:00
2
Power Base
Air Vents
Beneath Base
5
Assembling the Shred EmulsifierTM
Unwind power cord to desired length.
This appliance was designed with built-in power
cord storage beneath the Base. Store the excess
length of cord neatly underneath to avoid accidental
tipping of machine while in use.
WARNING: Do not plug power
cord into electrical outlet until unit
is fully assembled.
Power to unit will not take place unless steps 1–5
in this section are followed carefully.
1. Place the motor Base on a stable, dry surface.
2. Firmly seat the Pitcher onto the Base. The
Pitcher will fit on the Base 4 different ways. The 4
protrusions on the Base should fit into the corners
under the Pitcher. Once seated properly, this will
activate the weighted safety switch.
NOTE:
At this point you may want to place the ingredients
for processing into the unit. Add ingredients into the
Pitcher, soft foods first, harder items last. The E-Z
Lock Cap can be removed during operation to add
additional ingredients or to insert the Tamper. The E-Z
Lock Cap should only be removed at the lowest STIR
speed setting. Always replace E-Z Lock Cap when
you are finished using Tamper or adding ingredients.
6
Assembling the Shred EmulsifierTM (continued)
3. Insert the E-Z Lock Cap into the Lid (aligning the
Cap’s tabs with the Lid’s slots) and turn clockwise
to the lock symbol.
NOTE:
While the power is on and as air pressure inside
the Pitcher increases, steam will automatically
escape from the vents on the side of the Cap.
3
Cap Tab
4. Place Lid on Pitcher and push down firmly until Lid
Tabs snap into position over the Lip of the Pitcher.
5. Make sure the unit is assembled properly before
connecting the power cord to the electrical outlet.
Once the Shred EmulsifierTM is plugged in,
the Power Button will light up blue. But the LED
Display will not be lit up. This means the Shred
EmulsifierTM is not ON but there is POWER.
6. Once you push the Power Button, the LED Display
will illuminate. Before selecting a Processing or
Pre-Set Button, hold the top of the assembled unit
to prevent tipping on start-up.
7. After pushing the STOP Button or when a PreSet Function has finished, wait until the Blades
completely stop spinning and unit is unplugged
before removing the Cap, Lid, or Pitcher.
NOTE: Unit will not turn on until Weighted Safety
Switch is fully engaged. The Safety Switch is located
in the Base where it connects to the Pitcher. Should
the unit overheat during operation the motor will
automatically shut off. To restore power allow the
machine to cool down for 35 minutes.
7
4
Lid Tab
Using the Shred EmulsifierTM
Control Panel
POWER Button: Once the Pitcher is
in place and the unit is plugged into
a 120V AC outlet, the Power Button
Light will turn Blue indicating that
the unit is ON but does not actually
have Power. Now, select the Power
Button, the LED Display will light up
and the unit will have Power.
10:00
2
NOTE: During any processing
function, selecting the Power
button will shut everything down. To
continue processing you must reselect the Power Button.
(“o” denotes power off)
STOP Button: Located just below
the Power Button will also effectively
stop any Processing function
immediately but it will not cut the
power and the LED will remain lit.
TIME Button: The unit has a 10 Min.
Maximum run time. Add or subtract
minutes with the + or - buttons in the
TIME panel.
SPEED Button: The unit has 10
speeds. The default speed is 2. The lowest speed is “STIR”. If the LED is set on 2, selecting a
lower speed will change the LED reading to STIR. If the LED speed is set to 9, selecting a higher
speed will change the LED to “H” which is the highest setting.
EMULSIFY Button: Automatically operates the unit at its lowest speed for a 10 minute default
time. For less “Emulsify” Time, selecting STOP located below the Emulsify Button will cancel
the Process.
PAUSE Button: Allows you to stop any function in progress without cancelling the setting.
When on Pause you may add ingredients and then hit Pause again to complete the
pre-programmed setting.
PULSE Button: This button is used when you need short bursts at full power. Pulse will only
work only while button is pressed... removing your finger stops the process.
PRE-SET Buttons: There are 8 Pre-Set Functions that occupy the bottom half of the control panel.
You may apply these functions to your own recipes or select any from the Shred EmulsifierTM
Recipe Guide.
8
Using the Shred EmulsifierTM (continued)
The Tamper
The Tamper is useful when preparing thick or frozen
mixtures. The Tamper can be used while the machine
is running.
1. Remove E-Z Lock Cap leaving the Lid in place.
2. Insert Tamper through the opening in the Lid.
3. Hold the Pitcher handle with one hand, grasp
Tamper with the other hand.
4. Move up and down or in a circular motion to move
contents around the Blade.
Tips for Using the Tamper:
When preparing thick mixtures that don’t circulate
freely, insert the Tamper and move in a circular
motion. This will help remove any air or ingredients
trapped by the Blade. The Lid prevents the Tamper
from making direct contact with the Blade.
NOTE: In the event the motor overheats during
operation it will automatically shut off. To restore
power, allow it to cool down for 35 minutes
before using.
And As A Rule…
• Always remove all stems and large pits such as
peach, mango, apricot, etc. before processing as
these items can damage the Blade and cause the
motor to malfunction.
• Unless otherwise instructed, insert wet ingredients
into the Shred EmulsifierTM first, then the dry
ingredients, then ice if needed.
• Thoroughly wash all fruits and vegetables to remove
any dirt or chemicals.
• Fruits and vegetables process best when they are
fresh and firm.
• Always serve fresh foods immediately. After just a
few seconds they begin to lose vitamin potency.
9
Using the Shred EmulsifierTM (continued)
Making Hot Soups & Sauces
1. Carefully add liquids and solids, avoiding splashing
that could cause personal injury when liquids are hot.
2. Secure Lid and E-Z LOCK Cap on the Pitcher
making sure Cap is in the locked position and the Lid
is firmly snapped onto the Pitcher. Select one of the
Pre-Set functions such as Soup or Puree.
3. Or, If your recipe calls for a specific Time and
Speed, you may set it, then select the Emulsify Button
to begin the process. You may change the Speed or
Stop the unit at any time during the process.
4. Let the machine run until the selected Pre-Set
function is completed or the desired consistency or
temperature has been reached. The average cook
time is 6–8 minutes on speed #8. This will vary
depending on the texture of the ingredients and the
starting temperature.
5. Do not remove Lid until the power is OFF and the
unit has been unplugged. Wait for motor to shut off
and the Blades to completely stop. You may remove
the E-Z Lock cap during the process to use the
Tamper or add additional ingredients. (see page 8)
Pureeing Cooked Soups & Sauces
1. Carefully add hot soup or sauce, avoiding splashing
that could cause personal injury. Secure Lid and E-Z
LOCK Cap on the Pitcher making sure Cap is in the
locked position and the Lid is firmly snapped onto the
pitcher. Use your own Time and Speed settings or
select the Pre-Set Puree function.
Making Hot Soups & Sauces
1. To make ice cream and sorbet, add liquids and
soft ingredients (i.e. soft fruits) first, then frozen
ingredients. In order to make successful frozen treats
with the Shred Emulsifier™ you must always follow
the recommended ratio of ingredients. 1 part liquid to
3–4 parts frozen ingredients. Changing this ratio can
damage the Blades or the motor.
2. Snap the Lid on securely to the Pitcher. Remove
E-Z LOCK Cap from Lid and insert Tamper.
NOTE: You will need to use the Tamper to move
ingredients around quickly. (see page 9)
3. Use your own Time and Speed settings or select
the Pre-Set Frozen Treat function.
10
Using the Shred EmulsifierTM (continued)
Making Dough
1. To make dough for fresh bread or pizza,
add the dry ingredients into the Pitcher
first. Secure Lid without the E-Z LOCK
Cap onto the Pitcher making sure the Lid
is firmly snapped into place.
2. Set the Speed to 4 and Press Emulsify.
Immediately add the wet ingredients into
the Pitcher while the motor is running.
Allow it to run for 5–8 seconds only. Press
STOP button.
3. Reset the speed to 8. Push PULSE
Button Approximately 20 times until the mixture becomes a crumbled texture.
4. Disconnect the power cord from the wall outlet. Remove the Lid and Pitcher. Pour the dough
into a bowl while turning the gear end of the Blade by hand underneath the Pitcher to get all the
dough out.
5. Knead the dough into a ball on a floured surface. Place the dough back into a covered bowl.
Let the bowl and dough sit in a warm place for approximately 45 minutes or until doubled in size.
6. Divide dough into pieces to bake bread, pitas, pizza and more.
Chopping With The Shred Emulsifier™
The Shred Emulsifier™ chops food to a
fine texture quickly and easily for use in
salads, soups, and baking:
1. Place ingredients in the Pitcher. Do not
fill more than 1/4 full. We recommend using
smaller pieces when chopping.
2. Secure Lid and E-Z LOCK Cap on the
Pitcher making sure Cap is in the locked
position and the Lid is firmly snapped onto
the Pitcher.
3. Set to recommended speed.
4. Use the PULSE button until all ingredients
have been processed.
NOTE: The speeds may vary depending
on the ripeness of ingredients when using
fresh fruits and vegetables.
• Broccoli #3 – 4 • Cauliflower #3 – 4 • Zucchini/Squash #3 – 4 • Hard Boiled Eggs #3 – 4
• Olives #2–3 • Potatoes #2–3 • Onions #2–3 • Nuts #3 • Carrots #3 – 4 • Mushrooms #2–3
• Bread crumbs #2–3
11
Cleaning and Maintenance
1. Press STOP button and wait until the motor completely stops.
2. Using dry hands, unplug the power cord from electrical outlet.
3. Disassemble the machine.
4. Wash the Lid and Cap in warm soapy water. Rinse and dry thoroughly before first use.
NOTE: DO NOT put unit in dishwasher. We recommend washing the Pitcher by hand. For safety
reasons, do not touch the blade directly with your fingers. Fill the Pitcher with warm soapy water.
Attach the Pitcher to the Base. Then secure the Lid and Cap in place. Connect Power Cord to
outlet. Press POWER then Press EMULSIFY button. Increase the speed to 8. Allow unit to run
for about 1 minute. Rinse and dry thoroughly.
6. Make sure Base and parts are completely dry before storing in a cool, dry place.
7. Never use abrasive materials or cleansers to clean the main Base or any of the parts. This can
scratch the finish causing permanent damage.
CAUTION: To avoid personal injury use caution while cleaning inside of Pitcher as Blades
are sharp. Handle carefully.
Troubleshooting
NOTE: The Shred EmulsifierTM is a very powerful unit. When operating properly, the motor
gives off a loud but smooth sound that changes in pitch as the motor speed is increased.
This is normal.
Problem
There was a burning smell when
the Shred EmulsifierTM was first
turned on.
Motor does not run after Emulsify
button is pushed.
Normal Loud Smooth Sound
becomes unpleasant, more
pronounced and uneven,
producing erratic and sometimes
uncontrolled unit vibration.
The unit shuts off
while in use.
Possible Reasons and Solution
• There may be a short term Burn-Off Odor when
the Shred EmulsifierTM is first used. This is from a
lubricant used in manufacturing the motor
• Check to see if unit is plugged in.
• Pitcher is not seated correctly.
• Check if all parts are assembled properly.
• Check if any food is causing Blade to lock.
• Push power button to OFF immediately.
• Unplug unit and check for proper assembly.
• Reassemble and retry unit.
• The auto shut off feature has been activated due
to overheating.
• Push OFF button, allow to cool down
for 35 minutes.
• Check the thickness and quantity of mixture, if
overloaded, reduce accordingly.
NOTE: In the event the motor overheats during operation it will automatically shut off. You may
have overloaded the Shred EmulsifierTM. Remove excess contents. To restore power, allow the
machine to cool down for 35 minutes before use.
12
Frequently Asked Questions
Q. What is the difference between this unit and other blenders on the market?
A. The Shred EmulsifierTM is not a typical blender. This unit is designed to perform 31
different kitchen applications. The Shred EmulsifierTM will make everything from hot soups to
cold ice cream.
01. Pulverize fruit.
12. Fold batter.
23. Aerate egg whites.
02. Liquefy vegetables.
13. Mince herbs.
24. Juice.
03. Make frozen treats.
14. Mix cocktails.
25. Powder sugar.
04. Simmer soup.
15. Beat sauces.
26. Knead dough.
05. Blend smoothies.
16. Crush ice.
27. Prepare yogurt.
06. Grind nut butters.
17. Shred cooked meat.
28. Make soy milk.
07. Whisk salad dressings.
18. Mash potatoes.
29. Create coffee drinks.
08. Melt chocolate fondue.
19. Cream butters.
30. Grind grains.
09. Purée baby food.
20. Chop vegetables.
31. Make frozen sorbets.
10. Grate cheese.
21. Emulsify whole produce.
11. Whip cream.
22. Dice onions.
Q. What 20 different kitchen appliances can the The Shred EmulsifierTM replace?
A. They are as follows:
01 - Blender
02 - Minichopper
03 - 10” cook’s knife
04 - Immersion blender (stick
blender)
05 - Snow Cone Maker
06 - Coffee mill / grinder
07 - Spice mill / grinder
08 - Ice Cream maker
09 - Smoothie maker/ bar
blender
10 - Ricer
11 - Food mill
12 - Cheese / Veggie grater
13 - Juicer
14 - Meat grinder
Q. What is the Pitcher made from?
A. It is made of a BPA free plastic.
Q. How many speeds does the unit have?
A. The unit has 10 variable speeds.
Q. What are the dimensions of the unit?
A. 19.5”H x 9.25” W x 10.25”D (assembled)
Q. How is the unit able to make soups?
A. The centrifugal force of the Blade spinning
causes friction which heats up the contents.
Q. How many ounces does the Pitcher hold?
A. 70 ounces (2000ml).
Q. W
hy is there steam coming from the cap
when I prepare hot foods?
A. There are safety vents notched into the sides
of the cap. This allows steam and pressure
to escape from the unit when hot foods are
being prepared.
13
15 - Hand mixer
16 - Nut butter maker
17 - Garlic Press
18 - Soy milk maker
19 - Milk shake maker
20 - Latte whip or other milk
frothing appliance
Q. Why won’t the machine turn on?
A. The unit must be properly assembled or it
will not power on at all. The Pitcher must
engage the safety switch. Unit will not turn
on until Weighted Safety Switch is engaged.
The display will not light up unless it is
properly assembled.
Q. Why has the motor shut off while using?
A. The unit has a built in safety feature that will
shut it down to prevent overheating. Allow
the unit to cool down for about 35 minutes.
The machine will then power back on.
Q. What is the horsepower of the unit?
A. Almost 3 horsepower.
Q. What is the wattage?
A. 1500 watts
Frequently Asked Questions (continued)
Q. How often should I change the Blades?
A. The Blades of the unit will never have to
be replaced.
the Power button then Press Emulsify and
gradually Increase the speed to 8. Allow unit
to run for about 1 minute then press Stop,
unplug from wall outlet, disassemble, rinse
Q. Is it normal for my machine to be loud?
and dry thoroughly.
A. Yes, this is a powerful motor. And there will
Q. Is it normal for the motor to have a slight
be some noise associated with it.
burning smell?
Q. Can I make flour in the unit?
A. Yes, it is normal for the unit to have a factory
A. Yes, you can.
smell. It is caused by lubricants used in the
Q. D
o vegetables need to be cooked before
manufacturing process. After a few uses the
putting in machine?
smell will dissipate.
A. No.
Q. C
an anything other than the Tamper be
Q. Is the unit dishwasher safe?
used with the appliance?
A. The Base is not dishwasher safe. We
A. No. The Tamper is specially designed to
recommend washing the Pitcher, Lid and
stop 1 inch above the Blade. We do not
Cap by hand. Fill the Pitcher with warm
recommend that anything other than the
soapy water. Attach the Pitcher to the Base.
Tamper provided is used.
Then secure Lid and Cap in place. Press
Manufacturer’s Limited Warranty
The manufacturer warrants that your Shred EmulsifierTM is free of defects in materials and workmanship
and will, at its option, repair or replace any defective Shred EmulsifierTM that is returned to it. The Shred
EmulsifierTM motor has a Lifetime Guarantee, and all other parts and components are warranted for 60 days
from the original date of purchase. This warranty is valid only in accordance with the conditions set forth below:
1. Normal wear and tear are not covered by this warranty. This warranty applies to consumer use only, and
is void when the product is used in a commercial or institutional setting.
2. The warranty extends only to the original consumer purchaser and is not transferable. In addition, proof
of purchase must be demonstrated. This warranty is void if the product has been subject to accident,
misuse, abuse, improper maintenance or repair, or unauthorized modification.
3. This limited warranty is the only written or express warranty given by the manufacturer. Any implied
warranty of merchantability or fitness for a particular purpose on this product is limited in duration to the
duration of this warranty. Some states do not allow limitations on how long an implied warranty lasts, so
the above limitation may not apply to you.
4. Repair or replacement of the product (or, if repair or replacement is not feasible, a refund of the purchase
price) is the exclusive remedy of the consumer under this warranty. The manufacturer shall not be liable
for any incidental or consequential damages for breach of this warranty or any implied warranty on this
product. Some states do not allow the exclusion or limitation of incidental or consequential damages, so
the above limitation or exclusion may not apply to you.
5. This warranty gives you specific legal rights, and you may also have other rights which vary from state
to state.
Procedure for Warranty Repairs or Replacement:
If warranty service is necessary, the original purchaser must pack the product securely and send it postage
paid with a description of the defect, proof of purchase, and a check or money order for $29.99 to cover
return postage and handling to the following address:
Shred EmulsifierTM, P.O. Box 3007, Wallingford, CT 06492.
14
OWNER’S MANUAL
Congratulations on your purchase of the Shred EmulsifierTM.
We are very proud of the functional design and exceptional quality of this product.
Our manufacturing process is geared to deliver long years of product service to our
valued customers. Should you experience any problem with your purchase,
our dedicated customer service staff is here to serve you.
We are available at:
1-973-287-5194 or www.shredemulsifier.com
Tristar Products, Inc.
Fairfield, NJ 07004
SHE_IB_TP_ENG_V3_140228