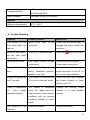
1
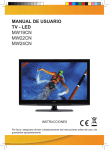
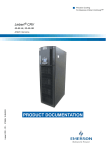
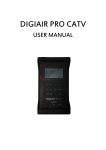
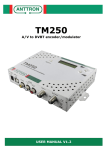
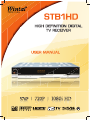
Table of Contents I. General Information........................................................................................... 3 1. Preface ............................................................................................................ 3 2. Main Features ................................................................................................. 3 3. For Your Safety ............................................................................................... 4 4. Front Panel...................................................................................................... 4 5. Rear Panel ...................................................................................................... 5 6. Remote Control Unit........................................................................................ 6 II. Connection and Installation............................................................................. 9 1. System Connection ......................................................................................... 9 2. Quick Installation........................................................................................... 10 III. Main Menu ...................................................................................................... 12 1. Installation ..................................................................................................... 12 1.1 Auto Search............................................................................................. 12 1.2 Manual Search ........................................................................................ 13 1.3 Channel Edit............................................................................................ 13 1.4 Factory Default ........................................................................................ 14 2. Program Guide.............................................................................................. 15 3. Program Manage .......................................................................................... 15 3.1 Program Edit ........................................................................................... 15 3.2 Favorite Edit ............................................................................................ 16 1 4. Program Select ............................................................................................. 17 5. System Setting .............................................................................................. 17 5.1 Common Setup ............................................................................................17 5.2 Time Zone Adjust .........................................................................................17 5.3 System Information ......................................................................................17 6. Shortcut Key Explanation.............................................................................. 18 IV. Technical Specification ................................................................................. 20 V. Trouble Shooting ............................................................................................ 21 2 I. General Information 1. Preface This High definition television set-top receiver is designed to pick up free-to-air digital broadcasts. It is fully compliant with the MPEG-2 and DVB-T standards. This unit can receive digital terrestrial TV signals transmitted at the rate of 3.7~23.8Mb/S on specific frequencies within the VHF or UHF band. The unit also provides a high quality digital video and audio connection, HDMI. 2. Main Features Fully DVB-T & MPEG-2 compliant Digital Reception covers VHF & UHF band Multi Bandwidth selection: 6M & 7M & 8M Multi demodulation selection: QPSK,QAM16, QAM64 MPEG-2 HD/SD decoding (MP@HL/ML) Dolby AC-3 or MPEG-1 audio decoding Down-mixes 5.1 AC3 to two channels encoded with Dolby Prologic Surround YPbPr Output: supporting 1080i (high quality video output) VGA output: supporting 1080i (high quality video output) HMDI output: supporting 1080i (highest quality output- recommended where available) CVBS output: PAL (low quality video output –not recommended) Conversion between SD programs and HD programs Teletext (OSD output) Subtitle (OSD output) Aspect ratio: 4:3/16:9 Dolby 5.1 channel or PCM digital audio output (Bitstream) Electronic program guide (EPG) Software upgrade via RS232 32 bits true color on screen display (OSD) Channel and Program editor 3 3. For Your Safety Allow clear space around the receiver for sufficient ventilation Do not cover the receiver ventilation slots or place it on a unit that emits heat Use a soft cloth and mild washing solution to clean the case Do not connect or modify cables when the receiver is plugged in Do not remove the cover Do not allow the unit to be exposed to extreme heat, cold or humid conditions Never allow liquids, spray or other materials to come into contact with the circuit boards inside. 4. Front Panel STANDBY: Press to turn the receiver on/off. CH : Press to adjust the volume when watching a program, or move the cursor left or right in the menu 4 5. Rear Panel LOOP OUT: RF output to other tuners, such as your TV’s antenna input ANT IN: Connect to terrestrial antenna HDMI OUT: HDMI audio/video output, connect to TV (recommended if available) S-VIDEO: Standard definition video output, connect to the TV or VCR (low quality, not recommended unless necessary) R-AUDIO/L-AUDIO: stereo audio output, connect to TV or audio amplifier using RCA jack CVBS: standard definition video output, connect to TV video input (low quality, not recommended unless necessary) VGA OUT: VGA video output available in high definition S/P DIF: Digital audio output for connection to a Hi-Fi system (recommended where available) RS232: Connect to a PC for software upgrade Y Pr Pb Component video output for in high definition signal output 5 6. Remote Control Unit 6 Keys specification Press to turn the receiver on/off Select a channel or to enter a number in menus Switch back to previous channel. Call the main menu, close current window and return to viewing. Return to the previous menu screen or exit main menu. Move cursor up / change channel up Move cursor down / change channel down Move cursor left or right / turn volume down or up. Press to display the program guide Cycle through different screen sizes to match your screen type Press to display the audio language menu Press to display the picture adjust menu Used to move programs in the edit programs menu Mute / unmute sound. 7 Press to display information about current channel Press to switch between teletext / closed caption and normal modes Move up one page within menus Move down one page within menus Confirm / save results in menu / call program list Display the favorites list Pause / unpause picture Switch between audio modes: left, right, mix and stereo Press to select the output mode (video out) Press to adjust the output resolution 8 II. Connection and Installation 1. System Connection Make sure the Power, Terrestrial Antenna, TV and other relevant equipment are connected properly before continuing. There are five different methods to transmit picture from the STB to your TV. You will only need to connect one. It is advised to use the best quality connection that your television supports (best being HDMI) Video methods are listed in order of quality below, with 5 being the highest quality. 9 Connect the appropriate video lead from the STB to the TV, taking note of the AV input used on the television (AV1, AV2, HDMI etc) as you will need to select this input on your TV later. Consult your TV manual for more information. Sound With all video connections except HDMI, an audio connection must also be made. Connect L-Audio and R-Audio using the red and white audio leads to your TV or amplifier. For better sound quality using digital audio, connect the STB to an amplifier or TV using a TOSLINK optical audio lead. 2. Quick Installation STEP1: Check connections Prior to powering up the receiver, ensure that all cabling is correctly connected as explained in system connections. STEP2: Adjust TV set Turn on the television and select the appropriate video input mode (AV1, AV2, HDMI etc) on the television. Consult your TV manual for more information. STEP3: Power up 10 Turn on the receiver using the ON /OFF switch on the back panel of your receiver. Then, press the standby button on the front panel. The startup on-screen display (OSD) will be shown on the TV screen. The startup OSD will remain for several seconds and then disappear. STEP4: Search for programs 1. The STB needs to perform a scan to determine where the channels are. Press Menu to display the Main Menu. Use keys to select Installation and press OK, select the Installation menu. The unit has two methods to search for programs: Auto Search and Manual Search. To start with, we’ll use Auto Search. Move cursor to Auto Search and press OK, the system will search for programs automatically. This should take a few minutes. After searching, found programs will be added to the TV program list. If you know the frequencies of certain channels, you can add them manually. For more details, please refer to 1. Installation in Section III. STEP5: Select program Press OK to call up a program list. Use to select the desired program and press OK key to view in full-screen. 11 III. Main Menu While not already in a menu, pressing MENU will call the Main Menu. This menu consists of five items as shown below. Installation Program Guide Program Manage Program Select System Setting Use to move up or down from one item to another. Press OK to select a sub-menu To escape the menu system at anytime, press EXIT on the remote. 1. Installation The unit uses two methods to search for programs: Auto Search and Manual Search. The Channel List determines what will be searched in those two windows, so it is important to edit channel in Channel Edit window. 1.1 Auto Search For beginners, Auto Search is the best choice. Use to select Auto Search in the Installation menu. Press OK to enter the Auto Search sub menu. The unit will search for programs automatically. After searching, found programs will be added to the program list. During autosearch, you can press EXIT key to stop or press OK key to skip. Press EXIT key again to exit from this window. 12 1.2 Manual Search You can set parameters in Manual Search window if you are familiar with station frequencies. In this mode, channels can be tuned in by hand. to select the channel number you wish to edit Channel No.: Press Frequency: This value will vary according to channel, however, to adjust, use the number keys to enter in a different frequency. to choose 6M, 7M or 8M. (7M is standard) Bandwidth: Press At the bottom of this window, there are two dynamic colour bars reflecting the signal’s quality and strength. Press OK key to start searching. Upon a successful search, the unit will store the newly found station as a program. During this process, you can press EXIT to finish. Note: this function is for advanced users. 1.3 Channel Edit Select Channel Edit item in the Installation menu and press OK. The Channel Edit window will be displayed. From here, new channels can be added and the existing ones can be edited or deleted. You can use the color keys on the REMOTE to execute the corresponding commands displayed at the bottom of the screen: Add (Red key) Delete (Green key) Modify (Yellow key) Add The Add Channel window allows you to enter necessary parameters for a new channel. Frequency: You can input values referring to above. Bandwidth: Press keys to choice 6M, 7M or 8M. Transmission Mode: You have a choice of 2K, 8K and Auto. Press to select appropriate mode. Guard Interval: Available options are: 1/4, 1/8, 1/16, 1/32 and Auto. Press 13 to select appropriate value. Press OK key to confirm and exit from the Add Channel window. If successful, you will find the new channel has been added to end of the list. Note: this function is for advanced users. Delete This command allows you to delete one or more unwanted channels. Select the channel you want to delete and press green key on the REMOTE, You will find the channel have been deleted from the channel list. Modify Select the channel you want to edit, then press the yellow key to display Modify Channel window. The operations are the same as “Add”. 1.4 Factory Default In the Installation menu, move the cursor to Factory Default and press OK, a warning message box will be displayed on the screen, press OK key to restore the factory default condition. Note: After restoring factory defaults, all programs you have searched will be erased and all parameters will return to the factory default shipping condition. This information cannot be restored, so only use when necessary. 14 2. Program Guide Move the cursor to Program Guide and press OK to enter the Program Guide sub-menu. You can also enter this window by pressing EPG on the REMOTE under non-menu mode. In Program Guide, use future programs (EPG), and to move cursor between TV program List and keys to move up or down in each list. Move the cursor to desired EPG and press OK, a text box will appear for a more detailed explanation of the program. Press the Green key to enter into the program schedule window Press EXIT key to return to Main Menu. 3. Program Manage In Main Menu, select Program Manage and press OK to enter. 3.1 Program Edit You can use the color keys on the REMOTE to execute the corresponding commands displayed at the bottom of the screen: Delete (Red key) move (green key) Rename (blue key) Delete This command allows you to delete one or more unwanted programs permanently. First select the program you want to delete and press red key on the REMOTE, You will find the channel has been deleted from the channel list. Move Use to select a program you want to move and press the green key on the REMOTE. A double-pointed arrow pointing up and down will be displayed next to the selected program. You can press keys to move this program to where you want to relocate to. Press the green key again to confirm new location. 15 Rename Press the blue key on the REMOTE to pop up a keypad window where you can rename the program. In this keypad window, select your required character by using direction key on the REMOTE and press OK. To switch between capitalization and lowercase, please select Caps On and press OK key on the REMOTE. Back command allows you to erase unwanted characters in the title bar. When finished, select OK. 3.2 Favorite Edit You can define and modify channels to be added to a favorites list for easy access. keys are used to switch among the three columns, and keys are used to select items in each column. How to define a favourite group Press the red key on the REMOTE, and will pop up a keypad window where you can define a favorite group name. This keypad is used as in the rename function, above. (3.1) How to modify a favourite group In the FAV column, use to select what you want to modify and press yellow. How to delete a favourite group In the FAV column, the selected favorite group will be deleted from the list as soon as green is pressed. How to add programs into a favourite group Select one favorite group in the favourite (FAV) column, then move the cursor to the Programs column. In Programs column, select programs to add to your favourite group and press OK, these programs will be added into your favourite group and shown in the selected column. If you want to deselect programs in your favorite group, move the cursor to the program and press OK, this designated program will disappear in selected column and will be shown in the Programs column. 16 4. Program Select In the Main Menu, use to select Program Select and press OK. From here, the default mode is “TV” mode. In program list, are used to select the desired program and press OK to view this channel in full screen. 5. System Setting In the Main Menu, use to select System Setting and press OK to enter the System Setting menu. 5.1 Common Setup Transparency: Menu transparency ranges from 0% to 20% by step 5%. Banner Time: Whenever a new channel is selected, an Info bar appears momentarily at the bottom of the screen. This setting is provided to set the display duration of the Info bar. Decoder: Press keys to select between MPEG and AC3. press OK or EXIT key to save and exit. 5.2 Time Zone Adjust Use to select your city. Use to select between “Daylight Saving On” and “Daylight Saving Off” Press OK or EXIT key to save and exit. 5.3 System Information From here, you can get not only the information about the hardware and software, but also IRD Type and Release date, etc. 17 6. Shortcut Key Explanation In normal view mode, you can access functions by pressing special keys on the REMOTE. These keys will be explained as follows: 1. Program List Pressing OK or FAV on the REMOTE will display the Program List window. Press FAV again or keys to switch among favorite groups that you have defined (refer to Favorite Edit). are used to select the program that you want to watch and OK to view in full screen. 2. Teletext/Closed caption Where available, you can press on the REMOTE to enter Ttx/CC, use to select Teletext or Closed Caption and press OK key to enter. Press EXIT to finish. Note TeleText is usually accessed from channel 7. 3. Information When watching a channel, press to switch channel, or press INFO for a simple EPG banner that includes program information. A SD or HD mark will display at top-right corner denoting resolution of broadcast program. By pressing INFO again, a more detailed textbox appears showing more details about the current program. Press INFO once again to return to normal viewing. Press EXIT key to exit from this banner at anytime. 4. Pause When watching a program, the picture on the screen will be paused as soon as key is pressed. Press key again to reactivate it. 5. EPG Press EPG on the REMOTE to enter the Program Guide directly. For operation, refer to Program Guide. 18 6. Audio Press Audio to switch between the Subtitle Language and Audio Language window. Note that the available selections in both audio and subtitle language window depend on the broadcast. Use to select the appropriate language and press OK key to confirm. 7. Audio R/L Press key to switch among Left, Right, Stereo and Mix modes. Select the best audio channel output for the current program. 8. MUTE By pressing key on the REMOTE, the volume will mute temporarily and MUTE mark will be displayed on the up-right corner. The volume will be restored by pressing key again. 9. Aspect Ratio Use ASPECT to select desired television screen output format between 16:9 Full Screen, 4:3 LetterBox, and 4:3 Full Screen. Continuously press this button to toggle through the different modes. 10. Output Mode (Yellow Key) Use the Yellow key to select output mode among, VGA and YPbPr. Continuously press this button to toggle through the different mode. 11. Video Resolution (Blue Key) Excluding viewing in SD modes, use the Blue key to select output definition among 576P, Auto, 720P and 1080I. Continuously press this button to toggle through the different modes. (Check to see what resolutions your screen will accept as we recommend running the unit at the max input resolution of your screen, not above) 19 IV. Technical Specification Tuner Input frequency 147 ~ 862MHz UHF&VHF(IEC Female Connector) Input level -80 ~ -20 dBmV Input impedance 75Ω Channel Decoding Standard DVB-T EN300 744 Demodulation QPSK, QAM16, QAM64 Code rate 1/2, 2/3,3/4,5/6,7/8 Demultiplexer Standard ISO/IEC 13818-1 Input max.bit stream rate 100Mbps(Serial)/12.5Mbps(Parallel) Video Decoding Standard ISO/IEC 13812-2 MP@HL/MP@ML Aspect ratio 4:3, 16:9 Video resolution 1920x1080MAX (interlaced) Power Input voltage AC 100 - 240V, 50/60Hz Power consumption 15 Wmax Safety Insulation resistance Withstand Voltage (Hi-Pot) 20 More than 10MΩ at 500Vdc Ambient conditions of 28±2% & 70%RH I/p to O/p:3kV(1 min) Temperature Rise Safety Standard <75 on winding & core; <50 on casting At 264Vac @ 50Hz Designed to meet IEC/EN6065 Ambient Operation temperature 0°C ~ +40°C V. Trouble Shooting Problem Possible Causes What to Do The display on the Mains power cable is not Check that the mains cable is front panel does not connected. plugged into power socket and turned on. light up. The unit is in standby mode. Press the Poor signal quality or bad Check the antenna system connections Check cable connections. Bad picture/ Blocking Weak signal –or- Signal is too Check with specialist or, try a error. strong. Masthead amplifier signal attenuator to the RF IN maybe up too high port or turn down amplifier. No picture appears on The system is connected but Check that you have selected the TV screen. TV is not in correct AV mode. the correct channel or Video No sound and picture, key on the RCU. but the front panel shows time. No sound or picture. Input on your TV. There is interference The system on using your digital terrestrial channel. RF is connected leads and the output channel of the receiver Change the receiver output channel to a more suitable channel. interferes with an existing terrestrial channel or Video signal. The Remote is not Battery exhausted. Change the battery. working. 21 Channels are not Wrong country selected. available after using Restore defaults, and select the proper country. “Auto Search” when installing the receiver for the first time. Can not lock signal The channel Check the frequency that by using “Manual frequency is not you entered is correct Search”. accurate. Picture seems Wrong resolution abnormal, or no Select correct resolution or output format picture. Forgot your oops password Try “5180”, the default password Note: If you cannot solve the problem even referring to the above trouble shooting, please contact your local dealer. 22