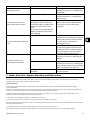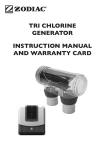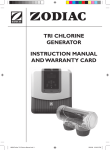
1
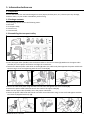
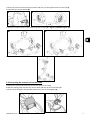
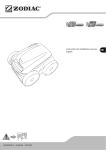
Instructions for installation and use English H03818-00.A3 - W2326A - 2012/03 EN • Read this manual carefully before installing, maintaining or repairing this device! indicates important information that must be taken into account in order to avoid risk • The symbol of personal injury and/or damage to the appliance. • The symbol indicates useful information. • Exclusive use: pool water cleaning (must not be used for any other purpose). Warnings Failure to comply with the following warnings can result in permanent injury, electrocution or drowning. PREVENT ELECTRICAL SHOCK To reduce risk of electrical shock: • Connect unit to receptacle protected by a Ground Fault Circuit Interrupter (GFCI) or a Residual Current Device (RCD) having a rated residual operating current not exceeding 30mA. • While the control unit is water resistant, it is not intended for any type of sustained contact with water. Therefore, it should be installed at least 3.5 meters from the inside wall of your swimming pool. Never submerge the control unit. • Be sure to follow all applicable local and national electrical and installation codes. • The cleaner is for fixed installations only and to be used in conjunction with swimming pool equipment. The cleaner is to be installed in accordance with the relevant requirements of the Australian wiring rules AS/NZS 3000. Also refer to the installation instructions relating to the swimming pool equipment for which the cleaner will be an integral part. The cleaner is to be supplied through a Residual Current Device (RCD) with a rated residual operating current of 30mA. • Do not enter pool while the cleaner is in water. • Do not bury cord. Locate cord so as to prevent it from being damaged by lawn mowers, hedge trimmers and other equipment. • To reduce the risk of electrical shock, do not use the cleaner or control unit if the cord is worn or damaged. If the supply cord is damaged it must be replaced by the manufacturer or its service agent, or a similarly qualified person in order to avoid a hazard. • Double insulation—The cleaner utilizes a 'double-insulated' construction which means that it is designed such that it does not require a safety-connection to earth ground. For continued protection against possible electric shock, use only identical replacement parts when servicing. Do not attempt repair of the cleaner, control unit, power cord, or floating cable. • NEVER OPEN CONTROL UNIT. • Do not use an extension cord to connect the unit to electric supply; provide a properly located outlet. The control unit should be placed near the outlet box. PREVENT CHILD INJURY AND DROWNING • To reduce the risk of injury, do not permit children to operate this product. • Do not let anyone, especially small children, sit, step, lean, or climb on any equipment installed as part of your pool’s operational system. H03818-00.A3 EN – 2012-03 1 Warnings Failure to comply with the following warnings could cause damage to pool equipment or personal injury. • This product is intended for use with permanently-installed pools. Do not use with storable pools. A permanently-installed pool is constructed in or on the ground or in a building such that it cannot be readily disassembled for storage. A storable pool is constructed so that it is capable of being readily disassembled for storage and reassembled to its original integrity. • The cleaner must be installed and operated as specified. • Turn the cleaner off before removing it from water, and do not operate out of water. • Do not remove the cleaner from the pool for 15 minutes after the cleaning cycle has completed. • Clean filter canister in the cleaner after each use. • Do not use the product in your pool if the water temperature is above 35° C or below 13° C. EN USE OF THE CLEANER IN A VINYL LINER POOL Certain vinyl liner patterns are particularly susceptible to rapid surface wear of pattern removal caused by objects coming into contact with the vinyl surface, including pool brushes, pool toys, floats, fountains, chlorine dispensers, and automatic pool cleaners. Some vinyl liner patterns can be seriously scratched or abraded simply by rubbing the surface with a pool brush. Ink from the pattern can also rub off during the installation process or when it comes into contact with objects in the pool. Zodiac Group Australia Pty Ltd., is not responsible for, and the Limited Warranty does not cover, pattern removal, abrasion or markings on vinyl liners. Contents 1. Information before use ............................................................................................ 3 2. Use .......................................................................................................................... 5 3. Maintenance............................................................................................................ 7 4. Replacing the Brushes .............................................................................................. 8 5. Replacing the Tyres on the Cleaner .......................................................................... 9 6. Troubleshooting....................................................................................................... 9 7. Zodiac Australia - Express Warranty and Guarantees ............................................. 10 8. Conformity............................................................................................................. 11 H03818-00.A3 EN – 2012-03 2 1. Information before use 1.1 Important Ensure that the unit has not been damaged in transit (impact, broken parts, etc.). Please report any damage, however minor, to your retailer immediately, before using. 1.2 Package contents The packaging should contain the following items: • The robot • a transport caddy, • a control unit, • a user manual, 1.3 Assembling the transport trolley • Insert the upper tubes (handles) into the bottom tubes on the cart as shown (1). Make sure the upper tubes (handles) are in the proper orientation and align the screw holes. • Position the bottom power cable hook as shown (2). Place the cable hook plate opposite the power cable hook. Secure using a screw and tightening with the Torx® wrench (3). • Secure the cable hook plate using two bolts and two nuts and tighten with Torx® wrench (4). • Position the power cable hook and control unit hook on the upper tubes (5). Make sure the upper tubes (handles) are in the proper orientation. • Secure the power cable hook and control unit hook around the tubes using a screw and hand tighten with the Torx wrench (supplied with unit). (6). H03818-00.A3 EN – 2012-03 3 • Secure the control unit hook using two bolts and two nuts and tighten with Torx wrench (7). • Place two caps on the wheels (8). • Attach the support blocks to the caddy using four screws (V3 = figure 9; V3 4WD = figure 10). EN • The transport caddy is now ready to use 1.4 Connecting the control unit to the caddy • Position the control unit over the control unit hook on the caddy. • Slide the locking plate clips into the control hook and line up the screw holes (1). • Secure the locking plate using Phillips head screws. Do not overtighten (2). H03818-00.A3 EN – 2012-03 4 1.5 Technical information Control unit voltage Robot supply voltage Installed load Cable length Cleaner size (WxDxH) Pack size (WxDxH) Weight of cleaner Packed weight Filtering surface Filtration Theoretical width cleaned Theoretical area cleaned Pump output Rate 220-240 VAC, 50 Hz; short-circuit-proof safety isolating type 30 VDC 150 W 18 m 43 x 48 x 27 cm 58 x 58 x 59 cm 11 kg 300 19 kg 3400 cm² medium 38 cm 260 m² / h 16 m³/h 8 m / min 2. Use 2.1 Advice on use • The cleaner must operate in pool water maintained at the following levels: Chlorine < 3 mg, pH between 6.8 and 7.6, temperature between 10°C and 35°C. • Use your cleaner as often as possible. You will benefit from a pool that is always clean and the filter will not become clogged. • If the pool is very dirty, especially during first use, remove larger pieces of debris using a net in order to optimise the cleaner's performance. • Remove thermometers, toys and other objects that might damage the cleaner from the water. • Immerse the cleaner in the pool, before starting a cleaning cycle. • Do not leave the cleaner in the water permanently. • Stow your cleaner on its caddy as soon as possible after use, in order to avoid distorting the flexible edge at the opening to the filter. • Never cover the control box while the cleaner is in operation • Do not leave the control box in direct sunlight after having used the cleaner. • If part of the pool is not properly cleaned, change the place where you immerse the cleaner until you find the best position of entry to achieve the best coverage. • The cleaner's behaviour is strongly influenced if the cable is tangled. Spread the cable out in the sun from time to time so that it resumes its original shape. • The behaviour of the cleaner can be influenced by the jet at the pool return outlets especially when the filter pump is operational. In this case we recommend that you start your cleaner when the filter pump is not operational. Do not use your cleaner during shock chlorination! 2.2 Immersing the robot • Submerge the cleaner in the pool and remove any air trapped inside by keeping the unit vertical (1). • Ensure the unit sinks to the bottom of the pool (2). • Spread out the floating cable over the pool, ensuring there are no kinks or coils in the cable (3). H03818-00.A3 EN – 2012-03 5 2.3 Electrical connection The cleaner control unit is water-resistant, not waterproof. In order to prevent electrocution, which could result in serious injury or death, never submerge the control unit. • Place the control box at a distance of at least 3.5 meters from the pool edge and away from direct sunlight; it can either be placed on the ground or attached to the caddy. • Connect the cleaner cable to the control box (1) and lock the connector by firmly tightening the ring by turning it clockwise (2). Make sure the connector is sufficiently pushed into place, if this is not the case repeat operation. • Connect the power cable. Only connect the control box to a power outlet protected by a 30 mA maximum ground fault circuit breaker (if in doubt contact a qualified electrician). Ensure that the plug is permanently and easily accessible. If you use an extension cable to connect your cleaner to the power supply, ensure the control box is placed no less than 3.5 meters from the pool edge. 2.4 Operation Program I: Maximised cleaning of the pool floor in minimum time. Duration 1.30 hr. Program II: Intense cleaning of the pool floor and pool sides, including the waterline. Duration 2.30 hr. OFF button: used to cut the cleaner power supply at the end of a cleaning cycle. 2.4.1. Start-up • To start your cleaner, press the button for "Cycle I" cleaning program. "Cycle I" cleaning is the primary cleaning cycle for inground pools. If an alternative cycle is preferred, press "Cycle II". The indicator light illuminates and the cleaner starts up after just a few seconds. When the cleaner is powered ON it will remain in standby until the Cycle I button is pressed (1). • When the "Cycle I" program button is selected the indicator light above will illuminate. The cleaner will start in a few seconds. • To change the selected cleaning cycle, press the new cycle button and the new cycle will start in a few seconds. • If you wish to stop the cleaner during a cleaning cycle, press the OFF button (2). 2.4.2. End of program • At the end of the cycle, the cleaner will stop and after 15 minutes the light will flash slowly to indicate the cycle is completed. • Cleaner includes a safety feature that automatically stops the cleaner after about 20 seconds, when it is powered on, but not submerged in the water. For pools equipped with a beach area, this safety feature allows the cleaner to reverse, and back into the pool when the impeller is out of the water. • Disconnect the control unit cable from the electrical outlet. • Disconnect the cable from the control unit. • At the end of each cycle, coil the cable starting at the cleaner and go toward the connection point at control unit. Remove coils or twists along the way. H03818-00.A3 EN – 2012-03 6 EN Approximately 15 minutes after the cycle is completed, the light located on the control unit will flash slowly to indicate that the cleaner may be removed from the pool. The 15 minute period allows the motor to cool and will prevent damage to the cleaner. • Remove the cleaner from the pool after the cleaning cycle is completed and store on the caddy. • Never lift the cleaner out of the pool by the floating cable. Always use the handle to remove it from the pool. • Remove the cleaner from pool when super chlorinating. • Do not handle cleaner while it is in operation. 3. Maintenance 3.1 Cleaning the filter bag • Use your cleaner as often as needed to keep your pool clean. • Clean the filter canister after each cleaning cycle. • Do not leave your cleaner in the pool on a permanent basis. • At the end of each cycle, remove the cleaner from the pool. Start at the cleaner head and untangle any coils in the hose before storing the cleaner. • To avoid electric shock and other hazards which could result in permanent injury or death, disconnect (unplug) the cleaner from the control unit before performing any cleaning and maintenance. • The filter canister should be cleaned at the end of each cycle. • Ensure that the control unit cable has been disconnected from the electrical outlet or that the floating cable has been disconnected from the control unit. • Remove the cleaner from the water and let the remaining water drain by maintaining the cleaner in the vertical position. • Set the unit on its wheels. • Push the cover lock (1) and lift the cover (2) until it is secured in the vertical position (Figure 1). • Remove the filter assembly from the body (3) (Figure 2). • Push the quick release button on the canister assembly (4) and pull open the filter assembly (5) (Figure 3). • Separate the filter canister from the filter support (6) (Figure 4). • Wash the filter canister, the filter support, and the cleaner under water or using a hose (7) (Figure 5). H03818-00.A3 EN – 2012-03 7 3.2 Cleaning and Storing the Cleaner The cleaner must be cleaned regularly using slightly soapy clean water, do not use solvents such a trichloroethylene or its equivalent. Rinse the cleaner generously using clean water. Do not let your cleaner dry in direct sunlight near the pool. The cleaner must be stored on its own caddy, so that it dries quickly. • Place the rear wheels on the caddy side wedges (1). • Roll the unit into place onto the caddy (2). EN The cleaner cable must be disconnected from the control unit before removing the cleaner from the pool. Wrap the cleaner cable around the hooks located at the rear of the caddy. 4. Replacing the Brushes The cleaner is fitted with PVC brushes. There are ''wear'' indicators on the brushes. To maintain cleaner performance at its best you need to replace the brushes as soon as one of the wear indicators has been reached (even if the blade wear is not even). It recommended to replace the brushes every two (2) years. • Lift the cleaner to a vertical position so that the handle is up (1). • Separate the edges of the brush and undo the tabs (2). Remove the worn brushes. • To install a new brush, position the new brush on the roller with the spikes facing downwards (3). • Thread each tab into the slot provided and gently feed it through until the heel comes out at the other side of the slot (4). • Use a pair of scissors to cut the tabs 20mm from the heel so that they are no higher than the spikes (5). • Repeat this procedure to install the second brush. H03818-00.A3 EN – 2012-03 8 5. Replacing the Tyres on the Cleaner • Pull on the inside of the old tyre to remove the tyre lip from the wheel (1). • Remove the old tyre (2). • To replace the tyre, position the tyre on the wheel making sure to orient the tyre so that the tyre tread is on the outer side of the wheel (3). The word "inside" is imprinted on the rim of the tyre. Make sure the word "inside" is facing towards the body of the cleaner. • Push one side of the tyre on to the wheel and fit the rib of the tyre in the groove of the wheel (4). • Work the tyre onto the wheel and verify the rib of the tyre is positioned properly within the groove of the wheel (5). • Push and position the rib of the inner side of the tyre in the groove of the wheel (6). If needed, turn the wheel gently to help with installation. 6. Troubleshooting Symptom The flashing indicator lights appear just after start (pressing the Power or Cycle button to start the cleaner) (< 20 seconds). Cause Floating cable is not properly plugged into the control unit. Cleaner is not well submerged. Cleaner needs to be reset and start new cycle. Propeller does not turn. Wheels do not turn. The flashing lights appears during the cycle. H03818-00.A3 EN – 2012-03 If the cleaner sucks air for 60 seconds, the flashing light appears. Solution Unplug the floating cable from the control unit and plug it again properly. Submerge the cleaner following the procedure in Section 2.2, "Submerging the Cleaner". Press the power button OFF and then Cycle I or II Program buttons to start new cycle. Please contact your local service representative. Please contact your local service representative. Submerge the cleaner following the procedure in Section 2.2, "Submerging the Cleaner". 9 Symptom The cleaner does not stay firmly on the pool bottom. Cause There is air in the appliance casing. Filter is full or dirty. The cleaner does not or no longer climbs the pool sides. Sides of pool are slippery or slimy. Although the water seems clear, microscopic algae, invisible to the human eye, are present in the pool. As a result the pool sides become slippery and prevent the cleaner from climbing. Not supplied with electricity. On startup the cleaner does not move. Unit is turned ON. Brushes have become smooth. The cleaner seems to be performing less efficiently. Filter canister is full or dirty Floating cable is excessively coiled or kinked. Solution Submerge the cleaner following the procedure in Section 2.2, "Submerging the Cleaner". Clean the filter canister following the procedure Section 3.1, "Cleaning the Filter Canister". Do a shock chlorination treatment and slightly reduce the pH. DO NOT leave the cleaner in the pool during this treatment. The outlet the control unit it is connected to is not supplying electrical power. Check that the outlet to which the control unit is connected is receiving electricity. Check that you have started one (1) of the two (2) programs and check that the indicator for the selected program is lit. If the problem persists, contact your local service representative. Replace the brushes following the procedure in Section 4, "Replacing the Brushes". Clean the filter canister following the procedure in Section 3.1, "Cleaning the Filter Canister". Make sure the floating cable is spread out over the pool. Make sure the floating cable is spread out over the pool. 7. Zodiac Australia - Express Warranty and Guarantees Zodiac Group Australia Pty Ltd (Zodiac Australia) warrants that V3 and V3 4WD (Product) will be free from defects in materials and workmanship for a period of 2 years from date of purchase. Terms & Conditions 1. This express warranty only applies if the Product has been purchased from a dealer authorised by Zodiac Australia to supply it (Authorised Dealer). Purchase from an Authorised Dealer ensures that the product is a genuine Zodiac product, that it is the version designed for Asia Pacific conditions, and that the Purchaser has access to appropriate technical knowledge and advice. 2. Zodiac Australia's liability under this express warranty is limited, at its option, to the repair or replacement of the Product or the payment of the cost of having the Product repaired or replaced. 3. This express warranty does not apply in the following circumstances: (a) if the Product has not been installed in accordance with Zodiac's installation instructions; (b) if the Product has been modified other than as authorised by Zodiac Australia or if a component part has been replaced by a part that is not a genuine Zodiac product; (c) if a defect results from use of the Product outside recommended operating conditions; or (d) if a defect results from damage (including damage to any internal electronics) caused by a power surge or lightning strike. H03818-00.A3 EN – 2012-03 10 EN Zodiac chlorinators are designed and tested in accordance with International Standard EN 61000-6-1 immunity measurements. They are designed to tolerate minor fluctuations (2000 volts) in power supply that can be reasonably expected to occur in the energy grid. They will not tolerate power surges outside these limits nor will they withstand lightning strikes. 4. Without limiting 3 above, products sold by Zodiac Australia are designed for use with swimming pool water balanced in accordance with Australian Standard AS3633-1989 with a pH range of 7.0 - 7.8. Maximum chlorine readings should not exceed 4ppm. Where pool water is not maintained within these parameters, Zodiac Australia will not be responsible under this express warranty for any resulting damage, including damage caused by corrosion, scaling or stress loading. 5. Replacement parts supplied under this express warranty are warranted to be free from defects in materials and workmanship for the remainder of the warranty period or for 12 months from the supply of the replacement, whichever is longer. 6. Warranty claims relating to replacement of the electrodes for LM series, C series, Duo Clear and D series chlorinators are subject to the following pro-rata pricing procedure. The Purchaser must pay for the replacement electrode a proportion of the cost equal to that proportion of the warranty period during which the original electrode functioned effectively. The warranty period for the replacement electrode is the remainder of the warranty period for the original electrode or 12 months from the supply of the replacement, whichever is longer. The Purchaser must pay full cost for any replacement electrodes after the first replacement. Product warranty registration 7. Purchasers should register their Products as soon as conveniently possible after purchase by completing a Product Warranty Registration Form and posting it to Zodiac Australia at the address shown on the Form or by registering online at www.zodiac.com.au. 8. Product registration must occur, and proof of purchase must be received by Zodiac Australia, prior to any warranty work being approved. Where applicable, a serial number, installation date and name of installer is required as part of the registration process. How to make a warranty claim 9. The Purchaser must telephone or email Zodiac Australia Customer Service and obtain a warranty ID number for the warranty claim. Contact details are: Zodiac Group Australia Pty Ltd 219 Woodpark Road Smithfield NSW 2164 Customer Service Telephone: 1800 688 552 Email address: [email protected] 10. Zodiac Australia reserves the right to determine, in relation to each warranty claim, whether the Product should be returned to the Authorised Dealer at the address where the Purchaser purchased the Product or whether warranty service will be provided in the field, repaired at a Zodiac workshop or at the premises of an authorized Zodiac warranty agent. 11. If it is necessary for the Purchaser to incur freight charges in making a valid claim under this warranty, Zodiac Australia will reimburse the Purchaser for charges reasonably incurred upon proof of the charges. Additional guarantees, rights and remedies Australian Purchasers - Guarantees under the Australian Consumer Law 12. The benefits of this express warranty are in addition to other guarantees, rights and remedies Australian consumers have under the Australian Consumer Law. 13. Zodiac Australia products come with guarantees that cannot be excluded under the Australian Consumer Law. You are entitled to a replacement or refund for a major failure and for compensation for any other reasonably foreseeable loss or damage. You are also entitled to have the goods repaired or replaced if the goods fail to be of acceptable quality and the failure does not amount to a major failure. Purchasers in other Countries 14. The laws and regulations of other countries may confer on Purchasers in those countries additional rights and remedies. To the extent that they cannot be excluded or modified, Purchasers have the benefits of those rights and remedies in addition to the benefits of this express warranty. To the full extent that it is permissible to do so, those additional rights and remedies are excluded or modified so as to be consistent with Zodiac Australia's express warranty. INCONSISTENCY WITH WARRANTY STATEMENTS IN PRODUCT MANUALS OR OTHER DOCUMENTS ACCOMPANYING PRODUCTS If any warranty statements in a Zodiac Australia product manual or other document are inconsistent with the above Express Warranty and Guarantees, the above overrides and replaces the inconsistent statements. 8. Conformity The manufacturer reserves the right to modify these specifications without notice. Although the cleaning robots have been tested in a large variety of Swimming pools, Zodiac cannot be held responsible in the case of a non perfect adaptation of the robot to a particular swimming pool. H03818-00.A3 EN – 2012-03 11 Notes Notes Notes Zodiac Group Australia Pty Ltd. 219 Woodpark Road, Smith eld NSW 2164 Ph: +612 8786 6800 | FAX +61 2 9756 3987 For more information visit www.zodiac.com.au or call 1800 688 552 ZODIAC® is a registered trademark of Zodiac International, S.A.S.U., used under license. All trademarks referenced herein are the property of their respective owners.