1
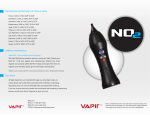
Vapir One Available at Vape World
USER’S GUIDE V5.0
Important Instructions
IMPORTANT OPERATING INSTRUCTIONS FOR VAPIR ONE VAPORIZERTM
SUPERCHARGED FAN MODELS
DUE TO HIGH AIR PRESSURE, TEMPERATURES MAY FLUCTUATE SEVERAL DEGREES
CAUSING THE GREEN LIGHT TO FLICKER BETWEEN RED AND GREEN. THIS IS NORMAL.
It is imperative that you place your Vaporizer´s fan setting on the HIGH or H position
when starting it up. Failure to do this may cause damage to your Vaporizer that is
not covered under warranty. This vaporizer has 3 Fan speed settings: L for LOW, M for
MEDIUM and H for HIGH. The unit should always be started on H for HIGH so that it can
properly achieve the speed it requires. The unit might not operate properly if it is not
started on the HIGH position. If the unit is heated without the fan on, it could possibly
overheat and cause damage to the unit that is not covered by the warranty In the event
that this occurs, immediately turn it off and restart on HIGH.
If your fan ever turns off or you notice it is not on, immediately turn the unit to the
off position, adjust the fan speed to H (HIGH position), and turn the unit on with the
heat off (heat is the large button with a flame on it). Do this for 5 minutes. It should
cool your device for usage.
Never unplug or turn your unit off until it has had sufficient time to cool down. Always
leave the fan running without heat for a minimum of 5 minutes after each use.
As a safety precaution, your unit is equipped with an internal safety switch. This switch
will disable your unit should it ever overheat. If your unit malfunctions or stops heating,
leave the fan on H (High position) for 20 minutes to cool the unit down. Then, turn your
unit off. At this time, it is safe to either restart the unit or unplug it and store.
Always unplug the unit from the electrical outlet before cleaning. Always make sure
your unit is completely dry before turning it on. Do not attempt any repairs to your
unit as doing so may cause fatal injury or void your warranty.
Vapir One Available at Vape World
Identifying the Parts
1
2
4
13
12
3
5
6
7
8
10
11
1. Vapor Outlet Valve
2. Accurate Digital Temperature
Control
Press + to increase temperature. Press
- to decrease temperature. Maximum
temperature is 400 °F (204 °C).
3. Push-Button Heat Control
Turns heat On or Off.
4. Fan Speed Switch
Adjusts speed of fan.
5. LCD Screen
Displays data. Screen toggles
between set temperature and current
temperature.
6. Red/Green Ready Light.
When light is red, it indicates that
heating is activated and the unit is
attempting to reach the temperature
that you set. When light is green, the
set temperature has been reached. It is
normal, once the set temperature has
9
been reached, for the light to toggle
between red and green as it attempts
to regulate the temperature.
7. Celsius/Fahrenheit Button
Adjusts display to Celsius or Fahrenheit.
8. Tone On/Off Button
Turns Tone On or Off.
9. Power Switch
Turns unit On or Off.
10. AC Power
Insert power cable here.
11. Air Intake Valves
Allows for proper internal ventilation
of your Vapir ONE Vaporizer. Never
cover these holes.
12. Eject Switch for Herb Disk Drive
Ejects herb disk drive.
13. Herb Disk Drive
Insert herb disk here after ejecting drive.
Vapir One Available at Vape World
Instructions For Use
First turn the fan setting to the High ( H ) position, then turn the unit on by pressing the
on switch to the On position. Once you hear the fan has engaged and is up to speed, you
can immediately turn the fan to the Low ( L ) position and begin using.
*Make sure the fan is on low when heating up your Vapir ONE.
It’s as easy as 1-2-3
i
HELPFUL HINT: FILLING THE HERB DISK
Whenever possible, grind herbs before filling disk. This will allow your materials to be heated
more evenly.
Loosely fill the finely ground herbs because over packing it can cause overheating.
1. Pre-heat unit by setting the temperature (+/-) and pressing
the Heat button.
2. Fill Herb Disk.
3. When Ready light turns from red to green, insert
disk into drive. Insert drive into unit. Begin
inhaling aroma and flavor immediately. Enjoy.
i
IMPORTANT: In order to prevent burning your herbs, the herb drawer should be
removed every time PRIOR to turning the fan speed up. Once fan speed has been
changed and is up to proper running speed you can insert the herb drawer and
immediately being vaporizing
Removing the herb disk after use
1. Eject the Herb Disk Drive by pressing release switch and
pulling out the drawer.
2. Use the supplied plastic tweezers to carefully
remove the hot herb disk. Never touch the disk
right after use! OR...
3. Remove the drawer from the Vapir ONE unit. Without
touching the hot disk, shake the drawer and allow the disk to
fall into a metal or ceramic bowl.
Vapir One Available at Vape World
Herb Tube Attachment
For best taste, we recommend following the procedure below to eliminate any plastic
tastes:
1. Soak tube in warm-hot (not boiling!) water for 30 minutes. Tip: Add essential oils to
water for better taste. Essential Oils are available for purchase at Vapir.com
2. Remove cap by twisting top portion of unit and
flipping cap over.
3. Insert warm tube through back of cap.
4. Use clean pliers to pull tube through cap.
Tube attachment is for flavor delivery purposes. Never put your mouth to outlet valve.
It may be hot. Always either use a tube or taste flavor from a distance of several inches
without touching the outlet valve.
Quick Tips:
• Insert tube before use.
• Grind herbs in either our Element, Max or Maxine Herb Grinders (sold seperately) or in
a coffee grinder.
• Preheat Vapir ONE unit to 250°F with the drawer out. Wait for light to turn green, then
insert the disk drive. If you are not getting enough flavor turn the tempurature up. If you
are getting smoke, turn the tempurature down.
• Inhale the flavor immediately upon insertion.
• When inhaling, breathe deeply. Hold the vapor in. Repeat for 10 -15 minutes.
• Remember, visible vapors will not always be present.
Vapir One Available at Vape World
• LEAVE FAN ON WITH THE HEAT OFF FOR 2-5 MINUTES AFTER USE. THIS
WILL COOL THE UNIT AND PREVENT DAMAGE CAUSED BY HEAT. NEVER STORE
A HOT UNIT.
• This unit and many of its components get very hot! Read all directions and heed all
cautions carefully before using this device. Serious injury may result from improper
operation.
• Optional tube attachment is for flavor delivery purposes. Never put your mouth to
outlet valve. It may be hot. Always either use a tube or taste flavor from a distance of
several inches without touching the outlet valve.
• Never cover air intake valves. This may cause the unit to overheat and malfunction.
• This unit has a preset safety time of 10 minutes. After 10 minutes of operation, the unit
will turn off to avoid overheating and to prevent any accidental damage to the unit by
leaving it on inadvertently. After 10 minutes, you can manually reset the unit for up to
another 10 minutes.
• Visible vapor will not always be present. Vapor is very different from smoke. Even in the
absence of visible vapor, the unit is still emitting potent vapors. The vapor emitted after
you first insert your drive is some of the most flavorful and most beneficial vapor in your
entire session, regardless of the fact that it may be mostly invisible.
• The Vapir ONE Vaporizer comes in both 110v and 220v versions. Check rating label
before use to make sure it matches your country’s voltage.
• To avoid wasting any vapor: make sure to eject the herb drawer when not inhaling.
WARRANTY
You must register your product by mail within 15 days of purchase for warranty to be valid
(except where prohibited by law*). Warranty covers defects in materials and workmanship
which occur with normal use of the device and when device has been purchased from an
authorized retailer. Warranty is valid no more than 90 days from the purchase date or as
required by law. For complete warranty information, visit www.vapir.com
*Some states do not allow the exclusion or limitation of incidental or consequential
damages or limitations based on the duration of an implied warranty. The limitations
and exclusions written above may not apply to you. This warranty gives you specific legal
rights, and you may have additional rights based on your state law. Other restrictions may
apply.
For more information, helpful tips and hints, and frequently asked questions please
visit www.vapir.com
Vapir One Available at Vape World
Instructions For Balloon Inflation Kit
Cut the tube to a length of 3-4 inches for best results when using with the
balloon.
This Vapir ONE is equipped with a new supercharged heater. Changing the fan speed may
or may not noticeably affect the temperature. It is not necessary to heat up your unit
to the maximum temperature to inflate balloons. Please use a moderate temperature
between 170ºC/300ºF and 176ºC/350ºF when preheating your unit. Using a higher
temperature may cause burning of your herbs.
H= HIGH M= MEDIUM L= LOW
Due to the high speed of the airflow the temperature will drop rapidly when the fan is
switched to the H position.
For effective balloon inflation:
1. Set the fan in the L position and set your desired temperature.
2. When the actual temperature reaches the set temperature, attach the ballon and insert
your 1/2 filled herb disk into the drawer.
3. Wait about 10 - 15 seconds then set the fan to the M or H position. The balloon will
start to inflate. When using the M fan position to inflate a balloon you will get denser
vapor but the balloon will fill up slower. When using the H fan position to inflate a
balloon you will get a less dense vapor but the balloon will fill up more quickly.
4. When balloon stops expanding, detach the balloon and inhale. Also turn the fan back
down to L to allow the Vaporizer to heat back up to desired temperature.
5. While inhaling remove the herb drawer so you do not waste any vapor. When you are
finished inhaling the previously filled balloon, repeat steps 2 - 4.
NOTE
• The quantity of balloons you inflate with vapor from one filled disk will depend on
many factors, including the condition of your herbs.
• Most vapors are invisible or slightly grey. You should always taste the flavor of your
herbs and you may see some slight grey vapor.
Vapir One Available at Vape World
Digital Element Herb
Grinders
10 Pack of Re-Useable
Empty Herb Disks
Car Charger/Power
Inverter
Max Gourmet Herb
Grinder
Jaguar Herb Disks
Maxine Gourmet Herb
Grinder + Re-chargeable
Battery
Inflation Kit 10 Balloons, 10 X-tip
Mouthpieces, 5 Matrix
5 Pack Of Water Tools
5 Pack of Matrix Tube
Attachments
10 Pack Of Re-useable
Empty Herb Disks
Spa Mask
10 Pack Of X-tip
Mouthpieces
Digital Spa
All Products Made By Vapir, Inc.
Vapir One Available at Vape World
INFORMATION ON COMMON PLANTS USED FOR VAPORIZATION
Herb/plant
Part of the Plant
Used For Vaporization
Desired Temperature
Chamomile
Eucalyptus
Hops
Lemon Balm
Lavender
Sage
Thyme
Tobacco
blossoms
leaves
cones
leaves
blossoms
leaves
herb
leaves
265 ºF (129 ºC)
310 ºF (155 ºC)
375 ºF (191 ºC)
265 ºF (129 ºC)
290 ºF (144 ºC)
375 ºF (191 ºC)
375 ºF (191 ºC)
375 ºF (191 ºC)
90 DAY LIMITED WARRANTY
Vapir ONE Vaporizer
Phone: 800.841.1022
Website: www.vapir.com
Email: [email protected]
This warranty covers failures due to defects in materials and workmanship for
a complete period of 90 days or as provided by law. Please go to www.vapir.
com/warranty to register you warranty and for more warranty details. Registration
of your 90 Day Limited Warranty must be completed within 15 days from the date
of purchase.
Vapir One Available at Vape World
Vapir One Available at Vape World
INHALE THE FUTURE!
VAPIR, INC. ALL RIGHTS RESERVED
Vapir, Inc.
www.vapir.com
Toll Free: + 1 800 841 1022