1
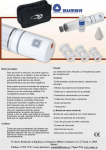
VAPORIZATION TEMPERATURES FOR POPULAR HERBS
Clove: (125C to 150C) 257F to 302F
Dandelion: (125C to 150C) 257F to 302F
Lavender: (100C to 125C) 212F to 257F
Peppermint: (100C to 150C) 212F to 302F
Sage: (125C to 150C) 257F to 302F
Tobacco: (125C to 150C) 257F to 302F
Saw Palmetto: (125C to 175C) 257F to 347F
Cats Claw: (150C to 175C) 302F to 347F
Damiana: (150C to 175C) 302F to 347F
Garlic: (170C to 185C) 337F to 365F
Ginger (170C to 185C) 337F to 365F
WARRANTY INFORMATION
Vapir NO2 1 Year Limited Product Warranty
We stand behind our products and our customers. Vapir Covers your
NO2 for 1 Full Year against any manufacturer defects. You must
register you warranty within the first 15 days of receipt of the item. To
register your warranty, please go to www.vapir.com/warranty*
*Battery is not covered under the 1 year warranty, all batteries have a 180 day limited warranty.
DISCLAIMER
All Vapir Vaporizers are intended for legal use only. Vapir makes no
claims about any health risks associated with smoking or vaporizing.
Vaporizing may not remove all health risks associated with smoking.
If you are unsure about any health risks associated with smoking or vaporizing
please consult your doctor. Vaporize at your own risk.
Vapir, Inc.
Phone: +1.800.841.1022
Website: www.vapir.com
E-Mail: [email protected]
TM
NO2 is a Trademarked name owned by VapirTM and protected by all US
and International Copyright Laws. The NO2 Vaporizer utilizes Patented
Technology protected by US Patent No: 6772756 & 20090095287
IDENTIFYING THE PARTS
PRE-USAGE INSTRUCTIONS - ADDITIONAL PARTS
The NO2 comes with 1 Internal Re-Chargeable Battery, 1 Power Cord, 3 Sets
of Mesh Bowl (1 already installed), 2 Bamboo Cleaning Sticks, 1 Measuring
Cup, 1 Cleaning Brush, 1 Tube Attachment and 1 X-Tip Mouthpiece.
Prior to using the tube attachment, make sure to soak it in warm water (DO
NOT USE BOILING WATER). It is suggested that you use the tube attachment
while vaporizing for a much better draw. To install the tube, simply push one
Top / Mouthpiece
end of the tube over the top of the unit until it is fully secure.
You can also use the mouthpiece in conjunction with the tube. Installation of
Top / Mouthpiece opening
(unscrew to open)
the mouthpiece is quite easy, simply push the open end (the larger opening)
over the open end of the tube until it is fully secure.
Set/Actual
Temperature
LED Heat
indicator light
Included are 2 sets of mesh screens for usage when the first set becomes too
dirty or worn out. You can clean the mesh screens using the cleaning brush.
Changing Internal Mesh Screen - Using the Bamboo Cleaning
Digital Temperature
Display
Temperature
Down Button
Battery charge
indicator
stick (included with the unit) put the stick inside of the herb
Power ON / OFF
Button
- the screen should come out quite easily. To install the new
Temperature
Up Button
Heat ON/OFF Button &
C/F Temperature Setting
chamber and grab the bottom of the mesh screen and lifts out
screen, use the bamboo stick and simply push the screen
inside the herb chamber until it reaches the bottom and is
flush with the bottom of the herb chamber.
Changing Mouthpiece Mesh Screen - Remove the top of the
unit by gently turning it counter-clockwise. Turning the
mouthpiece over you will see the mesh screen holder. To
remove the mesh screen simply locate the 3 lines on either side
of the mesh screen holder. Securely grab the 3 lines and turn
counter clockwise to open. If mesh screen holder is difficult to
Battery Door
remove you can gently use pliers to do so. Remove the old mesh
screen and insert a new mesh screen. To assist with installation
of the mouthpiece mesh screen use the tip of the NO2 (when
removed from unit) to depress the screen into the correct shape.
Now replace the mesh screen holder by pressing down and
1
turning clockwise until secure.
2
QUICKSTART GUIDE
DIRECTIONS FOR USAGE
1. Always pre-grind your herbs, it is important that you finely grind your
1. Grind Your herbs
herbs to allow heat to penetrate all surface areas for maximum benefit.
2. Set the unit to your desired temperature*. Using the + and - buttons
you can toggle through exact temperature settings in order to find the
2. Turn the Unit On
one you desire. It does take a little practice to find the perfect
temperature for your liking. In the meantime, here is a good guideline to
follow: if you are not getting enough flavor, turn the temperature up. If
your herbs are burning then turn the temperature down.
3. Set Desired Temperature
3. When you have set your desired temperature, engage the heating
Not enough flavor? Turn temperature up.
element by pressing the Heat Button (Red Button located beneath the
If herbs are burning? Turn temperature down.
LCD Temperature Display). Once this button has been pressed a Red LED
light will illuminate above the LCD Temperature Display indicating the
heating process has begun.
4. Press Red Button to Engage Heat
4. Now that the unit has reached the desired temperature the Red LED will
change to a Green LED, indicating the unit is fully heated and ready for
usage.
5. When LED Turns Green, Remove Top
& Insert Herbs
(approximately 3/4 full or less),
Replace top then inhale and enjoy!*
*Please note, the temperature will change inside the unit causing the
temperature to drop slightly and the Green LED will revert back to a Red LED
indicating the unit is re-heating to reach your desired temperature. This is
normal and will occur during usage.
**Vapir recommends plugging your NO2 into a surge protector while using in
AC mode.
*For best draw it is suggested that you use the included tube.
3
4
DIRECTIONS FOR USAGE
BATTERY OPERATION AND SET TEMPERATURE MEMORY
5. Once the unit has reached the desired temperature and is fully
pre-heated, you can remove the top by gently twisting
counter-clockwise - exposing the herb chamber. Once the top is
removed, you can insert your pre-ground herbs into the unit, making
sure the herb chamber is no more than 3/4 full*
*If you over fill the herb chamber you will impede the air flow, which will
prevent the heat from penetrating your herbs and thus prohibit full
vaporization from occurring.
Locating Re-Chargeable Battery - Lithium Ion Battery can be easily inserted
or removed by opening the door at the base of the unit.
Initial Battery Usage/Charging - Prior to using the NO2 in Battery Mode the
battery must be charged for a full 8-12 hours for optimal battery
performance. Subsequent charging of battery is only 4-6 hours.
Re-Chargeable Battery Usage - After the internal battery has been properly
charged and installed into the unit; unplug the unit from the wall adaptor
located at the base of the unit. When you power the unit on, battery power
will automatically take over and you can use your unit cordless.
Re-Chargeable Battery Charging - The NO2 comes with two different ways
you can re-charge your internal re-chargeable battery.
6. Immediately after the herbs have been placed into the herb
chamber, you can re-attach the mouthpiece by gently turning
clockwise until it is securely attached. Once the top is attached, you
can inhale and enjoy!
1. You can leave the battery inside the NO2 while it is plugged into an electrical
wall outlet using the power adaptor. If the NO2 is powered on while plugged
into an electrical wall outlet, even if the unit is being used, the battery will
automatically re-charge! In order for the battery to re-charge, the unit needs to
be plugged in and the Power ON/OFF switch needs to be in the ON position (the
heat does not need to be engaged).
2. For optimal battery life automatic re-charging only occurs when the battery
charge is at 2 bars or less. To over-ride simply switch the unit OFF and then ON
to begin re-charging.
For optimal performance make sure to clean the unit after each
usage.
3. The NO2 also has an optional external battery charging cord which is
available for purchase.
Re-Chargeable Battery Charge Indicator - The NO2 comes outfitted with a
battery charge indicator located at the lower right hand corner of the
digital LCD Display. This indicator will display how much charge the battery
has remaining and will blink to indicate that it is recharging. Battery lasts
approximately 45-60 minutes on a full charge, battery indicator bars may
show less during actual usage; this is normal.
Set Temperature Memory - The NO2 also comes with a temperature
memory, every time you turn your NO2 on, it will automatically be set to the
temperature you had used during you last vapor session.
Changing Temperature from Fahrenheit to Celsius - To change the
temperature reading from Fahrenheit to Celsius (or from Celsius to
Fahrenheit) simply hold down the heat button 2-5 seconds.
5
6
HEAT SAFETY MECHANISM
REPLACEMENT PARTS AND ACCESSORIES
- 12 Volt Adapter
To stop the heating process, press the Heat Button (Red Button
located beneath the LCD Temperature Display). You will note that the
- External Battery Charger
Further, this unit has a safety default setting of 20 minutes. After 20
- Cleaning Sticks
minutes of continuous heating, the heating element will
minute safety default heat setting is triggered, you can re-engage
the heat immediately to continue usage.
- 20 Pack of Mesh Screens
- 3 Pack of Tubes
- 10 Pack of X-Tip Mouthpieces
- 5 Pack of Cleaning Brushes
-5 Pack of Scoops
Replacement parts for this unit can be purchased directly from
our website www.vapir.com or
by calling 1.800.841.1022
7
8
TEMPERATURA DE VAPORIZACIÓN PARA
LAS HIERBAS MÁS POPULARES
Uña de gato: (150C a 175C) 302F a 347F
Clavo de olor: (125C a 150C) 257F a 302F
Damiana: (150C a 175C) 302F a 347F
Amargón o diente de león: (125C a 150C) 257F a 302F
Ajo: (170C to 185C) 337F to 365F
Jengibre: (170C to 185C) 337F to 365F
Lavanda: (100C a 125C) 212F a 257F
Menta: (100C a 150C) 212F a 302F
Salvia: (125C a 150C) 257F a 302F
Palmito: (125C a 170C) 257F a 347F
Tabaco: (125C a 150C) 257F a 302F
GARANTÍA
Vapir Modelo NO2 Garantía limitada de un año*
Respondemos por nuestros productos y por nuestros clientes. Vapir cubre su NO2 por
todo un año contra cualquier defecto de fabricación. Debe registrar su garantía dentro de
los primeros quince días después que recibió el producto. Para registrar su garantía,
visite www.vapir.com/warranty*
*La batería no está cubierta dentro del año de garantía, todas las baterías tienen una garantía limitada de 180 días.
DISCLAIMER
Todos los vaporizadores Vapir están destinados solo para uso legal. Vapir no hace
afirmaciones sobre los riesgos de salud asociados con el tabaquismo o la vaporización.
La vaporización no puede eliminar todos los riegos de salud asociados con el tabaquismo.
Si no está seguro acerca de los riesgos de salud asociados con el tabaquismo o la
vaporización por favor, consulte a su médico. Vaporice bajo su propio riesgo.
Vapir, Inc.
Teléfono: +1.800.841.1022
Sitio Web: www.vapir.com
E-Mail: [email protected]
TM
NO2 es marca registrada propiedad de VapirTM y protegida por todas
las leyes de derechos de autor, tanto de los Estados Unidos como
internacionales. El Vaporizador NO2 utiliza tecnología patentada protegida
por la patente estadounidense No. 6772756 & 20090095287.
IDENTIFIQUE LAS PARTES
INSTRUCCIONES PREVIAS AL USO. –PARTES ADICIONALES
Previo a utilizar el tubo accesorio, asegúrese de mojarlo en agua tibia (NO USE
AGUA HIRVIENDO). Se sugiere que utilice dicho tubo mientras vaporiza, para
obtener un mejor resultado de absorción. Para instalar el tubo, simplemente
empuje un extremo del tubo sobre la parte de arriba de la unidad hasta que
quede totalmente seguro.
Puede utilizar la punta X en combinación con el tubo. La instalación es fácil;
Tapa / Boquilla
simplemente empuje la abertura más grande sobre el extremo abierto del tubo
hasta que esté totalmente seguro.
Apertura de Tapa / Boquilla
Se incluyen tres juegos de pantallas de malla para que las pueda utilizar. Un
(Desenroscar para abrir)
juego ya está instalado y hay dos juegos de pantallas adicionales para uso
futuro cuando el primer juego esté muy sucio o gastado. Puede limpiar las
Temperatura
Ajustar / Actual
Luz indicadora de calor
pantallas con el cepillo limpiador.
Cambiando las pantallas de malla internas - Usando el palillo de
bambú para limpiar (incluido en la unidad) Coloque el palillo dentro de
Pantalla digital
de temperatura
Botón para disminuir
temperatura
Indicador de
carga de batería
la cámara de hierbas, hale el fondo de la pantalla de malla y hale
Botón de apagado
y encendido
use el palillo de bambú y simplemente empuje la pantalla cilíndrica de
hacia fuera –la pantalla debe salir fácilmente. Para instalar la nueva,
malla dentro de la cámara de las hierbas hasta que llegue al fondo.
La pantalla debe descansar completamente nivelada en el fondo de la
Botón para
aumentar la
temperatura
Botón de apagado y
encendido del calor
(C/F ajuste de temperatura)
cámara de las hierbas.
Cambiando las pantallas de malla de la boquilla - Quite la boquilla de
la unidad, dando vuelta suavemente en sentido contrario a las agujas
del reloj. Al dar vuelta a la boquilla, verá el sujetador de la pantalla de
malla. Para quitarla, simplemente encuentre la tira de tres líneas en
cada lado del sujetador de la pantalla de malla. Tome las tres líneas,
y gire en sentido contrario a las agujas del reloj para abrir. Si el
sujetador de las pantallas de malla es muy difícil de quitar Usted
puede utilizar cuidadosamente pinzas para hacerlo. Ahora, quite la
Puerta de batería
pantalla usada y coloque la nueva en su lugar. Para ayudar con la
instalación de la malla de la boquilla use la punta del NO2 (cuando se
quita de la unidad) para presionar la pantalla en la forma correcta.
Finalmente, vuelva a colocar el sujetador de la pantalla presionando y
girando hasta que quede seguro en su lugar.
1
2
COMIENZO RÁPIDO
INSTRUCCIONES DETALLADAS DE USO
1. Siempre triture sus hierbas previamente. Es importante que las triture
1. Triture sus hierbas
finamente para permitir que el calor penetre en todas las áreas de la
superficie para máximo beneficio.
2. . Coloque la unidad a la temperatura deseada*. Utilice los botones + y -.
2. Encienda la unidad
Se puede ajustar la temperatura para que encuentre la que más le convenga.
Toma cierta práctica encontrar la temperatura perfecta o a su gusto.
Mientras tanto, a continuación aparece una guía: si sale humo, baje la
temperatura. Si no se obtiene suficiente sabor, suba la temperatura.
*La temperatura recomendada de encendido es de 380°F /212°C
3. Establezca la temperatura deseada
(aproximadamente 375-385F o 191-200C)
3. Una vez ha establecido la temperatura, presione el Botón de Calor
(ubicado debajo del indicador de temperatura LCD). Una vez presionado dicho
botón se encenderá una luz roja sobre el indicador de temperatura LCD,
indicando que el proceso se ha iniciado.
4. Presione el botón rojo para encender el calor
4. Ahora que la unidad ha alcanzado la temperatura deseada, la luz roja
cambiará a verde, indicando que unidad ha calentado totalmente y está lista
para usarse.
5. Quite la tapa, coloque las hierbas
(aproximadamente a 3/4 de su
capacidad o menos)
Coloque la tapa nuevamente;
ahora puede inhalar y disfrutar!*
*Por favor observe que la temperatura cambiará dentro de la unidad, causando
que baje ligeramente, y la luz verde se torne roja otra vez, indicando que la unidad
se está recalentando hasta alcanzar la temperatura deseada. Esto es normal y
ocurrirá mientras se use.
**Vapir recomienda conectar el NO2 en un protector contra sobretensiones
mientras lo use en modo AC.
*Para una mejor inhalación se sugiere usar el tubo incluido.
3
4
INSTRUCCIONES DETALLADAS DE USO
5. Una vez la unidad ha alcanzado la temperatura deseada y se ha
precalentado completamente, se puede quitar la tapa al girarla
lentamente en dirección de las agujas del reloj, dejando ver la cámara de
las hierbas. Una vez que se ha quitado la tapa, se pueden colocar las
hierbas previamente trituradas dentro de la unidad, asegurándose que la
cámara no esté llena a más de tres cuartos de su capacidad*.
*Si llena demasiado la cámara de las hierbas, impedirá el flujo de aire y, al
mismo tiempo, que el calor penetre las hierbas y no se vaporicen totalmente.
OPERACIÓN DE LA BATERÍA Y
ESTABLECER LA MEMORIA DE LA TEMPERATURA
Ubicación de la batería recargable - El modelo NO2 viene con una batería
recargable de iones de litio, que puede ser ubicada fácilmente al abrir la puerta de
la unidad de la base y deslizar la batería hacia adentro o hacia fuera. El modero
NO2 funciona con o sin la batería instalada en la unidad.
Uso Inicial de la batería / Carga - Antes de usar el NO2 en el modo de batería, la
batería debe ser cargada por un total de 8 -12 horas para obtener un óptimo
rendimiento de la batería. La carga posterior de la batería es solo de 4-6 horas.
Uso de la batería recargable - Después que la batería ha sido adecuadamente
recargada e instalada dentro de la unidad, el uso es fácil. Simplemente
desconecte la unidad del adaptador de pared que está en la base de la unidad.
Cuando encienda la unidad, el poder de la batería operará la unidad y podrá
utilizarla de forma inalámbrica.
Cómo se recarga la batería - El modelo NO2 viene con dos formas diferentes de
recargar la batería.
segura. Una vez la tapa está colocada, puede inhalar y disfrutar.
1. Puede dejar la batería dentro del modelo NO2 mientras se conecta a un enchufe con el
adaptador de poder. Si el modelo NO2 se enciende mientras está conectado a un enchufe, aun
si se está utilizando la unidad, la batería se recargará de modo automático. Para que la
batería vuelva a cargar, la unidad necesita estar enchufada y el interruptor de encendido y
apagado debe estar en la posición de ENCENDIDO (El calor no necesita involucrarse).
Para mejor funcionamiento, asegúrese de limpiar la unidad después de
2. Para una vida optima de la batería la recarga automática solo se produce cuando la carga
de la batería es de 2 barras o menos. Para recargar simplemente apague la unidad y
enciéndala para empezar a recargar.
6. Inmediatamente después que las hierbas ha sido colocadas en la
cámara, puede volver a colocar la boquilla, girando hasta que quede
cada uso. Se puede limpiar la unidad con el cepillo limpia.
3. El NO2 también tiene un cable opcional para la carga de la batería externa, el cual está
disponible para su compra.
Indicador de la carga de la batería - El modelo NO2 viene equipado con un
indicador de carga ubicado en la esquina inferior derecha del indicador LCD. Dicho
indicador marcará cuanta carga tiene la batería y parpadeará para indicar que
está cargando. La batería dura aproximadamente 45-60 minutos con una carga
completa. Las barras del indicador de la batería podrían mostrar menos durante
el uso, esto es normal.
Memoria de la temperatura - El modelo NO2 viene con memoria de temperatura.
Cada vez que lo encienda, automáticamente se colocará en la temperatura en que
fue utilizada previamente.
5
6
MECANISMO DE SEGURIDAD DE CALOR
Mecanismo de seguridad de calor, Para detener el proceso de
REPUESTOS Y ACCESORIOS
- Adaptador de 12 voltios
calentamiento, presione el botón de calor (botón rojo debajo del indicador
de temperatura LCD). Notará que la luz verde o roja que indica que el
calentador está encendido, se apaga. Si la luz verde o roja todavía está
encendida, quiere decir que el calentador no se ha apagado.
Además, esta unidad tiene un mecanismo de seguridad de 20 minutos.
Después de 20 minutos de uso continuo, el elemento de calor se apagará.
- Cargador externo de la batería
- Palillos de limpieza
Si todavía está usando la unidad cuando se inicie dicho mecanismo, puede
volver a colocar el calor inmediatamente para que el uso sea continuo.
- Paquete de 10 pantallas de malla
- Paquete de 3 tubos
- Paquete de 10 boquillas de punta X
- Paquete de 5 cepillos de limpieza
-Paquete de 5 cucharitas medidoras
Puede adquirir los repuestos para esta unidad directamente en nuestro
sitio web www.vapir.com o llamando al 1.800.841.1022
7
8