1
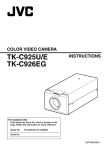
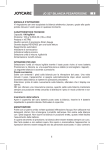
Muratec
Office Bridge IF-200
Internet Fax Machine
IF-200 Operating Instructions
COPYRIGHT NOTICE
Copyright © 2001 Muratec. All Rights Reserved.
All contents of this document are subject to change without notice and do not represent a commitment on the part of Muratec. Every
effort is made to ensure the accuracy of this information. However, due to ongoing product improvements and revisions, Muratec
cannot guarantee the accuracy of this material, nor can it accept responsibility for errors or omissions. No warranties of any nature are
extended by the information contained in these copyrighted materials. Use or implementation of any one of the concepts,
applications, or ideas described in this document or on Web pages maintained by Muratec-may infringe one or more patents or other
intellectual property rights owned by third parties. Muratec does not condone or encourage such infringement. Muratec makes no
warranty with respect to such infringement, nor does Muratec waive any of its own intellectual property rights which may cover
systems implementing one or more of the ideas contained herein. Procurement of appropriate intellectual property rights and licenses
is solely the responsibility of the system implementer. The software referred to in this document is provided under a Software License
Agreement. Refer to the Software License Agreement for complete details governing the use of the software.
All names, products, and services mentioned herein are the trademarks or registered trademarks of their respective organizations and
are the sole property of their respective owners.
1
IF-200 from Muratec
Regulatory Information
Safety Symbols
CAUTION
AVIS:
!
CAUTION
!
RISK OF ELECTRIC SHOCK
DO NOT OPEN
RISQUE D E CHOC E LECTR IQUE - NE
PAS OUVRIR
The exclamation point within an equilateral triangle is intended to alert the
user to the presence of important operating and maintenance (servicing)
instructions in the literature accompanying the equipment.
The lightning flash with arrowhead symbol within an equilateral triangle is
intended to alert the user to the presence of uninsulated “dangerous
voltage” within the product’s enclosure that may be of sufficient magnitude
to constitute a risk of electric shock to persons. To reduce the risk of electric
shock, do not remove cover (or back). No user-serviceable parts inside.
Refer servicing to qualified service personnel.
Ringer Equivalence
NOTICE: The Ringer Equivalence Number (REN) assigned to each
terminal device provides an indication of the maximum number of terminals
allowed to be connected to a telephone interface. The termination on an
interface may consist of any combination of devices subject only to the
requirement that the sum of the Ringer Equivalence Numbers of all the
devices does not exceed 5.
The REN of this device is 0.8B.
Additional Regulatory and Compliance Information can be found in Appendix B,
Regulatory Information section of this guide.
Complies with Part 68, FCC Rules for
Class A, Part 15. FCC Registration No.:
EBZKOR-43007-MM-E
Ringer Equivalence No.:
USOC: RJ11C Connecting Method
UL compliance registration
Industry Canada (CP-01, Part I, Section
14.2)
IF-200 Installation and Operation Guide
2
(REN) 0.8B
CA11A
E179677
To 885 10935 A
1. Introduction
Revised January, 2001
3
IF-200 from Muratec
1. Introduction
1.1. The Muratec Office Bridge IF-200 IP Fax System
The Muratec Office Bridge IF-200 captures the power of the Internet for fax users by
sending fax documents over the Internet and corporate Intranets. The product converts fax
documents into an e-mail format and sends them to any e-mail address, for both PC email users and fax machines. The IF-200 allows you to take advantage of the vast reach
and cost savings of the Internet for fax and e-mail capability.
The IF-200 is simple to use. It connects in-line between the fax machine and the
telephone line and directly to the LAN. A document is placed in the fax machine, the
recipient's number is dialed on the fax machine, and the fax machine sends the document.
The IF-200 intercepts the fax document, converts it into an e-mail format, and sends the
e-mail document over an IP network or the Internet, to the recipient's e-mail address. The
IF-200 also checks for e-mail messages you have received and downloads the messages to
the fax machine for printing.
The IF-200 is compatible with all ITU Group 3 fax and multi-function devices. It
automatically sends a fax over the public switched telephone network if it is unable to
send it over an IP network or the Internet.
The following terms are used in this guide:
•
E-Mail: Electronic mail, the method of transferring information over the Internet or
Intranet
•
Mailbox: The e-mail address where you receive Internet faxes
•
LAN: Local Area Network through which you are connected to the Internet
4
1. Introduction
Table of Contents
Regulatory Information..................................................................... 2
1. Introduction................................................................................ 4
1.1. The IF-200 IP Fax System ........................................................ 4
2. Installation .................................................................................. 7
2.1. Before You Begin ..................................................................... 7
2.2. Connecting the IF-200 .............................................................. 7
2.2.1. First Time Setup................................................................ 7
3. Quick Start ................................................................................. 9
3.1. Front Panel Controls ................................................................. 9
3.2. Initial Setup ............................................................................. 10
3.3. Entering Your ISP and Mailbox Information.......................... 11
3.4. Phone Book............................................................................. 13
3.4.1. Adding a Phone Book Entry (ADD) ............................... 14
3.4.2. Editing a Phone Book Entry (EDIT) .............................. 14
3.4.3. Sorting a Phone Book (SORT)....................................... 15
3.4.4. ESC ................................................................................. 15
4. Using The IF-200...................................................................... 16
4.1. Sending a Fax.......................................................................... 16
4.1.1. Sending a Fax as E-mail.................................................. 16
4.1.2. Sending a Fax Over the Telephone Network .................. 16
4.2. Receiving a Fax....................................................................... 18
4.2.1. Receiving Conventional Fax Messages........................... 18
4.2.2. IP Network or Internet Faxes .......................................... 18
4.2.3. Automatic Routing of Fax Messages to Email ............... 19
5. Group Phone Book................................................................... 20
5.1. Adding, Editing or Deleting a Group...................................... 20
5.2. Viewing a Group Phone Book ................................................ 20
5.3. Adding a Group Phone Book .................................................. 20
5.4. Editing a Group Phone Book .................................................. 21
5.5. Deleting a Group Phone Book ................................................ 21
6. Updating Information After Setup......................................... 23
6.1. ISP/Mailbox Information ........................................................ 23
6.2. System Settings ....................................................................... 24
7. Advanced Settings.................................................................... 27
7.1. Expert Settings ........................................................................ 27
7.2. Ping Network .......................................................................... 30
7.3. Delete Phone Book ................................................................. 30
7.3. Network Statistics ................................................................... 30
7.5. Update Firmware..................................................................... 31
5
IF-200 from Muratec
7.6. Factory Defaults ...................................................................... 31
7.7. Send Registration .................................................................... 32
8. Customer Service ..................................................................... 33
6
2. Installation
2.1. Before You Begin
Remove the IF-200 from the box carefully and remove all packing material. Verify that
you have the following items:
•
IF-200 product
•
AC adapter
•
Telephone line cord
•
Category 5 patch cable
•
Installation Guide and Operation Guide
2.2. Connecting the IF-200
All connections are made on the rear panel of the IF-200. Figure 1 illustrates the real
panel of the IF-200.
TEL
LINE
FAX
SERIAL
LAN
LINK
ACTV
12VAC
1AMP
POWER
Figure 1. Rear Panel
CAUTION
Make sure the IF-200 power switch is in the OFF position before making any
connections. To avoid any danger of shock from the telephone line, connect the
telephone line cord to the IF-200 before connecting it to the wall jack. Do not
install this equipment during lightning storms.
2.2.1. First Time Setup
1. If you are using an existing fax machine, unplug the telephone line cord from the
back of the fax machine (the one that goes to the telephone wall jack). Do not touch
the metal contacts on the end of the cord. Now, plug that line cord into the “TEL
LINE” jack on the back of the IF-200.
NOTE:
If you are installing your fax machine for the first time, plug the telephone
line cord that came with your fax machine into the “TEL LINE” jack on the
back of the IF-200. Plug the other end of the telephone cord into the RJ-11
telephone wall jack.
7
IF-200 from Muratec
2. Plug one end of the telephone line cord that came with the IF-200 into the “telco” or
“line” jack on the fax machine. Plug the other end of the cord into the “FAX”
connector on the IF-200 rear panel.
3. Plug one end of the Category 5 patch cable (supplied) into the LAN jack (RJ-45) on
the rear panel of the IF-200. Connect the other end of the Category 5 Patch cable to
the 10 Base T Ethernet connection. The green LED is lit when the IF-200 is connected
to the network. The yellow LED lights up whenever there is activity across the LAN
connection.
4. Plug the AC power adapter cord into the 12 VAC 1AMP connector on the IF-200 rear
panel. Plug the adapter into a 110 VAC wall outlet.
8
3. Quick Start
3.1. Front Panel Controls
Before you begin using the IF-200, you must enter some information using the control
keys and the keyboard.
The front panel of the IF-200 contains a control panel, a four-line Liquid Crystal Display
(LCD), and a computer-style keyboard.
4-Line
LCD Panel
Softkeys
Help Key
Control Keys
Scroll Keys
Keyboard
Figure 2. Front Panel Controls
Table 1. Buttons
BUTTON
FUNCTION
Softkeys
Help Key
Four
Scroll
Keys
Keyboard
These keys change function depending on the menu screen being displayed.
Displays information about IF-200 screens.
Located below the Help key, these are used to move the cursor around the
LCD display: up, down, right, left.
KEY
DESCRIPTION
Receive
Print
Poll (call) the ISP and download new messages.
Provide the option of printing the Phone Book, Journal, IF-200’s IP
Settings, or Help information.
Resend a message if there has been a transmission failure.
Stop any current transmission action.
Resend
Cancel
Enter mailbox, ISP and other setup information. The keyboard includes all
of the standard keys found on most PC keyboards.
Table 2 Control Keys
9
IF-200 from Muratec
3.2. Initial Setup
Step 1: Refer to the IF-200 Worksheet in Appendix A of this guide for the required
information. Complete the Worksheet under "Settings for your ISP/Mailbox.” Your
network system administrator can provide the data required to complete the worksheet.
Step 2: After you have completed the IF-200 Worksheet, turn on the IF-200 using the
power switch on the rear panel. The LCD screen shows messages. Follow the instructions
on the LCD screen and use the keys on the front panel to enter information. After the IF200 has been set up, the information remains in memory, even if the power is turned off.
After the power is turned on, the Welcome screen appears after a few seconds.
WELCOME to the world
of IP Fax Mail!
vX.XX
<Press any key>
Connect FAX machine
to FAX port on the
IF-200
<Press any key>
Print IF-200
worksheet detailing
required ISP info?
YES
NO
Did worksheet
print OK?
YES
Press any key to start the setup process.
Make sure your fax machine is connected
to the IF-200. Press any key to continue the
setup process.
If you have not already completed the
Worksheet in the appendix of this guide,
press YES to print out a Worksheet.
If the Worksheet is completed, press NO
and go to section 3.3, “Entering your ISP
and Mailbox Information”.
If you pressed YES above, you see the
screen shown to the left. Press YES if the
Worksheet printed.* Press NO to try again.
NO
*Using this blank Worksheet or the sample Worksheet in the back of this guide, ask your
local LAN or IT administrator to provide the information requested. It will be required in
the next section of this Guide to attach the IF-200 to the LAN.
10
3. Quick Start
3.3. Entering Your ISP and Mailbox Information
Once you have completed the Initial Setup and received the LAN information from your
LAN administrator, the IF-200 asks you to input the LAN information in a series of
screens. Use the keyboard to enter the information and press OK to move to the next
screen. Use the ESC key to go back one screen.
Enter the current date and press OK.
DATE:
00/00/00
OK
ESC
Enter the current time and press OK.
TIME:
00:00 AM
OK
ESC
Time Zone:
GMT Greenwich
OK PREV NEXT
ESC
Enter the time zone for your geographic
region. Scroll through the options using the
PREV and NEXT soft keys, and press OK
when the correct time zone is displayed.
From this point in the Setup sequence, please enter the LAN information from the Worksheet as
provided by your LAN administrator.
MailBox Name:
_
OK
ESC
Enter your mailbox name (the name you
choose to refer to your mailbox, not your
full e-mail address, up to 60 characters) and
press OK.
NOTE:
The screens below request you
to enter several IP addresses.
The correct format of an IP
address is:
xxx.xxx.xxx.xxx where x is a
digit, 0 –9.
The dot, “ . “, is also part of the
address and must be supplied when
entering IP addresses.
Enter the Netmask IP Address from the
Worksheet and press OK.
Netmask IP Address:
255.255.255.0
OK
ESC
11
IF-200 from Muratec
Enter the IP Address of gateway server
from the Worksheet and press OK.
Gateway IP Address:
0.0.0.0
OK
ESC
IF-200 IP Addr:
USE DHCP
0.0.0.0
OK PREV NEXT
ESC
Primary DNS Addr:
0.0.0.0
OK
ESC
Secondary DNS Addr:
0.0.0.0
OK
ESC
SMTP Server Address:
_
OK
ESC
POP Server Address:
_
OK
ESC
POP Username:
_
OK
POP Password:
_
Re-enter password
OK
Enter the password for this email account.
ESC
Re-enter the password for this email
account to ensure you know the password.
ESC
Your E-Mail Address:
*[email protected]*
OK
12
Enter the IP address of the Secondary DNS
(Domain Name Server) from the
Worksheet and press OK (this field is
optional, to skip, leave blank and press
OK).
Enter the name or IP address of the SMTP
(Simple Mail Transport Protocol server)
from the Worksheet and press OK. This is
how the IF-200 sends mail.
Enter the name or IP address of the POP3
server (Point of Presence server) from the
Worksheet and press OK. This is how the
IF-200 receives mail.
Enter the name of the POP email account
for this IF-200 and press OK.
ESC
POP Password:
_
OK
The IF-200 is capable of determining its
own IP address (if supported by your LAN)
using DHCP, RARP, an Auto Assign
method or a Static IP (manual input from
the keypad). Use the PREV and NEXT
keys to select the method of determining
the IF-200’s IP address.
Enter the IP address of the Primary DNS
server (Domain Name Server) from the
Worksheet and press OK.
ESC
The IF-200 displays its email address based
on your input. If this email address is
correct, press OK. Otherwise, press ESC to
correct the information.
3. Quick Start
Enter the telephone number of the phone
line to be attached to the IF-200.
IF-200 Phone#:
_
OK
ESC
Print IF-200
worksheet detailing
completed ISP info?
YES
NO
Connect LAN cable to
the LAN port on the
IF-200
<Press any key>
Send test FAX and
registration to
Muratec
YES
NO
Sending test FAX
and registration to
Muratec
****Please Wait****
If you would like verification that your IF200 is configured correctly, press YES and
the IF-200 will print a completed
worksheet. Otherwise, press NO to see the
Main screen.
Confirm the connection of the supplied RJ45 ethernet cable to the LAN port on the
rear of the IF-200. You should see a green
indicator light on the LAN port. Press any
key when complete.
If you pressed YES, the IF-200 sends a test
FAX to Muratec.
After the e-mail has been sent, press any
key to go to the Main screen. You may then
press the Receive key to check for an email confirmation from Muratec. The IF200 automatically checks for mail in 15
minutes.
Test e-mail sent!
Use Receive key to
Check for new e-mail
<Press any key>
IF-200
PHONEBOOK
vx.xx
SETUP
Main screen (ready mode) of the IF-200.
To change an incorrect entry after this
process is complete, press SETUP from the
Main screen. Move the cursor to the
ISP/Mailbox line and press EDIT.
For an overview of all the IF-200 Menu choices, refer to the IF-200 Menu Chart in the
appendix.
3.4. Phone Book
The phone book is a list of the e-mail addresses and phone numbers to which you will be
sending faxes. For each phone book entry, the IF-200 asks you for the person or company
name, their e-mail address, and their fax number. The IF-200 assigns each phone book
13
IF-200 from Muratec
entry a three- or four-digit number (you may change this number; see Editing a Phone
Book Entry).
IF-200
From the Main screen, press the Phone
Book softkey.
vx.xx
PHONEBOOK
SETUP
The Phone Book screen displays a list of
current phone book entries and offers four
options: add, edit, sort and escape.
100/jane<[email protected]
ADD EDIT SORT ESC
3.4.1. Adding a Phone Book Entry (ADD)
Press ADD. The IF-200 asks you for the information below. Enter the information from
the keypad and press OK to move to the next screen.
1. Enter the person or company name
(ex: jane)
2. Enter their e-mail address
(ex:[email protected])
3. Enter the direct dial fax number for
the recipient’s fax machine. The IF200 uses this number to send the
fax over the public switched
telephone network if the e-mail
transmission fails.
Person’s Name:
_
OK
ESC
The IF-200 assigns a three- or four-digit number to each phone book entry which can be
edited later.
3.4.2. Editing a Phone Book Entry (EDIT)
Use the up and down scroll keys to move to the address that you want to change. Press
the EDIT key to display the Edit screen.
No.: 100
Name: jane
Addr: [email protected]
EDIT SORT ESC
You may EDIT the following fields:
14
•
Number: The number assigned to this phone book entry.
•
Name: The person or company name.
•
Address: Their e-mail address.
3. Quick Start
•
Direct #: The fax number to be used if the IF-200 is unable to send over an IP
network or the Internet.
•
Pre-connect Suffix: Numbers to be dialed after the Direct # but before
connecting. Useful for calling card calls.
•
Post-connect Suffix: Numbers to be dialed after connecting to the Direct #.
Useful for calling into a PBX.
•
Confirmations: Whether or not you want confirmations sent to your mailbox
when fax mail you sent is read.
•
Use Fax# for E-Mail: Whether you want faxes sent over the Internet or the
public switched telephone network when the Direct # (if one is entered) is
dialed on the fax machine.
Move to the field that you want to change and press EDIT. Make the changes and press
OK.
To delete the phone book entry, press DEL.
NOTE:
PUBLIC phone book entries (created with the Remote Configuration
Software) cannot be edited or deleted using the IF-200’s keypad.
3.4.3. Sorting a Phone Book (SORT)
You can list the phone book entries alphabetically or numerically. Press the SORT key to
switch between alphabetical and numerical listings.
3.4.4. ESC
Press the ESC key to return to the Main screen.
Quick Start is complete. You are now ready to begin Internet Faxing or go to Section 5 to
set up your Group Phone Book.
15
4. Using The IF-200
4.1. Sending a Fax
Once Quick Start is complete, you have the option of sending a fax as e-mail, via a fax
service provider, or over the public switched telephone network. In the first two cases, the
fax is sent over an IP network or the Internet, either to a destination e-mail address or to a
fax service provider who then delivers the fax. The IF-200 displays a series of different
screens as it receives the fax from the fax machine and then sends it. A fax sent over the
public switched telephone network passes through the IF-200 as if it were not connected.
The IF-200 displays “Fax: Off Hook” while a direct fax is being sent.
The three methods of sending faxes are described below. The descriptions listed coincide
with the IF-200’s default settings. If you make changes to the Send Method or Hot
Character fields located in the System Settings menu (see Section 6), you will need to
modify the sending procedures accordingly. In all cases, perform the following steps:
1. Place the document in the fax machine.
2. Dial the appropriate number on the fax machine.
3. Press the START or SEND button on the fax machine.
4.1.1. Sending a Fax as E-mail
•
By dialing the IF-200 phone book Speed Dial number: The three- or four-digit
number assigned to the IF-200 phone book entry is used to send faxes over the
Internet.
•
By dialing a standard fax number: A standard fax number can be dialed to send a fax
over the Internet. The number must have been entered in the Direct # field when
setting up the IF-200 phone book, and the Use Fax# for E-Mail field must have been
set to “Yes” also when setting up the IF-200 phone book.
•
By dialing # Send/Start button: This is called “One Shot.” It enables you to send to a
random e-mail address that is not pre-stored in the IF-200’s phone book. Internet
faxes can be sent to addresses not in your phone book by pressing the # button on the
fax machine. The IF-200 prompts you for an e-mail address. Enter the e-mail address
using the IF-200 keyboard. After you have done so, the Internet fax is sent.
NOTE:
If your fax machine does not allow you to enter press the # Send button, you may
use the reserved speed dial, 9 9 9 9 Send to use the “one shot” feature.
4.1.2. Sending a Fax Over the Telephone Network
•
To send a normal fax over the telephone network and override e-mail delivery:
16
4. Using The IF-200
Dial # # fax telephone number Send , if you want to send to a fax number that is
stored in the IF-200, and you do not want the document to go to e-mail. Your
document will be sent as a normal fax for this transmission.
17
IF-200 from Muratec
•
To send a fax via a fax service provider:
This is only possible for those customers who have an account with a fax service
provider. Also, the Fax Service Routing field, located in the System Settings
menu (see Section 6), must be defined.
Dial # telephone number Send . “Telephone number” is the number of the recipient’s fax
machine, not the fax service provider number.
NOTE:
4.2. Receiving a Fax
4.2.1. Receiving Conventional Fax Messages
Unless you enable “Route Incoming Faxes to Email” in “Expert Settings”, incoming
faxes from regular telephone fax machines will be received and printed on the fax
machine as usual. The IF-200 will not answer the incoming calls on the fax telephone
line.
For more information, please send inquiries to [email protected]. Please include
your telephone and fax number in your message.
Receiving Email and IP Fax Mail is described on the next page of this manual.
4.2.2. IP Network or Internet Faxes
The IF-200 automatically polls (checks) its mailbox for new messages, or you may do so
manually. The IF-200 displays a series of different screens while it is receiving an Internet
fax.
The IF-200 first receives the fax from the ISP and then sends it to the fax machine for
printing.
Conventional faxes (from the public switched telephone network) pass through the IF-200
and print on your fax machine, unless “Route Incoming Faxes to Email” is enabled (see
Expert Settings).
Automatic Reception
The IF-200 can be set to poll its mailbox at a specified interval or at specific times of the
day. By default, the IF-200 is set to poll your mailbox every 120 minutes. To change the
polling interval or switch to a polling schedule, see Section 6.
Manual Reception
To download messages at any time, press the Receive key on the IF-200.
The IF-200 prints the messages you accept to print on your fax machine. The accepted
messages are currently determined by the default setting. To change your accepted
messages, see ISP/Mailbox Information (Section 6).
18
4. Using The IF-200
4.2.3. Automatic Routing of Fax Messages to Email
Documents sent from non-Internet fax machines pass through the IF-200 and print on
your fax machine. If you would like to have all incoming fax messages routed to email,
this can be set up and configured in the Expert Settings, described later in this guide. If
this feature is enabled, all conventional faxes will go to the email address specified and
will NOT print on the fax machine.
19
5. Group Phone Book
5.1. Adding, Editing or Deleting a Group
The Group Phone Book option allows you to group two or more phone book entries
together so that you can send the same fax to multiple locations at one time. Each group
may contain a maximum of 255 e-mail addresses.
For example, if a company headquarters wants to send the same information to ten branch
offices, the phone book entries for the branch offices can be linked together creating a
group. The headquarters can send a fax using the group number and the IF-200 will send
the fax to all the members of the group. Having a phone entry as part of a group does not
prevent the sender from also sending a fax to that phone book entry individually. Groups
are listed in the Main Phone Book for the user’s convenience, but adding, editing or
deleting a group must be done using the Group Phone Book menu.
5.2. Viewing a Group Phone Book
IF-200
vx.xx
Poll -> 2 hr
PHONEBOOK
From the Main screen, press SETUP.
SETUP
ISP/MailBox Info.
System Settings
Group Phone Book
EDIT
ESC
Scroll down to Group Phone Book. Press
EDIT to display the Group Phone Book
screen.
The Group Phone Book is currently blank
because no groups exist at this time.
ADD EDIT SORT ESC
5.3. Adding a Group Phone Book
Group Name:
_
OK
ESC
!101/Branch1 <Branch1
!101/Branch2 <Branch2
OK
SEL
NEXT
ESC
To add a group, press ADD. Enter the
group name (up to 60 characters) and press
OK.
(ex: Branch Offices)
The IF-200 displays the current numbers
and names entered in your Main Phone
Book. Scroll to the first name you want to
add to this group. Press the SEL key to
select it.
20
5. Group Phone Book
A small a appears next to each number
you select. To deselect a number, press the
SEL key again.
8000/Branch Offices
ADD EDIT SORT ESC
Select all the names you want for this group
and press OK. The IF-200 displays the
Group speed dial number and name. Press
ESC until you return to the Main screen.
5.4. Editing a Group Phone Book
To edit a group, press SETUP from the Main screen.
8000/Branch Offices
ADD EDIT SORT ESC
Numb: 8000
Name: Branch Offices
List:
101, 102
EDIT DEL ESC
Group Number:
8000
OK
ESC
Scroll to Group Phone Book and press
EDIT. The IF-200 displays the list of
groups. Scroll to the group name you want
to edit and press EDIT.
The IF-200 displays the following screen.
You may edit three fields:
1. Group Number
2. Group Name
3. List of entries (by speed dial
number) you have assigned to this
Group
Scroll to the field you want to edit and
press EDIT. Use the keyboard to make the
changes and press OK. Press ESC until you
return to the Main screen.
5.5. Deleting a Group Phone Book
To delete a group, press SETUP from the Main screen. Scroll to Group Phone Book and
press EDIT.
8000/Branch Offices
Scroll to the group you want to delete and
press EDIT.
ADD EDIT SORT ESC
Numb: 8000
Name: Branch Offices
List:
101, 102
EDIT DEL ESC
The IF-200 displays the information to be
deleted. Press DEL.
21
IF-200 from Muratec
Delete Group entry.
Are you sure y/n?
YES
NOTE:
22
NO
The IF-200 asks if you are sure you want to
delete the group. Press YES. Press ESC
until you return to the Main screen.
PUBLIC phone book entries (created with the Remote Configuration
Software) cannot be edited or deleted using the IF-200’s keypad.
6. Updating Information After Setup
6.1. ISP/Mailbox Information
This menu allows you to edit any of the information you entered during the setup
process. In addition, the following settings can be changed from their default values
(indicated by bold type).
Table 2. ISP/Mailbox Settings and Options
SETTING
OPTIONS AND DESCRIPTION
Delete E-Mail
Yes, No. Whether or not you want e-mail to be deleted after it has
been successfully printed at the fax machine.
If you choose No here, the e-mail builds up in your mailbox
and must be deleted by another source.
Print all E-Mail
Yes, No. Whether or not you want to print all e-mail in your
mailbox. If you select No, only fax-related e-mail is printed.
To change the ISP/Mailbox settings:
From the Main screen, press SETUP, scroll to ISP/Mailbox Info and press EDIT. The
IF-200 displays the current settings.
NOTE:
MailBox: myfax
Pri DNS: 205.216.138.22
Sec DNS: 205.138.24
EDIT
ESC
Scroll to the setting you want to change and press EDIT.
To change a setting:
•
Use the keyboard to enter information or
•
Use the PREV and NEXT keys to make your selection for that field
Press OK after changes are complete. Press ESC until you return to the Main screen.
23
IF-200 from Muratec
6.2. System Settings
To change any of these settings, press SETUP from the Main screen. Scroll to System
Settings and press EDIT. Use the scroll keys to move to the field you want to change
and press EDIT. Make the change and press OK. Press ESC until you return to the
Main screen.
Table 3. System Settings and Options
SETTING
OPTIONS AND DESCRIPTION (Default settings are in
BOLD type)
DATE
TIME
Time Zone
Time Display
Current date.
Current time.
Time zone for your geographic region.
AM-PM, 24-HR. Whether you want time displayed in
military (24-HR) or 12 hour (AM-PM) time.
Digit(s) to be dialed prior to any phone number stored in the
IF-200 (i.e. 9).
Network mask.
IP address of router.
Static, Use DHCP, Use RARP, AUTO ASSIGN IP. You may
specify a static IP address, use DHCP to obtain an IP address,
use RARP to obtain an IP address, or auto assign an IP
address. When the IF-200 auto assigns an IP address, it first
uses DHCP and then RARP (if DHCP fails) to obtain an IP
address.
Normal, Don’t Print, Verbose. Dictates whether the e-mail
header (text) is printed to the fax machine or stripped.
Yes, No. If enabled, prints errors on the fax machine as they
occur.
Tone, Pulse-10, Pulse-20. The method of dialing supported by
the telephone lines in your geographic region.
Yes, No. Whether or not the IF-200 data modem used to
connect to the Internet waits for dial tone before dialing the
phone number. In some countries the dial tone is weak and
should not be waited for.
Yes, No. Whether or not a comma should be inserted after 9
when it is the first digit of a phone number dialed on the fax
machine.
Periodic, Scheduled, Disabled. Determines whether the IF200 checks for mail according to the Poll Interval, the Poll
Schedule or not at all.
Phone Dialing Prefix
Netmask IP Address
Gateway IP Address
IF-200 Address
E-Mail Header
Print Errors
Dial Method
Need Dial Tone
Insert Comma After 9
Poll Mode
24
Appendix B
SETTING
OPTIONS AND DESCRIPTION (Default settings are in
BOLD type)
Poll Interval
120 Minutes. How often the IF-200 checks for mail if the Poll
Mode is Periodic. Enter the time in minutes from 0 (does not
poll) to 1440 (24 hours).
Allows you to specify which days and times the IF-200 checks
for mail if the Poll Mode is Scheduled.
Yes, No. Whether or not the IF-200 checks for pending e-mail
immediately after an Internet fax is sent before disconnecting
from the ISP.
EMAIL, FAX SERVICE, DIRECT FAX. These fields allow
you to change the dialing options for sending a fax. When a
number is dialed on the fax machine, the fax is sent using
Send Method 1 (EMAIL). When the number is prefixed with
a single hot character, # , the fax is sent using Send Method 2
(FAX SERVICE). When the number is prefixed with two hot
characters, # # , the fax is sent using Send Method 3
(DIRECT FAX).
The digits or characters (# ) dialed prior to the phone number
when using “One-Shot” e-mail or a fax service.
Yes, No. Whether or not the journal is automatically printed.
12:00 AM. At the time specified here, the IF-200 sends its
journal to the e-mail address specified in the Journal E-Mail
Addr field, if one is defined.
If an e-mail address is entered, the IF-200 sends its journal to
this address and at the time specified in the Journal E-Mail
Time field.
Text - sends a user readable format.
Binary - sends raw binary attachment. For use by computer
programs that are familiar with the binary format. Do not use
unless you are processing journals by computer or are familiar
with the format. Format users would like to receive the
emailed journal in.
If an e-mail address is entered, the IF-200 sends its
configuration information to this address any time a change is
made.
Poll Schedule
Poll After Sending
Send Method 1-3
Hot Character
Enable Journal
Journal E-Mail Time
Journal E-Mail Addr
Journal Format
Config. E-Mail Addr
25
IF-200 from Muratec
SETTING
OPTIONS AND DESCRIPTION (Default settings are in
BOLD type)
Fax Service Routing
The IF-200 supports sending faxes with fax service. If you
have an account with a fax service provider and want to send
selected faxes via the fax service, the Fax Service Routing
field should be configured to the name of your fax service
provider.
With this data in the Fax Service Routing field, any fax
number prefixed with the # sign is sent as e-mail to the fax
service. The fax service then sends the fax to the telephone
number.
Your fax service provider can give you specific details
regarding how to properly configure the IF-200 to work with
their service.
Determines how Fax Service Routing field is used in order to
work with the different fax service providers.
Your fax service provider can give you specific details
regarding how to properly configure the IF-200 to work with
their service.
Fax Service Format
NOTE:
26
Default settings are in BOLD type.
Appendix B
7. Advanced Settings
7.1. Expert Settings
Expert Settings allow you to change the detailed behavior of your IF-200.
It is strongly recommended that you do not change any of these settings
without guidance from the Diagnostic Center. They can be reached at 800347-3296.
To make a change, press SETUP from the Main screen. Scroll to Advanced Settings
and press EDIT. Then, scroll to Expert Settings and press EDIT. Use the scroll keys to
move to the field you want to change and press EDIT. Make the change and press
OK. Press ESC until you return to the Main screen.
Table 4. Expert Settings and Options
NOTE:
SETTING
OPTIONS AND DESCRIPTION (Default settings are in BOLD
type)
Serial #
Your IF-200 serial number. (Cannot be changed.)
Ethernet Address
IF-200’s IEEE MAC Address. (Cannot be changed)
IF-200 Password
Controls access to IF-200 system settings. Inactive unless entered.
IF-200 Phone #
“IF-200” is the current default. You may change this to the
telephone number of your fax machine.
CSID
BLANK Calling Station I.D.
Host Baud Rate
(Not currently used)
4800
9600
19200
38400
57600
115200
The baud rate of the SERIAL port used to communicate with a PC
for remote configuration purposes in bits per second (bps).
Fax Baud Rate
Maximum
9600
7200
4800
2400
27
IF-200 from Muratec
SETTING
OPTIONS AND DESCRIPTION (Default settings are in BOLD
type)
E-mail Size
4096. Limit to set on size of e-mail in kilobytes. Some ISPs limit
e-mail size.
Confirmations
Yes, No. Whether or not you want confirmation when an Internet
fax is read by the recipient.
NOTE:
Use Fax# for E-Mail
The recipient must be receiving e-mail through an IF-200
for this feature to work. This setting is applied to each
phone book entry individually. The phone book entry
initially takes on the value to which this field is set when
the entry is created, but the value can be changed by
editing the phone book entry.
Yes, No. When a fax number is dialed on the fax machine, the IF200 can do a search for that fax number in the phone book and if
found (in the Direct # field), send the fax to the corresponding email address or it can send the fax conventionally to the fax
number dialed.
NOTE:
If this field is set to Yes, a fax can still be sent
conventionally by dialing # # fax number (see Section 4,
Sending a Fax). This setting is applied to each phone book
entry individually. The phone book entry initially takes on
the value to which this field is set when the entry is
created, but the value can be changed by editing the phone
book entry.
Error Retries
5. Set the number of retries before the IF-200 stops dialing a
number.
Error Wait (mins)
1. Number of minutes to wait before redialing with any other
error.
Fax Units
INCHES, METRIC. The units used to store fax data.
Fax Encoding
Modified Modified READ (MMR), Modified Huffman (MH).
The encoding method used to store fax data. MMR is more
compact than MH.
Bit Fill Order
LSB First, MSB First. Unless you understand the internals of
TIFF and need to modify this field, do not change it from its
default setting.
Dial Digit Timeout
(secs)
6. Time to wait between digits dialed on fax machine before the
number is deemed complete.
28
Appendix B
SETTING
OPTIONS AND DESCRIPTION (Default settings are in BOLD
type)
E-Mail Subject
“Muratec Fax” The subject to be listed in the header of outgoing
IP network or Internet faxes.
Prompt for Subject
Yes, No. Allows user to define subject of email. During the
sending of a fax the user is prompted to enter the subject of the
email. If no subject is entered the default subject is inserted.
E-Mail Desc 1-4
Four lines of text at the bottom of the header of outgoing IP
network or Internet faxes:
Lines Per Page
1: Internet Fax is attached from a Muratec IF-200. If needed,
2: download a free TIFF viewer from www.muratec.com. Click
on products link, then click on the link for the IF-200 product
page, where you will find the viewer download file.
3: If you have problems or questions contact
[email protected]. Please
4: include your fax and telephone numbers so Muratec can
respond.
63. The number of lines of an e-mail text you wish to be printed
on each page.
Max Text Pages
5. Maximum number of pages of an e-mail text before it is
classified as “other” e-mail type.
Local Number
Length
0. If the number of digits in a local telephone number is specified,
then the following occurs. When a fax is sent using the FAX
SERVICE send method and the length of the telephone number is
less than or equal to the length specified, the fax is sent as a direct
fax rather than using the fax service.
Print all Text
Yes. Prints all text regardless of character set.
Route Incoming
Faxes to Email
No. Reroutes all Direct Incoming faxes to a user specified e-mail
address.
Inbound Routing
Address
E-mail address to route Direct Incoming faxes to.
Verbose
Yes, No. If enabled, communicates debugging information via the
IF-200’s SERIAL port at 38400 Baud, 8 data bits, 1 stop bit, no
parity.
29
IF-200 from Muratec
SETTING
OPTIONS AND DESCRIPTION (Default settings are in BOLD
type)
Rack mount
Operation
Yes, No. If enabled, the IF-200 does not wait for a key stroke
when it displays “Press any key” or “Press Resend or Cancel.”
This is useful for unattended operation.
Auto Apply
Firmware Updates
Yes, No. If enabled, the IF-200 will automatically accept and
update firmware when a firmware package is received via email.
If No, the unit will prompt for permission to Apply or Discard a
received firmware update.
NOTE:
Default settings are in BOLD type.
7.2. Ping Network
This feature allows you to verify connection to a particular IP address. Press SETUP
from the Main screen, then scroll to Advanced Settings and press EDIT. Scroll to
Ping Network and press EDIT. Enter the IP address you want to ping and press OK.
Upon completion, press ESC until you return to the Main screen.
PING TARGET IP:
_
OK
ESC
7.3. Delete Phone Book
Delete Phone Book deletes all entries in the phone book. To delete a single phone
book entry, refer to Editing a Phone Book Entry (Section 3.4).
To delete all phone book entries, press SETUP from the Main screen. Scroll to
Advanced Settings and press EDIT. Scroll to Delete Phone Book and press EDIT.
WARNING
Once deleted, there is no way to recover the phone book entries.
Press ESC until you return to the Main screen.
7.4. Network Statistics
This feature allows you to view information regarding network trafficking efficiency.
Press SETUP from the Main screen, then scroll to Advanced Settings and press EDIT.
Scroll to Network Statistics and press EDIT. The information listed below displays.
TX packets
30
number of transmission
attempts
Appendix B
RX packets
TX errors
RX errors
CRC errors
RUNT errs
DATA errs
OOW errors
JABBER err
Collisions
Underruns
RX misses
number of reception
attempts
number of transmission
errors
number of reception errors
source of reception errors
source of reception errors
source of reception errors
source of reception errors
source of reception errors
source of reception errors
source of transmission
errors
source of reception errors
7.5. Update Firmware
If the IF-200 has received a firmware update, the user must go to the Advanced
Settings menu, Update Firmware option and accept (Yes) or discard (No) the received
update.
Alternatively, the user may configure the IF-200 to automatically accept and apply
firmware updates. To enable this feature, go to SETUP->Advanced Settings->Expert
Setting->Auto Apply Firmware and select YES.
NOTE:
Firmware updates are received as special email messages.
7.6. Factory Defaults
Factory Defaults deletes all of the settings you entered and resets the IF-200 back to
the factory installed defaults. All ISP and mailbox information is lost.
To set the IF-200 back to the factory installed defaults, press SETUP from the Main
screen. Scroll to Advanced Settings and press EDIT. Scroll to Factory Defaults and
press EDIT.
WARNING
Once deleted, there is no way to recover the settings.
31
IF-200 from Muratec
7.7. Send Registration
If a registration was not sent during the initial Installation, it can be prepared and sent
using this Advanced Setting.
32
Appendix B
8. Customer Service
If you have trouble installing or operating the IF-200, refer to the following contact
information for assistance:
Contacting Muratec Customer Service
E-mail:
[email protected]
U.S.A.
Support Telephone:
Contact:
800-347-3296
6400 International Parkway
Suite 1500
Plano, TX 75093
CANADA
Support Telephone:
800-359-7035
33
IF-200 from Muratec
Appendix A
Table 5. Specifications
MODEM PROTOCOLS AND
SPEEDS
IMAGE DATA FORMAT
A full suite of Internet and e-mail protocols are
included in each Muratec product:
•
TCP/IP
•
MIME
•
POP3
•
SMTP
•
DNS
•
IETF, ITU Internet Fax Standards, T.37
•
v.17, 14,400 bps
•
IEEE 802.3, 10 base T
Image data is sent as an IETF Internet Fax Standard email attachment in the following format:
•
TIFF-F format is used for monochrome images
FAX
T.30, T.4, T.6 Group III Fax Protocol
CONNECTORS
US:
Fax Machine RJ-11
Wall Jack RJ-11 (Telco)
LAN
RJ-45
Canada:
Fax Machine CA11A
Wall Jack CA11A
LAN
RJ-45
RINGER EQUIVALENCE
NUMBER
(REN) 0.8B
PHYSICAL
Height 4.5"
Width 7.3"
Depth 9.1"
Weight 2.5 lbs.
Line Input Voltage 117-123VAC Single Phase, 5060 Hz, 0.2A
Unit Input voltage 12VAC, 50-60Hz, 1A
34
Appendix B
MODEM PROTOCOLS AND
SPEEDS
CERTIFICATIONS
A full suite of Internet and e-mail protocols are
included in each Muratec product:
•
TCP/IP
•
MIME
•
POP3
•
SMTP
•
DNS
•
IETF, ITU Internet Fax Standards, T.37
•
v.17, 14,400 bps
•
IEEE 802.3, 10 base T
•
FCC Part 15 Class A
•
FCC Part 68
•
UL 1950
•
CS-03
35
IF-200 from Muratec
IF-200 Worksheet
SERIAL#: 000000012345
INFORMATION
NEEDED
SETTINGS FOR YOUR
ISP/MAILBOX
EXAMPLE
1. MailBox Name
John Smith
2. Gateway IP Address
204.218.192.34
3. Network Mask
255.255.255.0
4. IF-200 IP Address
204.218.192.44
5. Primary DNS Address
205.216.138.22
6. Secondary DNS Address
205.216.138.24
7. SMTP Server Address
smtp.myisp.com
8. POP Server Address
mail.myisp.com
9. POP Username
jsmith
10. POP Password
********
11. Your E-Mail Address
[email protected]
36
Appendix B
IF-200 Menu Chart
Phone Book
Setup
Number
Name
Address
Direct #
Pre Connect Suffix
Post Connect Suffix
Confirmations
Use Fax# For E-Mail
ISP/Mailbox Info.
System Settings
Group Phone Book
MailBox
Primary DNS
Secondary DNS
SMTP
POP3
Pop Name
Pop Password
E-Mail Address
Delete E-Mail
Print all E-Mail
DATE
TIME
Time Zone
Time Display
Phone Dialing Prefix
Netmask IP Addr
Gateway IP Addr
IF-200 IP Addr
E-Mail Header
Print Errors
Dial Method
Need Dial Tone
Insert Comma After 9
Poll Mode
Poll Interval
Poll Schedule
Poll After Sending
Send Method 1
Send Method 2
Send Method 3
Hot Character
Enable Journal
Journal E-Mail Time
Journal E-Mail Addr
Journal Format
Config. E-Mail Addr
Fax Service Routing
Fax Service Format
Number
Name
List
Expert Settings
Serial #
Ethernet Address
IF-200 Password
IF-200 Phone #
CSID
Host Baud Rate
Fax Baud Rate
E-Mail Size
Confirmations
Use Fax# for E-Mail
Error Retries
Error Wait
Fax Units
Fax Encoding
Bit Fill Order
Dial Digit Timeout
E-Mail Subject
Prompt for Subject
E-Mail Desc 1-4
Lines Per Page
Max Text Pages
Local Number Length
Print All Text
Route Incoming faxes
Inbound Routing Address
Verbose
Rackmount Operation
Auto Apply Firmware
Advanced Settings
Network Statistics
TX packets
RX packets
TX errors
RX errors
CRC errors
RUNT errs
DATA errs
OOW errors
JABBER err
Collisions
Underruns
RX misses
Update Firmware
Factory Defaults
Send Registration
Ping Network
Delete Phone Book
37
IF-200 from Muratec
Appendix B
United States
FCC Part 15
NOTE:
This equipment has been tested and found to comply with the limits for a
Class A digital device, pursuant to Part 15 of the FCC Rules. These limits are
designed to provide reasonable protection against harmful interference when
the equipment is operated in a commercial environment. This equipment
generates, uses, and can radiate radio frequency energy. If not installed and
used in accordance with the instruction manual, may cause harmful
interference to radio communications. Operation of this equipment in a
residential area is likely to cause harmful interference in which case the user
will be required to correct the interference at his own expense.
Changes or modifications not expressly approved by Muratec can void the user’s authority to operate the equipment.
FCC Part 68
This equipment complies with Part 68 of the FCC rules. Located on the equipment is a label that contains, among other
information, the FCC registration number and ringer equivalence number (REN). If requested, this information must be
provided to the telephone company.
The REN is used to determine the quantity of devices which may be connected to the telephone line. Excessive RENs on the
telephone line may result in the devices not ringing in response to an incoming call. In most, but not all areas, the sum of the
RENs should not exceed five (5.0). To be certain of the number of devices that may be connected to the line, as determined by
the total RENs contact the telephone company to determine the maximum REN for the calling area.
This equipment cannot be used on the telephone company-provided coin service. Connection to Party Line Service is subject to
State Tariffs.
If this equipment causes harm to the telephone network, the telephone company will notify you in advance that temporary
discontinuance of service may be required. If advance notice isn’t practical, the telephone company will notify the customer as
soon as possible. Also, you will be advised of your right to file a complaint with the FCC if you believe it is necessary.
The telephone company may make changes in its facilities, equipment, operations, or procedures that could affect the operation
of the equipment.
If this happens, the telephone company will provide advance notice in order for you to make the necessary modifications in
order to maintain uninterrupted service.
If trouble is experienced with this equipment, please contact:
Muratec Customer Support
[email protected]
If the trouble is causing harm to the telephone network, the telephone company may request you to remove the equipment from
the network until the problem is resolved.
This equipment uses the following USOC jacks: RJ11C.
It is recommended that the customer install an AC surge arrester in the AC outlet to which this device is connected. This is to
avoid damaging the equipment caused by local lightning strikes and other electrical surges.
This equipment is Hearing-Aid Compatible (HAC).
The telephone Consumer Protection Act of 1991 makes it unlawful for any person to use a computer or other electronic device,
including fax machines, to send any message unless such message clearly contains a margin at the top or bottom of each
transmitted page or on the first page of the transmission, the date and time it is sent and an identification of the business or other
entity, or other individual sending the message and the telephone number of the sending machine or such business, other entity,
or individual. (The telephone number provided may not be a 900 number or any other number for which charges exceed local or
long-distance transmission charges.)
38
Appendix B
Canada
ICES - 003
This Class A digital apparatus complies with Canadian ICES-003.
Cet apparéil numerique de la classe A est conforme à la norme NMB-003 du Canada.
CS-03 Certification
NOTE:
The Industry Canada label identifies certified equipment. This certification
means that the equipment meets certain telecommunication network
protective, operational and safety requirements as prescribed in the appropriate
Terminal Equipment Technical Requirements document(s). The Department
does not guarantee the equipment will operate to the user’s satisfaction.
Before installing this equipment, users should ensure that it is permissible to be connected to the facilities of the local
telecommunications company. This equipment must also be installed using an acceptable method of connection. The customer
should be aware that compliance with the above conditions may not prevent degradation of service in some situations.
Repairs to certified equipment should be coordinated by a representative designated by the supplier. Any repairs or alterations
made by the user to this equipment, or equipment malfunctions, may give the telecommunications company cause to request the
user to disconnect the equipment.
Users should ensure for their own protection that the electrical ground connections of the power utility, telephone lines and
internal metallic water pipe system, if present, are connected together. This precaution may be particularly important in rural
areas.
CAUTION
Users should not attempt to make such connections themselves, but should
contact the appropriate electric inspection authority, or electrician, as
appropriate.
Connecting Method: CA11A
REN
The Ringer Equivalence Number (REN) assigned to each terminal device
provides an indication of the maximum number of terminals allowed to be
connected to a telephone interface. The termination on an interface may
consist of any combination of devices subject only to the requirement that the
sum of the Ringer Equivalence Numbers of all the devices does not exceed 5.
The REN of this device is 0.8B.
NOTE:
IF-200 Installation and Operation Guide
39
IF-200 Internet Fax Machine
Operating Instructions
Muratec America, Inc.
6400 International Parkway
Suite 1500
Plano, Texas 75093
http://www.muratec.com